

Even when taken at face value, Chromebooks are undeniably awesome. However, for power users, the real fun starts when you start getting under the bonnet and tweaking the machine so it perfectly suits your requirements.
For example, you could install Linux to give you access to software that would otherwise be unavailable, you could unlock the browser’s developer options to install the Android version of Skype, or you could choose to run a different release channel to let you use as-yet publicly unavailable features.
The latest cool hack we’ve got for you is disabling the sleep mode. We’ll explain why you might want to, what the potential drawbacks are, then show you two methods of how to do it (one of which is easier than the other!).
Sleep modes can be annoying. No doubt you’ll have lost track of the number of times you’ve been doing something on your mobile, put it down for a bit too long, and had to re-enter the password when you pick it back up.
Chromebooks are similar. They don’t offer screensavers, so automatically go into sleep mode if left for too long. If you have your device set up to request a password each time this happens, it quickly gets frustrating.
You might also want to disable it if you use a second monitor, an external mouse, and an external keyboard, and want to close the lid on your device without it shutting down.
In two words – battery life.
Battery life on Chromebooks is excellent compared to Windows and Macs thanks to the much less resource-intensive operating system (it’s not uncommon for a machine to last for 13+ hours of continuous usage on a single charge). However, leaving the screen on all the time when it’s not needed is a sure-fire way to make it run down more quickly.
Over time, it will also hurt the lifespan of the battery. Unlike most laptops, the batteries in Chromebooks are non-removable. It means there’s no way to easily replace it once a single charge is lasting minutes rather than hours.
In short – disabling sleep mode is not for everyone. If you don’t need it to be disabled, don’t do it.
If you want to disable sleep mode, there are some things you can do to try and smooth out the hit on battery life.
Firstly – Disable Bluetooth. Bluetooth is certain useful in certain situations, but is a massive drain on battery when not in use. Navigate to Settings > Advanced Settings and scroll down to Bluetooth to turn it off.
Secondly – Disable Wi-Fi. Chromebooks are still really useful when used offline, and disabling Wi-Fi if you’re just working in Google Docs will make a big difference.
Thirdly – Close unneeded tabs in Chrome. The more tabs you have open, the more memory your machine uses. The more memory it uses, the more battery it uses. Simple.
Fourthly – Kill the screen brightness. It’s bad for your eyes and bad for your battery – you don’t need the brightness at 100 percent. Ever.
Finally – Run the task manager. Go into the options menu and click on More tools > Task Manager. It will show you all the processes that are running, along with their memory usage. Disable the extensions that are hogging your memory. Anything that’s taking a lot of memory but is not being used can theoretically be killed (but beware of unexpected usability issues).
If you’re a tinkerer, this is the method for you. If you don’t like dealing with code and developer modes you should skip this section and keep reading…
Before you get going, you’ll need to put your device into Developer Mode. This varies from model to model – older devices might have a physical switch, while newer releases will need to be booted into Recovery Mode first (hold Esc + Refresh and tap the Power button). Once you’re presented with a screen that says “Chrome OS is missing or damaged”, you need to press Ctrl + D, then press Enter.
Beware, enabling (and disabling) Developer Mode will wipe your machine – make backups!
Once you’ve enabled Developer Mode and you’re back on your desktop, you’ll need to enter the Chrome OS shell (aka Crosh) by pressing Ctrl + Alt + T.
Type sudo chromeos-firmwareupdate –mode=todev and hit Enter. Your machine will reboot. Once it’s restarted, re-enter Crosh.
This time, type Shell and press Enter, then type cd /usr/share/vboot/bin/ to change directory.
Next, type sudo ./make_dev_ssd.sh –remove_rootfs_verification –partitions 2. You might be prompted to reboot after this stage. If you are, follow on onscreen in instructions and re-enter Crosh.
Now type mount -o rw,remount /, press Enter, then type echo 0 > /usr/share/power_manager/use_lid and press Enter.
Finally, run the following two commands; restart powerd and restart powerm.
Try restarting your Chromebook and closing the lid. If it stays on, it’s worked.
To undo your changes, just disable Developer Mode or perform a factory reset.
If you don’t fancy delving around in your Chrome’s system files, there’s a (much) easier way – just use a Chrome Web Store app!
The app in question is called Keep Awake. It adds an icon in the upper-right corner of the browser which makes it easy to temporarily override the power management settings on your device (no Developer Mode is required).
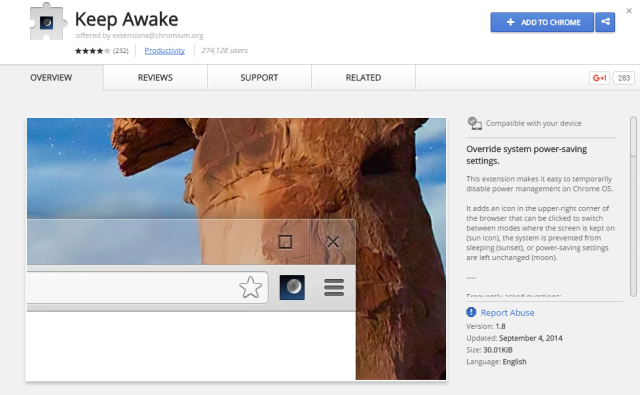
It comes with three modes of usage – one where the screen is kept on (the sun icon), one where the system is prevented from sleeping (the sunset icon), or one where power-saving settings are left intact (the moon icon).
The biggest draw of this app is the sunset icon – it will allow the screen to turn off, but will keep all network connections active, very useful if you’re using your Chromebook to share its connection with another device.
Did you try using the first method? Was it successful or did you encounter issues? We and your fellow readers can try and help you overcome any hiccups if you leave a description of your problem in the comments box below.
Perhaps you’ve used the app instead? Do you find it useful? Let us know your thoughts and feedback.


 Hordes of Flesh-Eating Narratologists
 Convert JSON files to CVS, PDF or other formats
 Ten Massively Expensive Video Game Failures
 SimCity Guide: How To Unlock Earthquake Disaster
 Assassins Creed Brotherhood Wallpapers in HD