

Every time you send a document to a colleague, you save it, you proofread it, correct any spelling and/or grammatical mistakes, and send it. It is a great habit to get into, and can certainly save time and energy down the line, if your work is consistently accurate. Editors will love you (won’t they?!). But what about the other information we might unwittingly provide when we send a document?
Microsoft Office creates and maintains a metadata file attached to your document. Each time you send it, your details are passed forward to the recipient, and anybody else that document moves forward to. This is okay in certain situations, but at other times it can be handy to clean your documents of any personal data before releasing them into the wild.
Let’s take a quick look at how to scrub your documents using the Document Inspector feature of Microsoft Office.
Microsoft Office automatically stores several types of personal information, along with some other forms of hidden data. The data isn’t immediately obvious. It isn’t displayed alongside your document; we’re going to have to root it out. Office documents can contain the following forms of information:
Obviously, this is only an issue if you deem it one. The majority of individuals creating and sending documents using Microsoft Office shouldn’t have any problems with the information created alongside their work. If you do need to rid yourself of any of the aforementioned information, read on!
The Document Inspector is an amalgam of all of the different inspector services available to Microsoft Office. Their main functions are to locate and remove any additional data from your documents. Before using the Document Inspector, save your current document.
Once that’s done, head to File > Info. You’ll be presented with a screen akin to this:
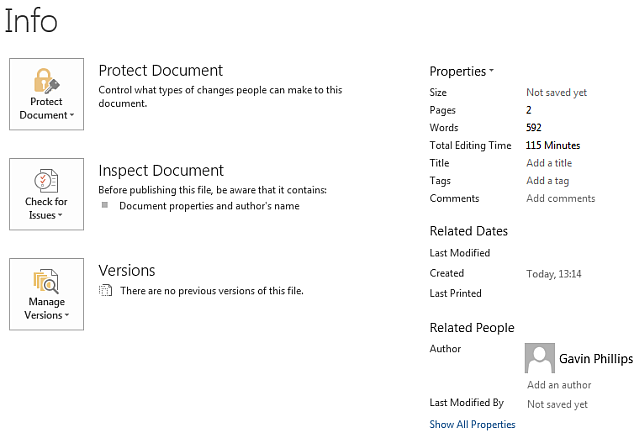
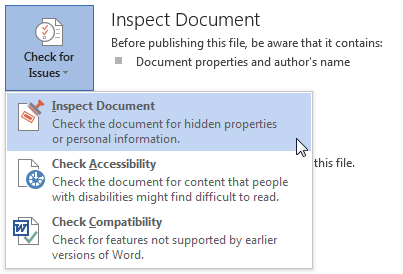
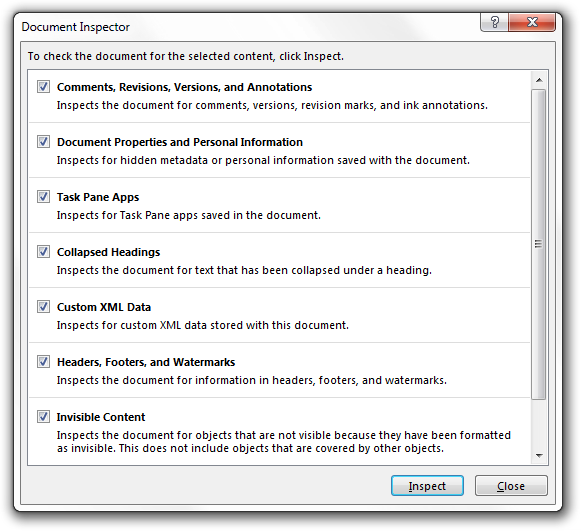
On the right-hand side you can see some of the information generated by Microsoft Office: pages, amount of editing time, myself as the author. To remove this, head to Check for issues > Inspect document. You’ll then arrive at the Document Inspector options panel. Check the options you require, followed by Inspect. Depending on the size of your document, this could take a moment.
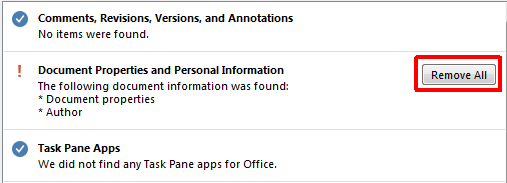
Once the Document Inspector has done its job, you’ll be able to remove any found hidden data. Look down the document list. Press Remove all on the sections you wish to clear.
Once you have cleaned the hidden information from your document, you can save it. Try reopening it and scanning again to ensure all the data has been removed. Otherwise, you should now be clear of any identifying information you may have unintentionally sent on.
N.B: In Office 2007 the Document Inspector can be found by heading to Office Button > Prepare > Inspect Document > Inspect. Make sure you save your work before making any alterations.
Yes – but it is a document specific setting, meaning you’ll have to apply the setting to each document you create. To prevent Office from saving the metadata with each document, head to File > Options > Trust Center > Privacy Options. Under Document-specific settings, check Remove personal information from file properties on save.
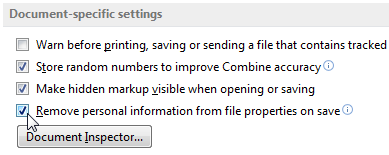
As mentioned, this will stop the metadata from your current document being saved, but you will have to apply it again next time around.
There are a massive number of reasons to remove personal information from an Office file, be that a PowerPoint presentation, Excel workbook, or Word document. As Office 2016 has introduced collaborative tools, it may become increasingly important to clean up our important documents before sending them.
At the very least, consider where your document might end up, and the information it is unwittingly providing to the next person.
Do you regularly scrub your documents? What’s your reason for cleaning them up? Let us know below!


 Fallout 4: Where to find the Hidden Locations Guide
 Are The Painfully Tedious Chase Mechanics of GTA 5 Intentional?
 Bravely Default Impressions: A Fantasy by Any Other Name
 Project Eternity: An Extended Interview With Chris Avellone @ Rezzed
 Dungeon Siege 3 Review Round-Up