You have an old Android device sitting in a drawer. Meanwhile, you’re working out how to afford the hardware to build a media center. What you haven’t realized is that the hardware is already there — sitting in the drawer!
Save time, space, and your electricity bill by turning your old Android device into a media server.
You might be slightly surprised, but it is true — your Android device, once connected to your home network and loaded up with your favorite music and movies, can be configured to stream content around your home to compatible devices.
Perhaps you’ve heard about Android set-top boxes (such as those running Android TV) that stream video from the Internet? Well, this is a little similar, but utilizes existing hardware, an Android device you’ve retired — perhaps due to an upgrade — and is a lot cheaper.
Much like using your Raspberry Pi as a home media solution, it involves installing software (in this case, one or more apps) and using the device as a dedicated media server. While it will run from the battery, you may find that keeping your old Android phone plugged in provides a more reliable solution.
So, grab your old Android phone, charge it up, and make it useful again. Stream content from the phone, from the Web, and from USB hard drives, and forget all about that expensive media center.
Along with an old Android device, you’ll need a home wireless network that the phone is connected to. If your phone or tablet can take a microSD card, you should add one for additional storage.
Similarly, if your phone supports USB OTG, additional media can be streamed from an external USB HDD or USB flash device.
You’ll also need an app, but depending on what equipment you have in your home for viewing streamed media, you’ll need to make a decision about which media streaming software to use.
While many apps can be used for creating an Android media server, your main options are Plex for Android, BubbleUPnP for DLNA/Chromecast, and Media Server. But which should you choose? Well, it depends on your existing entertainment setup.
If you have an Android TV, another Android device you want to enjoy TV on, a PC, or any other hardware running Plex apps, then Plex for Android should be your choice.
For those of you with Smart TVs or other DLNA hardware, including the Google Chromecast, then the BubbleUPnP for DLNA/Chromecast is your best option.
Filling in the gaps with support for Apple TV, Xbox One, Amazon TV, Roku and some of the same hardware as BubbleUPnP, AllConnect – Play & Stream is your third option.
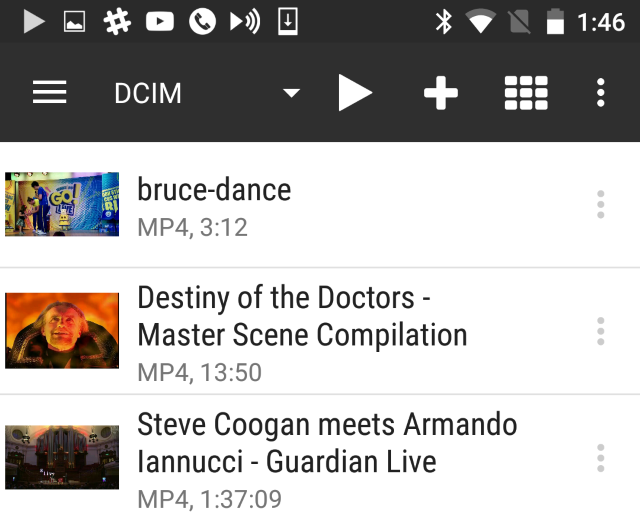
Below, we take a look at using all three solutions. Make sure you’ve copied some videos or music from your PC to your Android device storage before proceeding.
Use the link above to install Plex for Android, launch the app once completed, and create a new account (or sign in if you have an existing Plex account). Although a paid option is highlighted, you don’t need it for this.
Next, tap the Grant Access link to allow Plex to use your photos and videos, and tap Allow in the dialogue box. You should then be able to expand the hamburger menu (the sidebar on the left) and select Local Photos and Local Videos. These refer to the default directories on your phone, so upload or move your videos to these locations.
To configure the phone as a media server, open the menu and select Settings > System. Here, along with the already selected Advertise as player and Network discovery, select Advertise as server. You could also enable Show camera roll media if you want to view photos on your TV or other Plex-equipped device.
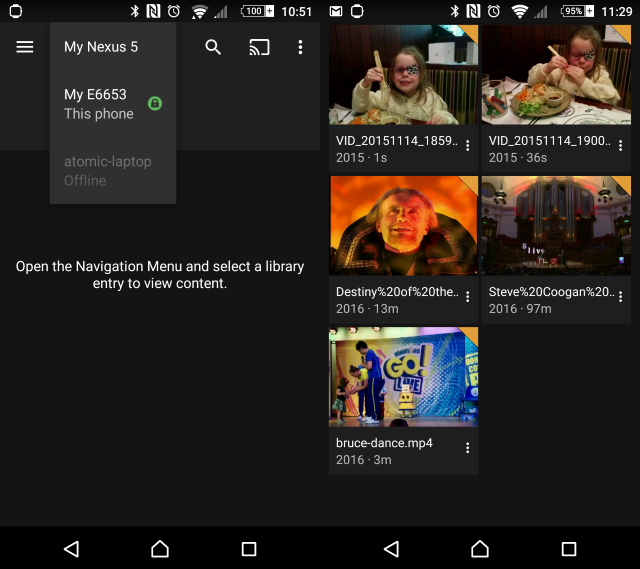
With Plex setup, install it on another device and sign-in with the same account. Open the drop-down menu at the top of the screen to ensure the correct server is selected (in this case, My Nexus 5). You’ll then be able to browse the contents of the server device from your chosen player.
However, note that unless library directories are configured, content will be labelled as “Local” — as long as the remote device is selected in the drop-down menu, the correct media will be accessible.
With this solution installed, you have a lot more options for what device you stream to. If you’re using a Chromecast, you’ll need to have the old Android device that you’re using as a media server close by, because you choose, play, pause, and stop the media from it.
For this method, simply choose Chromecast as the Renderer in the hamburger menu and then play whatever media from your device that you’d like to cast there.
However, for other DLNA options that have their own interfaces — like a Smart TV, Xbox, or PlayStation — just confirm in the BubbleUPnP app that your media is there by opening the menu and viewing the Library.
BubbleUPnP should scan your device for all content, so you should have access to everything.

Then on your Smart TV or other DLNA player, you should see that your Android device is now visible, typically listed by its device name. From here, browse the contents of your Android’s media folder and select something to play from your DLNA device.
As long as the video is compatible, it will shortly be streamed to your TV.
Using AllConnect is similar to casting content from Android to Chromecast, but it enables you to send media from your media server phone to any DLNA-equipped hardware, and much more. This might be a Smart TV (perhaps not as secure as you think it is); a network-connected DVD or Blu-ray player; an Apple TV, Roku, or Amazon Fire TV; an Xbox 360 or One; or a PlayStation 3 or 4.
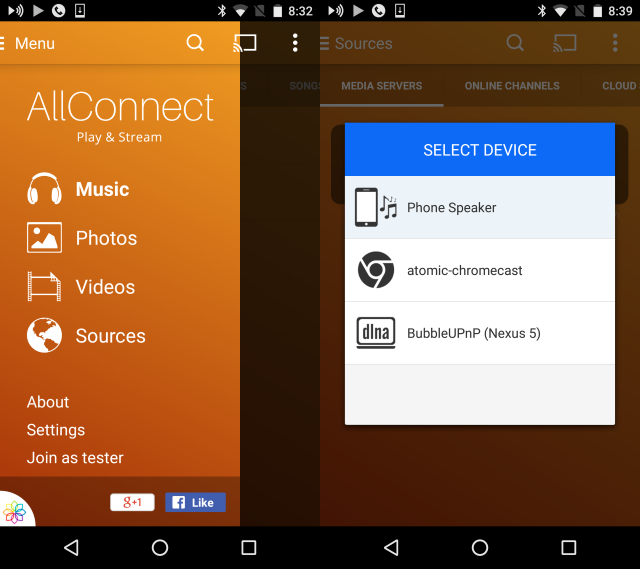
After installation, launch the app and use the menu to check how your media is organized. The AllConnect app can be used as a player and a server if required, so check the Sources screen and its three tabs to see what local and online sources are available.
All you need to do to stream content to your TV is press the Cast icon in the corner and select the desired network device to cast the media.
With either or all three of these apps installed on your old Android device (although keep in mind that it can be used in other ways), you should have a home media server solution that easily rivals the expensive alternatives.
Let us know how you get on with yours. If you have any issues, let us know and we’ll see if we can help you resolve them.
Talk to us in the comments below!


 Dishonoreds Seductive, Asymmetrical Morality
 How to unlock Destiny Shaders, Ghost Shell and Sparrows for PS4 and Xbox One
 Five Nights at Freddy's 4 Guide - How to Survive Night 5
 Homesick (PC) walkthrough - solve all puzzles
 Red Dead Redemption Achievement List