Sony made a host of improvements to their controller, with the PlayStation 4’s DualShock 4. It seems slightly smaller, but the handholds are thicker, giving it a markedly more comfortable grip. The joysticks have been modified too, now convex and with a button click that’s easier to trigger. These and other changes make the DualShock 4 controller a joy to use. While we wait for PlayStation 4 games to grow in number, we’ll also show you how to use the DualShock 4 on your Mac or PC.
Using your DualShock 4 on a PC takes some tweaking to begin with, but compatibility is great. We’ll use DS4Tool, a wrapper application created by InhexSTER that makes the DualShock 4 look like an Xbox 360 controller. It’s thanks to this piggybacking off the support for the this device that we can ensure such good compatibility for the DualShock 4.
Before you’re able to use DS4Tool, you’ll need to install some prerequisite software on your computer. Start by downloading and installing the Xbox 360 Wireless Controller for Windows drivers. Also download the latest version of DS4Tool (currently 1.2.2) to your computer. The archive contains only executables, no installer wizard, so you’ll want to extract its contents to an easily accessible location on your computer.
Other prerequisites will be installed on a lot of PCs already. Verify, or re-install these if you are experiencing trouble:
Head to the folder where you extracted DS4Tool in the previous step and run Virtual Bus Driver > SCPDriver.exe. Make sure to run it as Administrator, otherwise it won’t work.
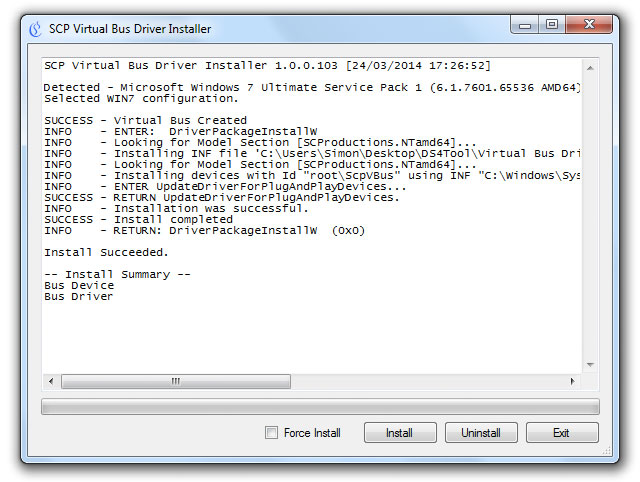
In the application, press the Install button. This should only take a second. The application ends with an ‘Install Succeeded’ message, even if it failed. Check in the log that all operations are marked with SUCCESS, instead of ERROR. If you encounter errors, make sure you’re running the application as Administrator.
This is where you connect your PlayStation 4’s DualShock 4 to your computer. You can use either a Micro-USB cable, like the one that comes with the PS4, or connect wirelessly over Bluetooth.
If you’re going with USB, just use a Micro-USB to connect your controller with your computer. Windows should recognise the device and start installing drivers. Easy as pie.

For Bluetooth, you’ll need a Bluetooth 2.1 and EDR (Enhanced Data Rate) support. First make sure your console and controller are both powered off. The LED light bar on the back of your controller should be off, too. Press and hold the PS and Share buttons on your controller until the LED light bar starts flashing. At this point, you should be able to pair with the controller on your computer’s Bluetooth Add Device menu. Chris Hoffman wrote a great walkthrough to pair with Bluetooth devices on Windows 7.
After playing over Bluetooth, press and hold the PS button to turn your controller off.
Go back to the folder to which you extracted DS4Tool and run ScpServer.exe. This is the application that actively maps the controls of your DualShock 4 controller to Xbox 360’s signals. If all went well, the application will recognize your controller as ‘Controller 1′.
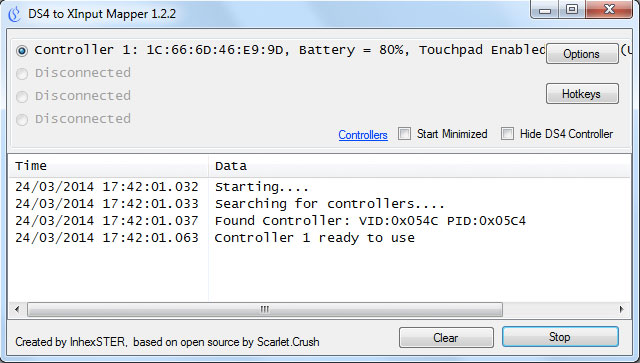
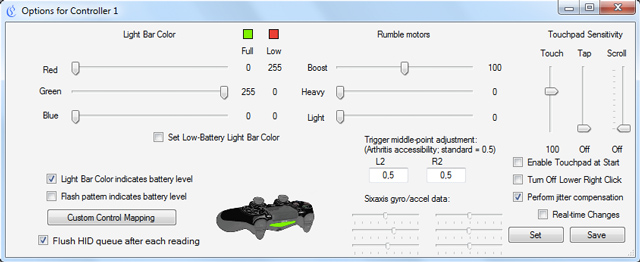
Press Options to tweak the settings for an individual controller. This is mostly for advanced users, so the golden rule of thumb is: if you don’t know what it’s for, don’t touch it. One fun extra is that you can let the Light Bar colour indicate battery level. To use this, tick off the box in the lower left and play with the colours above it.
There’s nothing more to it, so go play with your DualShock 4 controller! All games that support the Xbox 360 controller will now support yours out of the box.
The set-up process for connecting a DualShock 4 to your Mac is a lot less complicated than for the PC. However, there’s also very little out of the box compatibility, so you’ll have to manually configure your controller for a lot of games.
There are two ways to connect a DualShock 4 controller to your Mac. Either use a Micro-USB cable, like the one that comes with the PS4, or connect wirelessly over Bluetooth.
To connect over USB, just find a Micro-USB cable and plug your controller into your Mac. Your Mac will automatically detect it and the LED Light Bar on the controller back will light up.
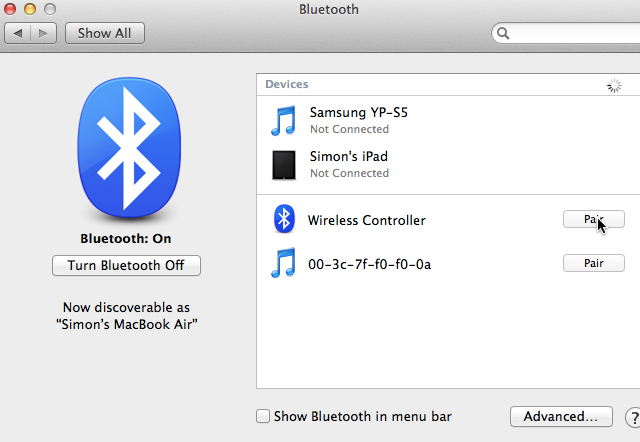
To connect over Bluetooth, first make sure your console and controller are both turned off. The Light Bar on the back should also be off. Go to System Preferences > Bluetooth and make sure Bluetooth is turned on. Hold the PS and Share buttons until the Light Bar starts flashing. When your controller shows up in the list of Bluetooth devices, press the pair button. The Light Bar will stop flashing after pairing.
After playing over Bluetooth, press and hold the PS button to turn your controller off.
At this point, your DualShock 4 is recognized by your Mac as a generic controller. Out of the box compatibility is scarce, however. Steam Big Picture works flawlessly and some games are catching on quick. If you want more extensive support, you’ll need to use a third-party controller mapper, basically binding buttons on your controller to key presses and mouse movements.
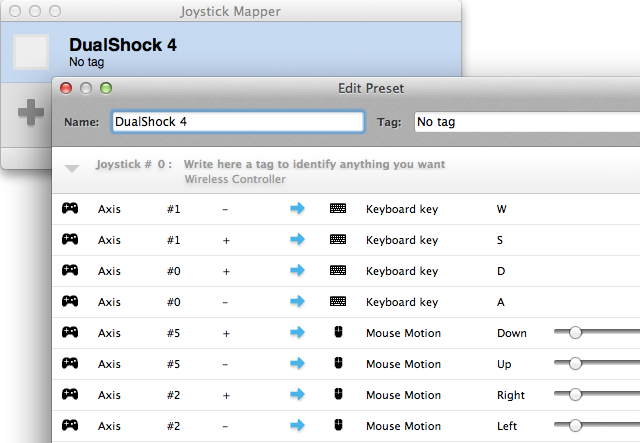
One of the best tools for the job is Joystick Mapper ($4.99). It’s perhaps the best controller mapper for Mac OS X, and definitely worth the five bucks if you regularly use a controller on your Mac. You’ll need to create a new preset and manually bind your controller buttons, D-pad and joysticks. You can create multiple presets to use different key bindings for different games.
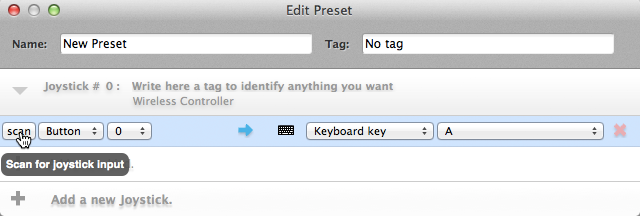
In your preset, first Add a new Joystick and then add your custom controls. For each button, or each joystick axis, press Add a new bind and press scan. Press and hold one of the controls on your DualShock 4 until Joystick Mapper picks it up and binds it to a key or mouse movement. When you’re finished, close the preset editing window and tick off the checkbox next to one of your presets to start using it. Just make sure to disable controller input in games that also pick up your generic controller, so the game controls aren’t triggered twice.
How are you going to use your DualShock 4 controller? Any specific games you have in mind? Share your experience in the comments section below the article!
Image credit: CraigJ


 Fable 3: Traitor's Keep Achievements List
 How To Complete King's Fall Raid In Destiny: The Taken King
 How to use Kinect microphone for in game voice chat with Xbox One?
 How to Emulate a Raspberry Pi on Your PC
 Galaxy on Fire 2 (iPhone) earn money through black market