Solving the Riddler Challenges in Batman: Arkham Asylum was one of the best ways of getting more replay value out of the game. Finding every trophy, object and question mark was a challenge, as the name would suggest, but brought rewards, granting additional XP and unlocking character profiles and trophies.
[UPDATED 03/11/2011]
Head over to page two to locate the Riddler Challenges for The Bowery, Industrial District and Subway challenges.
If it’s the Museum, Steel Mill and Wonder City challenges you’re after, however, visit page three.
Riddler Challenges make a welcome return in Batman: Arkham City but this time there are hundreds of them. Over 400, in fact.
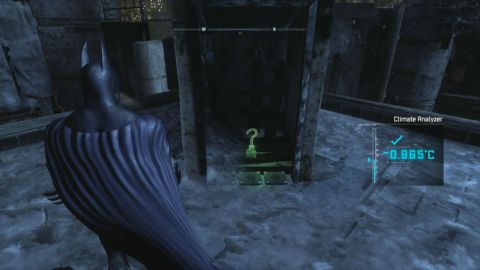
A Riddler Challenge falls into one of four categories: finding and collecting a question mark trophy, solving a riddle and photographing the appropriate item, finding and destroying CCTV cameras and specific objects and aligning hidden question marks.
This list is not yet complete so check back every day as we’ll update it as we find them. Alternatively, if you’ve spotted something we’ve yet to track down then feel free to fire an email off to us at: [email protected] with the location of a Challenge and how to solve it.
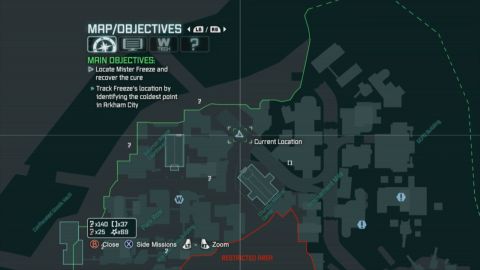
Be warned: not every Riddler item can be collected straight away, so look out for some of these situations below and return once you have the necessary equipment. During the Steel Mill section of the game you’ll learn how to tag Riddler trophies on your map – remember to do this each time you can’t collect a trophy, so you can come back at a later time.
Electromagents
There are electromagnets scattered around the map, often accompanying locked gates. These can’t be activated until you’ve collected the REC gun during the Steel Mill section of the game.
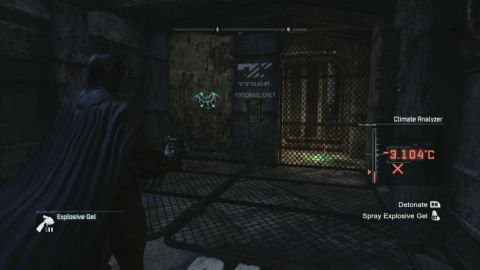
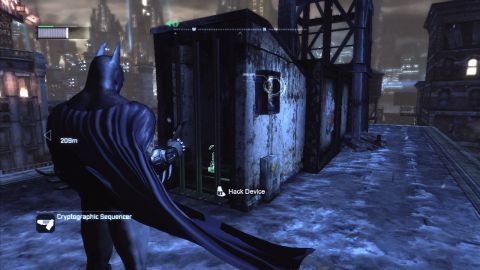
TYGER Panels
There are two types of TYGER panels throughout the game. Low-level ones can be unlocked after the section in the GCPD building, and often lead to Riddler trophies. Higher level TYGER panels can only be unlocked once you’re given the TYGER encryption codes.
Also note that the Cryptographic Sequencer used to hack these panels can be upgraded, meaning panels from greater distances or behind blockages can be hacked.
TYGER Cameras
While there the traditional TYGER cameras to collect throughout the open world segment of Arkham City, there are other machinegun-equipped versions that don’t count towards this total. These cameras can be disabled once you collected the Disruptor during the Museum section of the game.
Explosive Mines
These are more rare, but are impossible to bypass for Batman. Like the gun toting TYGER cameras, these can be disarmed with the Disruptor collected during the Museum section of the game.
Hot Air Vents
There are many of these throughout Arkham City, almost all of which block entry to Riddler trophies. The blast of hot air is enough to stop Batman from getting past, so you’ll need to use the Freeze Grenades.
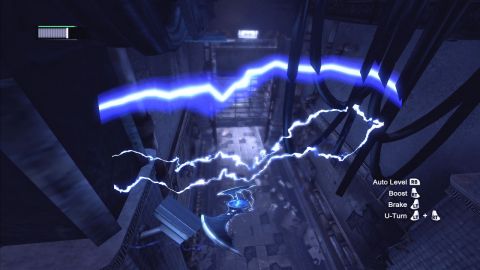
Line Launcher
There are some situations where you will need to travel across a wide distance but with no way of reaching it. That’s where the Line Launcher comes in, returning from Arkham Asylum and enabling Batman to glide gaps. Now, however, you can even aim another shot while riding the line, meaning not all locations need to be directly across from one another.
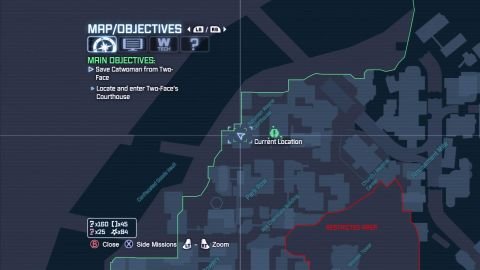
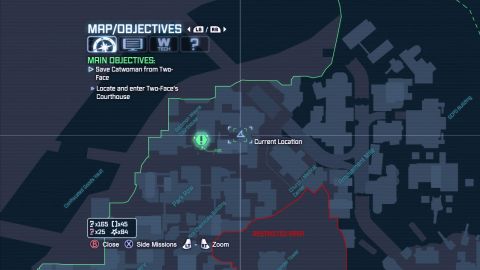
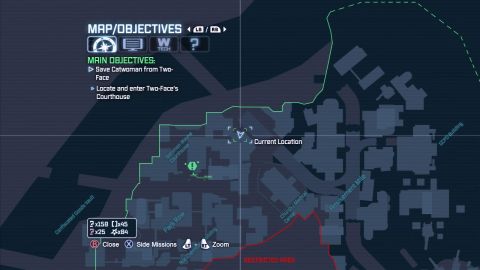
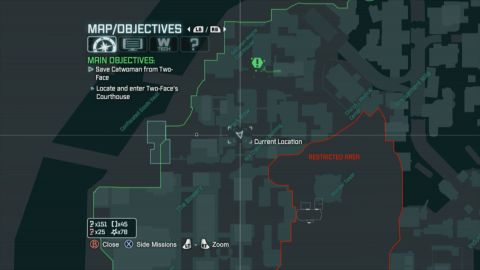
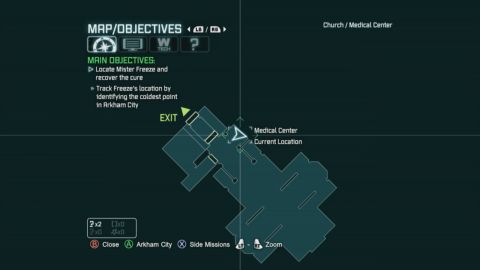
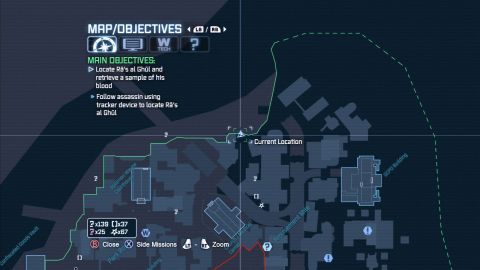
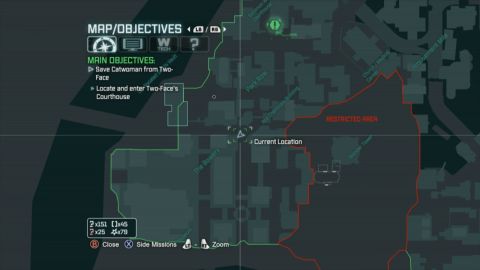
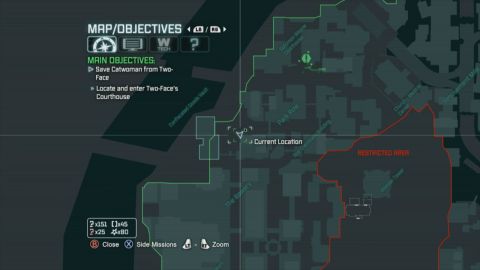
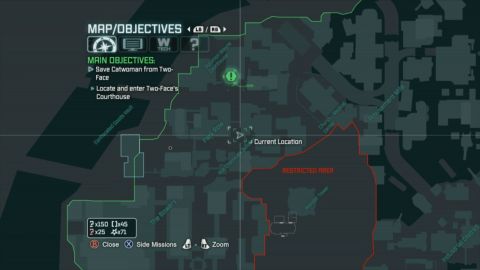
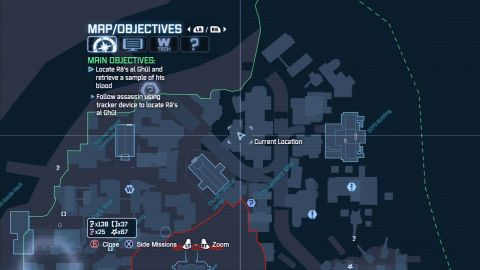
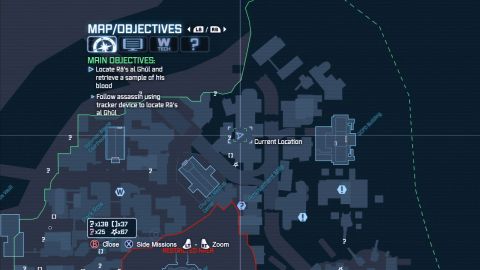
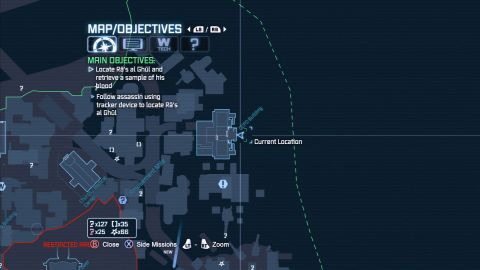
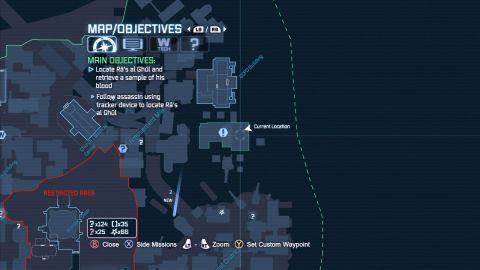
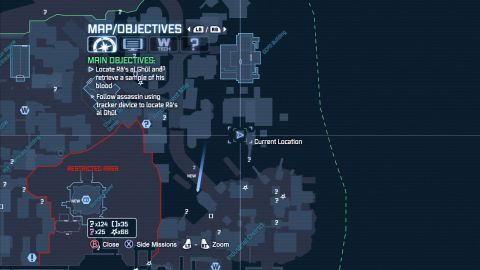
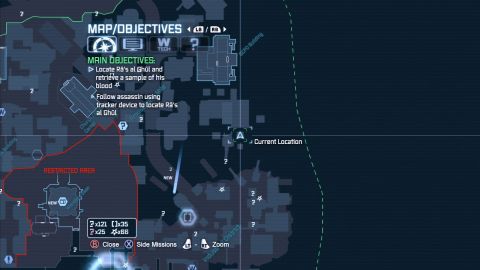
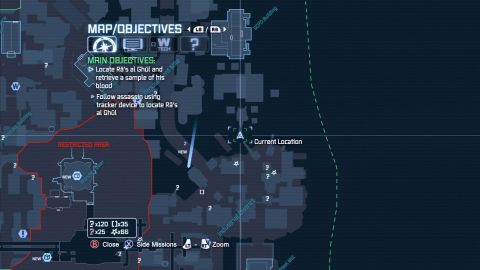
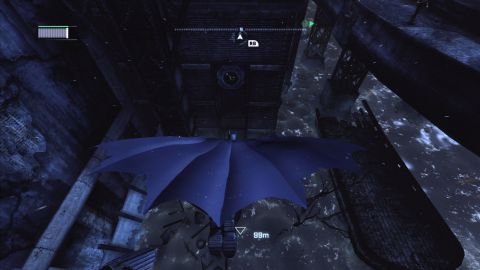
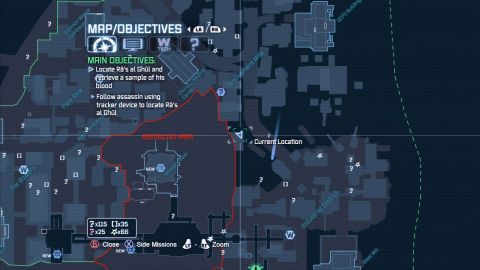
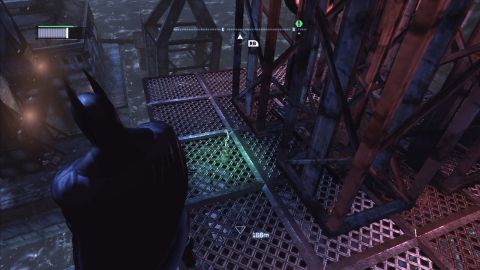
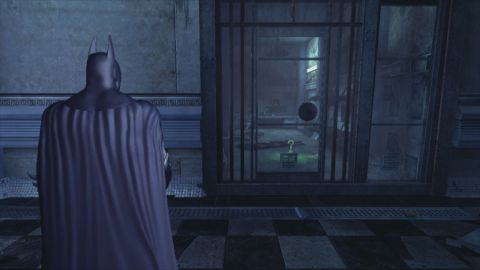
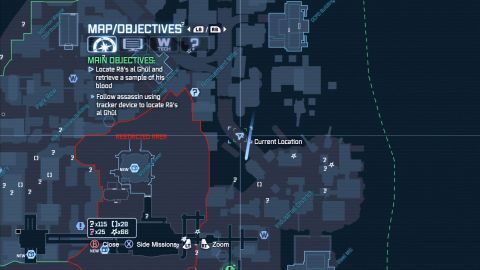
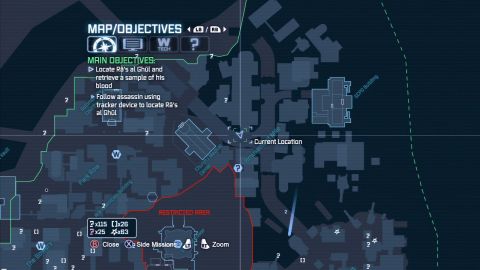
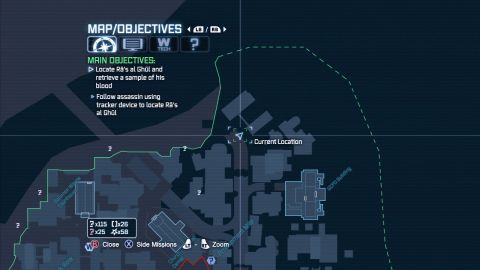
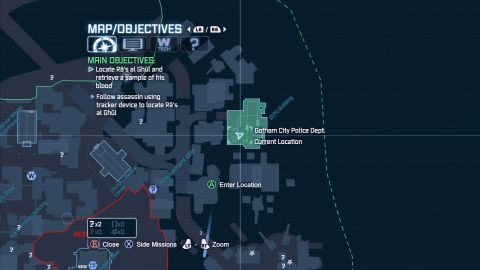
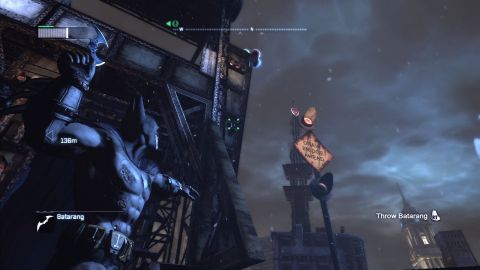
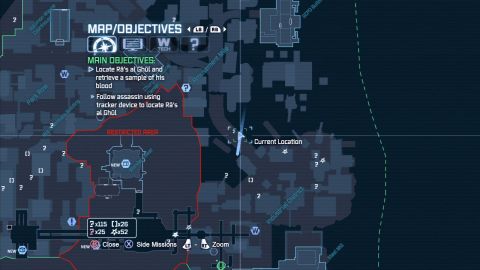
NOTE: If you want to view the map location for any of these Riddler challenges, simply mouseover the in-game image for its position.
Riddler Trophies Locations
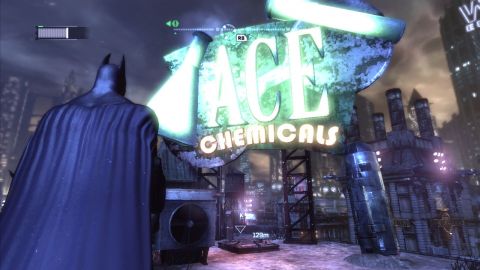
1: East of ACE Chemicals is a gargoyle sprayed with Riddler question marks. Climb onto here then drop down to the concealed area below for the trophy.


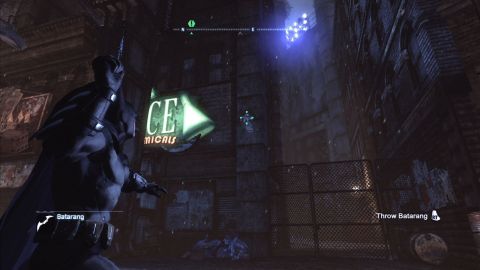
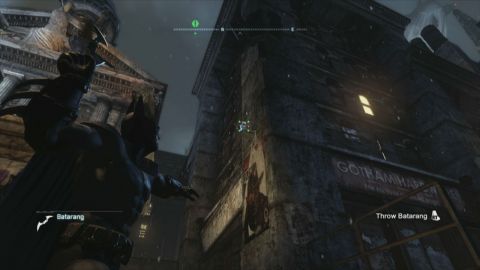
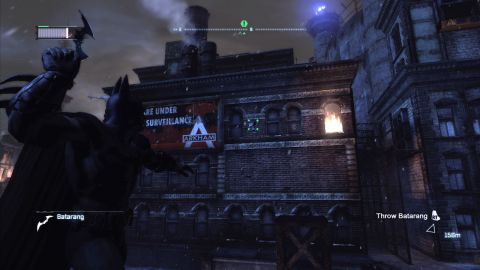
2: East of Trophy 1 on the roof near a wall with five Riddler question marks on the wall. Use the Batarang to destroy the right-hand Riddler mark by waiting until the light is on.


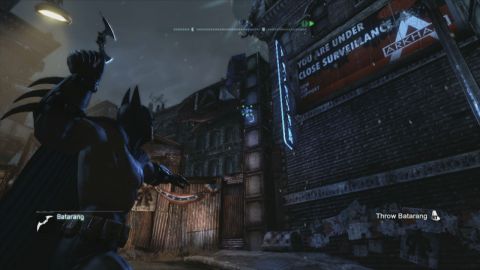
3: On the building north of ACE Chemicals, behind a ventilation system. Use the remote controlled Batarang to destroy the Riddler mark.


4: On the roof of the building with Park Row written over it on the map. The timed panel is a few steps to the west.

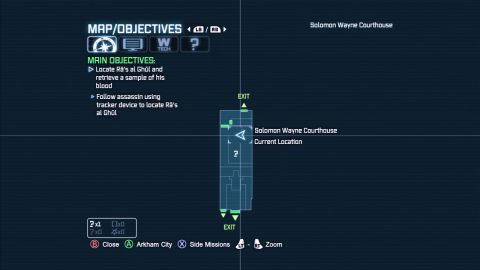
5: On top of the most northwestern building near Solomon Wayne Courthouse. Use detective vision to locate all four Riddler marks. You have 4 seconds to destroy all four marks, so use the explosive gel on the 3 hidden marks, then use the Batarang on the final Riddler mark closest to the trophy’s locked cage.

6: There are three pressure pads in the area. Starting from the northern rooftop overlooking the Riddler trophy, glide on to the southern wall and pressure pad. Immediately after pressing the pad, glide over to the wall on the opposite side then finally onto the pad on the ground closest to the Riddler trophy.


7: A pressure pad on the highest rooftop east of Solomon Wayne Courthouse opens a gate below. Activate it then glide down into the area, then use explosive gel to destroy the wooden panel beneath.
8: Slightly southeast of Trophy 7. On top of the roof with a nearby Riddler mark on a chimney. Use the Batarang to activate it.


9: On the northern roof edge of the large building east of Solomon Wayne Courthouse. Use explosive gel to destroy all three Riddler marks at once.

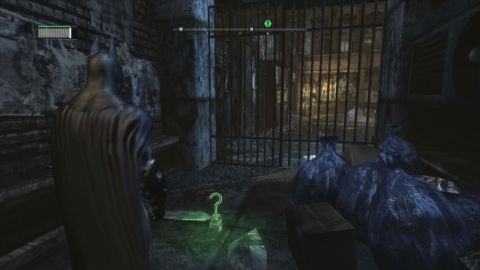
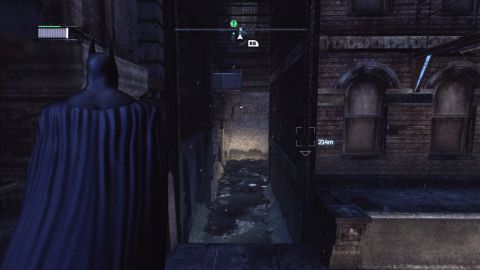
10: In a passageway at the most northern part of Park Row. Behind a chain fence with a destructible wall on the right. A TYGER camera guards the area.


11: At the end of the destroyed overpass is a selection of shanties. Search beneath the very end of the overpass for a structure with a destructible wall. Use explosive gel on this and search inside for the Riddler trophy.


12: East of the building between the north side of the restricted area and the Church/Medical Centre, opposite a building with a “The Black Canary” sign. Use detective vision to locate the necessary Riddler mark, then use the remote controlled Batarang to activate it from near the Riddler trophy.


13: On the roofs of the buildings west of ACE Chemicals and north of The Bowery is a set of cages with electromagnets. Once you have the REC, use the electromagnets to push the Riddler trophy out of the cage, starting with the bottom electromagnet.


14: Near west side edge of Arkham City, on the roof behind a set of bars. This TYGER panel will require the necessary upgrade before you will be able to hack these controls.

15: In a short passageway along the west wall of Arkham City. Guarded by a TYGER Camera.


16: West of ACE Chemicals, on the roof of the building that runs through the Arkham City wall. Activate the panel by gliding from the top of the nearby gargoyles on the Bank Of Gotham, then use dive bomb to land on the panel. Destroy the Riddler mark with the Batarang.


17: At ground level below ACE Chemicals. Access the cage by freezing the hot air with the Freeze Grenades.


18: Beneath an abandoned car west of ACE Chemicals. Bat-slide underneath it to collect it as you go.

19: Behind a set of iron bars west of ACE Chemicals and next to a short barrier with a “Do not enter” sign on it. Glide from the roof of the building to the north to smash through the destructible wall.

20: On top of the church’s roof, locked by a nearby TYGER panel.


21: On top of the church is a short passageway with an electrified fence and a destructible wall. Use the REC on the fusebox and explosive gel on the wall to collect the Riddler trophy.

22: In the alleyway behind the church is a cage with a set of pressure pads. You won’t be able to access this without the Line Launcher, since stepping on the red Riddler pressure pads will close the trophy cage above.
UPDATE: By using Catwoman you can collect this trophy much early. Hop onto the ceiling above the pressure pads and scurry towards the end of the cage. At the top platform Catwoman can collect both her trophy and Batman’s trophy, providing you didn’t somehow activate the red pressure pad. – thanks to Belthizor

23: By the waterside near the centre of Arkham City’s north wall. Use the Batarang in time with each of the five Riddler marks.


24: In a passageway between two buildings west of Solomon Wayne Courthouse, protected by a locked TYGER panel and an electrified floor.


25: Inside the larger building west of Solomon Wayne Courthouse, which can be accessed through a destructible wall on the north-side wall. A powered gate must be opened with the REC before collecting the Riddler trophy.


26: Follow the road east of Solomon Wayne Courthouse’s entrance. The Riddler trophy is inside a cage, which is restricted by the vent of hot air.


27: In the church behind the destructible wall of the second confessional booth.


28: In the church grapple on to the gargoyle above the entrance then drop down onto the edge to the left with a destructible wall. If you can’t manage this, return when you earn the Line Launcher.

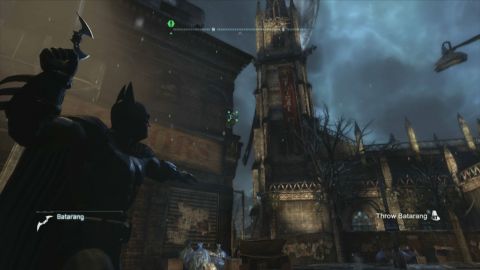
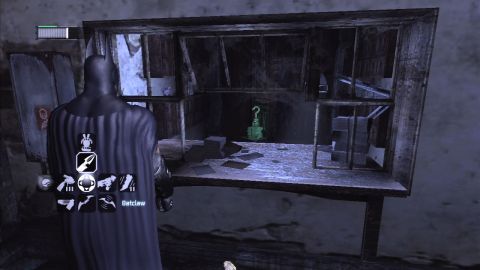
29: Enter the bell tower and start climbing to the top. After taking the set of stairs at ground level and grappling up to the next level, turn around and find the Riddler trophy stuck to the wall. Use the Batclaw to collect it.


30: Northeast of the ACE Chemicals tower, in the centre of the roof inside a small structure with a destructible wall.


31: West of the ACE Chemicals tower is an alleyway opposite Gotham Casinos. Once you have the REC, use it to open the gate and collect the Riddler trophy inside.


32: Inside Solomon Wayne Courthouse, start heading downstairs at the back of the building then turn around. Use the Batclaw on the Riddler trophy above the doorway.


33: Inside the Solomon Wayne Courthouse, from the rear entrance to the courthouse throw a remote Batarang through the nearby electricity then guide it downstairs. Once there, navigate over the bars in the first room to hit the fusebox on the far wall.


34: In an alleyway southwest of Solomon Wayne Courthouse. You’ll need to leap a chain link fence then slide underneath a small gap to collect it.


35: Slightly east of the Confiscated Goods Vault is a small chain cage, protected by land mines. The Riddler trophy is inside.


36: In the far northeast corner of Park Row, between its border with Amusement Mile. Use Freeze Grenades to create a platform near the trophy.

Here’s the locations of the Riddles that can be found in Park Row.
1: This question can only be answered from an unusual perspective. Can you get yourself there?
– grapple up to the roof of the Solomon Wayne Courthouse and walk onto the pole there. Switch to detective mode and align the camera to view the hidden Riddler mark.


2: DA campaign special: get two votes, for the price of one.
– Look for Harvey Dent’s DA campaign on the road to the west of Solomon Wayne Courthouse.


3: It’s far from PURRFECT, but she calls it home.
– climb to the roofs of the central northern building in Park Row, north east of Solomon Wayne Courthouse. A set of rooftop window let’s you look into the room below, scan this.


4: You’ve been warned. People aren’t the only unstable part of this city.
– head to the broken overpass and scan the “Catastrophic Subsidence” sign.

5: If you find the name, does the Cash come hand-in-hand?
– inside the church, search the west side of the room at ground level for a small room with a desk. Scan the photograph for the riddle.


6: This den is where the vicious animals take your treasure, is it theft, if it’s already stolen?
– Scan the large Confiscated Goods Vault on the west wall of Arkham City.

7: Do you have Strange thoughts? Maybe you should seek help?
– on the same road as the entrance to Monarch Theatre is an abandoned store called Strange Minds. It is beneath the orange “The Stacked Deck” sign.


8: I am an actor who can transform a film with the final cut. Who am I?
– Head to the Monarch Theatre and scan the poster of “The Terror” on the left-hand wall of the entrance.


9: Six legs went in and only two came out. Where am I?
– to the right of Monarch Theatre entrance is an alleyway behind a Chain link fence. Leap it and scan the “Crime Alley” sign.


10: Who’s crazy enough to date this guy?
– Downstairs in the Solomon Wayne Courthouse is the Calendar Man, locked away in his cell. Simply scan him. – Thanks Vicente Lau


11: BANG! BANG! Order in the court.
– Climb onto the platform near the acid bath in Solomon Wayne Courthouse and look into the closed booth. Zoom in and scan Two-Face’s gabble.
12: Acing the chemistry test will illuminate you.
– Simply grapple up to the top of the ACE Chemicals building and scan the large neon sign.

13: Has this flower turned over a new leaf?
– East of the Confiscated Goods Vault building the Baudelaire store. Scan this for the Riddle.


14: I wonder how you can land an appointment with this milliner? Perhaps it would be best to book?
– Inside the building that can be accessed after defeating the Mad Hatter.
Only Catwoman can collect these pink Riddler trophies.
1: Climb the chain ceiling and use the grate to access the cage.


2: In the alleyway behind the church is a chain fence with pressure pads on the floor. Climb across the ceiling to reach the trophy above.

3: Inside the larger building west of Solomon Wayne Courthouse, accessed through a destructible wall. The trophy is on a ceiling grate.


4: At the top of the most northwestern building in Park Row, underneath a billboard that looks down on the broken overpass.


5: Behind a set of iron bars west of ACE Chemicals and next to a short barrier with a “Do not enter” sign on it. Climb onto the ceiling to grab it.

Keep an eye out for these TYGER cameras, often found at street level rather than on the rooftops. They glow orange in Detective Vision.
1: On the building west of the shanties and destroyed overpass.


2: At ground level west of ACE Chemicals. Next to the alleyway with Riddler trophy 17 inside.
3: In a side road between ACE Chemicals and Bank Of Gotham. Next to an ACE Chemicals sign and a chain link fence.

4: On the northeast corner of the Bowery building, southwest of ACE Chemicals.

5: Near the north wall slightly northeast of the destroyed overpass.


6: East of the Confiscated Goods Vault building, on the corner of the first building nearby.

7: On the corner of the building to the east of Solomon Wayne Courthouse’s entrances.

8: From the entrance of Solomon Wayne Courthouse, take the road east. High up on the corner of a nearby building, behind a blue neon “Lounge” sign.

9: West of the church, near the road leading to the Solomon Wayne Courthouse.

10: South of the church, at the dead end blocked by the wall to the Wonder Tower.


11: Northwest of the church, opposite the barricades of the destroyed overpass.


12: Southwest of the entrance to Solomon Wayne Courthouse.


13: North of ACE Chemicals and south of Solomon Wayne Courthouse, near to the Monarch Theatre’s entrance.

Riddler Trophies Locations
1: Behind a weak wall on the building with the rooftop courtyard. Simply punch through it to destroy the wall.


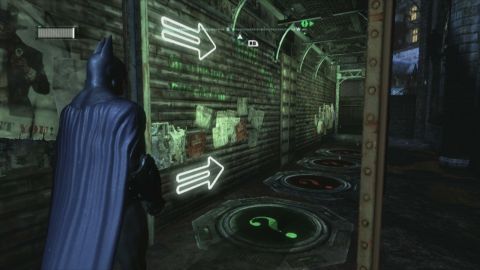
2: in a narrow alleyway between the church and the Amusement Mile text on the map. There are six Riddler marks in two sets of three. Plant explosive gel on each of the marks on the bottom row, then grapple above the top row so each button is targetable. Activate the explosive gel then quickly press L2/LT and X/A to quickly throw batarangs and hit each of the three marks. If timed properly, the riddler cage below will open up.


3: Starting from the top of the first building near the destroyed overpass, glide from the pressure pad down to the pad below. From there, look right and glide down to the third and final pad in the alleyway nearby. The Riddler cage is on a rooftop near the second pad.


4: Beneath Trophy 3 is a chain fence. Drop down on to the nearby rooftop and use Freeze Grenades to create a platform at the end of the water. Land on there then activate electromagnet with the REC.
5: On the roofs of the large building with a rooftop garden is a short chain cage. The Riddler trophy switches between positions, so time your slide underneath the cage to collect it as you slide past.

6: On the most northern building in the area near Ivy’s sanctuary overlooking the water is a small structure with a destructible wall. The Riddler trophy is inside there.


7: On the northeastern building on top of a vent with a pressure pad. Use Freeze Grenades to create a platform by the three Riddler marks by the water below and place explosive gel on the wall. Then activate the pressure pad, detonate the explosives and the Riddler cage will open.

8: On the northearnern building, on the rooftop above Trophy 7. Stand on the pressure pad to open the cage, then use the Batclaw to grab the Riddler trophy.


9: From the GCPD Building glide into the small gap in the building northwest of it’s location to activate the pressure pad on the wall. Immediately when pressing the button, grapple up through the now-open grate to collect the Riddler trophy.


10: look for a destructible wall along the north side of the GCPD Building, and either fly or Line Launcher into the area to destroy the wall.


11: outside the GCPD Building’s entrance (accessed with the REC launcher) is a destructible wall down a ramp. Destroy this and the trophy is on the otherside.


12: On the east side of the large building with the rooftop courtyard, look for a set of arches with wooden panelling and a locked set of iron bars. Enter the corridor and look south for a Riddler pressure pad. Activate this then use the Line Launcher to cross the distance and reach the Riddler trophy at the end.


13: East of Trophy 13, beneath the intersection of the broken overpass is a vent with a Riddler pressure pad and trophy on top. Step on the vent and look west. Use Remote Batarangs to hit all three Riddler marks, starting with the one on the right. Use the boost with the Batarang when the timer starts, and consider using an automatic Batarang or REC shot to lock on and hit the centre Riddler mark last.
– Thanks, Dave Thomason

14: West of Poison Ivy’s sanctuary is a hidden passageway submerged in water. Use Ice Grenades to gain access to the area. A TYGER camera also guards the area.


15: Beneath the “Gotham City Olympus” sign on the west side of the building is a wooden panel. The Riddler trophy is behind there.


16: On the rooftop west of Krank Co Toys and southwest of the GCPD Building. Step on the pressure pad when it turns green to open the cage.


17: South of Riddler Trophy 16. Step on the pressure pad then use the REC on the electromagnet. Once the ball rolls through the first gate step off the pressure pad to let it through the last one. You will need to activate the electromagnet again to reach the ball without letting it return to the start.


18: On one of the walkways around the GCPD Building is a set of floor grates. Look for a vent near some destructible walls to locate the Riddler trophy underneath a set of stairs.

19: South of the GCPD Building is a low roof with a set of arches. Use Ice Grenades to create platforms and access the area beneath. Then use the upgraded Cryptographic Sequencer to unlock the iron bars.


20: Get onto the platform floating in the water east of the GCPD Building. In an archway on the building itself is the Riddler trophy. Use the Batclaw to access it.

21: Get onto the southeast corner of the building west of the GCPD Building. With the Cryptographic Sequencer you can hack the TYGER panel through the chain link fence and access the locked area on the southwest corner of the GCPD Building.


22: On the rooftop west of the GCPD Building, behind a set of iron bars controlled by the nearby TYGER panel.

23: Inside Krank Co Toys, in the reception area to the right of the main room after entering. Use the Batclaw to access it.
24: West of the large crane is a cage with four chambers. Step on one of the pressure pads, grapple up to the crane but double tap X/A to Grapnel Boost. Landing on the ground will reset the pads, so make sure you glide around around then dive bomb on top of a second pressure pad. Do the same for the third pressure pad and the Riddler trophy will open.
25: On top of the Krank Co Toys building is a ventilation system with shutters that open and close. Throw a Remote Batarang in time with the doors, using brake and boost to get through successfully. The right hand Riddler mark stops the shutters, while the left hand one opens the trophy cage.


26: On the east side of the Krank Co Toys building is a cage with six red pressure pads. Align yourself with the right-hand wall and use the Line Launcher to reach the end of the cage.


27: On the platform south of Krank Co Toys is a pressure pad. Look towards the five Riddler marks on the north wall and step on the pad. Watch the pattern the marks light up in, and use the Batarang to hit each mark in the same pattern. Repeat this two more times to open the trophy cage.

28: Use the REC on the electromagnet to raise the crane’s hook and unveil the Riddler trophy.
29: west of the bridge leading to the Industrial District. Look for a pressure pad on the roof of the building to the north, glide down to the pad on the south visible from the pad then immediately glide to the last pad opposite. From there glide and grapple back up to the trophy cage at the top.
30: On the middle platform of the GCR radio mast out in plain sight.

31: East of the church, beneath the “Amusement Mile” on the map is a set of three Riddler pressure pads. Walk across all three to open it.


32: Along the west wall blocking entry to the Wonder Tower is a cage filled with landmines. Once you have the disruptor, use it on these mines to crawl through the cage safely.

33: On the underside of the raised overpass leading to the entrance of the Industrial District. Throw a freeze grenade directly below the Riddler trophy to reach it with the Batclaw.


34: After entering the GCPD building, continue down the first corridor and look for the cell locked with a TYGER panel. Unlock this, then use explosive gel on the destructible wall for the trophy.

35: After entering the GCPD building, take the left corridor to find the riddler trophy behind the locked cell. Use the electricity at the east side of the building (beyond the hot gas vents) to charge a Remote Batarang, before navigating back through the tiny slot above the doorway of the Riddler trophy to destroy the electrical panel.

36: In the GCPD Building, grapple up on to the platform above near the entrance. Use the Line Launcher to land on each of the three pressure pads in turn without touching ground. – Thanks, Sgt Gweeble


37: Inside the GCPD Building, locate the morgue in the east side of the building. The Riddler trophy is in plain sight inside.

This questions can only be answered from an unusual perspective. Can you get yourself there?
– Find the REC-controlled door and activate it. Now glide to the building opposite and look for the other half of the Riddler mark beneath the billboard.


Which acrobat family gambled with their lives, and has now been left to fly solo?
– Look for the poster with “Cancelled” writing across it on the north-facing wall on the east side of the building with the rooftop garden.


If she is the ROOT of evil, how could anyone be expected to CONTAIN her?
– Look for a cabinet near the roots of Ivy’s sanctuary.


Always a shining example of justice? Not if you ask me.
– Scan one of the GCPD Building’s spotlights for this riddle.


Would an invitation to party like the gods be a bolt out of the blue?
– Look for the Gotham City Olympus sign and statue, above the weak wooden wall with a Riddler trophy inside.


This place has taken a TURN for the worse. Is it a little BEAR for your tastes?
– Scan the large neon sign above the Krank Co Toys building.


If you’re afraid, don’t be scared to crow about it.
– On top of the raised overpass leading to the Industrial District is a pile of hay. Scan the mask on the ground nearby.

Look out! Can you see where the madness began?
– From the roof of the GCPD Building, look out to the sea and scan Arkham Island.


Park in his spot and you may just get a ticket.
– Access the underground section of the GCPD building through the wooden wall along its north side. From there, use the Line Launcher to propel yourself across the water. Scan James Gordon’s parking space to solve this riddle.


Joker Balloons – Amusement Mile
1: On the railing above the blue Gotham City Olympus sign, on the west side of the building.
2: On the southwest corner of the large building with the garden rooftop, west of the Gotham Olympus building.
3: On top of a set of speakers near the raised overpass leading to the Industrial District.
4: On the end of a destroyed ventilation system west of the GCR mast.
5: Attached to a broken ventilation system near the northern section of the destroyed overpass, south of Ivy’s sanctuary.
6: On top of the announcement speakers outside the GCPD Building.
7: On top of the short tower just south of the GCPD Building.
8: On the small building west of the large building with the large garden rooftop.
9: On top of the Gotham Casinos sign, on the rooftop.
10: On the second floor of the GCR mast.
11: Along the west wall of the area, attached to a set of speakers.
12: Attached to the centre of the raised overpass leading to the Industrial District.
1: At the start of the overpass, north of the church.

2: East of the church on the wall of a building south of the overpass.
3: On the southeast corner of the large building with the rooftop garden, north of the last camera.

4: North of the last camera, to the left of the large Gotham Casinos sign.

5: South of Ivy’s sanctuary, west of the GCPD Building and northeast of the destroyed overpass.

6: On the building to the right of Ivy’s sanctuary, close to the destroyed overpass.


7: On the building connected to Ivy’s sanctuary, beneath the walkways above.

8: In the centre of the rooftop garden building, overlooking the frozen swimming pool.


9: To the right of the REC controlled door leading to the entrance to the Museum.

10: On the wall northwest of the raised overpass leading to the Industrial District.


11: On the north side of the raised overpass.


12: On the south side of the raised overpass.
To locate the remaining Riddler Trophies and Challenges, continue through to page two. Alternatively you can find all of the Museum and Wonder City Riddler challenges on page three.

 Why You're Playing Civilization V Wrong: Time For Multiplayer!
 Gears of War: Judgment Glitches Guide
 Fallout 4: How to Find All Perk Magazine Locations
 5 Final Fantasy Characters Who Really Deserved Their Own Spin-Off Game
 Yakuza 5 Wiki – Everything you need to know about the game .