Alan Wake’s American Nightmare Walkthrough
The nightmare returns when Alan Wake is trapped in Arizona. That’s not even the worst part — he’s inside a script for the show Night Springs, and now faces the darker side of his personality. The evil Alan Wake, named Mr. Scratch, is set out to kill the real Wake with every literary device at his disposal.
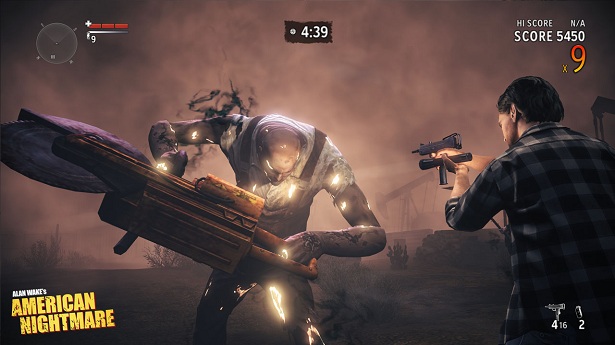
In this standalone downloadable episode for Alan Wake, you’ll be equipped with a series of new weapons and face off against a group of deadly new opponents. Eschewing the creeping horror vibe for a bit of pulpy action, Alan Wake must fight off the growing darkness once again.
Looking to get some inside information on the next chapter of Alan Wake’s fictional life? Check out our walkthrough below, or skim through our achievements and cheats.
The Oil Rig
Welcome to Night Springs. Follow the instructions on the screen to learn the basic controls, then approach the flashlight to pick it up. From where you started out, the path proceeds to the left. Your path will be blocked almost immediately and you will learn to wield light as a weapon. Score!
As you proceed, a gun will be indicated. Pick it up and prepare to be attacked. Use the boosted flashlight beam (which runs out quickly) to drop the shadow around your opponent, and then drop him with some well-placed shots. Hit X to reload. Another bad guy will appear almost immediately, toast him, and then proceed down the path.
Keep following the path to find the first manuscript page . These are the game‘s collectibles, there are 53 in all and they reveal more of the story, as well as unlocking Weapon Cases. Move on past the highway barrier to note the rest stop that is your goal. Follow the path to the left to move on.
More enemies will appear and the game will advise you to run for it! Do so, heading for the safe light of the hotel. When you arrive, you will notice ahead of you a suitcase on the ground. It’s a weapon case that will unlock a submachine gun when you find 3 manuscript pages. Incentive!
Look across the street where there is a pickup truck. Head over there to find a shotgun and ammo on the steps to the small building. Then be prepared to run back to the light. The game will tell you to investigate the garage, which is just past the weapon case and on the left. When you arrive, you’ll unlock a 10 point achievement and discover a person.
Emma will give you another page and then you’ll have a conversation. After that, if you look to your right, you’ll have the option to switch your handgun for a nailgun!
Now you’re going to track down the three items on your radar marked as stars. Hang a left out of the garage to find a cupboard to load up on ammo and batteries. Head straight ahead between two buildings to find flares and keep going for another manuscript page . Head over to the television for a disturbing bit of exposition.
Head south for the first object. When you get near you’ll trigger an event and face down some bad guys. Remember, when the last guy dies, some slow-mo will start, letting you know you’re in the clear. Grab the first object, a valve. Watch for question marks on the minimap to indicate more pages .
Head east toward the next two stars. In the tunnel is a weapon case for a magnum (10 pages) and out of the trench to your right is another page . Keep heading east to a building. On the far side is another page . A difficult opponent will exit the building. It splits in two when you shoot it. Switch to the shotgun, and get ready to fire fast!
Now, of course, you can get the item inside. There’s a rifle if you want to drop your shotgun, and some 9mm ammo, as well. Head back toward the hotel, and you’ll see a yellow jeep which offers a flare gun and some ammo. Then head toward the big rig trucks for the final item. Three opponents will appear and then you can grab the final item, a battery. Now it needs charging.
Head back to the garage and Emma. Might as well pick up the SMG on the way. Emma will charge the battery, then head to the oil field. If you want another page , there’s one behind the diner on the way.
Three guys will attack you at the oil derrick. There is a pool of light for temporary shelter, and you’ll get another page for your trouble. Head up the slope toward the location on your radar, and be prepared for more attacks. As you move along the path, you’ll hit a point where you must clear the area. You will face two of the splitting enemies. Use flares to put them on the defensive, and a heavy gun to put them down.
To complete the mission, you have to match the environment at the oil rig to the manuscript page. Click the L stick to get a reminder. Put the CD in the boombox in the hut to the left of the rig, and the battery at the platform to the right. The valve is dead center, place it, then turn it on.
The Aftermath
Now run away! Head back to the hotel, and defend Emma from up to 7 taken, including a really big one. The ammo refill is right there, though. Go talk to Emma.
Emma will send you to the Diner. On the way, you will be attacked by an object that is possessed by the shadow. Use your flashlight to chase the shadow away, and dodge if necessary. Enter the Diner. The room on your right has clues in it. Examine the briefcase and pick up the keyring, then return to the motel.
On the way, you will be attacked by a few Taken. Watch out for one of the guys who splits himself. Do NOT enter the garage, as you will be attacked, but unable to use your flashlight in the building. Instead, follow the stars and start exploring. Oh, and stock up on ammo.
The room across from the motel has an unpleasant surprise, as well as a keyring.
The Observatory
Welcome to Mount Redtooth. Enter the gate and look on the far side of the firetruck for a page . Head up the hill to the right toward the main observatory. As you pass a building on the right, three Taken firemen will attack you. Then look for the manuscript page at the far end of the building. A weapon crate for a hunting rifle is in front of the building on the right side.
Expect to get attacked as you continue. Explore behind the next building on your right, at the back corner near some dumpsters, for flares and flashbangs. When you reach the observatory dome, look for another page to the left, near a shipping container. Another page is around the left side of the observatory. All the way around the back is a weapon case for the combat shotgun. A carbine rifle and a flare are in the back of the van in front of the observatory.
Head to the door and interact with it. Then you’ll get attacked. Remember to dodge! Then you can head into the observatory. Follow the stairs up to an elevator, where you can also reload. Then you can talk to Dr. Meadows. Rawr!
Fetch quest? Fetch quest. Follow the star to the lower building and…hey, were those spiderwebs here before? Oh this is gonna suck. Fortunately, the spiders can be killed with just light, conserving your ammo. Unfortunately, there’s a lot of them and they’ll start to pop out of the ground on the way back to the Observatory.
You’ll be directed onto a platform to install the widget you picked up. Hey, way to fix the telescope!
You can talk to the doc some more, but you won’t learn anything that will actually help you accomplish your mission. Follow the stars. The first valve is just outside the door. The next is back where the spiders were, only it’s protected by some angry Taken. The third valve is on the other side of the observatory, just follow the star and expect attacks along the way. You’ll find a page when you get there, and have to avoid a big object attack when you do your job. Return to the observatory, watching for attacks.
When you return to the observatory, the machinery works, but the Taken will break in and attack. Repel the wave. There’s plenty of ammo nearby, and I recommend the carbine and an elevated position. Expect to kill as many as ten attackers. Then head up and talk to the lovely doctor. She’ll direct you to pick up a printout, and it’s on to the next location!
The Drive In
Head through the entry, go into the building on your left. Enjoy meeting this kooky broad. Head past her into the office to find keys and the ammo box. Head around back for a page before you move on.
As you head down the slope, expect to be startled, and then face down some Taken. Some ammo is on your right after the encounter as well as a weapon case. If you keep going to the right, you’ll see a souvenier stand in the distance. If you head toward it you’ll draw a lot of heat from Taken, but you’ll find the crossbow!
As you continue on toward the drive in lot, expect some more heat from Taken, and then a bigger encounter. Stay and fight or run back to the pool of light to skip them. Look in the trunk of the car with the blinking lights to the left of the parking lot for another page .
Head over to the cell tower looking thing and take the stairs down. When you see a rusted out old truck, expect an attack, and look for a weapons case. Keep heading toward the star and enter the gate.
Head off to the right through the fences to reach a page . It’s guarded by Taken, and there’s a pool of light above it to provide defense. Head inside and follow the star to find the activation switches. I did right, center, left, center with the three switches, but just keep going until all three bulbs above the switches are green.
Now, leave the way you came in, after killing some Taken and avoiding the electricity. Follow the star and exit the gate. When you do, you’ll come under attack, including from a new enemy, the Taken grenadier. He’s throwing flashbangs that will make you vulnerable to attack, but can also take out the other Taken. Be cautious. Once the way is clear, keep going to the star.
You’re going all the way back to where you started with the crazy lady. Along the way, you’ll face more grenadiers at the parking lot level, and a posse of Taken as you head up the last hill. Enter the building and hit the light switch. The woman will give you the code to get into the projector building. Head there next.
You’ll be told to destroy the “dark fountains” to proceed. The first shows up right before you. Taken will attack you as well. You need to shine your light on the three extensions of the fountain to destroy it, while under attack. Then head to the next one, etc. Flares and/or flashbangs are a great way to make fast headway here.
Head back to the projection booth. Adjust the calendar and the clock to fit the manuscript.
The Motel
Does this look familiar? Grab the page in front of you and return to the oil rig. There you’ll see another page guarded by two Taken who transform from flocks of birds! As you move on, you’ll see more floating around. The hut next to the truck on the way to the motel hosts another page .
Head back to the garage and talk to Emma. Pete meet repeat. Head toward the star, and keep an eye out for two pages on the way, one by a wrecked motorhome, and one at the base of the billboard that fell the last time. Then head into the railroad tunnel.
Oh, look, spider webs. I wonder what’s going to happen? As soon as you pick up the battery, you’ll come under attack. Due to the sheer numbers, flashbangs or flares are gonna be handy.Take the battery to Emma.
Head up to the Diner for a page , but expect to run into some bird guys along the way. Then head up to the oil field. When you get to the top, you’ll face a wave of Taken, including two more bird guys. Once that’s taken care of, recreate the last time you were up here, CD, Battery, Valve, and then watch what happens.
Run away again, but this time there’ll be Taken to face as you go. Return to the garage and get ready for a wave of Taken, including several Splitters. Finish them off and talk to Emma. After that, reload and use the keys to go into the two rooms you haven’t visited yet for two pages . Then enter the third room to find the body and go to the observatory again.
Observatory, Again
Well this all looks familiar, doesn’t it? Head up to the car to find the part, and along the way expect Taken and grenadiers. Grab the widget and the page just beyond it. Head up to the top and grab a page at the back of the van, and then turn to see another straight ahead of you.
Enter the building and install the widget. Then head outside to deal with the pipes, unless you want to talk with the doc first. Head down the hill to the star, and expect to hit some Taken flak just as you arrive. Enter the gate and flip the switch to move on and earn an Achievement . After that, head behind the big tanks for an ammo stock and a page . Then return to the observatory. The long way.
Along the way, you’ll face a hail of destructive objects and some Taken as you reach the top. Keep an eye on your radar and head off to the left on the way up the hill for another page . At the top is another pack of Taken and then you can enter the observatory again and go back to the doctor. Talk to her and then pick up the printout.



 How to Survive The Night in Dying Light, The Developer's Way
 Dark Souls 2 Merchant Locations
 Waste Away Your Life Playing All The Games On Pong.com [Weird & Wonderful Web]
 Mafia III (PC, PS 4, Xbox One) first impressions
 How to fix Pro Evolution Soccer 2015 PC Launch issues, Stuttering, Downloading issues, Server error, Sound issue and more