You’ve punted Oryx back into his hole and now you want a different challenge? With Destiny: The Taken King there shall be plenty of them. One of the many challenges come in the form of Strikes. Luckily, in Destiny: The Taken King there three new ones (four if you’re on PS4!) but today we’ll be covering the Fallen S.A.B.E.R. Strike located on the Cosmodrome.
First and foremost what you need to do with your Guardian is to complete all of TTK’s campaign missions. This will roughly take you around three to five hours to finish. Take your time though, the story in this content is much improved.
Once you’re finished with the campaign, head back to the Tower and talk to Commander Zavala to pick up the quest “A Cry For Help”. This quest will send you and your Fireteam to stop the Fallen on Earth from gaining control of Rasputin.
Your team will land on the Forgotten Shores, and you’ll be instructed to defend a Warsat from orbit. Here your Guardians will face waves of Fallen enemies such as Dregs, Captains, and of course numerous Shanks. You will have to hold position at the Warsat for 3:25 before your Ghost downloads the codes from Rasputin.
The best way to survive the onslaught is to make sure all of your teammates are covered. You will be swarmed with arc firepower not only from the enemies on the ground but also from the Fallen dropships overhead. Stay behind cover and use your super abilities and grenades as often as possible.
After your Ghost obtains the codes from Rasputin’s Warsat, hop on your sparrow. You don’t have to travel far for the next part, right over the canyon and walk through the newly unlocked doors. Here’s where it gets interesting.
Rasputin’s defenses need to be shut down in order to help the AI ally. Of course, the Fallen have different plans for Rasputin and have invaded the interior of his home. You will be faced with plenty of opposition just like you did outside. Stay on the far side of the bridges so you won’t risk falling into the abyss or being disintegrated by the Exploder Shanks marching towards you.
After you defeated what seems to be an endless supply of Fallen Captains and Shanks, your team will finally be allowed to march forward. Instead of having your Ghost hack into Rasputin, your Fireteam has to destroy a cable that is running underneath the floor. There’s a chute that’s open on the far side of the room that Guardians can chuck their grenades into, or you can just shoot the cables from above ground.
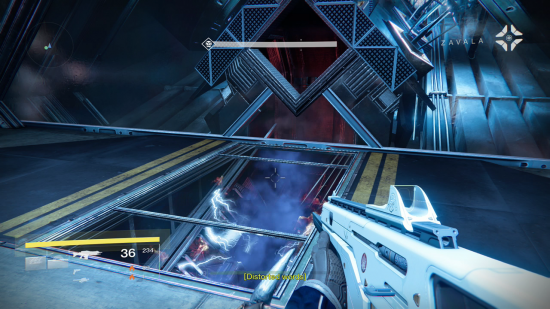
In an interesting display of electricity mayhem, the way forward will be revealed. Your Ghost will lead you to the next area and instruct you that Rasputin’s power grid is very much operational. Your Fireteam will see streaks of arc electricity flowing on both sides of the hallways.
In a sadistic game of chicken, you and Fireteam must reach the end of the two hallways to obtain a relic that will open up the next door. Take your time as you shimmy your way into nooks and crannies on the side of the hallways to avoid being hit with the arc blasts. Don’t stress if you get hit by one, they hurt but they won’t instantly kill you.
Once you grab the relic, your Fireteam must go back down the way you came and insert it into a panel inside one of the walls. As soon as you pick up the relic there will be Shanks that will spawn behind you, have the other Guardians who aren’t holding the relic blast the pesky exploding robots.
After you leave the arc hallways, you can breathe somewhat easier because the only foes you’ll be coming across are more Shanks. Just take your time because some of these evil R2-D2’s are prone to be explosive. Just make sure there is space between them and your Fireteam and you will be just fine.
When you come into the next room, you’ll be notified that you must find the Breach Site to investigate what’s going on with Rasputin. After a short skip and a hop, you’ll find yourself in a massive looking metallic warehouse. This is where the final boss awaits.
Your Ghost informs the Fireteam that in order to face the big baddy, you’ll have to draw it out. There are simple Servitors floating about the room that you need to destroy. After you end their robotic lives, the final boss of the Strike makes an appearance.
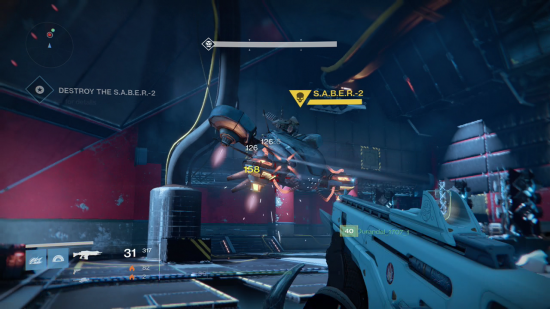
You’ll notice flashes of electricity in the room and the room’s main floor start to open up; S.A.B.E.R.-2 is here and he’s incredibly cranky. First thing’s first, if you’re near him, you need to immediately take cover behind a pillar, otherwise he’ll blast you into oblivion. Taking cover is essential in this first phase because the massive Shank will charge up a sniper shot and immediately wreck your shields.
The place you want to direct your fire is his main fins on each side of his body. They look like repulsers that keep him afloat. You’ll be scoring those much needed critical hits if you shoot S.A.B.E.R.-2 there. These weak points are critical in order to take down one of the hardest bosses in TTK.
Make sure you’re Fireteam is taking out all of the additional Shanks that are flowing through the pipes as well. These can easily cause a wipe on your Fireteam if you leave too many of them floating around blasting your shields. These are best handled by having your Fireteam split up and take cover around the complex.
After you get S.A.B.E.R.-2’s health down he’ll switch to his second phase. The environment will also become a part of the equation by trying to kill you as well. As you may painfully remember in the beginning of the Strike there were arc bolts flying everywhere, here it’s more of an issue. There are conduits that are littered on the outside of the arena that you want to generally avoid otherwise you’ll be fried to death.
Just keep destroying Shanks, avoiding the electricity hazards and pummel S.A.B.E.R.-2 and he’ll eventually reach his final stage. He’ll lower his shields down and expose his power core as he charges towards your Fireteam. He isn’t necessarily quick but if he catches you, you’re in for a world of hurt.
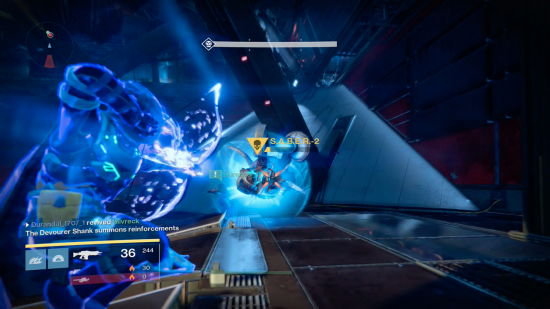
By far the hardest part of this stage is keeping track of the Shanks around the map, here there will be pesky Sniper Shanks up on top, who will have no problem taking you down. You need someone (preferably someone who has accurate aim) shoot these down while the rest of your Fireteam whittles away the bosses health pool.
After a stressful (and exciting) encounter, S.A.B.E.R.-2 will be shut down. Make sure you check where he blew up to pick up all of those much needed Engrams from the floor. After the you get sent back into orbit, make sure you head to the Tower and talk to Commander Zavala to complete your quest. He’ll offer you either a handy rare Fusion Rifle or Shotgun. Good luck Guardians, and enjoy one of Destiny: The Taken King’s best strikes!


 Walkthrough Lamar Down Mission GTA V
 A Story by any Other Means - Storytelling in LA Noire
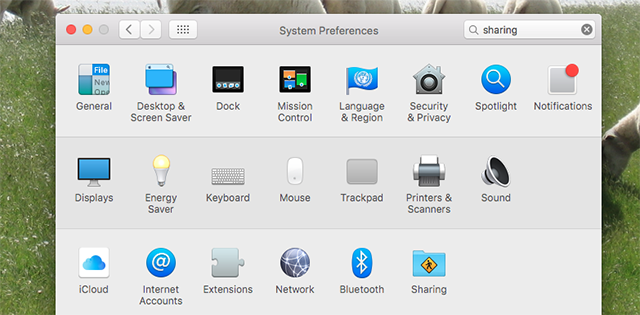 How to Share Your Mac's Internet Connection Using OS X
 Far Cry 4 - Valley of the Yetis (PC) walkthrough
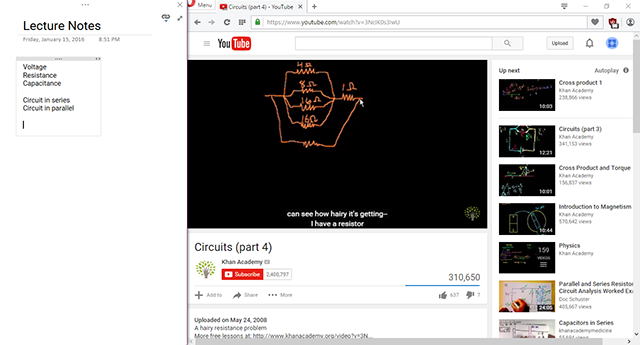 This Feature Can Make OneNote More Productive Than Evernote