Unofficial Assassin's Creed: Brotherhood Guide by CM Boots-Faubert for
Assassin's Creed: Brotherhood is the third installment of the epic story of a modern day misfit named Desmond Miles who is cursed with being the child of a long line of Assassins. The direct sequel to Assassin's Creed 2, the main character and protagonist is Desmond, and his Italian Renaissance Era relation, one Ezio Auditore da Firenze. Ezio, a young nobleman, is at the very heart of the story and its many plots that surround objects of significant historical value that also happen to be imbued with supernatural powers. Were they to fall into the hands of the modern day Templar organization who actively seeks them, it would allow them to rule the world, so a band of modern day Assassins -- the descendents of a long line dating back to the organization in Italy that gave the word its true meaning -- have set out to resist the Templar plan. Desmond was introduced along with his historical counterpart when the Templar (in the modern day form of employees of a massive global corporation called Abstergo Industries) kidnapped him. They wanted him because, locked within his DNA was the genetic memory of every person whose bloodline he is a part of, and a key number of those people know the location of the supernatural objects that have been lost in time.
Abstergo has developed a machine, called the Animus, that allows them to send people back into those genetic memories, literally building a virtual world that puts them into the memory, its era, and its events, where they can participate in and alter them. More important to the Templar, the test subject inside the Animus can return from it in full possession of the memories that they have just explored, one of which they hope will include the hiding place for these objects. Brotherhood is a classic third-person shooter set in a sandbox-style world that offers the player the sort of game immersion that is a rare and welcome part of modern gaming. The series is well known for its excellent musical scores, its depth of play and plot, and the wide-open paths that are available to the player to solve what turn out to be largely rail-based missions. The clever use of the environment and kit in the game succeed in masking the rail-based structure to the point that players often feel that they devised the solution, rather than simply met the criteria required for them to succeed. Brotherhood is destined to be one of the games that you add to your game collection shelf and your regular play rotation, because the multi-player side combined with what is anticipated to be an aggressive DLC program should have you returning often. This is probably not a game that will follow the original into the used game section of your local GameStop, in other words. PlayStation 3 owners will be pleased to learn that they have been provided with additional system-exclusive content for the game. Called the Copernicus Conspiracy, the DLC includes additional missions and content that is not present in the other versions of the game. If you have been playing other Ubisoft titles and you joined their fledgling U-Play Program, you probably already have some points banked that you can use right away as soon as you start playing the game. One of the bonus items you can purchase with your U-Play Points is the Gun Capacity Upgrade, which costs 30 points. This upgrade increases your gun ammo capacity by 10 bullets, which is actually a pretty good thing, so you will want to snag this if you have the points! In addition to the ammo upgrade, you can also score the multi-player Hellequin Character for 40 points if you plan on taking advantage of the online side of the game, and for 20 points each you can grab the Armor of Altair, Altair's Robes, and Florentine Noble Attire -- though for the most part these are simply aesthetics for the game and do not provide you with any significant bonus to play. They look good though, and that can be important if, like me, you are into game immersion. -- Achievements Easily Missed -- The lion's share of the Achievements in the game are part of the story, and so they cannot be missed because you will unlock them as you play regularly, but there are a handful that you can actually miss, and we would not want that to happen, so I will be providing instructions for obtaining them in the body of the relevant section -- all you will need to do is remember to grab them when prompted to, but on the off-chance that you are not using this as a play-through guide but just consulting it as needed, here is a list of the ones that you might miss otherwise: - Dust to Dust (20 GP) Find 1 Artifact in the Present. This Achievement must be unlocked prior to completing the game, because it cannot be completed in replays after that. It can only be unlocked after Lucy tells you to return to the Sanctuary before dawn, and you receive the communications ear piece as you leave the main room. The easy way to unlock this is to depart from the main room, heading up the stairs to the courtyard outside. Do not go past the generators on the right -- instead look left and you will see the fountain on the wall. Climb up to the roof here then to the next roof using the cargo-lift to reach the top, then look to the left and you will spot a hole in the roof tiles, inside of which is the glowing Artifact. The Achievement will unlock once you take it. In Sequence 2 as soon as the "Leave Animus" command is added to the Pause Menu, use it to return to the Sanctuary. When you exit the chair, head to the back of the room and use the (now glowing) computer there to check your email. You do not actually have any but that does not matter, the point is that you tried, and as any good Little League player knows, it is not about winning, it is about checking your email. This is not really one that you can miss by moving through an area, rather it gets missed because most gamers are not aware that they are supposed to throw money in the well..

Meeting Desmond Miles
Play Notes
The Assassin's Guild Challenge Board
- Mailer Daemon (20 GP) Access your email in 2012
- Your Wish is Granted (10 GP) Throw money in a well.
That is it -- the rest of the Achievements either come with the story, or are ones you will be actively working towards anyway, and so cannot miss like these. While Achievements are not why we play these games, they do make nice bragging score cards hey? So you should get as many as you can legitimately obtain in every game!
Part 01: The Vatican, December 1499
Escape from the Vatican
The excitement sets in before the game even starts, as you slot the disc and wait for it to load -- instead of quickly mashing the Start Button, wait a few moments and the title screen with its awesome drum-beat music will change to a CS in which Ezio will appear in Rome, in 1503. After an awesome cinematic panning moment we see Ezio's arch enemy in his carriage and then, oh yes! The man himself!
Walking through the crowd of blood-red cardinals he takes out the rear guard of armored troops and then confronts his enemy -- a fight ensues and Ezio demonstrates why facing one Assassin means you are pretty much outnumbered. Just as you think he may have bitten off more than he can chew, his buds pit in an appearance, the two groups head towards each other, and the CS ends!
This type of CS is what they call a static display, and it is created so that stores like GameStop or EB can slot the game in the machine whose display is in the window of their store, and people walking past will see either the start screen with its ominous music, or that wicked cool CS piped through an expensive sound system to draw them inside, where they can purchase a copy. But you do not have to worry about that, right? You already have your copy! And it is time to put it to use, so what are you waiting for>! His the damn Start Button!
And so it begins...
I am going to presume that you have played the other games in the series and are already fully aware of the three subplots and main plot -- you NEED to be aware of those, so if in fact you have NOT played at least the previous game, Assassin's Creed 2, you should pause the game right now and head over to the Wiki and read the full plot and game play sections for it. Do not do that for Brotherhood though, as it gives away information you not only should now know, but that will ruin the game for you!
OK are you back? Good! Now that you are totally hip to what has transpired to bring us to this point, it is time to delve into the barrel of entertainment that is ACB! Drink deeply, Grasshopper, for rarely does a game story of this caliber come along. Savor every moment of this, it really is worth the effort to appreciate it in a manner that it so clearly deserves.
Getting Started
Start by entering the name that you want to use in the game and, after you do that, watch the CS that will fill you in on the back-story -- well, it is not really detailed, more of a highlights sort of thing -- but you get the idea of what has come before if you did not read up on it earlier when I suggested it. Really you should read the details for AC2, because it links a lot of the subplots together.
Desmond talks about Lucy, and the Rebel Animus that the Assassins have managed to construct. Desmond concludes the retrospective and the screen transitions to a loading sequence that shows you his confrontation and the massive battle, prompting you to perform a button-sequence in order to kill your enemy!
The screen faces to white, you are briefly back in the lab, and if you are a U-Play Member you should now unlock your first U-Play Reward and 10 points! You will also unlock your first Achievement / Trophy, Technical Difficulties, which is worth 10 Gamer Points as well. Good on ya mate!
Ezio is confronted by a glowing woman in the Vatican in 1499, and is quite confused because he is himself rather than you possessing him. Not having the whole back-story or your memories, he has no idea what is going on. You are now in full control of Ezio, so run towards the opening ahead to discover the costume and the staff poking out of its slot.
When you try to remove it your actions set off a chain of events that causes the staff to sink back into the safe that protects it, and the room to begin to fall and close in on you! Your Uncle tells you that it is better that the staff has become trapped in the safe than it would be for it to have been taken by a man, and then urges you to climb out of the pit, which you can accomplish by finding the hidden handholds on the wall.
Eagle Vision
The best method for doing this also exposes you to Eagle Vision -- the special vision mode that allows you to see concealed objects, including hand-holds, which glow in a fire-like neon blue.
You are now given a mini-tutorial on how to climb -- basically you hold the Right Trigger and hit the A Button when you are near the object that you want to climb up, and after you have jumped up and grabbed it, you can release those buttons and just use the Right Joystick to complete the climb (in fact you should make a habit to release the trigger and climb button to prevent yourself from unintentionally launching yourself into space which can happen if they remain pressed).
Once you reach the top you will climb out and meet up with your Uncle, who will chat with you for a bit and then lead you on a chase that includes the mini-tutorials for running and fighting, and how to make it through crowds without being knocked down by holding down the B Button to gently shove people out of your way. During the fight remember that when you hold down the right trigger while fighting it will prevent you from walking around the fight, which allows you to concentrate upon defending against the enemy who are actually attacking you, and using more precise attacks yourself.
Work on getting comfortable with the attack commands and styles, as you will be using them quite a bit in this game, so their mastery should be a priority for you.
Your Uncle leads you on a chase through the rooftops that culminates on top of a tall tower, where you make the decision on what to do with the apple artifact, and then jump off of the tower, ending this chapter!
The game then shifts to the white and blue loading screen that will become very familiar to you as you play the game. Congratulations mate, you just completed your first chapter in the game! Well done!
Learning to use the Cannons
After the loading screen transition you find yourself sitting on a horse talking to your Uncle, who has the opinion that if this is all over -- and he hopes that it is -- that can only be a good thing!
Follow your Uncle as you ride through the countryside, and you will trigger a CS in which you learn that your Uncle has upgraded the armory of the castle that is your family home, and it now includes cannon.
Ride through the city arch and then the streets, where the citizens greet you by name, and you have a reunion with friends and relatives. You dismount during the CS, and then the game transitions to you on foot, and you get a Checkpoint Save notice.
Before we continue let us take a quick look at the stuff under the hood here, so that you are familiar with it! Hit the Pause Button (which is the Start Button on your gamepad) and you get the Pause Menu, which contains the following selections:
- Resume (Go back to the game)
- DNA (Review the memories and your progress through them)
- Inventory (The new Inventory System -- more on that in a bit)
- Map (Your Map of the Current Area with objective markers on it)
- Database (The Database containing all of the information you have uncovered)
- Options (Standard Game Options Menu, you know how that works)
- Quit (Buh Bye Mister Man!)
Of the menu choices there are several that we need to explore...
-- Options
In the Options Menu is a selection for Stats -- opening that choice gives you a number of sub-menu choices you can activate, with the default, Overall, showing you the amount of time you have spent in the Animus, overall time played, and the distance in meters that you have traveled.
The Fight selection gives you all sorts of stats on your doing of bad deeds, Navigation covers a variety of distances, Social tells you what a wanker you have been, Economy details what you spent and the things you acquired, which is actually pretty useful information.
The Rome selection is your key to learning how much you have accomplished in restoring the city, and can clue you in on where you should focus next, while the Guild and Memories selections provide you with raw stats that are mostly FYI.
-- The DNA
This selection gives you the percentage complete for the different Sequences, and for Additional and Secondary Memories. This is significant because unlike the previous games, you are actually able to go back and revisit the memories from within this DNA Menu!
-- Inventory
There are several selections here, Armor, Weapons, Supplies, Items, and Outfits, as well as Trade Objects, but things are a little different this time around, starting with the new addition to the menu, Trade Objects.
When you open chests you encounter, there is a chance that they will contain a Trade Object -- a valuable item that you can sell, but that may also be part of one of the side quests obtained from merchants in the game. You will want to think long and hard about selling these objects if you actually want to complete the different side-quests in the game, because doing so can cause you to be unable to complete them!
The Armor and Weapon selections take you to the screens that allow you to equip the various slots on your body - you actually have to own some armor and weapons to do that though, so for now that is just informational, right?
Supplies include healing items, ammunition, and kit items that will make your life a lot easier. Each is limited to a certain number of items so you will want to keep an eye out for ways to increase the limits -- the U-Play reward mentioned earlier increased our capacity of bullets from the default 6 to 10, which is pretty spiffy and will certainly come in handy later!
Items are largely the collection stuff that you will be picking up -- an important part of the game to be sure as they are associated with other content in it, but also important because hey, we LIKE to collect stuff, don't we?
Outfits -- ah... The outfits are, well, I don't want to come off as a girly-man or anything, but you have to admit that the outfits in this game are pretty freaking awesome! Why not look cool when you play? That is what I always say anyway! This is where you can play around with how you appear to all those babes in Rome, man. Because you gotta look good for the babes!
The default display when you enter the Inventory Menu Screen includes the contents of your Pouch and your Bank Account -- which for me, at the moment, is 53,724 Florin in my pouch, and nada, zip, zero in the Bank. How the hell am I carrying that much gold?! You will notice that the Bank has a cap of 5,000 Florin -- what you probably do not know is that the Bank is not there as a place for you to put your money, it is there as a place for people to pay you money they owe you and the rent or tax on your property.
The reason that there is a limit there is because the amount increases over time, and you will need to visit your Bank and empty it into your Pouch, or risk losing money that cannot go into it once it hits the limit. So be sure to keep an eye upon that and empty it before it caps off, right?
The Map -- pretty awesome, eh? Well, it is a Map, you know how those work. On the Map are the icons for the areas that are part of your objectives, so if you ever find yourself wondering what you should do and nothing really stands out in the objectives menu display, check the Map mate! There is almost always something to do assuming you have not fully completed an area, that is.
The Database -- a very cool part of the Pause Menu, it allows you to revisit the clues and information that you have uncovered, as well as read Recent Entries that contain information about the people you have met.
Right now you only have a few entries to read, but as you just met up with Claudia, go ahead and open the Database Entry on her, in Recent Entries, to learn that she was born in 1461, that she is of Noble birth, and oh yeah, she is your Sister. Dude, who do you think you are, a Borgia?!
The bio section of her entry has a lot of useful information, especially if you have not played the previous game in the series, so I recommend reading these just so you stay fully-meshed into the game. While you are here you may as well check out the file on your Uncle Mario -- no he is NOT a plumber damnit! And of course, your own file. If you play far enough into the game you will only see the most recent files for people in the Recent Entries Section, so if you missed someone you really wanted to research, check the People selection off of the previous menu, as it has all of the intelligence files for people in it.
Under Locations you can review what you know about all of the significant locations you have uncovered, and at the very bottom of the menu is the User Manual, which might end up being wicked important to you if you play the game in spurts, with significant time gaps in between, as it allows you to revisit command and other information that you will need to re-learn in order to play.
The Manual includes entries on all of the commands as well as a really good section on weapon types that is worth a read regardless of how often you play. At the bottom of the manual you will find additional subjects covered, like replaying memories, using cheats, virtual training, and U-Play. Check those out, it is worth the time in reading them.

The DNA Menu System
-- Exiting the Animus
It is important to remember that you can exit the Animus at any time simply by opening the Pause Menu and selecting Exit. This will return you to being Desmond in Monteriggioni in the future, which is something that you will want to do regularly to check your email as you play, because there is a Trophy / Achievement for doing that that you CANNOT unlock if you do not do this!
A word of caution -- the Quit selection is NOT what we are talking about when we say Leave the Animus, you actually want to use the select that says Leave the Animus. As this will not become available until Section 2 you will have to wait until it appears in the menu, right?
-- Back on Track
OK now with that out of the way, head past the training ring to the Villa and take a look around the grounds. You can enter through a back door to see the room where a wall that displays the Codex Pages from the previous game. This is the only room you can enter at the moment -- the rest of the Villa is locked up tight, so when you are finished here, hit the Back Button to open the Map -- or use the menu to get there, either way works but the Back Button is a shortcut...
On the Map you will see three ! markers -- these are your objectives! Select the closest memory to the Villa and place a marker on it, and then return to the world and make your way to that point in the city!
-- First Memory: Flowers for the Party-based
As you approach the damsel in distress you learn that her crate of flowers is too heavy for her, and you offer to carry it for her. Along the way you learn that you are carrying the flowers that are meant to decorate your own party -- a surprise party being put on by your sister.
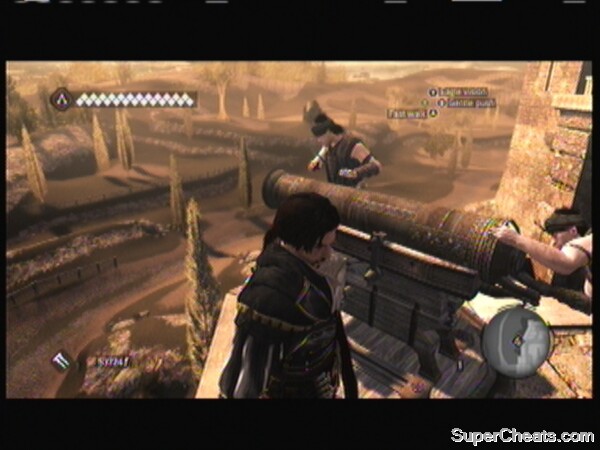
-- Second Memory: Fixing the Cannon
When you arrive using the new cargo-lift system to reach the top of the wall you find that the cannon are not working properly. Your quest is to locate the cannon mechanic and convince him to fix them -- which you do -- and then shoot the fixed cannon in a mini-tutorial aimed at teaching you to aim... Get it? Aimed at... Why do I bother?
-- Third Memory: Save the Stable Hand
The Stable Hand outside of the main gate to town has lost a special horse, and you need to help him recover it! Just follow the marker to the horse, mount it, and ride it back to the Stable Hand to finish the quest and memory!
Return to the Villa -- whose front door you can now open -- and you run into Caterina, who wants a military agreement from you. You see Mom, and Sis, and Machiavelli, who you give a debriefing to, describing what happened at the end of the last game.
The conversation that follows is rather interesting, but once it ends you will head up the stairs to the glowing door for a brief CS in which you undress and take a bath, whereupon Caterina comes to join you. This mercifully ends before we watch you do the deed, but no! More kissing! This is a freaking adventure game, not Debby Does Dude!
Ezio is apparently a stallion in bed -- but just as he is getting comfortable the town is attacked! No, Ezio, it is NOT a training exercise! It is an attack!
The advantage of mounted artillery
-- Under Siege --
A cannon shot destroyed your armor, losing you the artifact you were so proud of -- and your Uncle finds you and fills you in, telling you to use the cannons above the gate. You are mounted on a horse that you need to ride through the explosions and falling buildings to the city wall, which you will eventually climb to reach the cannons.
The trick to this is to concentrate ONLY upon the enemy cannons, ignoring the troops. Once you finish off the cannons on the left side, yours will be destroyed -- run to the right hand cannon and use it to do in the remaining enemy cannon over there. If you dwaddle or fail to shoot fast enough, you will fail the mission.
With all of the cannon now destroyed, work your way along the walls killing the invaders until you trigger a CS in which the Borgia tell you what a mutt you are, and execute your Uncle Mario. No more Italian plumber... Sigh.
Reach the Villa and fight your way to your Sister, then protecting her, follow her towards the rear of the Villa where you enter the secret escape passage that leads to the treasure room and beyond, where the rest of your family is waiting.
Using the escape tunnel you all get out, and then you dispatch your family to a safe shelter while you head to Rome to confront your enemy! As you ride through the country side the massive blood loss from your woulds finally takes its toll and you pass out, falling off of your horse!
The screen fades to white and another chapter is over.
Locating a new and safe home
As you fade back into the world you are in the Animus 2.0 in the back of a moving truck, and you have arrived at your destination. One of the Assassins with you mentions that they are having trouble locating Ezio in the Animus, and then you exit the chair and the truck, to find yourself outside of the Villa!
After a false start, and using Ezio's memory, you manage to find a way into the Sanctuary, which turns out to be the only safe place in the world for you right now.
Basically you are going to work your way through a maze of repeating puzzle elements to reach the sanctum sanctorum beneath the Villa -- and on the way you will encounter ghosts and elements of the events that took place all those years ago!
Trust me, eventually you will reach the Sanctuary, and when you do you will be amazed to see that it clearly has not been entered since the time of Ezio!
With the door now open you join the others in getting your gear and the Animus down into the Sanctuary, and while the Shaun takes care of the truck you have to go to town and find some power lines to divert into the Sanctuary.
Using your Eagle Vision locate the power boxes and install the shunts that she gave you to divert the power to the Sanctuary. Hey, at least you are not Shaun, right? You only need to find a total of 4 of the boxes, and there are a lot more than 4 so it should be no trouble at all.
When you do the fourth one you get a CS back in the Sanctuary. Shaun returns, the power is on, and you get a Checkpoint Save!
At some point above you will have unlocked the Achievement "Sanctuary! Sanctuary!" for 20 Gamer Points -- this is your third Achievement so far, as you previously unlocked "Battle Wounds" for 20 Gamer Points which you receive for Sequence 1, and "Technical Difficulties" for 10 Gamer Points when you first accessed DNA Sequence 9. Not too bad for a game you just started, is it mate?
-- Into the Animus --
Chat with your buds to learn that you will be able to relive memories, and Shaun can help you with the numbers... Sort of... When you have done all of that, climb into the Animus for your next adventure!
When you stand by the chair it says to press the ANY Button... There was no ANY Button on my gamepad -- I was able to press A-B-Y and that worked though.
When you enter the Animus this time you get a Training Mission - and learn how to get quick attack sequences. After you complete that, you get the Memory System explained to you -- and then you make a smartass comment. You learn you can take a break whenever, and how the Sync System works with the warning that it can unlock repressed memories. Bit of foreshadowing there, right?
Shaun tells you what he learned about the codes, and gives you the locations -- suggesting that they may be worth a look-see. He is no doubt correct, after all that could be where Ezio keeps his stash of wine, umm, an artifact, who can say?
As the world fades in around you it is clear from the peaceful sound that everything is OK -- I do not know about you but I was a bit worried we would wake up dead or in jail, after all we sort of passed out from loss of blood and fell off of our horse -- and let me tell you, I know from personal experience that falling off a horse can be painful!
Fully back in the Animus we find ourselves at the mercy of a villager -- clearly she has been nursing us back to health -- and she tells us how we got there. A strange man who she does not know brought you to her house and instructed her to care for you -- he left you a very familiar set of robes and clothing, garb I though we would never see again!
As you get dressed you realize that it had to be an Assassin who rescued you! The only question is who could it have been?
Now before we do anything else, one small matter to get out of the way -- open the Pause Menu -- we have now started Sequence 2, and Sequence 1 is at 100% -- you will notice that a new command has been added: Leave Animus.
Go ahead and activate the new command to leave the Animus and return to the Sanctuary, then walk to the back of the room where you will see that the computer there is now glowing!
Log in as if you wanted to access your email -- you do not actually have any email, but that is not important is it? You tried to access your email, that is what is important. As you complete the login process you will hear that wonderful "Plink!" and unlock the Achievement "Mailer Daemon" for a righteous 20 Gamer Points! Your total is now 70 Gamer Points (I do not know what your over-all total is, but this was the Achievement for mine that broke a milestone as it gave me 80,000 Gamer Points! I was hoping to break 100,000 in 2010 but clearly that is not going to happen with only a month left in the year, oh well).
Expanding the map detail from on high
We are now fully-rested thanks to the kind-hearted woman, but we are not fully-healed. To get healed we are going to need to find a Doctor,
We are now wearing our familiar uniform -- as far as restarts go following serious trauma, this one is working out pretty good! On screen we are being prompted to accept the facts of life: we are almost as good as new, but we need to find a doctor in town to heal our wounds from the Villa attack, and then we need to climb the church tower. But before we do that -- you knew that there was a "but" coming, right? But before we get too far into the next area there are a few minor items we need to address.
Opening the Pause Menu will now show us our current objective and the details about it -- so take a look now and get used to checking that. We need to find a doctor, and we must not drop below 1 full health square -- easey-peasy!
-- DNA Menu --
Now open the DNA Menu, and you will see that the first chain, representing Sequence 1, is complete. Highlight it and hit the action button and you will now see that you can select individual sections from within it! Clicking on the individual memory gives you the details -- we cannot actually replay that memory at the moment -- and we do not want to anyway right now -- but this is where you will go when you do want to, right?
Now back up to the main level of the DNA and move all the way to the right -- do the one labeled Additional Memories -- hit the action button and you can now see that it is divided up into sections, showing you the status of the collections for Viewpoints, Borgia Flags, Feathers, and Treasures, with the Flags divided by area. How cool is that?
A quick check of our Inventory shows that we are flat ass busted -- we have no money at all thanks to Borgia, so getting money, as well as some decent kit, is a very high priority right now! The only weapons we managed to hold on to are our Hidden Blade and a Common Sword -- the Hidden Blade was strapped to our arm, which explains why we still have that...
We also have 5 Throwing Knives, 5 vials of Poison, 6 Bullets, and 4 vials of medicine, which means our pouch must have been strapped to us as well, right? The only other kit we have is a Plain Cape and our Assassin's Guild Robes. Bummer.
A quick look at the map will reveal the location of the Borgia Towers in the city - we need to climb those to reveal their sections of the map, something that should be part of our main set of goals at this point in the game. Right, so that takes care of the things we needed to look into, so back into the world you go mate! Time for us to find that Doctor!
Now before you start off on this quest, do yourself a bit of a favor mate, and use one of the vials of medicine that you have in your pouch! That will not repair your arm, but it WILL recharge your health, and since at the moment you are down to one full square, and you cannot go below one full sqaure, any hit you take would have effectively ended the level, forcing you to restart it. By using a med vial you at least do not have to worry about a premature restart!
Visiting the Doctor
-- Off to see the Doctor --
We are too badly hurt to do any running, climbing, or jumping, so just take your time, do not draw attention to yourself, and work your way down the stairs to the street. Our destination is clearly marked on the map, and on the radar map on the main screen, so head there now.
Our horse is in the street outside the house, and you could grab it now I suppose, but that will get in the way of some of the things that we need to do, so I suggest not...
Follow the road towards the marker on your map to meet the Doctor -- and get a Checkpoint Save -- then talk to him. The Doctor gives you the treatment that he believes that you need immediately, and suggests that you seek out some of his colleagues for further treatment, not that you will be doing that any time soon mind you.
You will now be prompted to use the Wheel Menu to use a medicine -- but we already used the meds to restore our empty health boxes before so there is no need to waste one now just to comply with the prompt, as it does not actually care if you do it or not! The command wheel, which is now available by pressing the Right Bumper, is your fast track to selecting weapons, kit, and health items, so go ahead and open that now; get familiar with it, as it will be your new best friend for the rest of the game!
Our ability to run, jump, and fight has now been restored -- yay! Before we do anything else, we need to address the issue of our purse -- and it being empty. The best way to do that at the moment is to steal some money from the crowds in the street, so why don't you move through the crowds to perform your very first pickpocketing offense in the game?
Pickpocketing is actually very easy to do, but you do not want to remain in the general vicinity of your victim after doing it. Simply begin walking through the crowd and hold down the A Button. When you get near a person you will automatically pick their pocket -- you will know it worked because you will see the amount of money you have stolen appear on screen.
Do that a few more times to build up some pocket money so we do not have to worry about having the price of some medicine or a cup of coffee, and then make a quick check of our Objectives by hitting the Pause Menu. This now shows that climbing the Church has replaced finding the Doctor as our next goal, which makes sense -- we have completed the first stage, and found the Doctor, so now if you are done stealing money it is time to head for the Church marked on the map!
-- At the Church --
Remember that running in the city and near crowds raises the awareness of you by guards, snitches, and busy-bodies in the area, so you want to be sneaky-Pete for now, right? Pay attention to the radar map as it will show you the location of any enemy units by depicting them as a red dot -- we want to avoid those for now, right?
On your way to the Church there should be a few more crowds whose pockets you can pick, so that by the time you arrive there you will have a comfortable 200 or 300 Florin in your pouch, which is plenty for now.
When you reach the church, go around to the back (the opposite side from which the red dot on the radar that represents a soldier is displayed) and climb the very center of the taller area -- when you reach the roof you will automatically pick up the feather that is laying there, gaining the first of the 10 feathers for this area! Good on ya!
The tower you need to climb is ahead on the front side of the roof, so go there and climb it now. On top is a wooden perch, and when you step out onto it you will be prompted to hit the Y Button to look out at the area. Doing this expands the details that you know about for the immediate area on your Map, so after hitting Y take a quick look at your Map and you will notice that there is now a fair-sized circle of detail added to it!
On the Map if you hit the Right Bumper you get a view of the city sliced up by areas of influence -- and specifically the areas in which the Borgia have influence. When this is all over, you will have redrawn that map completely, destroying their power base here in Rome!
Each of the towers marked on the map has a similar perch, and visiting them all as well as any non-tower ones will allow you to properly fill in your Map details, which is actually something we want to do right away.
-- After the Church --
When you follow the prompt, diving from the tower to the wagon of hay below, we are confronted with a new task! We overhear the guards talking trash and realize that we need to follow them... Now.
When it is safe to do so unobserved, exit the wagon and begin to follow the guards -- do not run, do not dwaddle. If you get too close to them, a 25-second timer begins and you have to put enough distance between you and the guards so that they cannot recognize and detect you. If you let them get too far ahead of you, the same timer starts and you have to close the distance with them so that you do not lose them! The timer is very obvious and easy to spot, so if you see it you know you have to act.
The path they are on doubles back twice so you are bound to get the timer when that happens -- do not lose your cool, simply keep heading away from them along the path and you will be fine. If they get too far ahead of you or you get too close, regardless of how much time the timer says you have left, you will fail the mission. Don't fail the mission.
They will lead you through the city and, eventually, arrive at the plaza that is their destination. You will know that this has happened because they will spread out, attack a man, and you will get a Checkpoint Save. Once that happens, wade in and start killing them. When you kill the last one you will get the notice that the memory has fully synced up, completing the mission, after which you can move to the glowing man and talk to him to hear his story.
His wife was hung by the officials for a crime that he says she did not commit, and his pain is made worse by the edict that was passed that forbids him to cut her down and bury her; her body is intended to remain on display as a warning to other criminals.
-- Mission: Well Executed --
This triggers the next mission, called Well Executed, the goal of which is to dispatch the official using your Hidden Blade. After you accept the mission, you tell the man to cut his wife down when he is ready to do so, that you will deal with the official. At this point you get another Checkpoint Save, so if things go sideways you can always retry from here.
The easy way to reach the marker on the map is to head to the west of it into the area of the map that has not been revealed and climb the buildings there to approach the villa on top of the hill from that side.
When you make the killing blow it MUST be with the Hidden Blade -- anything else used will fail the mission. If you mess up and use your sword or some other weapon when the screen does the white background close-up of you talking to the victim it will tell you that you did not obtain a 100% Sync. If that does happen, hit the Pause Menu, then DNA, and select Sequence 2 then the mission Well Executed, and reload it to unlock the Achievement "Deja Vu" which is worth 20 GP. That Achievement is for reloading a DNA Sequence, so you take a mistake and turn it into a bonus!
If you use the Hidden Blade you will get 100% Sync on Sequence 2, Memory 2, so kudos to you!
As you move through the town keep your eyes out for small orange boxes tucked away near walls -- these can be looted for Trade Goods, some of which are part of side-quests, while others are just worth money that you can sell. If you end up using up your medicine supply, be sure to head back to the Doctor to re-supply your kit, and if you do head back do not waste the walk, pick some pockets on the way!
Having completed the mission, now would be a good time to look for some perch points and add some detail to the map -- too bad we cannot do that right now!
Taking down the tower
Instead of searching for perch points head to the next memory location marked upon the map, where you meet up with Machiavelli, who it turns out is not the man who sent for you! Talking with him triggers the start of the quest "New Man in Town" so go ahead and do that now.
Follow Machiavelli to the Blacksmith Shop, where he will give you some spending money, and ask that you provide him with any information you come upon in the city. You are prompted to purchase a Stiletto and Roman Spaulders from the Blacksmith -- go ahead and do that now -- the Spaulders cost 900f but they add 1 Health and 4 Resistance to Damage, so it is a fair trade!
The Stiletto is classified as a Small Weapon, and has 1 Damage, 1 Speed, and 2 Deflect, which makes it useful for case-style fighting accompanied by a sword. At the moment that is all that is available to be purchased, even though you have extra money. Because you do not have any armor on at the moment, the piece you just purchased is automatically worn, so you do not have to go in to the menu and equip it. You do need to use the wheel to arm the knife, but the system will prompt you to do so.
Now follow Machiavelli as he walks through the streets talking to you about the present situation and about your enemies. When you arrive at your first destination you get a short CS, and then you get a Checkpoint Save. Your current objective is to kill the Borgia Captain marked on the radar map - so go ahead and do that now. You need to toss him into the scaffolding by the way :P
The first problem? The Captain is inside the Borgia Tower, which is a forbidden area. But as you just received a Checkpoint Save... Heh... You can try a number of approaches. The straight-on go for him approach was how I chose to do it, walking boldly into the compound, climbing the tower, and using the perch to add the area to my map. No one tried to stop me, so that part was easy.
After the Leap of Faith off of the tower you are looking right at the Captain, who is with his men in the alcove. Now would be a great time to go over and have a nice chat with his men, wouldn't it?
-- Fighting the Captain --
During the fight the Captain will try to kill you -- do not kill him with your blade. As hard as this sounds, ignore him and take out his men first. Once they are dead, go out of combat mode (left trigger) then use B to grab him. Once you have him, if you are near the scaffolding great, otherwise throw him in the direction of the scaffolding so that the next time you grab him you are close enough to throw him at the scaffolding, which then collapses on top of him, killing him, and fulfilling the requirement for this specialization kill!
Now return to Machiavelli as prompted. You should have already used the perch in the tower to add the area to your map, so when you get the CS with Machiavelli you can just go ahead and set the tower on fire since you do not need it anymore to complete the perch scan!
Climb the tower and hit the button to set it on fire, at which point you get a CS for completing the mission and you are back with Machiavelli, who you now need to lead to the stable so he can purchase it. When you step into the Stable area you will see the lit spot; move into that and hit the buttons as prompted to examine it. Your objective is to renovate it, which you can do at no cost to you, and you have now completed the mission with full Sync!
The tower was a vital element in the mission and this stage of the game, and we will cover that in more detail in a moment, so be patient!
-- Easy Come, Easy Go --
You are prompted to start the next mission -- Easy Come, Easy Go -- so do that. Now that you have a local stable you can press Y at any time to call a horse to you. Your next objectives are to follow Machiavelli and to not lose ANY health. Do that now by calling your horse and mounting, then following him.
Eventually you get a CS, and then part ways with Machiavelli, being given a new objective: follow the thief and recover the item. Chase him down by holding RT to sprint, then hitting B when you are close so that you tackle him, thus recovering the stolen item. You spare his life, allowing him to leave alive.
The Towers are the Source of Borgia Strength
-- Let's Go Tower Defense! --
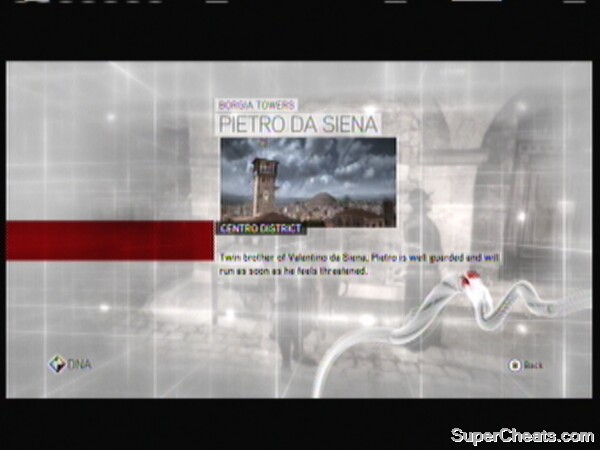
If you examine your map you will see that there is a new symbol -- one for View Points -- most of which are associated with Borgia Towers though some are not. These expand the map details -- as you know -- pushing back the fog of war. This is the primary task that we are now facing -- clearing the Captains out, using the perch at each tower to add details to the map and push back the fog of war, and burning the tower to remove the Borgia influence for that area. Just pick the nearest tower and start clearing them -- keep doing that until you are out of View Points that you can reach!
At first we want to concentrate on View Points not attached to Borgia Towers, so we can get them done without having to fight and quickly, but that black line you see on the map is the white wall of death, and anything beyond it you cannot do until you complete more story missions, so do not worry about those towers for now.
The first non-combat perch is located at the Pantheon, in the Central District. The second is at the Palazzo Senatorio to the south. There is no guard or guard detachment here, so you do not have to worry about fighting - just head over to it, climb up the side, and use the Perch to add the details for this area to the map!
-- The Borgia Towers --
Before you set out to begin liberation of the Borgia Towers, check your kit to see if you need to resupply anything -- if you do, go ahead and make the side-trips to complete that chore now.
While I am not going to detail each tower battle individually, since they are basically the same battle with only minor differences for each, I do want to cover one point. In a nutshell as you approach a tower you will be shown the details on its Captain, including the difficulty number for him. If the number is a 3, you can pretty much march nin and kill him, but if it is a 5, you need to be clever about that kill.
Level 5 Captains will run, and once they do your chances of catching them are slim to none. That being the case, you need to position yourself to take them out with a ranged attack -- either the gun or the crossbow. The problem with the gun is that sometimes it fails to one-hit-kill a Level 5 Captain, and once you shoot them and fail to kill them, they run. The crossbow never fails to one-hit-kill them, but the problem with the crossbow is that you probably do not have it yet, as it costs 12,000f.
The easy solution to this is to avoid Level 5 towers for now, and concentrate on the ones you can do, while you build up money. Do that by purchasing a treasure map from a Tailor Shop and using that to locate Treasure Boxes on your way to the other towers, and being sure to rob the solders you kill as you take each tower. You will collect the 12,000f in no time if you do that.
Once you have slain the Captain, climb up to the top of the tower and use the Perch to add the area to your map, and then burn the tower! After you escape the burning tower, check your map and head to the nearest Doctor and/or Merchant and re-supply any kit you used up, then rinse and repeat.
-- Upgrading Shops --
A word about the shops: in each of the regions there are different shops as well as special shops, like the Banks, that you can upgrade. You can only upgrade the ones in regions you have liberated from teh Borgias, first, and as you upgrade them they begin to pay you a share of their profits! Every 20 minutes of game time you receive a share of the profits from every shop you have upgraded, which is deposited into your Bank Account. The Bank Account can hold a maximum of 5,000f at any one time, so keep an eye on its balance and, when it is close to 5,000f go to the nearest Bank and withdraw the money.
If you have not upgraded a Bank yet in an area you control, make that a priority right now and do so!
Upgrading the shops accomplishes two additional important things - it earns you a discount on items or repairs purchased there, and it expands the type and level of the items you CAN purchase there! As you can see that is of critical importance to our progress.
Once you upgrade the shop check its inventory and you will see the big change. The first Blacksmith that I upgraded added new weapons to his inventory! When you check this, you will see that the weapons you already own are marked as such, and you cannot buy those. You will also see weapons you cannot buy because they require you to complete a quest for the shop, or they require some other prerequisite -- for example the Bearded Axe requires that you already have the Heavy Sheath from a Tailor Shop.
Some weapons will be available but you may not have the money to buy them -- in which case you know what you need to do, right? Go out and get the money! The Blacksmith also sells the ammo you need for replacement -- Bullets and Throwing Knives at the moment -- so keep up with those as well.
Another interesting point - you know all of those odd items you are finding in addition to money in the Treasure Chests from the map? Those are shop quest items -- so do NOT sell them! Hold on to them because eventually the shops will start to offer you quests, which largely consist of something like this: "Bring me X number of the following Trade Goods!"
By the time that happens you will already have a nice inventory so I shouldn't be surprised if you can complete a lot of these quests right away!
-- The Rinse and Repeat Cycle --
Right, so I have now covered everything that you need to know for this stage of the game. Now all that you need to do is take this information and use it!
Keep doing the towers until you have added as much detail to the map as you can for this stage -- having cleared all of the towers inside the black line on the map. That is actually a limited proposition, since a large area of the city is still not accessible to you, due to the white wall of death that blocks it off. Those areas will eventually be accessible once you complete more of the story missions though. Once you have finished liberating the towers and all of the areas are white on the map inside the black line AND you have upgraded all of the shops in the white areas, go to the next section, where we resume the story missions!
Checking your Email and the Subplots!
It is now time to resume the story line. At this point you should have burned 6 towers with 8 towers remaining, you should have Rome around 12% rebuilt, with the Central District at around 29%, and your Bank maximum balance should have increased to 12,500f due to your renovation of additional banks in the areas that you liberated. You should be getting a discount from the Doctors and Blacksmiths at this point, as well. Tailors are now offering you expansions to your pouch, and some other special items, and you will be able to complete Merchant Missions soon!
After you meet with Machiavelli in the park above the city he will provide you with a horse and instructions. To obtain full sync on this mission you will need to meet with Machiavelli's courier to obtain the letter, and you will need to catch the Borgia courier in under 1 minute!
We start by following Machiavelli to the Colosseum, where you find that Machiavelli's courier is being attacked by Borgia men. Their courier now has the letter, so after you kill the soldiers chase down the courier to recover the letter. Kill the courier for good measure as dead men tell no tales -- and you will then be told that you have new email!
Follow the prompt to exit the Animus and check your email now.
-- The Email Thing --
The purpose of this side trip is not really to read an important email, because it is not an important email! The email is just the weekly chore schedule that Lucy sent you all, but that is not the point. The point is part of the plot -- so before climbing back into the Animus go to each of the team members and talk to them. When you finish talking to each once, start over and talk to them each again in the same order as before.
The point to this is that you are activating two of the subplots here, and first becoming aware of them! One conversation will set the seed of wanting to leave the Sanctuary for R&R, one will reveal that the other Assassins who are part of your team ALSO have Animus avatars, and the other will reveal the situation with the other Assassin teams -- and reveal that you four are the only ones who know about the Temples.
The two cycles through gets you all of the information available -- if you try to talk to them again they will just cut you off and dismiss you -- it is time to go back into the Animus now that you have acquired all of the information you were meant to acquire, and have set the two subplots in motion!
-- Back in the Animus --
If you look at the map, previously the only district that you had access to was the Central District -- now though, you are inside the Antico District, and to the West is a Borgia Tower that influences control here. Go clear it out now!
This is one of the Level 5 Captains, and to kill him you will need to enter the tunnels beneath the site. Your best strategy is to carefully sneak around and assassinate the guards on the perimeter while remaining undetected. Once inside the tunnels there may be small groups for you to eliminate, but you can do that without spooking the Captain. Watch the video for the best strategy on this challenging tower!
Once you have eliminated the Captain, climb the tower to add its Perch Scan to your Map, then burn that sucker! Good on ya mate! That is another tower down, and more detail on your Map!
One of my favorite things to do after killing the Captain is to work my way through the Restricted Zone that surrounds the tower, taking out the patrols that are here and robbing their corpses! It is not a lot of money, true, but it is very satisfying, and more important, I never fail to recover all of the Kit Supplies that I may have used up, like medicine, bullets, etc. Very economical!
Once you have burned the tower take a look at the map for any merchant shops you can upgrade and do that now. At this point in the game for whatever reason you cannot return to the Central District -- the wall of white death has it blocked off -- until you complete more of the story, but before you do that go ahead and add as much detail to the map as you can, and as many shops as you can, right?
The Wolfman Battle taking NO Damage!
Your next story-line mission is to deliver the letter to Machiavelli near the Terme di Traiano in the countryside. To fully Sync the memory you need to not lose ANY health. This is a lot harder than it sounds, because you are about to be set upon by a dozen freaks dressed like wolves who will all attack you! If you take even ONE hit, you will not Sync 100%, which means if you have not had to replay a memory yet, here is where you will likely be unlocking that Achievement.
First I need to comment that yes, this is total pants. It is a perfect example of the use of Grief Code in a game to make it harder to fulfill the requirements. They do this to stretch out the game, make it take longer to complete the section, under the mistaken belief that the longer a game takes to complete, the more "entertainment value" that you, dear sheep of a consumer, will think you have received. They know that you will be upset by this, and that it will for ten minutes or so, make you not like this game. But they are betting that once you get through it, like most painful make-work events in life, you will forget about it, and go back to liking the game.
Understand something -- they know that this was a cheap no-talent sister-pimping dog-kicking move on their part. They are aware that what they have done is absolutely demonstrated to you that they (A) they were unable to come up with a creative way to do this mission, (B) took the easy road, and (C) could not give a rat's ass that in the process of doing this they gave you the finger.
The bottom line is that they know -- they KNOW -- you will forgive them.
This is almost the proper use of the tool called Grief Code, but sadly in this case they do not allow even a bit of damage which makes it a nasty piece of Grief Code. What I mean by that is this: normally if you take a hit, the health square goes hollow -- if you last X number of seconds without taking another hit, the square fills back in, so you are at full health again. That is sort of like being stunned but not hurt -- the stunning blow partially incaps you for a few seconds, but you recover, and as long as you did not take another hit in the interim, you took no damage. Sound about right?
The problem is that with this mission, that system does not count. It considers ANY damage at all to be enough to be a fail; even if the box pops back to full health, you still fail. I am going on like this to emphasize that I understand your frustration, and I sympathize with you, I really do. Now, do you want to know how to complete this in one-go without their shit-tactic messing up your day? You do?! Excellent!
After the CS, when the screen goes white, as soon as the screen fades in from white you need to lock on to the nearest enemy by *tapping* the Left Trigger (not hold it down), then immediately go into the Defensive Stance HOLDING the Right Trigger -- you will NEVER release the Right Trigger through this entire battle.
Now wait for them to attack you, then do a SINGLE COUNTER-KILL. You must NOT try to do a counter-kill streak using the Left Joystick, because to do that you have to let go of the Right Trigger, which gives them the opportunity to hit you. Let me restate that -- holding the Right Trigger keeps you in defensive mode, and blocks their attacks. Releasing the Right Trigger will result in you taking damage and failing this quest.
To recap - tap Left Trigger to lock-on, immediately hold down the Right Trigger and never let it go -- wait for them to attack and, when they do, tap the X Button to counter their attack and kill them. Now rinse and repeat the counter-kills until they are all dead. If you watch the video for this part it shows you exactly how you need to do this.
If you follow the above instructions -- and the video -- you can do this in one-go, with zero frustration mate, and considering how chickenshit this particular mission is, getting it in one-go is the players way of giving the finger back to the developers, and isn't that a beautiful thing?
Unlocking The Golden Boy Achievement
-- The Halls of Nero --
Now that you have completed the previous battle with 100% Sync, follow the path to the mission marker and kick in the window, dropping down into the underground chamber, whereupon you will be prompted to start the next mission -- The Halls of Nero -- so go ahead and hit A to accept it.
The objective for this mission is simple: you need to locate the Shrine to Romulus, one of the twins from Roman legend that was raised by wolves. They were the founders of Rome, and were among the many minor deities that were worshiped on a daily basis by the early Romans, hence the existence of a shrine.
In order to obtain 100% Sync on this mission you must complete it within 8 minutes -- so once you hit the A Button do not waste any time. A CS will play, and then climb the short column, jumping from column to column until you reach the ledge above, whereupon you will see a switch that you need to pull. This dumps water into the main pool below. You need to pull all four levers -- they are in each corner -- once you are up on the ledge getting to the other levers is easy.
Just pull the ones on the left side of the room, then use the columns to move to the right side, and pull the pair of levers there. Quickly drop to the floor and down the now collapsed pool, and run along the path to the marker on the radar map -- there is a Borgia Flag down here on one of the columns you can grab if you have the time -- and then work your way along the wall and past the locked gate.
After you swing over the gate and drop down, keep swinging the gates until you reach the one with the door at the end, and open it.
After you open the door and enter, the torch lights in the room illuminate -- you must find your way across this space -- there is a treasure box here if you have the time -- using the columns and walls, and the statues. If you fall -- don't fall -- you will die (desync) because that glowing stuff down there is a pool of burning oil. Just so you know :)
When you reach the far chamber you get a short CS, and then you have to get into the next room. Go through the hole in the wall, and jump across and reach the other side, work your way up to the balcony, where you will find the treasure that is the goal for this quest.
-- Helpful Hints--
If you take too long in beginning the water portion at the start, or you fall and have to climb back up, start the memory over. That is the section that causes players the most trouble with this quest, and eats up the most time. Eight minutes may seem like a long time to do a quest but it is barely enough time for this one.
If you fall and die at any point after clearing the water pool, you have hit a Checkpoint Save, so you do not have to restart the whole quest -- just let it load the Checkpoint and continue from there, as it saved your location and the elapsed time, so you can still complete this to 100% Sync as there is no penalty for death it seems.
If you have any trouble with this, just watch the video a few times, as it gives a complete demonstration of what you need to do to complete this with 100% Synch. Man, videos just rock for these guides -- I remember what it was like before videos were viable -- we used to have to give step-by-step directions and even then if there was any ambiguity in the environment it often did not work well.
-- Back to Machiavelli --
When you arrive back at the meeting with Machiavelli he is disappointed to learn that this letter is in code -- he was not expecting it to be -- and he will need your help to find a way to decode it! Follow Machiavelli to the tunnel entrance, where he will show you how to enter and explain them to you. This is the Fast Travel System for the game -- and while at the moment you only have one destination you can go to because of the story, you will find this to be a very convenient asset to the game!
You are introduced to Fabio, and shown to your quarters, then you have a very strategic conversation with Machiavelli during which you both fill each other in and learn the true state of affairs -- and what you are facing ahead of you for this struggle!
At this point do not be surprised when two Achievements unlock one after the other -- if you have been following this guide you should see the Achievement "Perfect Recall" (30 GP) unlock for achieving 100% Sync in the last Sequence, and of course "Rome in Ruins" (20 GP) for completing Sequence 2. That marks the end of this section! Good on ya!
Humiliating Santino the Pimp
When we regain control of our Ezio, we are back in town. Now, prior to doing anything else, take a look at your Kit to see if you need to replace anything. Do you? Then go do that now. As soon as you are done replacing your kit, visit the nearest Bank to withdraw all of your funds, as you are likely not earning money at the moment because it has reached its cap.
-- Clean Up on Aisle Map --
While we were wrapped up in the Story Mode we unlocked some new areas and, conversely, have a whole collection of shops that we can upgrade waiting for us to do so, and that is what we are going to do right now! Check your map and start upgrading the shops you have not visited yet in all of the areas where you have removed Borgia influence. Let me know when you are done doing that, okay?
Done? Excellent!
Now it is time to clean up the Borgia Towers that we now have access to! Check the map and start killing the Captains and burning the towers now. Let me know when you are done, right?
Wow, you did that quickly! But hey, you had a great teacher!
Now that we have all of that done -- and you did pick up the feathers, treasure chests, and flags that we passed by, right? I hope so... Anyway, now that we are done with that, hit the Tailors in the areas you now control and purchase the treasure maps that they have to sell you for their areas. Once you have them all, go ahead and clear away all of the treasure icons -- I will wait for you to get done with that...
Back already? Excellent! Did you use the Perch on the View Point near our new Hideout? No? Go do that now, okay? That is the last thing we need to do before we resume the story line! There was a treasure chest up there as well, you got that, right?
Notice the door there on the roof there? It leads into the building here - and inside to the left is a Fast Travel point to boot. On the mantle in the larger room is a box in which you store the feathers you have collected, and inside are stands with your weapon and armor collection -- so welcome home!
-- High-Stakes Negotiation --
In the western side of the city you will find a glowing door at the memory marker -- when you knock you discover it is a house of ill repute, Rose in Fiore, and before you can inquire a young girl runs up in terror and tells her story! You of course vow to help!
Your objective is to meet the slave trader and pay the ransom, but to fully Sync this one, you must not swim, so stay OUT of the water!
The meeting takes place on a boat - and have to walk out onto the gangplank in order to do the pay-off, but just when you think it is all managed, you are double-crossed, the girl killed, and you attacked. If you have bad luck, they will knock you into the water and you will fail the Sync challenge -- if you have good luck, and you carefully back down off of the plank before engaging the enemy, you can succeed!
Once all of the slavers are dead, return to the Rose, where you will find the checkpoint on the balcony in the read of the building. When you arrive you find your mother and sister waiting for you - they never went to safety as you ordered! Now they are in full rebellion -- and your sister declares that she will run the bordello! Could this get any more complicated?
Now you must locate the Architect and renovate the bordello. The upgrade is major and interesting, and when you are finished your sister takes a lot of the credit :)
Following the chat with your sister you get a Checkpoint Save and 100$ Sync that memory -- good on ya! Inside the brothel is a woman by the stairs inside with a target glow -- talk to her to flag the next state of the quest.
She needs you to investigate a troubling enemy -- so exit and look on the map for the Courtesan Assignment marker and go to it. It is not far, and when you talk to the woman you will learn that she can identify the man who poisoned her. To complete this memory with 100% Sync you must do it in under 400 seconds!
She may be crazy or may be imagining things - I am not sure, but you follow her and she points out several men who you beat up -- but do not kill them! Just beat them up, because in the end she admits that she is sure at least two of the men were guilty, not all three! After you talk to her and get 100% Sync, look at your map. To the east is a marker for Cristina Mission -- head to that now!
-- Cristina Mission: Second Chance --
Approach the woman near the wagon where the bloke is yelling at the crowd and talk to her, and you will trigger a flashback to 1476 and a scene from Assassin's Creed 2! You see your older brother, who encourages you to talk to the girl, but you blow it! Or do you?
You now accept the mission Second Chance, in which you follow Cristina to seek the renewal of her affections. You need to follow but not too close, you cannot let her verify that you are following her!
Eventually a man of your acquaintance accosts her, and you save the day! What a hero! After you get the kiss you earned -- and a 100% Sync -- you pop out of the flashback to find yourself
The Courtesan Waiting to Give the Assignment
The next Courtesan Assignment is to the east -- check for the marker and go there now!
The girl tells you of a threat to their group -- a young pimp who has the Borgia support who thinks that he has inherited the girls. She needs you to humiliate him -- so go do that now! You only need to beat him up, not kill him, so make sure that bare hands are what you have selected!
Run to the marker and beat him until he is out cold, then pick him up and take him to the fountain in the central plaza. Drop him on the ground and denounce him to complete the humiliation and receive your reward and 100% Sync!
-- Old Habits Die Hard --
The next assignment awaits you to the east in the next zone. Go there and you will find her by the well -- talk to her to learn that you need to follow a girl to her benefactor. Take the quest to assassinate the target from a hiding spot (for 100%). The easy way to accomplish this is to follow her until she goes up the stairs by the bloke who is sweeping, then wait out of sight while she backtracks and heads up that street to the left.
At his point use the rooftops to follow her until she meets her benefactor, then dive into the well behind him and assassinate him from within it. Once he is dead, talk to her to end it with a perfect Sync!
The rest of these side-quests you can finish up at your leisure, when you like!
Completing the Assassins Guild Quest
Out in the eastern countryside on the other side of a tower you cannot approach due to the white wall of death surrounding it, you will find a Villa with an old friend in it. After you speak with him his wife fills you in on what is really happening, and you then flag the quest.
Your objective is to eliminate the Captain of the nearby tower, sending his men to attack the Barracks, so that the Mercenaries can concentrate their force on the French Assault. To gain the 100 % Sync you can kill ONLY the Captain.
Once he is dead jump into the moat and climb up the rear of the tower, go to the top and burn it, then return to your mates Villa and talk to him. When you finish there will be an architect standing nearby -- talk to him and renovate the barracks, then you get a CS with your mate.
You learn about the carrier pigeons from his wife, and then receive 100% Sync for this memory! You have now unlocked the Assassins Guild side of the game, and can start taking contracts if you like. They are all pretty much self-explanatory and you can complete them whenever you like!
Remember if there are any towers you can clear that you have not, you should clear and burn them. If there are any shops you can upgrade, do that, and make sure that you keep the bank account empty mate!
Now head towards the last memory on the map, the Thieves Guild!
-- Double Agent --
When you arrive you meet with an old mate who is the leader of the Thieves Guild -- and he does not like Machiavelli -- in fact he claims that the man is a traitor! You argue on Machiavelli's behalf but word comes that the man is having a secret meeting, and your bud decides that you both need to check that out!
For full Sync on this you cannot be detected throughout, including while lowering notoriety and traveling back to the Guild.
Go to the marker on the map and you will witness what for all the world appears to be a betrayal of trust. Standing on the edge above switch to your gun and shoot all four of the soldiers for the quick and dirty approach! The CS will join you with the boy, simply lead him out of there to he nearest group of courtesans, hire them, and use them as cover to reach the marker.
Your next task is to reduce notoriety by tearing down posters, and then rejoining your mate at the Guild -- without being detected the whole while!
Once you have the notoriety removed head to the guild and chat with your mate, then talk to the architect to upgrade the Guild to make it look like an Inn. If you did everything correctly you should clear this memory with 100% Sync!
Grabbing the Artifact in the real world
When you arrive back at home base Machiavelli is waiting -- he tells you about some valuable information he has acquired -- and you learn that Caterina will be moved soon. The conversation concludes, and you are given the following tasks: Discover the location of the Apple of Eden, Caterina Storza, Cesare and Rodrigo Borgia. Hey, easy-peasy!
As you have already done all of the footwork -- assuming that you have been following this guide, all that you need to do is walk over to the quest point right here in the HQ and talk to the clerk, who will brief you, and then you will receive 100% Sync and the Achievement for Sequence 3 will unlock! Good on ya!
Now check the map and you will see, far to the north, the next memory location -- run there now! When you trigger the memory you get a CS of Caterina being moved -- Lucretia makes a big speech about how cool the Borgias are, then hauls Cat off to be imprisoned. Machiavelli wants you to concentrate upon killing the two Borgias but you want to help Cat... Gah!
-- Castello Crasher --
Your objectives are to infiltrate the castle, and not be detected doing it!
The simple way to do this is to always remember that you are an expert Assassin! You rule the night, demons fear you, you are the man! OK are you good and pumped up now? I hope so because this mission is a bitch to 100%!
If you are a wimpy Navy Seal you can dive into the moat and swim across to the pilings, use those to climb out, jump to the wall and work your way to the platform and the marker. If you are a Green Beret though, you will use your mad parkour skills to walk across the water using the bridge abutments and pilings -- you decide, are you a squid, or a man?
Wait for the guard to search the hay pile, and then when he is on patrol jump into it! Now watch the patrol pattern and you will see your opening when the patrolling guard on your side approaches the hay to search it again.
This time you have him targeted and, when he is close enough, you assassinate him from inside the hay pile! With him dead use your best silent kill option -- either knives or crossbow -- and take out the guard at the far end of the courtyard. With him eliminated, do the same to the one by the ladder and then work your way to the next marker point!
When you reach the top of the ladder you will overhear a conversation between the Borgia and their church council -- listen carefully. Interesting, hey?
Now head towards the door to the right and climb up, then shimmy to the right and assassinate the guard here by grabbing him and pulling him over the ledge to his death. Move left until you are across from the hay pile and jump in! You can see the next marker now, that is our destination.
Work your way along from marker to marker until you reach her cell, where you will have a brief convo and then you will set off do deal with the Borgia girl...
-- The Long Walk --
Okay, first you need to be warned that being seen fails full Sync period. Killing yourself to go back to the checkpoint before you were seen does not work. You have to get through this ENTIRE sequence without ever being seen. Are we clear on that? Failing to get full Sync does not mean you failed the mission, it just means you will not get the Achievement for getting 100% Sync on all of the missions. To verify that you have not been seen check the pause menu objectives screen - if it is black you are fine, if it is red and says you failed, not so much.
Climb to the rampart above the door to your right then move right and assassinate the guard standing near the edge. To the left is the marker and a hay pile, use the hay pile to hide and trigger the marker, then work your way towards the next marker, killing the guard who could see you. A crossbow works really great here. Drop down to the next marker and work your way along the wall here, dropping down on the narrow roof of the room that sticks out of the wall, and shooting the guard below. Work your way to the next narrow roof, where you will pause to shoot one or two patrolling single guards before crossing the rest of the way and taking a third out.
Use the ropes to walk across to the main building, scale it up and to the right, where you will spy Lucretia having a umm, well, dood that is her brother! Eww! Eww!
After the CS as you progress through the jumps you see that one of the brothers is leaving the castle -- bummer, you will not be able to kill him then. Another CS plays in which Lucretia puts the bear-down on Cat, breaking her hip, and then storms off with the key to the cell... That means we have to get the key from her or somehow get her to unlock the cell...
Once you are inside be slow and stealthy. Take your time and only take out guards who are alone. Hide any bodies and be stealthy until you get the notice that you have 100% Sync, after which the gloves come off mate. You can now go full-Arnold death machine!
-- At Cat --
While surprised to see you it is clear that Cat is not all that sure you can get her out of here. Alive anyway. She tells you that Lucretia has the key, so you go off in search of her, and find her with a lover on a patio, It seems she is using this guy to make her brother jealous -- after the guard leaves go and talk to her, and then physically take her to the cells!
Along the way you will need to kill guards who fail to realize that this is a hostage situation. They should back off but instead they attack, so clearly they do not really care if you know, you kill her. It is a long walk if you mess up and forget that you need to turn left into that small opening at the second landing and continue down, because down leads to a section of dead-ends. So stay on track, kill the guards, recapture her often, and eventually you will arrive at the cells!
Once you reach the cells Cat will pull the key out of Lucretia's cootchie and unlock the cell, then give her a love tap, and lock her into the cell. Now you must escape! Together!
-- The Great Escape --
You need to escape with Cat and to 100% you need to make the escape without being seen. This is actually harder to do than it was to get into the castle without being seen! But you can do it! Work your way along, sneaking behind guards where you can, and you will reach a portcullis gate that you must raise. To do that you have to crank two switches -- one to the right, one to the left. Take Cat with you ti each because if you get too far from her by leaving her at the gate you can fail the mission.
With the gate now open, carry her through to the stables, where you will both mount up and have your other escape.
-- Ride Captain Ride! --
You would think considering the size of these horses that you could ride through pretty much any crowd of soldiers, knocking them aside, and have your escape, but once you actually do have your escape you need to remain behind to fight a LARGE group of solders all by your lonesome. To get 100 % Sync you will need to not lose a lot of health -- actually try not to lose any -- if you fight this as a purely defensive fight you should have no trouble doing this!
Cat pleads with you to get back to her in one piece -- that is the plan Cat!
Eventually as the fight progresses a timer will kick in - fight through that timer and then make your own escape. In theory you should be trying to remove your notoriety prior to heading back to the base, but the reality is that, using the roofs you can go straight home without having to do that and it not have a negative effect on the game.
The end of this is actually pretty predictable -- well, partly anyway, because you knew Lucretia was going to get hers, and besides she is just... Ick. That's all I am saying about that.
Once you have escaped and made it back home the memory ends and you begin the next memory!
Adding to the numbers of the Guild
After arriving back at the home base you meet up with Machiavelli and his crew and you have another strategic conversation in which you vow that it is time for a new approach, time to expand the numbers of the Assassino and take this fight to the Borgia!
To do that you will note that several black diamond icons have been added to the radar map - these are helpless citizens being attacked by soldiers -- go and rescue them and induct them into the roles of your Guild now!
The conditions for obtaining full Sync is to not lose more than 5 health squares which should be easy-peasy by now, as you should be expert at defensive battles.
Once you have recruited the second one technically the mission is over, though if you recruit a third you will unlock the Achievement "Brotherhood" for 20 GP, so it is worth the effort!
Taking care of the woman beater
Malfatto likes to hurt girls, and you arrive at the next memory point to find a pair of beaten and battered girls. This is not acceptable, no sir! One of the beaten whores points out the offender, and you go after him. To achieve full Sync on this one you need to kill him using one of your new recruits -- to do this you need to get close enough to the target to highlight him, and then order the hit using the Legt Bumper, and one of your recruits will do the kill.
The route you will take to locate the man is peopled with other prostitutes, and you will notice that they often point you in the right direction, so clearly they want him dead too! Mind the guards on the roofs if you decide to take a shortcut, you do not want to get drawn into a battle after the target starts to run, because he only needs to get a little bit ahead and you can fail this.
Calling in the recruits to handle a fight is the only way that you can train them and raise their levels, and as there is am Achievement for training a recruit to the rank of Assassino you wil want to keep that in mind. Like all good things though, this can only be used in moderation -- that new red meter bar that is on the screen just below the health boxes in the upper left is the recruit meter. It has to fill up to all red in order for you to use LB to call in a strike, so bear that in mind.
Also bear in mind that when it IS fully charged unless you have a tough mission coming up it makes little sense not to use it! You want to train your recruits, right? Well, then train them!
Speaking of recruits, now would be a good time for a short break from the missions -- you see all of those black diamonds on the map? Those are potential recruits - so spend the next hour or so gaining them all. The more you have the better -- I am not sure how big of an impact that it has overall after a certain point, but the more you have the larger the meter gets. That means the more often you can call them in. Once you have recruited 11 Assassins the rest of the markers disappear from the map, so it looks like the number is 11, and 11 is the number!
A full load also adds three triggers and a special move called a Flurry of Arrows.
When you are done return here for more instruction :)
Dealing with a Slaver and Running Contracts
Sitting on a dock in the lower section of town is a little boy who is crying. When you talk to him you learn that the Borgias are taking his mother away for some reason -- This is another mission you need to use to level your Assassin Recruits -- so say you will do it, hunt the Borgia Slaver down, and have them kill him!
You send the boy to stay with his Aunt and you start following the markers -- and eventually you will get inside the range of the target -- use Eagle Eye to ID him, then do not get too close as you follow him to where he has the slaves imprisoned, as you cannot kill him until you know where they are!
Once you arrive at the pens you overhear his conversation with a woman who is part of the kidnapping ring, and then you are instructed to move close enough to target him and call in your Recruits -- which you do. You may need to assist them by shooting a few of the soldiers, but once that is managed they will free the slaves, and then you are prompted to go to the nearby Pigeon Coop -- so do that now.
-- Pigeon Coops --
At the Coop you will have to sit through all of the messages that piled up from the recruiting process -- do that now -- you will also be able to see what levels your recruits have reached thanks to these messages -- when one of them reaches Level 10 you need to go back to the base to watch their ceremony as they are made a full Assassin!
Now you are in the Coop Menu System -- select Assassins to resew the status of your recruits and apply any points you have available now. You do this by selecting the individual Assassin Recruit that you want to spend the points on and then applying them either to weapons, armor, or both. In addition to the upgrades you can change the color of their armor -- I like to do that to distinguish the ones who I am actively leveling from the ones who are still pretty low.
The individual Assassins marked with an "!" have points to spend, the ones who are not, do not. When you are finished upgrading them and changing their armor, back out to the main Coop Menu and select Contracts -- you will see that there are some available all over the region.
You want to be careful which ones you send a recruit on -- the more stars it has the harder it is and you do not want your crew getting killed. Obviously 4-star jobs you save for when your boys are well trained and able to handle surprises, right?
Assign out the available jobs as you see fit, and the recruits you send will be unavailable for X-number of minutes while they do the jobs you gave. After you exit the Coop you will end this memory, with a 100% Sync, so good on ya mate! You know how to use the Coop System now, and how to train your crew, so spend a little time doing that now. Getting them trained up is going to be really important later on, when you really need their help!
-- Working on Levels --
The training process requires you to send the Assassin Recruits out on jobs, but the game is not really structured to make that easy, because it is interrupt-driven. That means that you end up doing a specific chain of events that leads to another chain, and so on, and that tends to result in not paying attention to the side-quests like training your recruits.
The simple solution to this is to take care of the training precess as a priority. I am not saying that it should be considered make-work, rather it can be combined with another similar type of content -- the treasure chests.
Treasure Chests are important to the game because they are largely where you obtain the artifacts that you need to complete the shop quests. You need to complete shop quests to unlock special weapons and armor, as well as other items, like maps and such. While they are not a top priority for the game, they are nonetheless an important element of it. This is such a deep game that it is very easy to lose sight of that!
So instead of doing all of this piecemeal, combine the two activities together. Purchase the Antique Maps from the shop and then head for the countryside outside of Rome, where you are going to see a LOT of these hidden. Work on them, while your recruits are out on assignment. Whenever the recruit bars hit three again, stop at the nearest Coop -- there are plenty of those in the countryside -- and send them out on more assignments. If you do it this way you will very quickly build up a supply of artifacts for the shop quests, and also quickly level your recruits to the point where you will be sitting in on their graduation ceremonies before you know it!
You can also spend the time waiting for them to complete their missions by upgrading any shops you encounter in the countryside that you have yet to do that for -- there will be some there -- so go do that now and alternate between treasure chests, upgrading shops, and training your crew.
Come back when you have two or three at Level 10, right?
Reuniting with Leonardo Da Vinci
A mysterious voice keeps appearing in your head, and it is time to learn its source! As you approach the crate by the wall your old friend Leonardo Da Vinci appears! The Borgia have forced him to build war machines for them, and Leo wants you to destroy them! He also warns you that the Borgia have the Apple of Eden -- but you know that.
You tell him that you lost all of the Codex plans, but he says it is not a problem, you just have to pay for the materials, as he has the plans in his head. This is a Checkpoint Save, after which you are prompted to sit down. Once you do the Gadget Menu will open.
Hopefully you have a pouch full of gold - I do - so you can buy some of this stuff! If you purchase nothing else, be sure that you get the Double Blade, because it is a prerequisite for some of the armor in the game. After you buy it Leo leaves, telling you he will return shortly, and then does!
This wraps up the memory "An Unexpected Visitor" for which you should have scored 100% Sync.
The next memory is out in the countryside to the East, the far East...
While you are in town do some chores -- empty your Bank Account, visit the different Shops to do their quests as you just spent the last I do not know how long training your recruits and building an inventory of artifacts.
Use the Mercenaries to obtain the War Machine Location
This memory is a simple mission - you need to kill the Templar Overseer in order to recover the map he has that shows the location of one of Leo's war machines. For Full Sync you will need to send the Mercenaries into the fight -- and there is a band of Mercenaries right near by! How convenient!
Hire them and then head towards the marker, target the enemy and send in the Merc's!
You may need to help them a little, but when the battle is over you should have an easy 100% Sync.
That will wrap up this memory, complete the mission sort of, and place a new marker on the map for the next memory.
Removing Leo's Machine Gun from the Equation
This has a rather lengthy load screen, but eventually you get a nice CS in which you are placed at the start of the mission and memory, and you are charged with the task of destroying Leo's Machine Gun. This thing has to be destroyed, it is way too deadly for the period. Leo is just too smart!
To get 100% Sync you must avoid killing anyone until AFTER you destroy the blueprints, right?
Check your map and stealth your way to the marker, staying far enough away from any solders so that they cannot recognize you. You can NOT run, and you can not be SEEN climbing. Other than that, it is pretty much a standard stealth ninja mission!
Explaining this mission is rather complicated -- in a nutshell you need to get to the blueprints and burn them, then kill the guards who are in your way without ever being detected. At all. You have that? Now there are probably a number of ways that you can do this, but after a half-dozen different approaches I only found ONE that works every time, without fail.
I have filmed the entire approach all the way up to where you head for the wagon in full without skipping any steps at all, so you know what to do. Just watch the video! For those of you who do not want to watch the video, where are the steps to take:
(1) Move forward and drop down the cliff, take shelter in the hay pile below.
(2) Stealth along the outside edge of the outer compound sticking to the walls so you do not get sighted by the guards on the roofs. The civilians will ignore you.
(3) When you reach the far corner near the building climb the building and, on the roof, use a smoke bomb and quickly drop down, run straight ahead and then left and hide in the hay pile!
(4) Once the outer guard has completed his patrol and turned around, climb out and follow the wall, stop and wait for the inner guard to turn around and head towards the back of the area, then follow him. When he turns right, move to the blueprints and burn them. At this point you can now kill but you still must NOT be detected. Kill the guard here, and then climb the building to the roof.
(5) Stick to the cliff-side of the roof, work your way to the center, then kill the guards below from hiding. Once they are dead or most of them are, drop down the far side.
(6) Go inside the shed and light the barrels of gunpowder, then follow the checkpoints as prompted to escape.
(7) Once you are on the horse, RIDE! You do not need to worry about attacking, getting into position to attack, any of that. All that you need to do is ride. Get past the blocks they trigger and eventually you will get close enough to trigger the CS in which you commandeer the wagon.
(8) Drive the wagon through the area ahead, using it to knock the chasers off of their horses. When you knock the required number off you will move to the machine gun and begin a shooting sequence. Just shoot EVERYTHING. Eventually you will kill enough and have traveled far enough so that a new CS begins in which you unhitch the wagon and blow it up with your gun.
Grats mate! You just completed one of the tougher missions in the game -- tough from a 100% Sync POV anyway! Good on ya!
After the mission is over check the map for Leo's marker and go there -- sit on the flashing bench and purchase one of the two gadgets that you have yet to buy from him. I chose the Leap Glove because I do a lot more climbing than shooting people with darts, but either choice is valid!
After Leo goes to his workshop to construct the item he returns and gives it to you. Sadly that bench is no longer a valif summon point for him so we cannot buy the remaining item right now. Sigh.
You cannot reach the nearby View Point Perch because you have to repair the aqueduct first, and you cannot do that because of the Borgia Tower here that is protected by a white wall of death, so this will have to wait.
Saying goodbye to Cat and Outside the Animus
When you return to the hideout your crew is waiting -- a planning session unfolds, and everybody shares the information that they have as the plan takes shape. You are intent upon dealing with the French while at the same time destabilizing the Borgia Army by removing its funding. With the help of the thieves you should be able to do this easily!
After the conference ends and everyone goes their own way, check out the map sitting on the desk -- this is the main interface for your management of the Assassin's Guild. It is slightly different than the one on the Coops in that it allows you to review the History of all of the assignments you have handed out to your crew.
This is actually pretty deep, showing you the outcome of the contract, who you sent, and how they did right down to how much XP they earned as their share if there was more than one Assassin sent on the mission!
The Contracts selection shows you the currently available contracts plus which ones you have men out on, and of course the Assassins Menu provides you with detailed information about each one of your men.
After you consult the map you are told to leave the hideout -- but you have to do so through the front door as it triggers a CS in which Cat basically bails on you. She tells you her children need her, and that you are the man now, so be a man!
This concludes this memory, which you should have scored 100% Sync on, and unlocks the Achievement "Principessa in Another Castello" which is worth 20 GP. This also officially ends Sequence 4 and initiates Sequence 5.
-- Progress Check Time --
This is the point in the guide where we stop to take a look at how we have been doing, and I tell you what you should have unlocked and completed by now. This is important because if there is a major variation between what I have unlocked and what you have, some of the sections ahead are not going to play out right, and you could end up frustrated.
- Sync Levels
Take a moment now to check your record by opening the DNA Menu -- if you have been following this guide you should have 100% on Sequences 1 through 3, and around 85% on 4 assuming that you were unable to get 100% on the Castle Infiltration -- and if so do not feel bad mate. That is the one mission in the game that pretty much everyone decides that they will just finish it for now, and come back after they beat the game and have better armor, weapons, and skill to deal with it. There is absolutely no shame in that. It really was a tough mission!
- Additional Memories
You should have at a minimum the following under Additional Memories unlocked:
* Borgia Flags Rome: X/83 (this will be different for everyone)
* Borgia Flags Secret: 1/18
* Feathers: X/10 (this will be different for everyone)
* Treasures: X/144 (this will be different for everyone)
* Viewpoints: 18/24
- Guild Challenges
This section will be different for everyone, but at a minimum at this point in the game you should have at least Level 5 in the Assassins Guild, and some ranking in all of the others. If you do not, you need to work on this now, as the edge that these give you later can not be overstated.
- War Machines
You should have 25% Sync with the following:
* War Plans: 100%
* Outgunned: 100%
This is part of the next phase of the game so it will be increasing shortly.
The rest of the stats will vary and though important are not a focus for now.
-- Leave the Animus --
As we are at the mid-way point of the game and have started a new Sequence you need to leave the Animus now to touch base with the team.
Talk to Lucy and you will ask about food -- she will blow some poo in your face but she is just kidding, then the game will update with a Checkpoint Save and she is gone.
Talk to Rebecca who is over by the Power System, and you get a CS of an argument between her and Shaun.
Talk to Shaun to learn about what happened to Cat -- it is not good news.
Head to the back of the room and check your email on the computer there, and pay attention to your deleted messages -- because you did not delete them. There is an email with access codes you should read.
One of the new emails is a report from Rebecca about a white van that has her concerned and an update on what is happening with the other teams. Russia is OK but Brazil may have a mole. Japan has not been heard from yet but that is as expected.
After you check your email talk to Shaun for more background, then Rebecca for the same with details about the Animus 2.0, and then take the stairs outside and talk to Lucy, who is standing put by the lights past the generators. At this point you have triggered all of the dialogue you are supposed to -- talking to them again will get their canned dismissal speech so go ahead and jack back in to the Animus now.

Hitting up the Banker to empty your account
Before we do anything else it is time to take care of some minor chores, so first thing you should do is go empty your bank account.
- The Blacksmith Shop
Now head over to the Blacksmith and have them repair your armor. At this point you should possess the following items:
* Roman Greaves
* Roman Vambraces
* Roman Spaulders
When you check the shop you will see that you can now purchase the Roman Chest Guard -- do that as it adds to your health and damage resistance quite nicely! In addition to this there are two new items that have been added to the shop but you cannot buy them -- these are a Seusenhofer Chest Guard and a Seusenhofer Pauldrons. They are both Shop Quest rewards -- in other words they get unlocked and you can purchase them if you completed their quest.
You should have the items you need to complete the Blacksmith Shop Quest "Faith" already and may have already completed it, I don't know, but if not do so now. That unlocks the Captain's Sword. The quest that unlocks the two new pieces of armor is called "Exotica" and requires the following artifact items:
* 2 Shrunken Heads
* 3 Elephant Ivory
* 3 Indian Diamond
Chances are good you have some -- but not all -- of the items you need for this, but hey that is two good armor upgrades, so that should be all the encouragement you need to start getting serious about the treasure chests! Plus you need to do the recruit training, as well as the other guild challenges so combine all that into your regular treasure chest hunting routine why don't you?
There are a number of new weapons available as well as ones you previously unlocked. Look at them to see if there is anything you want paying attention to the stats.
- Art Shop
Head there and purchase any paintings and maps you do not already have. The paintings are one of the things you collect in the game, the maps your best way to locate the artifacts that we need -- so do not skimp on them!
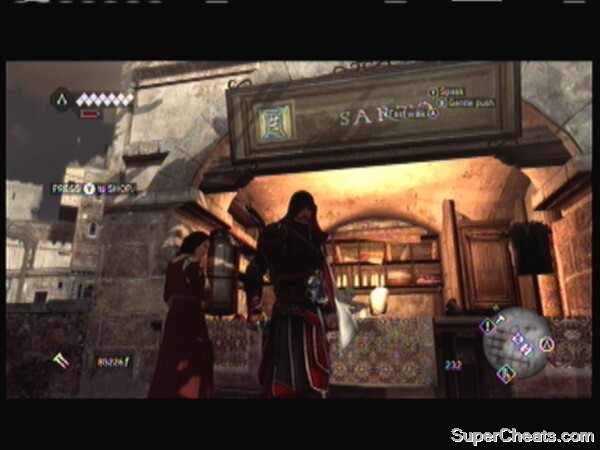
The Tailor Shop has your Pouch Needs Covered!
- Tailor Shop
You can do dye jobs on your gear if you like, whatever makes you happy, but whatever you do make absolutely certain that you purchase the Pouch Upgrades here! At a minimum you should now have the following upgrades (and if you do not, then buy them now):
* Medium Medicine Piuch
* Large Medicine Pouch
* Knife Belt Upgrade
* Heavy Sheath
* Smoke Bomb Pouch
* Medium Quiver
In addition to the above the shop will have a Large Quiver but to buy that you have to complete the Ship Quest, "Pulling the Threads" which requires 8 Silk and 5 Cardinal's Purple Dye, which I know you do not have. You get that as loot on certain enemies and as artifact rewards from Treasure Chests... You know where this is going, right?
- Wrapping up the Chores
OK you have now seen to everything except the Doctor. Check your kit -- if you are low on supplies, head to the nearest Doctor and buy them now. Otherwise you are good to go. Oh, one more thing, always keep an eye out for shops to upgrade and, when you have the extra money, the special sites you can purchase. You eventually need to have upgraded and bought all of those anyway, so seeing to them when you can is better than waiting until the end of the game and having only that left to do -- it could get wicked boring that way!
Kick then Kill, Kick then Kill!
Marked on your map by black diamonds with a white "L" are the quests for this quest line -- head to the one on the middle-western part of the map (west of the hideout) now and trigger it!
This is another War Plans Quest -- and to Sync it completely you need to kick the Overseer a few times when you attack him!
What I did was just run up and start kicking everyone I saw before I killed them. I must have looked like a madman to the soldiers, and then the Overseer gets on his horse so I have to deal with that! I hope that you had a smoother run through this than I did LOL. Check the video if you are curious -- I wish it had the Benny Hill Music in it...
-- Naval Cannon --
The next stage is near the town gate -- which makes sense as it is actually in Napoli not Rome. Our objective is to sink or destroy the warship that the Borgia have constructed thanks to Leo's plans -- To fully Sync this we need to open 1 of the first 3 gates, so as we start out by the bridge consult the radar map for the target location and then get moving!
As you step around you will overhear an engineer giving instructions to a soldier -- this Eduardo person is obviously some one we need to speak with! Ignore the civilians and kill the two soldiers that stand between you and your target, then head over and have a chat with Eduardo, who it seems is actually interested in helping us!
The thing about this is that you cannot ride with him in his boat, and you cannot swim next to it because you will get detected. And you cannot get detected.
Follow him into the tunnel and try not to get detected -- you will get detected though, and then when it resets you are standing in the beams above, which is better than being in the water!
Work your way along killing as needed and not otherwise being detected until you reach the end, at which point you need to open a door on the right side of the last dock you can swim to and go inside.
There are a few blokes for you to kill here, as you work your way to the dry dock where the small gunboat is stored. Use the lever on the right to lower the cargo pallet then use that to get up and to the other side, killing as needed. Parkour over to the other side and onto the balcony there by going around the back of the chamber, and then flood the dry dock. You get a CS at this point and are now in the small gunboat.
Row out to the three ships and use the fire arrow launcher on the gunboat to set the sails on fire. That is really all that you need to do. Once all three sails on each boat it burning they sink, you win, yay you!
I experienced this as the most frustrating quest in the game. No other quest was more frustrating for me personally, mostly due to the lack of understanding of how to access one of the first three gates to raise it. I replayed this one a dozen times and never managed to do it, so I have to apologize for not having that information for this guide.
I was able to complete the mission no problem, I just could not do it as per the 100% Sync requirement.
Obtaining the plans from the Overseer
-- War Plans 3 --
This time around we need to get another location from a Templar Overseer by using a Smoke Bomb to stun them. Sounds like a plan!
Follow the marker on the radar map to the Overseer and have your Smoke Bombs ready, then identify and approach him, drop the bomb near him and kill him for an instant 100% and good on ya! If you watch the video you will see that one of those pesky bards tried to make this a lot harder for me than it had to be, so I was happy to make sure he got a lung full of smoke in the process, bastard!
Now that we have the location, we head to the marker on the map and we see it is by another gate -- this is a theme with this series isn't it?
-- Flying Machine 2.0 --
The mission opens with us in a new town -- and our objective this time around is to destroy the bomber that the Borgia have made from Leo's redesign of his Flying Machine which is now armed! In order to get 100% Sync we have to make sure we do not get shot while we are using the bomber -- a worthy goal really, as I prefer not to get shot when doing pretty much everything!
Our first task is to locate the Architect who created the bomber from Leo's plans. We start out on a roof of what appears to be a church -- it has a bell anyway -- and below us is a group of soldiers. The thing is, they are going to be a problem for us once we ID the Architect, because they will see us when we move from roof to roof, so it would be an idea to kill them right away, using a ranged weapon. I chose the crossbow for its stealth, though to be honest people do not react to gunshots in this era, so you could as easily use the gun I suppose.
Whichever you use, after you dispatch the solders below you switch to Eagle Vision and you will spot the Architect on the other side of the area eventually. Once you do use the roofs to get close to him. You are following him and so you have to maintain a certain distance -- not too far, not too close -- until the objective changes from follow to beat up.
Once the objective changes make sure that you change your weapon to bare hands, then drop down and grab him. Tune up on him until he tells you where the plans are located, and then you ask where the machine is. He tells you -- of course he does, hell *I* would tell me if I grabbed me like that and started head-butting me, I am just saying...
OK so we let this guy live. I guess that Ezio does not kill civilians, even the ones who work for the Borgia. Personally I think that is bad policy -- after all this guy knew he was building a war machine for as nasty a group of psychopaths as you ever heard of, so in all fairness he probably should have been executed. Oh well.
Getting in the Easy Way
- Making it Less Hard -
From this point on this is one of those missions where a lot of players simply make it more difficult for themselves than it really needs to be. This is one of the times in the game where you want to keep this as simple as you can, because simple works best here!
Despite the fact that there are dozens of soldiers in the area, you only actually need to kill FOUR of them to get to the blueprints and burn them. If you follow the video, and do exactly as follows you will find this to be one of the easiest memories in the game!
(1) Jump on the roof of the house we are standing behind after talking to the Architect, and look to the right, where you will see the pair of guards who are on a circular patrol route approached. In the immediate area they are the biggest and only real threat to you -- if you are going to be detected on this side of the compound they will be who does that.
When the come around the corner of the building on the other side of the path, target them and shoot them with a ranged weapon. I used the crossbow, but you can use any ranged weapon you have -- none of the other guards here appears to respond to gunfire. Once they are dead, go to number 2.
(2) Jump down in the direction of the firewood shed behind you, then cross the path to the building past the dead guards, climb to the roof and walk out onto the perch in the corner.
Target the guard in the tower on top of the battlement and kill him with your ranged weapon of choice. It is absolutely critical that you kill him and he does NOT fall off of the tower, so shoot him when he is not by the edge. If he sees you he may approach the edge -- as long as it is the edge facing you that is not a problem, since none of the other guards will see him on the ground there, but do not shoot him off any of the other three sides, right?
(3) Now back up, face the perch, and take a good running leap so that you grab the top of the wall across from you! This is your way in, and the only way in that does not involve a bunch of other guards who will see you and ruin your day! No ladder, no sneaking, no hiding in the bushes!
Remember what I said about keeping it simple? This is way simple! You go over the wall here, drop to the ground, and hide behind the building to the right. When your heartbeat is under control, make sure that your ranged weapon is still armed, then peak around the nearby corner and kill the guard here who is talking to a civilian. Do not worry about the civilian, they will not rat you out, and no other guards will come to investigate.
(4) Now that the only guard between you and the blueprints on this side of the wall is dead, move along the back wall to the shed on the far side of the Architect's house, go inside and burn the blueprint. That should earn you a checkpoint save, so if things go sideways from here, at least the hard part is over!
- The Bomber -
As you can see on the radar map, the bomber is ahead and up above you. To get to it unfortunately you are going to have to move through an area filled with hostiles. OK remember when I said to keep it simple? Well the problem you are facing is that ahead are two guards, but they are on opposite sides of the road and have enough distance between them so that by the time you take on out and get within range of the other, you are fully compromised.
While Ezio does not kill civilians, we are not Ezio, and the easiest way to draw one of those guards out is to shoot a civilian, because while the guard is not within range of our crossbow at the moment, the civilians ARE.
Use Eagle Vision to spot the guards and your useful diversion and then pick a civilian and shoot them. The guard will then come to investigate, and you can shoot HIM. I do not mean to sound so cold-blooded about this but this tactic works. If this confuses you, watch the video, it shows it in detail :)
There are two groups of two guard ahead -- and though the hay piles look like great places to hide, the guards think so too, so if you use either of them it has to be temporary. When the guard approaches to check kill him -- then kill his partner when he comes to check looking for the one you just killed!
Ahead on the hill leading to the upper compound is another pair of guards who are walking back and forth between two hay piles, checking them over and over. Stay in the middle hay pile and, when the check the next one and turn around to head back up the hill, jump out run ahead and shoot the one in the read, then hide in the nearby hay pile. When the second guard comes down to check it, ignoring his dead partner, kill him.
Getting to the top of the Tower
-- The Upper Compound --
Handling the upper compound can be tricky. I like to stash the body of the guard I killed in the road just because I am a neat freak :) You do not have to though as I do not believe that there are any other patrols here...
As you move into the upper compound you will notice that there is a significant presence along the walls and on the towers of the fort. Using the same Keep-It-Simple approach, we see that there is a cargo hoist with a pallet in the air by the middle tower. Using the overhang of the stables we climb up and then Parkour over to the tower wall across from the pallet, then jump to the pallet and, from it, back to the tower wall where we can get hand-holds to make it to the top!
At the top we wait for the lone guard here to approach the edge, and assassinate him. Now we are on top of the tower, and there are guards below in both directions -- so we want to go to great lengths to not be seen right? Picking any off, no matter how quiet, is likely to get us caught...
In the corner of the tower is a perch with some birds on it -- take a running leap off of that into the compound below and be nicely hidden in some hay! Now there are several sets of patrolling guards down here, including a pair that walk right past this hay pile. Next time they pass snag the guy in the rear, and kill him quietly in the hay! His partner does not get close enough for you to do that so there is no point in waiting for him to make another trip around -- just jump out and kill him from behind now.
Continue along the wall in the direction they were patrolling to the far corner, then look right -- see those boxes? Run up them and parkour to the roof of the low building toward the other corner, then climb the ladder, jump to the pallet, and then to the tower here. Work your way around and then up until you are hanging just off of the scaffolding and wait for the guard up here to move to the other side. Now shimmy left and wait for him to get close enough to this side to assassinate him by throwing him over the edge.
Now you can get to the top here, and jump across to the other tower - the one with the marker in it!
Sadly until you get to the target tower there are no checkpoint saves between the starting tower and the target – sorry.
-- The Target Tower --
Once you reach the roof of the tower beside the target, and kill the guard, use the beam that sticks out from scaffolding to make the leap over to its mate then turn right and run and jump to the wheel-thing that will swing you around and onto a beam below. Shoot the guard below you with your crossbow, then drop down to the marker and go inside.
Climb to the top of the inside of the tower using the beams, ladders, and scaffolding, and then go out the window, around to the side and up. At the top ninja to the pulley mechanism and trigger it to open the trap door, killing all four of the guards on top of the tower, then climb the ladder and hit the marker there for a checkpoint save -- thank God!
After a brief CS you will find yourself at the controls of the glider -- and remember this is a glider and not a plane -- it needs thermals to stay aloft (hot air). Your objective is to destroy the workshops - you will do that with the cannon on the glider -- but in the process of doing so make sure you also ignite fires on the ground so you have hot air to use for lift, because you need to stay aloft. Oh yes, and do not get shot, right?
Was this as tough a mission for you as it was for me? After all that excruciatingly painful stealth, finally reaching the glider, and before I can even figure out the controls, I get shot from one of the towers below! Bam! A perfect Sync no longer possible because to do that you have to start over again. Oh man!
Well at least the mission is done, the memory is in the can. If you got hit as I did it is just one more mission to replay later, right? Bonus is that it unlocked the Achievement "Boom!" worth a cool 20 GP, not too shabby!
The first tank on tank battle in history
As we start the next of Leo's War Machine Missions we're charged with using our pistol to kill the Overseer, which makes more sense than a smoke bomb if you think about it... Still, head into the marker and accept the mission, then head for the Overseer,
When you arrive you will find a fair number of soldiers -- and the Overseer -- just be sure to use the pistol on him, and remember that you can only defend against Pikesmen with the Hidden Blade!
Now follow the new marker and walk into the glow to trigger the mission "Hell on Wheels" and the story should be familiar to you by now -- burn the blueprints, steal the tank, and to get full Sync take no damage while in the tank!
As the mission begins the Architect is walking away with a major officer, and you must trail them while not being detected -- getting detected will desync the mission! Run ahead and jump into the hay pile, and once he moves ahead run to the next hiding spot, a hay wagon. Assassinate the soldier here by pulling him into the wagon with you! Now run to the corner of the building, snipe the guard ahead by the hay pile, and then run to it and dive in!
Run to the next wagon, dive in and assassinate the knight here, but mind the bloke on the roof ahead on the left side of the road! When you hop out of the hay wagon immediately target the bloke on the roof and snipe him with your crossbow, and then RUN to the next hay pile on the right and dive in. It is important that you move fluidly because by now the Architect has almost reached the gate!
Ahead at the gate there is guard standing in the center, looking in your direction so be discreet mate! Wait for the Architect to enter the gate and for the portcullis to drop then jump out and run to the right, and out of the line of sight of the guards!
Run along the cliff to the right -- you should reach the boxes before they can detect you -- head along the wall to the hole in the wall and jump down into the hay pile. Pop out when the Architect is near, select your bare hands, and beat him up! He dishes on the location of the plans, and the weapon, so it is time to burn another set of prints.
Parkour along the wall, take out the soldier in the archway, and then climb to the roof. Walk along the wall, jumping to the top of the mid-wall inside, and then down into the area with the blueprints and burn them! Easy-peasy! Well, to now it was.
-- Onwards to the Tank --
Cross the courtyard and climb the wall at the cement blocks, assassinate the guard on the roof across from you, then kill the guard in the courtyard to the left by the well, then kill the bloke on the roof to the left. Cross the courtyard and free the prisoners, who will tell you where the machine is!
Follow the Mercenaries and kill any enemy you encounter -- at this point you can be detected and not fail so fight! Fight! Fight!
Once the group of solders is dead continue to follow the mercenaries and kill guards and soldiers until you reach the covered well. Open the well and climb in, then use the walls to get to the lever to open the gates for the mercenaries. This is mostly parkour, which you should be very used to by now! Pull the lever to let the mercenaries in, then continue along the corridor, loot the treasure chest, and then open the next gate.
Now you will reach a raised bridge that you need to lower -- you will know this because you will say to yourself, "I will lower the bridge!" It is a good thing you told yourself that as otherwise you would not know what you are supposed to do!
Cross the bridge to enter the tank room, and you will all climb into the tank together. As you roll forward you want to concentrate your aim on the cannon -- this is a tank man, foot-soldiers cannot damage it! The cannon are easy to spot, as they have a special marker, so make sure you shoot them quickly and often :)
Running down the troopers is a nice way to spend the time between shooting cannon, but at the end of the valley you must do battle with another tank! Just keep moving in circles and keep shooting to destroy the first tank while avoiding the cannons. Blast through the gate and fight two more tanks, both at the same time.
If you are going to get hit here, this is where it will happen, but hey there is no shame in it, just chalk it up to another mission you will need to replay later. Getting yourself killed will just result in restarting at the last checkpoint save with the sync still failed! The only way to correct that is to restart the memory from the very beginning, and who wants to do that?!
After you blow up the pair of tanks you will be tasked with destroying your own tank with one of the cannon mounted on the wall, which you do in a CS.
Completing this mission unlocks the Achievement "Kaboom!" worth 20 GP and the satisfaction of having completed another mission and memory! Good on ya!
A CS now plays in which you are sitting with Leo and he gifts you a pack of parachutes to use when you find yourself falling off of a high place that otherwise might kill you! When the CS finishes, hit the B Button to interact with the bench, and purchase the final item in the gadgets list -- Poison Darts.
As usual Leo leaves you to return to his workshop to construct your gadget while you sit around and the sun moves through the sky. Later in the afternoon he returns with your new gadget! You now have them all! Well done mate!
The Route to the Banker
Back at the Rose, you talk to your sister, agreeing to this crazy scheme, and she tells you that her girls will be ready! To complete this memory with full Sync you must not be detected while you are escorting the senator. Now, go speak with Troche to learn the whereabouts of the Banker! Run through the streets to the green marker, where you will encounter a group of soldiers beating on Troche!
After you rescue him you get a CS in which you learn that he is more of a pragmatic fellow than an idealist... You will need to escort him to the destination -- but in safety. This will involve stashing him in safe corners while you clear the way ahead as best you can, but beware! If you are detected you will fail to gain 100% Sync!
This is actually a rather stupid mission -- you lead the man to several destinations that are not the destination until finally you go to the one place in town that is literally surrounded by soldiers, but somehow this place is safe when the other places that had no soldiers had too many solders? Really?
After you arrive you get a CS that requires you to pay 3,000f to the bloke -- pay it now -- then you get another CS in which you learn that you have purchased a senator!
-- Follow the Money --
Your next memory is called "Follow the Money" and to get 100% on this one you need to stay on the rooftops and not be detected. Sheesh!
Once you reach the meeting spot you trigger a CS and then begin the trailing -- if you fail on your first try (I did) no worries, just replay later! At the Pantheon the CS of the meeting plays out and then you are instructed to infiltrate via the roof of the structure, so make your way up there to the marker and then kill the guard below without being detected.
Scale your way down the inside of the dome and kill the guard to trigger another CS, and the next mission in the chain, "When in Rome."
-- When In Rome --
To get 100% on this you must arrive at your destination in under 3 minutes. You must lead the guards and you cannot be detected. Their conversation will point the way, or that is the theory anyway.
The premise of this mission is that you have killed the Captain of the Guard and taken his place, and you will use the comments of the guards, along with the meter on the screen to feel your way in the right direction. It is mostly luck and there are no markers to indicate your destination even when you arrive at it, so just use trial and error and hope you manage it in under 3 minutes. I did not.
-- In and Out --
You have arrived at the bank and gone inside -- but what you do not know is that the body of the Captain has been found, and they now know you are not he. You need ro kill the Banker and escape -- to get 100% Sync you need to do it from a bench and not be detected. Can this get any more bizarre?!
Use the courtesans for cover, and the crowd as needed, and tail them to the Banker. When you reach the restricted area use the hay pile on the right as you will likely lose your escort here. Go up the stairs and use the hay pile to kill the guard here, then move to the next hay pile on the left and do it again.
Move from hay pile to hay pile killing the guards until the path diverges to the right, at which point there is another group of courtesans for you to use as cover. The Banker is now identified! Simply set the courtesans on to the guards ahead and then follow the Banker into the complex. You will have to set your last set of girls on to the guards at the junction, so use the crowd then take the back alley, and follow him to the main courtyard, where he will pause to celebrate. This is where you kill him!
Listen to the Borgia speech, then his convo with The Pope. When that ends use the hay wagon to kill the guard there and work your way across the courtyard, climb the wall then the stairs to the balcony, then work your way down to the bench. Now just wait until he walks past and kill him with your Double Hidden Blade by using the assassinate option. Excellent! You did it mate! 100% and a dead pervert! Way to GO!
Yeah... But now you have to escape...
Once you get a certain distance from the killing spot you will get 100% on it though the guards are actually still chasing you. Hide, fight, it really will not matter as you have technically completed the memory. Good job mate! Now head for the next mission marker on the map!
You have been dispatching your Assassin Recruits on new assignments, right? If not you should do that on the way to this mission mate. If you have been keeping up the bulk of your team should be Level 8 by now!
-- Paper Trail --
When you arrive at the marker you learn that Caludia's girls have stolen the Banker's money -- not that he needs it where he is now -- but this has caused trouble at the Rose, so hurry to help!
Whn you get inside you discover that your sister is wicked with a blade! She has already killed the soldiers! There is nothing for you to do but bask in your 100% glory mate! Just as you start to do that, the world shakes and shimmies and you unlock the Achievement "Fundraiser" which is worth 20 GP, and ends the 5th Sequence. Do I need to say good on ya? Should I say Excellante Bustamonte?!
Well done anyway, and Happy Christmas!
Now as this is another Sequence coming to a close let us cover some basic housework here -- I will not go into detail, but pause in your story-line questing and do the following now:
-- Empty your Bank Account
-- Dispatch your Assassino
-- Upgrade any shops you have yet to upgrade
-- Purchase any historical sites you have not purchased
-- Re-supply your kit
-- Buy the new armor at the Blacksmith
-- Buy the new pouches at the Tailor and max out your parachutes
-- Do any Shop Quests that you have the stuff for
-- If there are any Assassin Contract Markers you have not cleared yet, clear them.
-- If there are any Thief Mission Markers you have not cleared yet, clear them
-- If there are any Treasure Markers you have not cleared yet, clear them!
That wraps up all of the chores. Obviously some of this stuff is discretionary -- you can do it after you finish the story mode, but doing a lot of these will actually help you with that so it is your call...
Taking out the French Baron
-- Gatekeeper --
You are tasked with preventing the French Troops from taking over the barracks by lowering the gates that lead inside -- to 100% this one you need to not take any damage in the process!
The easy way to do this is to use your smoke bombs to give yourself time to close the gates without having to fight. So do that now :)
After you close the gates you are confronted by the French General, whe has the Mercenaries wife hostage. After the CS get on your horse and follow Bart to the fort, where he will yell a lot and then this part of the memory is complete. Head towards the next memory marker on the map now.
-- French Kiss --
Go inside and talk to Bart, who will listen as you explain the plan. Now you must assassinate 20 French Soldiers in the ruins so that Bart's men can take their uniforms and armor. To do this 100% you must not be detected!
Head to the red markers on the radar map and kill French Soldiers until you reach 20 -- this is the easiest part of the series :) Now head for the next memory marker!
-- Trojan Horse --
The plan is coming together -- you now need to march your disguised forces to the French camp, killing any outlying checkpoint guards along the way so that they cannot raise the alarm. To get 100% on this one you have to do it without losing any health!
According to the instructions on screen you are supposed to follow the mercenaries and not lead them, but you are also to eliminate any guards so that no one can sound the alarm. You will find that this works easier and smoother if you run ahead and clear the way rather than trying to follow behind and deal with the problems after they become problems...
Once inside the camp you will march through several gates, and finally confront the Baron. Or Bart does rather... When the Baron is just about the shoot Bart's wife as an object lesson you give the signal, and it is a free-for-all slay-fest! Woo hoo!
As soon as you hit your target count you get a brief CS in which Bart asks you to save his wife, which ends this part of the memory and starts the next!
-- Au Revoir --
You need to catch and assassinate the Baron and you need to do it in under 5 minutes so get going!
Once you get across to the other side and into the yellow area you drop down onto the ground and open the portcullis, then run inside and shoot the Baron, getting 100% and saving Bart's wife. Excellent! You pulled off a miracle!
Not only did you do the near impossible, you unlocked the Achievement "Forget Paris" which is worth 30 GP and signals the end of another Sequence -- Sequence 6 in this case. And how about that?!
At this point you should be getting repeated notices to return to your home base on the island for a ceremony, as several of your Recruits are ready to be made full Assassins! This is a great time to do the usual stuff, hit the Bank, top off your kit, you know the drill by now, but also why not attend that ceremony? I am sure your men would be proud that you did.
Discovering the true identity of the Traitor
Visit the Thieves Guild for the next memory start, and you learn that all may not be as you thought... The Thieves are under attack and the secret of the Guild is threatened! You must defend both the secret and the band of thieves being attacked! To score 100% do not drop below 5 health squares.
Once you repel the invaders at the Guild ride like the wind to save the Thieves, and then mount up and follow La Volpe to the next group, who you save. Follow him for a third time and you learn more about what is to happen to Pietro -- he is to be crucified.
That wraps up this part of the memory - and the next part is very close to where you are now, but before you trigger that memory, remember the last Borgia Tower that we could never get to because of the White Wall of Death? Yes, well, that wall has fallen. The Tower is very close to you as well, so go ahead and take it out now, before we continue this memory line!
Done? Excellent!
Now trigger the memory to continue the Sequence!
-- Calling All Stand-Ins --
When he talks to his contact here there is no better information, but La Volcha is convinced that Machiavelli has betrayed you all and is using an agent, Micheletto, to do nasty things. You are not entirely convinced, but you are going to tail this Micheletto to the play, and find a way for your Recruits to infiltrate it. To score 100% Sync you will need to use the Recruits for the kills.
Once you accept a marker appears nearby -- run to that and it will trigger a CS in which you see Borgia and his prisoner. As you watch a guard garrote the prisoner to death. You get a checkpoint save and now mount the nearby horse and follow Micheletto!
You cannot let him get too far ahead of you or you will desync - so stay close! If any of the patrolling soldiers get suspicious of you do NOT attack them yourself! Instead order your Recruits to kill the soldiers, that way you do not build notoriety or get sucked into a battle royale. Keep an eye on Micheletto, and do not let him see you obviously...
He will have three meetings -- each is very similar from your point-of-view -- which means you need to have your assassin Recruits take out each of the three contacts for this to be a success. Basically you will follow him to each of the meetings, get close enough to trigger the meeting CS without actually being detected, and then when Micheletto leaves the area, have your Recruits kill the agent or agents (there can be more than one).
The soldiers securing the area here are not part of this mission - killing them is not an objective, so you should only do that when you have no choice. Use your Recruits to deal with any groups of soldiers who grow suspicious of you, so that you do not increase in notoriety or get sucked into a long battle that could allow Micheletto to get too far away from you and desync you.
Once he finishes the third meeting he will head to the play -- WARNING -- if you get too close on the final leg there is a bug that can kick in that causes him to stop walking, and breaks the mission. You can kill him if you want, but you are never going to see the CS you need to see, and the mission will not progress from here, leaving you no choice but to start it over, so try not to follow too close for that stage.
After the third meeting and when you reach the Colosseum you get the CS, and the next mission/memory start.
-- Exit Stage Right --
You need to enter the Colosseum, rescue Pietro, and not be detected -- for 100% you must not kill anyone other than the gunmen.
Work your way to the marker on the upper level to trigger a CS, which gives you a tour of the place and the locations you need to be aware of. The culmination is witnessing the play, and watching the soldier/actor poison Pietro. You now have 5 minutes to eliminate the gunmen, get Pietro to the Doctor, and save the day!
The gunmen are clearly marked, so work your way along the upper wall and take them out with a ranged weapon -- once you get the fourth and last one, head to the backstage area where you will find a marker point. Step into it to get a CS of you getting into a costume with your men. Now just walk past the guards and onto the stage, ending the mission/memory by stabbing Micheletto, ending the memory with a CS and immediately starting the next memory in the chain.
-- Intervention --
Grab Pietro and carry him to the Doctor -- to get 100% do not swim during the mission.
Once you have him in your arms follow the markers that appear to the small Doctor's kiosk. If any soldiers take interest in you, use your Recruits to deal with them, as you need to not put Pietro down!
The poison that he drank unwittingly on stage is slowly killing him, but if you get to the Doctor on time he can be saved, earning you major kudos with the Roman Association for the Care and Feeding of Actors...
As the CS plays out at the Doctors, you learn that you got him there on time, and the man will live. You ask for the key to the castle, explaining that his secret has been revealed, so he gives you the key. Just as you think all is well, you recognize a thief who was at the Villa!
Giving chase you catch him, and learn that he is the Borgia traitor, not Machiavelli! You must go save Machiavelli from the revenge of the Guild which he clearly does not deserve! Ride damn you! Ride!
Umkay so you have less than two minutes to get there -- and remember to use the boat, and not swim -- arriving just in time to save Machiavelli, and reveal the betrayal of La Volpe's man!
You get a nice CS to close and 100% Sync, good on ya mate!
Rising to become the Leader of the Order
-- Ascension --
When you return to the hideout you decide that it is time to induct Claudio into the Order, and after that happens, Machiavelli surprises you by naming you the head of the Order -- Machiavelli tells you all about the things you did not know, and his part in it all. As you are talking you are told that Borgia has returned to the Castle!
The path ahead is crystal clear, but for now this mission and memory completes the 7th Sequence, so it is time to leave the Animus and check in with our team in the real world again.
-- Back in the Real World --
First talk with Lucy, so that you can ask her an important question, then go over to Rebecca to learn the status of the disrupted memory. Finally speak to Shaun to learn some more about Borgia, the guy was not a nice person...
Now return to Lucy and talk to her again to get her opinion about her concern for you, back to Rebecca to learn you have completed your dialogue with her, then on to Shaun for more information about Borgia. That wraps up all of the dialogue options, and gets you the final checkpoint save for them, so go check your email.
Two of the emails are mundane, but the status update from Shaun reveals that the Denver team is probably dead. Now that you have obtained all of the intelligence you were supposed to, it is time to return to the Animus!
We have reached a critical area of the game now, and it is time to wrap up a lot of loose ends for the benefits that doing so will give us.
Claiming the Armor of Brutus
We have now reached the point in the game where completing the sub-quests is no longer optional, because the things we gain by doing them can have a major impact on how the last quarter of the game plays out. With that in mind it is time to wrap up any of the sub-quests that we have delayed doing until now...
The reason that this is important has to do with the benefits that we gain from doing these side-quests, for example completing the Lairs of Romulus gains us the Armor of Brutus, which provides us with the maximum amount of health diamonds -- 25 -- that you can have in the game!
Completing the Guide and Shop side-quests adds so many different things that I hardly know where to begin -- they add items like weapons and armor, they unlock new and expanded pouch options, and they increase our 20-minute income considerably! They also add background information to a degree, but probably the most important element that they bring to the table is expanded services from the different Guilds.
In the case of your Recruits, having most of them at Master Assassin Level gives them better armor and weapons, guns, and smoke bombs, and you only have to see them use those one time to understand why that is a good thing!
These quests are mostly repeats of the same basic mechanisms within each -- but where it will help I have provided videos to show the different steps, making this the most video-rich section of the guide. If you run into trouble, watch the videos as that will help a lot.
-- Cristina Missions --
These have their own chain of Icons on the map -- if you get lost look along the North edge for the second mission, the third is in the southeast of the central district.
Considering that this started out with so much potential it is a pity that it ended the way it does....
-- The Guild Quests and Challenges --
Take the time now to raise the different guild levels in the game. Basically there are four Guilds, and each should be at a minimum Level 10 when you are done. How to get them there is explained below.
Before you begin, hit the Pause Menu, select DNA, and then move the selection to Guild Challenges and click the action button. You can now move left and right to determine the current Rank for each of the four Guilds -- it will range from Unranked to whatever the number is. Ideally you will want them at Rank 10 at this point.
If you click on the individual Guild in this section of the DNA Menu you will see how many challenges are required to reach the next rank, click again and you will see a list of the challenges for that guild and your current status for each challenge!
You want to look the list over to see which you think you can do more easily, and then go out and do them until you reach the desired rank -- which in this case is ten. Refer to the Appendixes for a complete list of the Guild Challenges for each of the Guilds. Below are notes you need to be aware of for each.
Training your Assassin Recruits to the level of Assassin is the first priority for this portion of the section, so if you have not already done so it is time -- but be sure to take a look at Appendix A and complete ALL of the Guild Challenges that can only be done with Recruits prior to getting them all to graduated level.
You want to complete the Recruit-related challenges first, and then the others. When you have completed 10 Guild Challenges (using all of the Guilds not just this one) you will unlock an Achievement, so bear that in mind.
In addition to the Guild Challenges you can raise Rank through Assassination Contracts -- these are special jobs for you that appear at specially=marked Coops -- check the map -- this a a rapid way to gain rank.
-- Templar Agents --
Scattered around the map are black diamond markers for Templar Agents -- each has a different story, the operative point being that the person you need to kill for them is an agent of the Templar, and killing them weakens the Templar organization.
Keep working these until you get them to a full Sync.
-- The Lairs of Romulus --
We completed one of the Lair's earlier as part of the quest line we were doing -- there are three more that we need to complete as side-quests:
* Shrine in the Basilica di San Pietro (Amen)
* Shrine in the Catacombe di Roma (Undertaker 2.0)
* Shrine in the Cloaca Maxima (Plumber)
* Shrine in II Colosseo (Gladiator)
* Shrine in Palazzo Laterano (One-Man Wrecking Crew)
* Shrine in the Terme di Traiano (Golden Boy)
Basilica di San Pietro (Amen)
Catacombe di Roma (Undertaker 2.0)
Cloaca Maxima (Plumber)
II Colosseo (Gladiator)
Palazzo Laterano (One-Man Wrecking Crew)
The almost final last battle... Almost.
Our objective is to get inside the perimeter of the castle and reach the Pope in his private apartment -- for full 100% Sync we need to not be detected.
The path forward here is very obvious and linear until you get inside, once you are inside it is not so obvious. Use the crates in the corner by the door to climb the wall and then shimmy around, using the beams and bars to swing and jump. When you get on the platform head the other way, and when you get to the end of this run and it looks like you have no place to go once you are on the beam at the corner, turn to face the direction you came there from and drop town and grab the beam you are standing on.
You can now shimmy along the wall here! Do that until you are under the trap door above, climb until you cannot and then jump to the other side of the shaft and climb out. I do not have to tell you to kill the guards you encounter, right?
Work your way to the next marker, which is in an open set of doors -- go inside and up the stairs, then ease around the corner and take out the guard inside then the two on the balcony. Use the bookshelf to climb up, then move to the marker at the other end of the balcony, climb out the window and shimmy towards the next marker. Drop on the roof then climb up to the marker to end this part of the memory and view the CS.
I am not sure what I was expecting here, I knew that Borgia was going to have a confrontation with the Pope, but this? More than I expected :)
-- An Apple a Day --
Our objective is now to beat Cesare to the Apple -- to get a perfect Sync we cannot kill anyone in the process.
You are on a timer -- just follow the marker down to have a confrontation with Borgia, and then use the cargo pallet haning at the far side of the hallway to jump to the beams and pole to get to the shaft above the door Borgia locked. Go up and then follow that path outside, running away from any guards you encounter -- or killing them like I did, either way.
You are in speed mode, and you will want to use the two leaps of faith ahead to get the jump on Borgia. When you get to the end stand in the marker and hit X then turn on Eagle Vision to end the memory. That oddly shaped thing inside the columns in the middle of the courtyard is the next memory starting location -- once you use Eagle Vision it will begin to glow.
Use B to interact, and get the Apple just as Borgia shows up -- but the difference between him and you is that YOU know how to USE that Apple!
-- The Apple of Eden --
Now that you have the Apple of Eden you need to escape from the Vatican -- for Full Sync you need to do it without losing any health!
This is the most simple mission in the game -- just run and evade the guards until you are outside of the Vatican and in the Central District, at which point you should climb to the roof and hide. Once you do that you will get a CS of you using the Apple to see what Borgia is doing, and that triggers the next memory.
-- Demilitarization --
The objective is for you to destroy Borgia's Roman Army. Doing so is supposed to leave him no support to wage a counterattack. Now that you have the Apple of Eden this is supposed to be a cake walk.
Climb to the roof of the church to trigger a CS in which Borgia argues with his Generals, and then you are inexplicably on the ground and once again surrounded by soldiers. Your task is to slay the five marked Generals using the Apple.
How this works is pretty simple - the Apple of Eden is powered by your life energy. The more you use it, the weaker you get. You have to stop using it for a bit so that your life energy recharges. The other thing is you cannot really control who you kill with the Apple. Someone near you will die when you use it, but probably not the person you want to die.
All that you can do is get close to the target and keep using the Apple until they die, or you need to run in circles to recharge your life energy, and then rinse and repeat. Eventually you will kill the people you are supposed to kill, and then you will get a CS which signals the end of this memory, and the start of the next!
-- Seeing Red --
Evidently killing those five Generals had the effect of destroying Borgia's Roman Army. Good on ya mate! Now you need to drop in on a meeting he is having with the Cardinals and stop it. Sounds simple enough, right?
Sadly this is another mission you will be using the Apple of Eden for. You appear out in the sticks tasked with tailing one of the Cardinal's to the meeting - you know the drill, do not get too close, do not drop too far back. Use your Recruits to take out the guards outside, then head inside the Collesum to get a CS of the meeting and you breaking it up!
I am not really sure what the point to all of this was other then to use the Apple a lot. You can call in your Recruits to help speed this up -- I did -- but mostly you will be using the Apple a lot. Have fun!
When this mercifully ends you get another CS that does not make a lot of sense, with some epic music and then the memory ends and the next one begins!
-- All Roads Lead to --
Our next task is to join the Assassin's Guild and confront Cesare Borgia -- and once again you are stuck using the Apple of Eden. When you are holding the Apple you cannot use any item or weapon. All you can do it mash the X Button and hope that one or two of the people you actually want to kill get killed. Yeah, it stinks -- I don't know about you but I did not see the game going in this direction. It went from massively cool to absolutely stupid in the blink of an eye. What were they thinking?!
Borgia is making a speech in the square when you arrive -- a fight begins and you really have no choice but to call in the Recruits. After they kill all of his men you get another CS by the gate, and Borgia is arrested. It is something of a bittersweet victory since you played pretty much no part at all in the final battle. All you could do is stand around making your Apple blink.
Watch the CS that follows, and then be very grateful that the memory has ended. Be eternally grateful that the memory also ended the Sequence. You are probably thinking that if the next missions are this lame, you may as well stop playing now -- but trust me, you have worked your way through the lame bits.
As the Sequence closes out you unlock the Achievement "Vittoria Agli Assassini" which is worth 20 GP. Congratulations mate, you are almost to the end of this. Very sorry about the last few missions, even though it is not my fault I still feel compelled to apologize to you for what these people did in the this game.
A Borgia-Kicking Good Time!
So there is good news and bad news. The good news? The lame forced Apple mode is done. The bad news? You are forced into combat without having the option of doing anything else for the start of the mission/memory.
Your objective is simple: chase Borgia through the battlefield, then kill him. Do not drop below 5 health FTW.
Fight for a bit and then you get a CS. Pick yourself up off of the ground and mount the nearby horse, following the path ahead. Eventually your horse dies. Now run.
You will be set upon by a group of soldiers -- do not forget to search their bodies for supplies to replace what you use. Fight your way through two more groups before reaching the checkpoint inside a broken up house -- where you get a CS of a woman being brutally killed by a Roman soldier.
When you get to the last checkpoint of this series you will arrive at a burning siege tower. Climb in then use the ladders to reach the top, whereupon you get a CS of it collapsing from the flames, and you doing a leap out.
Now follow the next series of checkpoints, and climb another siege tower to reach a long battlement. Walk along that to another checkpoint, and you finally confront Borgia!
There is a pattern here -- you kick him until his guard is down then attack to damage a piece of his armor, at which point a new group of soldiers joins the fight and you have to kill them, then rinse and repeat until you finally kill Borgia.
I will be honest here, I took a great deal of pleasure in kicking him... Too much it may appear, when you watch the video you will see what I mean :)
The end of the memory is Ezio hiding the Apple in the vault, or so it appears. As he is walking away the memory starts to collapse, and the Achievement "Requiescat In Pace" for another 20 GP, and the end of the Sequence. Yay!
Reaching the end of the Saga
As the memory ends we are ejected from the Animus just before the power fails, leaving us in the dark and unable to access the database to search through the memories for the password to the vault in which the Apple of Eden is concealed.
As the others whinge and moan, Desmond goes all silent and thoughtful, and then you run up the stairs to that cipher that you saw on the wall when you first arrived. Using Eagle Vision you read it again, and you work out that it is actually the password that you need -- with Shaun's help anyway.
Everyone agrees that you have the password, so it is time to head to the vault and see. Lucy drives, you ride shotgun, and you arrive at the modern day Colosseum. You split up, the team taking a support role and you bird-dogging into the depths of the ancient structure.
Basically you are going to parkour your way through the ruins until you reach a modern day power junction box, at which point you climb up for a checkpoint save, and then some more parkour down to the lower level. At the generator you climb up, then jump backwards to the ledge and do some more Parkour moves to another area with a generator and those odd striped beams.
Work your way around the corner on the beams and along the stone wall and do some more parkour to the large open arch, where you get a checkpoint save. Keep going in that direction and eventually you will get to an area with several sets of the striped beams and a checkpoint save.
Use the beams to get up on the edge by wall jumping twice, and then swing through to the lower area here -- you will be talking on the radio while this is going on and gather the joint suspicion that you are being lead to this site. That maybe the Templar actually wanted you to come here...
Use the cargo lift to climb up, then jump across to the beams and the ledge and do a leap of faith to the bottom where there is a hay pile. You are prompted to turn on Eagle Vision -- do that -- and you get a checkpoint save.
Now push in the blocks on the pillars to open the secret door, passing through into the chamber behind it, where should start to recognize this space. The lady of light appears, and you get another checkpoint save. Wisely you do not tell the others what you just experiences.
As you reach the next area using the beams, poles, and wall, you meet up with the lady of light again. You are once again instructed to use Eagle Vision and push some blocks to open another secret door.
Make your way up the walls of this shaft to the large open area, and then let the others in. You are in a church -- a famous one if Shaun is to be believed -- but your only interest is in the glowing square ahead that your ghost image climbs to. You follow it!
Pushing the panel lowers the light things that gives you a path back over to the other side of the room in the air! This should be very familiar to you if you played the previous game -- we have done this route before!
This is mostly a question of aiming right -- when you hit the half-way point you open a ladder you can use if you fall past this point. when you get to the center, pull the lever to open the floor panel and lower the set of swinging bars, which is your route down!
When you arrive Shaun is all pessimistic, having decided that this is a dead end. Ah, but you know better and you show them! Boy do you show them!
When the floor stops sinking Shaun gets all cocky, and Lucy goes all really obvious. The path from here is pretty straight forward, no real surprises. The lady of light puts in an appearance and has her say, and then you continue along the blue stone jumping points, but sadly they are on timers so you have to go fast!
The end was not what I was expecting... That is all I am going to say about it, as I do not want to ruin the game for anyone who reads ahead. Just one thing, do not turn off the credits -- there is some significant dialogue that takes place during them that may be a hint about what really happened, and what may be coming in the next chapter in the series!
This was a long and interesting story and adventure, and it had high points and low. I honestly was disappointed with the sequence before the last and being forced to use the Apple, which let us be honest, is not the best of weapons. It certainly felt as if we coasted through that set of memories for sure. Still that one small blight on an otherwise immaculate and immersive story is easy to accept.
Having completed the story, we have reached the point where this guide logically ends, but that is not the end of the game! There is still plenty for you to do, from wrapping up all of the side-quests that you did not finish before we headed into the final stretch to taking on some of the elements that we never addressed at all, like the feathers and flags, and the hidden messages and puzzles. While all of those are beyond the scope of this guide, there are excellent mini-tutorials and mini-guides out there on the web that specifically cover those parts of the game, and I seriously suggest that you make use of them, as otherwise you are likely to get frustrated!
I hope that you enjoy this guide at least as much as I did in the writing of it, and that it helps you to get your maximum value and pleasure from the game. We can expect some amazing things for this game in the future, as the word is that Ubi plans on kicking out some awesome DLC for it, which was an element that the previous games lacked.
There is also the multi-player side of the game, a new element for the series, but one I am confident will be very popular with gamers.
That pretty much wraps things up -- as I write this Christmas is just three days away -- I hope that you had a very Happy Xmas, and a wonderful New Year 2011!
Cheers!
The Assassins Guild Graduation Ceremonies
Assassin Guild Challenges:
* 25 Assassin Recruits signaled during a fight.
* 15 Arrow storms.
* 20 Assassin Recruits signaled to kill a target.
* 5 Assassin Recruits singnaled within a core memory.
* 5 Recruits raised to the rank of Assassin.
Courtesans Guild Challenges
* 10 Courtesan Groups sent to distract Guards
* 10 Enemies evaded using he crowd and other hide spots
* 20 Enemies stationed at Guard Posts killed using the crossbow without being detected
* 10 Horses belonging to guards commandeered without killing the rider
* 5 Dead bodies hidden in wells or hay stacks
* 15 Guards poisoned
* 20 Guards killed during a Smoke Bomb Attack
* 10 Guards assassinated from behind
* 5 Guards assassinated from blend spots
Thieves Guild Challenges
* 10 Thief groups sent to lure guards
* 1 Sprint uninterrupted for 300 meters
* 20 Jump from a horse to a beam
* 40 Leaps of Faith
* 1 Preform a dive from a height of 25 meters
* 250f pickpocketed
* 1 Glide a cumulative total of 500 meters with a parachute
* 25 Guards killed with a ranged weapon
* 5 Guards air assassinated from a beam
Mercenaries Guild Challenges
* 10 Mercenary groups sent to attack guards
* 5 Scaffolds destroyed by thrown guards
* 25 Brutes killed
* 25 Papal Guards Killed
* 25 Guards killed while on horseback
* 10 Guards on horseback air assassinated
* 10 Double assassinations
* 5 Guards disarmed and killed with their own weapons
* 5 Kill 5 guards within 10 seconds
* 10 streaks of at least 5 kills
The Retail Version Assassin's Creed: Brotherhood has a total of 50 Achievements at launch that total exactly 1,000 Gamer Points, and are split between the Single-player Story Mode and the Multi-player Mode. They are presented here, in a logical order, broken out by grouping and then in alphabetical order. No particular importance in placed upon the grouping order, it is just meant to make these more accessible to you.
* .. .- -- .- .-.. .. ...- . (20 GP) -- Solve all of Subject 16’s Puzzles
* Brotherhood (20 GP) -- Recruit 3 Assassins
* Capture the Flag (30 GP) -- Remove All Borgia Flags in Rome
* Deja Vu (20 GP) -- Replay a Memory
* Dust to Dust (20 GP) -- Find 1 Artifact in the Present
* Fly Like an Eagle (10 GP) -- Jump with the parachute off the top of Castel Sant' Angelo
* Home Improvement (20 GP) -- Upgrade 5 buildings in the Antico district
* In Memoriam (20 GP) -- Collect All Feathers
* Mailer Daemon (20 GP) -- Access your email in 2012
* Perfect Recall (30 GP) -- Achieve 100% Synchronization with a Sequence
* Perfectionist (20 GP) -- Earn 3 gold medals from the Animus Virtual Training Program
* Sanctuary! Sanctuary! (20 GP) -- Find a secure place to hide and re-enter the Animus
* Serial Killer (20 GP) -- Perform a Speed Kill Streak of 10
* Show Off (20 GP) -- Complete 10 Guild Challenges
* Spring Cleaning (10 GP) -- Kill a guard with a broom
* Technical Difficulties (10 GP) -- Attempt to access DNA Sequence 9 for the first time
* The Gloves Come Off (10 GP) -- Win the highest bet at the Fights
* Tower Offense (20 GP) -- Burn All Borgia Towers
* Welcome to the Brotherhood (20 GP) -- Train a recruit up to the Rank of Assassin
* Your Wish is Granted (10 GP) -- Throw money in a well
* Battle Wounds (20 GP) -- Complete DNA Sequence 1
* Rome in Ruins (20 GP) -- Complete DNA Sequence 2
* Fixer-Upper (20 GP) -- Complete DNA Sequence 3
* Principessa in Another Castello (20 GP) -- Complete DNA Sequence 4
* Fundraiser (20 GP) -- Complete DNA Sequence 5
* Forget Paris (20 GP) -- Complete DNA Sequence 6
* Bloody Sunday (20 GP) -- Complete DNA Sequence 7
* Vittoria Agli Assassini (20 GP) -- Complete DNA Sequence 8
* Requiescat In Pace (20 GP) -- Complete DNA Sequence 9
* A Knife to the Heart (50 GP) -- Secure the Apple of Eden
* Amen (20 GP) -- Discover the Shrine in the Basilica di San Pietro
* Gladiator (20 GP) -- Discover the Shrine in Il Colosseo
* Golden Boy (20 GP) -- Discover the Shrine in the Terme di Traiano
* One-Man Wrecking Crew (20 GP) -- Discover the Shrine in Palazzo Laterano
* Plumber (20 GP) -- Discover the Shrine in the Cloaca Maxima
* Undertaker 2.0 (20 GP) -- Discover the Shrine in the Catacombe di Roma
* Bang! (20 GP) -- Destroy the Machine Gun
* Boom! (20 GP) -- Destroy the Bomber
* Kaboom! (20 GP) -- Destroy the Tank
* Splash! (20 GP) -- Destroy the Naval Cannon
-- Multi-player Only Achievements --
* Abstergo Employee of the Month (20 GP) -- Get every bonus at least once
* Ahead of the Curve (20 GP) -- Perform a double or a triple escape
* Download Complete (40 GP) -- Reach Level 50
* Fast Learner (25 GP) -- Kill your target and escape your pursuer in less than 10 seconds
* Job skills (20 GP) -- During Open Conflict, kill your target and escape
* Needle in a Haystack (5 GP) -- Kill your target while hidden in a hay bale
* Overachiever (20 GP) -- Score 750 points or more on a single kill
* Role Model (20 GP) -- Get all the Co-op bonuses in 1 session
* Strong Closer (20 GP) -- Take the lead 10 seconds before the end of the session and go on to win
* Synchronization Established (10 GP) -- Complete an entire Session with at least one kill
The Retail Version Assassin's Creed: Brotherhood has a total of 51 Trophies at launch that total exactly xx Bronze, xx Silver, xx Gold, and x Platinum, and are split between the Single-player Story Mode and the Multi-player Mode. They are presented here, in a logical order, broken out by grouping and then in alphabetical order. No particular importance in placed upon the grouping order, it is just meant to make these more accessible to you.
* .. .- -- .- .-.. .. ...- . (Silver) -- Solve all of Subject 16’s Puzzles
* Brotherhood (Bronze) -- Recruit 3 Assassins
* Capture the Flag (Bronze) -- Remove All Borgia Flags in Rome
* Deja Vu (Bronze) -- Replay a Memory
* Dust to Dust (Bronze) -- Find 1 Artifact in the Present
* Fly Like an Eagle (Bronze) -- Jump with the parachute off the top of Castel Sant' Angelo
* Home Improvement (Bronze) -- Upgrade 5 buildings in the Antico district
* In Memoriam (Bronze) -- Collect All Feathers
* Julias Caeser (Platinum) -- Unlock every trophy
* Mailer Daemon (Bronze) -- Access your email in 2012
* Perfect Recall (Bronze) -- Achieve 100% Synchronization with a Sequence
* Perfectionist (Bronze) -- Earn 3 gold medals from the Animus Virtual Training Program
* Sanctuary! Sanctuary! (Bronze) -- Find a secure place to hide and re-enter the Animus
* Serial Killer (Bronze) -- Perform a Speed Kill Streak of 10
* Show Off (Bronze) -- Complete 10 Guild Challenges
* Spring Cleaning (Bronze) -- Kill a guard with a broom
* Technical Difficulties (Bronze) -- Attempt to access DNA Sequence 9 for the first time
* The Gloves Come Off (Bronze) -- Win the highest bet at the Fights
* Tower Offense (Bronze) -- Burn All Borgia Towers
* Welcome to the Brotherhood (Bronze) -- Train a recruit up to the Rank of Assassin
* Your Wish is Granted (Bronze) -- Throw money in a well
* Battle Wounds (Silver) -- Complete DNA Sequence 1
* Rome in Ruins (Silver) -- Complete DNA Sequence 2
* Fixer-Upper (Silver) -- Complete DNA Sequence 3
* Principessa in Another Castello (Silver) -- Complete DNA Sequence 4
* Fundraiser (Silver) -- Complete DNA Sequence 5
* Forget Paris (Silver) -- Complete DNA Sequence 6
* Bloody Sunday (Silver) -- Complete DNA Sequence 7
* Vittoria Agli Assassini (Silver) -- Complete DNA Sequence 8
* Requiescat In Pace (Bronze) -- Complete DNA Sequence 9
* A Knife to the Heart (Gold) -- Secure the Apple of Eden
* Amen (Silver) -- Discover the Shrine in the Basilica di San Pietro
* Gladiator (Silver) -- Discover the Shrine in Il Colosseo
* Golden Boy (Bronze) -- Discover the Shrine in the Terme di Traiano
* One-Man Wrecking Crew (Silver) -- Discover the Shrine in Palazzo Laterano
* Plumber (Silver) -- Discover the Shrine in the Cloaca Maxima
* Undertaker 2.0 (Bronze) -- Discover the Shrine in the Catacombe di Roma
* Bang! (Bronze) -- Destroy the Machine Gun
* Boom! (Bronze) -- Destroy the Bomber
* Kaboom! (Bronze) -- Destroy the Tank
* Splash! (Bronze) -- Destroy the Naval Cannon
-- Multi-player Only Achievements --
* Abstergo Employee of the Month (Bronze) -- Get every bonus at least once
* Ahead of the Curve (Bronze) -- Perform a double or a triple escape
* Download Complete (Silver) -- Reach Level 50
* Fast Learner (Bronze) -- Kill your target and escape your pursuer in less than 10 seconds
* Job skills (Silver) -- During Open Conflict, kill your target and escape
* Needle in a Haystack (Bronze) -- Kill your target while hidden in a hay bale
* Overachiever (Bronze) -- Score 750 points or more on a single kill
* Role Model (Bronze) -- Get all the Co-op bonuses in 1 session
* Strong Closer (Bronze) -- Take the lead 10 seconds before the end of the session and go on to win
* Synchronization Established (Bronze) -- Complete an entire Session with at least one kill