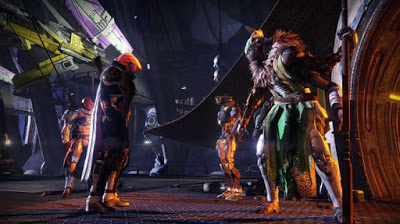
Flashback to events just after Emergence Day — the day in Gears of War lore when the Locust Horde appeared to lay waste to Sera. Their next target is the COG territory of Llima City, and Zeta Squad isn’t about to give the place up without a fight. This singleplayer DLC for Gears of War 3 is expected to run you three hours, with all new characters, some new mechanics, and a chance to play as the once unstoppable General RAAM. Combine that with six new multiplayer models and one weapon skin, and you’ve got a pretty robust set of DLC.
If you’re planning on shooting your way through this mini-adventure, join Game Front as we give you the best strategy for conquering the Locust and the COG. For even more information on Gears of War 3: RAAM’s Shadow, check out our achievements page. If you want to find a list of all our extra content on this DLC package, check out the cheats page.
Gears of War 3 – RAAM’s Shadow DLC Walkthrough
Evacuation
Chapter One: Evacuation
We need a term for a prequel that is an expansion. Anyone?
Most players of GOW are naturally curious about how it all started, and now you can at least see a little part of it. You start this adventure just after E-Day, with a new squad and some familiar faces.
Your adventure starts with the biggest damn e-hole you’ve ever seen. You’ll hear a boomer before you see him, so be prepared. Almost immediately you’ll be directed to get on a turret, so get moving!
Note the command center to your left as you climb up the turret. There’s also a Longshot on your right, which is handy. Hang on to it. As soon as you’re on the Troika, the heavy attacks start. Take out everything you see, as fast as you can, and look for another big challenger to drop in. Look for an attack from the left, and then the turret will be down. Hold out against the insurgents until your comm says it’s time to get serious. Go to the command center to unleash the hammer.
This hammer is old fashioned, so you’ll be aiming from overhead in a kind of IR vision. Simply target the bugs and get it done.
Head to your left and out a gate to move on. When you reach the mass of cars, look for a big gate on your right. Follow the path through another gate to a garden area. Some exciting stuff will happen off to your left, and then proceed up the stairs to see some Wretches run by.
Enter the gate if you want some ammo, otherwise, hang a right. When you enter another garden, look for a hole, throw a grenade, and then take out the Wretches and a few grubs. Kick a desk out of your way to proceed. You’ll enter a large courtyard, with lots of grubs. Look for snipers on roofs to your right and drop them stat.
After you clear the area, you’ll find what’s left of Echo Squad. Then hunker down for some rough fighting. To the left of the bank entrance an e-hole will open, then to the right, and then behind you. The first has some snipers and shotgun bugs, the second has heavier guys, and the third has Guards coming out of it. After that, two boomers and two bloodmounts will break through. Keep ammo handy.
After that, enter the bank. Head into the door on the left with a blue security panel, then through another similar door on the right. That will open the access to the vault. On the next level, follow the hall, hang a right, and get ready for Wretches backed up by one grub. Then head down another flight of stairs to the vault. On the landing before the descent, look to your right for ammo.
Enter the vault after Jack hacks it, and expect a wave of Wretches. After that, an e-hole will open to your right, and then another to your left, through a door. Scorchers will be all over the place, so keep your wits about you. When I played, my compatriots had a habit of falling into the e-holes and dying, so close them fast. Remember, with Scorchers, aim for the backpack and get away before the fireworks. When the room is clear, head to the vault and open it.
Gears of War 3 – RAAM’s Shadow DLC Walkthrough
Darkness Spreads
Chapter Two: Darkness Spreads
Move up the stairs to cue a cutscene and change sides!
As RAAM you can stab, but your primary attack is the Krill cloud, holding the left trigger to targer and unleashing it with the right. Keep it going for a kill. Use it to clear out the next area, as you can’t move on while a human lives. The B button is your knife swing, and hold it for a stabbing charge. Look for a troika on the right. Another crew of humans will show up next. Another wave will follow after orders from the queen. Keep the defense going until the Seeder is released.
Head into a tunnel, kill the humans and the queen will warn you of snipers. Use the Krill to drop them first, and watch the chopper come down soon after. Head toward the radar point next and shove a van out of the way to proceed.
The second verse is the same as the first, hold off the humans until the Seeder rises. When that happens, a gate will open to the next area with two foot soldiers and a guy in a mech. Two Krill attacks will dice the dude in the mech, allowing you to move on to three more soldiers and a man on a troika. After that, bash through the wall to move on.
More of the same through the gate, if you come toe to toe with a mech, hit it with your knife and run away when it starts to burn as it will explode. Look for more of the same, soldiers will continue to come in while the hammer Berserker summons the Seeder.
After that, you’re back with the squad. Follow the path and bust out the door to get into the open. Hope you kept your Longshot, because there are two snipers ahead and above. An e-hole is there as well, so close it as quick as you can. Move on just a little bit and you’ll come under mortar fire. Snipe them out. As you reach the next section, you will face two e-holes and a couple of boomers. Keep your head down and keep firing.
Open the gate to reach the next section. Are you now going to attempt to undo everything RAAM just did? Bet your ass. Head through two doors into the next section, look all the way along the wall to your left for Boomshots, and aim for the pillars ahead of you to take out the Seeders. Locust will attack while you do so, but if you’re not on too hard a difficulty, your team will take them out. A Brumak comes to join the party next, so hang onto that Boomshot.
Gears of War 3 – RAAM’s Shadow DLC Walkthrough
Hide And Seek
Chapter Three: Hide and Seek
Follow the Evac Checkpoint signs to the entrance of the school. Open the door, and then head to the left to climb into the building. Hop out an open window and the follow the outside hall to another open window, and re-enter the building. Follow the checkpoint to a dead end and a comm signal. Then go back toward where you came in on the inside of the building, and move the obstacles to keep going.
Kick open a door to move on, and hang a left down a hall. Follow the radar points to a closed door and then an open one. Head through another double door and hang a left to move down the hall. Keep going to a room with a switch. There will be a tense moment when you enter, then move to the switch and throw it. This will lead you back out to where you started, and now you can move downstairs.
At the bottom of the stairs the crew will turn right. There is ammo to the left if you need it. Then there’s a wave of Wretches. They come in from the fenced-off area Jack breaks open, and when you get rid of them he’ll open up the next gate. Just back into a corner so they can’t sneak up on you and it’s not too challenging.
Keep going until you hit daylight and then get ready for some heavy fighting. There is an uber sniper up above you, armed with a One Shot, and after the first wave of grubs, you’ll face two berserkers, and then three e-holes will open up all over the place. If you don’t have grenades, it’ll take a while to clear. No heavier bad guys, thankfully. After the sniper is dead, feel free to grab his gun to lay waste to the grubs if you can get past the berserkers.
Head up past where the sniper was, and into the building. Follow the radar point to an office, and after you bust it open, another Wretcher wave comes. Again, grab a corner and get ready to reload fast.
Follow the radar points to the cafeteria. Here you’ll face three waves of tickers. The first two are the proto tickers, who don’t do a lot of damage, but the explosive kind start showing up in the third wave. The tables make shooting them a pain in the ass. Make your way through the maze of tables, letting your teammates keep the bugs down. At the end, Jack will create another path.
Turn the next corner, and at the end of this room is an e-hole, which lets out some therons and other grubs, and expect a small wave of tickers as well. Sniping will help a bit, but mostly you just have to stay on top of the number of grubs in the relatively small area. Two more grubs will burst out of the next room when you get there.
Move into the room past the projector room, and get ready for things to be creepy. Enter the main locker room and follow the radar point. That brings a very challenging fight. You will face two serapedes, remember, shoot them from the tail end first. You may not see the second right away, and he’ll get you while you’re shooting the first. Then a berserker joins the fray, and then some loose grubs. Good times.
In the gym, chainsaw the two crates blocking the right section of the bleachers, then throw the switch, and use the stairs to ascend. Then a mama berserker will join the fight. Lure her into the metal boxes blocking the bleachers, then extend them. Head up the stairs again, head to the right and unblock your path. After that, you’ll face mama again. Use the cars and particularly the tanker to keep her lit up and glowy, and unload on her.
Gears of War 3 – RAAM’s Shadow DLC Walkthrough
Under The Shadow
Chapter Four: Under the Shadow
You’re back in RAAM’s big boots again, and clearing out the humans. There are a few troikas and some heavy weapons involved, so even though it’s slower, using the blade rather than the kryll will be helpful here. Then, once again, it’s guard duty while the Thumper does his thing.
The next section features lots of grenadiers and a mech, but if you don’t get too far ahead of your troops, it’s still pretty easy. Bust through the wall to continue. In the next section there is a troika, a mech, and guys with flamers, who will make things difficult, very quickly. After that, reinforcements will drop in behind you and some more will enter in from up front. Expect a couple of mechs, and several foot soldiers, but it’s easier than when you came through the wall.
Now we’re back with Zeta. Move forward, bust open the gate, gather ammo, then hang a left. You’ll see a wave of tickers first. Then two e-holes will open up, one on the left and another on the right. Keep grenades handy. Then the building ahead of you will break open and a boomer will come out with two pet Wretches.
Head into the garage, open the gate, and then hang a left up the ramp. You’ll come to a burned out area with a scorcher still in evidence, reinforced by a pack of grubs. The entry to the next ramp will burst open with three grubs, and you can move up. The next level features another burner, and grubs all over the place. Once the first wave is mostly down, look for a boomer to come from the far corner. When he’s gone, you can shove a car down the next ramp to take out at least one of an upcoming pair of boomers. At the bottom of the ramp hit the button to open the gate and move on.
As tradition dictates, the path will split. From the rooftops you offer cover, from the ground you’re in it hip deep. Choose accordingly. The grub wave isn’t as bad as the characters say it is, but keep your eyes open for an e-hole. After the first wave is cleared and you meet up again, two more e-holes will open, the second around the corner, after a bloodmount attacks. Fortunately there is a mulcher nearby.
Follow the radar to enter the building, which should look very familiar, and then proceed up the stairs to the next door. Head towards the big shiny door to city hall.
In the courtyard of the city hall, you’ll see some grubs ahead of you, but don’t get too distracted, as there are Wretches about. As soon as you clean off the patio area at the far end, get down there. There is a vulcan cannon, and you’re gonna need it. Two e-holes open in the courtyard, along with two crypts on either side opening up with grenadiers in them. It’s a long fight, coming in stages, so be ready and armed. Finally, a gate on the right, facing the courtyard from the raise area, opens and a boomer and a grinder join the fray. After they’re done, finish mopping up. Will two reavers show up after that? Yes they will. Will it be a pain? Also yes. They attack and then fly, so keep moving when they’re in the air, and let them have it when they’re stationary.
Now you can enter the city hall. Head all the way around for some grenades, then break through the door into the entry hall. A grinder will come from either side of the stairs, along with a few grubs, and then a wave will come from the top of the stairs, including snipers, Therons and another grinder. Once clear, head up the stairs and to the right. There will be a library type room with another batch of grubs, and through that, the hammer controls.
After laying down the hurt with the hammer, where you just only have to kill three seeders, you’ll be brought back to the action. The grubs are in the library, throwing everything at you but the kitchen sink. When the room is clear, follow the radar to a door and find your way outside.
Follow the path to an alley and some barbed wire. Move on until you see grubs, move up and then down, and grab the mech to move on. Use it to pick up a shield and then follow the path indicated. The shield will cover you. Follow the path and STAY in the elevated section as long as you can, that is, as long as your ammo lasts. An e-hole will emerge then ongoing waves of guys including Therons, some boomers, a grinder, you name it. There is a mortar to use, and otherwise, have a sniper rifle handy or grab a boomshot as soon as you can.
When things are finally cleared out, follow directions and activate the crane. Enjoy a monster cutscene, and the end of the chapter.
Gears of War 3 – RAAM’s Shadow DLC Walkthrough
Kryllstorm
Chapter Five: Kryllstorm
You’re in the thick of it now. Three e-holes will open up, one after the other, in this big courtyard and it is easy to get distracted and surrounded. You’ll note a big guy that is clearly on his way to you, and once the area is cleared, two big doors will burst open and more grubs will join the fight. They will be joined by two mauler elites. It’s easiest to let your teammates distract them and shoot them from behind. When that’s clear, continue toward the orphanage, and in case you need a reminder, gather ammo.
Head into the building, through a kickable door, and then you’ll chainsaw another one. Now you’re in an area with a floor glowing with ooze and here you face off against the big Theron. He’ll absorb some fire, then pop open a kryll shield and run away. Each time another wave of grubs will join the party. Be patient, fire at him whenever you get the chance, and clear the other grubs in between stat.
Head up the new ramp. There is an opening beside the big door where you can find some grenades. Otherwise, pop the door and continue. Climb the ladder inside after stocking up, and welcome to the party.
You finally make it to the orphanage. Clear out the street, head to the barricade, and then RAMM returns on his pet reaver. Unfortunately, he also brings reinforcements in the shape of six e-holes, which open up periodically and distract you from the main job of killing him. He also has his kryll shield, which makes him hard to hit, he throws it at you, which kills you fast, and the throws ink bombs.
Focus on the e-holes first, there is a limit to them, and once they’re done you can focus on RAAM. You’ll know you have him on the ropes when he shifts to another building. He’ll throw his shield, then throw three ink bombs, and that’s your opening. It takes some doing, especially since the ink bombs and the kryll are hefty attacks, so movement is vital.
RAAM comes down to the ground, and now e-holes will start opening up inside the orphanage yard. One will be on the left, and two on the right, at least. At the same time, RAAM will throw ink grenades and throw his kryll. As ever, when the kryll are gone, headshots will bring him up short.
Next RAAM brings in two reavers. They’re ugly, and your AI teammates will take a beating, but they’re not too tough to get past. Then RAAM comes back, on your level, and his reaver is aggro, stabbing you with its legs. Keep your distance, fire when he’s vulnerable, and keep after him. After he takes some damage, he will start doing fly-bys, largely with his shield down, but it can be hard to get a bead on him. Hitting him enough during this phase will bring his reaver down again. And that is that. Not for RAAM of course, we all remember him, but for this expansion pack.