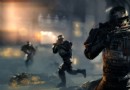
Part Tribes, part Halo, and all fun, Section 8: Prejudice is a downloadable shooter that plays like a boxed title. You can read our review, or check out our lists of trophies and achievements, but we also highly recommend the following: a singleplayer walkthrough and multiplayer guide for the game.
Below, you’ll find step-by-step instructions to get you through the levels alive, plus guides to weapon types, purchasable items, map types, game types, and much more. Let us help you terminate your enemies with extreme Prejudice!
Multiplayer
The Basics
Section 8: Prejudice is all about defeating your enemies with extreme prejudice. Like the previous game in the series, Section 8 is a multiplayer focused FPS with custom loadouts and unlockables gained through levels online or stars offline. With singleplayer and two multiplayer game modes, with a third on the way, you get plenty of content for the 15$ price tag.
The fastest and easiest way to get a hang of the controls is through singleplayer or offline botmach. But, for those of you out there with no patience for that nonsense, select “Help & Options” under the top menu, from there select “How To Play” – press X to jump right into the tutorial.
The tutorial goes over many of the basic functions of the game. Many most gamers will be familiar with; running, jumping, shooting, and aiming. Section 8 has a few unique features going for it. The jetpack is useful for jumping to high places or confusing opponents. Overdrive is activated after a sprint to get you across the map fast. The Dropship will allow you to spawn anywhere on the map, with some restrictions. Because the Dropship is such an important feature, learn it and love it.
The Dropship
Every game starts in the Dropship. Here, you can check out teams, change your loadout, and choose a landing zone. You have two options; Free Spawn and Squad Spawn. Free Spawn allows you to choose a spot to land, while Squad Spawn drops you onto whichever teammate you’ve selected. Squad Spawn is perfect for landing together in a group.
Falling out of a Dropship is fun and all, but keep your eyes on the prize. The battle lines can swing wildly in even the few seconds during your fall to the surface. Watch where you’re falling and who you’re falling on, dropping into a swarm of red pointers is a sure fire way to get killed.
Dropping into the thick of a fight might seem helpful, but remember that your hard landing leaves you vulnerable for several seconds. Drop near or behind cover to obscure your opponent’s line of sight. The maps of Section 8 are sprawling outdoor affairs, if you’re stuck in an empty field, you’re just begging to be shot.
There’s even more to Dropship spawning – look forward to AA guns. Check below for what to look out for and how to stop suckers from spawning ontop of you.
The Weapons
Weapons? Where would we be without them. Section 8 has all the mainstays; you’ve got the Assault Rifle, Machine Gun, Missile Launcher, Pistol, Shotgun, and Sniper Rifle. While the selection sounds dull, each weapon has a selection of variants that change how that weapon works. For instance, the Sniper Rifle’s regular, hum-drum slow-firing accurate Rail Rounds can be switched out for Frag Rounds – bullets that explode on contact.
Every weapon does what you’d expect – not counting the Pulse Cannon, an energy weapon that can be charged. As you gain levels and unlock more variants, pick through the options to confound your opponents. Napalm does very little damage to shields while eating away armor, while EMP destroys shields but scratches armor. Pick the variants you need for the job. Are turrets and vehicles giving you problems? Take Crash Rounds for your Machine Gun. Are your opponents too fast with their jetpacks? Use Concussion Rounds to slow them down. There is a wide variety of different variants, so experiment to find which combo works best for you.
Equipment
Every player has two equipment slots that must be chosen to activate. The standard selection is all here; grenades, repair tools, detpacks, but just like the weapons they all feature unique variants. The Knife can be switched out to suck the armor or shields off of an opponent at close range or Frag grenades back be switched out for EMP. An EMP grenade mixed with Napalm or Slugs can devastate a highly shielded opponent.
The two unique choices out of the bunch are mortars and beacons. Beacons are deployable devices that either jam enemy sensors and detects nearby enemies. These are especially handy for Infiltrators or Recon classes, the ubiquity of sensors in Section 8 means that most players just assume everyone is visible on the map. With a little jamming, you’d be surprised how easy it is to be ignored while you snipe or sneak into the enemy base.
Mortars are weapons fired from your backpack. Think of the mortar as a long-range grenade. The mortar shells takes time to reach its target, and the target is lit up for both sides to see, but it’s still a great suppression weapon to confuse and weaken opponents during a large firefight. If you’re a heavy bruiser with a Machine Gun, consider bringing the mortar to rain destruction. The mortar is also a great back-up weapon for destroying purchasable structures when you don’t want the Rocket Launcher taking up a weapon slot.
Upgrades
Like equipment and weapons, more upgrade options will unlock as you gain levels. Upgrades vary in usefulness, as most players are going to go for upgrades that increase weapon damage and defense. There’s a good reason for that, putting points into your shields and armor can never hurt your chances in the hard fought early levels.
Weapon damage is great, but many of the upgrades can help in unique ways. One of the upgrades can increase your Lock-On, making it last longer and recharge faster. Lock-On is a destructive ability in the right hands, and less skilled players should consider putting one or two out of your ten points into increasing that particular upgrade.
Many players focus on dishing out armor damage while ignoring shields. Throw four points into the Shield Generator to muscle through damaging Napalm Rounds. If you’re an engineer, following vehicles or staying on base defense, consider powering up the Repair Field upgrade. More upgrade modules become available as you play, like the Stealth Shielding or Assassin Module that make sneaking into bases and knifing opponents that much easier.
Purchasing
Here’s the meat and bones of the game. As you kill opponents, capture command points, and complete DCMs, you’ll gain cash. With cash, you’ll be able to purchase vehicles or structures that help your cause. That’s right, no fighting over vehicle spawns like in Battlefield. You buy a vehicle and it’s all your’s.
The cheapest of the purchasable structures is the Supply Depot and Sensor Array. Both do exactly what you imagine, the Supply Depot repairs your armor and restocks your weapons. The Sensor Array, meanwhile, detects nearby enemies. Deploying both of these just off the beaten path is a great way to keep your team alive and the enemy team on your minimap. Setting up Supply Depots near base hardpoints, where structures will automatically rebuild, means that the hardpoint structure will constantly be repaired, useful during a heavy siege.
The next three purchasable structures are the turrets. The Minigun and Missile Turrets are self-explanatory, the minigun is effective against opponents while missiles are better against vehicles. Vehicles are a relative rarity, through all three are powerful. These turrets are good at harassing opponents, but any veteran players will run circles around these things.
The real standout turret is the AA. This weapon creates a large circular area on the map, and will fire on anyone that tries to drop within range. Obviously capturing and holding onto a base forces your opponents to hoof it, dropping AA turrets on the edges of the map or even nearby your opponent’s base during an attack can net you kills as overeager players immediately return to their base or try to attack your’s. AA turrets will also prevent purchasables from landing. Placing AA in non-obvious locations such as… pretty much anywhere that isn’t a DCM waypoint. Speaking of DCMs…
DCMs
Dynamic Combat Missions occur during Conquest and Swarm games, and provide extra control points by either achieving the objective or stopping the enemy from achieving their objective. There’s a variety of different DCMs, all of which take place in the badlands between bases. A good team will know when to pursue a DCM – often DCMs are just a distraction, some of which reward only a handful of points that would be better spent defending or attacking your bases.
An unorganized team will scatter once a DCM is activated, as they either spread out to snatch all the intel or wreckage, or run for the DCM waypoint to lock it down. Take this opportunity to attack their undefended base. As the CP is hacked, the alert will definately draw some of the opponents back – now they’re really disorganized. Breaking teams apart is what DCMs are all about, they add randomness and confusion, and completing DCMs without losing the CP’s you’ve gained takes communication and teamwork. Some DCMs are best left unpursued.
Conquest
Now that you know the basics, you’ll have you chance to dive into the Conquest game mode. Like the Battlefield series or Onslaught from the Unreal Tournament series, two teams fight to control points on the map and gain points before their opponents. Points are gained by killing, completing DCMs, and holding Control Points. When one team reaches 1000 points, they win.
Be Flexible
Plenty of options are available to you, so use them. Most players come equipped to fight heavily armored opponents at medium range – the shotgun is ubiquitous among every class for good reason. If players are driving you nuts, change tactics. Change equipment, change upgrades, change your attack. A player hacking into a Control Point is waiting for you, and if you’re in enemy sensor range, they can track you.
Don’t keep running into the same wall. If the opposing team has a Control Point definitively controlled, attack a different point or focus on completing DCMs. Change your loadout to reflect what you need. Most players will find one role that they like and stick with it. There’s nothing wrong with that, every team needs attackers and defenders, but not every team is created equal.
If your team is favoring an attack, stay near one of your control points. If your team is turtling up, try sneaking into the enemy’s base. If they’re all buying vehicles, try purchasing structures instead, or taking a repair tool. Section 8 may not have classes, but there are roles and not everyone will fit all of them at once.
Be Patient
Death comes easy and respawns are plentiful, but that doesn’t mean you should be suicidal. Many players will drop into the center of battle in their haste to help friends defend, capture, or complete DCMs only to get killed before looking up. Your armor and shields provide a lot more protection than in many other shooters, but you’ll be surprised how fast those shields and armor fall down in a chaotic gunfight.
Instead of landing directly into a fight, drop off somewhere safe and move in. The treck across the grass isn’t as dangerous or long as it seems. Spawning off on the perimeter of the map will you give a long line of sight and plentiful cover to shoot down opponents that run on the road.
Capturing Control Points
Patience is a virtue while captung Control Points. Landing at the edge of an enemy control point seems like a good idea, but remember that everyone inside the base has cover and turrets, while you have nothing. The outer edge of the AA gun’s range is a natural frontline for creating structures to aid in the team effort to attack a base.
A base might seem impenetrable, but there are two major weaknesses to any base. The AA turret and the Sensor Array. Most players take these structures for granted. Destroying an AA turret with a few rockets or Crash Mortar shells will open the base up for immediate drops. While dropping near a base is usually a bad idea, the interior of the base is loaded with cover, making a coordinated drop deadly to any number of defenders.
The Minigun turrets may seems like a problem, but most Control Points are hidden away. Enter into Overdrive and use your Jetpack, and the turrets won’t be able to keep up. Any hardpoint structures still standing will immediately switch to your side after a successful capture, which is always a bonus. The truly tricky part of capturing a base is the period after hacking. A successful hack will turn the base neutral, shutting down every structure excepting the AA gun – which just fires on both teams.
You know that area directly around the Control Point? The opposing team is going to expect you there. Pull a fast one on them, after a hack, distance yourself and watch the computer from afar. Red team will rush in to defuse the hack, making them easy pickings for an ambush. That leads me into my next point…
Holding Control Points
First of all, if your Control Point is hacked, don’t run directly to the computer and defuse the hack. That’s just asking to be shot in the back. Take a moment to look around the base, even if it’s only a second. The red team won’t expect a defender to go looking for them after a hack, and they’ll likely be armed with long range weapons or equipment. Surprise them, and you’ll have a distinct advantage as they fumble to switch to a shotgun.
A few extra structures can go a long way to defend your position. Placing Missile Turrets can really help your efforts late in the match when players start purchasing vehicles. Most regular players will ignore or run by the slow moving missiles instead of waisting their ammo destroying the turret, so placing them out in the open is a good option to give the turrets a good shot at vehicles. The roofs of bases are the most popular spot for structures, but also the most obvious and the most limiting. Placing turrets out in the open, near the back end of a base, will increase their survivability while still harassing red team.
Camping is a difficult prospect, especially in a game where players can drop right onto your position. If you shoot at incoming players trying to take your base, don’t stand still and don’t hang around the same piece of cover. Switching your angle, either hiding inside the base or sniping outside into the base, can confuse and slow opponents.
Taking and keeping Control Points is the bread and butter of Conquest mode. Kills are inconsequential, your goal should always be to take these points.
Completing DCMs
DCMs might split up teams and provide victory points, but they also provide other bonuses in Conquest and Swarm modes. These are bonuses you want. Escorting a VIP to your Control Point adds a powerful NPC to defend your location until he’s killed. The Convoy DCM creates a tough truck that can launch missiles, giving one team a quick edge with a powerful new weapon. Airstrike completely destroys any opponents or structures in a base, making it easy pickings. Many of the DCMs can be completed with a single dedicated player – Infiltrator, Intelligence, and Recover can be done alone, while others like Airstrike or Convoy technically can be done alone, but more often need an organized effort.
The victory points are tantalizing, but it’s the extra bonus effects that make completing DCMs worthwhile. Your opponents are going to try to take advantage of DCMs too, and even better, a single dedicated player can often stop an entire team from completing their DCM. Dropping detpacks onto the Outpost, Convoy, or Jammer can be devastating, while planting AA guns near Intelligence and Recover objectives can net you some easy kills and a failed enemy DCM as your opponents run over open land to reach them.
Maps – Small and Large
All four maps in Section 8 have their own particular differences and functions. Eden forces players to fight at close range with its many walls and barricades blocking snipers except on the major roads, while Zephyr is a more traditionally open area resembling a large Halo 3 map with fewer barren hills. Learning the maps will take time, but knowing what’s important on each map is as simple as looking at the size.
All four maps feature three sub-variants to play on that reduce the total amount of Control Points. Medium sized maps have three Control Points, and small maps have two. The fewer control points, the more you’ll have to focus on fighting your opposition. The small maps are frantic gunfights with the full compliment of 16 players, and the close quarters boils teamwork down into simply sticking together.
Small maps rarely require vehicles. The Heavy Tank and the Bike will just make you a target on the smallest maps. The Mech is where your vehicle cash should go, the Mech’s powerful anti-infantry guns and the strong melee attack make it well-suited for small or medium maps especially.
On small maps, make sure to destroy AA guns planted outside your base quickly. If one team captures both bases, it won’t take long to place another two AA guns and block off the entire battlefield. The AA guns can only fire on one person at a time, if this happens, make sure to use Squad Spawn to overwhelm a single gun.
Medium and large maps are where you’ll need to be the most flexible, and where Control Points will change hands most often. On a small map, your best bet is to Squad Spawn in the beginning. On a larger map, both teams will spread out in a mad dash to capture the most Spawn points. Check your drop zones, wait a few seconds to see incoming enemies, and pick an easy target.
Swarm
Think of Gears of War’s Horde mode here, with some Halo and tower defense thrown in. The four multiplayer maps are all represented with one single Control Point you and three friends need to defend from increasingly difficult enemy spawns. Turrets are even more useful here, as your small team will always be outnumbered and shot at from multiple angle. While the enemy AI is easier than a player, you can follow many of the same strategies here to defeat them.
First, don’t just stand in the center of the Control Point. Every enemy that drops down will be gunning for the center, so try to keep your back to a wall or an accessible piece of cover. Turrets are far more powerful shooting at the slow AI, so the more guns you drop down the better. Call down Supply Depots, you’ll be surprised how fast you run out of ammo.
There are three phases to Swarm, each increasingly more difficult than the last. Usually near the end of each phase, the enemy will spawn with Mechs, so don’t forget anti-armor weaponry. Every phase ends with a bombing run – the voice will command you to find cover, but don’t worry. The bomber’s explosions won’t hurt you.
Flexibility is good, but with such a tightly knit team, you’re better off choosing distinct roles and sticking to them. Everyone in the team will have to contribute their points to buying purchasables. You’ll have time to discuss your plan before hacking into the Control Point, which activates the first phase. If you’re not sure where enemies will spawn, look around for the closest piece of cover just outside the base near the red border. The enemies always spawn out of view and usually one short field outside the base, just out of range of your AA gun.
Don’t go gung-ho, and focus on taking out the closest group of enemies first. Your main goal here is to survive, dying will leave your team down one valuable gun for several seconds – of which you might be overwhelmed after the drop. Mortars and EMP grenades are good for destroying your enemies’ shields while Machine Guns can destroy multiple enemies at medium range between reloads. Detpacks and knives can destroy enemies going for the Control Point – remember that the AI doesn’t hold a candle to human opponents. They are completely single-minded, they’ll step right into planted detpacks or run at you without a good close range weapon. Take advantage of the AI, after the landing, they’ll usually run directly towards the base in a large group – perfect for mortars and Machine Guns.
Keep your head on straight, and Swarm can be a fun little mode that tests your teamwork.
Singleplayer
Answers
Part 1
This mission is primarily a tutorial. Starting with a shooting gallery, shoot the targets and follow the instructions on-screen. You’ll learn one unique power, the lock-on. Test it out and move to the next instructor.
This instructor will show you how to use the load-out screen, how to use grenades, and finally how to hack into Control Points.
The third instructor shows you how to use dropships to spawn.
Part 2
Run up the hill to talk to your fourth instructor. In this obstactle course, you’ll use all the skills you’ve gained so far. To start, jet-pack over the wall and run forward. Jet-pack over any walls that block your path and run onto a catwalk.
Look out for the spaces between platforms, you’ll need to jump over these until reaching a small shooting gallery. Shoot the targets and turn left. Run across to another gallery, shoot the targets and use your lock-on to shoot the fast moving target.
Run and overdrive, then jump and jetpack to make it over the large gap. You’ll land in a minefield, but these mines are pretty weak. Just run to the finish line.
With all that fun done, run to the doors up the hill to talk with the General. Follow your waypoint down to another set of doors. Through there, run to an elevator that’ll take you into a watchtower.
After the cutscene, you’ll be fighting real enemies. Use the assault rifle and stay near your allies. More soldiers will drop down as you fight, but they won’t pose much of a threat. Stand near cover in an emergency and shoot your way to the exit door.
Part 3
Fight through more enemies – some of them will be equipped with rocket launchers already. Don’t worry, your armor is crazy tough, a rocket will barely scratch the paint job. Fight your way to the General waiting at the top of the hill for new orders.
Run to the waypoint marking a door. Wait for it to open and fight your way through swarms of enemies. The General will order you to protect the dropships, but there’s nothing you can do for now. After the first two are destroyed, you’ll see a cutscene at the third dropship.
The fourth dropship you’ll need to protect. It is very tough, so don’t worry about baby-sitting it too much, just focus on shooting every enemy soldier that runs through the gates or drops down nearby. Stay near the dropship or the Supply Depot and gun down the soldiers as they run up the road.
Into the Breach
Part 1
The mission starts with a dropship insertion into a snowy area. Just follow your comrade’s lead as he takes out the first guard. Take out the second guard with your knife – holding down the equipment button shows a little animation.
Continue towards a ledge, after the cutscene start clearing the first structure ahead of enemies. Use the sniper rifle and they won’t be able to hurt you. When you’re ready, jump down and follow the right road into a bunker guarded by two enemy soldiers.
You won’t be able to enter the base, entering any red-lined areas on your minimap is instand death. Stay in bounds and snipe the guards in all three bases. Start with the left building and move right. As you clear out areas, the next area down the line will spawn new soldiers.
Part 2
Jet down to your little buddy for new orders. Soldiers will begin to run in through the large entrance road, so take care of them.
Use the dropped Supply Depot to snag a rocket launcher with crash rounds to destroy the convoy. Overdrive your way up the road and destroy all three trucks. Move quickly and look out for rockets and snipers in bunkers covering the road.
Once you reach the base, destroy the turret outfront and start clearing the way. Enemies are everywhere inside, so take it slow and keep an eye out for bunkers or watch towers.
Part 3
Shoot your way into the control room and hack the console inside. There’s a shotgun soldier waiting there, but a few grenades should soften him up. Watch the cutscene and hoof it out of the base.
Following the road, you’ll be heading towards a refueling station for the enemy fleet. The bridge on the road is knocked out, so clear out the enemies on the opposite side. When they’re taken care of, give yourself some room to enter overdive and jetpack across the broken bridge.
Down the road, you’ll find the entrance of the station marked with a turret and some bunkers. Head towards the waypoint to find a broken section of fence and jump down.
Part 4
Entering the Fuel Depot enemy soldiers will rush through the doorway. Inside, you’ll have to contend with soldiers on the first and second floors. Your goal is a computer attached to the fuel lines on the first floor. Hack into it, then wait for the arms to break both containers. Run to the second floor and hack the computer.
Exit the depot using the second floor doorway. Jump down and fight your way into the second depot. You’ll have to do the exact same thing again, so use both computers.
Now that both fuel depots are sabotaged, fight your way into the courtyard. Stay to the left or right wall so you’re not taking too much damage at once – this large area is filled with bad guys, so stay back.
Once the area is clear, jump into the tower marked by your waypoint and set a bomb.
Deadwood
Part 1
Starting off in Deadwood, run towards the station beyond the frozen stream. Access the Supply Depot there and take either a missile launcher or a machine gun. The machine gun is great for handling close or medium range enemies. As you approach the waypoint, you’ll have to fight a mech. Mechs are pretty tough, they have high shields and very high armor. Back away and strafe around rocks or structures to escape their deadly melee attack and their twin machine guns. Grenades will also help.
After destroying the mech, run to link up with your allies. Fight your way into the valley, shooting soldiers hiding behind rocks until you can plant an explosive charge on the AA gun. Take your time and take out the turrets guading the passes.
Continuing forward, you’ll fight through a small base loading with enemies. They won’t stand still, most of them will be armed with asssault rifles or machine guns, so prepare for some close range combat. Fight to the back end of the base to get some cash and a new objective.
Part 2
Purchase a bike and hop on board. Bikes are the cheapest vehicle for a reason, they don’t provide much protection. To offset the low armor, they’re fast and come equipped with machine guns and rockets – making them more effective against turrets than mechs. Take your bike for a spin down the hill into another valley.
This valley is loading with troops and turrets. Take the first hill slowly and shoot down the turrets lining the upper half. At the top, you’ll see another defense line of bunkers. Destroy them at range, and remember you can always hop out of your bike and jump back in if you want to do some sniping.
Inside the next valley you’ll have three objectives to accomplish. Follow the left road, it will take you to the Convoy Depot, then the Fuel Tanks, then to the Radar Dish array. Destroy each of these bases, look out for turrets near their entrances and exits, and fight off the soldiers defending. On the way, you’ll find enemy bikes too.
Near the Radar Dish array, use your jetpack to enter a cavern built into the rocks. Run through to find your last objective.
Part 3
Outside of the cavern, fight into the final base of the stage. It’s guarded by two snipers and two minigun turrets. Take these out from a distance before entering the compound.
Inside you’ll find an especially tough enemy – Graves. Shoot his guards first before focusing on him. He can’t do too much damage to you, so just unload your weapons into his heavy armor until he retreats.
This is where the boss battle really starts. A large group of enemies and turrets will drop near the bunker entrance. Bombers will fly by and drop their payload, targeting one of three straight passages in the base. When you see red semi-circles, jetpack out of the way.
Destroy the turrets and enemies. During this battle, two enemies will spawn infinitely to harass you. Once you’ve cleared out the majority of bad guys, use one of the three switches to bring down the shields. You’ll need to do this three times. More enemies will drop down after each bombardment, so keep on your toes and run away if you’re overwhelmed. Don’t forget to reload your supplies if you run out at the Supply Depot.
Stormfront
Part 1
As the level begins, run from the enemies behind you. Overdrive and jetpack past the large cutting laser once it shuts off. You’ll have to contend with these lasers for most of the first section of the level. For now, they start and stop. Shoot your way through this first courtyard of enemies and into the second. The only danger here is a soldier equipped with a rocket launcher on a ledge to your right.
Eventually, you’ll find an ice bridge. Fight into the courtyard blocked by swivelling laser beams. At the end is a hill completely filled with four moving lasers. Take this section slowly, enemies are hiding in the alcoves up this hall.
Inside the ice cave, you’ll be ambushed by plenty of soldiers. Keep your head on straight and don’t rush ahead. Stay back and pick off the soldiers with a sniper rifle or assault rifle. Grenades are also helpful in here, and low ceilings mean that your mortal is totally ineffective. Clear out the enemies and leave the cave.
Part 2
Outside, look right and down to see the Arm of Orion firing on your dropship. Shoot them or simply wait for the explosion to kill them. You’ll have to meet your dropship somewhere else. Turn around and head up the path into a valley.
There’s a mobile escavator in the valley guarded by turrets and soldiers. Destroy the turrets and carefully use the excavator for cover. Enemy soldiers are hiding all around the excavator and will try to ambush you inside, so keep your back to some cover.
Once the excavator is clear, use the road of ice marked by flares to reach a cave filled with yet more soldiers. Fight your way through the cave and into a chasm.
A bomber will fly by and destroy the bridge. Shoot down the soldiers on the other side before carefully walking on the ice alongside the cliff-face. Stick close to the wall, there’s a blind corner that you don’t want to miss. On the other end, you’ll fight through more enemies inside an ice cave.
Exiting the cave, you’ll find a large excavator filled with soldiers. Many of the soldiers are carrying sniper rifles, so stay on your toes. Work your way to the landing pad and prepare for a defense mission.
Part 3
You’ll have to defend the landing pad until your dropship arrives. Enemies will drop nearby and surround you. Stay near the dish at the back of the landing pad, you’ll find plenty of cover there and your friends will help you fight any soldiers trying to jetpack onto the pad. Defend here for several minutes until you get a new objective.
Follow the waypoint towards another excavator. Behind the device, a few soldiers are waiting using the rocks as cover. Run into the ice cave to find your crashing dropship. Fight off the enemy soldiers surrounding it, just aim and kill until you can get close enough to the dropship.
After the cutscene, another group of soldiers will drop nearby and use the rocks surrounding the dropship as cover. Kill them and move towards the ice bridge marked by flairs. Run across and take out the two soldiers guarding the AA gun. Plant your charge and run back to the dropship. The ice bridge will break as you return, so sprint and go into overdrive to make a running jetpack assisted jump.
More soldiers will attack your dropship. Don’t worry about them, just reach the waypoint to finish the mission.
For the Wicked
Part 1
Talk to the General for some exposition. When he finishes jibber-jabbering, use the stairs to get up top and meet your ally. He’ll take you to your next goal – setting up a radar array. Climb to the top of the structure and place the deployable structure.
With that finished, jetpack to the base below. Stock up on medium-range weaponry like machine guns, pistols, and assault rifles. You’ll have access to new weapon variants like inferno rounds that dish out very high damage to enemies. Use the console marked by you waypoint to initiate the enemy attack.
Defend your position, and shoot down the soldiers as they drop. Once the first wave is defeated, you’ll be able to build two minigun turrets. Place them where ever you like, and don’t worry about bringing a repair kit. Minigun turrets help, but they aren’t essential to the defense.
Another wave of Spear soldiers will drop on the cliff above your base. If your turrets are on the roof of the base, they’ll both be able to shoot the enemy soldiers as they attack. Clear them out and prepare for another wave.
Part 2
More Spear soldiers will drop down near the back of the base, out in an open valley. Shoot them down as they land, and look out for their rocket launchers. Once you’ve killed enough of them, they’ll begin to retreat. Try to pick them off and chase them down as they run.
The runners are aiming to destroy one of their downed dropships. Chase them and take out the two soldiers that try to ambush you near the dropship crash site. Collect your intel and you’ll be rewarded with a Mech. The Mechs are just like the enemy suits you’ve fought before. They come equipped with double machine guns and a killer melee attack. Jump into a suit and follow your waypoint.
The waypoint leads into a power station under attack. Kill the attackers and destroy their bikes and turrets. Once the first group is down, another two waves will drop down to your left and right in sequential order. They’ll drop with rocket launchers and missile turrets, so keep moving and strafing to avoid taking too much damage.
Once the enemies are down, jump out of your mech and use the consoles to activate both generators. Now you need to help defend another position, so jump into your mech and follow the waypoint.
You’ll find the radar station beseiged, take out the gathering enemies and stand guard for a huge attack.
Part 3
Defend the position for the remainder of the mission. You’ll face several waves of enemies armed with rocket launchers dropping down with turrets to back them up. They’ll target both radar dishes, usually focusing on the dishes instead of you. You’ll be outnumbered, more so then usual, so keep your distance and take each enemy down one at a time.
Eventually, Mechs will enter the fight. Mechs will slaughter you in melee range, so soften them up with machine gun fire before delivering the final blow. Don’t let both of them attack you at once, try leading them towards your ally to double the rate of machine gun fire.
Aim for the troopers carrying rocket launchers as they begin to attack the dishes. This defense mission can be failed, so stand near the center of the base and let the enemy come to you. Defeat enough of them and you’ve won the mission.
Beasts
Part 1
You’ll be dropping into an escort mission as the stage starts. Rush ahead and start picking off soldiers hiding around cover just off the road, then jetpack up the concrete wall to take out the rocket soldiers shooting at your tank from below.
Soldiers are swarming this first turn in the road, so use your repair tool to fix the tank if it starts to take damage to the armor. Tanks are resilient, so you don’t have to worry about babysitting it, just keep an eye on the health if it looks like too many soldiers are pegging the tank with rockets.
Over the hill, you’ll enter into a valley marked by fence running along the right side of the road while bunkers overlook to your left. Start engaging enemies, as you near the right turn more troops will drop directly onto the road. You’ll have to worry about turrets and mechs, too. Switch to a rocket launcher if you’re not doing enough damage to the mech.
Keep a rocket launcher handy, a tank is waiting around the corner down the road a ways. If your allied tank is low on armor, make sure to use it as cover as you repair it. Knock down the tank’s shields and armor with a few rockets, and your allied tank can do the rest of the work.
Just run through the volcanic landscape, taunted by the bad guy, until you find your next objective.
Part 2
Down the road, you’ll lead the tank into a lava cavern. Tall rocks and columns are useful cover to your right while ledges round the left wall. A group of enemies, including two mechs, will drop into the cavern and attack. Use the handy rocket launcher and inferno variants to burn your way through these enemies.
Outside the cave, you’ll reach a firebase that needs help. Talk to the captain inside the bunker, then run outside and overlook the rocks below where two turrets are facing. Soldiers will pour down the hill sectioned off by the rock walls. Use mortars, grenades, and rockets to destroy the incoming turrets and mechs that back-up the Spear soldiers.
After the battle, follow your waypoint to Command HQ. On the way you’ll see allies fighting enemies, but just ignore them. Get your next objective from the base commander.
Bring a repair tool into the trenches to repair both minigun turrets on opposite sides of the warzone. Move low and through the trenches to avoid taking fire from every enemy in the area. The bad guys here will constantly respawn, so stay moving, and only shoot the soldiers immediately after you. Most of the enemies will just ignore you here.
Once both turrets are repaired, continue deeper into the volcanic wasteland.
Part 3
Inside the first generator base, two engineers will attack. In Section 8, engineers are actually deadly opponents instead of wimpy guys that wear pocket protectors. These two will get in close and try to use their vampire tools – tools that deplete your power and armor instead of repairing. Keep your distance and run away if they try to jetpack around you.
Defeat the engineers and activate the switch. The generator is now activated, so follow your waypoint to link up with some allies defending another generator. On the way you’ll cut through an industrial zone that looks complicated, but you’ll only face three soldiers. At the generator, you’ll see them in a shootout with enemies just outside the base. Help clear the enemies out before running inside. At the back of the base you’ll find a Supply Depot.
Waves of enemies will drop down at the crest of the hill overlooking the base entrance. Use inferno mortars and rockets to hurt them as they advance. Stay near your allies in the back of the base to safely engage these new enemies – including a mech.
After the defense, run up the fill and follow the right path into a lava cavern. Navigate the rusty catwalks and keep your jetpack power high. Near the final grating, you’ll see a catwalk that’s very close to the lava. Step on it and it will drop into the magma, you’ll need to jetpack over the magma and forward to escape this treacherous cave.
Climb the stairs up to enter the last generator base. A few enemies are scattered around, including a sniper on a catwalk at the far end. The sniper is the only real danger you face, and only until you take out the soldiers helping him. When the base is clear, use the terminal to activate the last generator.
Part 4
Return to the generator your allies are protecting down the round. It’s safe now, so overdrive. Watch the cutscene, and head into the narrow path.
Take cover from the dropship and wait until it flies away. Use the Supply Depot before crossing the bridge. Bring crash-variant weapons that do high damage to vehicles. The rocket launcher or machine gun are effective. When you’re ready, run across to the platform.
On the platform, you’ll have a time limit to defeat the dropship. The dropship will fire on you with its machine gun and launch missiles that will tear apart the platform. Run downstairs and hide under the ceiling to escape the bombardment. Your only goal here is to constantly shoot, even if you’re fast you’ll have barely enough time to destroy the dropship.
Do enough damage and the dropship will crash. Activate the switch to finish the mission.
Devolved
Part 1
Landing on the new planet, meet up with your allies and engage the enemies scattered around the area. Use the rocket launcher on an incoming mech, otherwise you shouldn’t have problems. After the short battle, an outpost will drop with an extra supply depot nearby.
Your next goal is destroying three AA guns scattered around the rocks just outside the lab. Take your time and circle the area. Bring a rocket launcher or sniper rifle for long range deployable destruction. The mortar also works well here, just don’t get yourself surrounded.
After that fight, head towards the lab and stop at a supply depot. The next defense objective is tough, so you’ll need all the help you can get.
Part 2
Use the supply depot before entering the lab. Grab anti-personnel weapons like the shotgun riot variant or inferno rounds for the machine gun. Grenades and the serrated knife will also come in handy. Detpacks can also be used here, just go with anything you like in a close quarters fight. Enter the lab when you’re ready and hack the computer.
Enemy soldiers will drop near the four doors and attack the computer from all sides. Stand near one of the doors and kill the soldier as he lands, that way you’ll have cover in the doorway and won’t be surrounded. The enemy soldiers are focused on destroying the computer, so finish them off efficiently.
Once the computer is defended, follow your allies outside and into a base. Fight the handful of soldiers protecting two mechs, and hack the console nearby. The mechs are now your’s, jump into one and keep it for the remainder of the mission.
Part 3
Follow the path into another group of structures with your mech. The waypoints scattered around show you the locations of toxic gas canisters that you’ll want to destroy. Kill the enemies in your path and destroy the turrets, most of the enemies here are equipped with rockets so keep moving.
Run to the back of the base and destroy the slow convoy truck before it reaches the landing pad. Once that objective is out of the way, destroy the rest of the canisters at your leisure.
Toward the landing pad, you’ll hit a cutscene and a boss. The boss is pretty tough, he has high shields and very high armor. He likes to jetpack around while launching rockets at your mech, as turrets and rocket equipped reinforcements drop into the fight.
Take out the turrets and soldiers as they drop down, many bring repair tools and will try to heal the boss as you fight him. Otherwise, keep moving and backing around the landing pad to escape his rocket fire. Wear him down and eventually you’ll win.
Prejudice
Part 1
Now you have a tank. The tank is durable, like most tanks are, and has a variety of weapons. Two of your allies are inside the tank, they control the missiles and machine guns while you control the treads and main turret. The main turret is enough to take care of anything in your way.
Destroy your way through the base, the watch tower and outer wall are both destructable. Inside you’ll content with soldiers carrying rocket launchers, but your armor and shields should keep you safe. Near the raised pipeline, you’ll be ambushed by fresh soldiers and turrets. Destroy them and take out the three power generators before moving on.
Into the canyon, you’ll reach a tank guarding the next set of generators. Tanks are tough, so duck behind cover and wear it down with your main cannon. There’s plenty of cover on your end, take advantage of it. Destroy the generators and move on.
After destroying the second set of generators, you’ll have to contend with another tank down a narrow rock lane. There’s no cover here, so back out as you fire and destroy the tank as it tries to chase you. Drive past the burning husk you just made to find the last generator. This one is protected by two mechs. Their machine guns will barely scratch your tank. Destroy the generators and drive up to the tunnel entrance. Once it opens, kill the soldiers inside before jumping out of the tank to bypass the debris.
Part 2
Through the tunnel you’ll enter into a large open area where enemies will fire at you from every direction. Stay near the debris and clear out the soldiers taking cover to your flanks before running out into the open. Over the hill you’ll find a Supply Depot and another industrial base.
The industrial base introduces new enemies; the Crimson Guard. These guys are tough, they carry EMP grenades, special weapon variants, Repair tools, and have aggravatingly heavy armor. Bring long range weapons like the Sniper Rifle with the rapid-fire mod to get rid of these guys at long range.
At the far end of the industrial compound, destroy the turrets guarding the canyon entrance. Inside, you’ll find enemies below you, but after a second or two rocks will fall from the ceiling and kill them. Use the supply depot and push forward, enemies will slow your progress, including more Crimson Guard.
Take the cave slow and lookout for turrets near the exit. Fight and you’ll reach the next compound and a miniboss.
Part 3
Take supplies for a long range fight against two high armor soldiers with mechs and turrets backing them up. The rocket launcher and a machine gun are a good combo, but you’ll be free to switch supplies whenever you need to.
Kill the soldiers inside the compound. Once you’ve killed enough and made it deeper, two special engineers will attack. The Vehicle Engineer calls down a mech and attacks at close range while the Deploy Engineer summons turrets and depots to repair them while launching rockets. You’ll want to keep your distance from these guys, and you don’t want to fight them both at the same time.
Use an anti-vehicle/structure weapon, like the launcher with crash variant to destroy all the purchasables they call down. Without back-up from mechs or turrets, these guys aren’t much tougher than the Crimson Guard.
After that fight, enter the cave to the left of the complex. More soldiers and Crimson Guard are waiting to defend the tower. Take it slow and use the cover available.
Part 4
The outer defense of the tower is your last hurdle before getting inside. Soldiers crowd the road, mixed with turrets and Crimson Guard. Keep an eye out for snipers above, and fight your way to the tower entrance.
Grab yourself a rocket launcher and destroy the turrets quickly. A sniper rifle is handy for killing off the weaker enemies. The Crimson Guard will back each other up and repair the other’s armor, so stick to picking off weaker enemies that only take three or so hits to take down.
After destroying the turrets and clearing out the soldiers, you’ll have an open window to enter the tower. More soldiers will drop in, but you can ignore them. Run inside and prepare for the last boss.
Part 5
Use the supply depot and take anti-personnel weapons for close range combat. Bring a shotgun and a machine gun, use the riot variant for the shotgun and inferno rounds for the machine gun. Bring whatever you prefer, just remember to prepare for close range. Grenades will also be helpful, and a repair tool might save you if your armor is low.
Run down into a room surrounded with switches. Start hitting the switches, it doesn’t matter which. After the third switch, you’ll be attacked by General Salvadore.
Salvadore has two main attacks; he fires an energy pulse from his hand straight forward or he pounds the ground to create an energy shockwave. The energy shockwave will deplete your shields and knock you back, but it’s hard to dodge. The energy pulse he shoots is not hard to dodge, just circle-strafe around the central pillar of the chamber.
Unload your weapons into him as you back-up in a circle around the central pillar. Eventually he’ll fall to his knee. Run up and interact to pull off one of the devices stuck to his back. After the third device is ripped off, Salvadore will summon some friends to help him fight you. Ignore them and finish off the General quickly if you can.


 Destiny Guide: Reef Hidden Ghost Locations (Video)
 The Unfinished Swan Wiki – Everything you need to know about the game .
 Destiny The Taken King - Locations of all Keys and Chests
 Fallout 4: Recruit X6-88 as a companion, location / quest
 Dark Souls 2: How to Beat Every Boss – Tips & Strategies Guide