Return to Dunwall and face off against the Brigmore Witches in this new DLC for Dishonored — and learn how to master new enemies and abilities with our walkthrough.
The add-on continues where The Knife of Dunwall left off (check out the Game Front review to see what we thought!) where you play as Daud, the master assassin. Unlike Corvo, Daud comes with his own special skills that alter gameplay in interesting ways. See how to sneak and stab through each new mission with step-by-step instructions below.
Looking for secrets, extras, and collectible locations? Find all that and more on our list of Dishonored cheats.
Check back soon for new updates.
More Dishonored Guides
Dishonored: The Brigmore Witches DLC Guide
Daud’s Base
Choosing Your Mark
The Dead Eels
Playing as Daud, you’ll be in front of your desk and out of the corner of your eye, you’ll spot Corvo Attano. Once Corvo kills one of your guards, it’s up to you to kill him.
You’ll have your sword with you. When Corvo swings, press “Left Control” to block his attacks. If you time it correctly, he’ll get pushed back. From here you can swing away. Once you’ve killed Corvo, you’ll wake up. It was all a dream.
One of the guards mentions that Thomas has information that you requested and is down below. Walk down the metal staircase, then press “F” to talk to him. He says he’s found Lizzy Stride. And she’s in Coldridge.
After you’ve finished talking, take the blueprints off the table on the left, then grab your equipment from the chest below the blue drapes. You’ll get a rune in the process followed by the upgrade menu.
Your bone charms that you collected in the previous DLC, Knife of Dunwall will be saved as well, but they won’t be equipped, so make sure to put them on, in the “Bone Charm” tab.
Head back upstairs to grab a new kind of charm, a corrupted charm. It’s in a chest by the foot of the bed. A corrupted charm is a powerful charm, but has penalties along with the good.
Leave the room and exit through either one of the double doors to the library on the same floor. Use void gaze to spot the other rune in the vicinity. It’s on top of the shelf in the library.
Once you’ve picked it up, head back to Thomas to head to Coldridge Prison. Remember that place?
Dishonored: The Brigmore Witches DLC Guide
Coldridge Prison
A Stay of Execution for Lizzy
Once you begin the mission, you’ll be reminded of what favors are. For instance, some people might be able to help you by giving you extra equipment, but make sure to always grab the favors that reveal runes since that’s your way of upgrading.
Once you’re done, you’ll be briefed on the situation. You’ll need to sneak in the prison the same way Corvo escaped, only this time, the water that Corvo jumped into has been drained. You’ll also have to deal with overseer music, which negates your powers.
Exit from the sewer to the river bed. Once you’re outside, you won’t be able to use your powers. Notice the rocky path that leads up to the prison? Grab the RUNE that was laid down as a favor at the foot of path.
Head up the path to do some rock climbing. You’ll see two guards talking on the right side, standing on a bridge. They won’t notice you. From here, jump or blink up along the wall to get to the top of the fence.
Below you’ll see two guards. One is ordering the other to execute the prisoners. There are three prisoners in all. Hang around here a bit until all the prisoners have been executed. One will drop a RUNE.
Silently take out the guards on the execution grounds. When you’re done, you can use the stairs to enter, or you can take the yellow pipes up to get a height advantage. In either case, don’t worry about the guy by the desk. Blink your way up above the metal gate and sneak along the pipes.
Eliminate the guard patrolling by the control room. Once he’s out, hide his body, then grab the rewire tool inside. It’s in the corner closest to the pylon. Use the rewire tool on the box, in an adjacent room, that powers the pylon. Also don’t forget to grab the blueprints in this room, “Compact Arc Amplifier”.
Once you’ve rewired, those two guards who were having a chat, won’t be having one anymore. Leave the control room, then look up along the pipes on the wall. Blink up to one of them, then stay up here. Take note of the vertical sign in the corner that says “Section”. Your goal is to get to pipe above that by blinking your way up.
Once you’re there, you can blink to the next pipe that reveals an exit to the courtyard. Remember this path, but for now it’s time to locate Lizzy. You’ll notice that there’s a guard that patrols inside the prison, on the third floor, and stops at the balcony
When his back is turned, blink to the railing, then knock him out. You’ll now be on the third floor where the prison cells are. You’ll also notice there’s a marker down below that says “Log Book”. This is to locate where Lizzy is, but since we’re already on the third floor, we don’t need to go down there.
Continue along the walkway to cell “A20″. You can grab some stuff here, including an elixir. Follow the walkway down to the door. On the right, you’ll see Lizzy Stride. Now that you’ve found her, you need to get her out.
The guard below you, on the second floor has a guard post key. Quickly knock him out, then grab his key. You can now open the doors inside the prison. Head back up the third floor and head through the doors past Lizzy to cell “D21″. Take note of this door, as there is a CORRUPTED BONE CHARM inside.
Now head back the opposite way and blink to the pipe near the “Section” sign. Take out the guard directly below you, then his fellow guard that patrols around the courtyard. The control room you need to get into is above you, but you need to get through the door ahead, use the stairs, then follow the hallway to the control room.
After you’ve taken out the guards and bypassed the pylon in the courtyard, head left before going inside to grab a BONE CHARM in the bushes. Now stay by the staircase and watch the patrols inside the room. You’ll need to head inside the room past the red banners on the wall. It’s the interrogation room Corvo was being held.
Blink to the pillar on the left to avoid line of sight, then blink inside the room. Grab the RUNE and the ingots while you’re at it. There are also books, notes and an audiograph on the desk.
Hang out by the doorway, then blink on top of the hanging light above. When the guard patrols to the left, along the walkway, get behind him, then knock him out.
Enter the hallway toward the cell control system. There’s a note on how to use the control system on the left. Basically, you have three knobs. One for a letter and the other two are numbers. Since Lizzy is in cell “C28″, switch the knobs to match her cell number. Don’t forget to do “D21″ as well.
Once you’ve opened both cells, you can blink to the pipe on the wall that leads to the pipes near the “Section” sign. From here, you can blink back up to the third floor walkway, grab the CORRUPTED RUNE, then free Lizzy.
Once she’s freed, however, she’ll collapse and you’ll have to carry her. Take her back out the way you came from. Make sure to stay high along the pipes.
When you reach the room with the gate guard, blink to the pipes across the room with the vertical sign that’s leaning on the pipes. When one of the guards walks to the bridge, sneak behind him, then make a right on the rocks.
Make your way down back to the sewer entrance.
Dishonored: The Brigmore Witches DLC Guide
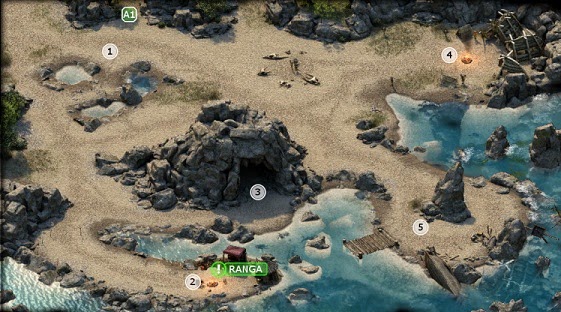
Draper’s Ward
The Dead Eels
As Daud you’ll make your exit through a tunnel to Draper’s Ward. Up ahead, you’ll see two gangs fighting, the Dead Eels and the Hatters. When you get close to the exit, where all the makeshift barricades are, look up and to the left. You’ll see a canopy you can blink to, to get a view of the action from above. When one gang has won, drop down and take out any remaining foes to clear the way.
From here, you’ll notice two markers, the Riverfront and the Textile Mill. You can only go to the Textile Mill after you’ve finished the Riverfront, but to make things a bit easier later, let’s take out any obstacles in this area before moving on.
Let’s clear and explore this area first. Head toward the lovely sun soaked, red colored tree in the distance. You’ll come upon some metal barricades on the left as you move down the alley. It leads to the Textile Mill. There’s also a pylon in the way.
Head inside and look up. You’ll see a glass archway above with a corrupted charm hanging on the end of it. Walk up the metal staircase to get some elevation, then use the vents to blink your way up to grab the CORRUPTED CHARM.
Move to the street so that the canal is horizontal to you. Activate void gaze to locate the other runes and bone charms in the level. There’s a rune right in front, across the canal in the fourth story building colored red and blue. We’ll grab this later.
You’ll also notice that a hidden rune is on the right side. To get it, you’ll need to drop down into the canal. As you head right, there are two hatters guarding a safe. Quickly put them to sleep, then grab the HIDDEN RUNE in the canal.
Make your way across the canal to the the Dead Eels side. The building to the right of the blue and red colored building can be entered via the balcony on the second floor. The building has a “For Sale” sign on it. If you head up, you can find a merchant that will sell goods.
From here, there’s a window that’s directly in front of an air shaft. Blink up to it, then keep climbing until you get to the roof. Once on the roof, look ahead of you and blink to the broken balcony on the side of the building
Enter “The Dressmaker’s Studio”. Knock out the dressmaker, then grab the RUNE hanging on the wall. There’s also a note from Lady Boyle that you can read, talking about her costume ball.
Head to alleyway behind these buildings. You can save a gang member being harassed by a hatter here. Make your choice then continue stealthily taking down opponents as you continue through the alleyway to the Riverfront.
There’s an abandoned vault key here you can grab in the alleyway. It’s in a bush, opposite another bush next to some rocks. If you pass by the red door stopper toward the Riverfront, you’ve gone too far. This vault key opens the safe in the canal where the duo of hatters were stationed.
Enter the door to the Riverfront.
The Riverfront
Upon entering, immediately, blink up to the pipe on the left side wall. Listen to the conversation below as you slowly move your way across the pipe. Blink to the room across the way using the balcony. Once you do, your buddy will notify you that Edgar Wakefield is on the Undine.
Hop out the window and onto a rooftop. You’ll see the Undine ahead along with a huge throng of Dead Eels on the dockyard. Blink to the balcony with the mattress hung over the railing. Jump up to the roof to grab the CORRUPTED CHARM.
Hop on the pipe and follow it as it turns along the wall. You’ll drop and your friend mentions that there’s a hatch underneath the Undine. Continue following the pipe along the left wall.
Using void gaze, you’ll come upon a rune on the left side. Drop down onto the train car. There’s a tripwire that leads inside the room. Blink past it, take out the weeper inside, then grab the RUNE. Head back up the pipe, then continue along the pipe until you reach the water.
Using void gaze once again, you’ll notice there’s another rune close to the one you just got. It’s inside the building next to the water with two patrolling guards out in front. Take out these guards. I’d prefer using the sleep darts.
Head toward the building and use void gaze to zero in on the rune. Jump in the water. There’s an opening underneath the building. Swim through and head up. Grab the RUNE, then have a visit with The Outsider.
Swim back out and use the pipes again to gain some elevation. Move along the pipes toward the Undine. Notice the boat next to the Undine? There’s a bone charm in the water. From the pipes you can actually blink your way to the water without being seen. Jump in and grab the BONE CHARM. Watch out for the fish.
Get some oxygen, then dive back in. Head underneath the Undine. There’s a moon pool underneath. Swim up and do what you want with Edgar Wakefield. I kept him alive. From here it’s time to signal Lizzy that the job is done. You’ll need to get on the deck of the ship and use the ship’s horn.
Knock out the crew aboard, then head up to the controls. Pull the cord to sound the horn. Lizzie will now be in control of The Dead Eels. You’ll be given safe passage. Talk to Lizzie after her speech. She has another task for you. To grab the engine coil from the Hatters. Lizzie will give you the password to the Textile Mill.
Head back through Draper’s Ward, then bypass the pylon near the Textile Mill entrance. You’ll need to knock out two Hatters guarding the area. Use the password to enter the mill.
Textile Mill
As you head through the alley, jump on top of the vent shaft along the wall to your left. You’ll see two markers, the Rothwild Laborer and the Main Office. The Main Office is where the Geezer is.
As you round the corner on top of the vent, you’ll see two Hatters talking. Looking slightly right, you’ll see a bone charm in an outhouse. Grab the BONE CHARM, then knock out the hatters if you like.
As you explore the area, there’s a small office facing a wall of light. Take care of the hatter inside, as well as the rest in the surrounding area outside of the wall of light. Once that’s taken care of, head back to the out house. There’s a room inside that you can get into by breaking planks. Head inside and use the textile mill key on the door.
From here, you can turn off the wall of light using the panel. Move through the hallway past the panel, then head into the room “Dry Storage” to have a chat with the Rothwild Laborer. Grab the RUNE, then have a chat. He says you need a combination to get into the engine room. Time to talk to Nurse Trimble.
Leave the room then make a left up the staircase. Going down leads to the engine room. Continue moving up until you’re one floor above the “Manufacturing Floor”. Knock out the hatter watching the floor when you get up there. Also, you can check out the fourth floor to grab some blueprints, “Explosive Bolt”.
From here, hop on top of the machines using blink until you can blink to the pipes along the wall across the room. Follow the pipes to the balcony, with a spotlight perched on it, that leads to the “Main Office. You’ll talk to Trimble. He’ll say that you need to start the water again and he’ll give you the engine coil.
Before going down to the sewers, head upstairs to enter Trimble’s lab. Grab the key from the door to unlock it, then head down the stairs. Move past the water wheel, then head down the canal to enter the sewer.
Follow the sewer down. You’ll need to contend with three spores at the T intersection. Hit them with darts while they’re open. When they’ve been thoroughly pruned, head up the stairs, past the rat swarm, then make a left down the hallway.
Continue down until you hear a woman asking for help. She’ll be in the cistern in the middle of the room. There’s also a charm in this room. Head to the woman. You can either help her or not. I decided to help her. Then she promptly attacked me.
My first response was to attack her with lethality, so I never tried using sleep darts. In any case, when she’s finally down, head back up the walkway and open the closed door. There will be two witches inside. Take care of them, grab the BONE CHARM in the area, then talk to the statue of Delilah.
Drop down to the bottom floor and use the crank to open the gate. Before going up the stairs, make a left to the rocks and foliage inside the sewer. Grab the BONE CHARM.
Head up the stairs to the “Water Control Station”. You’ll see two witches guarding the place. Duck underneath the gate, then immediately head down the stairs on the right. Take care of the weepers down below, grab the whale oil under the staircase, then enter the door where the cones have been placed.
Put the whale oil in the panel, then flip the switch. It’ll turn on both fans, but one will break. Enter the tunnel where the fan broke to grab the RUNE inside the room. It also contains a shrine. Now head back up to the water control station.
Stealthily take out the witches guarding the station. At times they will teleport, so keep an eye out on where they appear. When they’re down and out, the valve you need to turn is disabled. Head back down and go behind the staircase where you got the whale oil. Grab the wrench on the tool shelf, then head back to the valve.
Something is blocking the wheels from turning. Head down to the bottom floor and hack away at the plants holding the wheels. Now it’s time to head back to Trimble. Move through the tunnel where the fan broke, then exit out the sewers that way.
Talk to Trimble at the main office. He’ll be good on his deal and he’ll give you the combination down to the engine room to get the engine coil. He says the code is “7-7-4″.
Head down to the engine room, turn the dials to 7-7-4, then grab the engine coil. Leave the Textile Mill, run through Draper’s Ward, then finally head back to the Undine.
Put the coil on the engine mount, then talk to Lizzie. Head up to the bridge to fire up the engine. It’s time to set sail to Brigmore Manor.
Dishonored: The Brigmore Witches DLC Guide
Brigmore Manor
Delilah’s Master Work
Before the mission begins, make your purchases. Through the favors tab I chose turncoat and hole in the fence. Turncoat will provide you extra information, while hole in the fence will give you a rune, plus a stealthy approach to the estate. Once you’re ready, continue on with the final chapter.
You’ll be outside the estate when the mission begins. You’ll have a chat with your follower. To the left, surrounded by flowers is a skull. When you get close, a hound will appear and attack. They will continue to respawn forever unless you break the skull. I would suggest avoiding these puppies.
Instead, head right along the water past the tree. Use void gaze to pinpoint the corrupted charm in the water. Once you’ve fished out the CORRUPTED CHARM, keep heading toward the estate, but keep to the right side. You’ll see a little outpost in the middle.
Head inside to loot the place. Careful of the tripwire. Once you’ve grabbed the goods, blink up to the rooftop to grab a RUNE. A witch will appear, but she’ll patrol out of the way. Keep moving along the right side. Grabbing the favor, hole in the wall, will give you an entrance through a broken fence.
Move right along the rock wall as your feet are dipped in water. There are two pods on this side that will shoot spores at you. Eliminate them when they are open, with bolts. Turn on void gaze to locate the RUNE near the house next to tree. Be careful of witch patrols here.
From here, look up at the wooden scaffolding along the front side of the manor. Make your way across to the greenhouse in the distance, the opposite side of where you found the rune. Knock out the witch inside.
Near this greenhouse is the entrance to the crypt. It’s in the graveyard, you can’t miss it. Unfortunately the lever has been removed and is found in the shed. From here, you’ll need to go the backyard of the manor, find the shed, then retrieve the lever.
So after taking out the witch inside the greenhouse, blink up to the rafters, then enter one of the windows. They both lead to the same room, they are just separated into two floors. The room has seen better days. Grab the loot inside, including a chest, then head for the window that overlooks a rocky path. Turning on void gaze will allow you to see the bone charm at the top of the path.
Let the witch stroll down the path before you blink up to the cliffside. Grab the BONE CHARM, then follow the path all the way down, keeping the rock wall on your left side. When you head down, you’ll see a waterfall with a body in the stream. The front door key is here.
Head out of the water and continue moving along with the rock wall on your left. Soon, you’ll come upon the garden shed. The shed will be facing a courtyard with a fountain in the middle. It’s surrounded by witches.
Wait until the witches aren’t facing you, then jump blink inside the shed over the tripwire. Immediately take out the seriously annoying pod. Grab the lever from the shelf and just for the hell of it, turn the fountain on along the wall. It will actually reveal a RUNE.
Now look up, then blink to the rooftop. Use the wooden beams to do so. If you wait a bit, scoping the fountain area, you’ll see the turncoat witch, dressed in red, approach the shed. Wait until she’s in a secluded spot, then chat her up. She’ll reveal Delilah’s plan, plus guide you toward the crypt entrance.
Head back up the rocky path, then blink to the room that’s connected to the greenhouse. You can avoid the witches inside the room, by heading to the upper level, but you’ll need to deal with another witch inside the greenhouse. Make your way down to the graveyard, insert the lever, then drop down into the crypt.
There are a swarm of rats inside. You can avoid them by jumping on some higher platforms, or if you want, you can blink past the tripwire as the swarm gets closer to get rid of them all. Grab the BONE CHARM by the statue, then head up the stairs into Brigmore Manor.
Brigmore Manor
Continue up the stairs, grab the loot inside the shelf on the right. Don’t head through the door that leads to the entrance way, instead, blink up to the hole above you to get access to the second floor. When you reach the top, turn on void gaze and head toward the corrupted charm. It’s past the hallway with the rubble. You’ll also notice there’s a bone charm in the next room, but we’ll come back for that later.
Grab the CORRUPTED CHARM on the table, then remember this room with the fireplace and the rubble of bricks all around. You’ll be coming back here. Exit through the hallway, then enter the room with the bone charm. There’s an overseer here. Have a chat with him after you’ve grabbed the BONE CHARM. Take out the witch that appears. Grab the stun mine on the table as well.
Exit the room, then make a right. There’s a witch that patrols the hallway. Knock her out, hide the body, then continue down the hallway where she came from. To the right, on the floor above you’ll hear two witches talking. There’s also a rune and bone charm near their positions.
When they stop talking, they’ll teleport to the floor you’re on. Hide behind the table. Knock out the witch that heads toward the sunlit room first (she has a Brigmore Chest Key), then grab the one that’s overlooking the chandelier.
Blink up to the floor above. Acquire the BONE CHARM inside the chest, opened by the Brigmore Chest Key, then move to the next room to grab the RUNE inside another chest pressed against a wall. Next to this chest is hole in the floor. You’ll see a tub underneath. Drop down, then drop down once more. You’ll hit a floor that’s submerged with about a foot of water.
Follow the sunlit hallway down. You’ll notice two witches in a room to the left talk about Rothwild. The hallway will turn left. There will also be a witch at the turn. Knock her out, then hide her body. As you move down the hallway, you’ll notice the floor above is slightly broken with wooden beams jutting out. There’s a witch that patrols this top portion.
Move down the hallway. You’ll see a group of three witches ahead. Blink up top to the floor above where the witch patrols. Alternatively, there’s a doorway on the left side of the hallway, that leads to stairs. Using either method, knock her out, then blink to the broken platform as you continue following the hallway down.
Blink to the next platform with the wooden beams practically sloping down at a 45 degree angle, then enter the door that’s covered by foliage. Move around the perimeter of the room over the wood planks, then continue to the next room.
Disarm the traps and grab some loot as you make your way down the hallway. When you reach the other side, you’ll be above Delilah’s planning room, complete with glowing, ritualistic marks on the ground and a giant board. Take out the two witches down below, then read Delilah’s notes.
From here, head back to the room I asked you to remember. The one that contained the corrupted charm and the fireplace. Blink back up the way you came from. Blink along the platforms, back to the original platform with a single witch patrolling it, near the stairs.
Move down the hallway that contains various heads of animals as trophies. Continue forward and up ahead will be the room with the fireplace. Head through the door, over the fallen table. Make a right past the tripwire, then head up the wooden rubble turned ramp.
You’ll be in Deliah’s studio. Watch out for the multiple tripwires guarding the place. Jump on top of the boxes, then use the rafters to safely get to the glowing purple lantern on the table next to paintings of Emily Kaldwin. Disarm the traps and grab the West Wing key hanging on the wall. Once you’ve grabbed the lantern, head back to Delilah’s planning room, the one where you read Delilah’s notes.
Take care of the lone witch, then head toward the painting on the huge board below. Set the lantern near the painting. When the board reveals itself, enter the painting.
The Void
You’ll have a chat with The Outsider. Once he’s done talking, take a leap down into the bright light down below. When you reach Delilah’s ritual site, take the stairs up that lead into the tree. You’ll see Delilah as well as her statues ahead.
There’s also a painting in the distance that you can use to switch paintings. For now let’s grab the painting. To grab the painting, all you have to do is blink on the floating islands on the right side. The statues won’t be able to see you. Once you’ve grabbed the painting it’s time to make a choice.
From here, you can either fight Delilah, suitably killing her, or you can switch paintings to take care of her using the non-lethal approach. If you want to kill her, chat her up before the fight for dramatic effect. You’ll have to contend with her doubles, along with a scream that pushes you back, but it’s nothing a few bullets can’t handle.
Once you’ve taken care of her, you’ll see her guard the painting. Slash at her to see her final seconds with a pretty awesome final blow from Daud.
If you want to kill her non-lethally, wait for Delilah to make her finishing touches on the painting. When she walks away to perform the ritual, drop down, switch the painting, then watch her, as she unknowingly sucks herself into the void.
Congratulations! You’ve just beaten The Brigmore Witches. Watch the rest all the way through, to see your decisions played out, along with decisions from the main game played out as well.


 How to move Nintendo Wii data to Wii U using System Transfer tool
 The 16 Best MMORPGs of 2014
 Binding of Isaac: Rebirth Guide - How to Find the Secrets
 Metro Last Light Wiki: Everything you need to know about the game .
 10 Generation Defining Elements of the PlayStation 3