Head down the cave all the way to the end. When you reach the gate, pres A to open it.
Once through the gate, use the X button to attack the enemies and unlock the First Blood Achievement.
Continue down the path and get used to fighting enemies by killing the ones that attack you. Keep moving down the tunnel until you find yourself outside.From here, you will have unlocked your first quest. Using the start button, you can select this new quest, titled “A Harsh Word.” Our new objective is to find Ivy’s father Gromar.
Gromar’s Blessing
Melgan’s Dagger
You can find Gromar in the center of the village standing up in front of a bench. If you get lost, pull up the map with the start button and head for the area that looks like a giant clearing. Once you find Ivy’s father, you will initiate a conversation with him. He’s clearly not happy, and you’re about to find out why.
If you go slightly north from where you met with Gromar, you will now be able to cross the bridge (and complete the quest The Bridge to Knut’s Farm ). You will also acquire a new weapon, the Rotting Club, which you can equipby pressing start and going into your inventory.
Proceed down the path past the bridge and into the cave, killing all the molerats as you encounter them for experience. In the cave, go left at the juncture and youwill find Melgan’s dagger on the table in the back of the room.
Make your way back and talk to Knut. If you have slayed all the molerats on your way (you can check how many you have left to go by pulling up the quest in the startmenu), you will gain experience for completing the “Molerat Hunt” quest.
On your way back to see Gromar, go inside the house next to Ivy. In here, you will find 2 treasure chests full of goodies, a dagger, and a bed you can rest in.
The Smuggler
Speak to Gromar in the center of town, and he will prompt you to go drive away a smuggler. You will level up and receive a few quest updates and a much needed gate key. Select A Smuggler in the Forest for your quest, as that is the next task at hand.
Go to the left and up from where you met Gromar until you reach a wooden gate.Take the path all the way down to reach the smuggler. He’s a very easy fight if you hit him when he’s not blocking. After the fight, the smuggler will tell you he will give you his weapon if you are able to fight off the group of goblins gathered by the beach.
Take the cliffside path down to the beach and you will find a few goblins by the boat. They are easy to take out. Eat the apples you have picked up if you need to replrenish health. After this, go back and talk to Diego the smuggler who will give you his knife to take to Gromar. Okay, so far so good. One more trial to go!
The Deer Hunt
Talk to Ivy. She is by the gate that you opened to find Diego the smuggler. After Ivy opens the gate for you, go down the path and into the house on the right to acquire her bow. It’s stag huntin’ time!
Use the RT button to draw your bow. Take out 3 deer (you will unlock the Hunter Achievement upon killing the first one) and collect the Antlers. Find Gromar inside of the house you found him in front of last time and talk to him. Finally, we have his blessing!
The Engagement Bangle
Talk to Halwel right outside the house where you found Gromar. Then, talk Orruk. He will ask you to gather toadstools in exchange for the amber.
Head back to the forest where you hunted the deer and descend down into the hole where you see the gate. Go through the gate and collect the 6 toadstools that are scattered throughout the area. The enemies here will give you decent experience, so take them out as you see them. When you are done, go back and speak to Orruk again and he will give you the amber.
Speak to Halwel. You can find him in the southwestern part of town working on molding weapons by a fire. He will give you the engagement bangle, and you will
subsequently have completed the For Ivy Quest .
Talk to Ivy in the center of town. You will unlock the Family Man Achievement after doing so.
Head to the waterfall cavern and you will run into Knut on the way. He will fightyou and is very easy to defeat. Once you beat him up, you will complete the Jealous Farmer Quest . Afterwards, talk to Diego in the waterfall cavern and e will send you on (yes, yet another) test to prove your strength.
Lyrca
After receiving the herbs, leave Diego’s hut through the back entrance (not the entrance that you came in through).
Head eastward (straight from the cave exit) until you reach a path, and then make a left at the path to follow it north. Go inside of the hut on your left and talk to Lyrca.
After gaining the ability to use magic, you will have to kill 6 loam vermin and their queen. Use your physical attack until they go in their shell, and then use the
RB button to cast your newly acquired lightning spell. After killing the queen, you will get the Queenslayer Achievement .
Reaching Silverlake
Go up the cliff directly east of Diego and you will reach a structure. Once inside, head to the pub and talk to Murdra. She will tell you that Daranis is
upstairs. You will also have the opportunity to buy equipment and other useful items from her (press X to do this instead of A).
Go up the stairs in the pub and check the doors until you find the room with Daranis. Then, talk to Murdra in the pub again. Go out the way you came, and take the
southwest path to the beach. Here, you will have to fight Garv and 2 woodcutters to acquire mead. Bring the mead back to Murdra to unlock the Greenhorn Achievement .
Head south of where you are and enter the mines. The digger inside will ask you to bring back an alembic. Head back outside and follow the sign to the entrance of the old tunnel. If you see a sign out in front that says “danger: goblins!” then you know you are in the right place. Head inside and go down the tunnel until you see a table to your right. Here you will fight an ancient relic, the digger’s alembic, and another interesting item that I won’t spoil for you. Now, take the fork the opposite direction and you will find the digger again. Hand him his alembic.
After the sequence head inside of the mines and collect the Iron Boletes. Head back and give them to Murdra. Behold, the toxic concoction that you will be using to trick the guards has been completed!
Head north until you reach the men guarding the bridge. Talk to them and hand them the mead. They will open the gate for you. Proceed forward and onto the next stage of the journey.
Stewark
Head up the series of steps and feel free to check out the available shops on the way. When you reach the top, you will talk to Gorn. After that, head to the south part of the city and talk to Aldrich next to the prison. Then talk to Diego, and head west around the tower where you found Gorn to locate Winstan.
From there, head out of Stewark and to the northeast. You should reach a cave with a rebel in front of it. Take out the rebel and go inside. Take the path to the end to find Mermund. Talk to him once you do. Sure enough, there is another complication- you have to go find his documents now.
Next, go to the rebel hideout west of the town. You will give the password (it was a fake.. surprise surprise) and make your way in. Proceed down to the end of the tunnel and defeat the enemies to recover the documents. Next, go back to Stewark to the west and head up the flights of stairs where you find Gorn. You are now allowed to see the Baron.
Speak to the Baron. He will give you the permit that you need to proceed onwards. On top of that, you will have attained the Kingmaker Achievement.
Silverlake
Head to the area east of Stewark and then head south to reach the gate. You will show your permit and be let through. Now, enjoy the epic cutscene.
Follow the path until you reach the town, and talk to Gilthor in front of the first house you see. From there, head NORTHEAST along the path (it splits off a few times, make sure to keep heading in that direction) and you will reach Doran. Talk to him once you do so.
Proceed to the goblin cave to the east, and recover the standard that Doran needs. Go back to the battlefield and talk to Doran again. Then, head south past the town (as you’re exiting the town, you should see a sign pointing you in the direction of Silverlake Castle) and go through the gorge until you reach the gates. Speak to Norman, who will let you in. Find Gilthor and speak to him to reveal the next phase of your quest. To the Orc Cave we go!
Exit the city to the south and head past the bridge. Stay eastward on the path and you will reach a gate with an orc guarding it. Speak to him. Now it’s time to find Melog (will this goose chase never end!?).
Head south along the path to find the shaman Melog in the only visible structure around. Melog will want you to find Irrigh. Take the path west. It seems that Irrigh has lost his soul. Okay, time to head south to find Shalog (another search quest.. who’s surprised? Anyone? ). Take the path south now, and you’ll find Shalog sitting by a fire not too far from where Irrigh was (it’ll take you all of 20 seconds to get from one to the other). You’ll engage in a quick fight.. it’s an easy one. I suggest having a two handed weapon equipped at this juncture so that you can deal greater physical damage.
Go to the easternmost part of Silverlake and you will find a cave. For the enemies during this part, I find axes with high melee power to the the most effective weapons. Of course, whatever you’re most comfortable with works. Circle around the path until you see a chest with a “!” above it. Irrigh’s soul is in there. Make your way back out and return the soul to Irrigh, who is now in Melog’s hut. After all is said and done, you will come away with the Scaboze. Now, backtrack to the Orc Cave (hint: just use the teleportation device outside the hut and it will take you straight to the cave).
You will be able to enter the Orc layer. Congrats, you’ve successfully infiltrated it. Unfortunately, after speaking to some of the residents here, you’ll realize that you have to make a quick stop back at the hut. Talk to Irrigh here and he will give you his soul.
Go back to the cave, and go down the straightforward path. Challenge Erhag to a duel. Fair warning- him and his orc buddies hit HARD, so be prepared to use some healing items in the middle of the fight. Don’t let your health drop into critical. After defeating them, free Lord Gawaan in the cell straight ahead of you.
Next, you will need to free Gawaan’s men, who are being held prisoner. To find them, go north from the Orc Caves and use the map to locate your targets. The battle here is very simple- just rely on physical attacks and take out the orc slave drivers as quickly as you can. You can find the other 2 orc leaders wandering around the caves. Take then out and head back to Silverlake Castle. Talk to Gawaan, who will now grant you access to the castle archives.
Get the map you need in the cellar located on the southern tip of Silverlake. Return to where Gawaan is and speak to him again. Looks like you are off to Tooshoo now. For completing this seemingly endless web of quests, you will have unlocked the Champion of Silverlake Achievement .
Tooshoo
Head to the southernmost part of the map and you will reach the rubble that Gawaan told you about. Select the scroll that he gave you from the inventory and you will be able to push the rubble out of your way. After you move it, defeat the Rock Golem (be patient… he has very high health and defense but does NOT hit hard so you’ll be fine).
Once you reach civilization, find Gilana and talk to her. Then, go down to the basement and talk to Vultus. Then go back up and talk to Gilana.
Go to the cave to the west of Tooshoo and you will find the runaway snapper. After defeating it, you will obtain a collar that you have to bring back to Gilana. Go back to Tooshoo and speak to her- she is in the exact same location.
Head to the ruins southwest and you will find a straw hat by the entrace. Bring this back to Vultus. It seems that he wants to send you to the Elements Shrine like Gilana did.. only for the opposite reason. Either way, you’ll have to head straight south and jump the steps down into the ruins. However, before you leave town, make sure to read the following list of preparations you need to make:
LIST OF PREPARATIONS FOR THE SHRINE QUEST: Stock up on as many healing items as you can. You will need BOTH potions and items that speed up your health recovery. The enemies in the next area are tough and there are a LOT of them. Next, make sure you have at least 50 arrows for your best long ranged bow. Other than that, make sure you’re sporting your best equipment.
Once you reach the ruins, follow the path around them, killing all of the enemies in your path (they will follow you if you don’t.. there is NO WAY to get around them). If you need direction, highlight “The Elements Shrine” quest in your menu and bring up your map. Your job is to head towards the exclamation mark. There is only one path in these ruins that does not lead to a dead end, so don’t panic and just backtrack a bit if you make a mistake.
As you make your way through the ruins, you will come upon a locked gate. Proceed past it just a little bit to find the chest with the key for the gate. Go back through the gate and pick up the “Shrine Parts” on the floor. For the quickest exit, follow the path you are on, and once you drop from the ledge, head WEST.
Once you exit, you will see Zyra standing right outside. Speak to her, and she will ask what weather you want. Be prepared to fight her in a duel first though. Sge isn’t a big deal- if you were able to make it out of those ruins, won’t get more than a hit or two on you, and she’s weak physically to boot.
Talk to the elements shrine and make your pick. Then, head north to Tooshoo and talk to Gilana. Next, head up the walkway to the library and talk to Calamus. Proceed through the door he opens and talk to Merdarion after taking the path up. You will unlock the Master of the Elements Achievement upon doing so.
Go down the way you came back to the library and talk to Calamus again. Now go around to the door that was previously locked and use the key. I won’t spoil what you are about to see, but your next objective is to talk to the mage that is right outside of the room.
Head southeast of Tooshoo and you will run into a hut. If you get lost, use the map for guidance- it’s the only place remotely in the area. The hut is past the swamp field by the shore. Speak to Milten inside the hut.
Follow the glowing weed trail outside and it will lead you to a cave. Make your way through the cave and you will get into a boss battle. I suggest using a potion at the very beginning to speed up your health regeneration and then go wacko on the orcs with your physical attacks.
Talk to Lester, and then move the statue that is right next to him to reveal a secret passageway. Once you exit, cross the long bridge ahead of you. You will know you are going in the right direction if you see a sign that is directing you to the monastery.
The Monastery
Make your way to the top of the path and talk to Ruhndor. You will then engage in a boss battle with two Holy Guardians. At first, it may seem like you are not damaging them a lot, but fear not, for their defense is their best attribute. Their attacks are slow and easy to read, so be PATIENT and dodge their attacks so you don’t take the damage. After they attack, that’s your cue to land some blows.
Afterwards, no matter how you respond to Ruhndor, you will have to fight him as well. He hits very hard, so be careful. The good thing is that his defense is low and it won’t require much time for you to take him out. Do NOT drop below 100 health as he can deal damage in a hurry.
You will gain access inside the the next area, where you will talk to the two abbots. After that, exit the monastery and go north until you reach the Black Gorges. Continue north past them. Head up for a while and you will see a red target on the map. You will have to go through this tunnel. Once you exit it, you should see a sign pointing you in the direction of Setarrif. Go in that direction, and you should see a few more signs along the way. Once you reach the city, stock up on potions and equipment as much as your money will allow.
Temple Tantrum
Go back to the entrance of the city and head in the direction with the sign that says “Caution: Troll.” This is where the temple is, so go inside and talk to the spy. You will need to pick a very dangerous path to follow (either fire or acid.. it doesn’t make a difference).
You will engage in a fight with the spy. TARGET THE SPY ONLY AND IGNORE THE ROCK CREATURES- you don’t need to beat them to complete the quest. After the battle, head inside the temple.
Go down the temple until you reach the giant bug eggsack. If you try and attack it, you will provoke a boss battle that is fairly difficult. The concept is simple- do not get hit. There is one main attack that the boss does, and it telegraphs it by raising up high. This is when you need to roll away from it, because the strikes that it is about to throw at you are very damaging.
Go out the exit past the eggsack and enter the the next cave. Here, when you reach the fork, go down the path that is gated off (you can open the door). Head down the path until you reach a similar gate to the one you just entered. This one is locked, and the key is further down the path.
Once you retrieve the key and unlock the gate, you have a pretty difficult BOSS battle in store for you. The strategy here- take out your long ranged weapon and back away QUICKLY as you fire your strongest arrows. The separation you create between yourself and your enemies will allow you to take less damage.
Next, you will meet the ghosts of the Ahn’Nosiri. They will reveal a shocking bit of the storyline to you. Go down the path and exit this area. Continue down the path until you reach another entrance. Speak to the first person you see, then enter the cave next to him and take out all of the undead (they’re very easy.. do it in whatever way will bring you the most joy ). Go back and talk to the same person, who will now have you purge his village of the undead. You can find this village to the southwest of where you are now.
King Rhobar and the Last Dungeon
In the city, make sure to get some shopping done. The selection isn’t as wide as you’d like, but make due the best you can depending on how much money you have. If you talk to the man with the quest market above his head, he will have you activate two obelisks, which you will find in the suburbs. Use the quest markets on the map for direction.
Go down towards the shoreside and through the city with a bunch of undead enemies. You will find a hologram that gives you some not so useful information. Near the hologram you will find Diego. Speak to him once you do.
Next, speak to the man next to Jovie. He will direct you to an alley, where you have to take out some enemies. Use your trusty quest markers to find the alley if you don’t see it from where you are standing. From this alley, you will be able to get into the castle. I won’t spoil what takes place in here, but after all is said and done, your next goal will be to storm the Bastion.
Cross the bridge in the city and head east to reach the Bastion. Talk to the prisoner and head out the western exit of the Bastion. Head to the Coliseum as instructed, where you will engage in a boss battle with Drurhang. This battle is about endurance (as you will also have to kill a large number of Drurhang’s officers), so make sure to conserve your resources (healing items and mana potions) and attack wisely.
Head to the castle and speak to the King. After the long and revealing conversation, it’ll be decided that you are going to the Defiled Temple. Go speak to Merdarion (once again, use the quest marker target on your map to find him.. he is just in front of where you currently are). After speaking to him, you will be able to go through the temple and kill the cultists. The path is straightforward, and you will find Daranis at the end of it.
Next, you will need to hunt and kill 5 Ahn’Bael in the area (the devil woman type creatures). Unfortunately, they move around a lot and are difficult to find, so you will have to follow the targets on your map and do your best to run into them. They’re easy to defeat, so it will be time consuming at worst.
Next, follow the red marker on the map to Ningal and speak to him. You will then need to go south to the graveyard and enter the tunnel. Go through it and you will end up in Xardas’ tower.
Xardas’ tower is the last dungeon of the game, and fittingly so, it is a test of survival and endurance. There are plenty of enemies here to keep you occupied that I suggest fighting (although lots of them you can run from). The reason for this is that the upcoming boss fight is significantly more difficult than anything you’ve faced thus far, and you will need all the experience you can get.
although this dungeon/temple/cave/whatever you’d like to call it is fairly long, the path is straightforward and it’s nearly impossible to get lost. At the end of the road you will find Xesha.
Prepare yourself with your best equipment.. shortcut the spells that you are most comfortable with (although you will not be using a lot of them), and let’s get to it!
Final Boss Fight Strategy: The reason this fight is difficult is because it is extremely fast paced and combines a little bit of everything you have experienced in the game. Xesha will attack you physically from a close distance and shoot magic at you. The boss will strike you from above and can conjure thorns from the ground to damage you at any given moment. To avoid dying, you need to always have your eye on Xesha and to always be in motion unless you are attacking. You will be able to hit her the most with your bow and arrow when she is in the air and far away from you. If she is closer.. focus on dodging and don’t give into the temptation of launching ill advised attacks. The last thing to keep in mind is that Xesha is quick and can attack in flurries. This means don’t lose focus or relax after you dodge an attack of hers- there is most likely another one that is following it. After the battle, you have completed the game! Congratulations, and enjoy the ending!

 ). Take the path south now, and you’ll find Shalog sitting by a fire not too far from where Irrigh was (it’ll take you all of 20 seconds to get from one to the other). You’ll engage in a quick fight.. it’s an easy one. I suggest having a two handed weapon equipped at this juncture so that you can deal greater physical damage.

 Activision-Blizzard Announces eSports Division
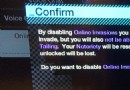 How to turn off Online Multiplayer Invasions in Watch Dogs
 Soul Caliber V and the Ezio Factor
 RE Revelations 2 Episode 4: Metamorphosis (PC) review
 Destiny: The Taken King Guide On How To Get The Chaperone Exotic Shotgun or Complete Jolly Holliday Quest