All Relic Locations
There are a total of 29 relics in the single player campaign which you must collect in order to get the Relic Hunter achievement. Some can easily be missed, so check out the guide below to get this achievement and find all the relics in The Darkness II. We’ve broken the guide down by chapters.
Jump to Content
Just so you know, all of the relics can be obtained without ever purchasing a single skill. You also must not worry if you miss one relic because after you finish the story, you can go back via chapter select, or begin a New Game+ where you can replay the story and get your missing relics. All of your progress will get handed over to the New Game+ saved data.
1. Roanoke’s Bane – Near the exit of the fiery ruins of the building where you are, rip out the steel door and there you will find the first relic.
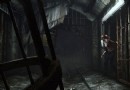
2. Yhwh’s Lament – Going down the subway as you can see at the screen shot shown below, turn to your left and then go forward. Not far, you’ll find the second relic.
3. The True Revelation – Go up the stairs of this mansion and then head to your left. There you will see a room. When you enter, you’ll see the next relic on the desk just beside the flower vase.
4. Sister of Light – When you enter the pool/bar lounge, turn around to your right and there on the floor just next to those slot machines is the forth relic.
5. Dark Man – Now, this takes place in a junk shop where you’ll see a sign for Marshall Bros. Salvage. Below that sign or bill board, is a ruined bus, at the rear part of it, you’ll see the next relic.
6. The Trinity – You’ll find a crane in that area where you’ll have to jump on it to go across, there you’ll find a something like a container van which is white and inside you’ll see the Trinity relic.
7. The Graven Image – When you get to this area shown below, go down and then head to your right. When you see a yellow box, approach it and there you will see an entrance which leads to the seventh relic.
8. Chime of Deliverance – Now, reaching this area, go forward. Once you see a fork-lift truck, you’ll also see stairs on your left. Go up the stairs and enter the door you see. Just at the left, you’ll find the next relic.
9. Brothers of men – When you arrive at the Lucky Mannequin, facing this sign, turn to your right. There you will see a parked truck. Head towards the back of it and there you will find what you’re looking for.
10. The Key of Mictlan – Upon reaching this area, as shown in the screen shot below, head to your left, and easily, you’ll spot the next relic.
11. Thumb Screws – Just where you encounter this scene, on the right side of that man which is tied up is the next relic.
12. Fool’s Phylactery – As soon as you reach this area, jump down, then go up the short stairway and move forward. When you get to another stairway going down, look at your right. You will see the next relic at the terrace of the lower floor of a building. Here you will want to grab it using the darkness.
13. Winged Demon – Upon moving along this parking area, you’ll see a blue car. Move towards it and there you will hear some gun shots. As you enter, you will see someone who gets killed.. Move to your left and rip the door, inside you’ll locate the Winged Demon relic.
14. Blinding Sun – When you reach this area shown below, head to the door near the fire place. When you enter, you’ll see another fire place where you’ll find the next relic.
15. Cain – Outside, you’ll see a statue of Mother Mary, at the back portion of this, the next relic can be found.
16. Engraved Skull – Somewhere nearby, when you reach this area, at the rear part of this temple-like structure, you’ll find the next relic.
17. The Lantern of St. Anthony – As soon as you locate this stall, go forward and near that, you’ll find the seventeenth relic.
18. Af and Hemah – When you are in front of this Funnel Cakes stall, turn towards your back and there you will find the next relic.
19. The Ambysmal Maw – You’ll see a big scary black Darkling-like statue on top of a store. At the back part of that store is a building where you’ll see an entrance, go straight forward and you’ll obtain the next relic.
20. Crescent of the Sun – When you reach this area, enter then turn to your right.. Move a bit more then turn again to your right. You’ll see an entrance and on top of the table is your next relic.
21. Siddahartha’s Tears – Enter this area. There you’ll see a truck which has it’s lights on. Move forward and there you’ll find the next relic.
22. Mark of Cain – Enter the Castle of Horrors and there you will see two pathways. Look at your right, there you’ll get the next one.
23. Pope John XII - When you arrive at this area through the tunnels, you’ll see a table and some chairs on the left. If you move forward, you’ll see an entrance leading to the next relic.
24. Reliquary of the Blessed – Upon entering this somewhat secret library, look at you right and there you’ll find the next relic.
25. The Silent Knight – When you reach this ruins, go enter the cracked wall wherein you’ll have to enter another cracked wall. There at your left, you’ll see a stairway leading up. When you are on top, destroy the wall, there you will see the next relic.
26. Deceiver’s Grasp – Placing yourself here, go up the stairs. There you will see a propeller, continue to move forward and you will obtain the next relic.
27. The First – At this part, you’ll see an entrance blocked with wood. Breakthrough this and enter. There when you go down the short stairway, as you look at your right, you’ll find the next relic.
28. Prism of the Bothers – Upon reaching this area, you’ll see Jenny wearing some white sheaths of cloth. After the short conversation, turn to your right and there you will get the next relic.
29. Ashes of the Unnamed – When you are at this section of the game, move forward. You’ll have to kill two enemies and where they dropped, you’ll find the last relic in the game.
So there you have it! All twenty-nine relics.
Here is the full video version of the guide:


 Ori and the Blind Forest Complete 1080p HD Walkthrough
 How to be the Best Gladiator in Gladiators: Call of Arena with better Attack, more Gems ans Smart Gameplay, Tips & Tricks
 The Walking Dead: Episode 2 Walkthrough
 Fireball Pitches? Tornado Putts? 4 Sports Games With Super Powers!
 PES 16 or FIFA 16 - which game is better - comparison