Millennium Secrets: Emerald Curse Walkthrough, Guide, & Tips
Millennium Secrets: Emerald Curse Walkthrough

Welcome to the Millennium Secrets: Emerald Curse Walkthrough!
Help Kate solve a thrilling mystery and find the Professor!
Whether you use this document as a reference when things get difficult or as a road map to get you from beginning to end, we’re pretty sure you’ll find what you’re looking for here.
This document contains a complete Millennium Secrets: Emerald Curse game walkthrough featuring annotated screenshots from actual gameplay!
We hope you find this information useful as you play your way through the game. Use the walkthrough menu below to quickly jump to whatever stage of the game you need help with.
Remember to visit the Big Fish Games Forums if you find you need more help. Have fun!
This walkthrough was created by prpldva.
General Tips & Information
- From the main screen you may manage player profiles.
- The options menu allows for the adjustment of music and sounds volume.
- You may play this game in windowed or full screen mode.


- Before you start a new game you will be asked to choose your difficulty level.
- Casual play offers a tutorial, faster hint recharge, and a Skip button, and the cursor will sparkle when you are able to interact with an item.
- Advanced play has no tutorial, a slower hint recharge and Skip button, and no cursor sparkle.
- You can change levels and turn the tutorial off and on in the options menu.
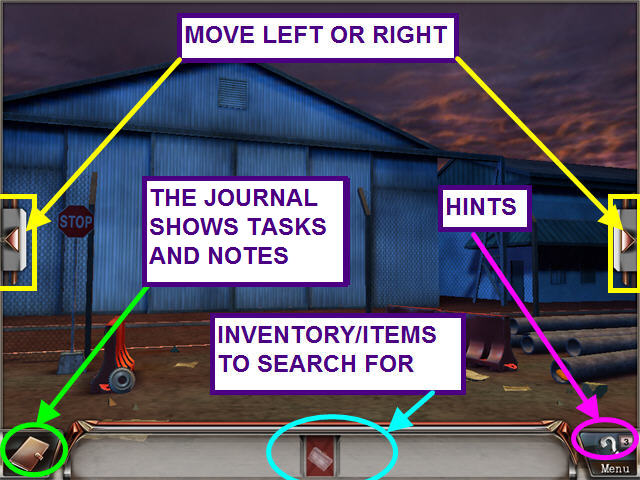
- Use the arrows on the left and right to move to the next scene.
- When you are in a close-up, click the down arrow to exit.
- Read the journal often for goals and notes.
- Inventory and needed items are in the bottom section.
- The items you are searching for will be lightened until found.
- There are bonus items in many levels. Find all of the items for extra hints!
- The solutions for mini-games are randomized; your solution may vary.
The Port
- Kate receives a frantic call from the professor telling her to find the CASE and get it to the authorities.
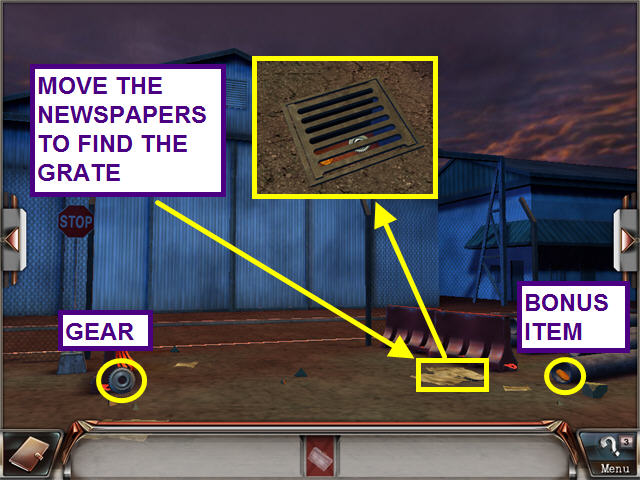
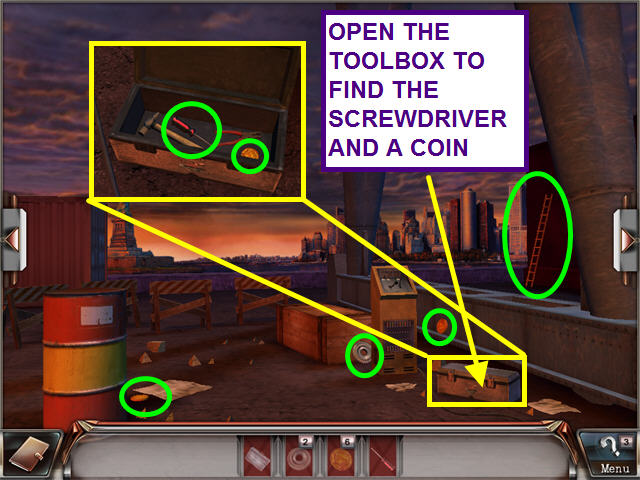
- Pick up the GEAR to discover you need 4 more GEARS.
- Take the gold COIN from the pipe on the right.
- The gold COIN is a bonus item; you’ll need to find 9 more COINS to earn a hint.
- Click on the newspaper next to the barricade to uncover the grate.
- Click on the grate for a close-up.
- You see a COIN and a GEAR beneath the grate.
- Click on the grate to learn you need a CROWBAR.
- Click on the down arrow to exit the close-up.
- Click on the left arrow to move to another scene.
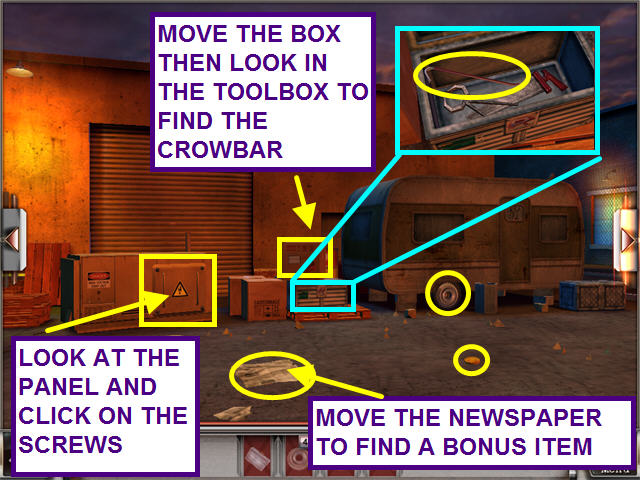
- Look at the close-up of the generator panel.
- Click on the panel screws to learn you need a SCREWDRIVER.
- Move the newspaper on the ground to find a bonus COIN.
- Take the GEAR and the other COIN.
- Move the box and look into the tool box.
- Take the CROWBAR.
- Click the down arrow to exit the close-up.
- Click on the right arrow to return to the first scene.
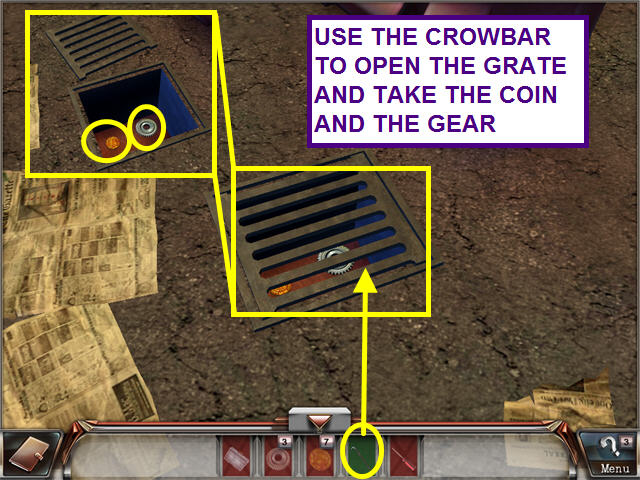
- Look at the close-up of the grate.
- Take the CROWBAR from your inventory and use it on the grate.
- Take the COIN and the GEAR.
- Click on the down arrow to exit the close-up.
- Click on the left arrow twice to move to another scene.
- Look in the toolbox to find the SCREWDRIVER and a COIN.
- Exit the close-up.
- Take the LADDER, GEAR, and 2 COINS.
- Click on the left arrow to move to the next scene.
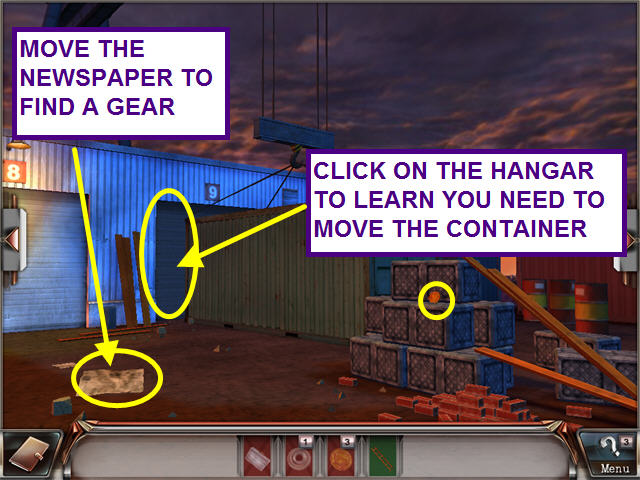
- Move the newspaper to find a GEAR.
- Take the COIN.
- Look at the hangar to learn you need to move the container.
- Click on the left arrow twice to return to the generator.
- Look at the close-up of the generator.
- Take the SCREWDRIVER form your inventory and use it on the 4 screws on the cover plate.
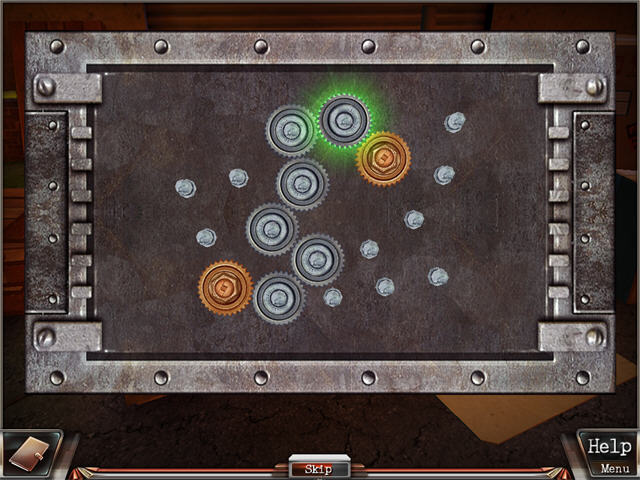
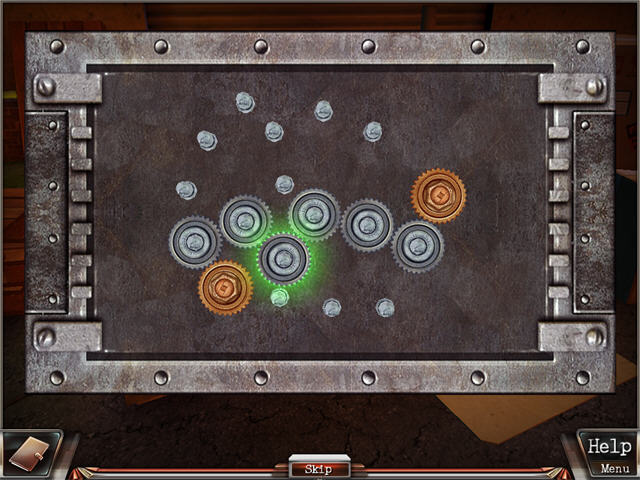
- Take the GEARS from your inventory and click them inside the panel to trigger a mini-game.

- The object of this mini-game is to set the silver gears so that both gold gears rotate.
- Left-click to pick up and place a gear.
- This mini-game is randomized, so your solution may vary.
- Here are two possible solutions.
- Click on the left arrow to return to the crane control.
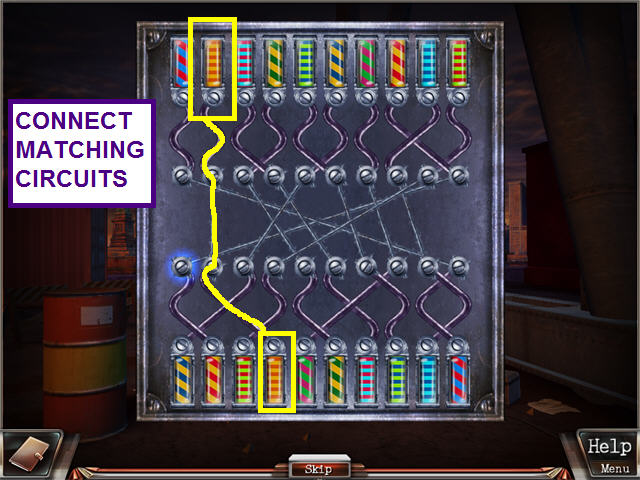
- Click on the console to trigger a mini-game.
- The object of this mini-game is to connect all the circuits.
- Click on a connector screw and find the matching pattern on the bottom.
- Both connector screws will sparkle if the connection is correct.
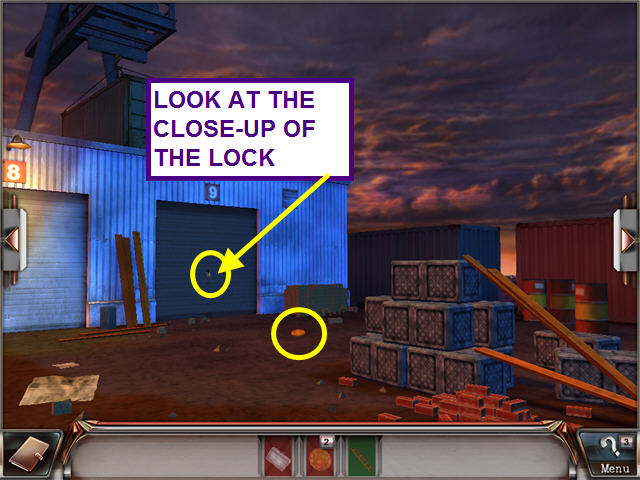
- After a cut-scene of the moving container, you will find yourself in front of Hangar 9.
- Take the COIN.
- Look at the close-up of the lock on the hangar door to trigger a mini-game.
- The object of this mini-game is to slide the levers into the correct positions and open the lock.
- Move each of the 4 levers onto a blue line; then push the TEST button.
- A green light indicates correct placement; red indicates improper placement.
- You have 4 chances to solve the puzzle before it resets.
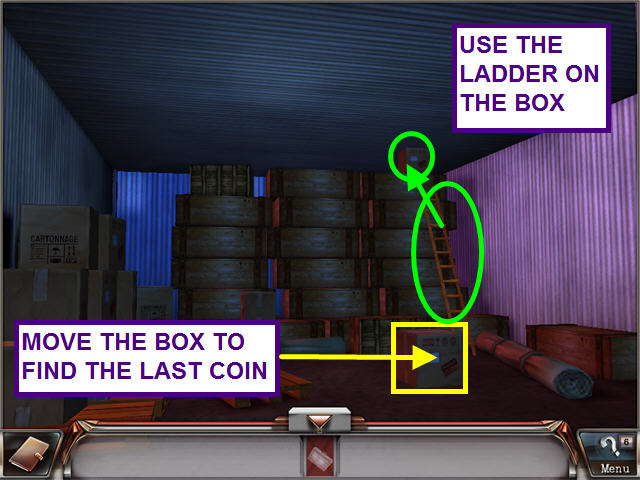
- Move the box in the center of the floor to find the last COIN.
- You have earned 3 additional hints.
- Look at the box in the upper right; it is too high to reach.
- Use the LADDER on the box.
- Push the box aside and take the BRIEFCASE.
- Department of Investigation agents show up, taking the BRIEFCASE from you and advising that you let them handle the investigation.
The Professor’s Apartment
- Deciding that the Professor needs your help, you head to his apartment.
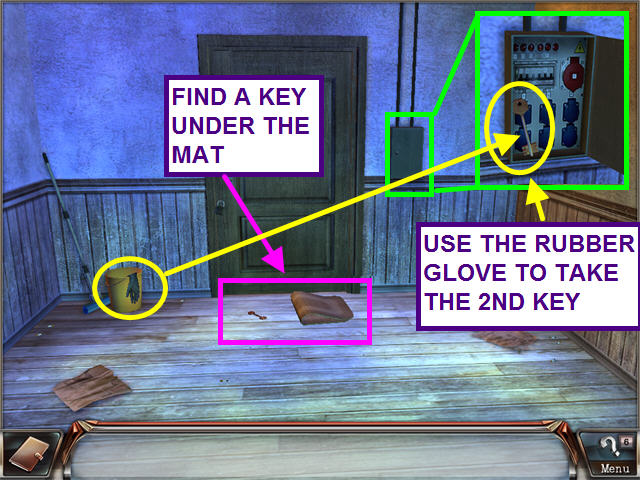
- Look at the lock on the door to see that you will need 2 KEYS.
- Take the RUBBER GLOVE from the bucket.
- Look under the doormat and find a KEY.
- Open the fusebox to the right of the door.
- Use the RUBBER GLOVE to take the KEY.
- Use the KEYS on the front door.
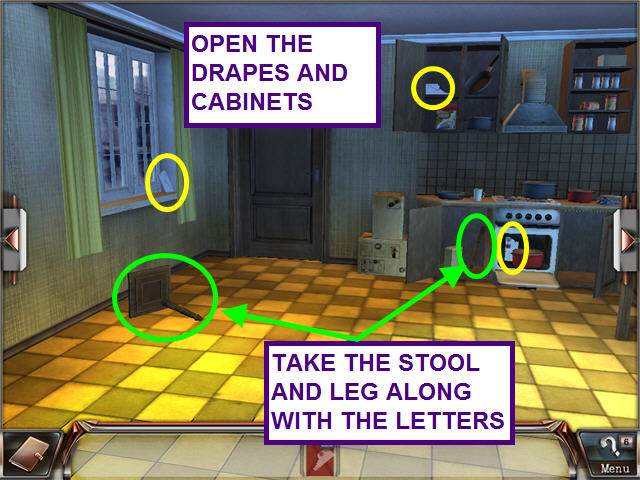
- Open the drapes, stove, and cabinets.
- Take the 3 LETTERS.
- Take the STOOL and the STOOL LEG.
- Click on the right arrow to move to the next location.
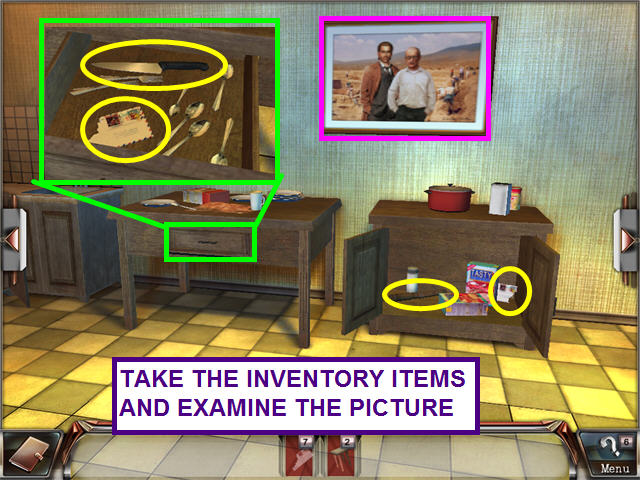
- Open the right cabinet; take the STOOL LEG and the LETTER.
- Open the drawer on the table; take the KNIFE and LETTER.
- Exit the close-up.
- Examine the painting on the wall.
- Click the left arrow twice to move to another scene.
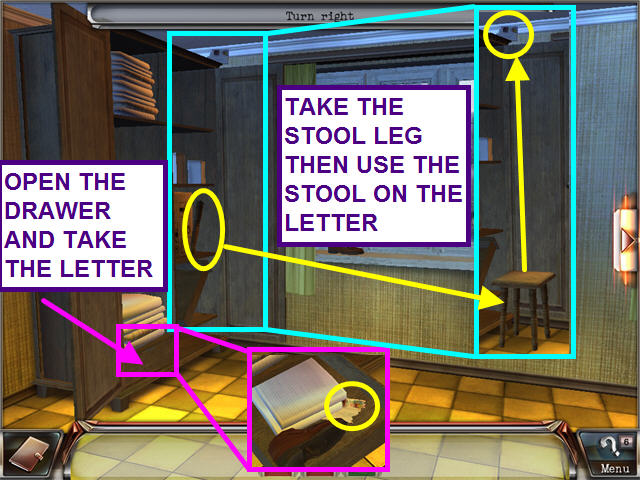
- Open the cabinet and take the STOOL LEG.
- Look at the LETTER at the top of the cabinet; it’s too high to reach.
- Use the STOOL on the LETTER.
- Take the LETTER.
- Open the drawer and take the LETTER.
- Click the left arrow to move to another scene.
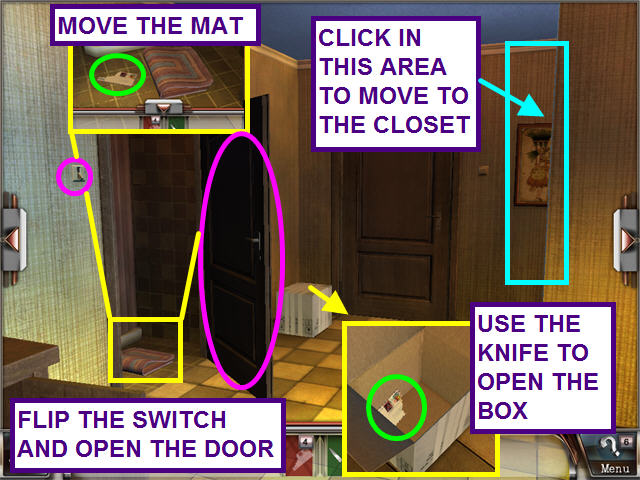
- Flip the light switch and open the left door.
- Look inside the left room.
- Move the bathmat to find a LETTER.
- Exit the room.
- Look at the close-up of the box.
- Use the knife to open the box.
- Take the LETTER.
- Click to the right of the right door, near the painting to move to the closet.
- Open the lower cupboard.
- Take the LETTER.
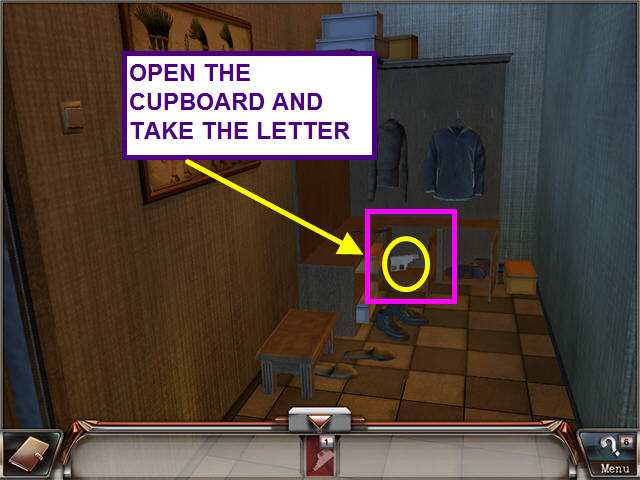
- Taking the last LETTER will trigger a mini-game.
- The object of this mini-game is to reassemble the letter.
- Left-click to take or place a piece of the letter.
- Adjacent pieces will ‘snap’ together.
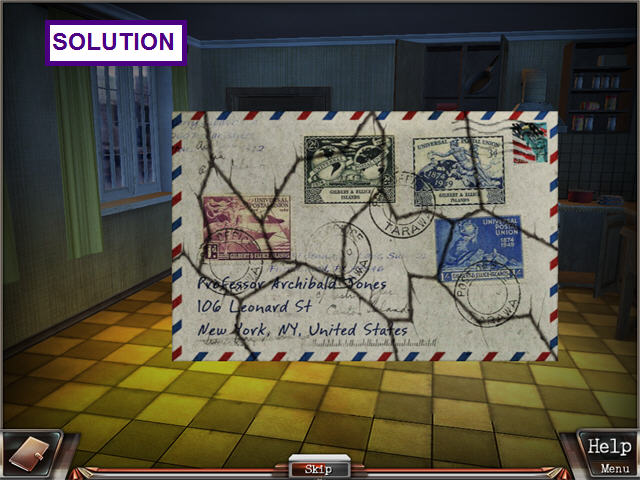
- The letter is from Sir James Scofield requesting that the Professor head an expedition.
- You are returned to the kitchen.
- Click on the door to the left of the window to explore the rest of the apartment.
- Open all the doors on the bookcase.
- Look in the box and take the BATTERY.
- Collect the LIGHT BULB and the 3 DVD-ROMs.
- Take the 3 bonus item DOG STATUES.
- Click on the desk to view a close-up.
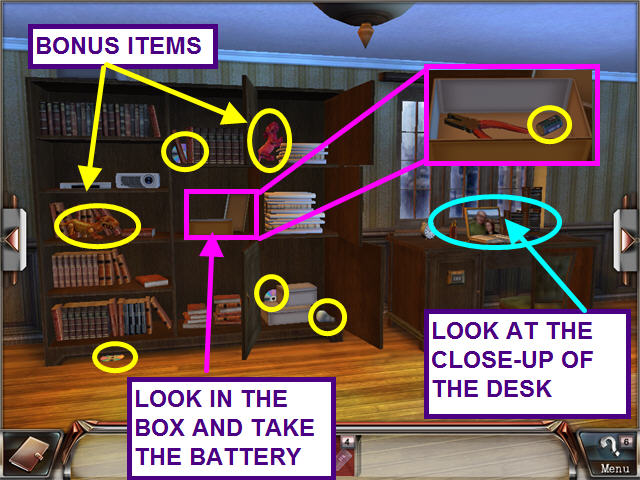
- Examine the photo.
- Take the INSULATING TAPE.
- Exit the close-up.
- Click the left arrow to move to the next scene.
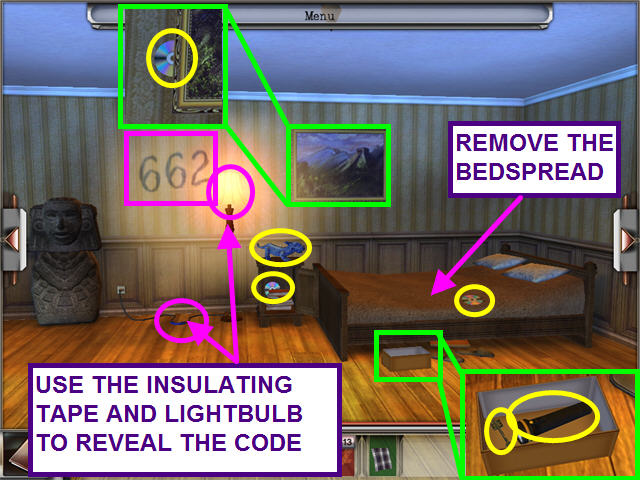
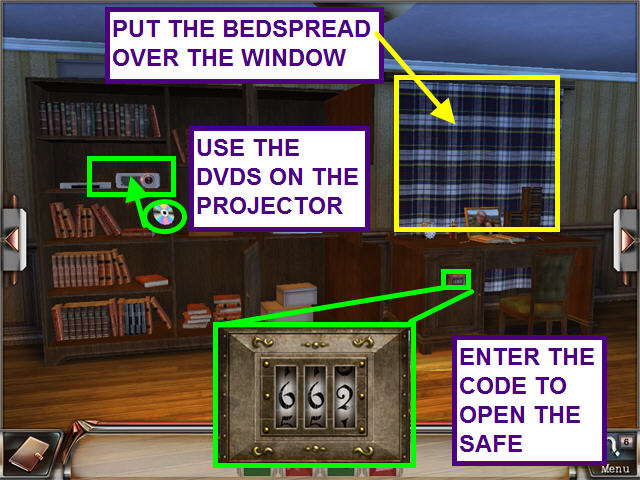
- Use the LIGHT BULB on the lamp and the INSULATING TAPE on the cord.
- The code 662 appears on the wall.
- Take the BEDSPREAD and the DVD that was underneath.
- Open the nightstand and take the DVD.
- Take the blue DOG STATUE.
- Look at the close-up of the painting.
- Move the painting to find a DVD.
- Look at the box under the bed.
- Take the FLASHLIGHT and the KEY.
- Click the left arrow to move to the next scene.
- Take the DVD from the clock.
- Pull down the projection screen.
- Use the KEY to unlock the chest.
- Move the top book inside the chest and take the battery and the DVD.
- Click the left arrow to move to the next scene.

- Open the wardrobe and move the box to find a DVD.
- Move the chair in front of the wardrobe.
- Move the box on top of the wardrobe to find a DOG STATUE.
- Examine the painting.
- Take the red DOG STATUE from the dresser.
- Open the top dresser drawer and take the BATTERY.
- Open the bottom drawer and move the book.
- Take the DVD and the BATTERY.
- Click the left arrow to move to the next scene.
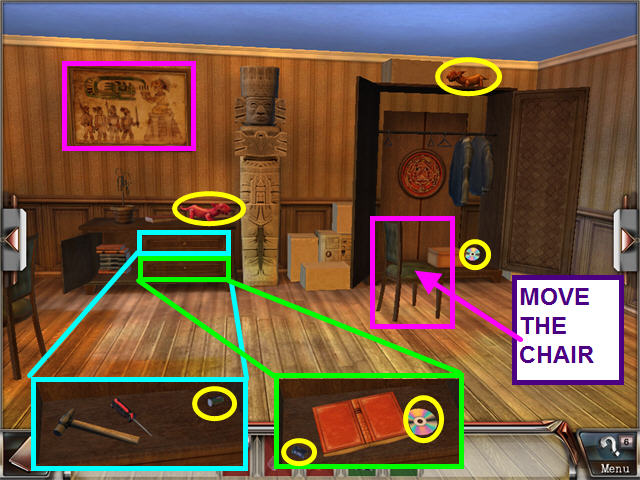
- Look at the close-up of the safe.
- Use the code from the wall, “663,” to open the safe.
- Take and read the file folder.
- The Professor is concerned about the health of a young girl.
- Take the BATTERY.
- The BATTERIES will automatically combine with the flashlight.
- Use the DVDs on the projector to trigger a mini-game.
- The object of this mini-game is to duplicate the pattern by moving pieces into the grid.
- Left-click to pick up or place a piece.
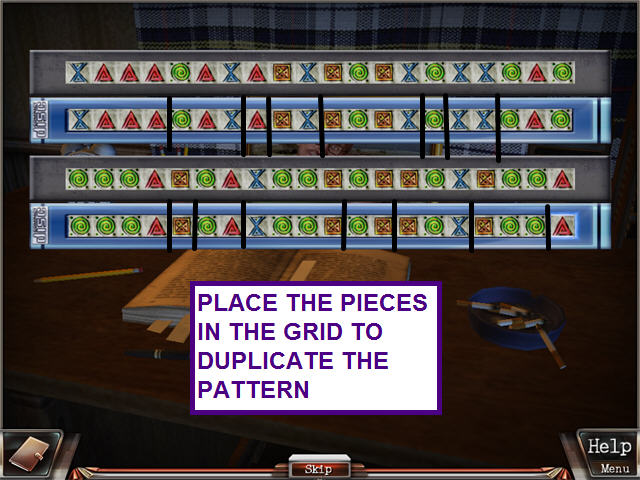
- The DVD is about a burial site near Texcoco Lake in Mexico.
- The professor is puzzled at the meaning of jewelry found with the bodies.
- You will find yourself back in front of the screen.
- Click on the left button to chance scenes.
- Click on the circular puzzle inside the wardrobe.
- The object of this mini-game is to restore the painting by rotating the rings.
- Click on each ring to rotate it.
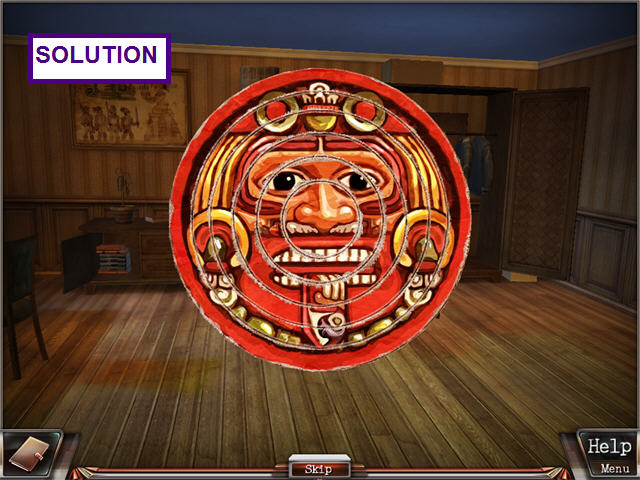
- A secret passage opens in the wardrobe.
- Use the flashlight on the dark entrance.
- Aim your flashlight at the right side of the room.
- Open the cabinet.
- Take the 2 DOG STATUES and the 2 DOCUMENTS.

- Move your flashlight to the left side of the room.
- Look at the painting.
- Open the top drawer of the desk.
- Take the DOG STATUE.
- Open the second drawer and take the DOCUMENT.
- Click on the left button to move to the next scene.
- Focus the flashlight on the right half of the room.
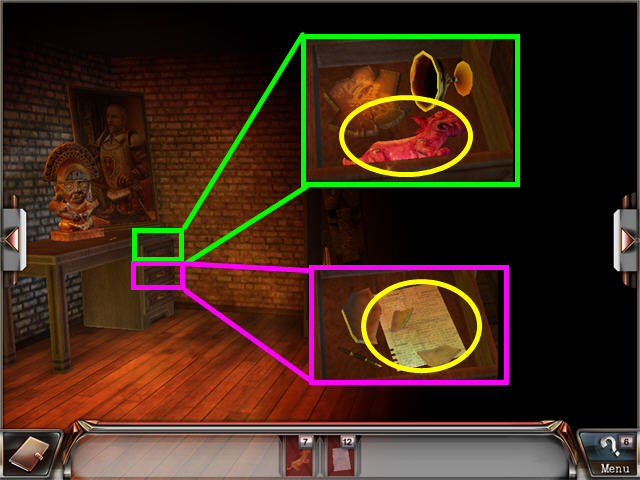
- Look inside the crate and take the DOCUMENT.
- Open the top drawer of the desk and take the DOCUMENT.
- The middle drawer holds a DOG STATUE.
- Take the DOCUMENT from the bottom drawer.
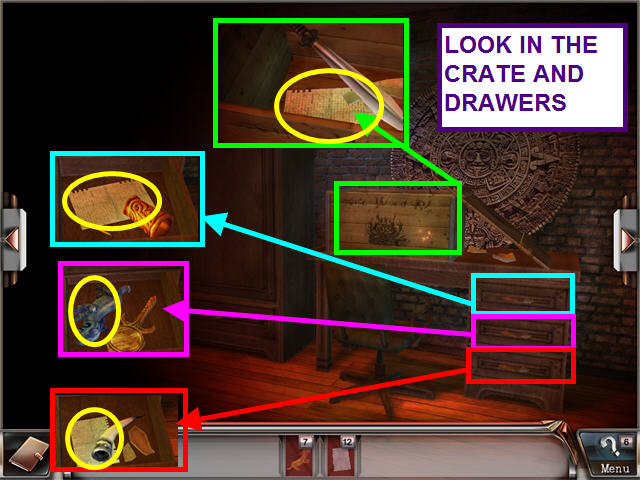
- Focus the flashlight on the left half of the room.
- Look in the drawer and move the decorative disc.
- Take the DOCUMENT and the DOG STATUE.
- Exit the drawer and take the other DOCUMENT AND DOG STATUE.
- Click on the left button to move to the next scene.

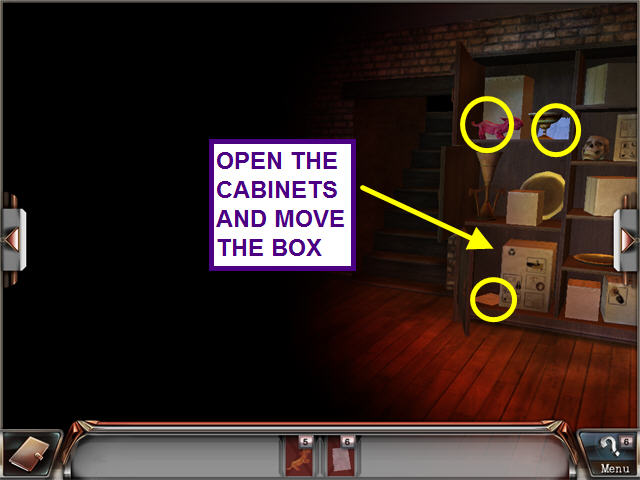
- Move your flashlight to the right side of the room.
- Open the cabinets and move the box on the lower shelf.
- Take the 2 DOCUMENTS and the DOG STATUE.
- Focus the flashlight on the right half of the room.
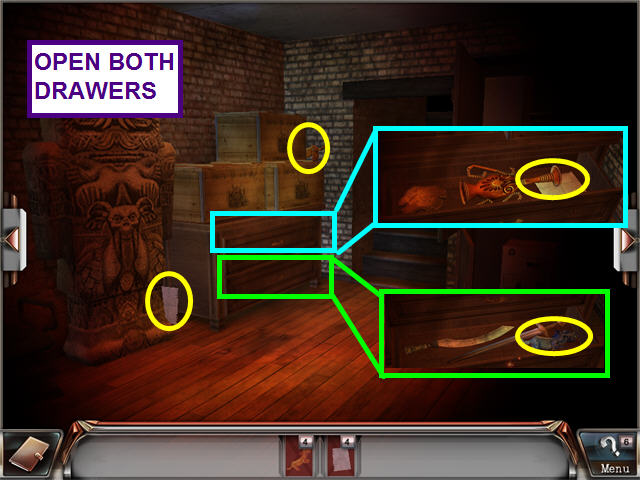
- Focus the flashlight on the left half of the room.
- Take the DOCUMENT and the DOG STATUE.
- Open the top drawers and take the DOCUMENT.
- Open the bottom drawer and take the DOG STATUE.
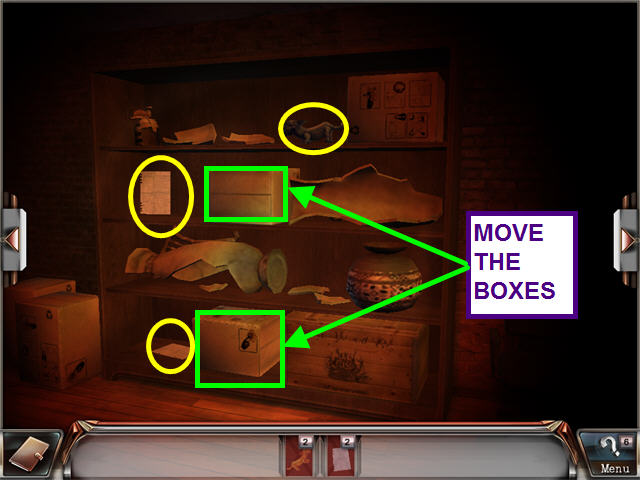
- Click on the left button to move to the next location.
- Move the boxes on the shelf.
- Take the2 DOCUMENTS and the DOG STATUE.
- If you find all the DOCUMENTS before the final DOG STATUE, you will be asked if you want to stay and continue the search for bonus items.
Lord Scofield’s Manor
- Since the Professor suspects Lord Scofield of dealing on the Black Market, you head to his manor.
- Under the guise of an art collector, you finagle an invitation to stay at the manor.
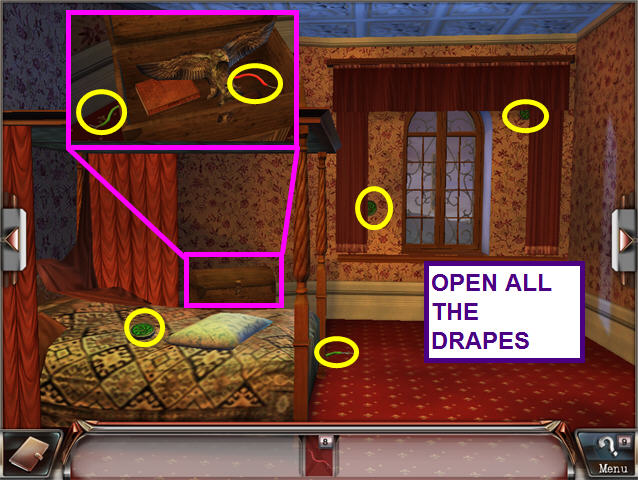
- Open the drapes and take the 2 WINDOW KEYS.
- Open the bed curtains and move the pillow.
- Take the WINDOW KEY.
- Look in the chest and take the 2 WIRES.
- Take the WIRE at the foot of the bed.
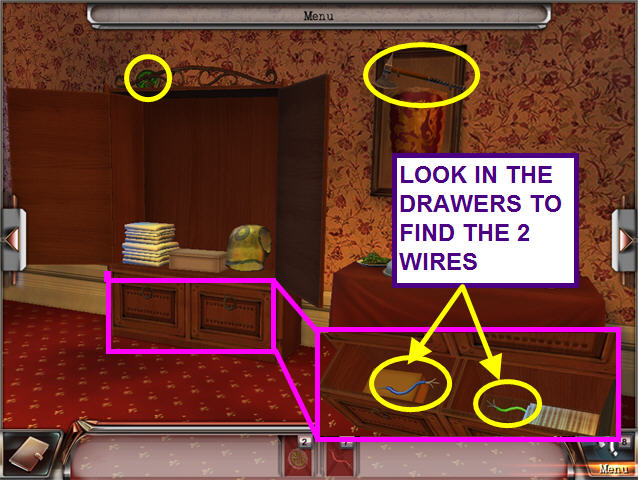
- Click on the right button to move to the next scene.
- Take the WINDOW KEY from the top of the wardrobe.
- Open the bottom left drawer and find a WIRE.
- Open the bottom right drawer and move the linen.
- Take the WIRE.
- Take the AXE off the wall.
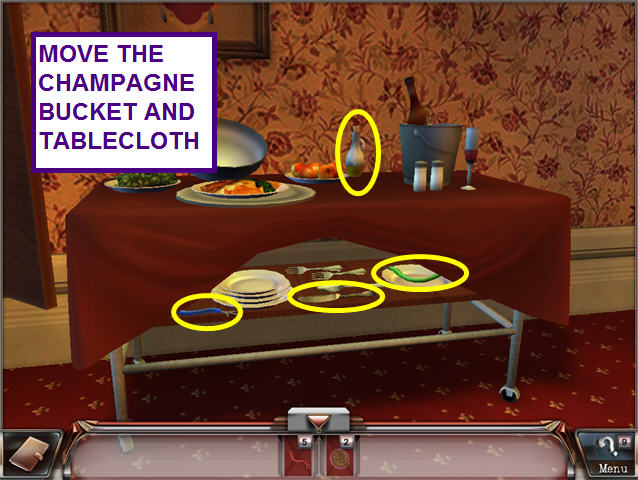
- Look at the close-up of the dining cart.
- Move the champagne bucket and the tablecloth.
- Take the OLIVE OIL, KNIFE, and 2 WIRES.
- Exit the close-up and push the right arrow button.
- Look at the close-up of the shield and take the WIRE.
- Look at the close-up of the vase and take the WIRE.
- Take the WINDOW KEY.
- Press the right arrow button.
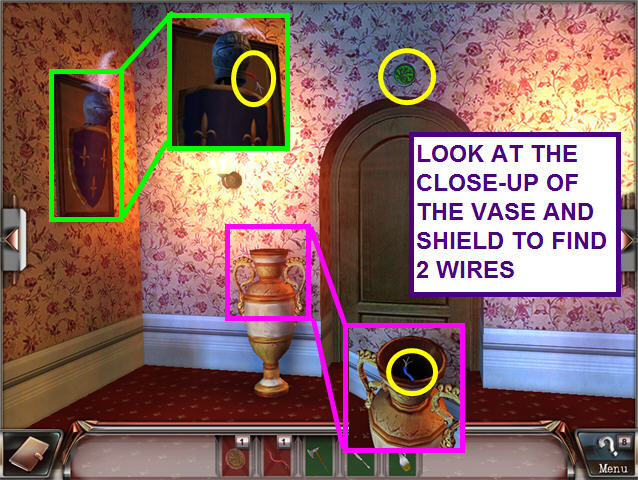
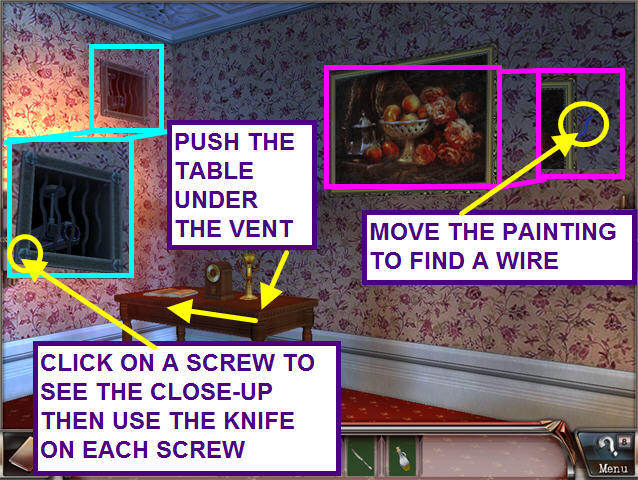
- Move the painting on the wall and take the WIRE.
- Look at the grate; it is too high to reach.
- Push the table under the grate.
- Click on a screw to see the close-up.
- Use the KNIFE on each screw to remove the grate.
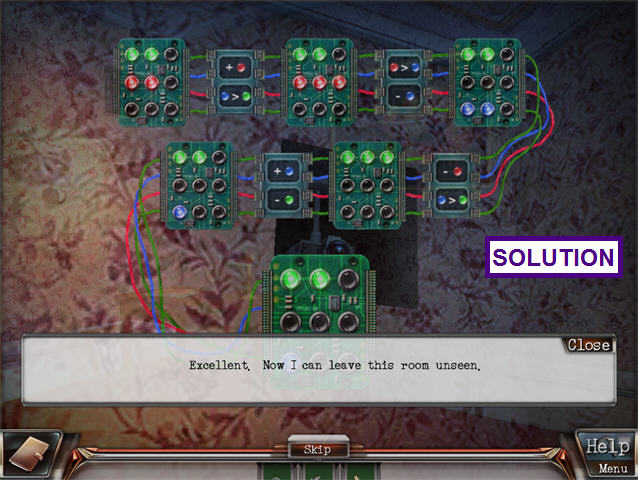
- Take the WIRES from your inventory and use them in the camera.
- The object of this mini-game is to insert the microchips so that the final two circuit boards match.
- Insert the chips into the empty spots.
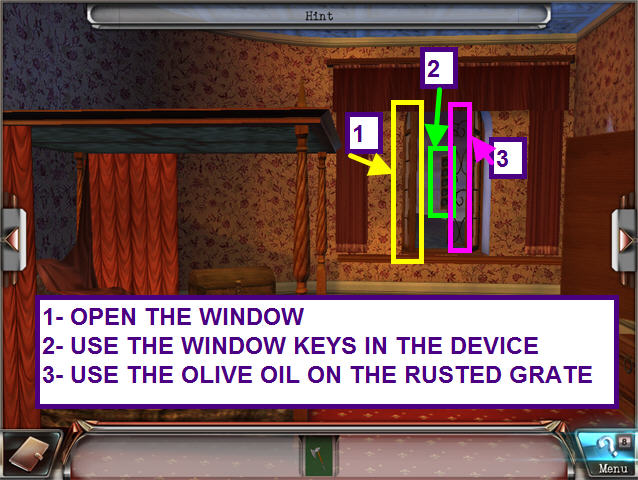
- Turn to the right.
- Open the window.
- Use the WINDOW KEYS on the device.
- Use the OLIVE OIL on the rusted grate.
- Try to walk to the left window, but the ledge gives way.

- Return to your room and face the window.
- Use the AXE on the windowsill to get the PLANK.
- Exit out the window and use the PLANK on the gap in the ledge.
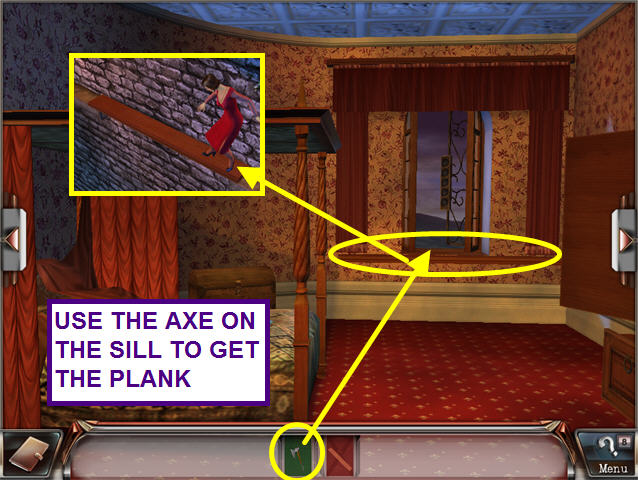
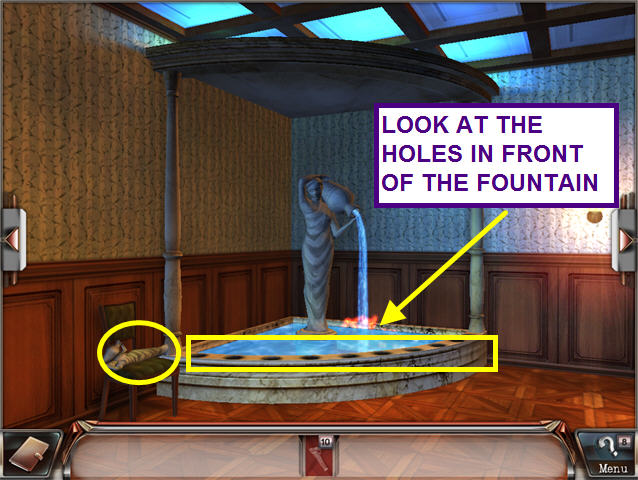
- Look at the holes in front of the fountain to learn you need to collect statues.
- Take the STATUE from the chair.
- Click on the right arrow button.
- Select the painting on the wall.
- Find the 10 differences between the paintings.
- You may click on either side.
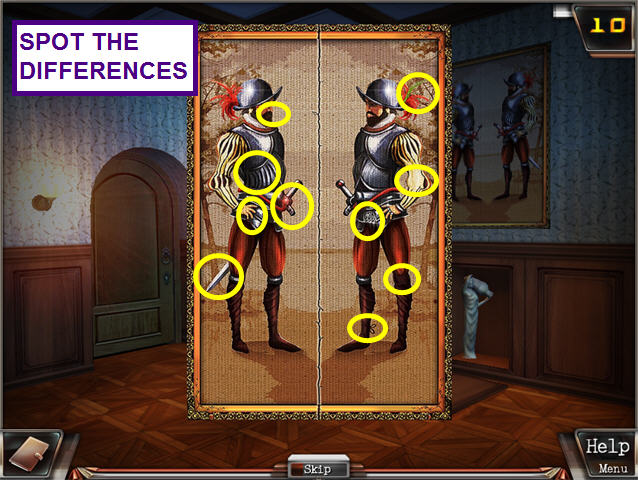
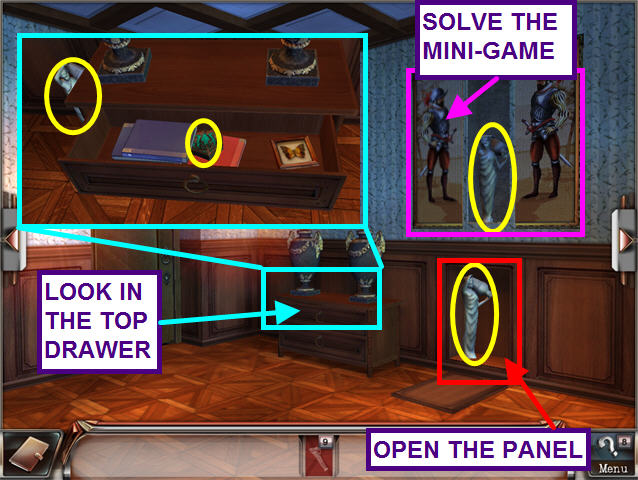
- Take the STATUE that was hidden by the painting.
- Just below the painting, remove the wood panel and find another STATUE.
- Look inside the top drawer of the chest.
- Move the book and take the FRAME ORNAMENT.
- Take the STATUE just to the left of the chest.
- Exit the close-up and turn right.
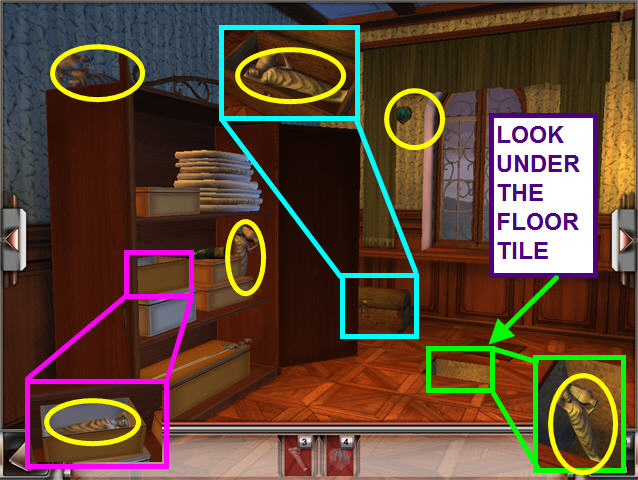
- Open the drapes and take the FRAME ORNAMENT.
- Look in the chest and take the STATUE.
- Look under the floor tile and take the STATUE.
- Take the STATUE from atop the wardrobe.
- Open the right door of the wardrobe and take the STATUE.
- Open the left door of the wardrobe and take the STATUE from the close-up of the box.
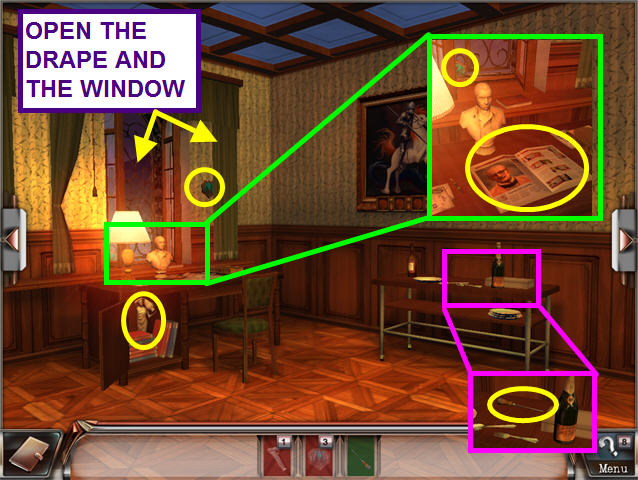
- Exit the close-up and turn to the right.
- Look at the close-up of the dining cart.
- Move the small box and take the ICE PICK.
- Move the right drape and open the window.
- Take the FRAME ORNAMENT.
- Open the bottom cabinet on the desk and take the STATUE.
- Look at the close up of the desk and take the FRAME ORNAMENT and the ACADEMIC JOURNAL.
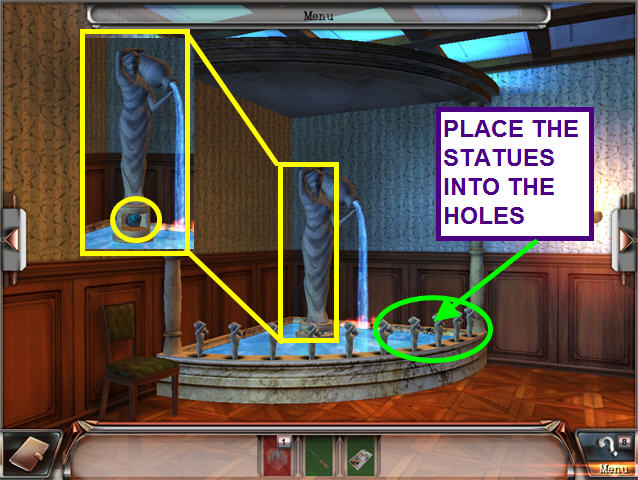
- Exit the close-up and turn to the right.
- Place the STATUES in the holes on the fountain.
- After the STATUES lower, take the FRAME ORNAMENT from the base of the center statue.
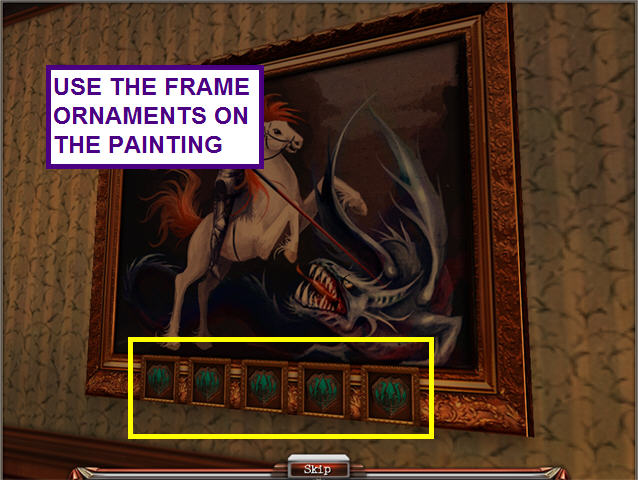
- Click on the left arrow button.
- Use the FRAME ORNAMENTS on the painting.
- This opens a peep hole through which you can hear Lord James discussing the Professor with his henchman.
- Turn to the right twice.
- Look at the keyhole on the door.
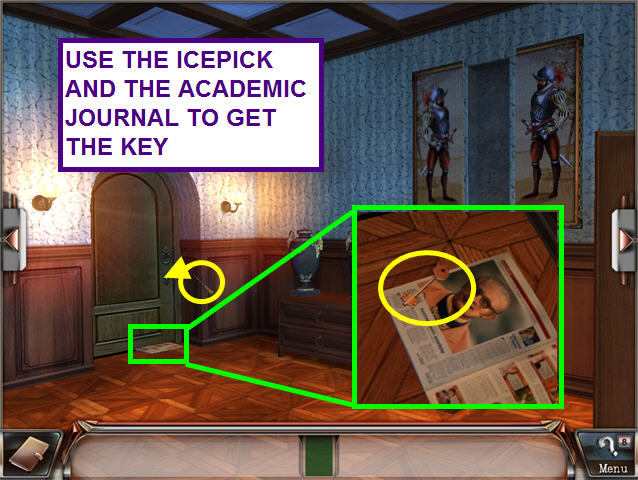
- Place the ACADEMIC JOURNAL under the door.
- Use the ICEPICK on the door lock.
- Look at the close-up of the magazine and take the KEY.
- Use the KEY to open the door.
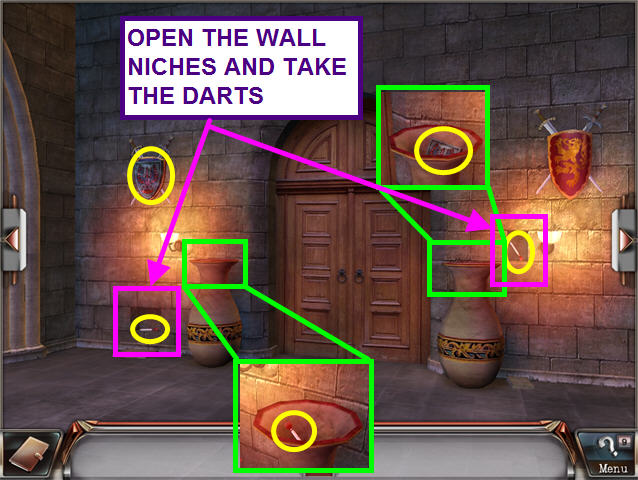
- Take the BIRD KEY from the left shield.
- Open the wall niches and take the TRANQUILIZER DARTS.
- Look inside the vases and find a BIRD KEY and a TRANQUILIZER DART.
- Turn to the right.
- Move the center set of antlers to find a BIRD KEY.
- Take the BIRD KEYS from the suit of armor and atop the cabinet.
- Look at the close-up of the dining cart and move the tablecloth.
- Take the NAPKIN and 2 TRANQUILIZER DARTS.
- Open the left side of the cupboard and look in the vase to find a TRANQUILIZER DART.
- Open the right side of the cabinet and take the GUN.
- Click on the right arrow button to move to the next scene.

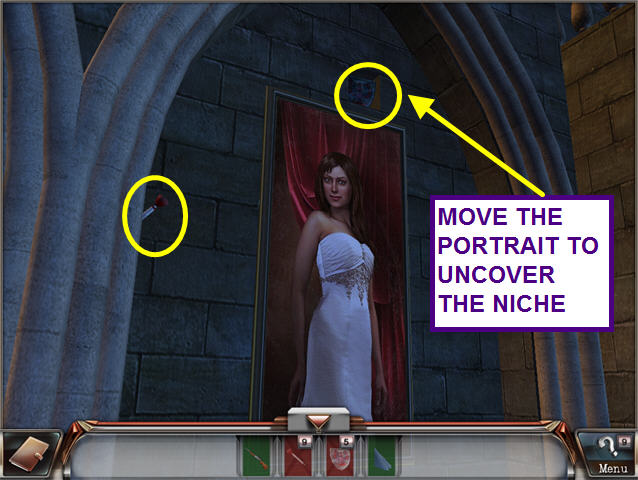
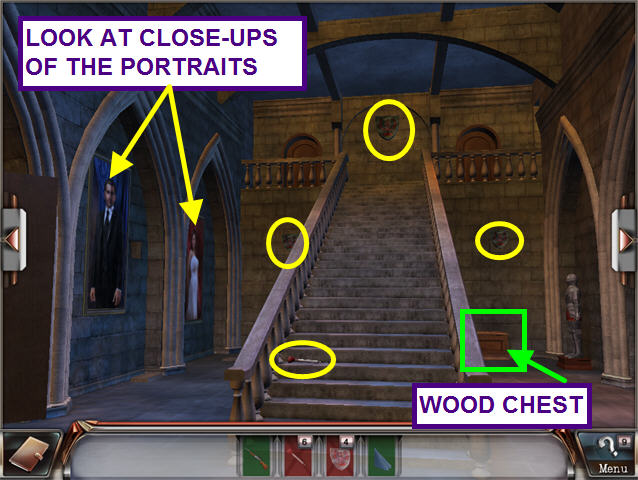
- Look at the close-up of the woman’s portrait.
- Click on the portrait to move it down.
- Click on the lighter stone to open a niche.
- Take the BIRD KEY and TRANQUILIZER DART.
- Look at the portrait closely; the woman looks a lot like Kate.
- Exit the close-up.
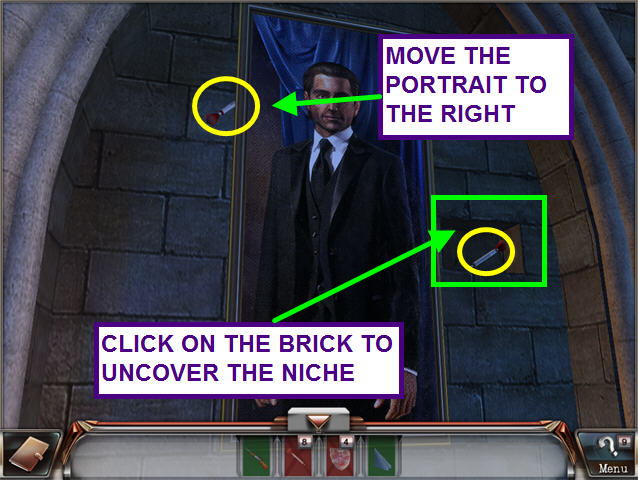
- Look at the close-up of the man’s portrait.
- Click on the portrait to move it to the left.
- Click on the lighter brick to reveal a niche.
- Take both TRANQUILIZER DARTS.
- Exit the close-up.
- Take the 3 BIRD KEYS.
- Take the TRANQUILIZER DART from the steps.
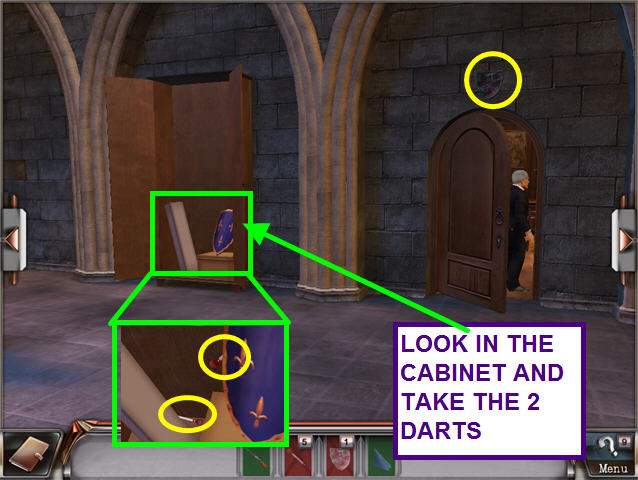
- Turn to the right.
- Open the cabinet and take the 2 TRANQUILIZER DARTS.
- Take the BIRD KEY from over the door.
- Return to the left.
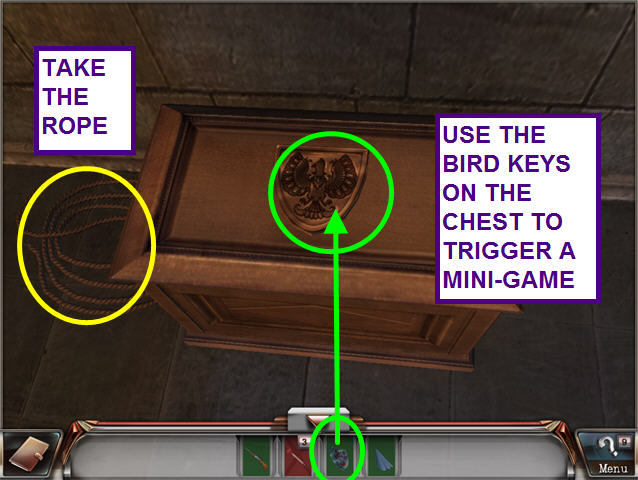
- Look at the close-up of the wood chest.
- Take the ROPE.
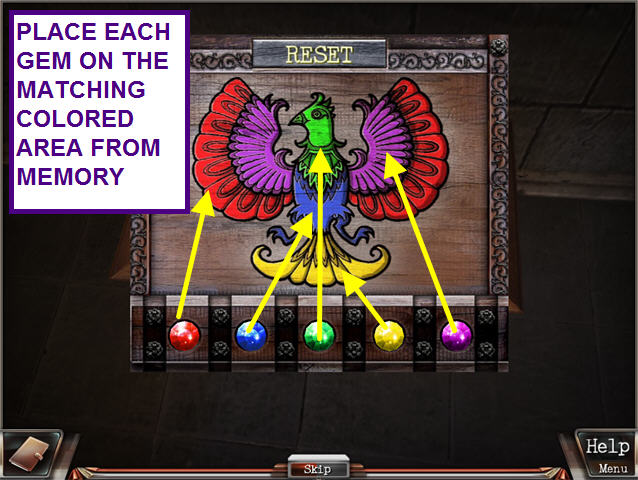
- Use the BIRD KEYS on the chest to trigger a mini-game.
- The object of this mini-game is to place the colored gems on the matching colored area from memory.
- Once you begin, the colors in the bird disappear.
- Recreate the colors by placing the gems in the correct positions.
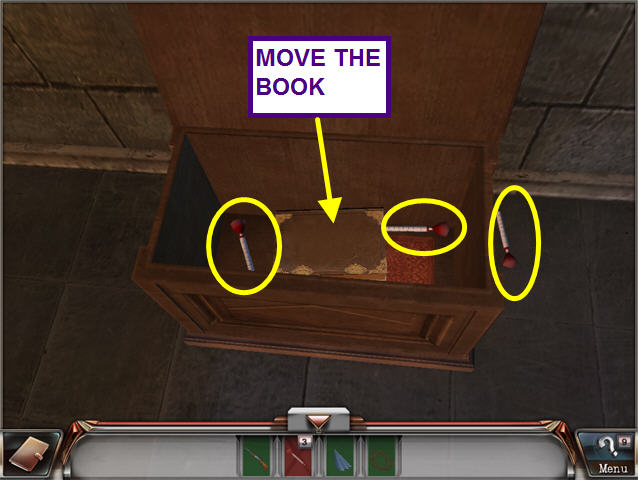
- After opening the box, move the book.
- Take the 3 TRANQUILIZER DARTS.
- The gun is automatically loaded.
- Exit the close-up and turn to the right.
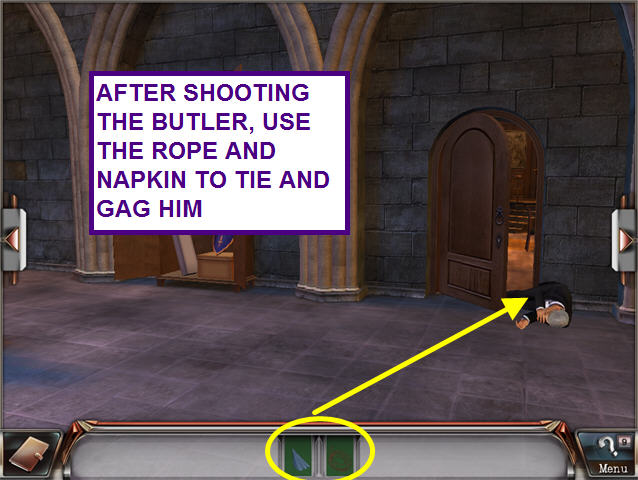
- Use the GUN on the Butler.
- Use the ROPE to tie up the Butler.
- Use the NAPKIN on the Butler to gag him.
- After hiding the Butler in the cabinet, go through the door.
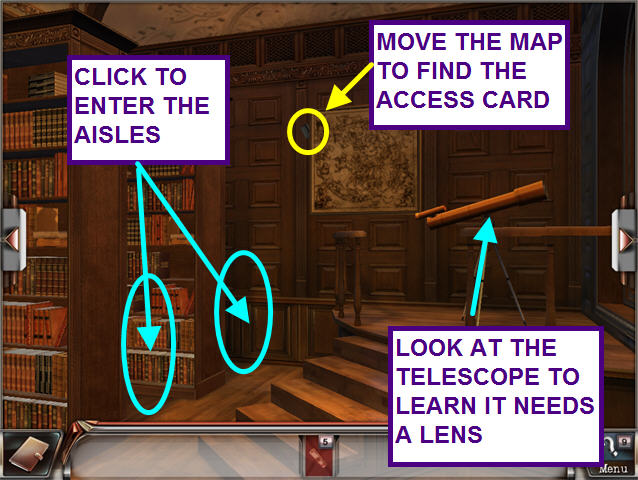
- Look at the telescope to learn it is missing LENSES.
- Move the map on the wall and take the ACCESS CARD.
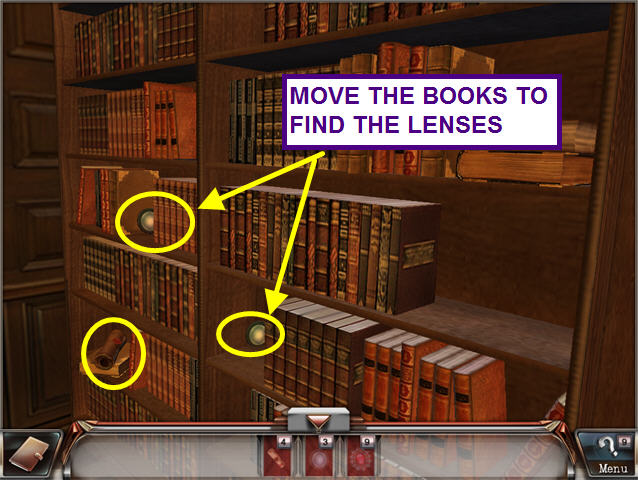
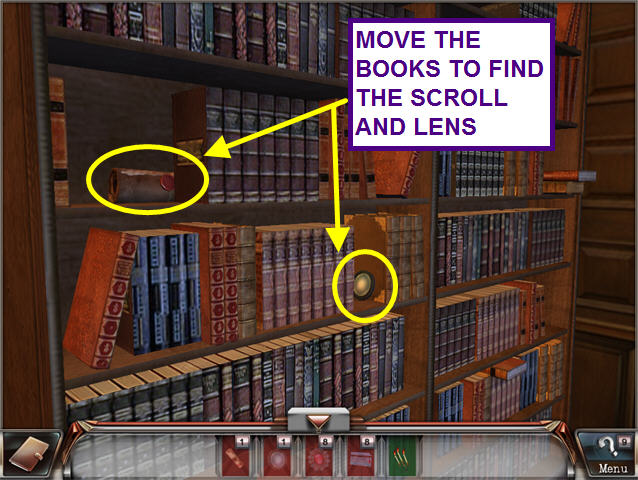
- Enter the first aisle.
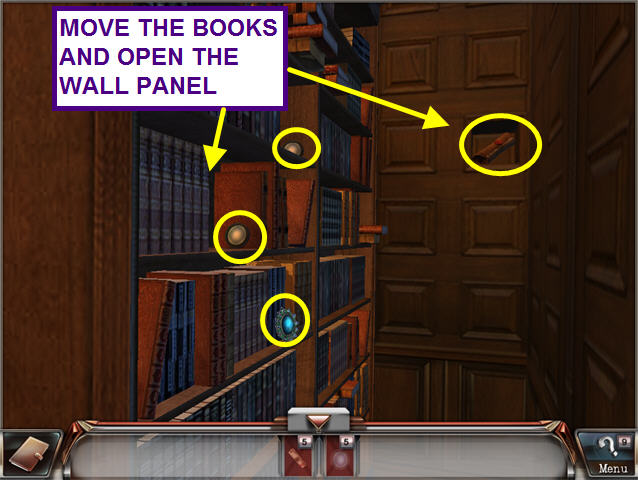
- Move the books to find the 2 LENSES.
- Take the JEWELRY.
- Open the wall panel and take the SCROLL.
- Exit the aisle.
- Move the books to find the 2 LENSES.
- Take the SCROLL.
- Exit the aisle and turn to the right.
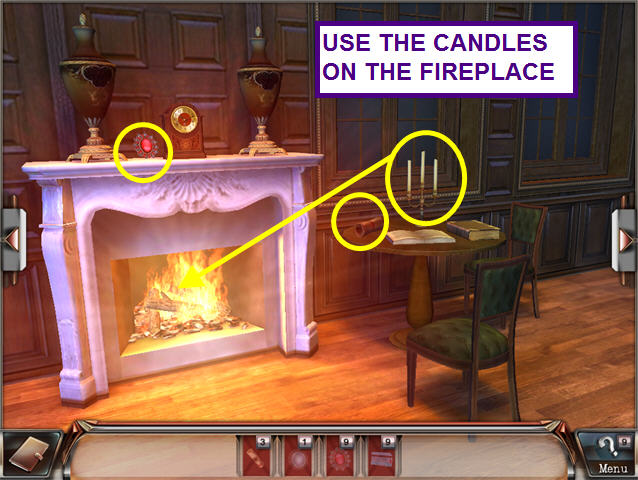
- Take the JEWELRY from the mantle.
- Take the SCROLL from the table.
- Take the CANDLES and use them on the fireplace.
- Turn to the right.
- Take the SCROLL off the top shelf of the front bookcase.
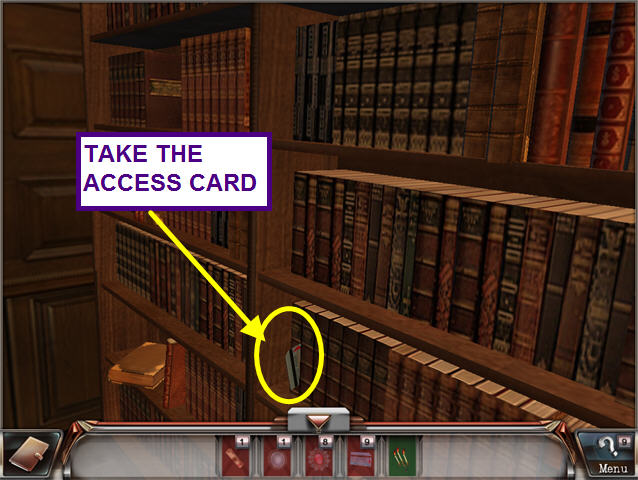
- Enter the rear aisle.
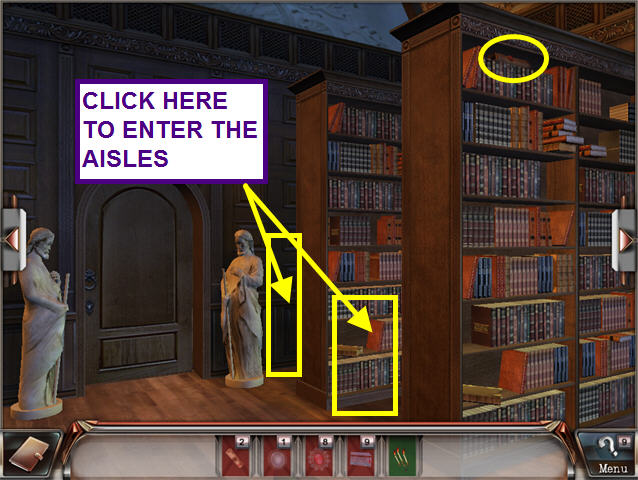
- Take the ACCESS CARD.
- Exit the aisle.
- Enter the second aisle.
- Move the books and take the SCROLL and LENS.
- Exit the aisle and turn to the right.
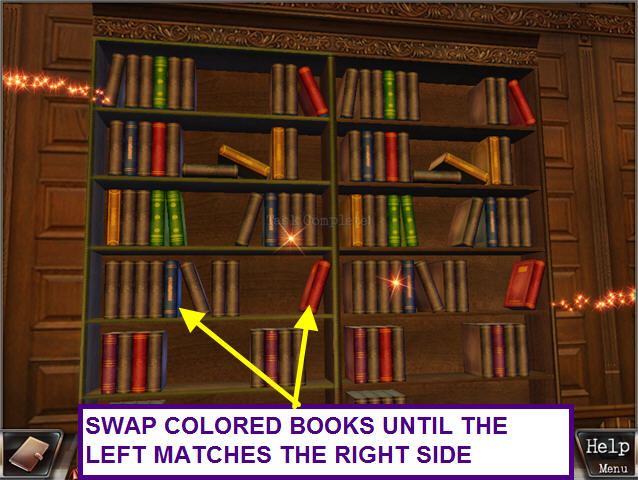
- Click on the center bookcase to activate a mini-game.
- The object is to make the left side match the right side.
- Left-click on two colored books, on the left, to swap positions.
- Continue this process until the books on the left match the books on the right.
- A secret passage is revealed.
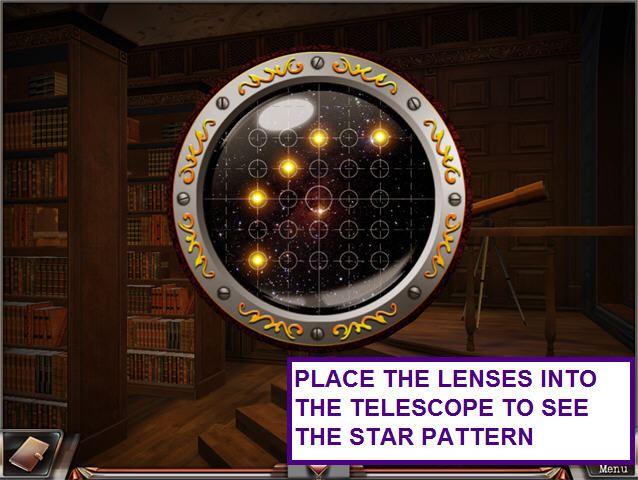
- Turn to the right.
- Use the LENSES on the telescope.
- Look in the telescope to see a star pattern.
- This pattern will be recorded in your journal.
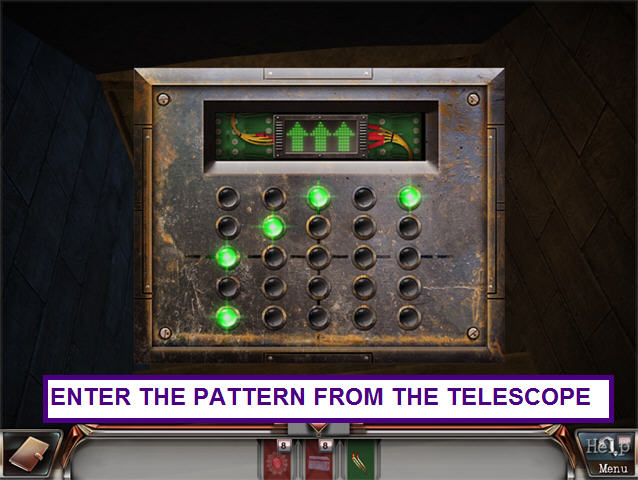
- Turn back to the left.
- Enter the secret passage.
- Look at the lock on the door.
- Enter the pattern that you saw in the telescope to open the door.
- Use the LIT CANDLES to enter the dark room.
- Turn to the left.
- Click on the light switch between the two file cabinets.
- Look at the right file cabinet.
- Move the file on top and take the ACCESS CARD.
- Open the top drawer and take the JEWELRY.
- Open the middle drawer and move the red file to find an ACCESS CARD.
- Open the bottom drawer and move the front file to locate an ACCESS CARD.
- Look at the left file cabinet.
- Click on the lighter tile on the floor to find an ACCESS CARD.
- Open the top drawer and take an ACCESS CARD and JEWELRY.
- Open the middle drawer and move the red file to find an ACCESS CARD.
- Open the bottom drawer and take the JEWELRY.
- Turn to the left to see another scene.
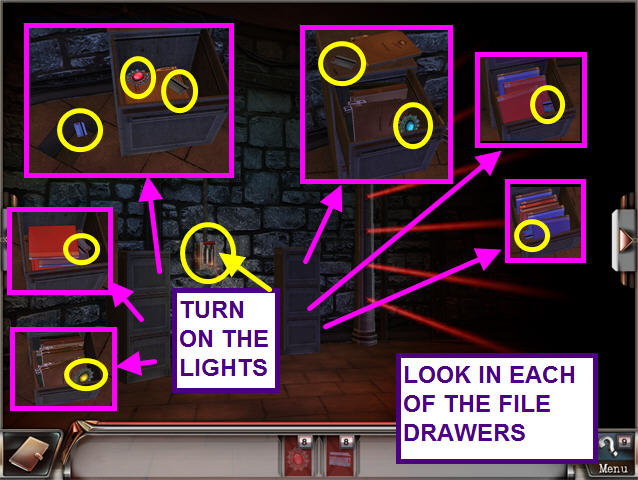
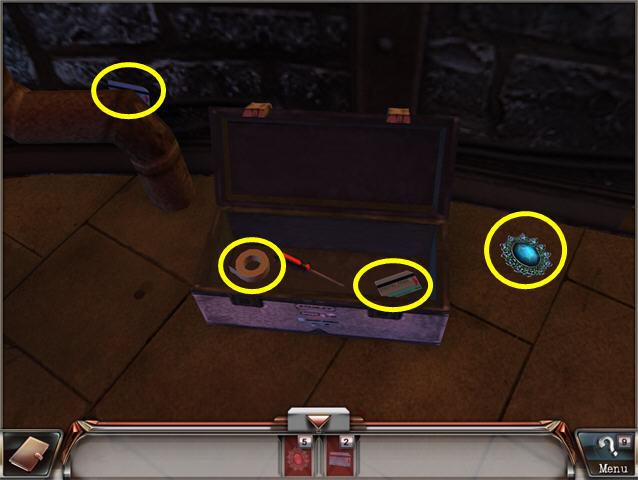
- Look at the toolbox.
- Take the ADHESIVE TAPE, 2 ACCESS CARDS and JEWELRY.
- Exit the close-up and turn to the left.
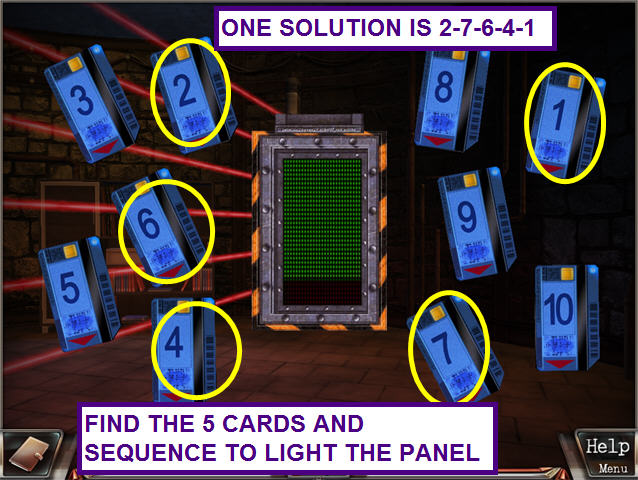
- Use the ACCESS CARD on the control to trigger a mini-game.
- The object is to determine the 5 cards and sequence for deactivating the magnetic field.
- Try each card until the first bar lights up; this is your first card.
- Try a second card.
- If the cards are ejected, use the first card again and try another second card until both stay lit.
- Continue this process until you enter all 5 cards.
- Your solution may vary.
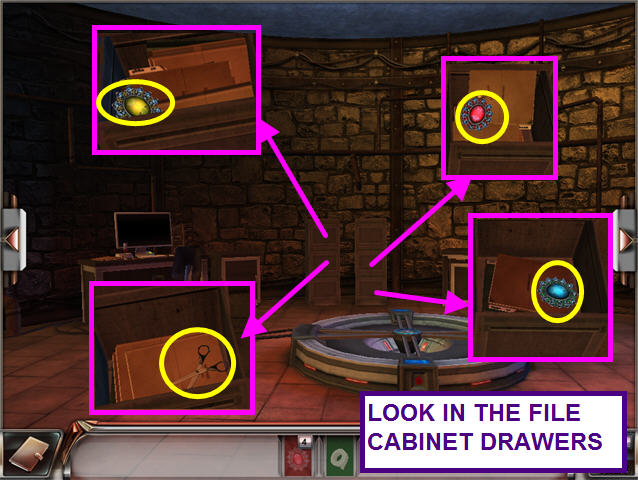
- Turn to the left and look at the right file cabinet.
- Open the middle drawer and take the JEWELRY.
- Open the bottom drawer and take the JEWELRY.
- Look at the left file cabinet.
- Open the top drawer and take the JEWELRY.
- Open the middle drawer and take the SCISSORS.
- The SCISSORS will automatically cut the ADHESIVE TAPE into a PIECE OF TAPE.
- Exit the close-up.
- Look at the close-up of the desk.
- Take the JEWELRY.
- Use the PIECE OF TAPE on the glass to get a FINGERPRINT.
- Use the FINGERPRINT on the fingerprint reader.
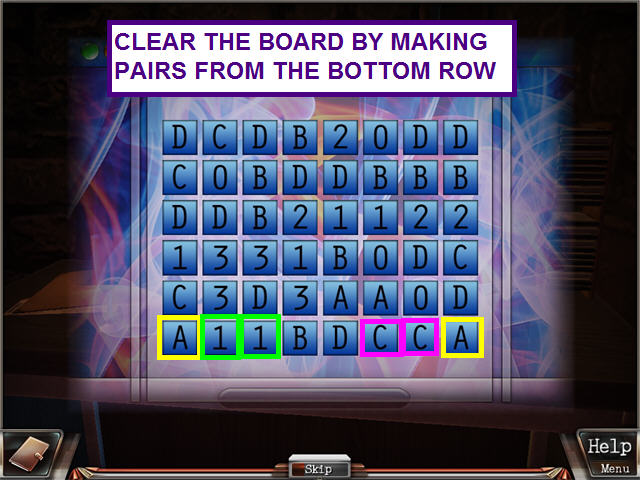
- Click on the white box to gain access to the computer and trigger a mini-game.
- The object of this mini-game is to clear the board by matching letters.
- You may only take letters that are at the bottom of a column.
- Plan ahead so that letters are not trapped.
- The puzzle will reset if you have no more moves.
- The message from the Millennium Brotherhood leads you to Barcelona, Spain.
Syndicate Headquarters
- Click on the door to learn you need some type of key.
- Move the loose brick on the left wall and take the SNAKE KEY.
- Move the loose brick in the path and take the SNAKE KEY.
- Take the shovel and dig a hole in the grass.
- Take the SNAKE KEY form the hole.
- Use the SNAKE KEYS on the door to gain entrance.
- Look at the statues to see they are missing helmets, shields, and swords.
- Move the loose brick on the left wall and take the HELMET.
- Look at the crate and take the SHIELD, SWORD, and STAINED GLASS SHARD.
- Look at the close-up of the right corner and move the loose brick.
- Take the HELMET, SWORD, and STAINED GLASS SHARD.
- Turn to the left.
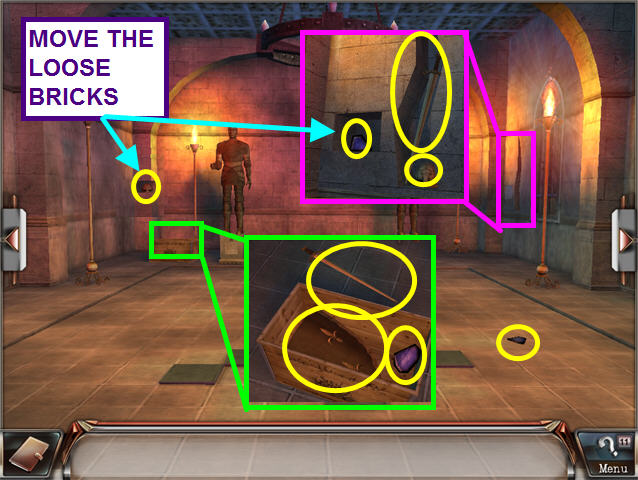
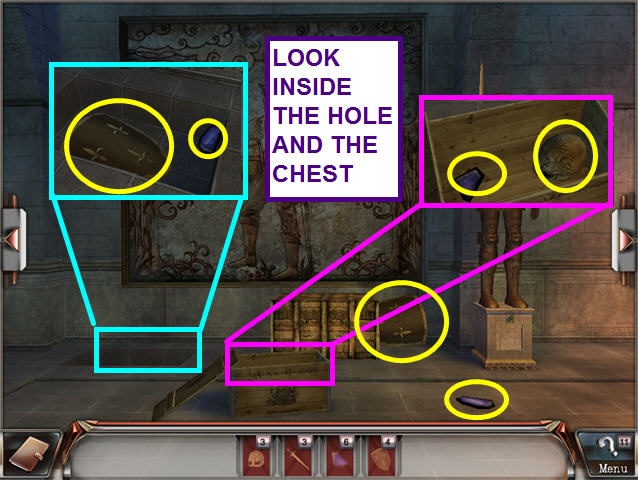
- Look inside the hole in the floor; take the SHIELD and the STAINED GLASS SHARD.
- Look inside the chest; take the STAINED GLASS SHARD and HELMET.
- Move the box under the tapestry; take the SHIELD
- Take the STAINED GLASS SHARD from the floor.
- Turn to the left again.
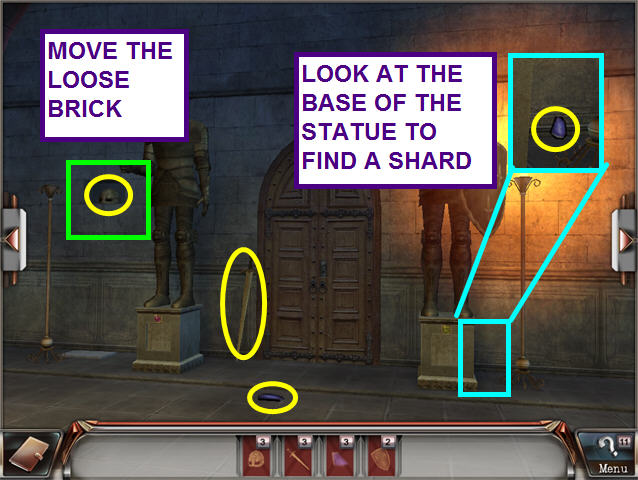
- Move the loose brick on the left wall; take the HELMET.
- Take the SWORD and the STAINED GLASS SHARD.
- Look at the base of the left statue and take the STAINED GLASS SHARD.
- Turn to the left again for another scene.
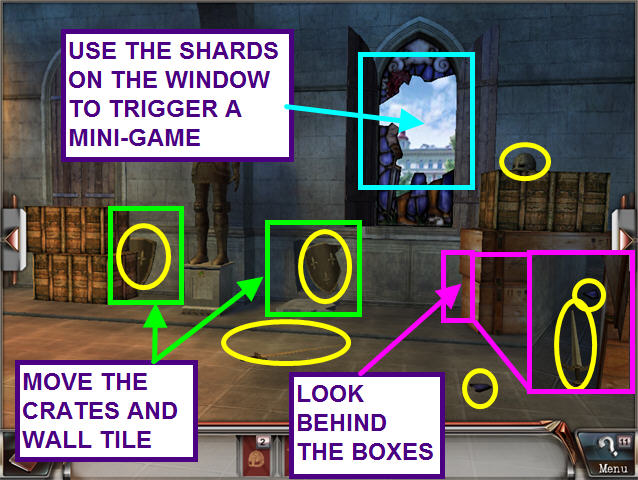
- Move the crates under the left window and take the SHIELD.
- Take the SWORD and the STAINED GLASS SHARD.
- Move the wall tile and take the SHIELD.
- Look behind the right crates; take the SWORD and the STAINED GLASS SHARD.
- Take the HELMET from the top of the crates.
- Open the right window.
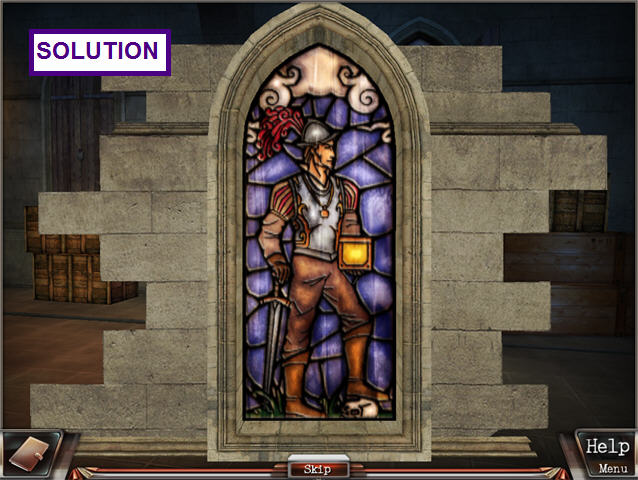
- Use the STAINED GLASS SHARDS on the right window to trigger a mini-game.
- The object of this mini-game is to repair the stained glass window.
- In this jigsaw style mini-game, left-click to pick up and place pieces.
- Hover the cursor over a piece to see the rotate symbol; left-click to rotate it.
- Light is shining through.
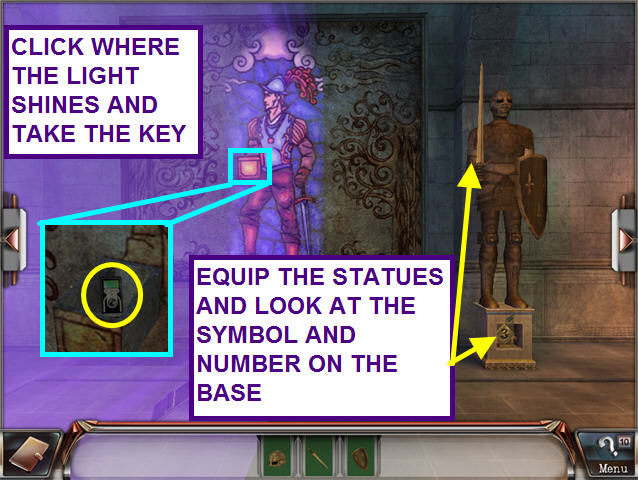
- Equip the statue with a SWORD, SHIELD, and HELMET.
- Look at the base of the statue; note the symbol and number.
- Turn to the right.
- Give the left statue a SHIELD and SWORD; the right STATUE needs a HELMET and SWORD.
- Note the symbols and numbers at the base of each statue.
- Turn to the right again.
- Give the statue a SHIELD and HELMET.
- Note the symbol and number at the base of the statue.
- Look at the tapestry and click on the point where the light is shining.
- A secret compartment opens and you find an ELEVATOR KEY.
- Face to the right once more.
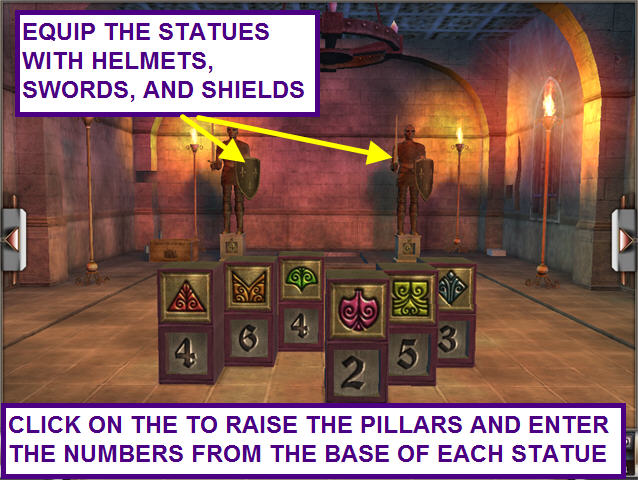
- Equip both statues with HELMETS, SHIELDS, and SWORDS.
- Look at the base of each statue to see the symbols and numbers.
- Click on the 6 colored floor tiles to raise the pillars.
- Enter the numbers that correspond to each symbol found on the base of each statue.
- The pillars will drop and an elevator will rise between the statues.
- Use the ELEVATOR KEY on the elevator.
- Look at the printer and the computer console; they are out of power.
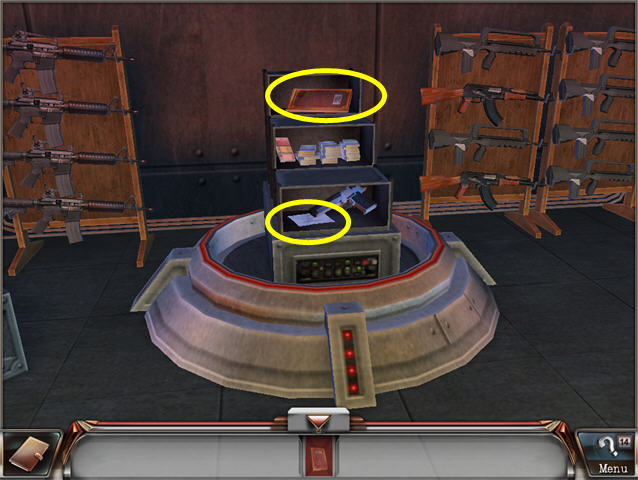
- Look at the box atop the tall, middle console.
- Take the PRINTER PAPER.
- Click on the book to move it; take the SAFE KEY.
- Exit the close-up; look at the crate near the right support pole.
- Move the books; take the PRINTER PAPER.
- Take the POWER SUPPLY UNIT and the STEP.
- Exit the close-up and turn to the right.

- Move the left cardboard box; take the POWER SUPPLY UNIT.
- Take the other 2 POWER SUPPLY UNITS.
- Open the small compartment just under the lava and take the SAFE KEY.
- Look at the close up of the center cardboard boxes.
- Take the PRINTER PAPER and STEP.
- Move the left stack of cash; take the 2 SAFE KEYS.
- Exit the close-up and turn to the right.
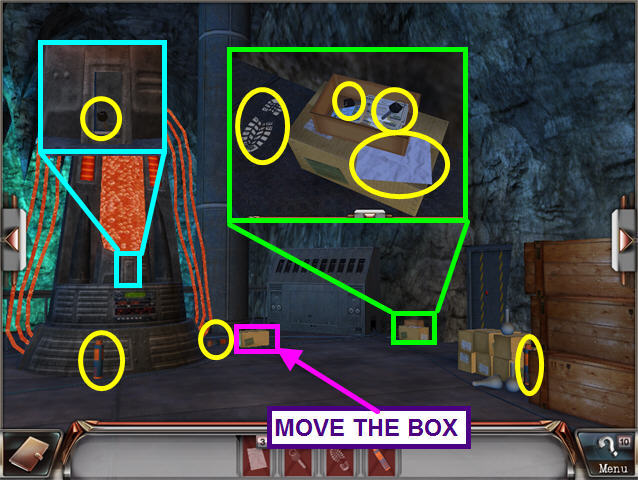
- Move the right crate.
- Take the 3 POWER SUPPLY UNITS and the PRINTER PAPER.
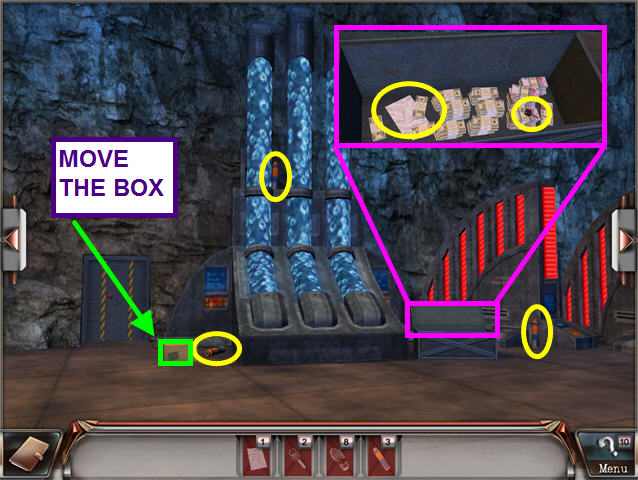
- Turn to the right.
- Move the cardboard box.
- Take the 3 POWER SUPPLY UNITS.
- Look in the metal crate; take the SAFE KEY and the PRINTER PAPER.
- Exit the close-up and turn to the left.
- Use the SAFE KEYS to open the safe.
- Take the STEP and the DOOR CODE PAPER.
- The door code, “??? + 428.”
- The note will be added to your journal.
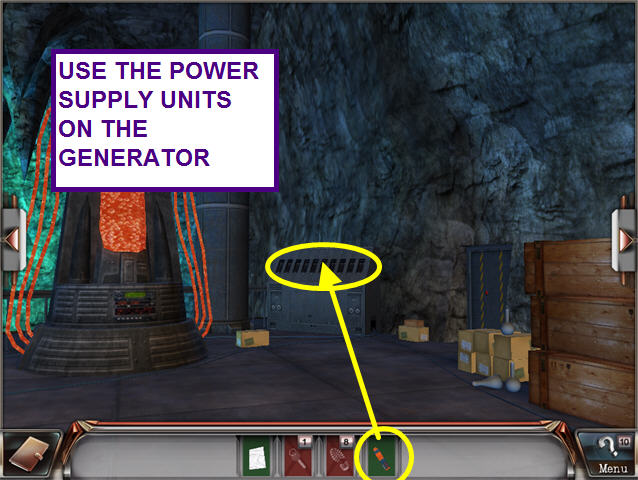
- Exit the close-up and turn to the left.

- Use the POWER SUPPLY UNITS on the generator.
- You will return to the computers.
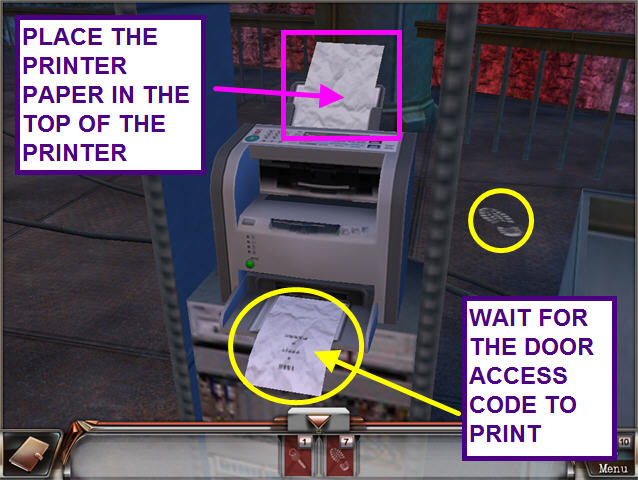
- Look at the printer.
- Place the PRINTER PAPER in the top of the printer.
- Wait for a page to print.
- Take the door access code that reads, “220 + ???”
- Take the STEP.
- Exit the close-up.
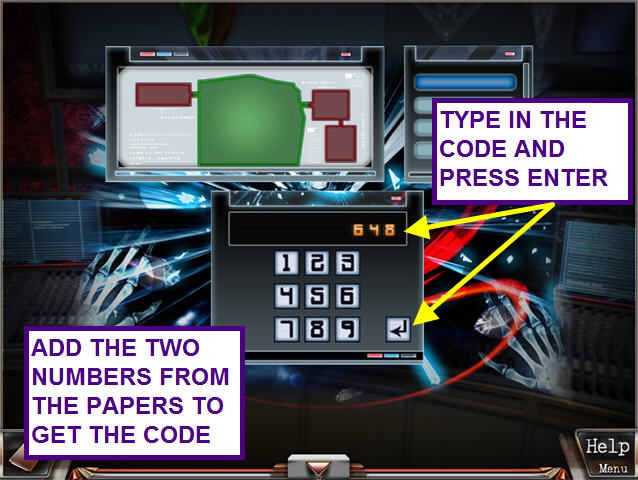
- Click on the computer console.
- Add the two numbers from the DOOR CODE PAPERS to find the code.
- Type in the code; press enter.
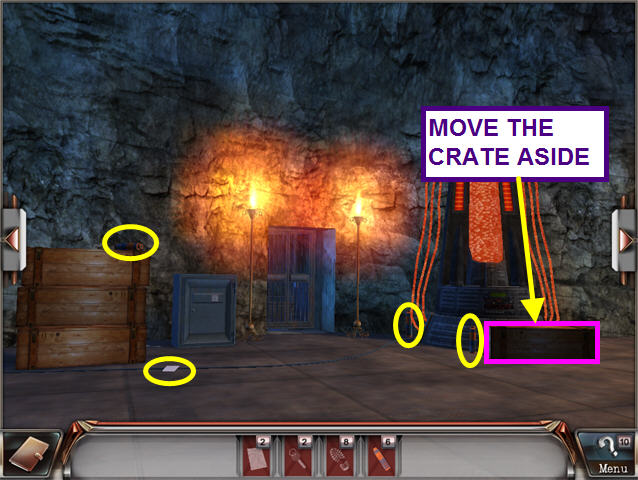
- You will find yourself in front of the now open storage room.
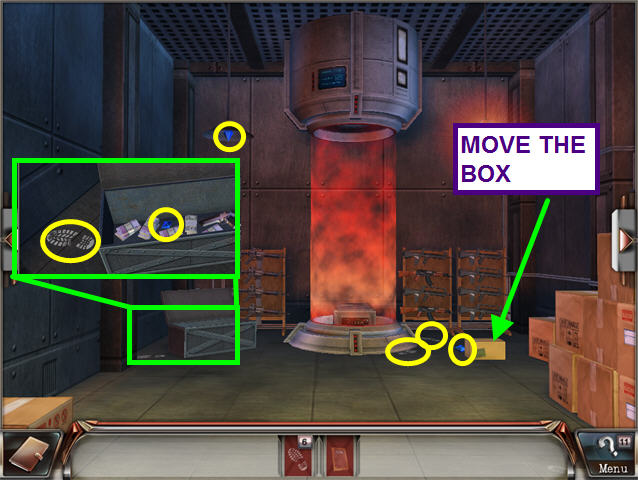
- Enter the open door.
- Move the cardboard box on the floor.
- Take the 2 CRYSTALS and the 2 STEPS.
- Look at the metal box on the left.
- Take the STEP and the CRYSTAL.
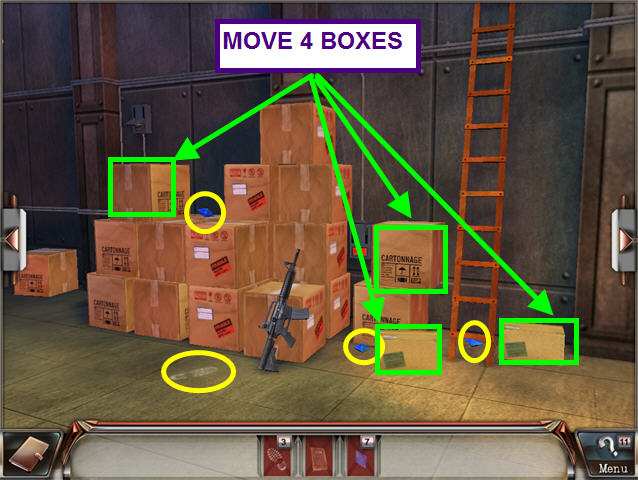
- Exit the close-up and turn to the RIGHT.
- Move 4 of the cardboard boxes.
- Take the 3 CRYSTALS and the STEP.
- Turn to the right twice.
- Move the 2 metal crates.
- Take the 2 CRYSTALS and the 2 STEPS.
- Turn to the left.
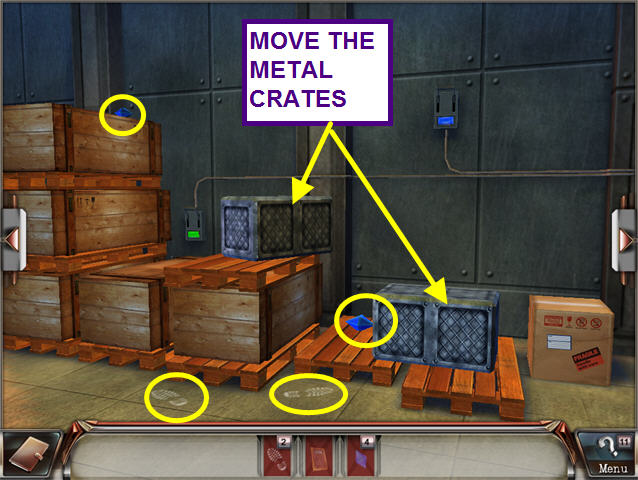
- Move the lighter floor tile; take the last 2 CRYSTALS.
- Exit the close-up.
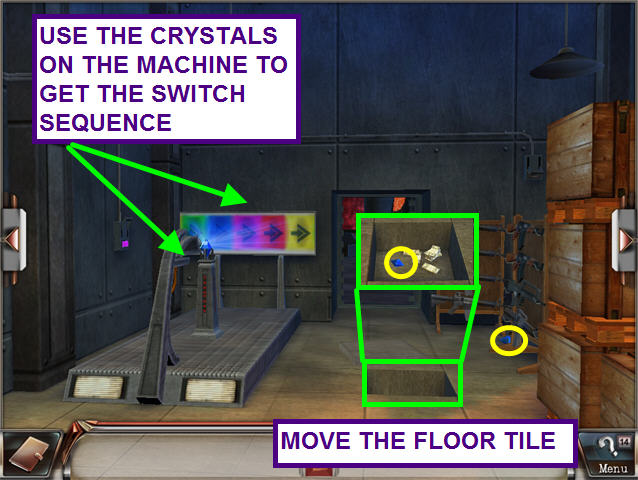
- Use the CRYSTALS on the strange machine.
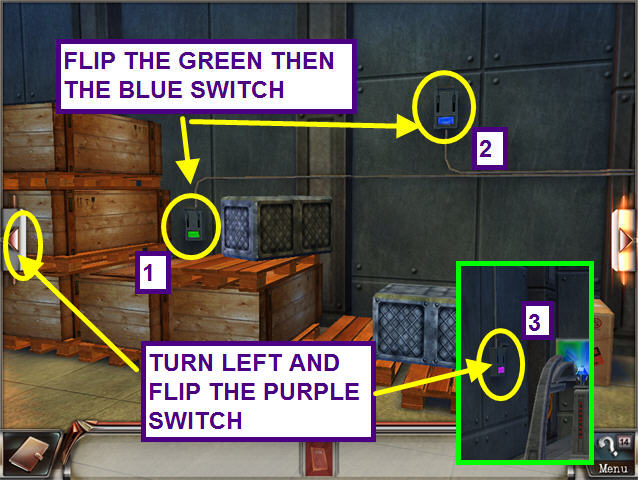
- A possibly random sequence of colors is displayed on the wall; this is the order in which you must flip the wall switches.
- Turn to the right and flip the green switch first.
- Secondly, flip the blue switch.
- Turn back to the left and flip the purple switch.
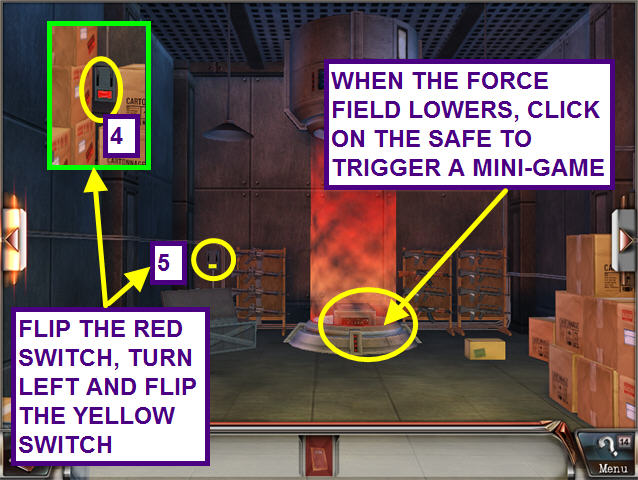
- Turn to the left and flip the red switch.
- Turn to the left again and flip the yellow switch.
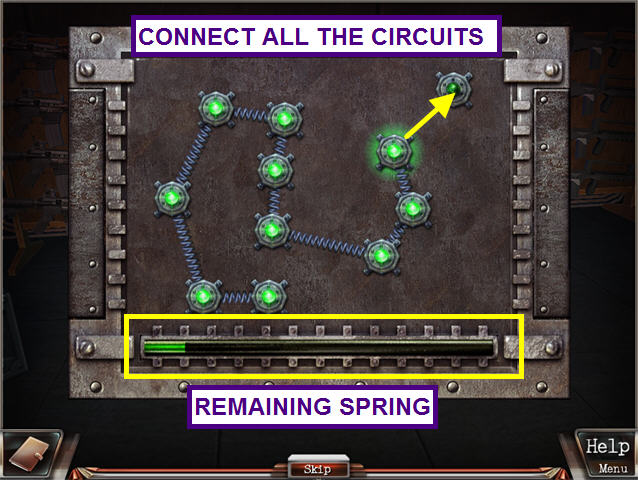
- Once the force field lowers, click on the safe for a mini-game.
- The object of this mini-game is to connect all the circuits using the spring.
- The bottom green bar shows the amount of spring remaining.
- Click on two circuits to connect them.
- If you do not have enough spring remaining, the circuits will not connect.
- Take the OCEAN DREAM INFORMATION and the LAB CODE.
- The LAB CODE (599), will be added automatically to the journal.
- Exit the safe close-up and turn right twice.
- Walk forward and turn right to return to the computers.
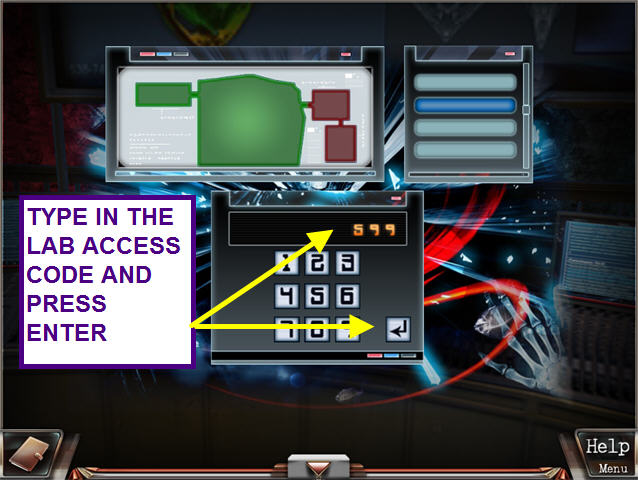
- Click on the computer console.
- Type in the Lab access code; press enter.
- You are returned to the lab entrance.
- Enter the lab.
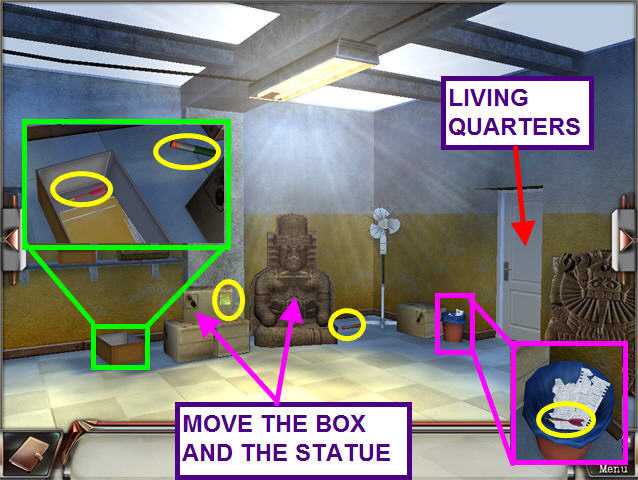
- Look in the trash can; take the DART.
- Move the top cardboard box; take the STICKY NOTE.
- Move the statue; take the TUBE OF ACID.
- Look at the left crate; take the DART and the TUBE OF ACID.
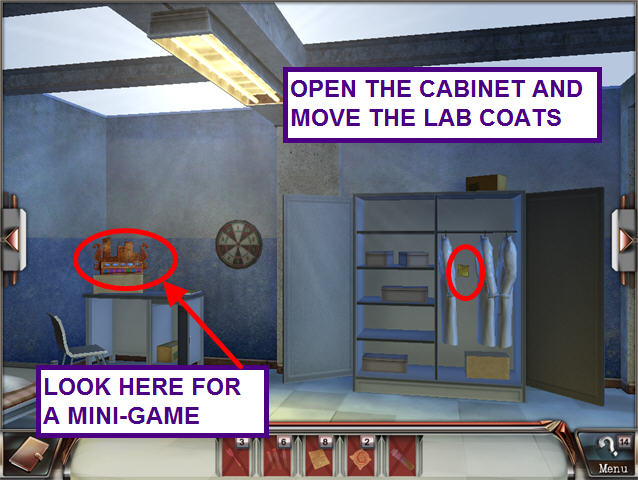
- Open the white door and enter the living quarters.
- Open the cabinet doors.
- Move the lab coats; take the STICKY NOTE.
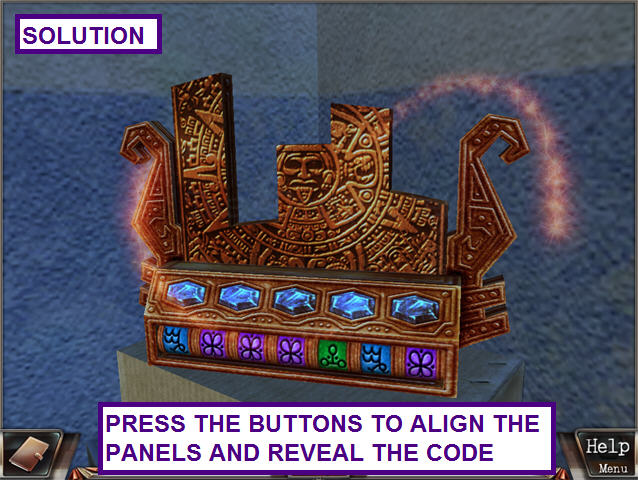
- Look at the artifact on the desk to trigger a mini-game.
- The object of this mini-game is to push the buttons so that the image on the panel is aligned.
- Note that you will only form a partial image.
- Watch the lines on the panels, not the height of the image.
- When correct, a code will appear at the bottom.
- The code will be added to your journal.
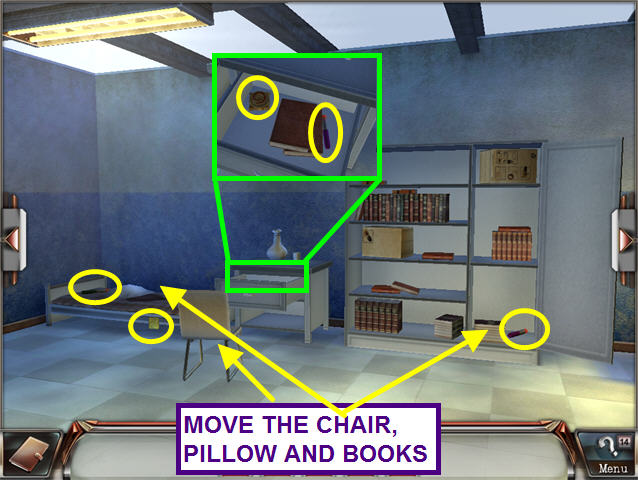
- Turn to the right.
- Open the right cabinet and move the books to find a VIAL OF ACID.
- Look in the nightstand drawer; take the MAGIC KEY.
- Move the books; take the VIAL OF ACID.
- Move the chair and pillow.
- Take the STICKY NOTE and VIAL OF ACID.
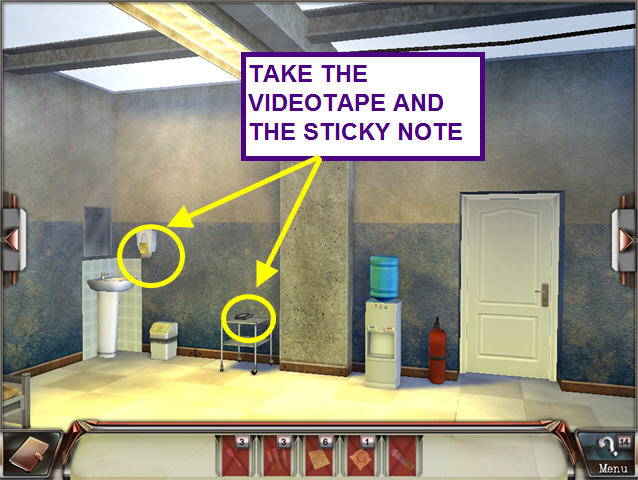
- Turn to the right again.
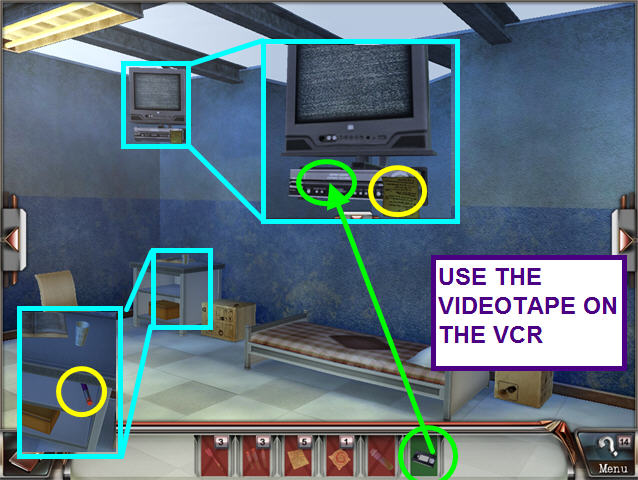
- Take the STICKY NOTE and the VIDEOTAPE.
- Turn to the right once more.
- Look at the television; take the STICKY NOTE.
- Use the videotape on the VCR.
- It’s the same little girl from the pictures.
- Look at the nightstand; take the VIAL OF ACID.
- Turn to the left and go through the white door.
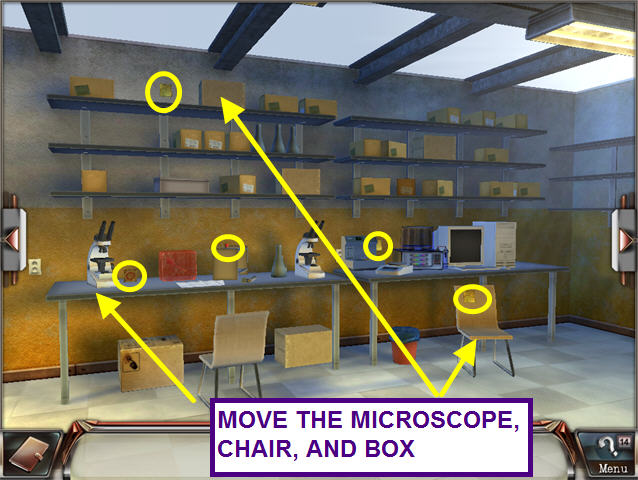
- Move the chair; take the STICKY NOTE.
- Move the box on the top left shelf and take the STICKY NOTE.
- On the left table, move the left telescope.
- Take the MAGIC KEY and the VIAL OF ACID.
- Take the STICKY NOTE from just above the right table.
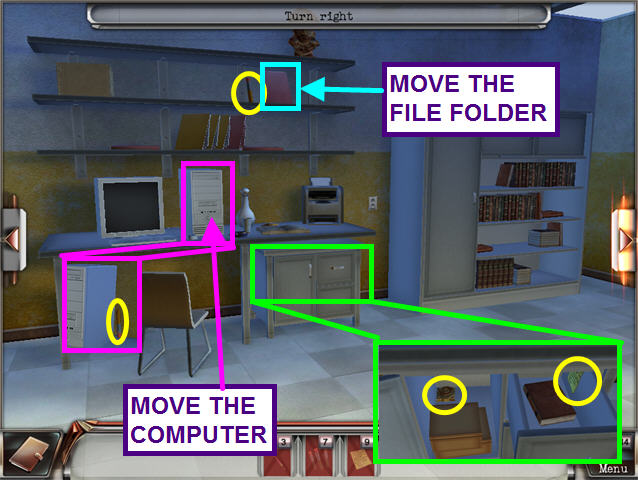
- Turn to the left twice.
- Look at the top of the desk; move the computer.
- Take the VIAL OF ACID.
- Look at the desk drawers.
- Open the top drawer; take the STICKY NOTE.
- Open the cabinet side; move the boxes to find the MAGIC KEY.
- Move the file folder on the second shelf over the desk; take the VIAL OF ACID.
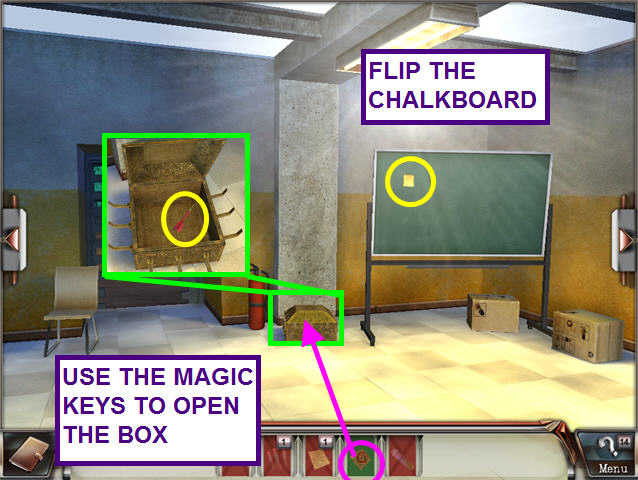
- Turn to the right.
- Flip the chalkboard; take the STICKY NOTE.
- Now that you have all the notes, they form a picture of a dartboard with the number 18.
- Use the MAGIC KEYS on the ornate box.
- Take the DART.
- Turn to the left twice.
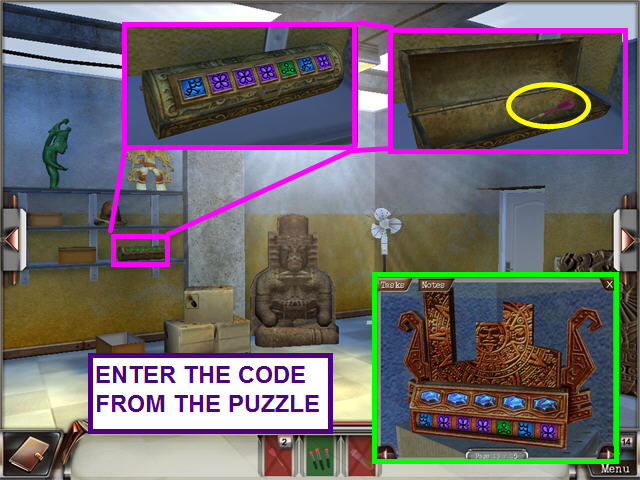
- Look at the ornate box on the shelf.
- Enter the code from the mini-game with the panels.
- A picture of the solved puzzle will be in your journal.
- Enter the symbols on the box.
- Take the DART.
- Turn to the left.
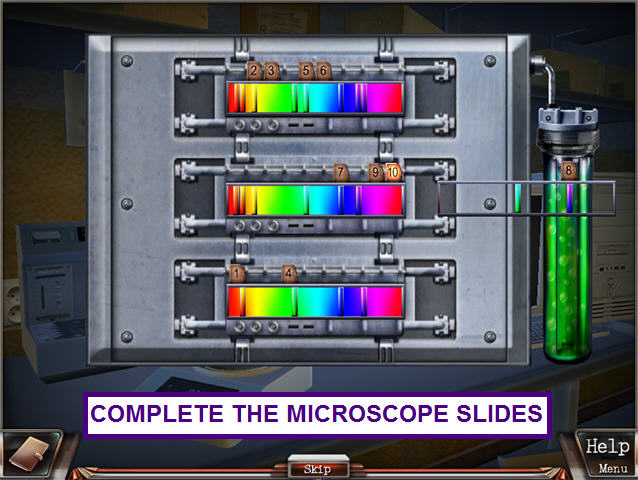
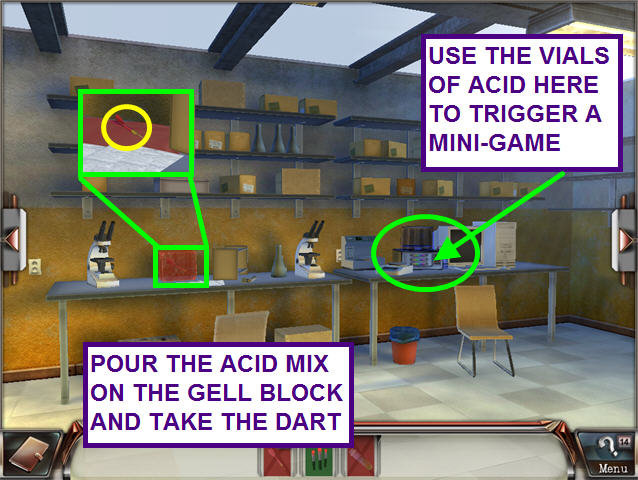
- Use the VIALS OF ACID on the machine on the right table to trigger a mini-game.
- The object of this puzzle is to fill in the black bands by placing the slides over the bars.
- You will use 9 of the 10 available slides.
- An example solution has slides 2, 3, 5, and 6 on the top.
- Place slides 7, 9, and 10 in the middle.
- Use slides 1 and 4 on the bottom.
- Look at the left table.
- Use the ACID mixture on the gel block.
- Take the DART.
- Turn to the right and enter the white door.
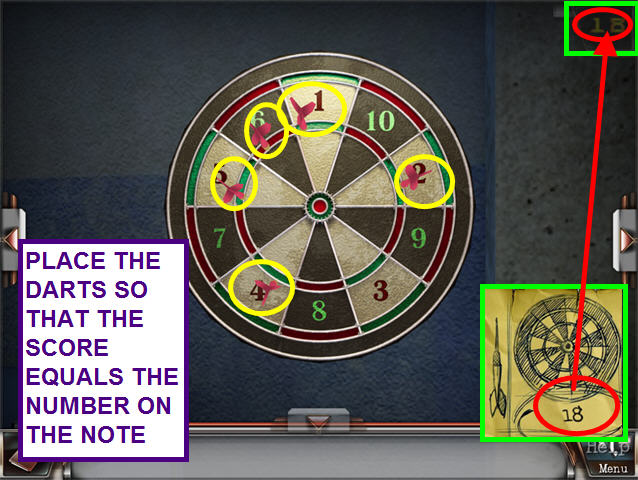
- Use the DARTS on the dartboard to trigger a mini-game.
- Look at the note that came from the STICKY NOTES.
- There is a number next to the dartboard in the drawing.
- Use the 5 DARTS to score that number.
- Underneath the dartboard are more notes on Mary.
Ocean Dream Oceanarium
- The clues from the Syndicate Headquarters have led you to the Oceanarium, but the administrator will not let you pass.
- You need to pose as an employee.
- Move the box on the top shelf of the bookcase; take the NAUTILUS SHELL.
- Look at the close-up of the desk.
- Take the NAUTILUS SHELL from the bucket.
- Open the top drawer; take the GLUE.
- Open the bottom drawer; take the NAUTILUS SHELL.
- Turn to the right.
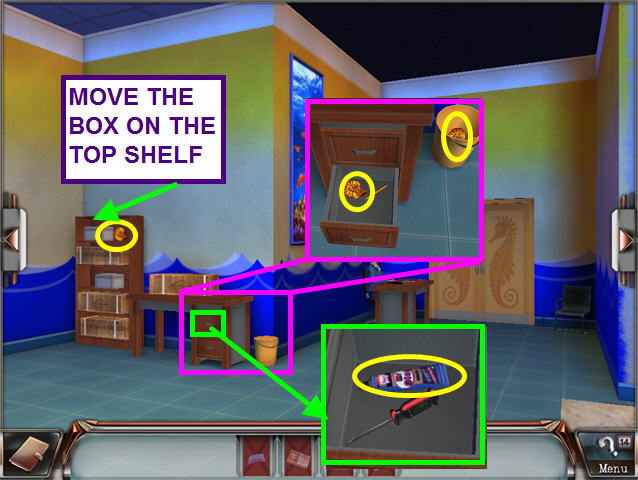
- Move the box on the floor; take the NAUTILUS SHELL.
- Look at the close-up of the box on the scaffold and take the KEY.
- Turn to the right.
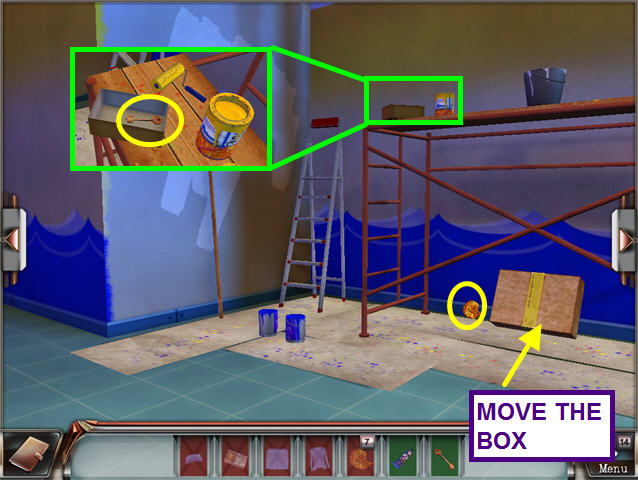
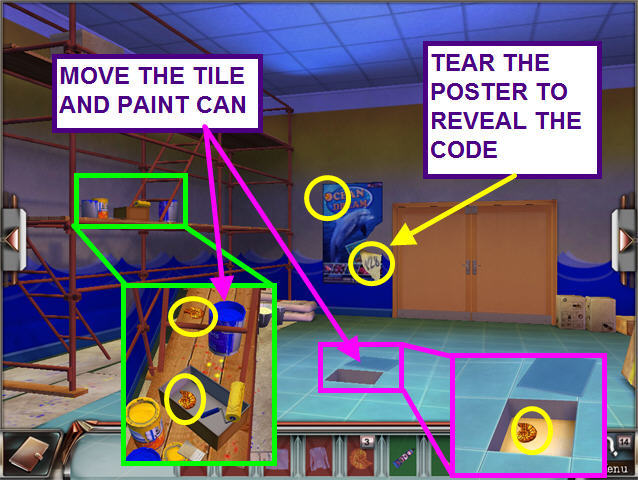
- Look at the close-up of the scaffolding; move the paint can.
- Take the 2 NAUTILUS SHELLS.
- Remove the floor tile; take the NAUTILUS SHELL.
- Tear the poster to reveal the code “128.”
- There is also a NAUTILUS SHELL in the upper left corner of the poster.
- Turn to the right.
- Walk behind the left lockers to the storage closet.
- Open the door; move the bag.
- Take the NAUTILUS SHELL.
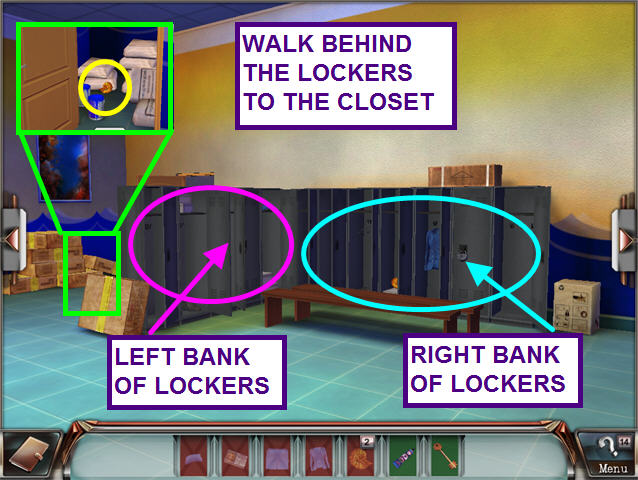
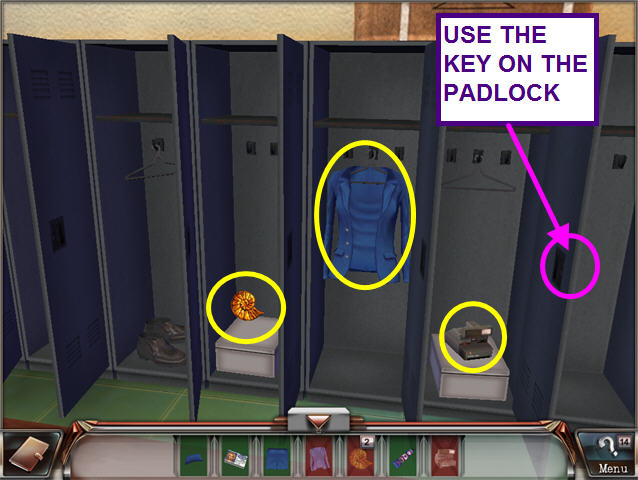
- Look at the left bank of lockers.
- Enter the code from the poster into the padlock.
- Open all the lockers.
- Take the SKIRT, HAT, and EMPLOYEE PASS.
- Exit the close-up.

- Look at the right bank of lockers.
- Use the key to unlock the padlock.
- Open all the lockers.
- Take the NAUTILUS SHELL and the JACKET.
- Take the camera; it will take KATE’S PHOTO, which will automatically be combined with the GLUE and EMPLOYEE PASS.
- Exit the close-up and turn right.
- Give the administrator the EMPLOYEE PASS to gain entrance to the Oceanarium.
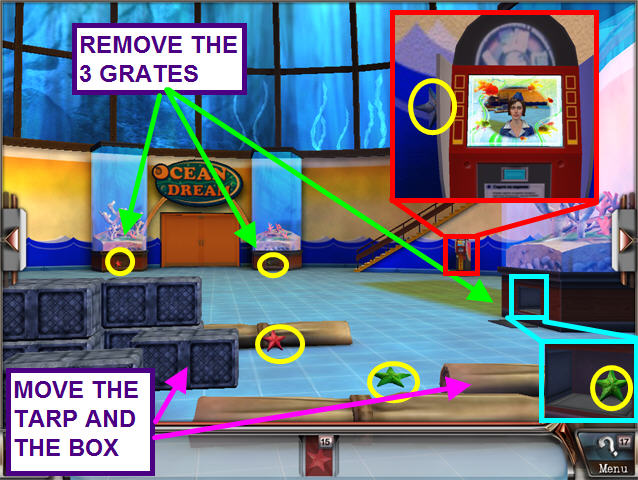
- Your first task is to collect 15 STARFISH.
- Move the tarp and the box to find 2 STARFISH.
- Remove the grates from the bottom of the three tanks and take the 3 STARFISH.
- Look at the Fun Camera Machine near the stairs and take the STARFISH.
- If you click on the light blue button on the Fun Camera Machine, you will see Kate in her uniform.
- Additional clicks will change the background.
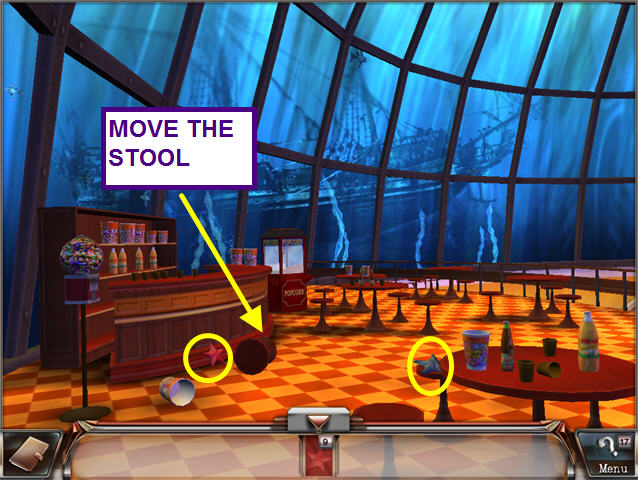
- Exit the close-up and click on the stairs.
- Move the stool; take the 2 STARFISH.
- Exit the refreshment area and turn to the left.
- Look at the toolbox; take the DRILL and the STICKY TAPE.
- Move the box that is low center of the screen and take the STARFISH.
- Look at the booth.
- Move the metal box; take the 2 STARFISH.
- Exit the close-up and turn to the left.

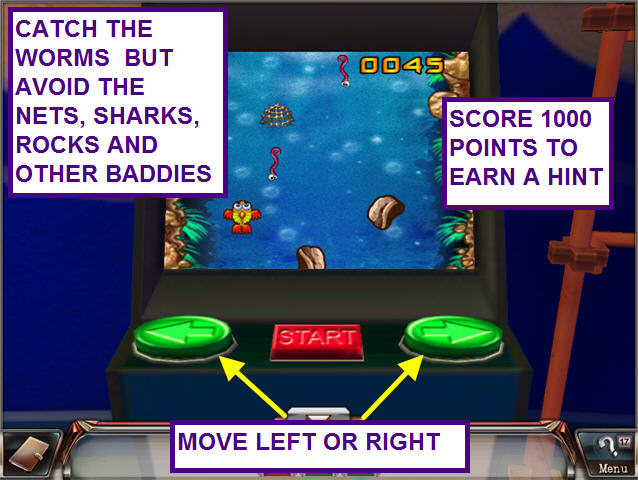
- Look at the arcade game on the back wall.
- You can earn additional hints for every 1000 points you score.
- Press the center button to begin.
- You want to capture the red worms while avoiding the sharks, nets, and other baddies.
- Look at the booth.
- Move the box; take the 2 STARFISH.
- Exit the close-up and turn to the left.
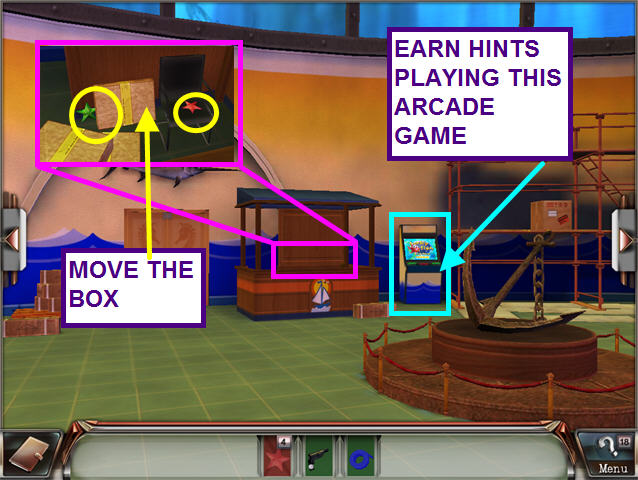
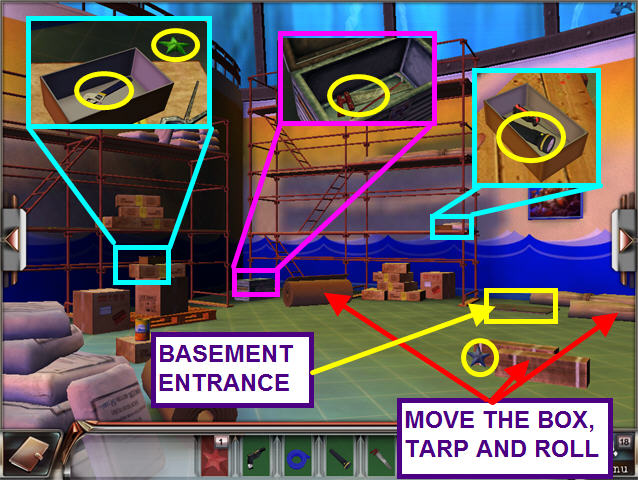
- Move the box on the lower right; take the STARFISH.
- Move the tarp and find the entrance to the basement.
- Look at the box on the scaffolding; take the FLASHLIGHT.
- Move the roll; look at the tool chest to find the SAW.
- Look at the left boxes to find the WRENCH and the last STARFISH.
- Turn to the right and go through the doors.
- Turn to the right twice.
- Give the administrator the starfish.
- She now wants you to help Bob and gives you BOB’S ROOM KEY.
- Return to the Oceanarium through the double seahorse doors.
- Use BOB’S ROOM KEY on the double orange doors under the Ocean Dream sign.
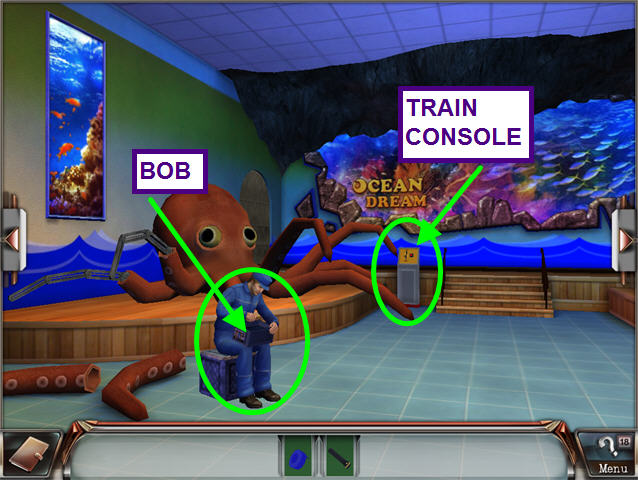
- Talk to BOB.
- He needs help finding his tools.
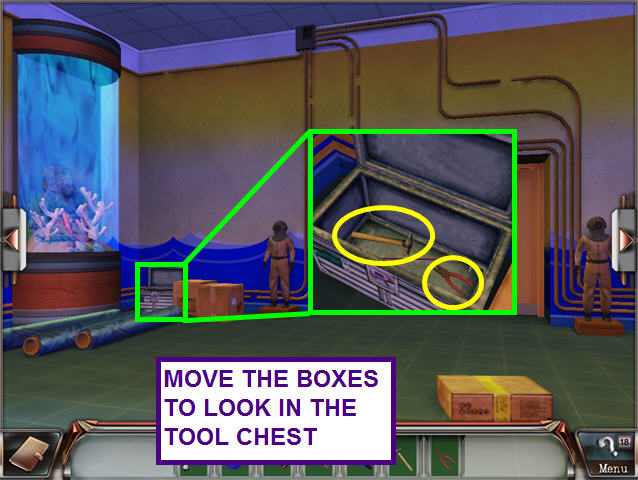
- Turn to the left twice.
- Move the boxes in the left corner.
- Look in the tool chest; take the HAMMER and the PLIERS.
- Turn to the left twice.
- Give Bob the hammer and the rest will follow.
- He tells you how to open the basement door.
- Click on the console to attempt to start the train, but it is not working.
- Talk to Bob again; he tells you to repair the breaks in the line.
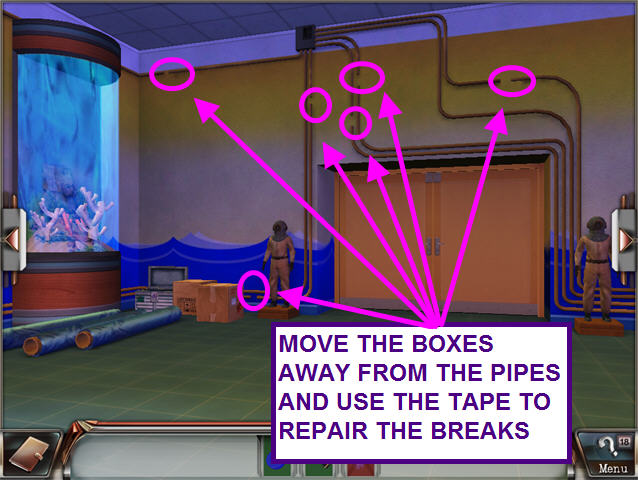
- Turn to the left.
- Move the boxes away from the pipes.
- Use the STICKY TAPE on the 4 breaks in the pipes.
- Turn to the left.

- Move the boxes away from the pipes.
- Use the STICKY TAPE on the 6 breaks in the pipes.
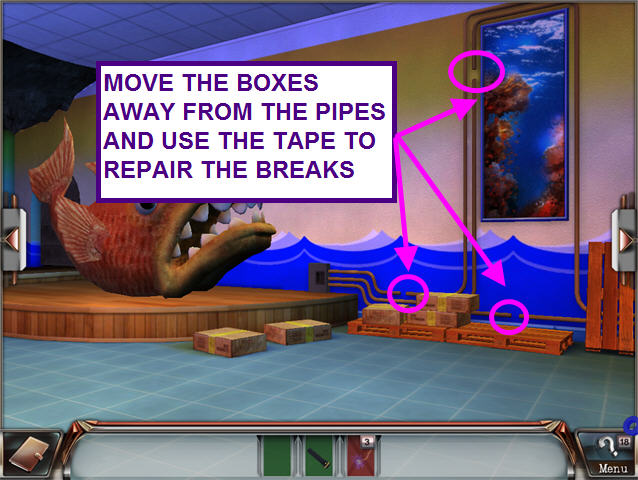
- Turn to the left.
- Move the boxes away from the pipes.
- Use the STICKY TAPE on the 3 breaks in the pipes.
- Turn to the left.
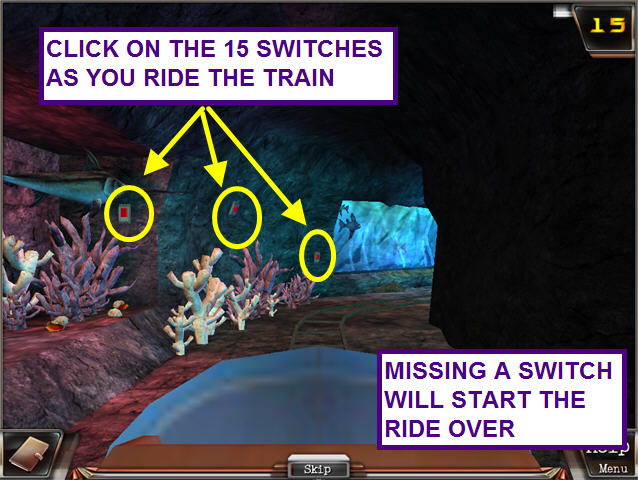
- Click on the train console to activate a mini-game.
- You must hit all 15 switches while riding the train.
- Missing a switch will start the ride over.
- When you have completed the puzzle, a cut-scene will show the basement trapdoor opening.
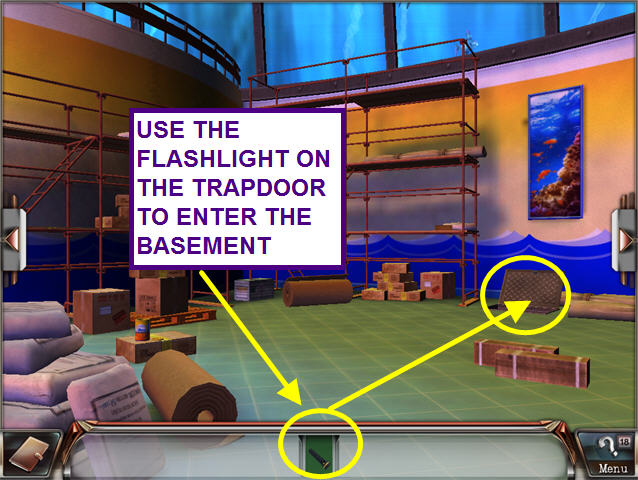
- Turn to the left twice and go through the double orange doors.
- Turn to the left and look at the trapdoor.
- Use the FLASHLIGHT on the trapdoor to enter the basement.
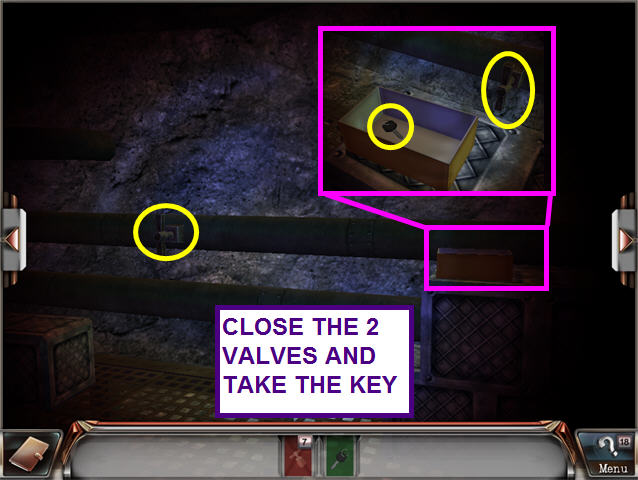
- Hot steam is everywhere; you’ll need to close the valves.
- Close the 2 valves.
- Turn to the left.

- Close the valve.
- Look at the close-up of the small box.
- Take the KEY and close the valve.
- Exit the close-up and turn to the left.
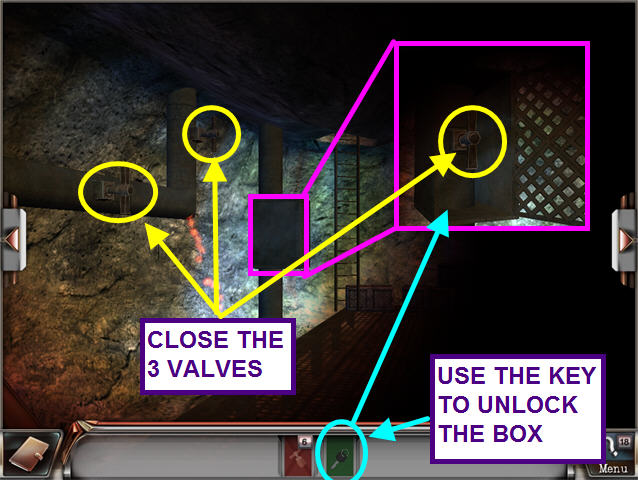
- Close the 2 valves.
- Look at the metal box on the pole.
- Use the KEY to unlock the box.
- Close the valve.
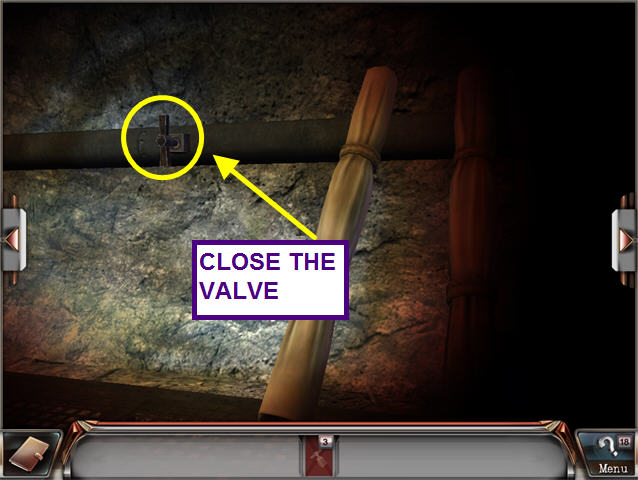
- Exit the close-up and turn to the left.
- Close the valve.
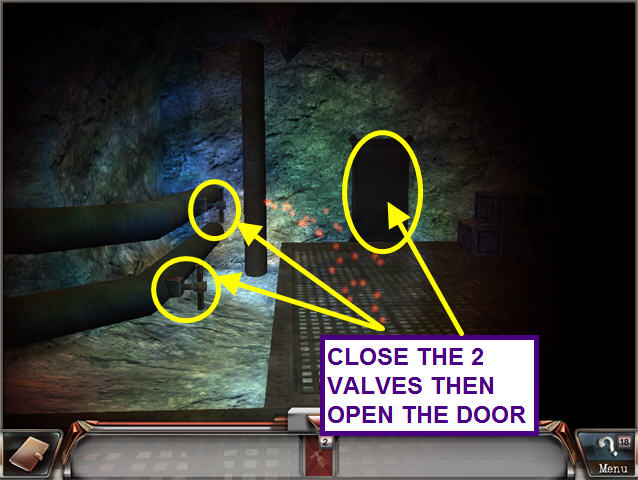
- Turn to the left and walk forward.
- Close the final 2 valves.
- Open the metal door.
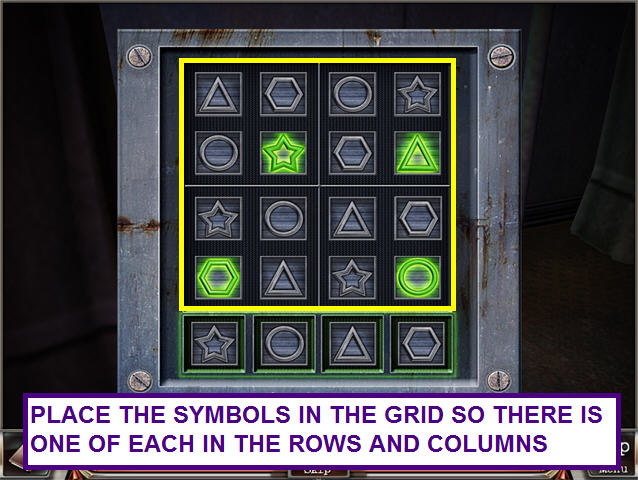
- Look at the safe on the left for a mini-game.
- The object is to fill in the grid with the symbols.
- Each symbol should be in each row and column only once.
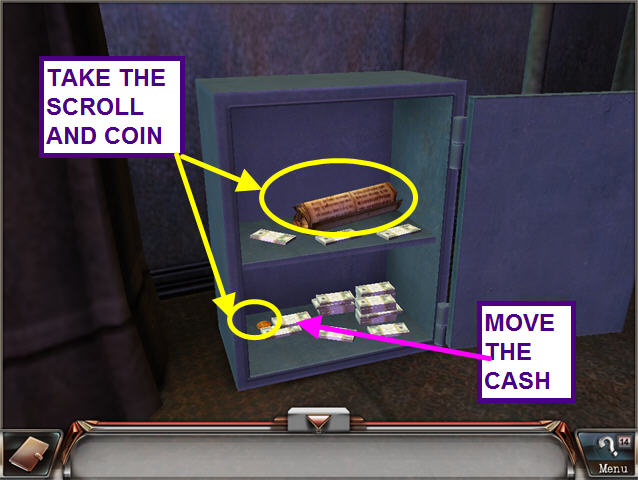
- Move the bundle of cash; take the COIN and the SCROLL.
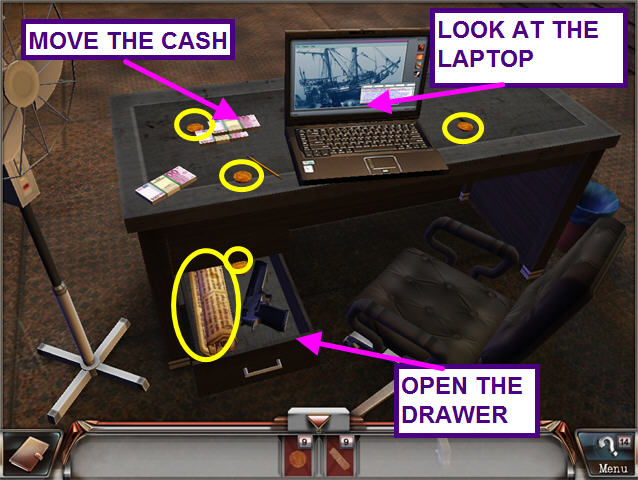
- Exit the close-up of the safe and look at the desk.
- Move the cash on the desk.
- Look at the laptop to see a picture of the wreck.
- Open the drawer.
- Take the SCROLL and the 4 coins.
- Exit the close-up and turn to the right.
- Move the right cardboard box.
- Take the 4 SCROLLS.
- Turn to the right.
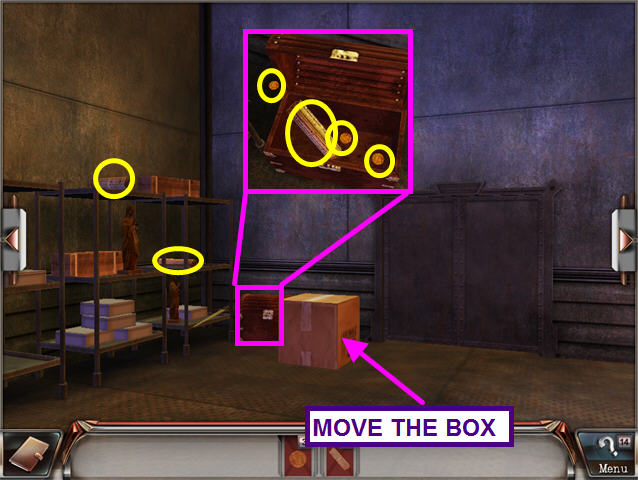
- Open the large wooden chest.
- Take the 2 COINS and the SCROLL.
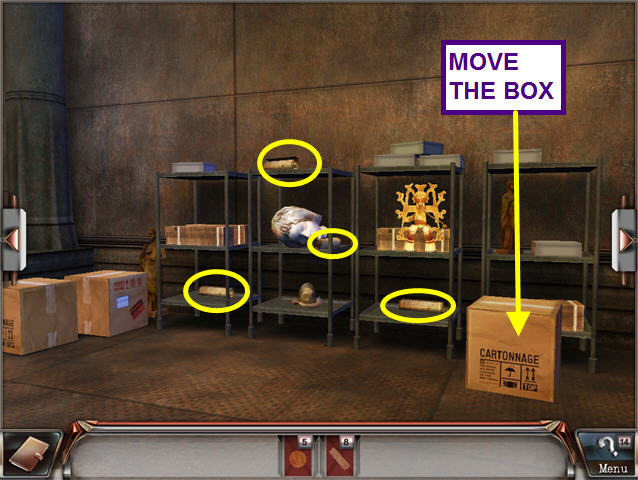
- Turn to the right.
- Take the 2 SCROLLS from the shelves.
- Move the cardboard box; open the large wooden chest.
- Take the SCROLL and the 3 COINS.
- The SCROLLS are maps from the wrecked ship pointing to something in Mexico.
- Lord Scofield and his henchmen arrive and he prevents them from killing Kate.
Tenochtitlan, Mexico
- Kate is locked in a room and is reunited with the Professor.
- He tells Kate about a virus created by the ancient Indians to drive away Cortes and his men, but things went bad and many died.
- Time to escape!
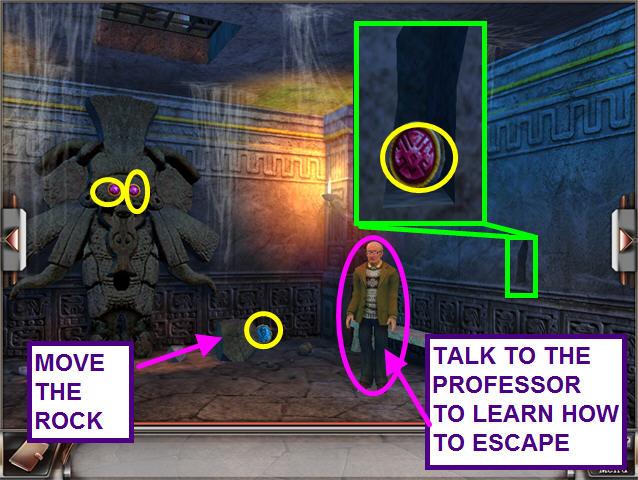
- Talk to the Professor several times to learn how to escape from their prison.
- Look in the wall niche and take the PLANET SIGN.
- Move the rock; take the 3 PLANET SIGNS.
- Turn to the right.
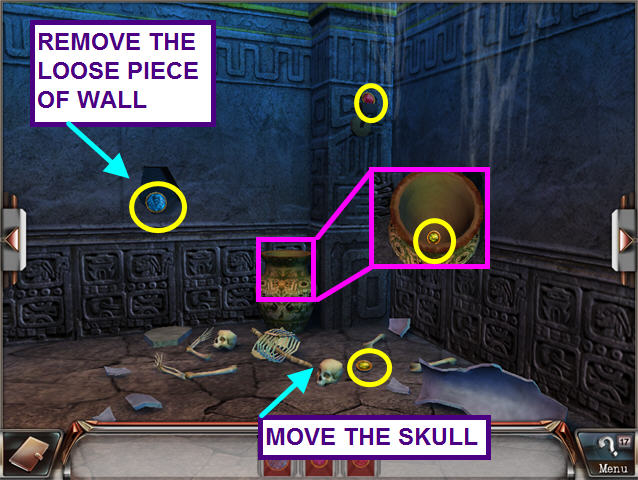
- Move the skull; take the PLANET SIGN.
- Remove the loose piece of wall and take the PLANET SIGN.
- Take the PLANET SIGN from the wall sconce.
- Look in the vase and take a PLANET SIGN.
- Exit the close-up and turn to the right.
- Move the loose piece of wall and the rock chunk.
- Take the 3 PLANET SIGNS.
- Turn to the right.
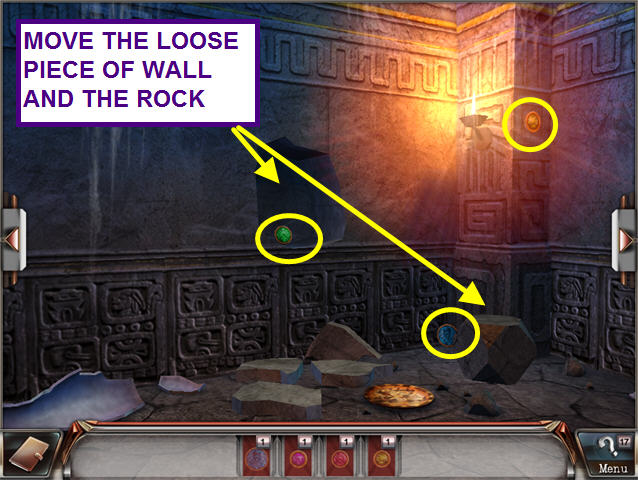
- Move the piece of rock on the ground.
- Take the 3 PLANET SIGNS.
- Look at the broken vase; take the PLANET SIGN.
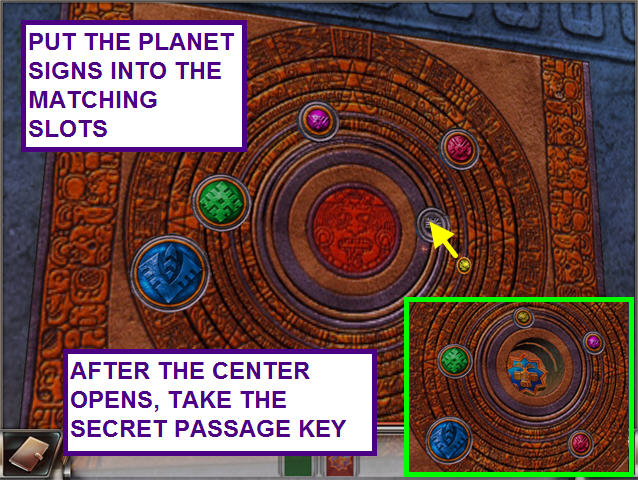
- Look at the solar system diagram on the wall to trigger a mini-game.
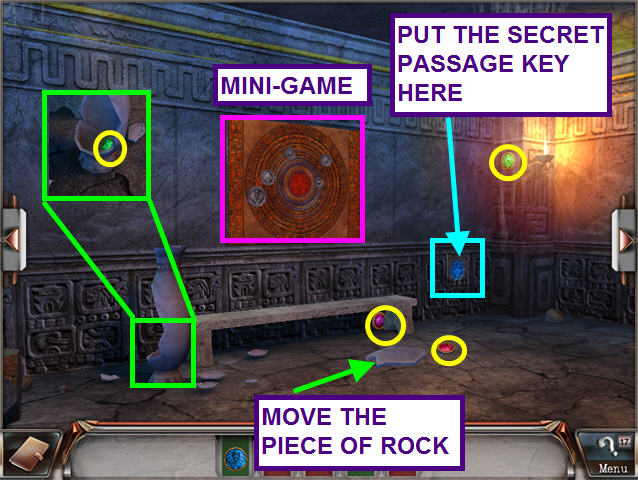
- Place the PLANET SIGNS on the matching symbols.
- After the center opens, take the SECRET PASSAGE KEY.
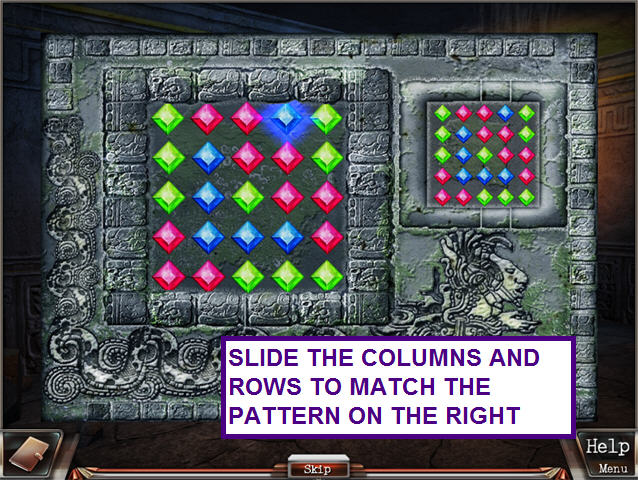
- Use the SECRET PASSAGE KEY on the matching wall symbol to trigger a mini-game.
- The object of this mini-game is to move the gems to match the pattern on the right.
- You may slide columns and rows of gems.
- The rows and columns loop around.
- The professor stays behind to help with the Syndicate, while Kate escapes to find help.
- Remove the loose wall; take the 3 SYMBOLS.
- Turn to the right.
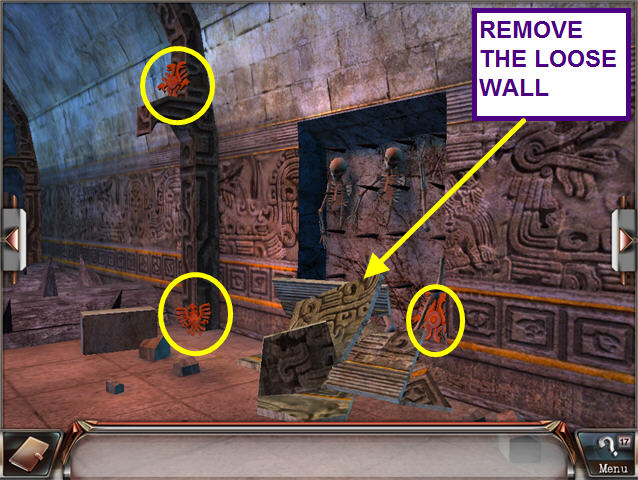
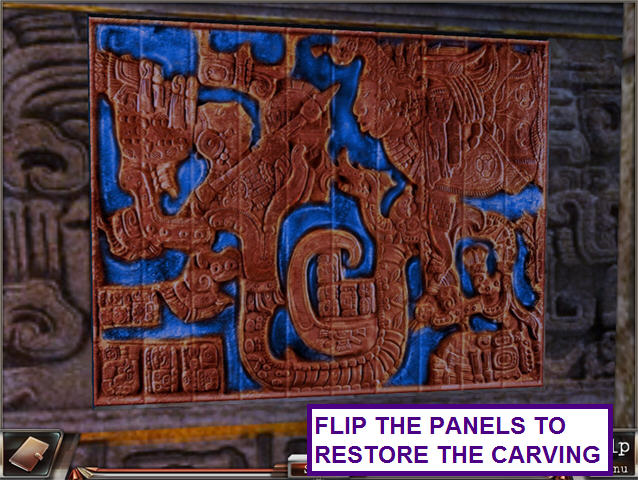
- Look at the left wall to trigger a mini-game.
- Restore the carving by flipping the panels.
- Solving this puzzle lowers the bridge.
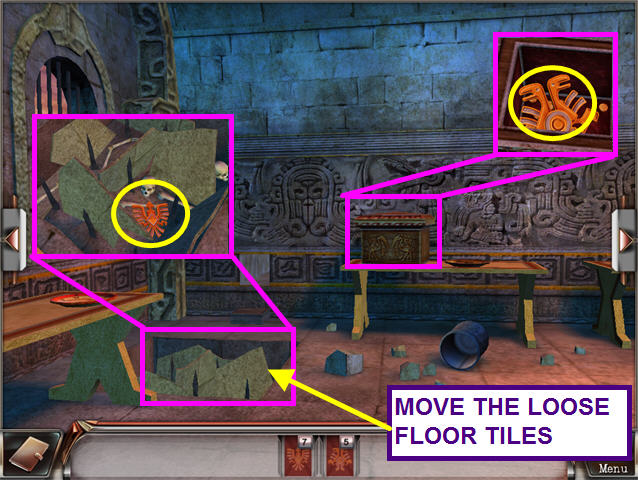
- Turn to the right twice.
- Take the 2 SYMBOLS.
- Look in the jar on the table; take the SYMBOL.
- Exit the close-up and turn to the right.

- Move the loose floor tiles; take the SYMBOL.
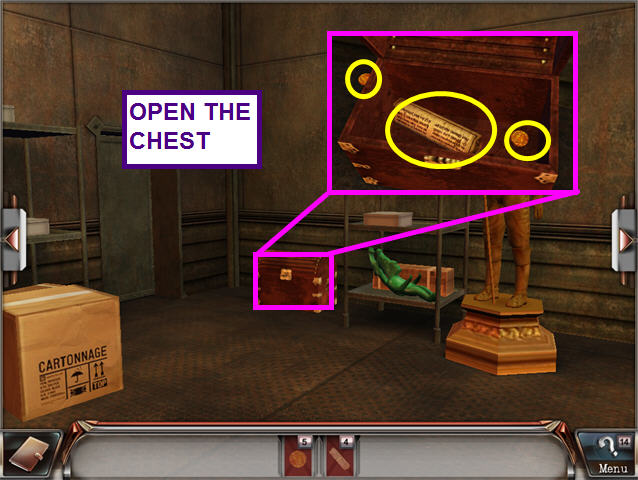
- Exit the close-up and look in the chest.
- Take the SYMBOL.
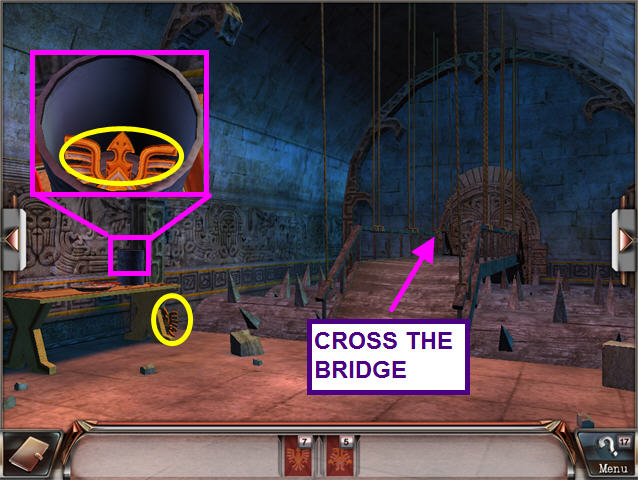
- Exit the close-up and turn to the right.
- Take the SYMBOL by the table leg.
- Look in the vase on the table; take the SYMBOL.
- Exit the close-up.
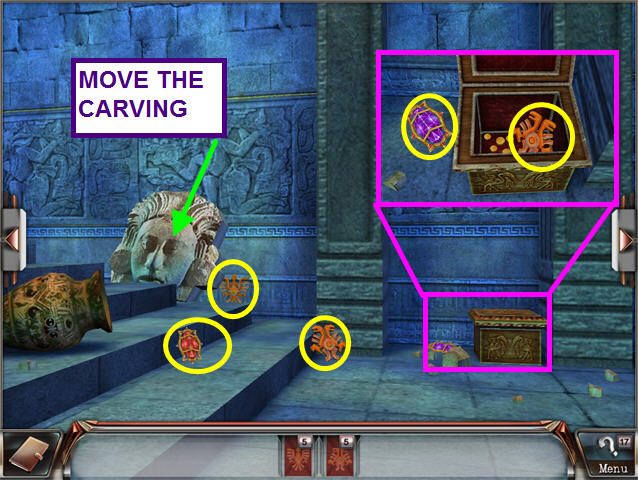
- Cross the bridge and turn to the left.
- Move the head carving; take the 2 SYMBOLS.
- Take the JEWELRY.
- Look at the chest; take the SYMBOL and the JEWELRY.
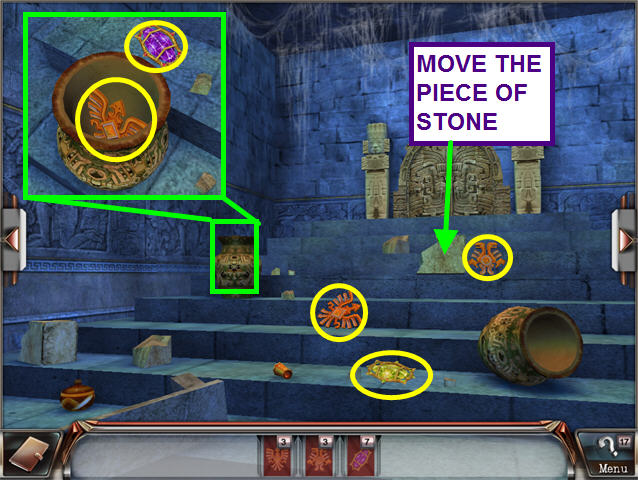
- Exit the close-up and turn to the left.
- Move the stone piece.
- Take the 2 SYMBOLS and the JEWELRY.
- Look at the vase.
- Take the SYMBOL and the JEWELRY.
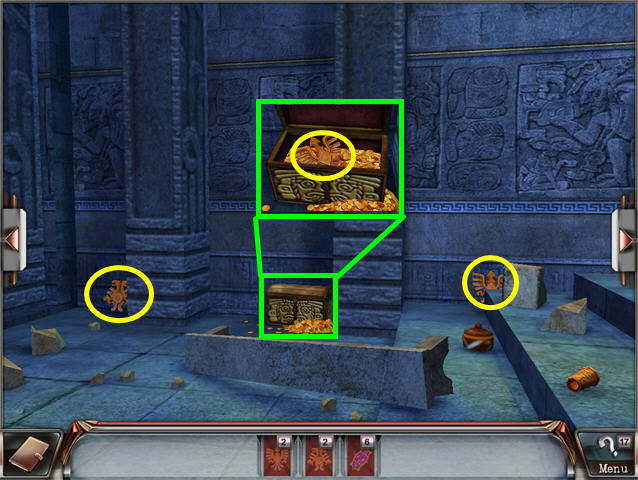
- Exit the close-up and turn to the left.
- Take the 2 SYMBOLS.
- Look in the chest; take the SYMBOL.
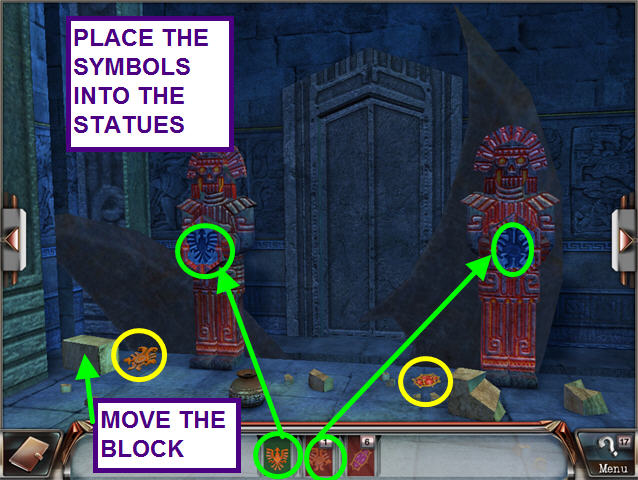
- Exit the close-up and turn to the left.
- Move the block on the left.
- Take the SYMBOL and the JEWELRY.
- Use the SYMBOLS from your inventory on the statues.
- Once the blades stop spinning, open the door.
- Turn to the right.
- Move the large stone block.
- Take the 2 JEWELRY and the 2 PYRAMIDS.
- Turn to the right.
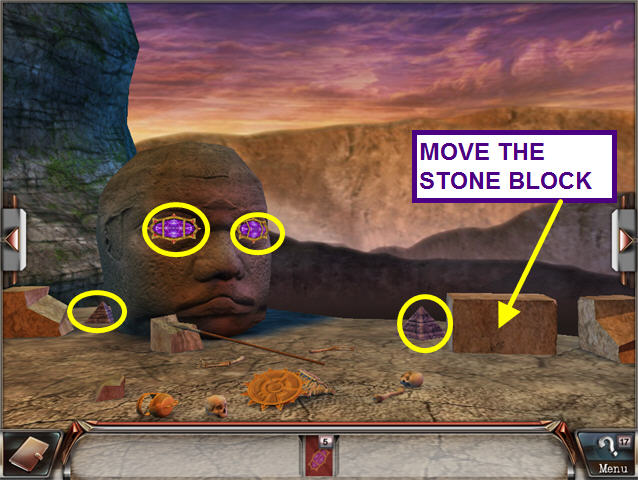
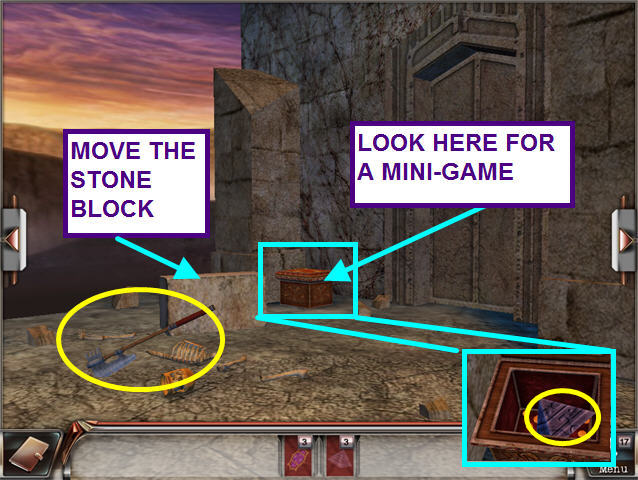
- Take the SWORD.
- Move the large stone block.
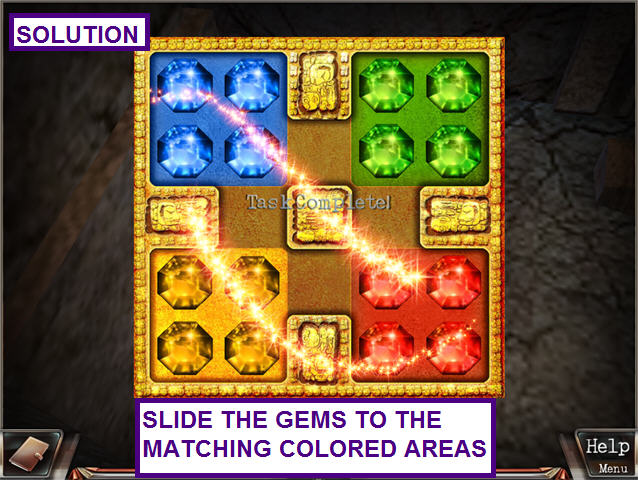
- Look at the ornate chest to trigger a mini-game.
- The object of this mini-game is to move the gems to the matching areas of color.
- Slide the gems one at a time to reach the colored area.
- Take the PYRAMID.
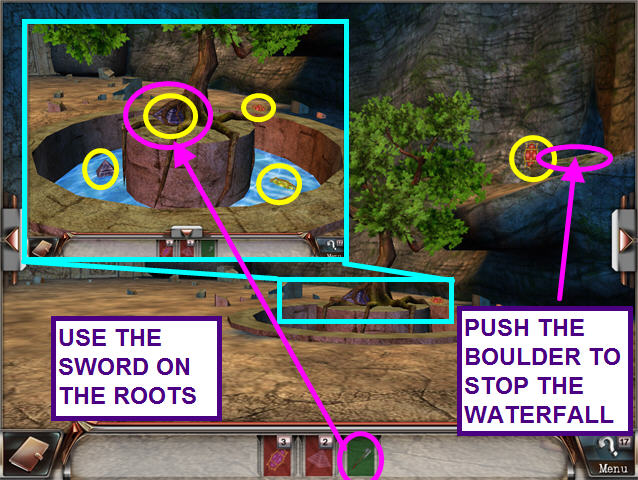
- Exit the close-up and turn to the left twice.
- Knock down the boulder to stop the waterfall.
- Take the JEWELRY.
- Look at the close-up of the tree.
- Use the SWORD on the roots.
- Take the 2 PYRAMIDS and the 2 JEWELRY.
- Exit the close-up and turn to the left.
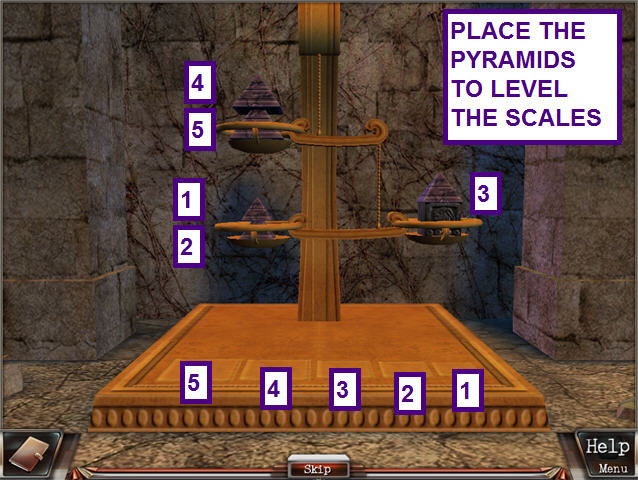
- Use the PYRAMIDS on the scale to trigger a mini-game.
- Place the pyramids into the scale so that both arms are level and equal.
- Number the PYRAMIDS 1-5, from smallest to largest.
- Place 4 and 5 in the upper left bowl.
- PYRAMID 3 goes in the right bowl.
- Put 1 and 2 in the lower left bowl.
- Solving this lowers the door and traps the guards.
- Turn to the right and open the rear door.
- Turn to the right.
- Take the CRYSTAL from the bench.
- Look at the close-up of the vase; take the 2 CRYSTALS.
- Exit the close-up and look at the cabinet on the right.
- Move the bowl on the second shelf.
- Take the 2 CRYSTALS.
- Exit the close-up and turn to the right.
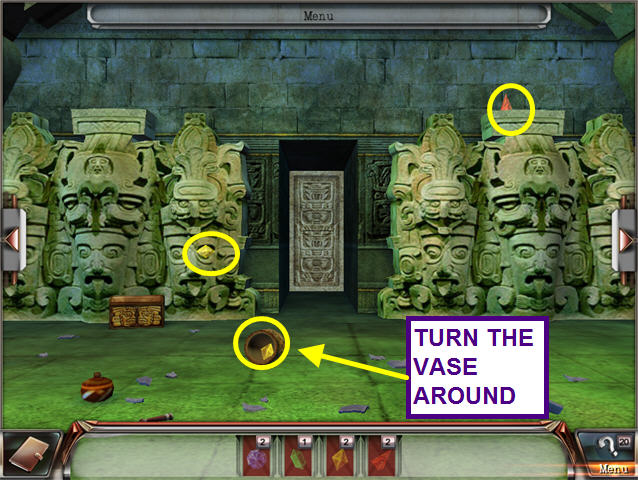
- Turn the vase around.
- Take the 3 CRYSTALS.
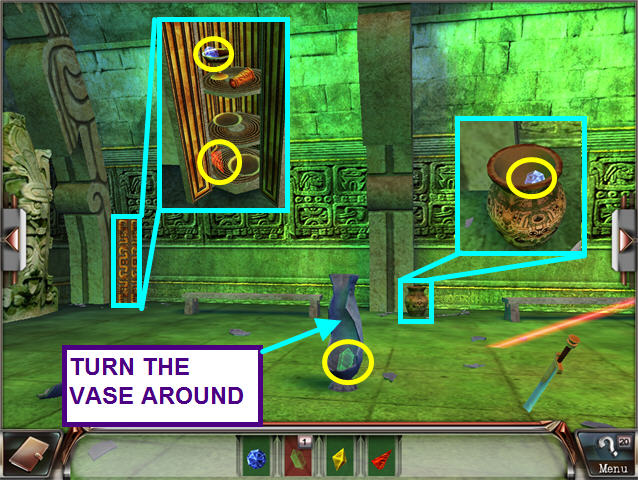
- Turn to the right.
- Turn the broken vase around; take the CRYSTAL.
- Look in the cabinet on the right; take the 2 CRYSTALS.
- Exit the close-up.
- Look in the vase; take the CRYSTAL.
- Exit the close-up and turn right.
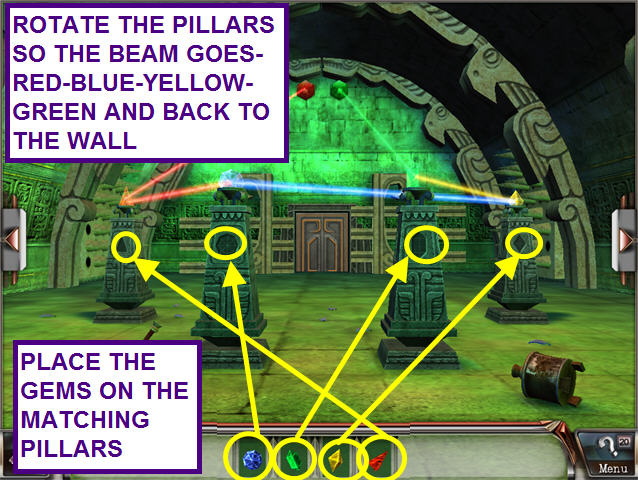
- Place the CRYSTALS onto the pillars with the matching shape.
- Rotate the pillars so the beam goes from the red crystal to the blue, yellow, and green crystals (in that order), before returning to the green gem in the wall.
- Once the beam is complete, the chomper is deactivated.
- Exit through the door.
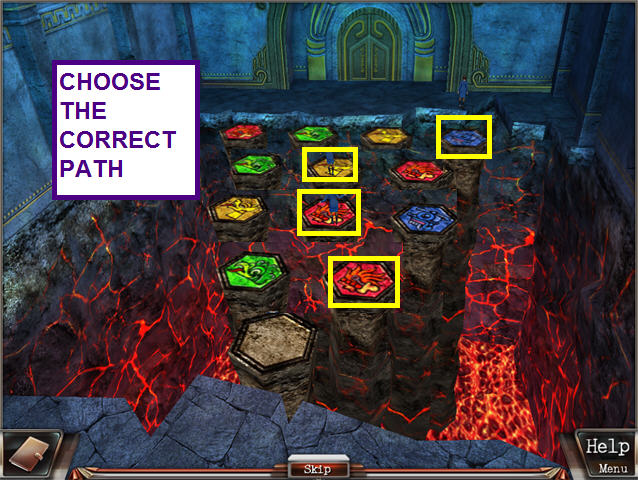
- In this mini-game, you must jump from pillar to pillar over the lava.
- If you choose the wrong pillar, you have to start over.
- Our path was: red-red-yellow-blue.
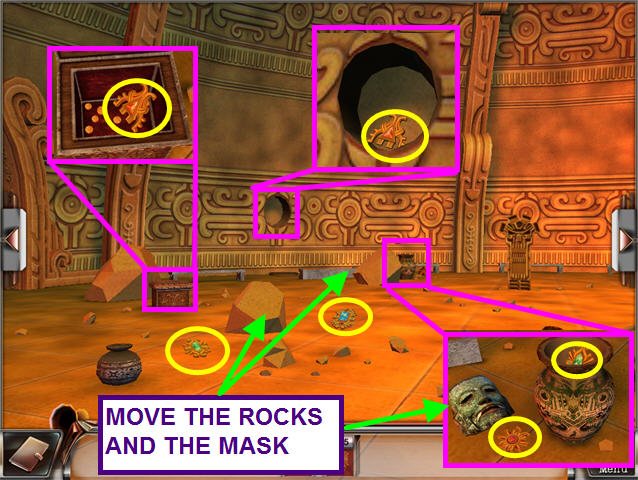
- After you enter the temple, turn to the left.
- Move the rocks; take the 2 KEYS.
- Look in the wall niche; take the KEY.
- Exit the close-up and look at the chest.
- Take the KEY.
- Exit the close-up and look at the vase.
- Move the mask; take the 2 KEYS.
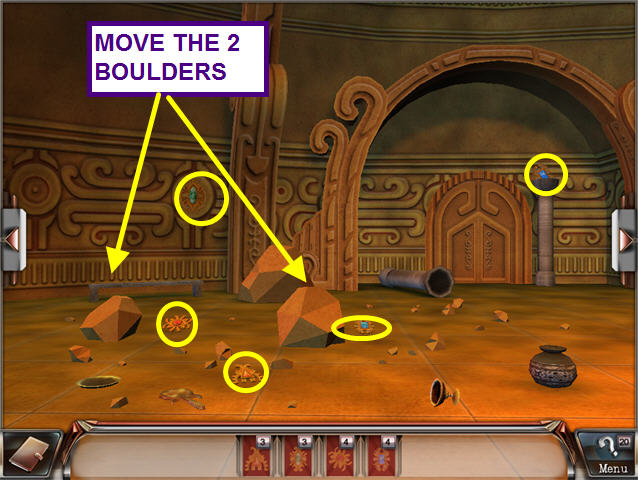
- Exit the close-up and turn to the left.
- Move the boulders; take the 5 KEYS.
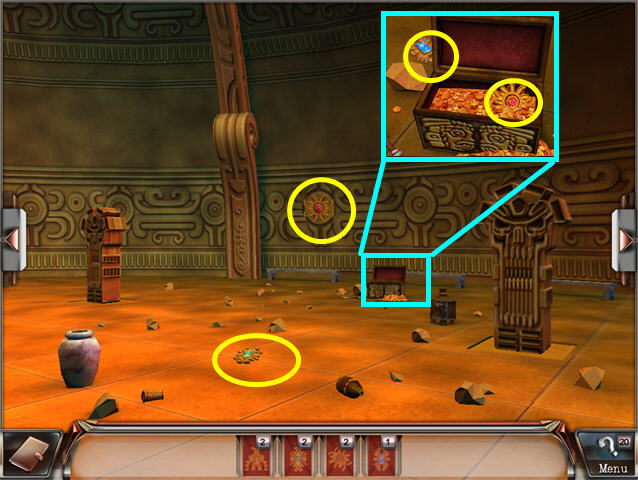
- Turn to the left.
- Take the 2 KEYS.
- Look at the chest; take the 2 KEYS.
- Turn to the left.
- Look in the large cabinet and see all the virus samples.
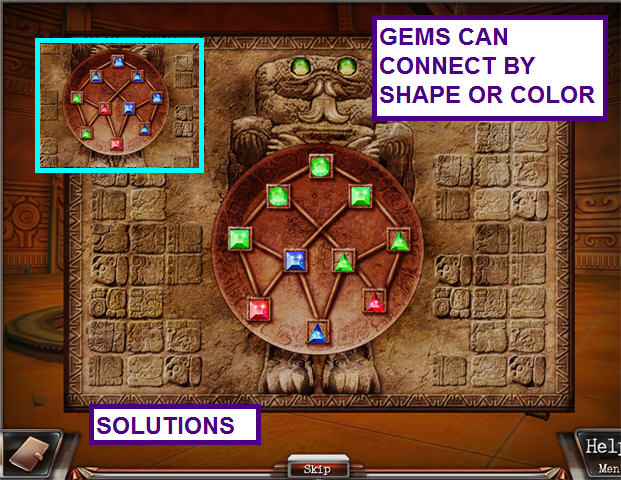
- Look at the stand on which the hand of statue is resting to trigger a mini-game.
- Place the gems into the grid so that connecting gems share the same color or shape.
- The screenshot features 2 solutions.
- Solving this puzzle moves the cabinet over the pit.
- Take the 3 KEYS and turn to the left.
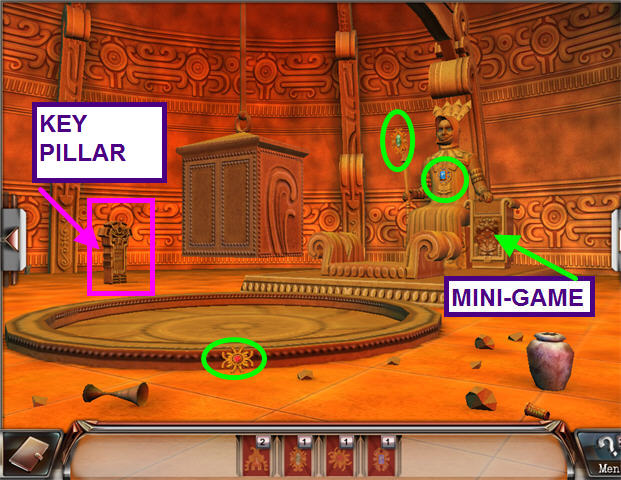
- Place the matching KEY into the pillar.
- Once the pillar drops, take the KEY that was hidden behind it.
- Exit the close-up and turn to the left twice.
- Look at the right pillar; place the matching KEY into the pillar.
- Exit the close-up and look at the left pillar.
- Place the matching KEY into the pillar.
- Move the rock on the left; take the KEY.
- Exit the close-up and turn to the left.
- Look at the final pillar and insert the KEY.
- The virus supply is destroyed in the lava.
- The henchman tries to shoot you, but Lord Scofield saves you.
- The antidote you found will save Mary, who turns out to be Scofield’s daughter.
Congratulations! You have just completed Millennium Secrets: Emerald Curse!


 Mystic Diary: Missing Pages Walkthrough, Guide, & Tips
 Big City Adventure: New York City Walkthrough, Guide, & Tips
 PuppetShow: Souls of the Innocent Collector's Edition Walkthrough, Guide, & Tips
 Sunken Secrets Tips and Tricks, Guide, & Tips
 Botanica: Into the Unknown Walkthrough, Guide, & Tips