Mystery Trackers: The Void Walkthrough, Guide, & Tips
Mystery Trackers: The Void Walkthrough

Welcome to the Mystery Trackers: The Void Walkthrough!
Help the secret organization of Mystery Trackers find 3 missing celebrities in the mysterious Void family mansion!
Whether you use this document as a reference when things get difficult or as a road map to get you from beginning to end, we’re pretty sure you’ll find what you’re looking for here.
This document contains a complete Mystery Trackers: The Void game walkthrough featuring annotated screenshots from actual gameplay!
We hope you find this information useful as you play your way through the game. Use the walkthrough menu below to quickly jump to whatever stage of the game you need help with.
Remember to visit the Big Fish Games Forums if you find you need more help. Have fun!
This walkthrough was created by Margie B, and is protected under US Copyright laws. Any unauthorized use, including re-publication in whole or in part, without permission, is strictly prohibited.
General Tips

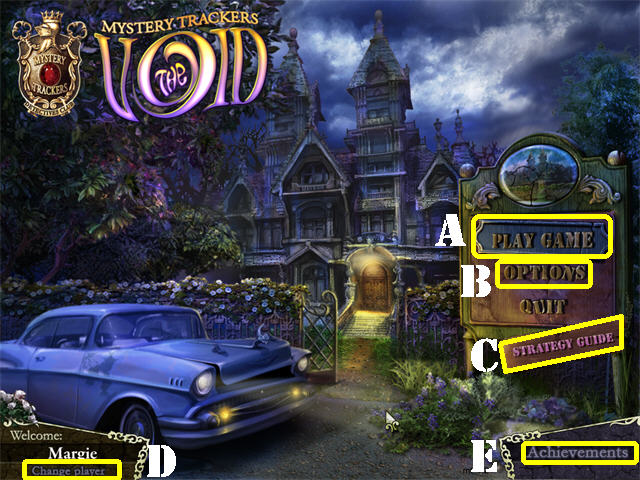
- Click PLAY GAME (A) to begin the adventure.
- Select OPTIONS (B) to adjust music, sound, cursor, and screen size.
- Click on the STRATEGY GUIDE (C) icon on the main menu, or while playing the game, by clicking the Strategy Guide icon below Mr. Toad for the link to purchase the strategy guide.
- Puzzles can be skipped once the skip button in the lower right corner has fully charged.
- Click the Info button in the lower right corner of a puzzle scene for that puzzle’s instructions.
- Change Players (D) in the lower left corner of the main menu.
- The Achievements (E) can be accessed from the main menu.
- Consult your Journal often; it contains story points and puzzle solutions. Some Journal pieces can be picked up during the game.
- There are 12 Achievements to earn. You will receive an instant notification following each achievement.
- Achievements will be revealed little by little throughout the game.
- Please see the Achievements chapter for a comprehensive list of achievements.

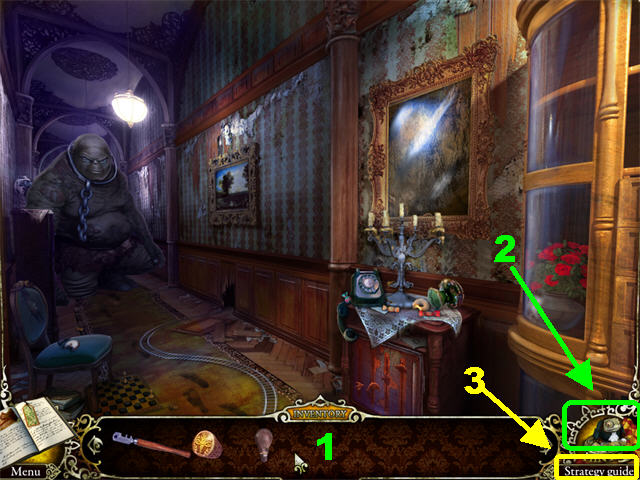
- Inventory items will be stored in the tray at the bottom of each scene.
- Some inventory items will be found piecemeal. The item in the inventory tray will let you know how many pieces are needed to complete it.
- Run your mouse over the bottom of the screen to access your inventory (1).
- You will receive an inventory item after each Hidden Object Scene.
- Inventory items can also be found anywhere in the game.
- To use an inventory item, grab it from the tray and click it onto the area in which you wish to use it.
- Hints are unlimited in the game, but must recharge between uses.
- Click Mr. Toad (2), in the lower right corner, for a Hidden Object Scene hint, or or advice on what to do next.
- Click Strategy guide (3), below the toad, for the link to purchase the Strategy Guide.
Chapter 1: Hotel Room

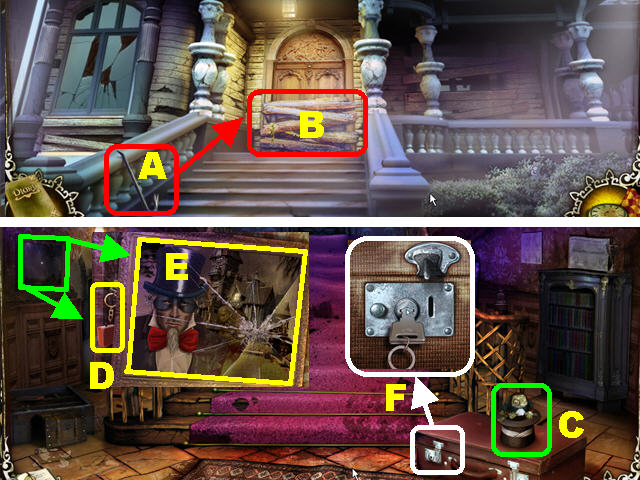
- Take the CROWBAR (A) in the lower right.
- Zoom into the front door (B); break the boards 3 times with the CROWBAR and go through the door.
- Click on Mr. Toad (C) above the suitcase, enabling the in-game hint feature.
- Zoom into the painting on the left; take the COPPER KEY (D) and the PICTURE (E).
- Open the suitcase (F) in the lower right with the COPPER KEY to trigger a Hidden Object Scene.

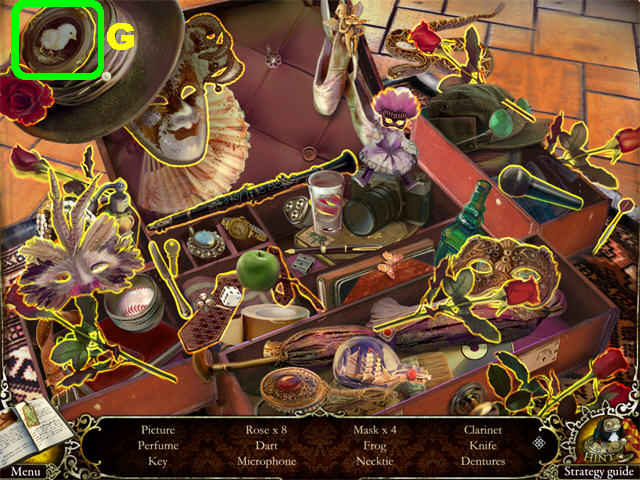
- The PICTURE (G) will be added to inventory.

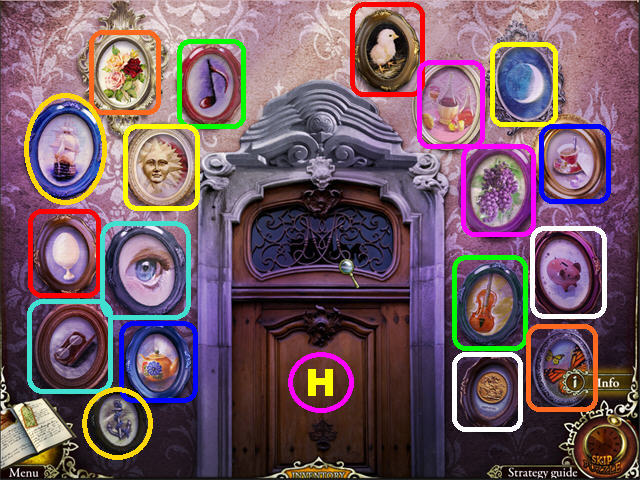
- Zoom into the back door; place the PICTURE on the wall to trigger a puzzle.
- Click on 2 related items to eliminate them both from the board. (H).
- Go through the door.

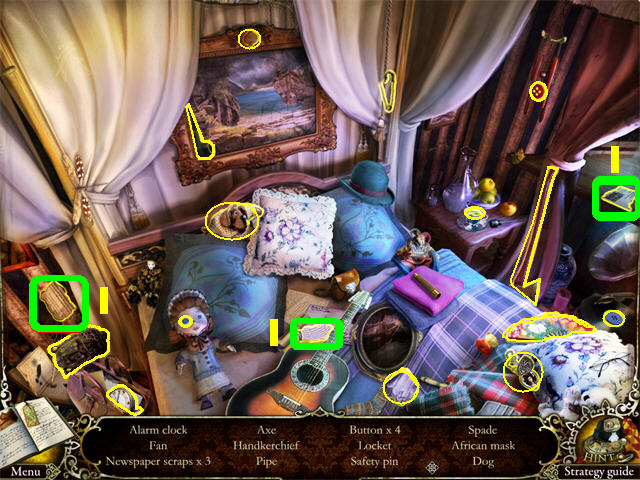
- Play the Hidden Object Scene by the bed to obtain the NEWSPAPER SCRAPS marked in green (I).

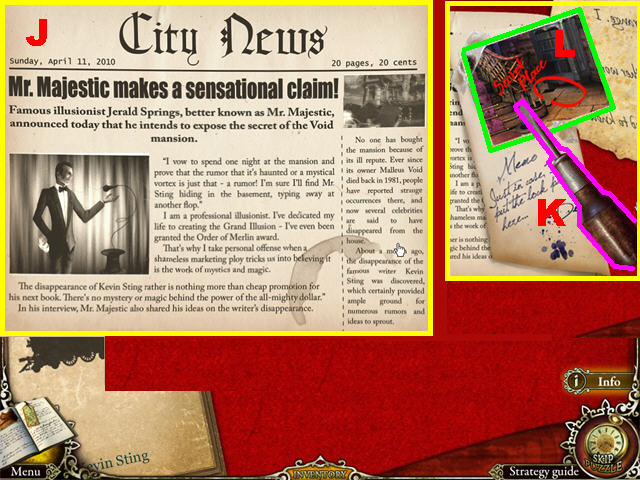
- Zoom into the papers in the lower left corner.
- Place the NEWSPAPER SCRAPS on the table to trigger a puzzle.
- Click on the scraps to rotate them.
- Arrange the scraps as shown in the screenshot (J).
- Take the SCREWDRIVER (K) and POSTCARD (L) after the puzzle has been completed. The Secret Place is shown on the postcard.

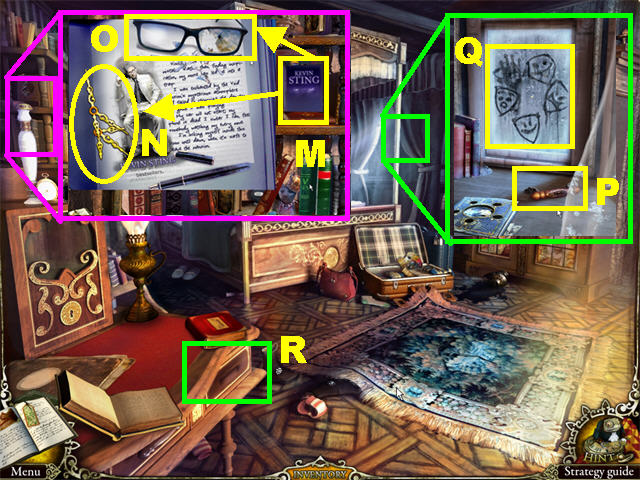
- Zoom into the shelves on the left.
- Zoom into the KEVIN STING BOOK (M); take the CLOCK HANDS 1/4 (N) and the GLASSES (O), which will be added to the Journal.
- Zoom into the window on the right; take the HANDLE (P) and the MASK SKETCH (Q).
- Click down to exit the window.
- Zoom into the drawer (R) in the lower left corner; place the HANDLE on the drawer to trigger a Hidden Object Scene.


- The SCISSORS (S) will be added to inventory.

- Return to the foyer.
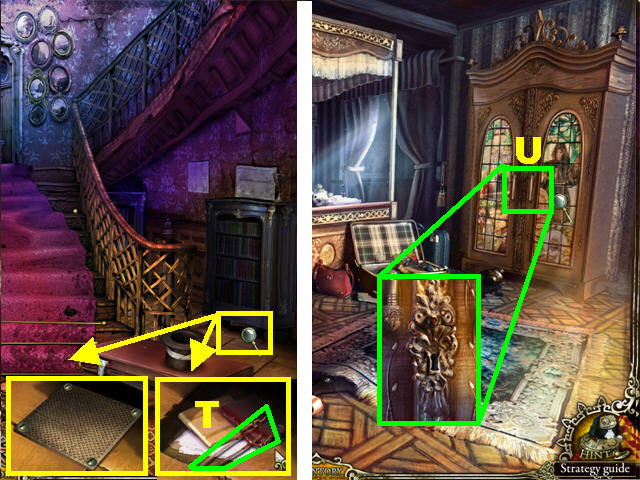
- Zoom into the floor in front of the cabinet; remove the plate with the SCREWDRIVER and take the LOCK PICK (T).
- Return to the bedroom.
- Zoom into the wardrobe (U); open the wardrobe with the LOCKPICK to trigger a Hidden Object Scene.

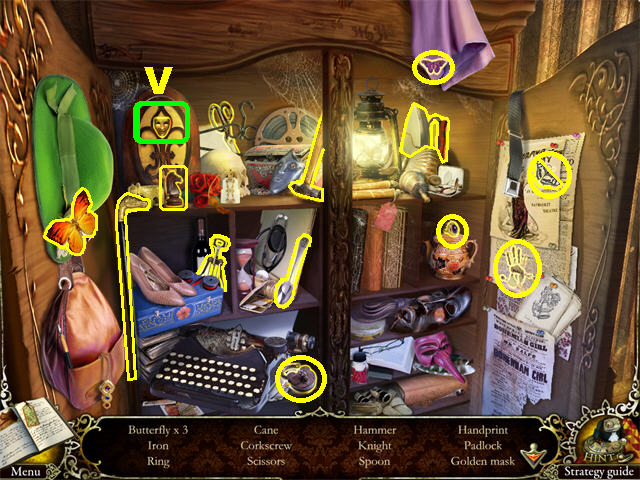
- The GOLDEN MASK (V) will be added to inventory.

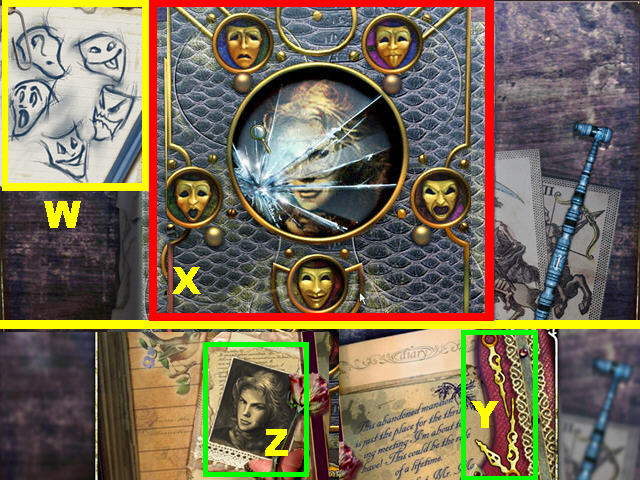
- Zoom into the window by the bed; take the image on the glass (if you haven’t done so already) to add it to your Journal.
- Click on the blue book; place the GOLDEN MASK in the empty slot to trigger a puzzle.
- Using the image in your Journal (W), click on each mask until they match the image shown in the screenshot (X).
- Take the CLOCK HANDS 2/4 (Y) and the PHOTO (Z) after the puzzle has been solved.
- Head right, by the wardrobe, to enter the next scene.

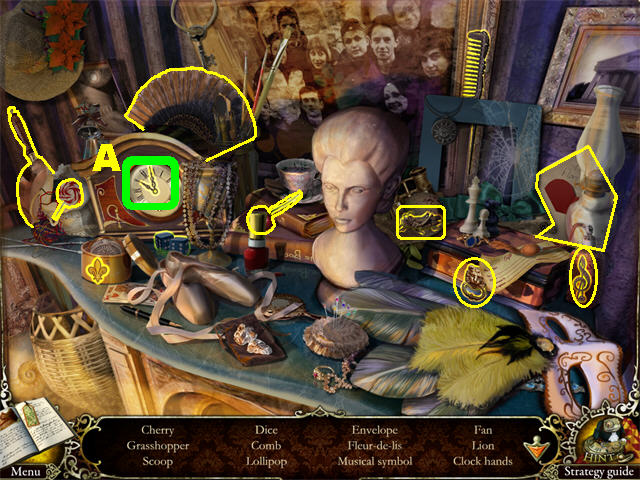
- Play the Hidden Object Scene to obtain the CLOCK HANDS 3/4 (A).

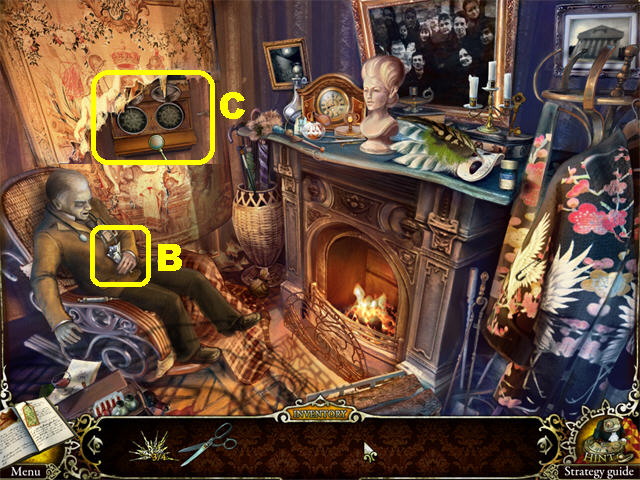
- Grab the CLOCK HANDS 4/4 (B) from the dead body on the chair.
- Cut the tapestry (C) with the SCISSORS to reveal the clocks.
- Click on the clocks to trigger a puzzle.

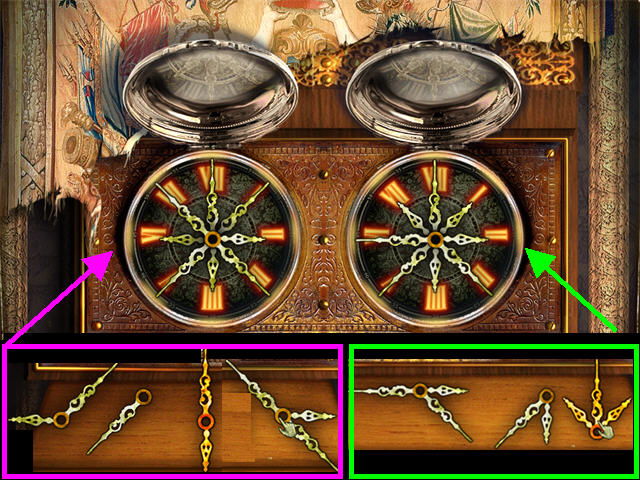
- Place the clock hands on both clocks until all the numbers are glowing.
- Right-click on a piece to rotate it before or after you put it on the clock.
- The hands in the screenshot have been rotated before they were placed.
- Go through the wall after the puzzle has been solved.
Chapter 2: The Corridor

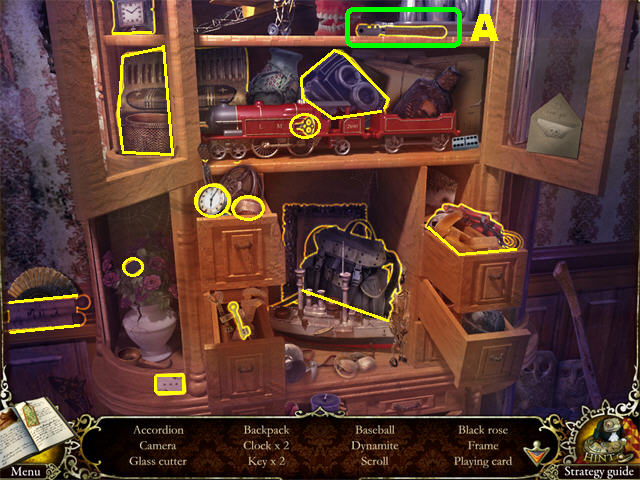
- Play the Hidden Object Scene to obtain the GLASS CUTTER (A).

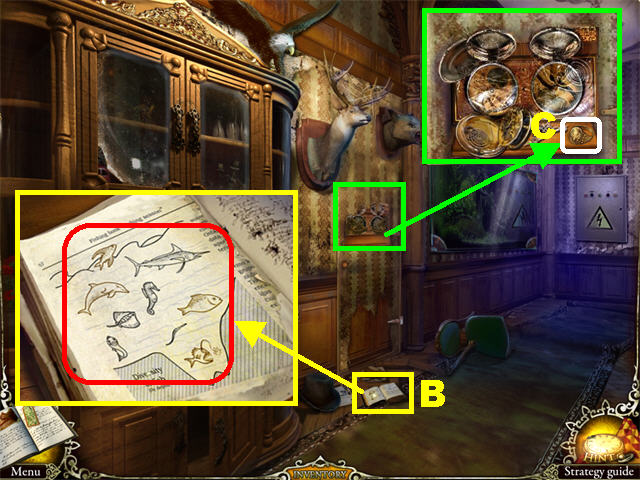
- Zoom into the book on the floor (B); take the FISH SKETCH for your Journal.
- Zoom into the clocks on the wall; take CADUCEUS RING (C).
- Go left.

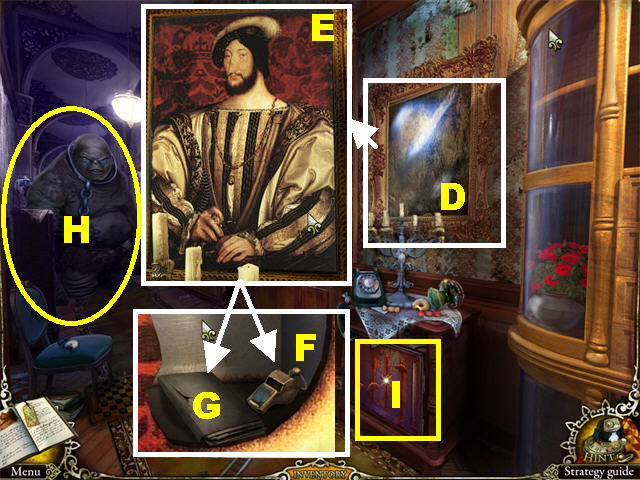
- Use the GLASS CUTTER on the painting to trigger a puzzle (D).
- Click on the painting to switch the images to match the image in the screenshot (E).
- Take the WHISTLE (F) and the JOURNAL PAGE (G) after the puzzle has been solved.
- Give the WHISTLE to the monster (H) and it will go through the wall.
- Zoom into the safe (I) below the painting to trigger a puzzle.

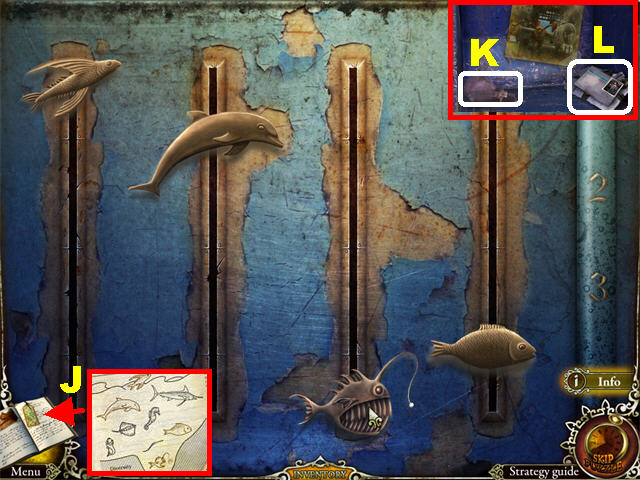
- Using the image in your Journal (J), slide the marine animals up or down until they match the image shown in the screenshot.
- Take the BULB (K) and the JOURNAL PAGE (L) after the puzzle has been solved.

- Head right.
- Zoom into the control panel on the right.
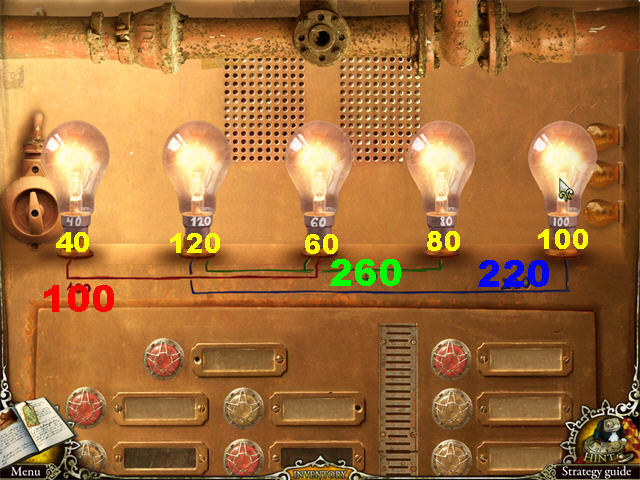
- Place the BULB in the empty slot to trigger a puzzle.
- The numbers with connecting colored lines must add up to the number of that line. Click on 2 bulbs to swap their positions.
- From left to right the solution is 40-120-60-80-100.
- Solving this puzzle triggers a Hidden Object Scene in the fish tank.

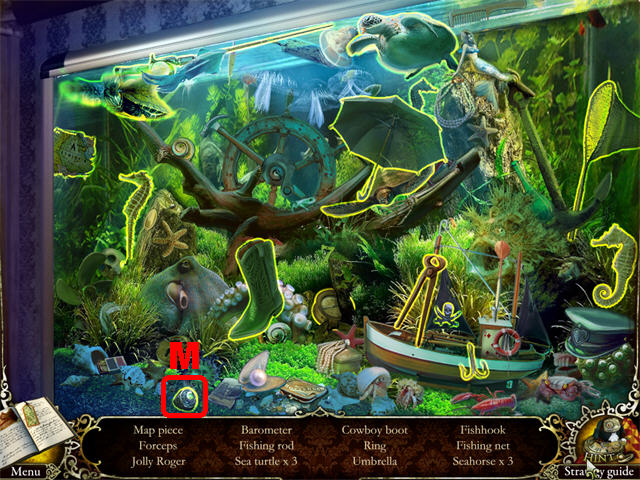
- The EMERALD RING (M) will be added to inventory.

- Go into the Illusionist’s room at the end of the hallway.
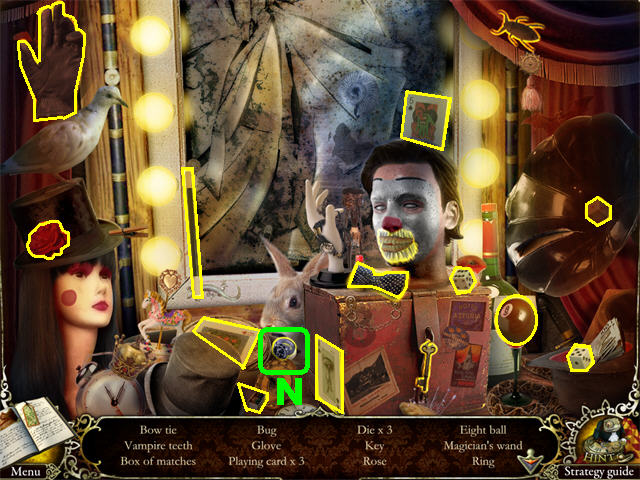
- Play the Hidden Object Scene to obtain the SALAMANDER RING (N).

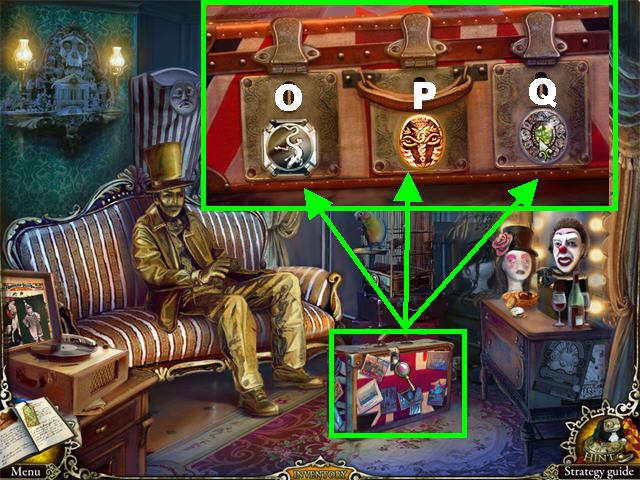
- Zoom into the suitcase; place the SALAMANDER RING (O), CADEUCEUS RING (P), and the EMERALD RING (Q) on the locks to trigger a puzzle.

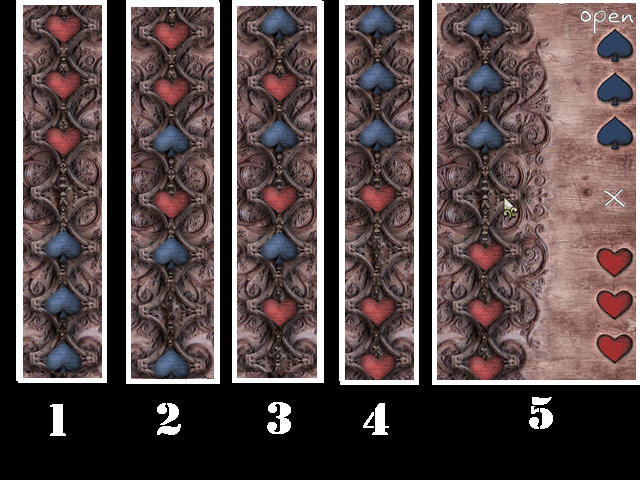
- Move the blue hearts to the top and the red hearts to the bottom.
- Click on the UNDO button if you get stuck.
- The screenshot shows you a step-by-step solution for this puzzle (R).
- Take the ROPE LADDER inside the suitcase.

- Go to the hallway and then through the hole in the wall.
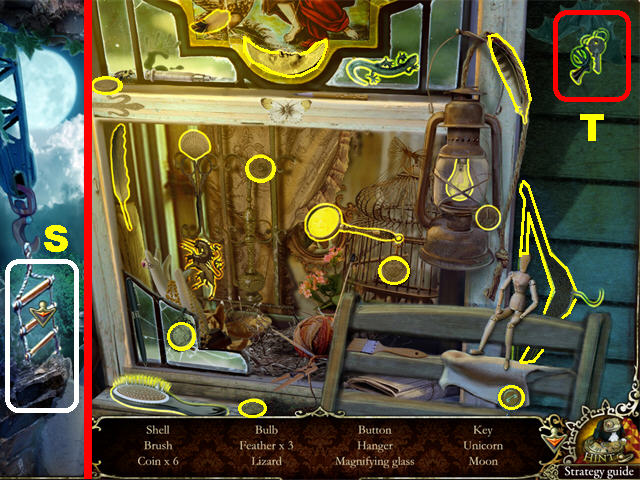
- Place the ROPE LADDER on the hook; click on the rope ladder to go down (S).
- Play the Hidden Object Scene to obtain the MAILBOX KEY (T).

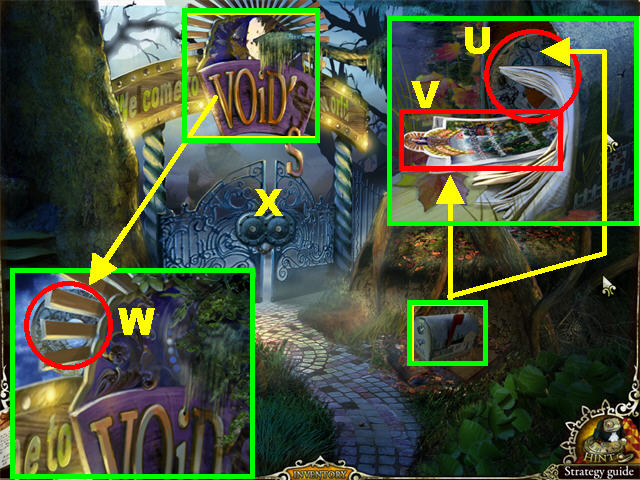
- Head left.
- Zoom into the mailbox.
- Open the mailbox with the MAILBOX KEY; take the STARRY SKY CIRCLE (U) and the JOURNAL PAGE (V).
- Zoom into the section above the VOID sign; take the other STARRY SKY CIRCLE (W).
- Zoom into the gates (X); place the 2 STARRY SKY CIRCLES into the slots.

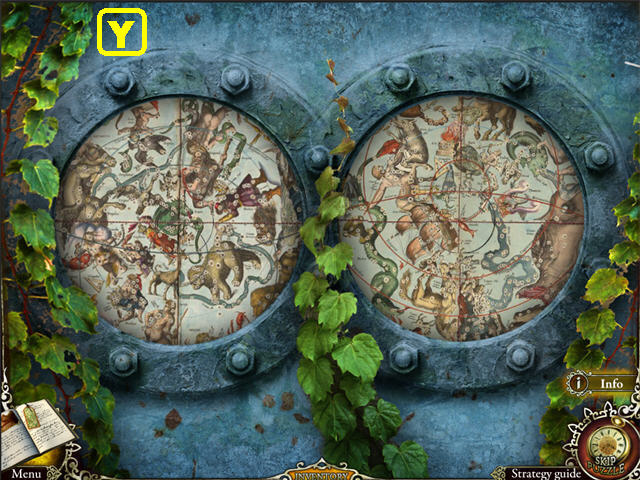
- Click on the circles to rotate them until they form the image shown in the screenshot (Y).
- Once you solve that puzzle, another appears.

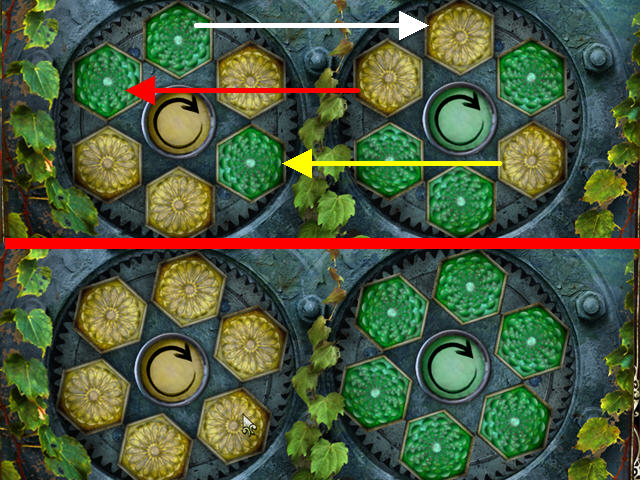
- Swap the hexagons until the color of the hexagons match the center arrow.
- Use the arrows in the center of the hexagons to rotate them.
- Clicking on a hexagon will swap it with the hexagon in the same position on the opposite side.
- Go through the gate after the puzzle has been solved.

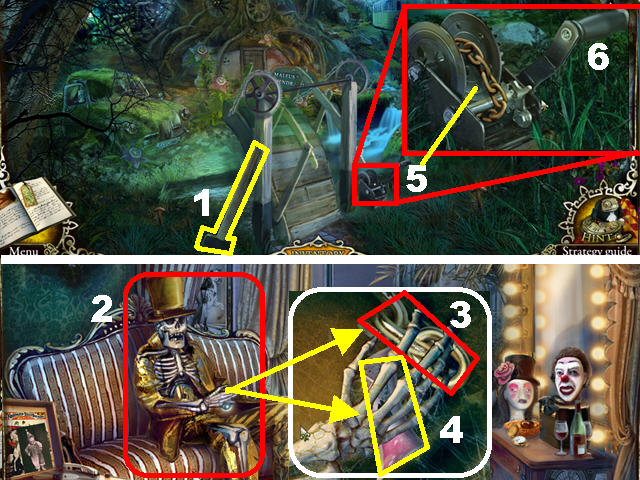
- Take the SLEDGEHAMMER (1) on the lower left.
- Return to the Illusionist’s room by means of the rope ladder.
- Hit the statue on the sofa 4 times with the SLEDGEHAMMER (2).
- You’ve earned THE LOST MAN DISCOVERED! Mr. Majestic Achievement!
- Zoom into the hands; take the CHAIN LINK (3) and the JOURNAL PAGE (4).
- Return to the drawbridge.
- Zoom into the hoister (5) and place the CHAIN LINK to repair it.
- Click on the handle (6) to lower the drawbridge.
- Cross the bridge.
Chapter 3: Dendrarium

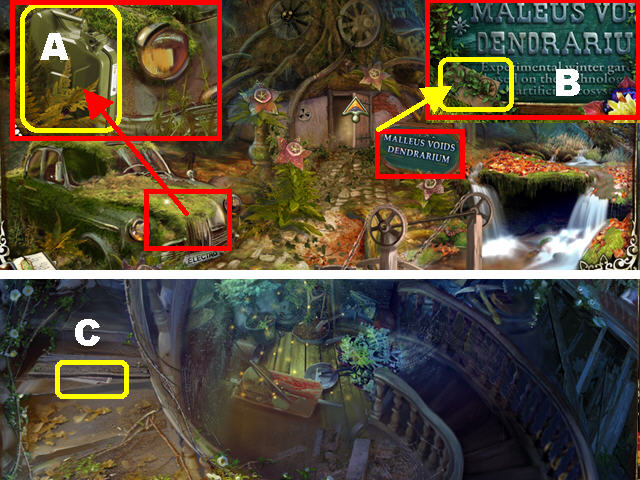
- Zoom into the hood of the car; take the CANISTER WITH GAS (A).
- Zoom into the green sign; take the JOURNAL PAGE (B).
- Go forward.
- Take the JOURNAL PAGE (C) in the upper left.

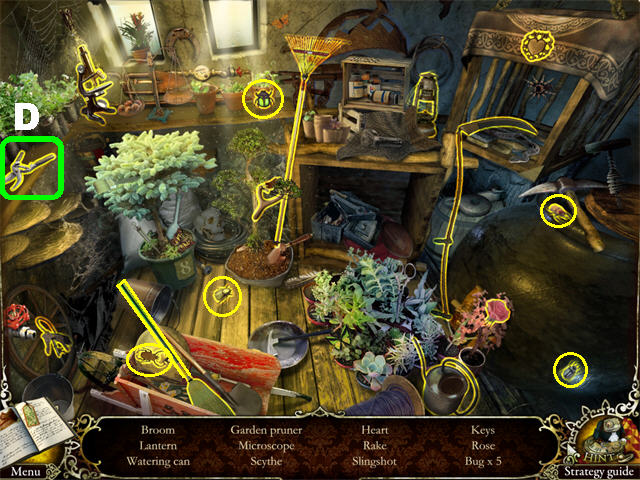
- Play the Hidden Object Scene at the bottom of the stairway to obtain the GARDEN PRUNER (D).
- Click down and head right.

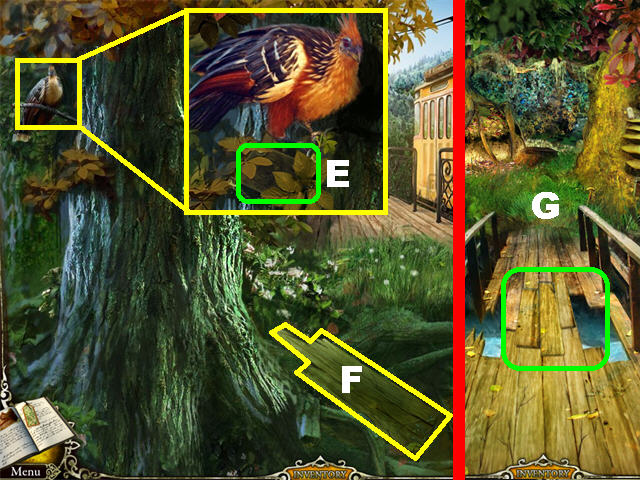
- Zoom into the bird in the upper left; take the JOURNAL PAGE (E).
- Take the PLANK (F) on the ground.
- Click down and head left.
- Place the PLANK (G) on the broken bridge.
- Go forward.

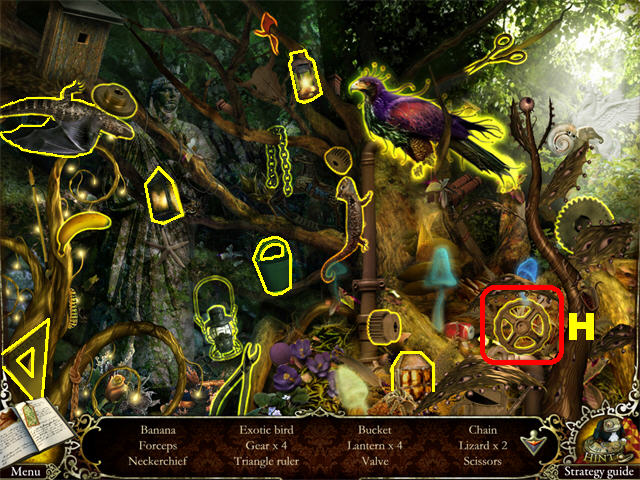
- Use the GARDEN PRUNER on the roses on the right tree to trigger a Hidden Object Scene.
- VALVE 1/2 (H) will be added to inventory.

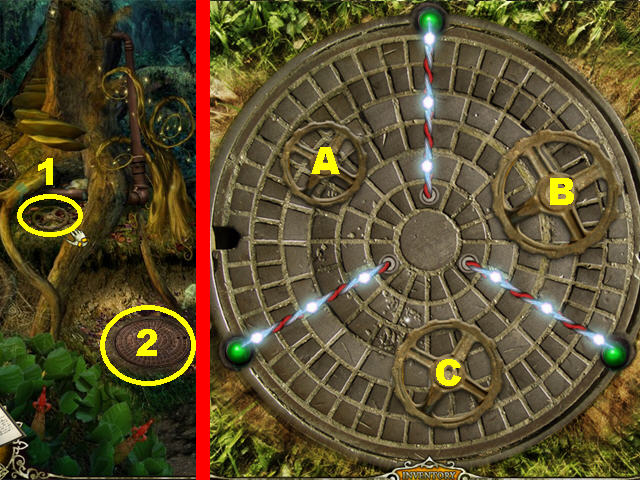
- Take VALVE 2/2 (I) on the left tree.
- Zoom into the hatch (2) by the left tree.
- Place the 2 VALVES on the hatch to activate a puzzle.
- Zoom into the hatch on the ground.
- Click on the first valve (A) 3 times, the second valve (B) 3 times, and the third valve (C) three times.

- Go through the hatch after the puzzle has been solved.
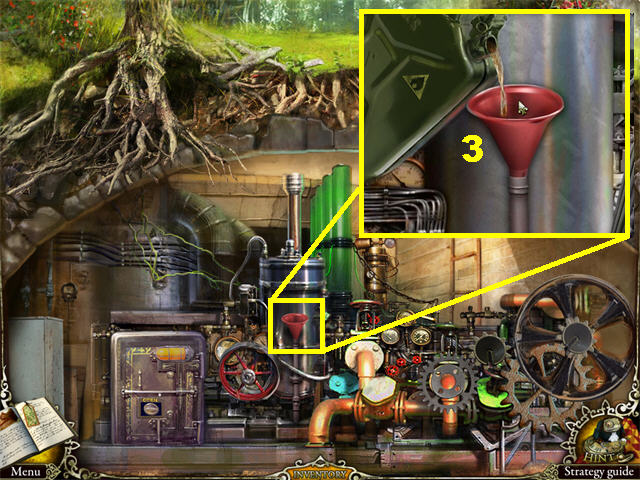
- Zoom into the red funnel; place the CANISTER WITH GAS in the funnel (3) to trigger a puzzle.

- Fill the right 4 segments of the fuel tank by clicking valves B, C, E, D, A, D, E, D, A, and D.

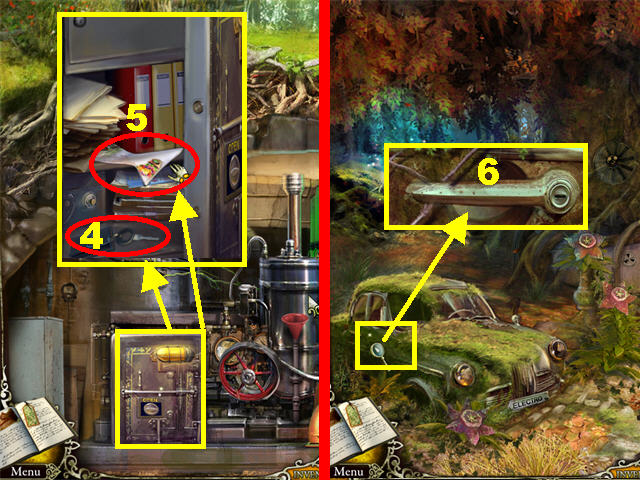
- Zoom into the safe in the lower left; open it and take the CAR KEY (4) and the JOURNAL PAGE (5).
- Return to the scene of the abandoned car.
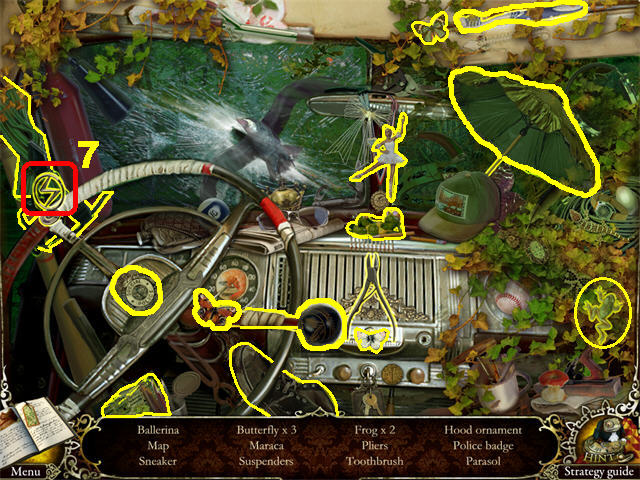
- Zoom into the left door. Place the CAR KEY on the lock (6) to trigger a Hidden Object Scene.


- The HOOD ORNAMENT (7) will be added to inventory.

- Zoom into the car’s hood; place the HOOD ORNAMENT (8) on the hood and take the LEVER (9).
- Go right twice to reach the tram.
- Look into the telescope (10) to see the monster and add a section to your Journal.
- Zoom into the door on the right; place the LEVER on the controls.
- Click on the lever so it points to the Ropeway (11).
- Enter the tram.

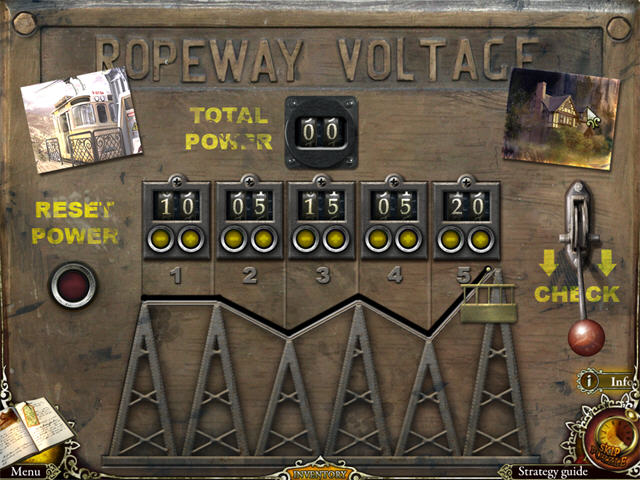
- Zoom into the controls on the left.
- Click, in the following order, numbers 10, 05, 15, 05, and 20.
- Click the lever to confirm your selection.
Chapter 4: Hotel


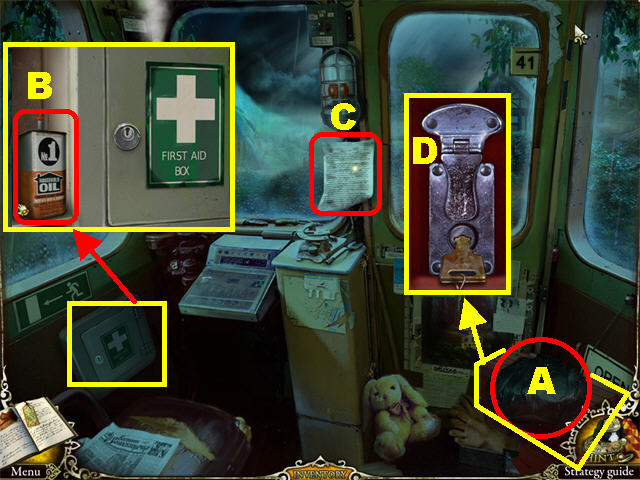
- Take the LEATHER JACKET (A) in the lower right.
- Zoom into the first aid kit in the lower left; take the OILER (B).
- Take the JOURNAL PAGE (C) in the center.
- Zoom into the toolbox in the lower right; place the OILER (D) on the key and turn the key to trigger a Hidden Object Scene.

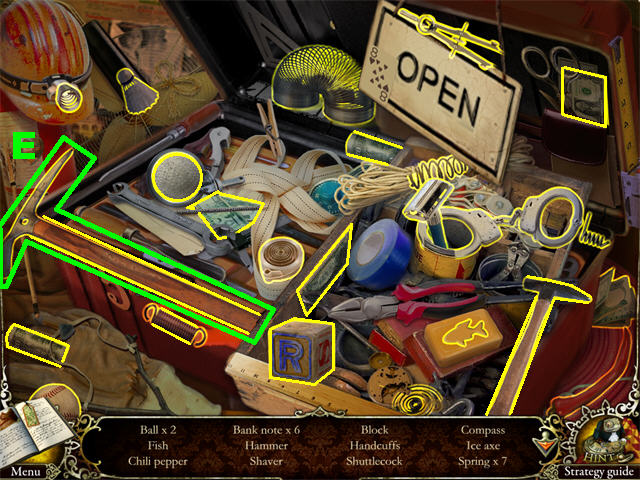
- The ICE AXE (E) will be added to inventory after the Hidden Object search.

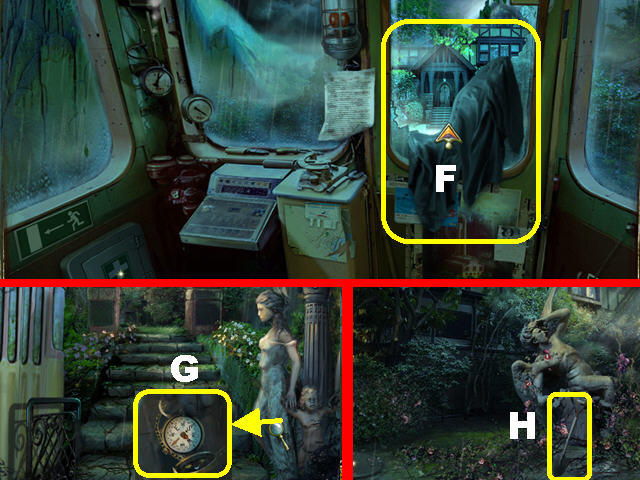
- Zoom into the right window (F). Strike the right window 3 times with the ICE AXE.
- Place the LEATHER JACKET on the broken window and go through it.
- Zoom into the statue on the right; take the COMPASS (G) to add it to the Journal.
- Go forward.
- Take the SHOVEL (H) by the statue.
- Go left.

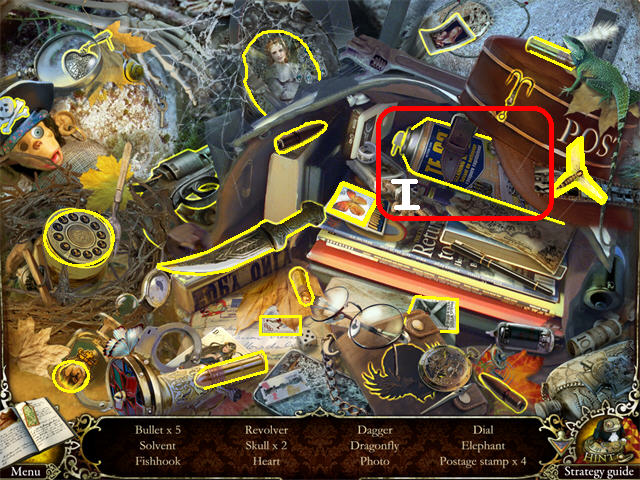
- Play the Hidden Object Scene to obtain the SOLVENT (I).

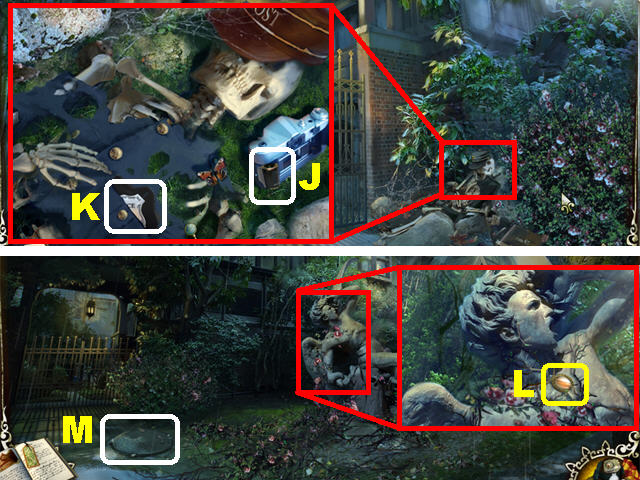
- Touch the gate and the monster will gesture you to follow it.
- Zoom into the skeleton in the bushes.
- Click on the back of the camera to open it and take the FILM (J).
- Click on the skeleton’s shirt pocket and take the BADGE (K).
- Click down.
- Zoom into the statue; place the SOLVENT on the 3 dirty areas and take the PLANET COIN (L).
- Zoom into the galaxy model (M) in the lower left; place the PLANET COIN on the galaxy code lock.

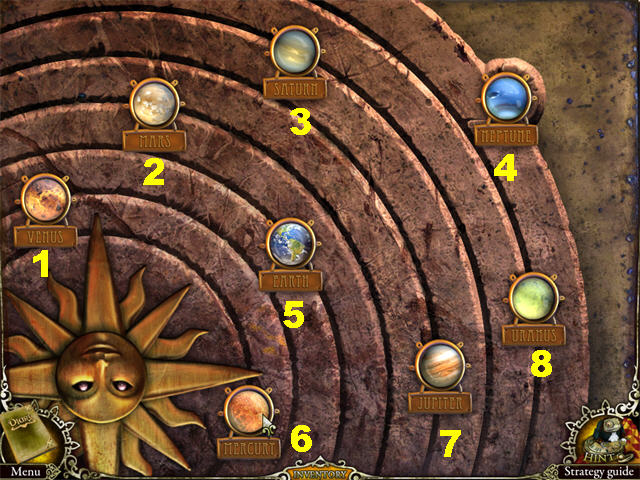
- Click on the planets Venus (1), Mars (2), Saturn (3), Neptune (4), Earth (5), Mercury (6), Jupiter (7), and Uranus (8) to arrange them correctly.

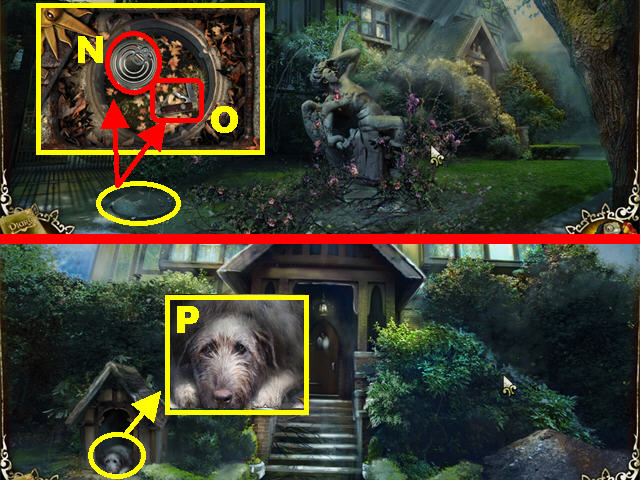
- Take the DOG FOOD (N) and the POCKET KNIFE (O) after the puzzle has been solved.
- Head toward the right.
- Zoom into the dog house.
- Give the DOG FOOD to the dog (P) to trigger a Hidden Object Scene.

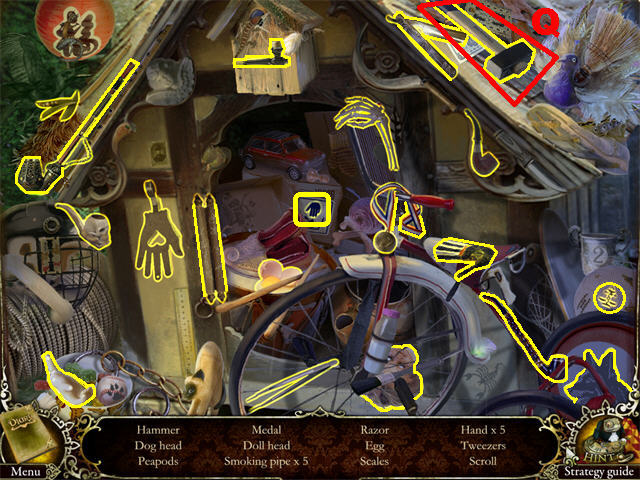
- The HAMMER (Q) will be added to inventory after your search.

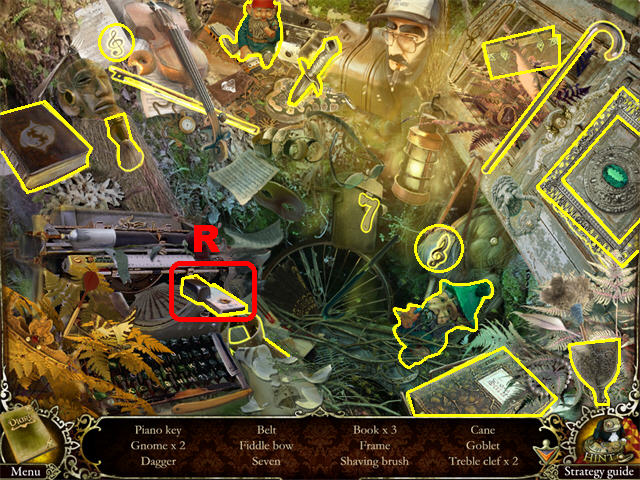
- Zoom into the patch of dirt in the lower right; dig with the shovel to trigger a Hidden Object Scene.
- The PIANO KEY (R) will be added to inventory.

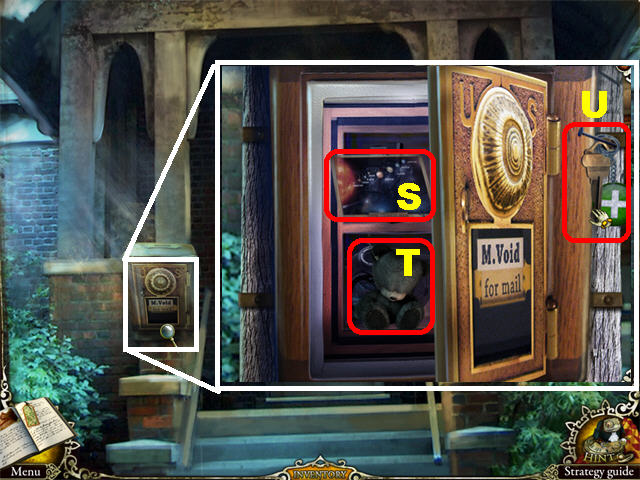
- Go up the steps.
- Zoom into the mailbox on the left; take the POSTCARD (S) and click on the BEAR (T).
- Grab the KEY (U) in the upper right.

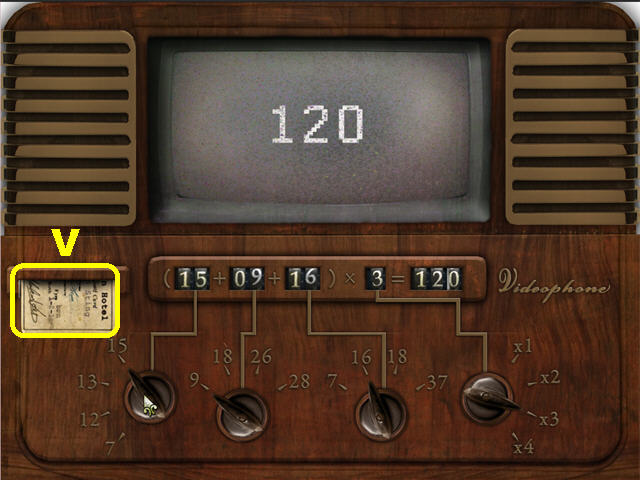
- Zoom into the door to trigger a puzzle.
- From left to right, adjust the dials to 15, 09, 16, 3, and 120.
- The ACCESS CARD (V) will be added to inventory after the puzzle has been solved.
- Click down 3 times.

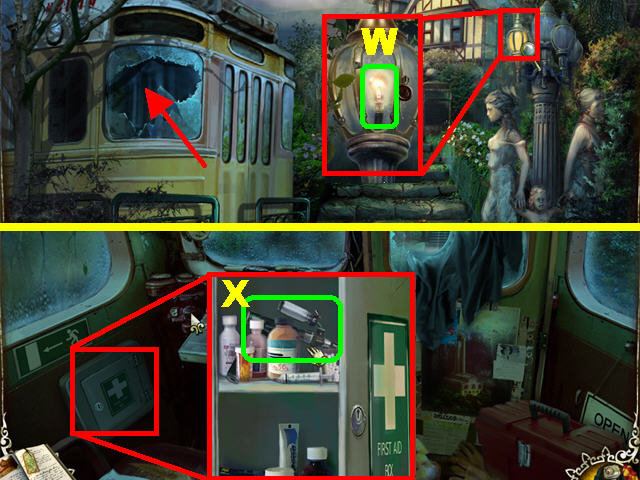
- Zoom into the lamppost.
- Cut the cord with the POCKET KNIFE; click on the glass and take the LIGHT BULB (W).
- Go into the tram.
- Zoom into the first aid kit in the lower left; open it with the KEY and take the INJECTOR (X).
- Leave the tram, go up the steps and turn left toward the gates.

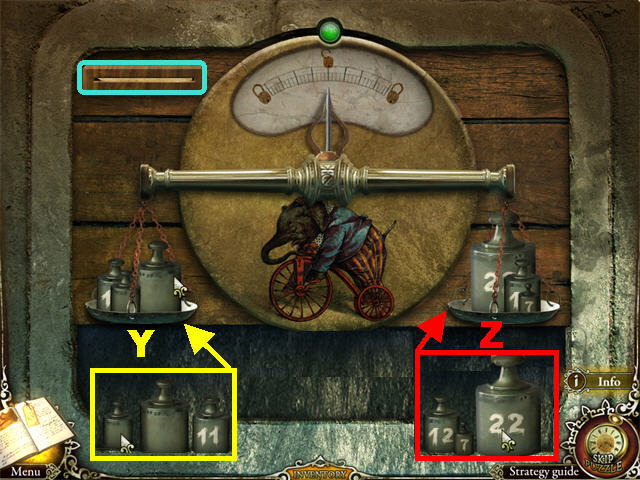
- Zoom into the gate to trigger a puzzle.
- Place the ACCESS CARD in the slot in the upper left.
- Place the medium, unmarked weight, 11 weight, and small, unmarked weight on the left scale (Y).
- Place the 12, 7, and 22 weights on the right scale (Z).

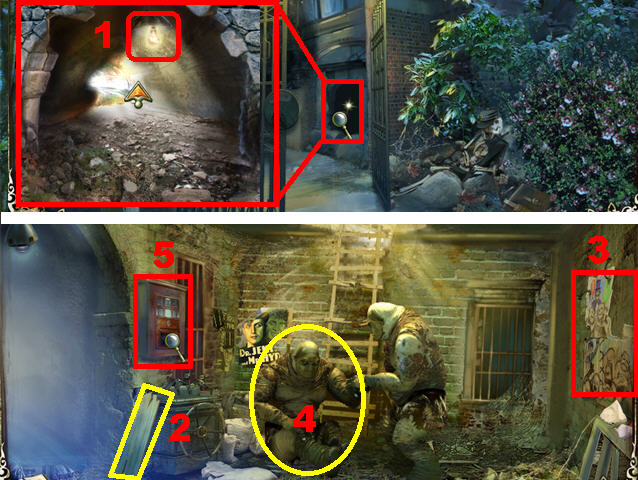
- Zoom into the tunnel on the right; place the LIGHT BULB in the lamp and go forward (1) to access the cellar.
- Take the BOARD (2) on the left.
- Take the JOURNAL PAGE (3) on the right.
- Give the INJECTOR to the monster on the left (4) and both monsters will leave.
- Zoom into the shelf on the left to trigger a puzzle (5).

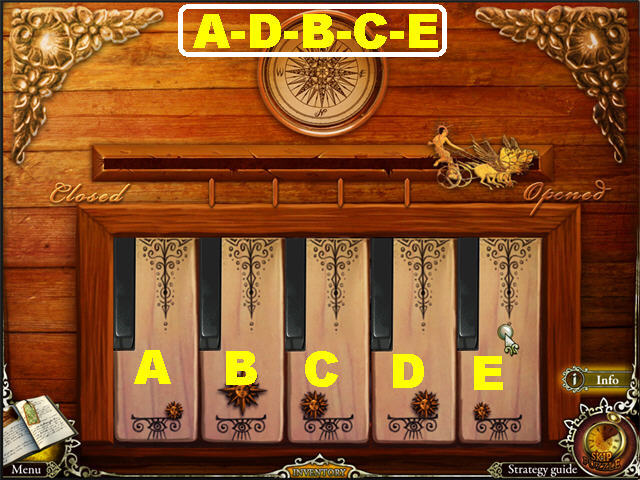
- Place the PIANO KEY on the puzzle to activate it.
- To solve the puzzle click, in the following order, keys A, D, B, C, and E.
- Grab the NAILS in the cabinet after the puzzle has been solved.
- Zoom into the ladder; place the BOARD, NAILS, and HAMMER on the ladder to fix it.
- Go up the ladder.
Chapter 5: Inside Hotel

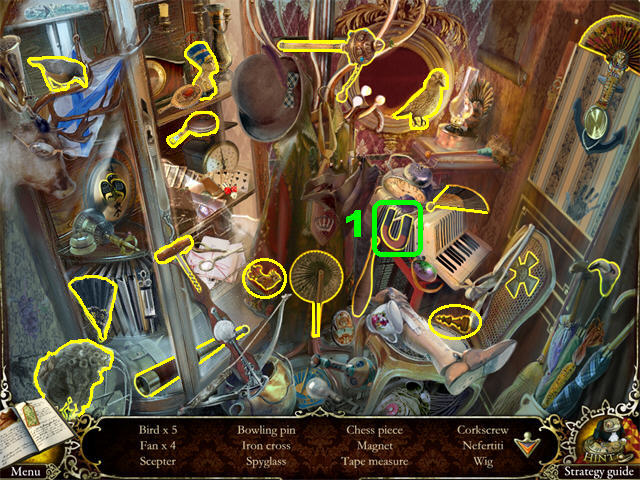
- Make a left in the hallway.
- Play the Hidden Object Scene to obtain the MAGNET (1).

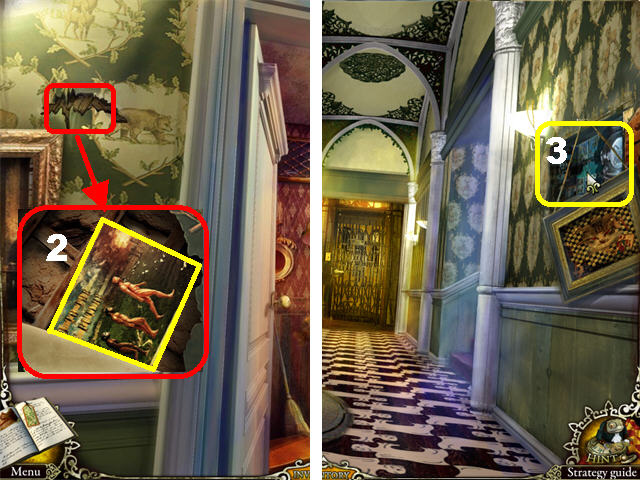
- Zoom into the upper left side of the wall; click on it 3 times and take the EVOLUTION POSTCARD to add it to the Journal (2).
- Click down.
- Zoom into the puzzle on the right side of the wall (3).

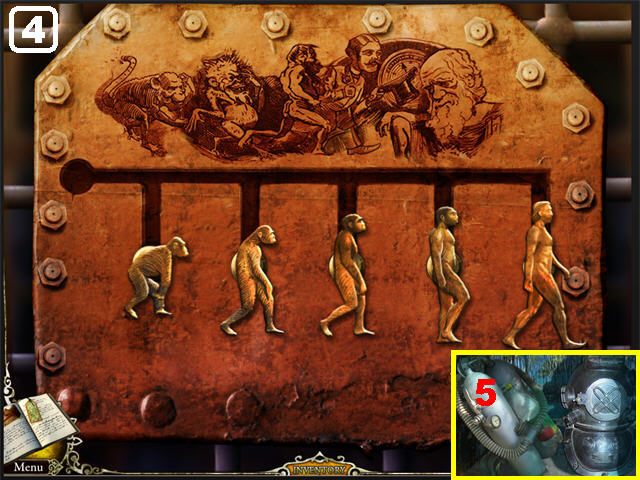
- Using the Journal image you found in the last hallway; move the items as shown in the screenshot (4).
- Use the slot in the upper left to move a piece out of the way, allowing the others to slide around it.
- Take the OXYGEN TANK (5) after the puzzle has been solved.

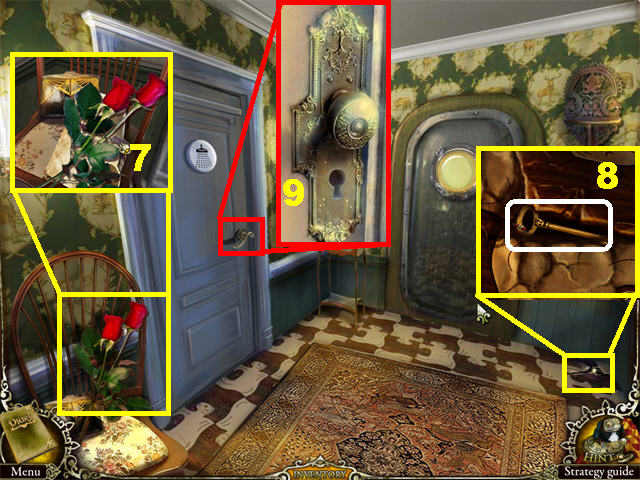
- Go into the right door.
- Zoom into the flowers in the lower left; take the ROSES to add them to your Journal (6).
- Look into the back door to add an entry into your Journal.
- Zoom into the crack on the right side of the ground (7); use the MAGNET to retrieve the BATHROOM KEY (8).
- Zoom into the bathroom door on the left; open the lock with the BATHROOM KEY and go inside (9).

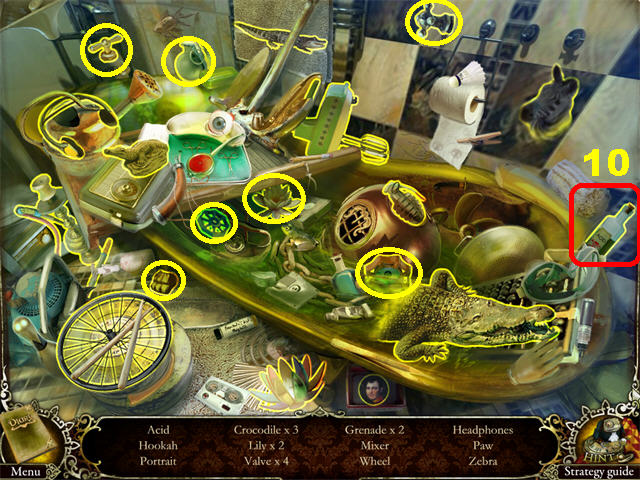
- Play the Hidden Object Scene to obtain the ACID (10).

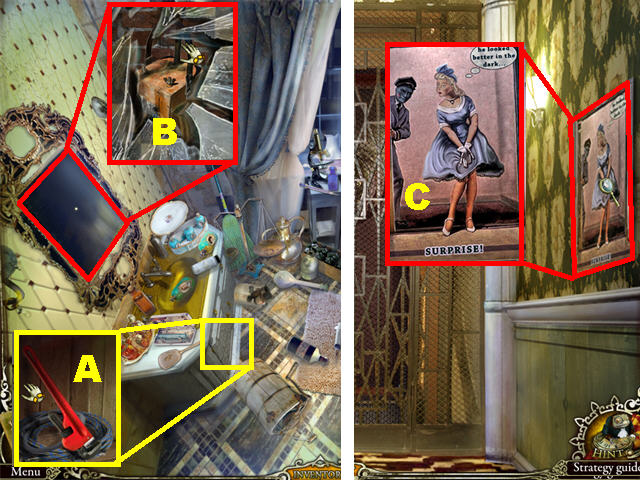
- Zoom into the bottom cabinet, open it and take the WRENCH (A).
- Zoom into the mirror on the wall, break it with the WRENCH and take the DETONATOR (B).
- Click down twice and go forward.
- Zoom into the picture on the right side of the wall; grab the JOURNAL PAGE (C) to add the word SURPRISE! to your Journal.

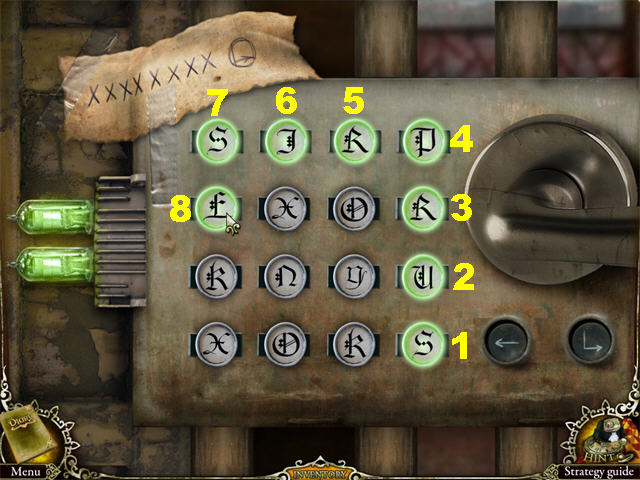
- Zoom into the door to trigger a puzzle.
- Click on the letters, highlighted in green in the screenshot, to spell out SURPRISE.
- Enter the elevator after the puzzle has been solved.

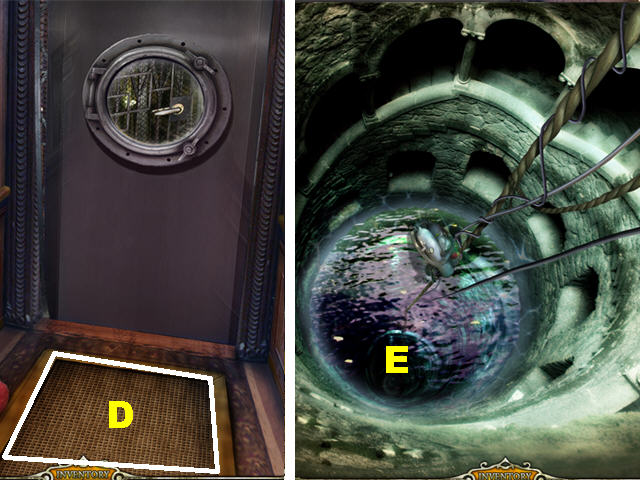
- Zoom into the grating on the floor; pour the ACID over it (D).
- Zoom into the ground again and place the OXYGEN TANK on the shaft (E) to trigger a Hidden Object Scene.

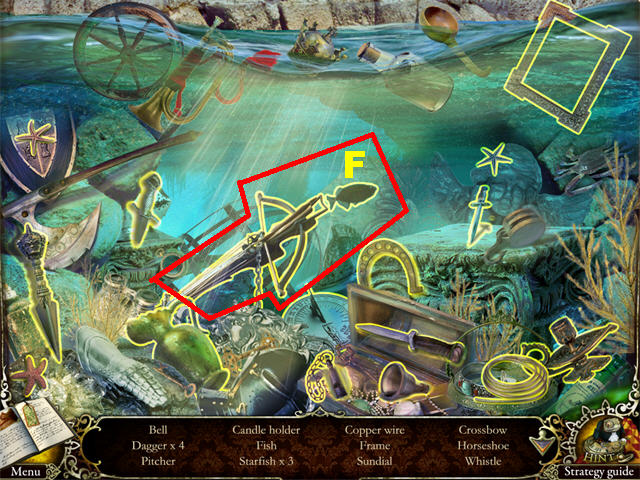
- The CROSSBOW WITH CHAIN (F) will be added to inventory.

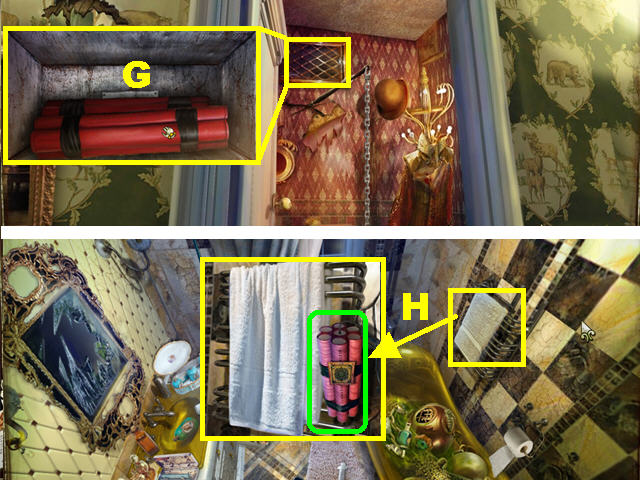
- Click down twice and make a left into the storage closet.
- Place the CROSSBOW WITH CHAIN on the vent.
- Zoom into the vent; place the WRENCH on the vent to remove it and take the DYNAMITE (G).
- Return to the bathroom.
- Zoom into the right side of the wall; place the DYNAMITE next to the towels (H).
- Click on the dynamite to trigger a puzzle.

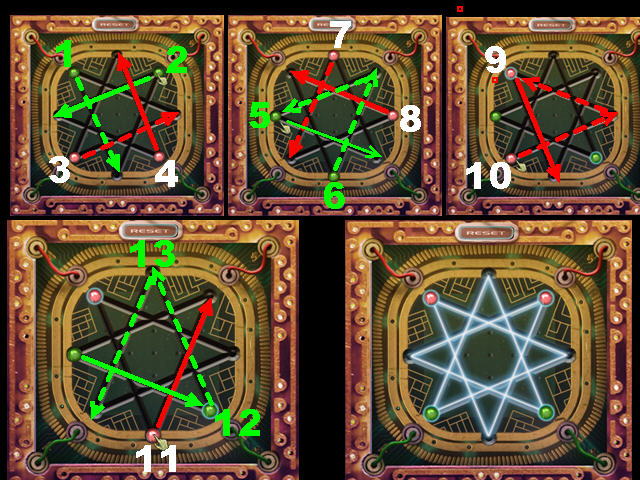
- Connect the red balls to the red wires and the green balls to the green wires by sliding them as shown in the screenshot.
- Click the RESET button to start over if you get stuck.

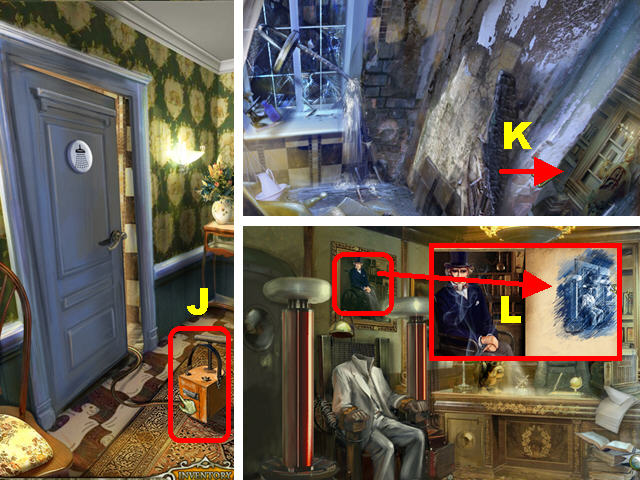
- Click down to exit the bathroom.
- Attach the DETONATOR to the end of the wire and click on it to set it off (J).
- Enter the bathroom and go through the hole on the right to access the study (K).
- Take a closer look at the painting on the wall; take the JOURNAL PAGE (L).

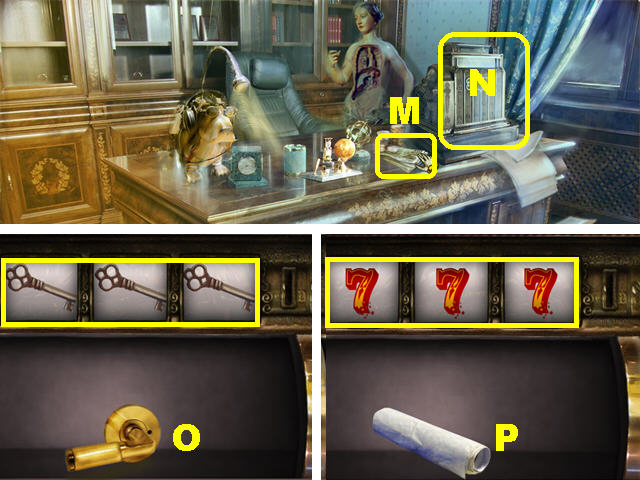
- Zoom into the desk.
- Take the MONEY (M) on the counter.
- Zoom into the slot machine on the counter (N).
- Place the MONEY in the right slot to activate the puzzle.
- Grab a coin, place it in the slot, and pull the lever to spin the machine. This must be done for every spin.
- You have to get 3 Keys going across the bars on top by pulling the handle.
- Once you’ve obtained 3 Keys, you can try to obtain 3-of-a-Kind through the same means.
- Take the SAFE KEY (O) after you obtain 3 Keys.
- Take the SCROLL (P) after you obtain 3-of-a-Kind.

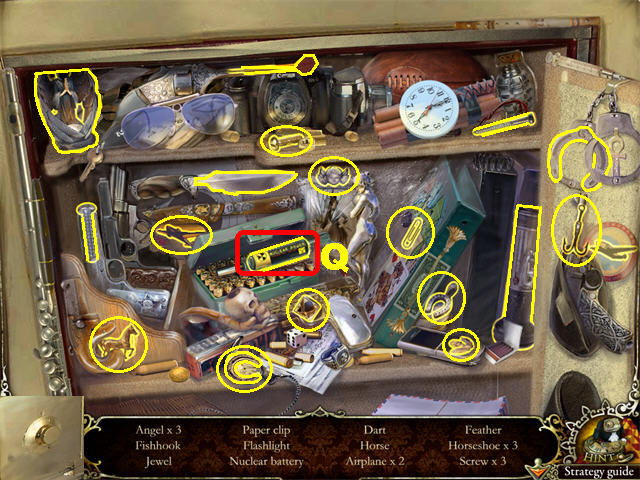
- Zoom into the safe at the bottom of the counter.
- Open the safe with the SAFE KEY; click on the handle to trigger a Hidden Object Search.
- The BATTERY (Q) will be added to inventory.

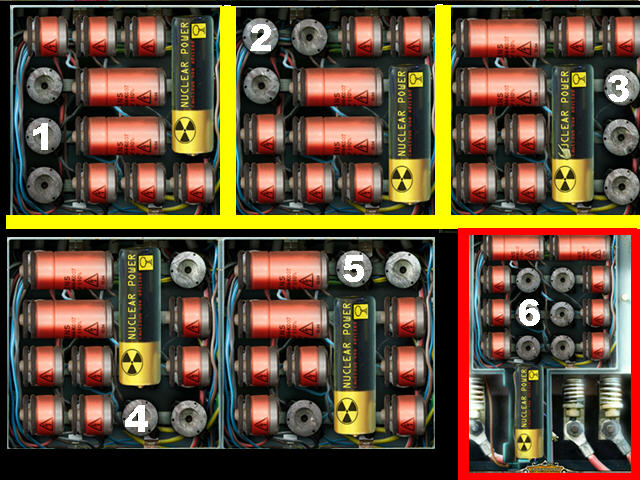
- Click down.
- Zoom into the holographic console in the lower left.
- Place the BATTERY on to the puzzle to activate it.
- Slide the battery into the lower left slot using the directions in the screenshot.
- You’ve earned THE LOST MAN DISCOVERED! Kevin Sting Achievement!

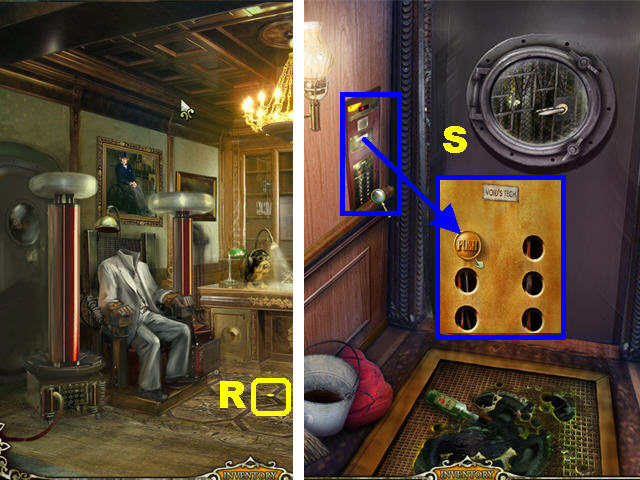
- Take the BUTTON (R) that falls on the ground.
- Go to the elevator.
- Zoom into the panel.
- Place the BUTTON over the torn wires.
- Press the button to go down to the subway station (S).
Chapter 6: Subway

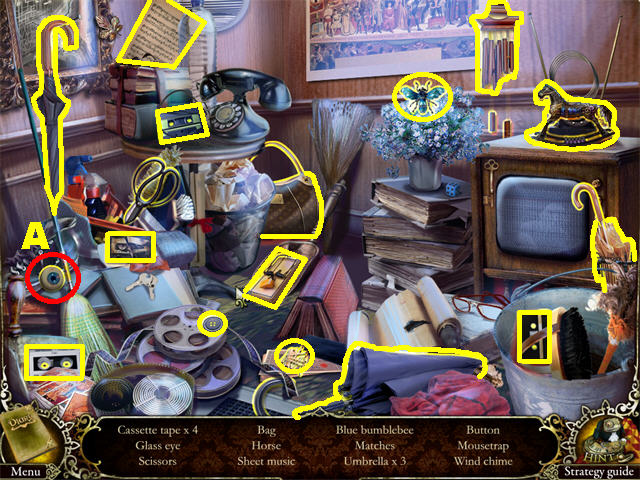
- Play the Hidden Object Scene to obtain the GLASS EYE (A).

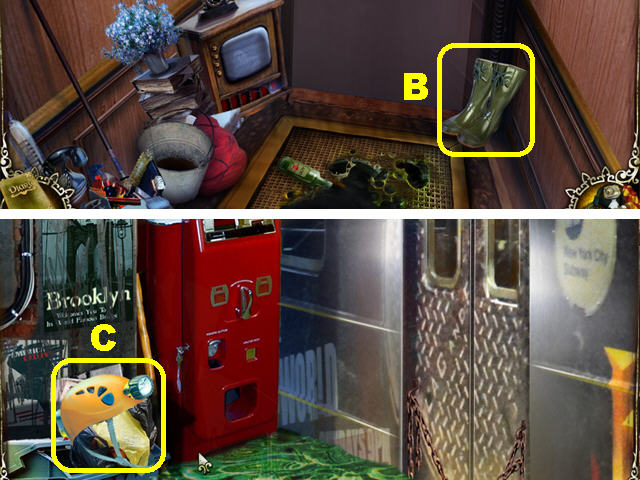
- Grab the RUBBER BOOTS (B).
- Open the elevator door; place the RUBBER BOOTS in the water and go out the door.
- Go towards the soda machine.
- Take the HEADLAMP (C) next to the machine.
- Click down and head left.

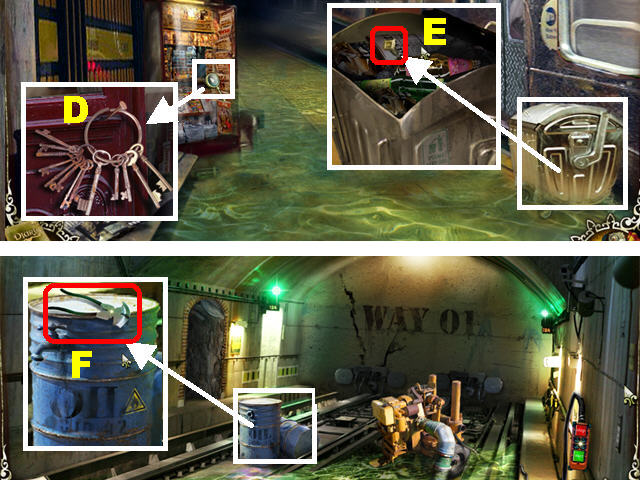
- Zoom into the newspaper stand; take the BUNCH OF KEYS (D).
- Zoom into the bin in the lower right; take the RIVET (E).
- Head toward the tunnel.
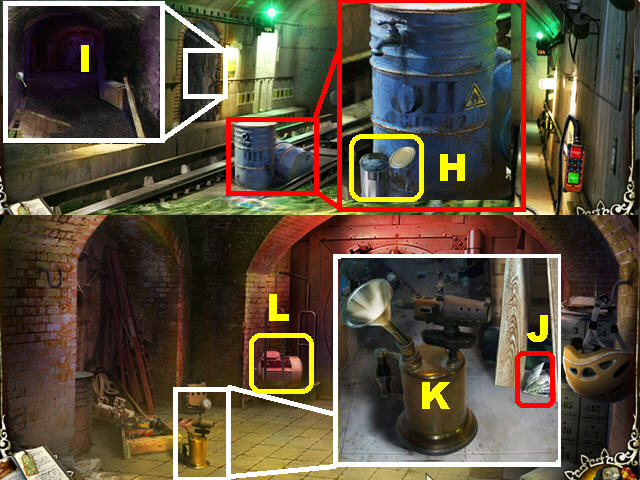
- Zoom into the blue barrel; take the WIRE CUTTERS (F).
- Click down twice.

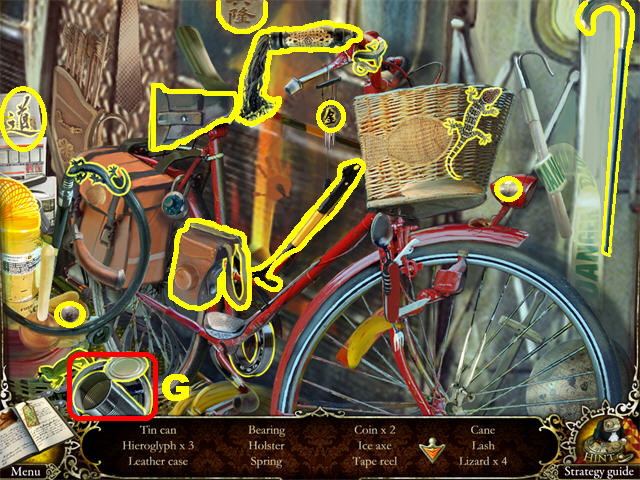
- Place the WIRE CUTTERS on the bicycle near the train to trigger a Hidden Object Scene.
- The TIN CAN (G) will be added to inventory after your search.

- Go left and then forward.
- Zoom into the blue barrel; place the TIN CAN below the barrel to fill it with oil and take the TIN CAN WITH FUEL (H).
- Zoom into the tunnel on the left; place the HEADLAMP in the tunnel to light it and head into the bank vault (I).
- Zoom into the torch; take the JOURNAL PAGE (J) to enter the numbers 401,408, and 412 into the Journal.
- Place the TIN CAN WITH FUEL on the torch; take the TORCH (K).
- Take the ENGINE (L) by the door.

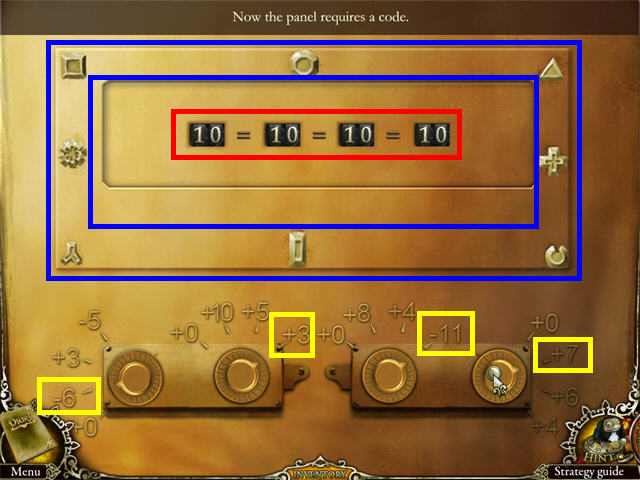
- Zoom into the door; place the RIVET in the slot to activate the puzzle.
- Move the rivets so they match the silhouettes below them (blue area).
- Once you’ve solved that part of the puzzle another will appear.
- Turn the dials so all the numbers above show the number 10.
- From left to right, set the dials at -6, +3, -11, and +7.

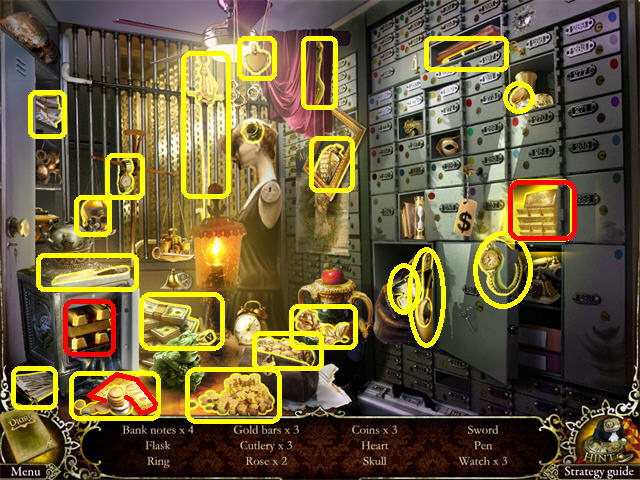
- Solving the puzzle triggers a Hidden Object Scene.
- A GOLD BAR (of those circled in red) will be added to inventory.

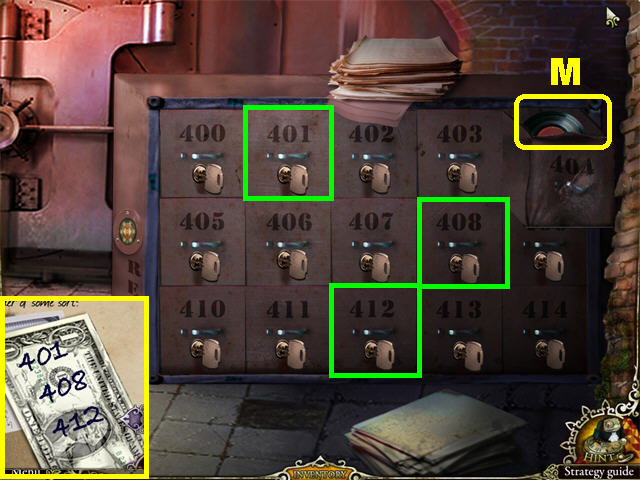
- Zoom into the lockers on the right; place the BUNCH OF KEYS on the locker to activate a puzzle.
- Click lockers 401, 408, and 412 to solve the puzzle.
- Take the RECORD (M) in the upper right locker after the puzzle has been solved.

- Click down.
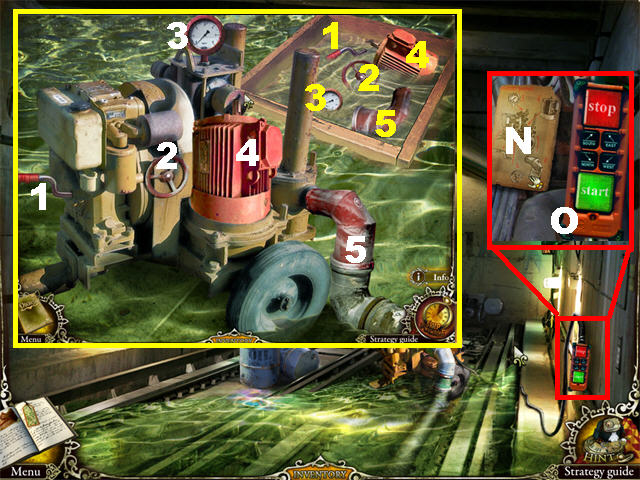
- Zoom into the panel on the right; take the JOURNAL PAGE (N) containing instructions for the diesel pump.
- Zoom into the diesel pump; place the ENGINE along with the other parts.
- Place the pieces according to the screenshot.
- Zoom into the panel and click on the START button (O).
- The water has now receded from the area.

- Click down twice and then go towards the soda machine.
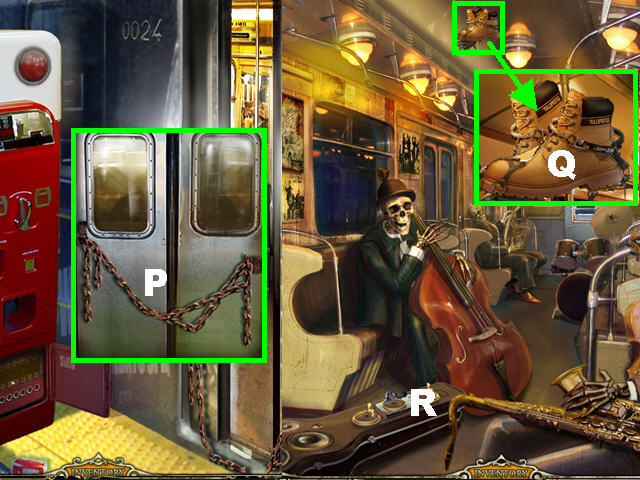
- Zoom into the doors on the side of the train.
- Place the TORCH on the chains and enter the train (P).
- Take the CLIMBING BOOTS (Q) in the ceiling.
- Zoom into the record player (R).

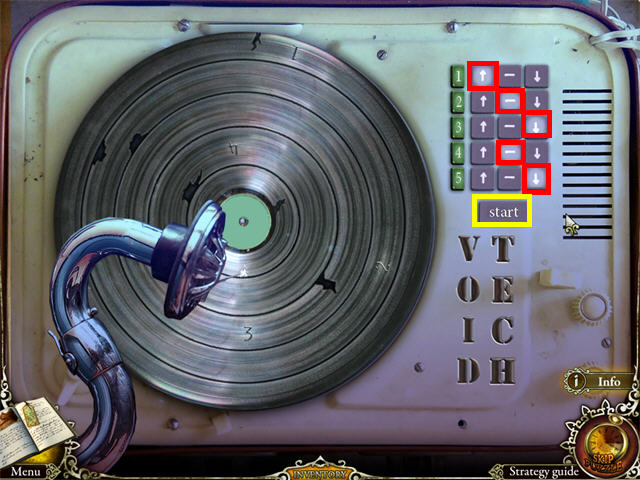
- Place the RECORD on the player to activate the puzzle.
- Use the arrows on the right to maneuver the needle so it does not land on any of the broken grooves.
- Only click on the buttons marked in red in the screenshot and then click on the START BUTTON to activate the needle and solve the puzzle.

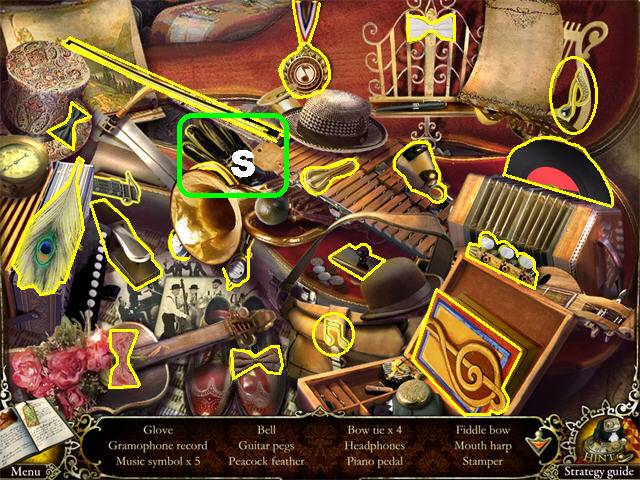
- Solving the previous puzzle activates a Hidden Object Scene.
- Play the Hidden Object Scene to obtain the GLOVE (S).

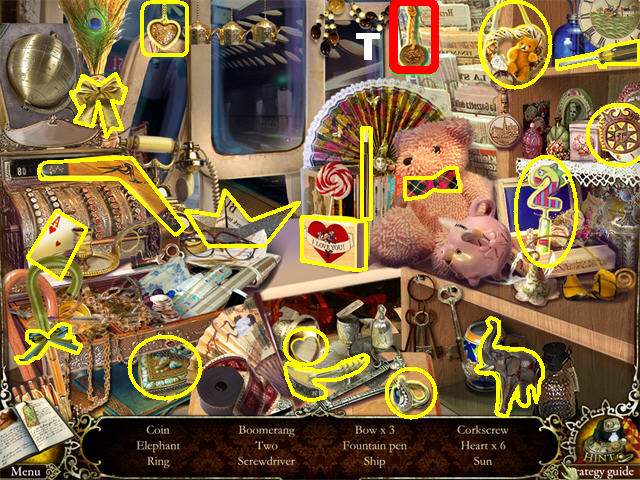
- Exit through the back door of the train.
- Zoom into the newsstand.
- Break the glass with the GOLD BAR.
- Use the GLOVE to reach through the broken glass and click on the handle to activate a Hidden Object Scene.
- The COIN (T) will be added to inventory.

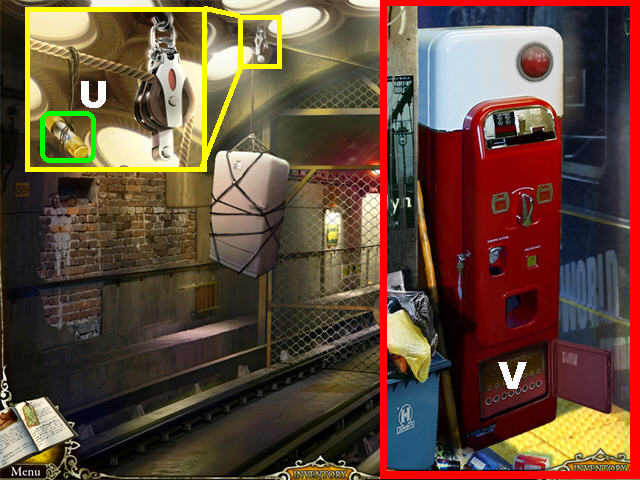
- Click down once and head right.
- Place the CLIMBING BOOTS on the suspended fridge and take the FUSE (U).
- Return to the soda machine.
- Zoom into the base of the machine (V).

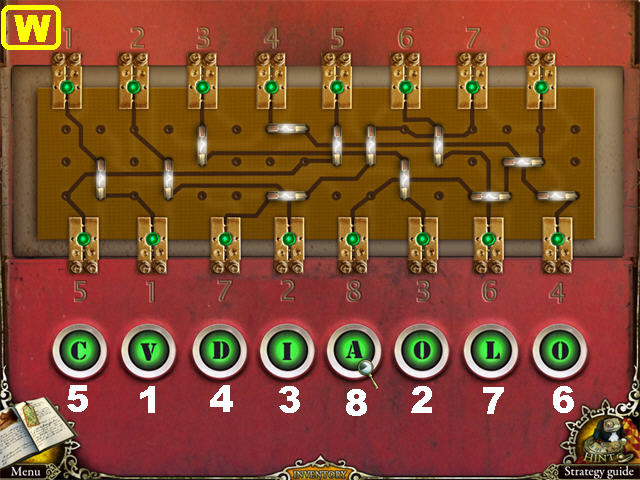
- Place the FUSE on the panel to trigger a puzzle.
- Place the fuses as shown in the screenshot (W).
- Spell out the word VOIDCOLA at the bottom of the puzzle by pressing the buttons in the correct order.

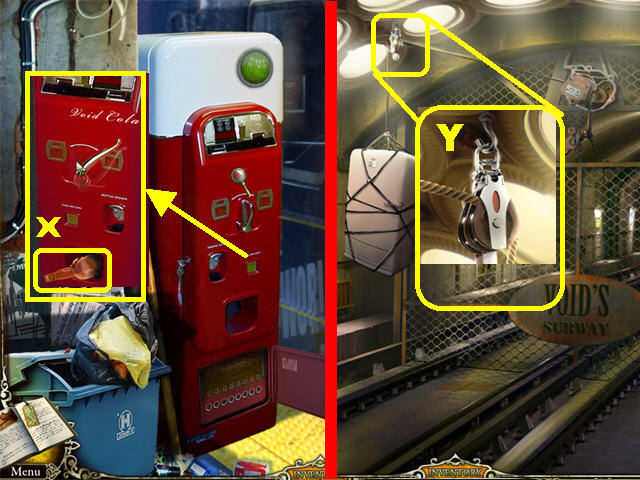
- Zoom into the center of the soda machine.
- Place the COIN in the coin slot and turn the handle.
- Take the BOTTLENECK (X) that appears in the bottom slot.
- Click down and then right.
- Zoom into the pulley (Y) above the fridge; cut it 3 times with the BOTTLENECK to lower the gate and activate a Hidden Object Scene.

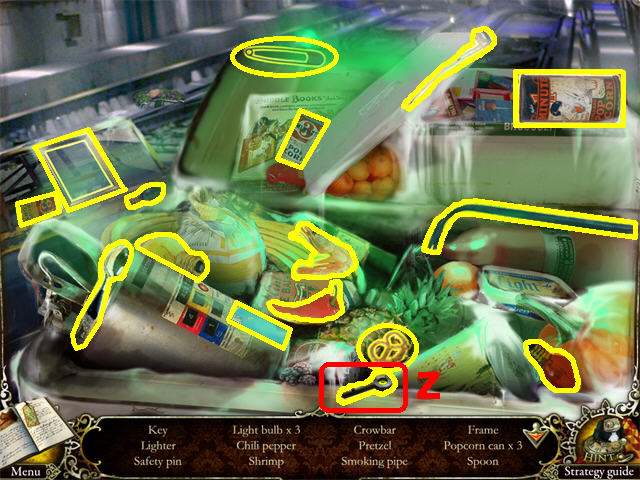
- The KEY (Z) will be added to inventory after your search.

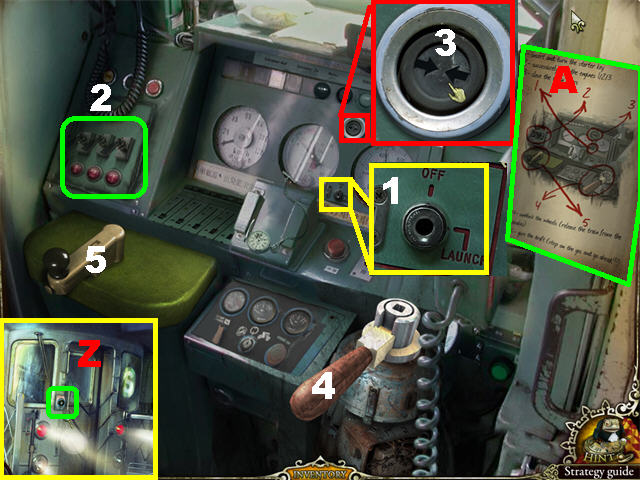
- Click down.
- Zoom into the front door; place the GLASS EYE on the retina scanner and enter the train (Z).
- Zoom into the controls; take the JOURNAL PAGE (A) in the upper right (it contains directions for controlling the instruments).
- Zoom into the ignition; place the KEY in the lock and turn it towards LAUNCH (1).
- Zoom into, and switch on, the 3 switches on the left (2).
- Click on the button (3) above the ignition to close the doors.
- Pull the lever (4).
- Pull the throttle lever (5) to start the train.
Chapter 7: Mansion

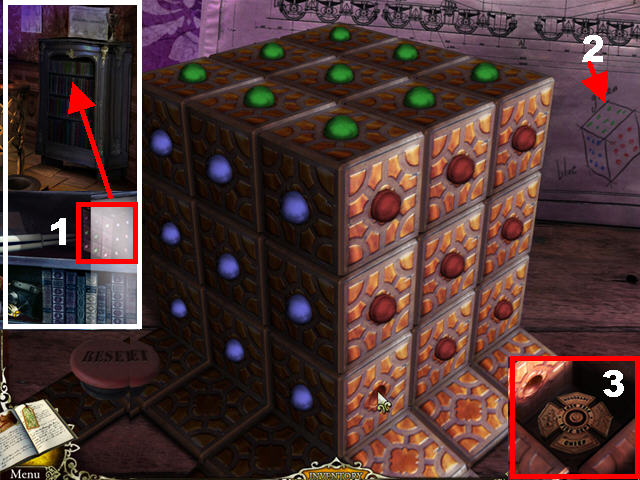
- Go up the ladder once you arrive at the station.
- Zoom into the cabinet on the right; click on the cube to trigger a puzzle (1).
- Move the colored buttons on the cube until they resemble the image on the paper on the back wall (2).
- Start by moving the green balls toward the top and shifting the blue ones toward the left. Shift the red ones to the right as space becomes available.
- If you get stuck, click the RESET button in the lower left.
- Take the FIREMAN BADGE (3) after the puzzle has been solved.

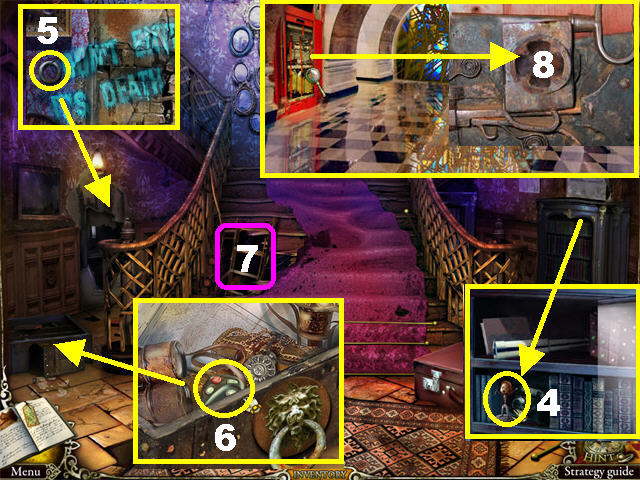
- Zoom into the cabinet again; take the FIGURE (4).
- Zoom into the left side of the wall; take the RING (5).
- Zoom into the chest in the lower left; open it with the RING and take the KEY FOB (6).
- Take the ladder inside the broken stairway (7).
- Zoom into the fire hose cabinet; place the FIREMAN BADGE (8) on the lock to trigger a Hidden Object Scene.

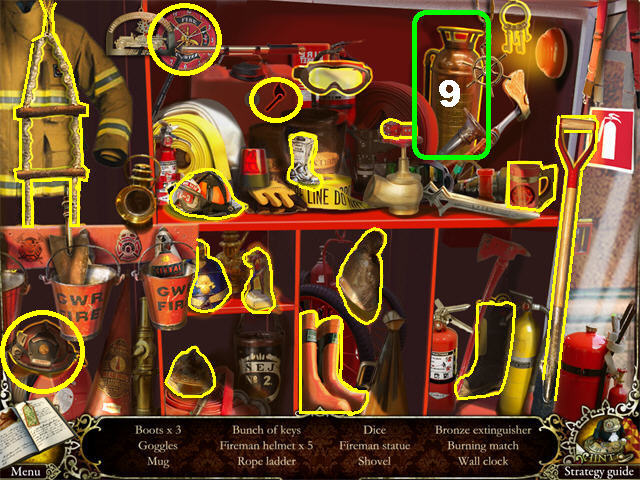
- The EXTINGUISHER (9) will be added to inventory.
- Go up the ladder and then click down to reach the porch.

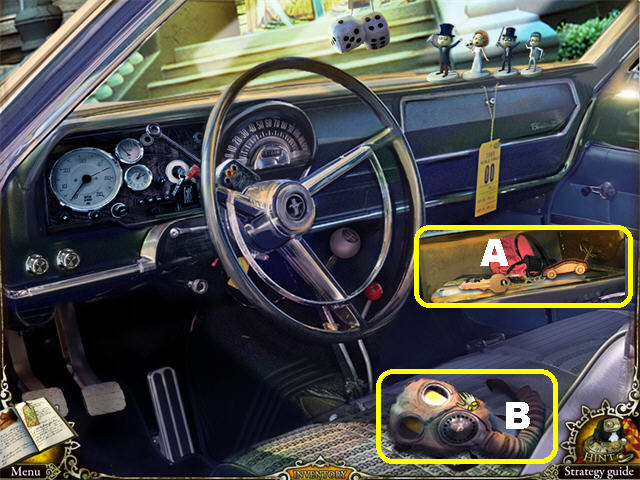
- Place the KEY FOB on the car; open the door and go inside.
- Zoom into the dashboard; place the FIGURE next to the others.
- Place the heads and torsos on the appropriate stands using the titles on the base for guides.


- Take the TRUNK KEY (A) in the glove compartment.
- Grab the GAS MASK (B) on the seat.

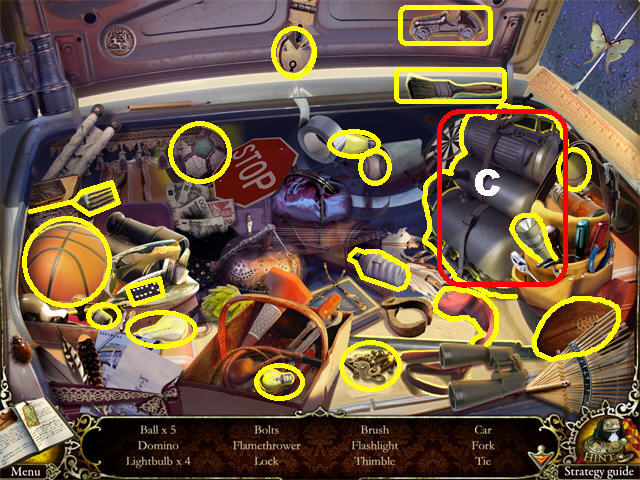
- Zoom into the trunk; open it with the TRUNK KEY to trigger a Hidden Object Scene.
- The FLAMETHROWER (C) will be added to inventory after your search.

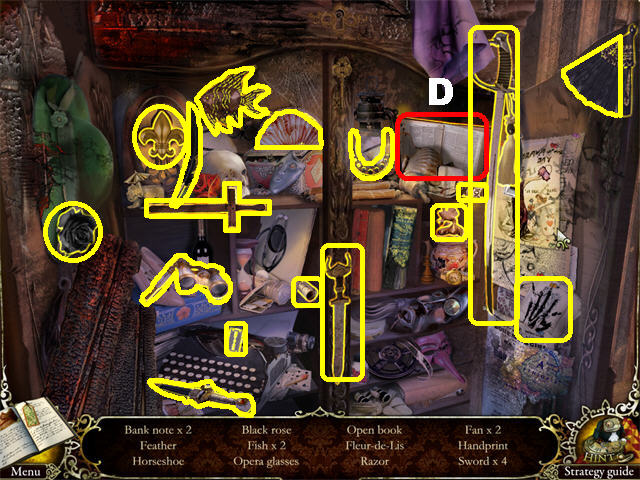
- Go inside the house and through the door above the steps to access the bedroom.
- Place the GAS MASK anywhere in the scene.
- Open the window.
- Play the Hidden Object Scene to obtain the BOOK (D).
- Head right.

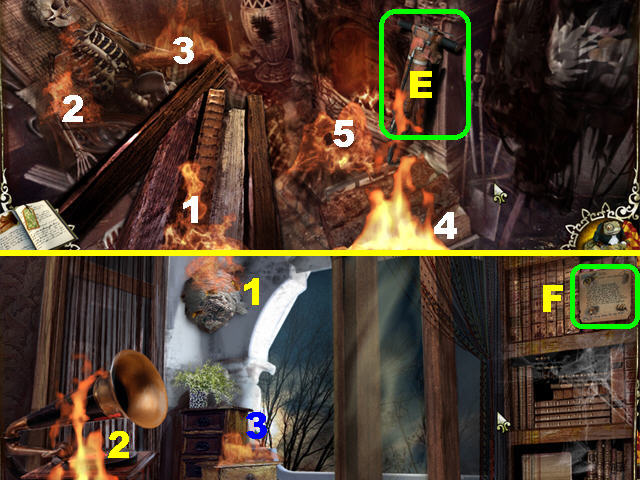
- Place the EXTINGUISHER on the 5 FLAMES in the scene.
- Take the JACKHAMMER (E) by the fireplace.
- Click down twice and turn in the UPPER left.
- Take the JOURNAL PAGE (F) in the upper right.
- Place the FLAMETHROWER on the scene; it will fire up the hornet’s nest.
- Place the EXTINGUISHER on the 3 flames to trigger a Hidden Object scene.

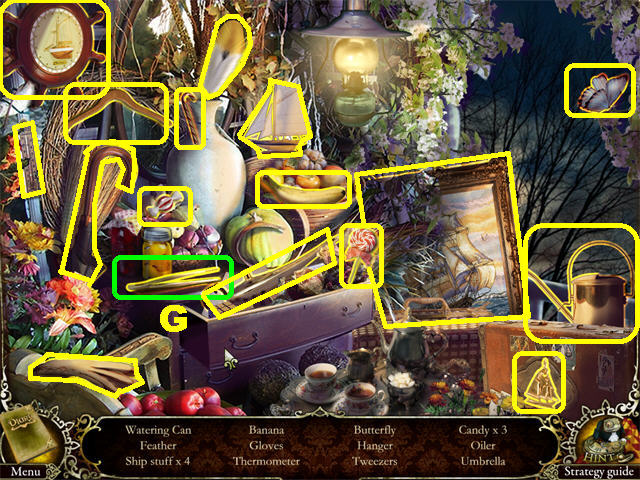
- The TWEEZERS (G) will be added to inventory after your search.

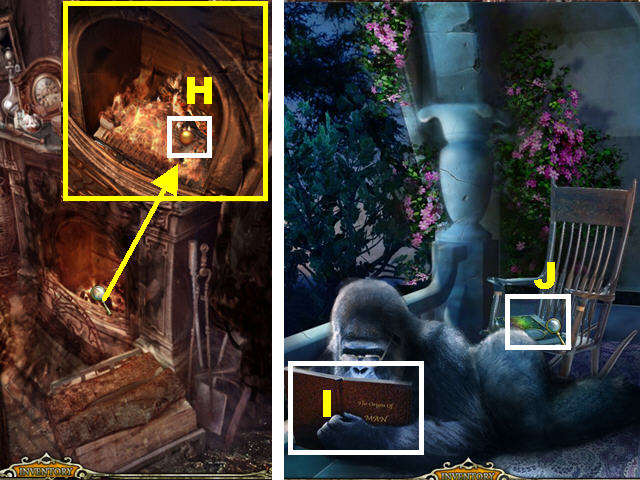
- Return to the fireplace room downstairs; zoom into the fireplace.
- Use the TWEEZERS in the fireplace to retrieve the BALL (H).
- Go upstairs and out to the balcony.
- Give the BOOK to the gorilla (I).
- Zoom into the puzzle on the seat after the gorilla moves (J).

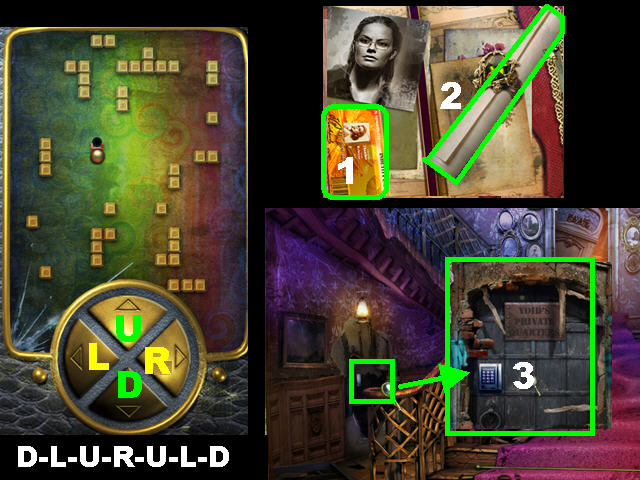
- Click on the arrows to move the ball into the hole.
- To solve the puzzle, click, in this order, the buttons D, L, U, R, U, L, and D.
- Take the ID CARD (1) and the SCROLL (2) after the puzzle has been solved.
- Go to the foyer.
- Zoom into the left side of the wall.
- Break the wall with the JACKHAMMER.
- Place the ID CARD on the electronic lock (3).
- Go through the door.
Chapter 8: Apartments

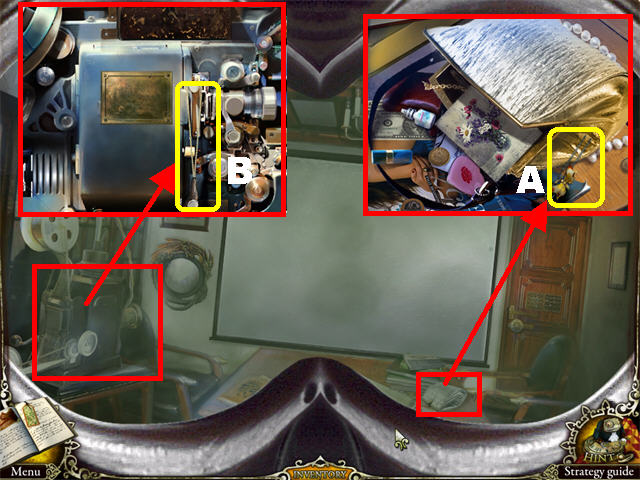
- Place the GAS MASK anywhere in the scene.
- Zoom into the purse in the lower right; take the HAIRPIN (A).
- Zoom into the projector; take the LEVER (B).

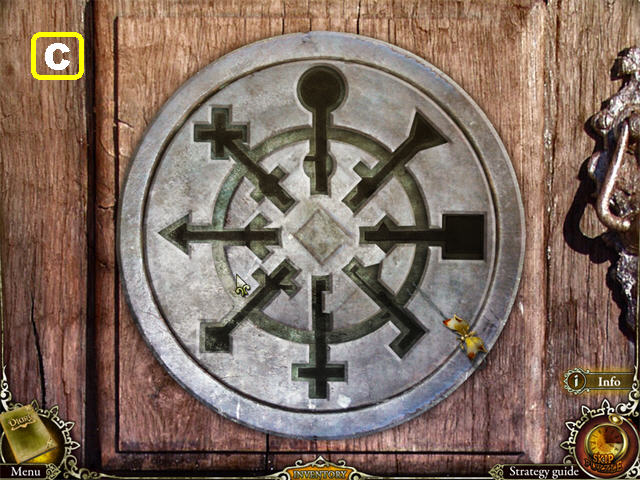
- Zoom into the right door; place the HAIRPIN on the bottom lock to trigger a puzzle.
- Rotate both rings so the silhouettes below them match that part of the wheel (C).

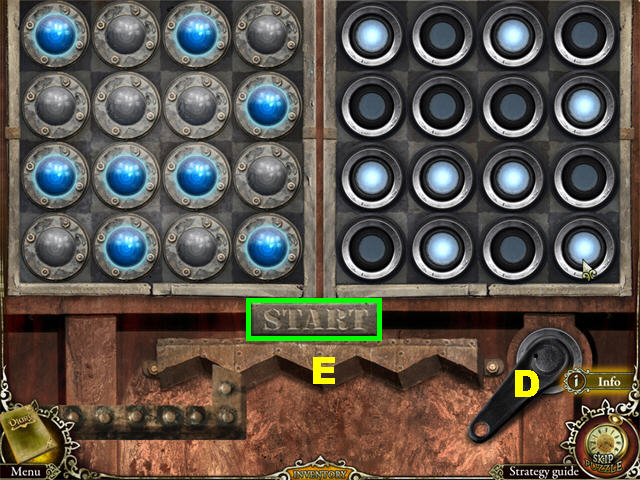
- Place the LEVER (D) on the puzzle.
- Match the patterns that appear on the left by clicking the same buttons on the right once the sequence has ended.
- Click START to confirm your selection.
- Each correct guess will advance the notch (E) at the bottom by one. An incorrect guess will set you back.
- The solutions are random; you have to beat 4 rounds to win the game.
- Go through the door after the puzzle has been solved.

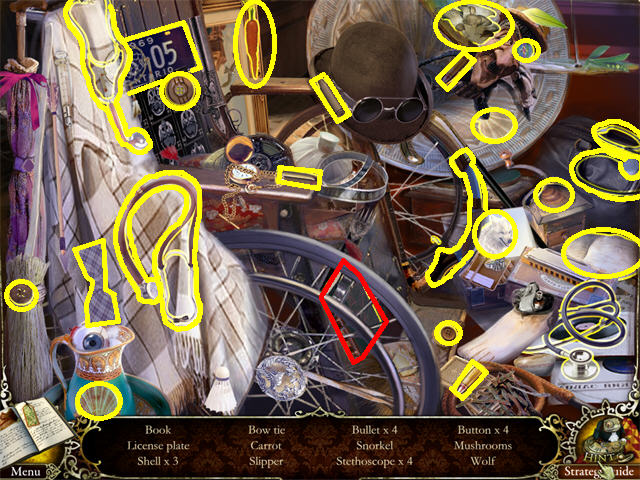
- Play the Hidden Object Scene to obtain the BOOK (F).

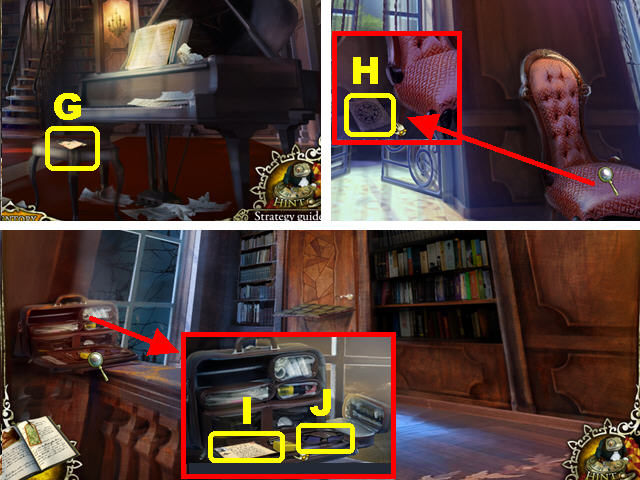
- Take the JOURNAL PAGE (G) on the stool in front of the piano.
- Go through the left door.
- Zoom into the chair; take the SCHEME (H).
- Click down and go up the staircase.
- Zoom into the bag; take the EYEGLASSES (I) and the POSTCARD (J).
- Zoom into the right side of the wall.

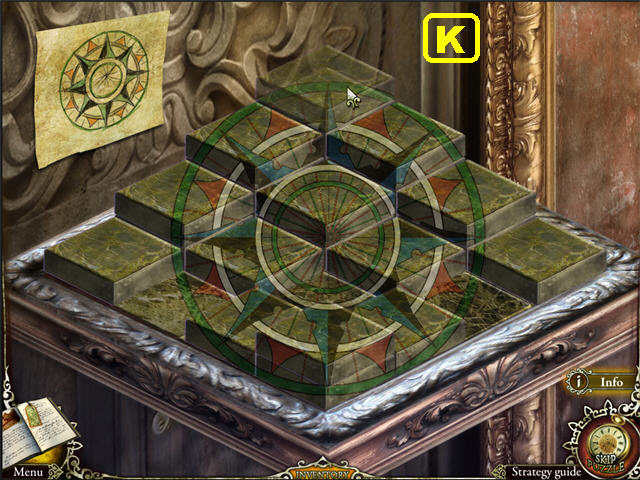
- Place the SCHEME on the puzzle.
- Duplicate the image shown on the scheme by placing the blocks in the correct order.
- The image on the blocks will be 3 dimensional, so the height of the blocks and the images on the side are important for the solution (K).
- In 2 sections, no tiles will be used at all.

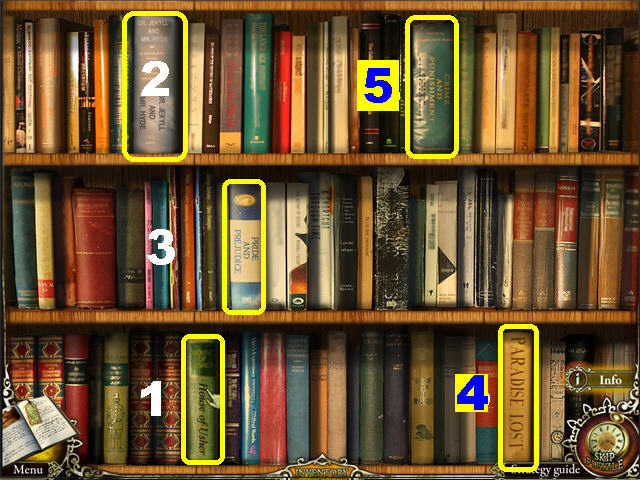
- Zoom into the books.
- Click the books in the order shown in the screenshot (L).

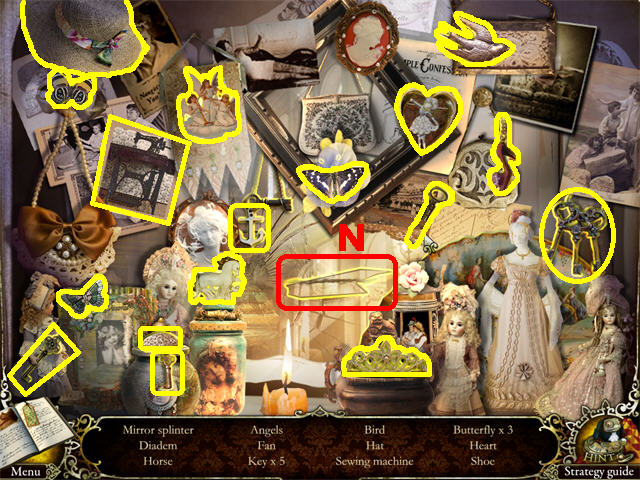
- Play the Hidden Object Scene to obtain the MIRROR SPLINTER (N).
- Go through the wall by the bookcase.

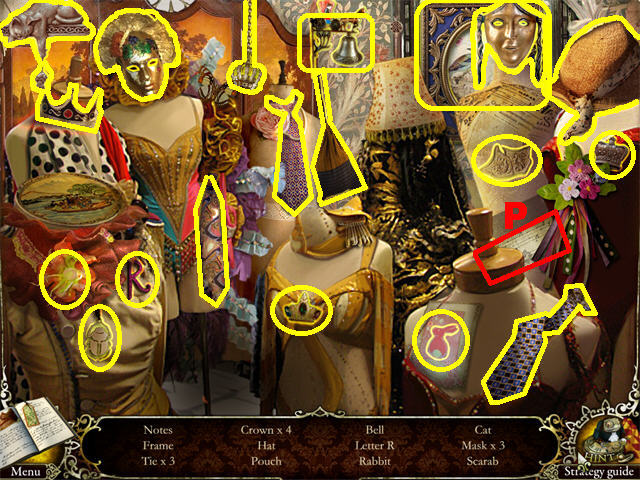
- Play the Hidden Object Scene to obtain the NOTES (O).

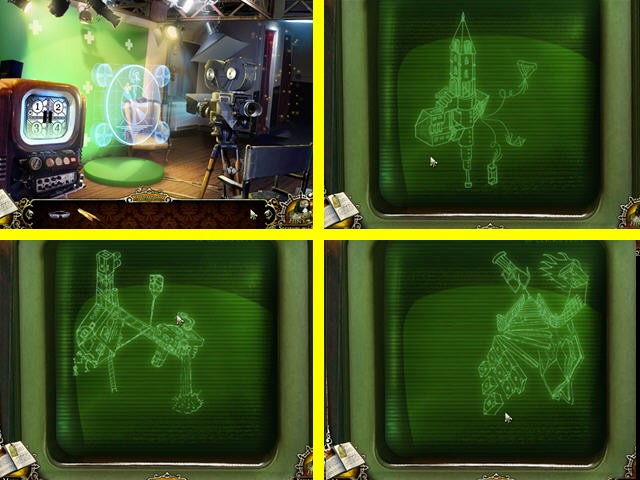
- Click on the computer screen to trigger a puzzle.
- You have a certain amount of clicks to solve the puzzle. If you fail to complete it in time, a new pattern will appear.
- Please look at the screenshot for all possible solutions (P).

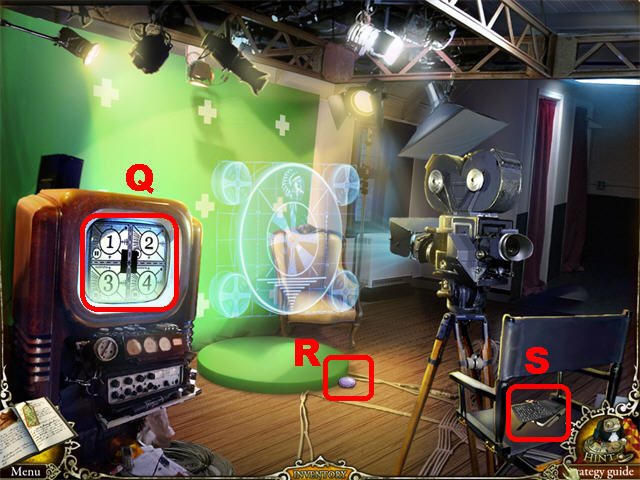
- Click on the computer monitor (Q) after the puzzle has been solved for the holographic image to appear.
- Take the MIRROR on the ground (R).
- Grab the JOURNAL PAGE (S) on the chair.
- You’ve earned the ACTRESS FOUND! Achievement.
- Return to the living room.
- Zoom into the piano.

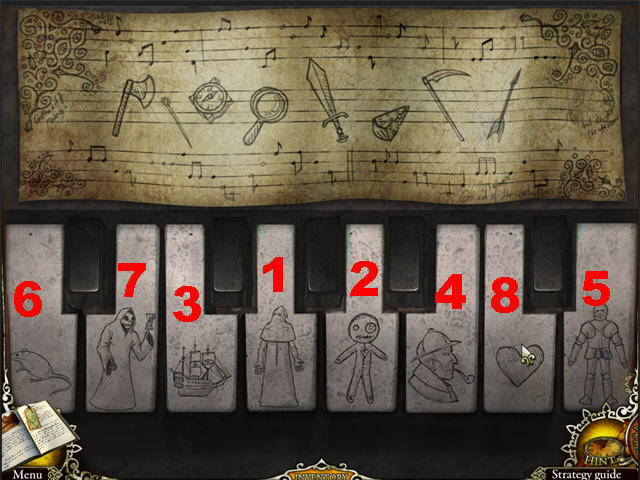
- Place the NOTES on the piano to activate the puzzle.
- Using the images on the sheet, click on the keys in the correct order.
- The voodoo doll corresponds to the needle; the Heart belongs with the arrow; the Mouse with the Cheese, etc.
- Click on the keys according to the screenshot to solve the puzzle (T).
- Solving this puzzle triggers a Hidden Object Scene.

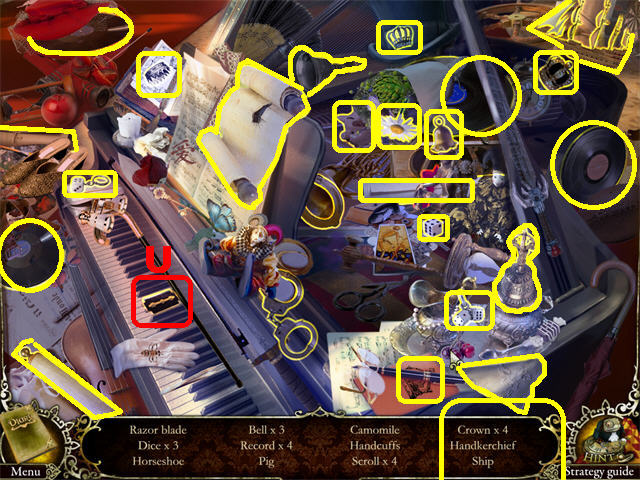
- Play the Hidden Object Scene to obtain the RAZOR (U).
- Click down.

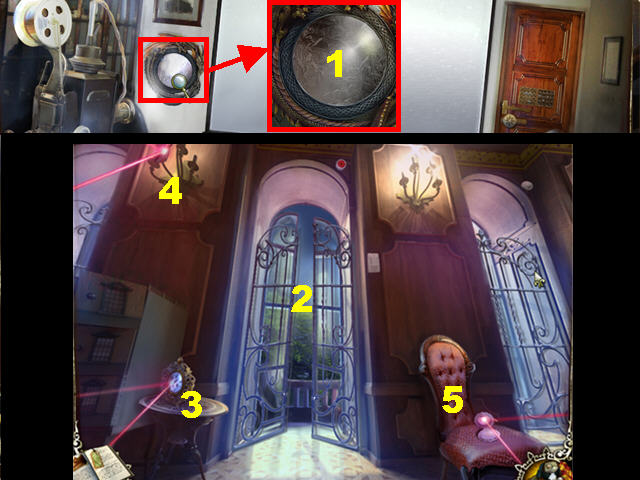
- Zoom into the mirror and place the RAZOR on the FOIL to cut a piece (1).
- Go through the right door and then through the left door.
- Place the EYEGLASSES on the patio door, making the laser beams visible (2).
- Zoom into the mirror; place the FOIL on the mirror (3).
- Zoom into the left candleholder; place the MIRROR SPLINTER on the candleholder (4).
- Zoom into the chair; place the MIRROR on the seat (5).
- Go through the patio doors.
- Click on the blue car to enter it; turn the key to move the car.
Chapter 9: Hotel Revisited

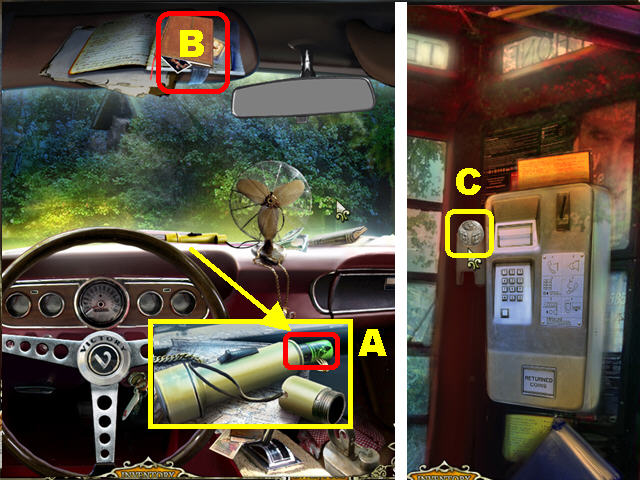
- Zoom into the dashboard; take the BATTERY (A).
- Take the JOURNAL PAGE (B) on the visor.
- Exit the car and zoom into the phone booth; take the FACE CUBE (C) next to the phone.
- Go to the front porch.

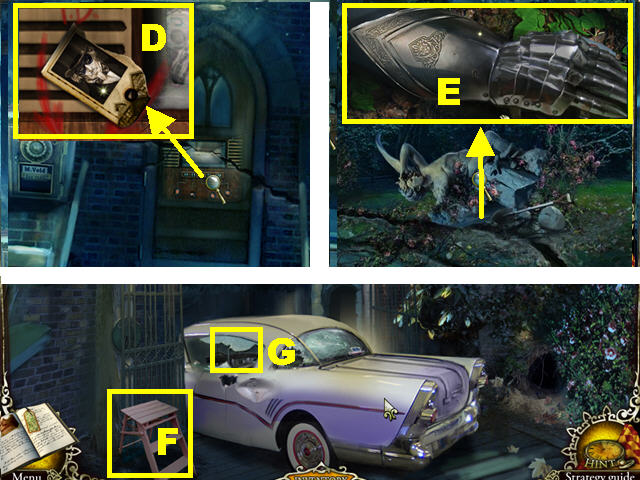
- Zoom into the door. Take the ACCESS CARD 1/4 (D) on the side of the videophone.
- Exit the porch and head left.
- Zoom into the angel and take the GAUNTLET (E).
- Head left.
- Take the STEPLADDER (F) in the lower left.
- Zoom into the broken car window (G).

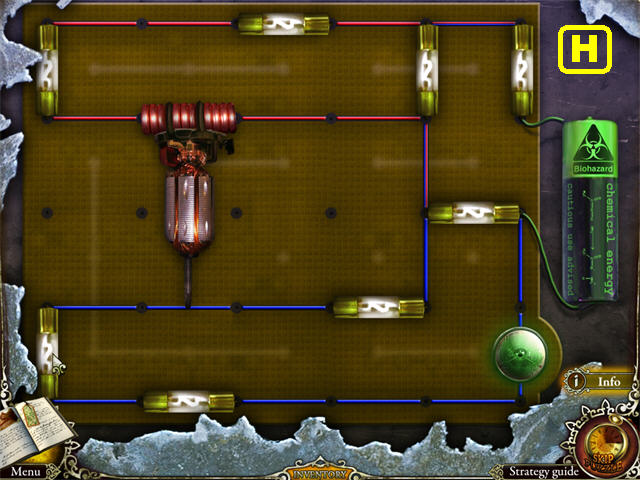
- Use the BATTERY on the board to activate the puzzle.
- Place the fuses as shown in the screenshot to connect all the wires, solving the puzzle (H).
- You will enter the car after solving the puzzle.

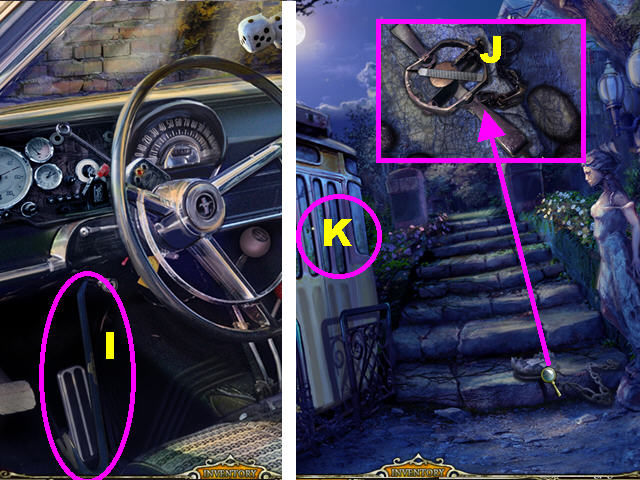
- Grab the CROWBAR (I) in the lower left.
- Exit the car and click down twice.
- Zoom into the trap on the steps; use the GAUNTLET to obtain the FILE in the trap.
- Click on the tram doors (K) to trigger a Hidden Object Scene.

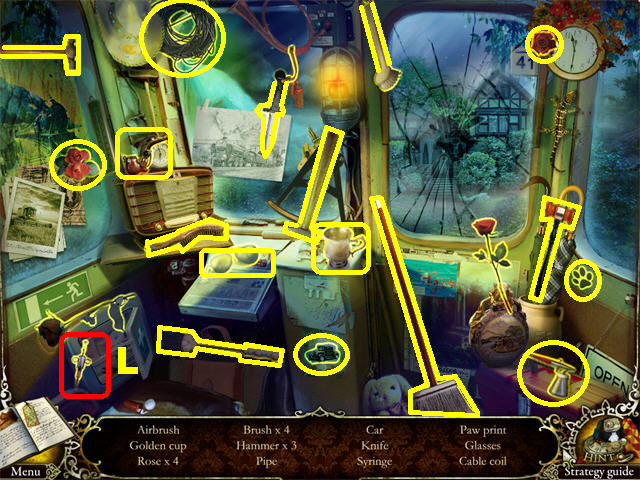
- The SYRINGE (L) will be added to inventory.

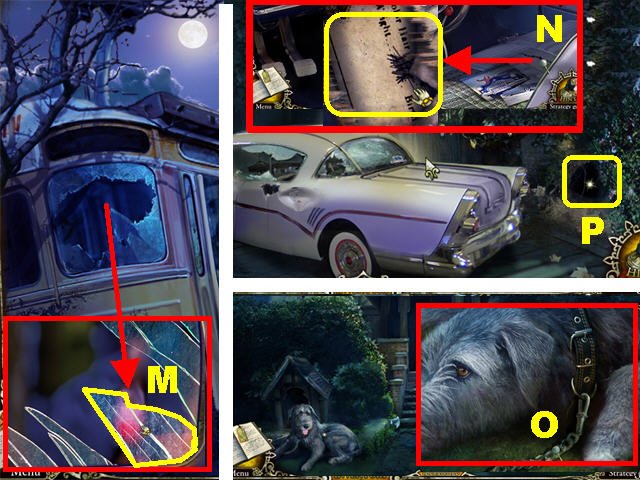
- Zoom into the tram’s broken window; take a piece of the BROKEN GLASS (M).
- Go forward and then left.
- Get into the car.
- Zoom into the rip in the seat; cut it open with the BROKEN GLASS and take ACCESS CARD 2/4 (N).
- Go to the front porch.
- Zoom into the dog in the dog house; cut the leash with the FILE and take the DOGGY (O).
- Head left twice.
- Zoom into the hole in the lower right and place the DOGGY inside to trigger a Hidden Object Scene (P).

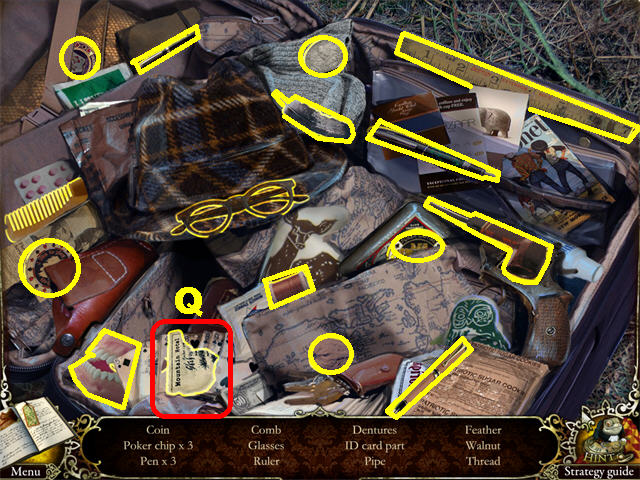
- The ID CARD 3/4 (Q) will be added to inventory.

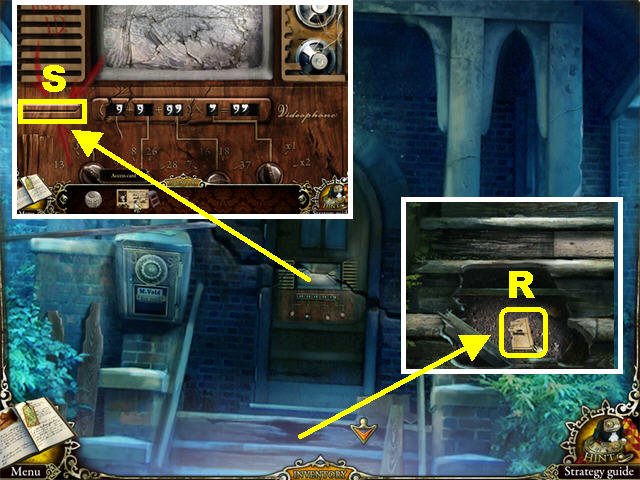
- Go to the front porch.
- Zoom into the steps; break the steps with the CROWBAR and take ID CARD 4/4 (R).
- Zoom into the front door; place the ID CARD on the videophone to trigger a puzzle (S).

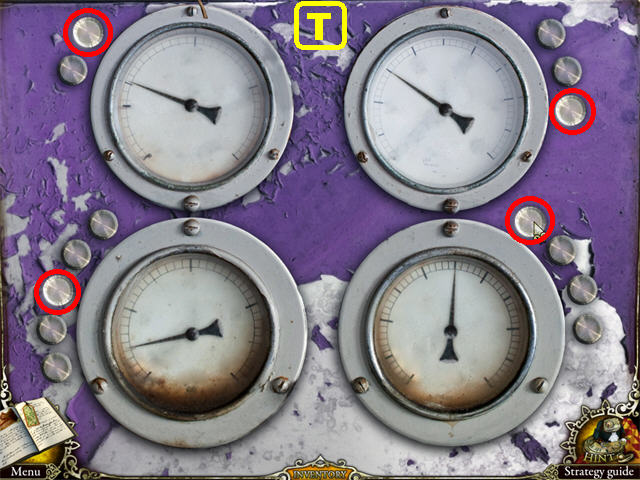
- You must click on one of the buttons next to the clocks so that all the clocks are turning at the same speed.
- Please look at the screenshot for the solution and only click on the buttons marked in red (T).
- Go through the door.

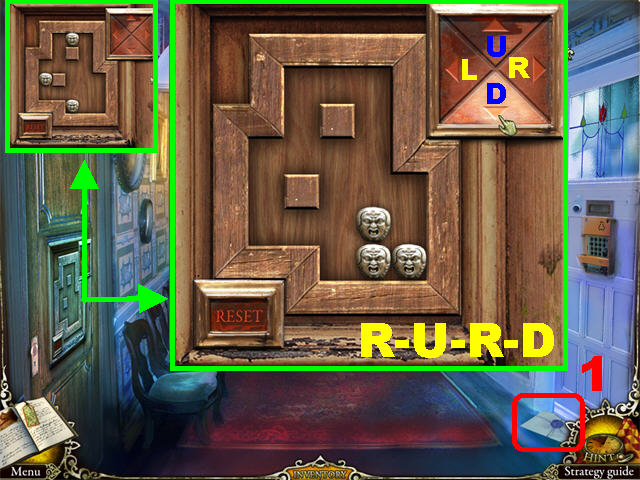
- Take the JOURNAL PAGE (1) under the door.
- Zoom into the left door.
- Place the FACE CUBE on the board to activate the puzzle.
- Connect all the faces, using the arrows for positioning.
- Click, in the following order, arrows R, U, R, and D.
- Solving the puzzle triggers a Hidden Object Scene.

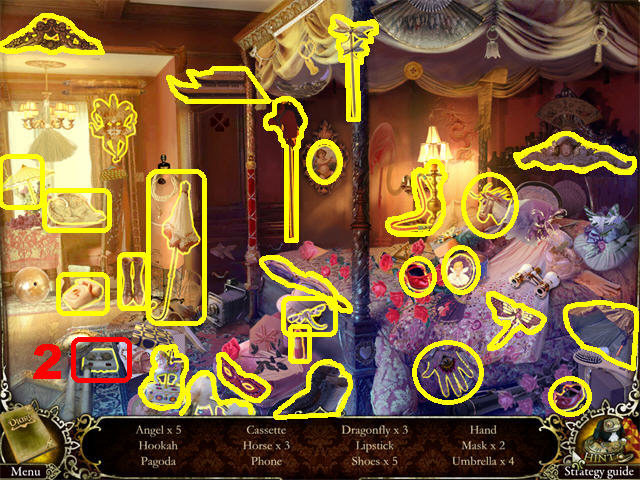
- The CASSETTE (2) will be added to inventory.

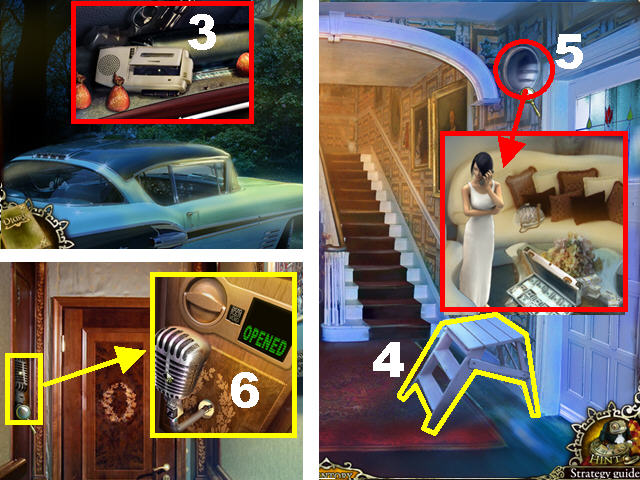
- Return to the car by the phone booth.
- Open the glove compartment and place the CASSETTE in the TAPE RECORDER (3).
- Go inside the hotel.
- Place the STEPLADDER by the right door (4); zoom into the gable window (5).
- Place the TAPE RECORDER on the scene to create the VOICE RECORDING.
- Go up the steps.
- Zoom into the microphone on the left; place the VOICE RECORDING on the microphone (6).
- Go through the door.

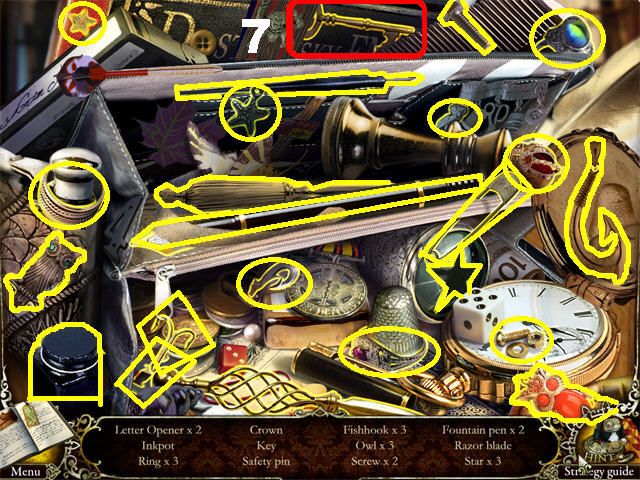
- Play the Hidden Object Scene to obtain the KEY (7).

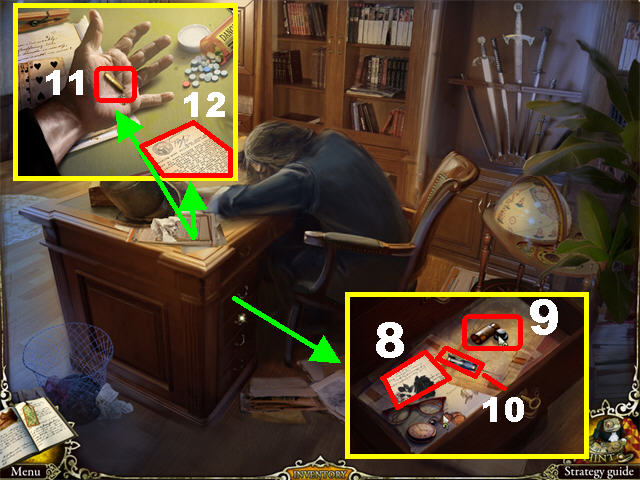
- Zoom into the desk drawer; open it with the KEY.
- Take the JOURNAL PAGE (8).
- Place the SYRINGE on the antidote bottle (9) and take the SYRINGE + ANTIDOTE (10).
- Zoom into Sirius’ hand; give him the SYRINGE plus ANTIDOTE.
- You’ve earned the VOIDS’ MYSTERY REVEALED! Achievement!
- Take the BULLET (11) in his hand and the JOURNAL PAGE(12).

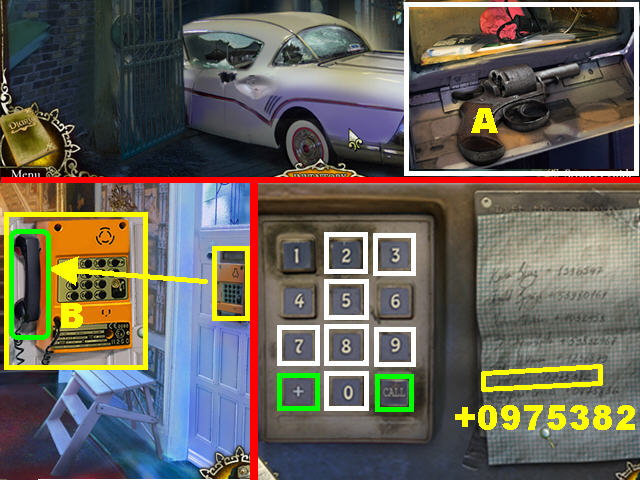
- Click down 4 times and make 2 lefts.
- Go through the car window.
- Zoom into the glove compartment; place the BULLET in the REVOLVER (A) and take it.
- Go inside the hotel.
- Zoom into the right door; place the REVOLVER on the phone and take the HANDSET (B).
- Return to the phone booth.
- Zoom into the phone; place the HANDSET on the phone and click on the phone again.
- Dial (+0975382) and click CALL to phone the police. Don’t forget the “+” otherwise the call will not go through.
- Congratulations! You have completed Mystery Trackers: The Void.
Achievements

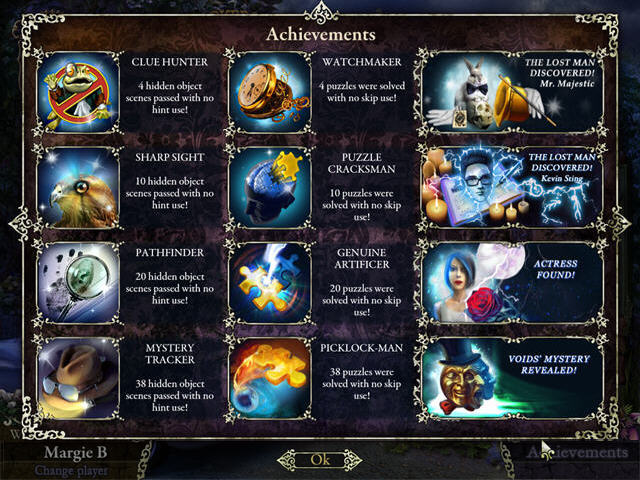
- The following is a comprehensive list of game achievements and their requirements.
- The CLUE HUNTER will be given for playing 4 Hidden Object Scenes without using a Hint.
- The WATCHMAKER will be awarded for solving 4 puzzles without skipping.
- THE LOST MAN DISCOVERED! Mr. Majestic will be given once you find Mr. Majestic, the Famous Illusionist.
- The SHARP SIGHT will be given for playing 10 Hidden Object Scenes without using a Hint.
- The PUZZLE CRACKSMAN will be awarded for solving 10 puzzles without skipping.
- THE LOST MAN DISCOVERED! Kevin Sting will be given once you find Kevin Sting.
- The PATHFINDER will be given for playing 20 Hidden Object Scenes without using a Hint.
- The GENUINE ARTIFICER will be awarded for solving 20 puzzles without skipping.
- The ACTRESS FOUND will be given once you find the actress, Rebecca Thatcher.
- The MYSTERY TRACKER will be given for playing 38 Hidden Object Scenes without using a Hint.
- The PICKLOCK MAN will be awarded for solving 38 puzzles without skipping.
- The VOIDS’ MYSTERY REVEALED will be given toward the end of the game, once you find Sirius.





 Death Pages: Ghost Library Walkthrough, Guide, & Tips
 Otherworld: Omens of Summer Walkthrough, Guide, & Tips
 Drawn: Trail of Shadows Collector's Edition Walkthrough, Guide, & Tips
 The Tarot's Misfortune Walkthrough, Guide, & Tips
 Mountain Crime: Requital Walkthrough, Guide, & Tips