Hallowed Legends: Samhain Walkthrough, Guide, & Tips
Hallowed Legends: Samhain Walkthrough

Welcome to the Hallowed Legends: Samhain Walkthrough!
Celtic folklore seems to be more truth than lore when the Samhain festival goers disappear! Find the missing people and save the day!
Whether you use this document as a reference when things get difficult or as a road map to get you from beginning to end, we’re pretty sure you’ll find what you’re looking for here.
This document contains a complete Hallowed Legends: Samhain game walkthrough featuring annotated screenshots from actual gameplay!
We hope you find this information useful as you play your way through the game. Use the walkthrough menu below to quickly jump to whatever stage of the game you need help with.
Remember to visit the Big Fish Games Forums if you find you need more help. Have fun!
This walkthrough was created by Margie B, and is protected under US Copyright laws. Any unauthorized use, including re-publication in whole or in part, without permission, is strictly prohibited.
General Tips

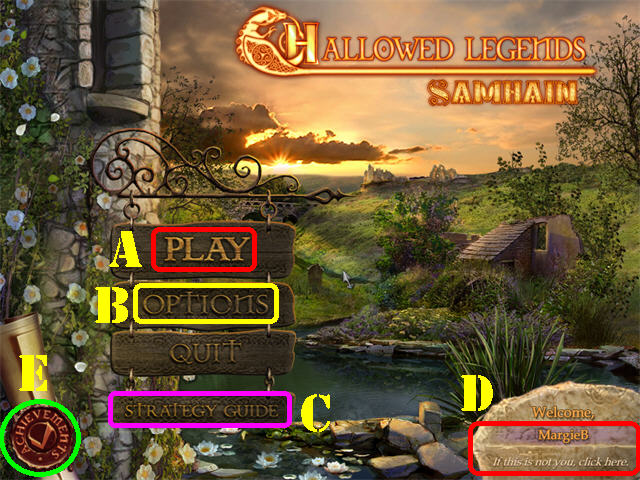
- Click on ‘PLAY’ (A) in the main menu to play the regular adventure.
- Select ‘OPTIONS’ (B) to adjust music, sound, cursor, and screen size.
- You can purchase the (C) STRATEGY GUIDE by clicking on its buttom in the main menu or by clicking on the STRATEGY GUIDE button in the upper left corner of each scene.
- Change Players (D) in the lower right corner of the main menu.
- The Achievements (E) can be accessed from the main menu.
- Puzzles can be skipped once the skip button has fully charged.
- Click the ‘Info’ button in the upper left corner of a puzzle scene for that puzzle’s instructions.

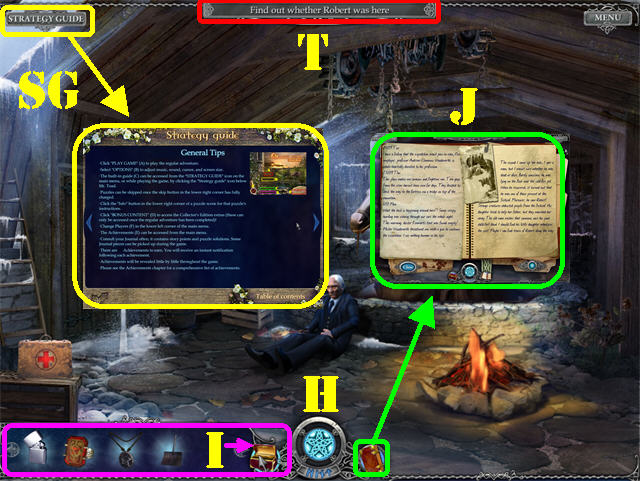
- The taskbar (T) in the upper center shows you the main objective.
- Inventory items will be stored in the tray at the bottom of each scene. You can access the inventory tray by clicking on the small red chest (I) next to the hint button.
- Some inventory items will be found piecemeal. The item in the inventory tray will let you know how many pieces are needed to complete it.
- You will receive an inventory item after each Hidden Object Scene.
- To use an inventory item, grab it from the tray and click it onto the area in which you wish to use it.
- Clicking on the ‘STRATEGY GUIDE’ (SG) buttom in the upper left will take you to the purchase page for the guide
- Hints (H) are unlimited in the game, but must recharge between uses.
- Consult your Journal (J) often; it contains story points and puzzle hints. Some Journal pieces can be picked up during the game.

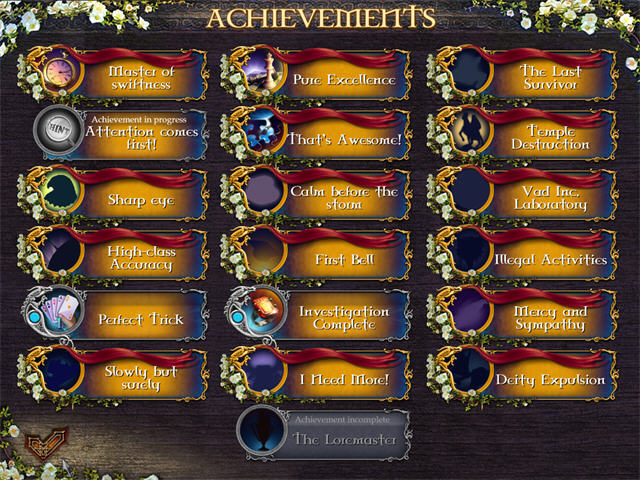
- There are 19 Achievements to earn. You will receive an instant notification following each achievement.
- Achievements will be revealed little by little throughout the game.
- Mouse over each achievement to see what needs to be done to obtain it.
Chapter 1: The Cemetery

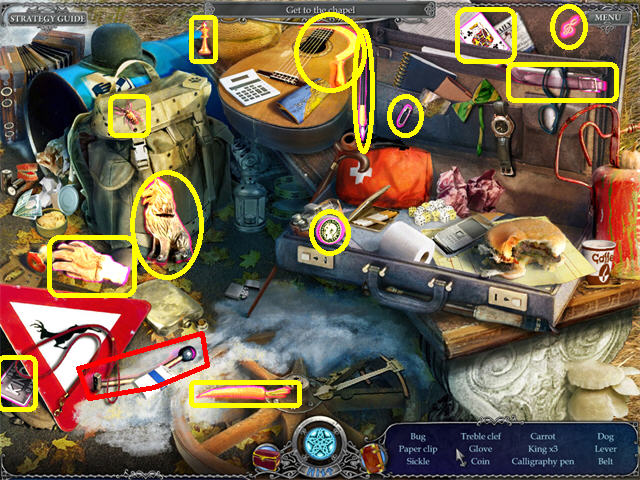
- You can choose to view the brief tutorial if you want to receive the ‘First Bell Achievement’.
- Play the abandoned things search scene on left to obtain the LEVER.

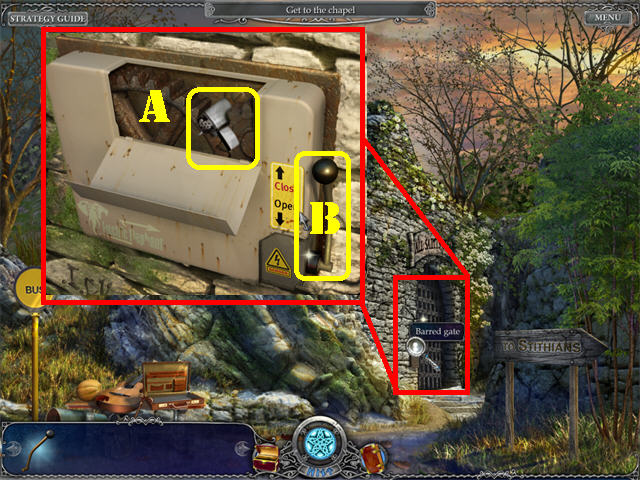
- Examine the mechanism by the barred gate.
- Open the cover; take the LIGHTER (A).
- Place the LEVER on the side of the mechanism (B).
- Click on the LEVER to open the gate; go through the gate.

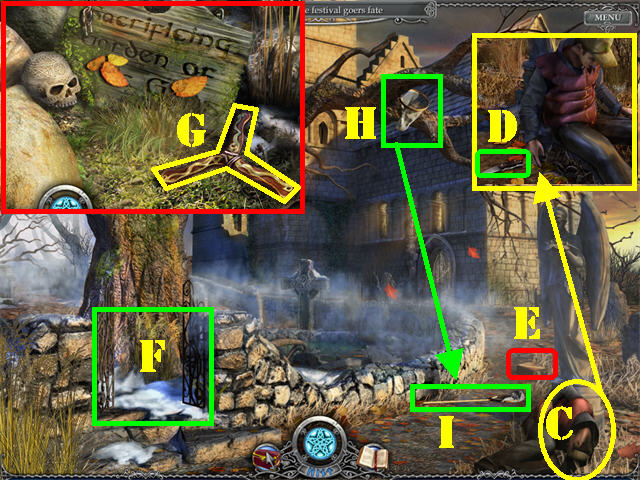
- Examine the DEAD MAN to add a journal page (C).
- Grab the KNIFE (D) next to the DEAD MAN.
- Take the FULL GAS CAN (E) that appears behind the DEAD MAN.
- Examine the gate on left; cut the vines with the KNIFE 3 times (F).
- Open the gate and go through it.
- Take the BOOMERANG on the ground (G).
- Click down.
- Zoom into the tree branch; place the BOOMERANG on the branch (H).
- Take the BUTTERFLY NET (I) that falls on the ground.

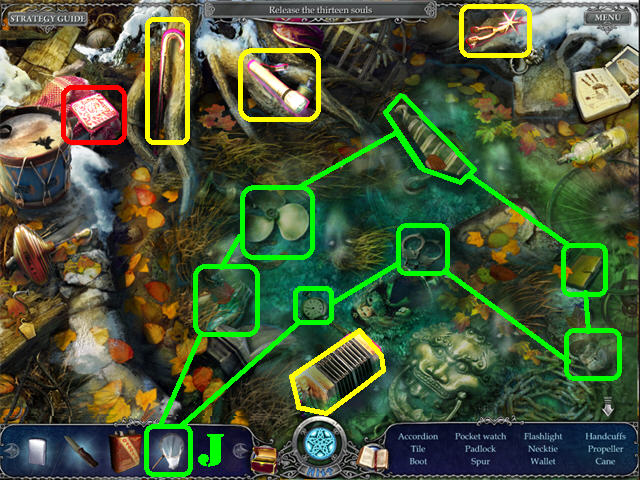
- Go through the gate again.
- Play the cemetery pond search scene.
- Use the BUTTERFLY NET (J) from inventory to retrieve all the items in the water.
- The TILE will be added to inventory and a page to your journal.

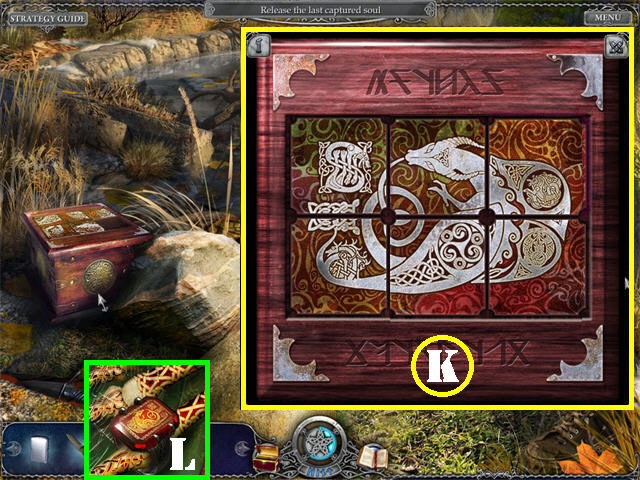
- Zoom into the small box on left.
- Place the TILE on the box to activate a puzzle.
- Click on any 2 tiles to swap their positions.
- Right-click on a piece to rotate it.
- Correct pieces will lock in place.
- Please look at the screenshot for the solution (K).
- Take the DRAGON RING (L) after the puzzle has been solved.

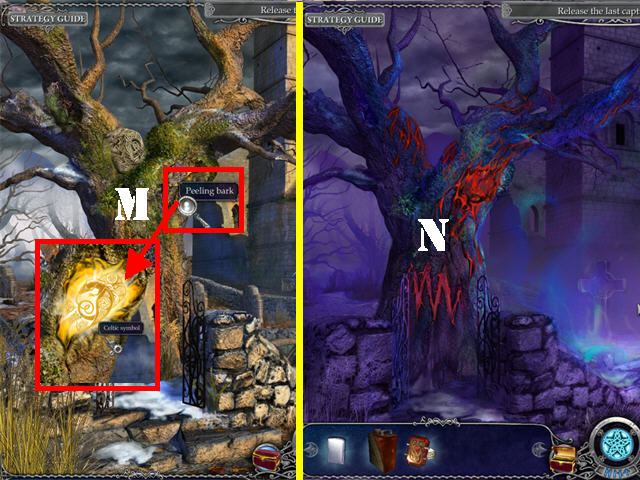
- Zoom into the peeling bark on the tree; place the KNIFE on the peeling bark twice to reveal the Celtic Symbol (M).
- Place the DRAGON RING on the Celtic Symbol and the scene will become dark.
- Place the FULL GAS CAN and then the LIGHTER on the scarred bark to activate a search scene (N).

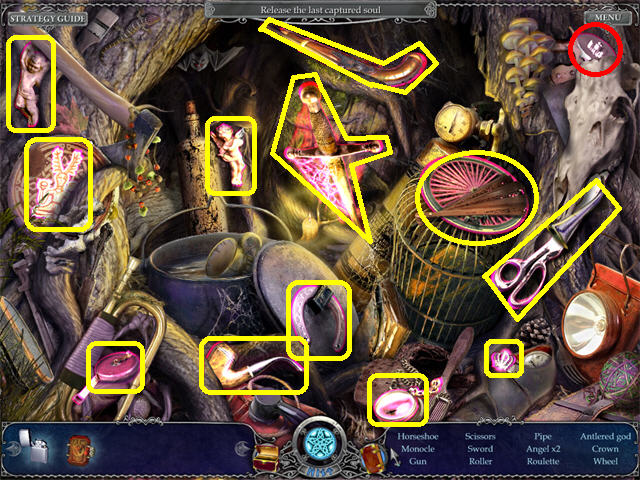
- Play the tree hollow search scene.
- The ROLLER will be added to inventory.

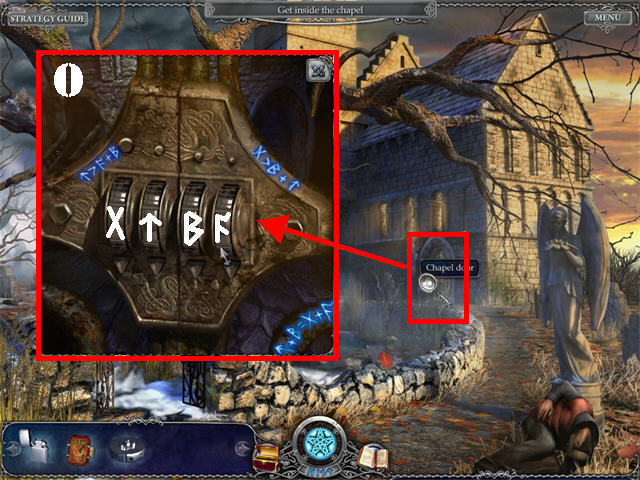
- Examine the chapel door.
- Place the ROLLER into the empty slot to activate a puzzle.
- Arrange the symbols in the correct order by using the codes on the side of the lock.
- Click on each roller or on the arrows to change the images.
- Please look at the screenshot for the solution (O).
- Go through the Chapel door.
Chapter 2: The Chapel

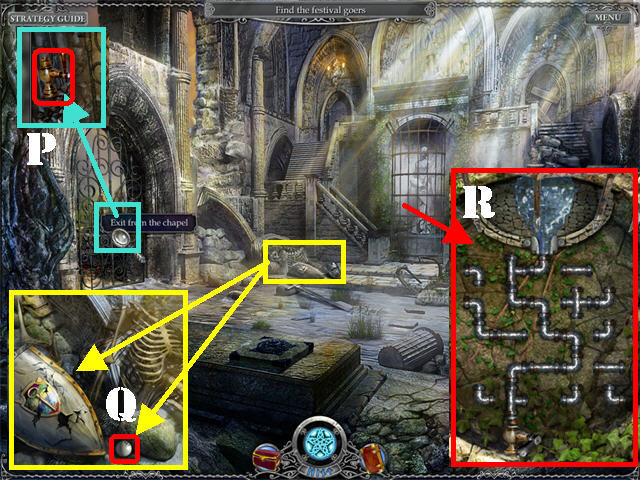
- Examine the chapel door; take the TAP (P).
- Examine the skeleton on the ground; take the BALL 1/3 (Q).
- Click on center of the shield to add a journal page.
- Take a closer look at the broken fountain in the back; place the TAP at the bottom of the fountain to activate a puzzle.
- Connect the pipes so there is a solid line between the bottom and the top pipes. All pipes do not need to be used.
- Click on a pipe to rotate it.
- Please look at the screenshot for the solution (R).
- Solving the puzzle activates a search scene.

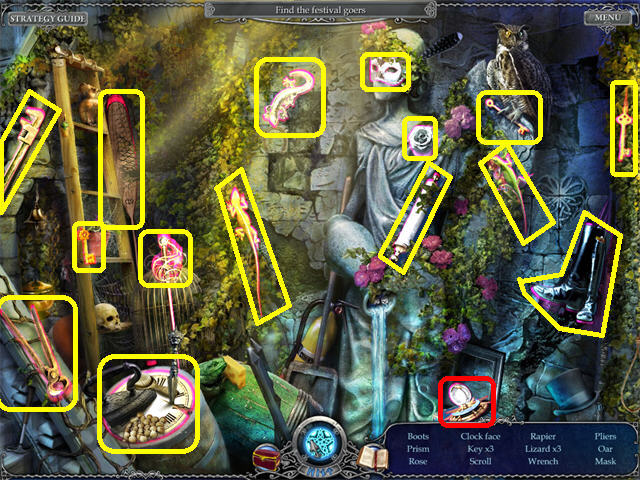
- Play the angel search scene to obtain the PRISM.

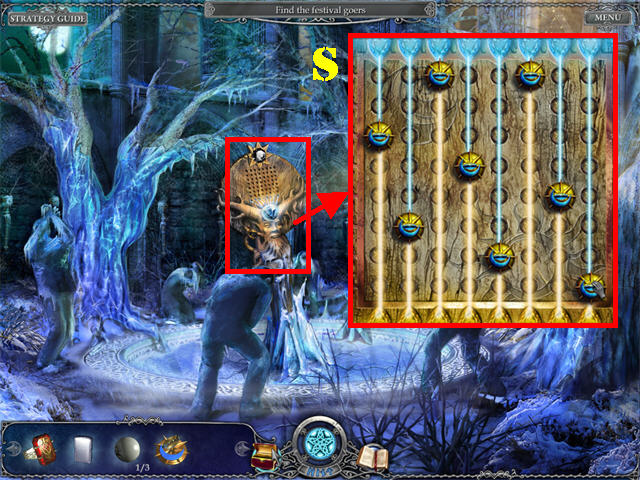
- Go into the lower right door.
- Examine the totem; place the PRISM in the upper left side of the board.
- Place one prism per column so that all beams turn yellow.
- Drag the prisms to the desired spot. As each prism is placed some of the holes will close. Choose an open hole to place the next piece until you fill in all the columns.
- There is more than one solution for this puzzle. Please look at the screenshot for the solution (S).

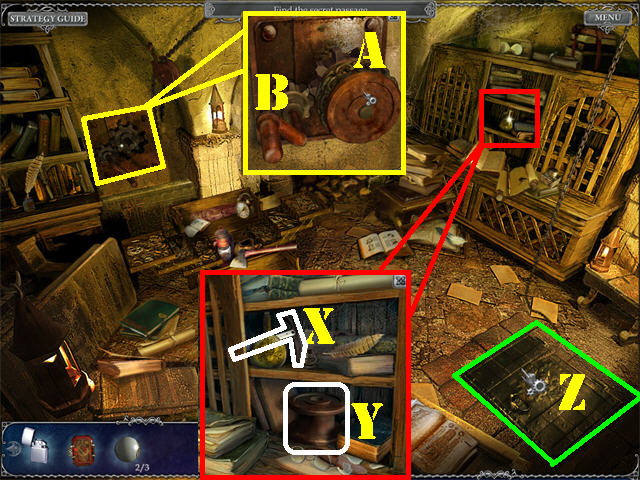
- Solving the totem puzzle makes a light shine on the female statue.
- Examine the female statue; take the KEY (T).
- Examine the male statue on the left; take BALL 2/3 (U).
- Click down.
- Zoom into the Scriptorium Door in the upper left.
- Place the KEY in the empty slot to activate the puzzle.
- Click on any 2 keys to swap their positions.
- Once keys have been positioned correctly click on the stones above them to enter your selection.
- The green key cannot be moved.
- Please look at the screenshot for the solution (V).
- Go through the door.
Chapter 3: The Scriptorium

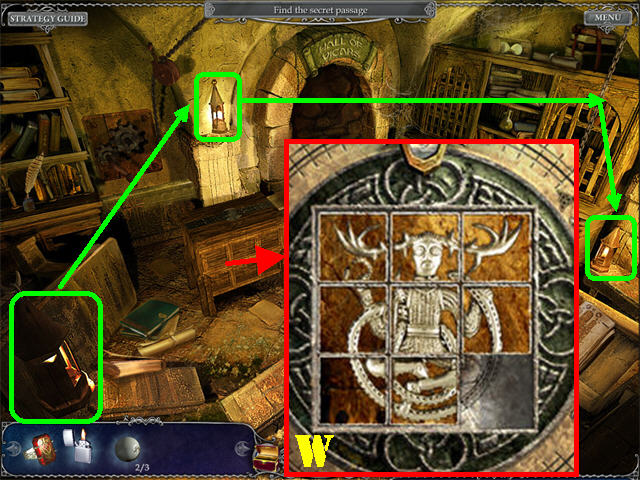
- Use the LIGHTER to light the 3 lanterns marked in green.
- Zoom into the wooden chest to activate a puzzle.
- Assemble the image by placing the tiles into the right spots.
- Click on a tile next to an empty square to move it to the empty space.
- Please look at the screenshot for the solution (W).

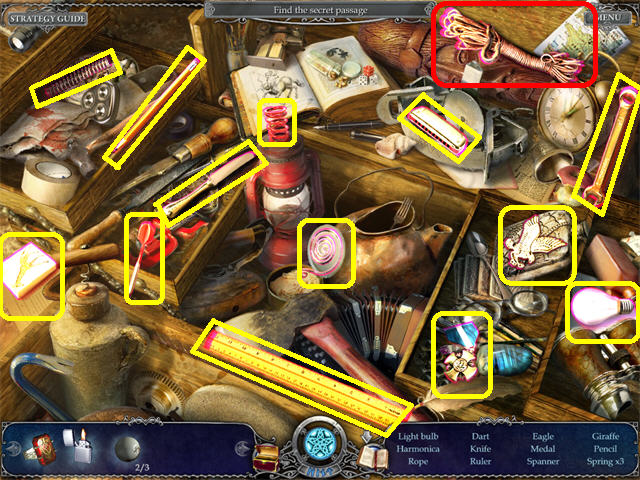
- Solving the puzzle activates a search scene.
- Play the chest search to scene to obtain the ROPE.


- Zoom into the right bookcase; take the ICE AXE (X) and the SPOOL (Y).
- Click on the stone table in lower right to move it out of the way to reveal a hatch.
- Place the ROPE on the hatch (Z).
- Examine the lift mechanism on the left.
- Place the SPOOL on the mechanism (A).
- Click on the LEVER to lift the hatch (B).

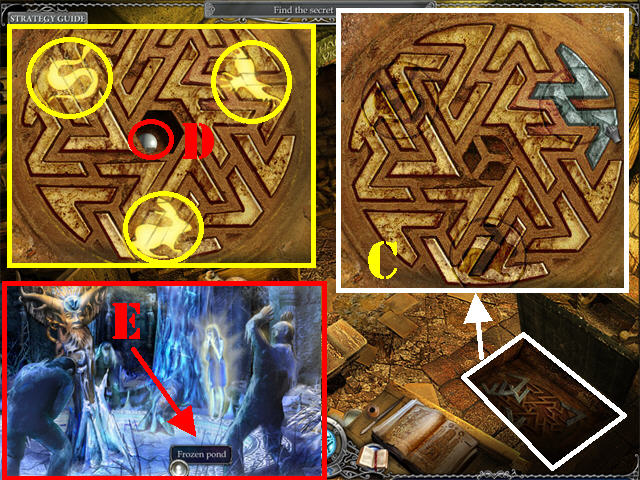
- Click on the hatch to activate a puzzle.
- Drag the puzzle pieces into the correct spots as shown in the screenshot (C).
- Make note of the symbols that light up in the puzzle: the snake, eagle, and rabbit.
- Take BALL 3/3 (D) in the center of the puzzle.
- Click down and go into the lower right door.
- Zoom into the frozen pond; break the ice with the ICE AXE 2 times (E) to trigger a search scene.

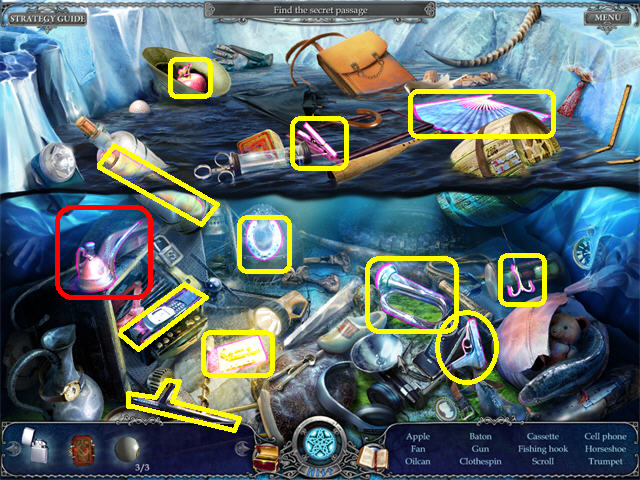
- Play the frozen pond search scene to obtain the OILCAN.

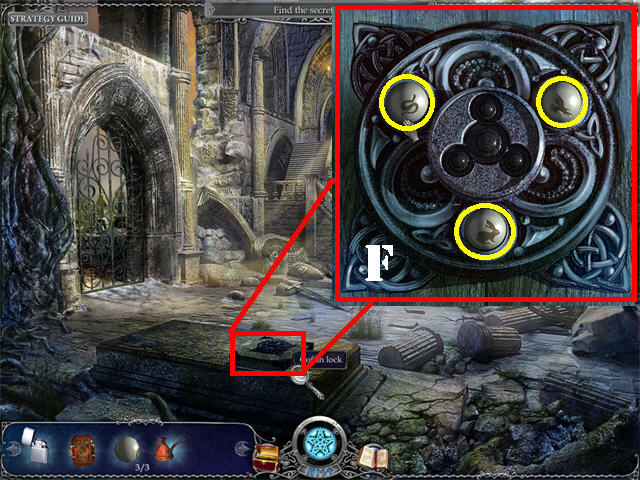
- Click down.
- Zoom into the coffin lock in the lower center.
- Put the OILCAN on the rusted part of the lock.
- Place the 3 BALLS into the rounded slots to activate the puzzle.
- Click on each of the BALLS to change their images in the same order as the puzzle in the hatch.
- Please look at the screenshot for the solution (F).

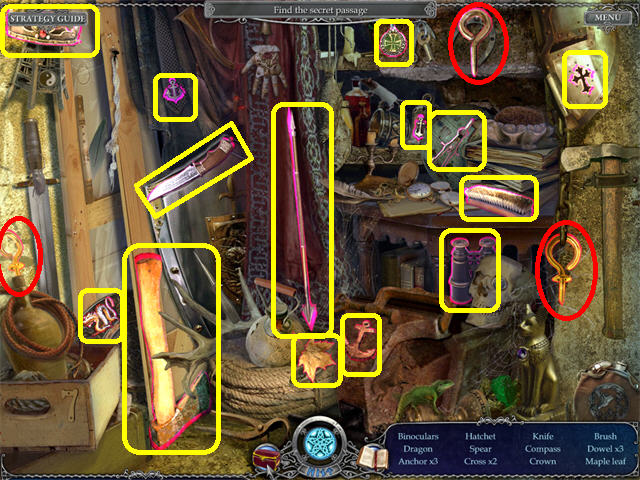
- Click down into the spot where the coffin was located.
- Play the dweller’s things search scene on left to obtain the 3 DOWELS.

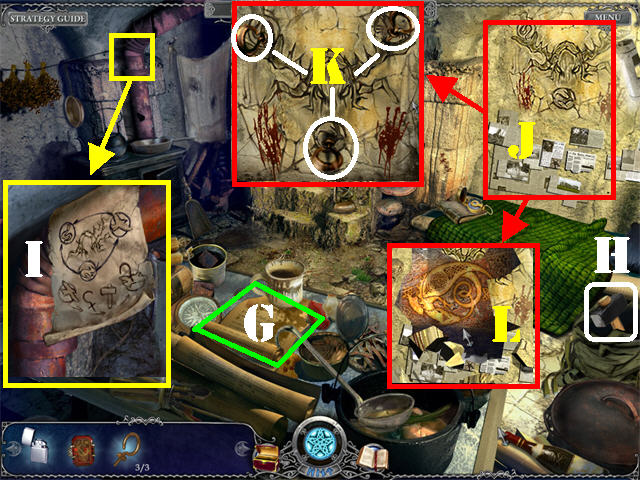
- Take the WET SCROLL on the table (G).
- Open the backpack in the lower right and take the HAMMER (H).
- Examine the hot chimney on left; place the WET SCROLL on the hot pipe (I). The scroll shows what you need to do with the dowels.
- Click on the newspaper clippings on right to add a journal page (J).
- Examine the obscure image on the right side of the wall.
- Place the 3 DOWELS on the Deity’s face (K).
- Use the HAMMER on the 3 DOWELS. The Celtic Dragon appears on the wall.
- Place the DRAGON RING on the Celtic Dragon to enter the gates to Sidhe (L).
Chapter 4: The Sanctuary

- Go into the upper right side of the scene (M).
- Click anywhere in the scene to be automatically transported to the next scene (N).
- Examine the archaeological instruments; take the ROPE (O).
- Take a closer look at the lift plans on left; click on it to add a journal page (P).


- Go through the right door.
- Zoom into the drawbridge on left to activate a puzzle.
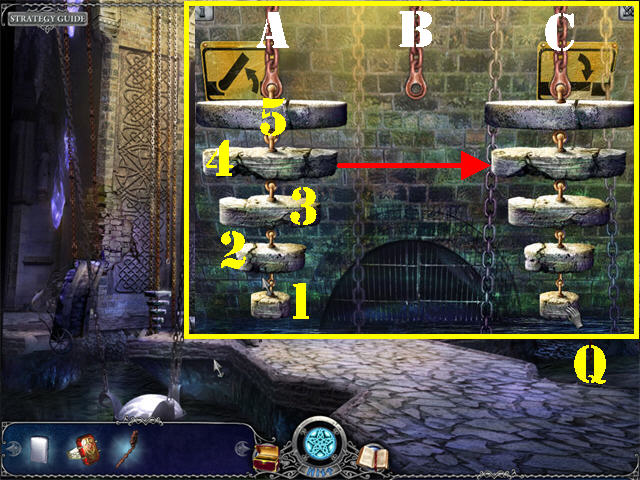
- Move all the weights on left onto the chains on the right in the same order.
- Use the chain in the center to place the weights.
- A large weight cannot be placed over a smaller weight.
- You can only move single weights even if they are in order.
- Use the steps in the screenshot to complete the puzzle. When it says ‘Move 1 to C’, it means, move disc 1 to chain C.
- To solve the puzzle (Q) please follow these steps:
- Move 1 to C, Move 2 to B, Move 1 to B, Move 3 to C, Move 1 to A, Move 2 to C.
- Move 1 to C. Move 4 to B, Move 1 to B, Move 2 to A, Move 1 to A, Move 3 to B.
- Move 1 to C, Move 2 to B, Move 1 to B, Move 5 to C, Move 1 to A, Move 2 to C.
- Move 1 to C, Move 3 to A, Move 1 to B, Move 2 to A, Move 1 to A, Move 4 to C.
- Move 1 to C, Move 2 to B, Move 1 to B, Move 3 to C, Move 1 to A, Move 2 to C, and Move 1 to C.

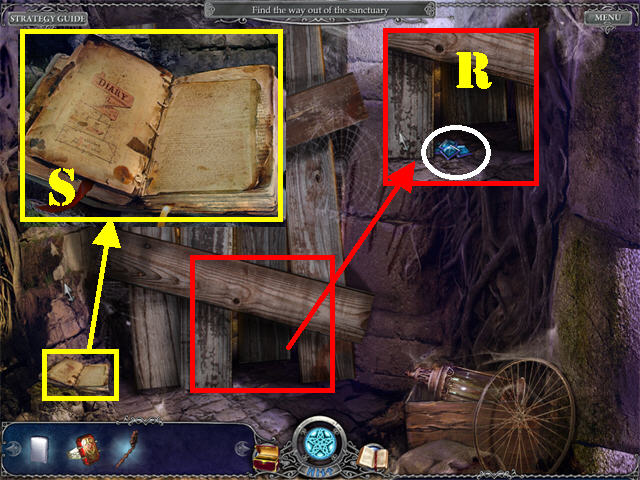
- Head in the lower left after the bridge has been fixed.
- Examine the barrage in the center; take the STONES (R).
- Zoom into the book in the lower left; click on the left page to add a journal page (S).

- Click down twice.
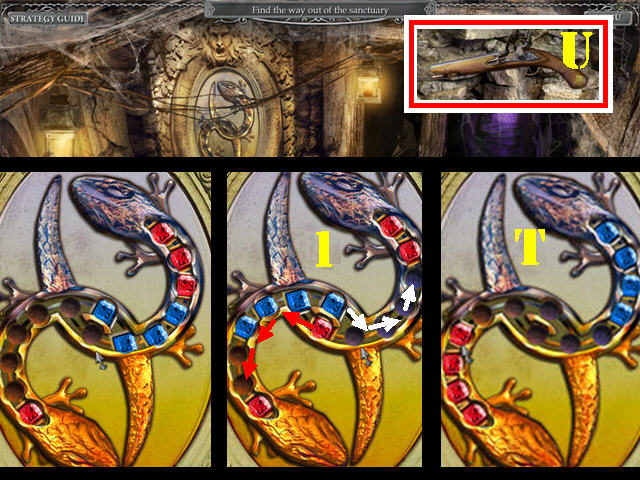
- Zoom into the snake on the back wall; place the blue STONES on the puzzle to activate it.
- Move the stones so they land on the opposite side. The blue stones should be on top and the red ones at the bottom.
- Stones of opposite colors cannot jump over each other.
- Diagram (1) in the screenshot shows you how to position the stones so you can move the red stones to the bottom. Place a red stone as shown in Diagram 1, move all the blue stones to the right, and then move the single red stone to the bottom. Repeat this process until all stones have been placed correctly.
- Please look at the screenshot for the final solution (T).
- Zoom into the snake again; take the PISTOL (U).

- Go into the right door.
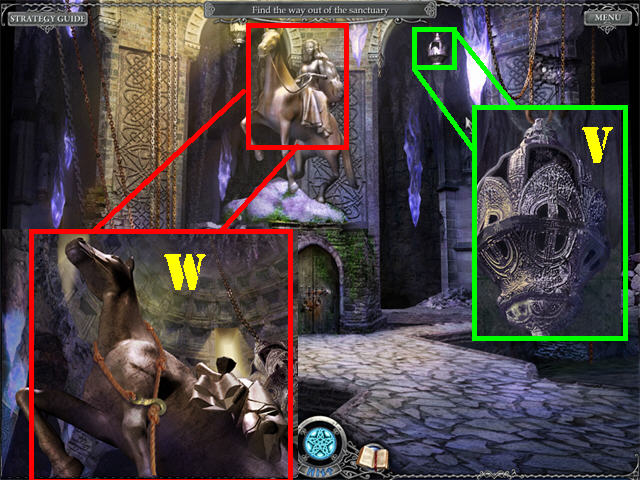
- Zoom into the chained WEIGHT in the upper right (V).
- Place the PISTOL on the broken chain and it will knock down part of the statue.
- Examine the broken statue; place the ROPE on the broken statue (W).

- Take a closer look at the statue’s neck.
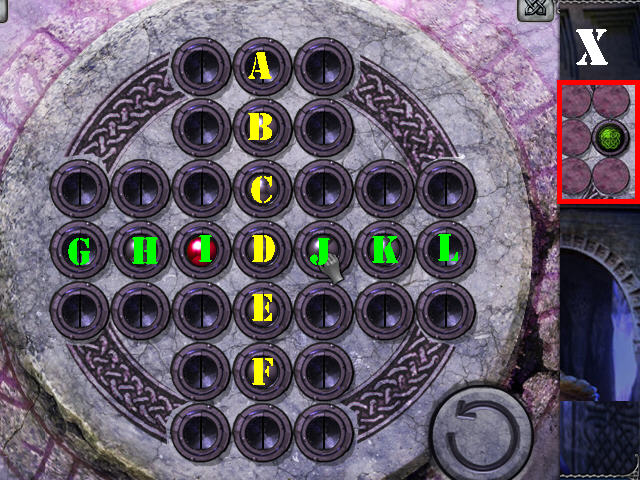
- Click on the horse lock to activate a puzzle.
- Remove all the spheres except for the red one.
- Drag a sphere to an empty spot to remove the sphere it crosses.
- Click on the reset button in lower right to start over.
- Drag the balls in this order to solve the puzzle: Move I to G, Move J to I, Move B to D, Move D to H, Move G to I, Move F to D, Move I to J, Move J to L.
- Click on the green button (X) to raise the horse.
Chapter 5: The Mountain Passage

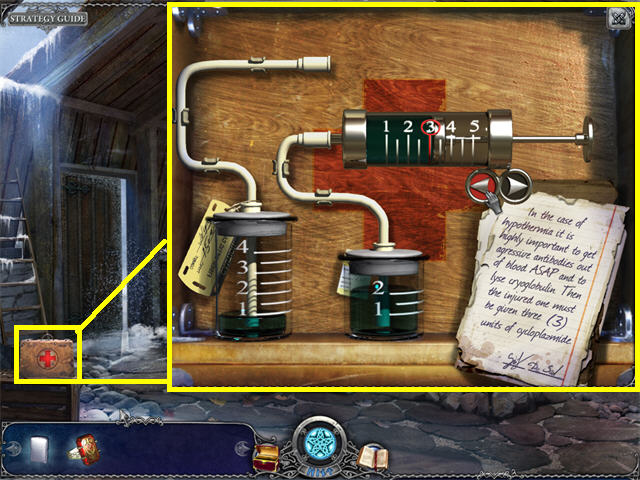
- Examine the medicine bag on the lower left to trigger a puzzle.
- Drag the syringe to any of the 2 beakers. Use the arrows to add or subtract liquid.
- To solve the puzzle follow these steps:
- Drag the syringe to the bottom and click on the RIGHT ARROW.
- Drag the syringe to the top and click on the RIGHT ARROW.
- Drag the syringe to the bottom and click on the LEFT ARROW to solve the puzzle.
- The MEDICINE will be added to inventory after the puzzle has been solved.

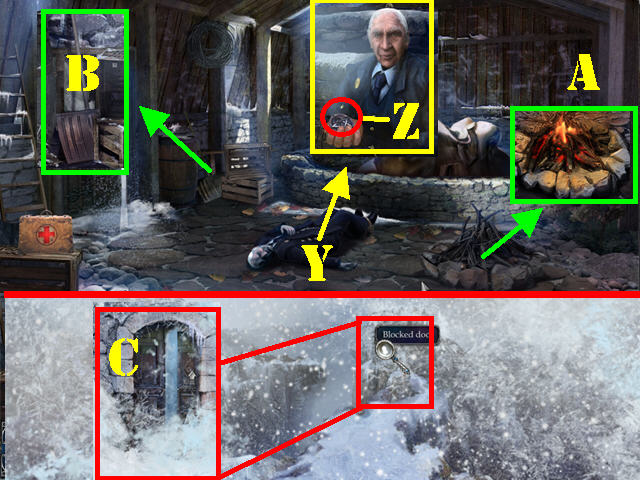
- Examine the man; give him the MEDICINE (Y).
- Zoom into the sitting man; take the LOCKET (Z) and a journal page will be added.
- Examine the campfire; light the fire with the LIGHTER (A).
- Take a closer look at the crates by the door; take the SHOVEL (B).
- Go out the door to add a journal page.
- Examine the blocked door up the hill; place the SHOVEL on the snowdrift 3 times (C).
- Open the door and go through it.

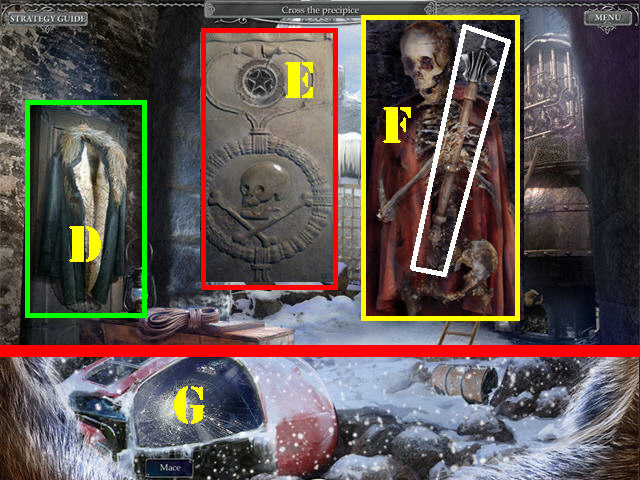
- Click on the FUR COAT on the left to wear it; the coat appears around the edges of the scene (D).
- Examine the steel plate on the left door; put the LOCKET on the secret lock on top to reveal a skeleton (E).
- Zoom into the skeleton; take the MACE (F).
- Click down to go back outside; you are now able to brave the cold because you are wearing the coat.
- Break the cracked glass on the helicopter with the MACE (G).

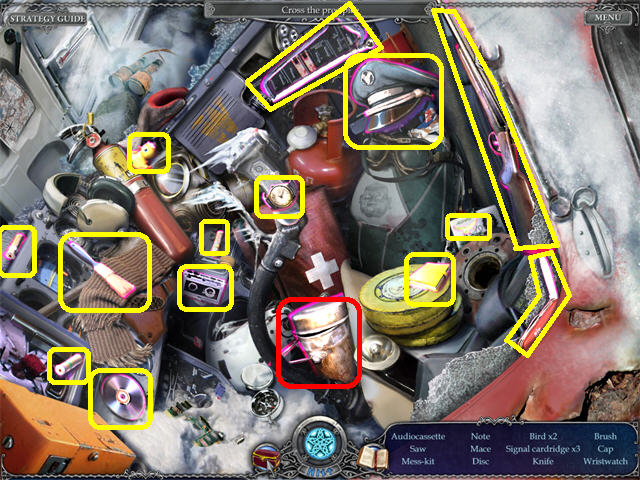
- Zoom into the glass to activate a search scene.
- Play the helicopter cabin search scene to obtain the MESS-KIT.

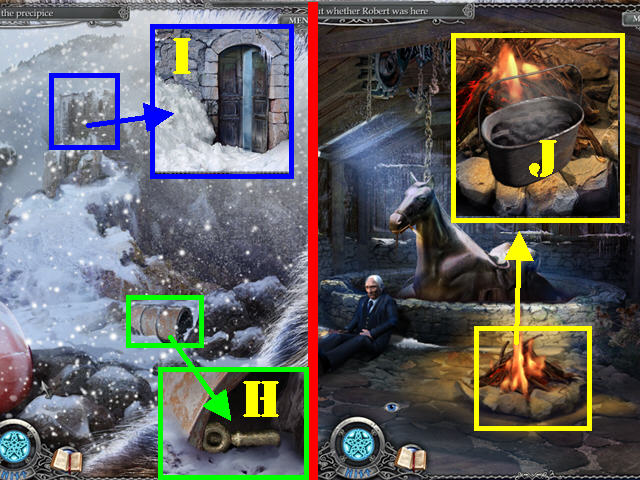
- Zoom into barrel on right; take the RING SPANNER (H).
- Return to the door at the top of the mountain.
- Place the MESS-KIT on the snow hill to obtain the SNOW MESS-KIT (I).
- Return to the inside of the cabin.
- Zoom into the campfire.
- Place the SNOW MESS-KIT on the fire (J).
- The MESS-KIT WITH WATER will be automatically added to inventory.

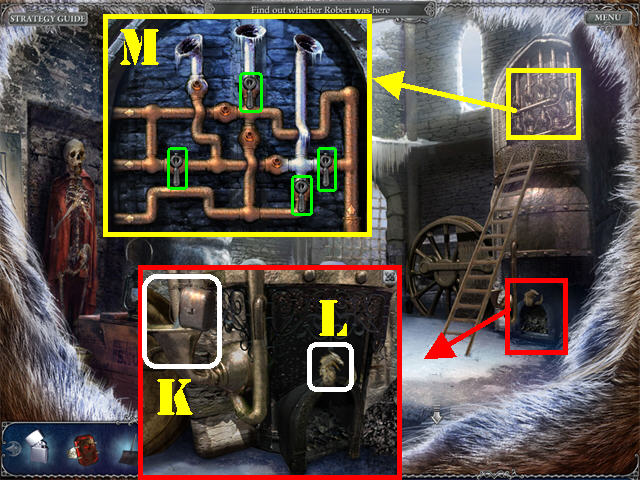
- Go outside and return to the boiler room up the mountain.
- Zoom into the mechanism in the lower right.
- Place the MESS-KIT WITH WATER into the boiler (K).
- Click on the MECHANICAL IGNITION (L) 3 times to light the fire.
- Examine the steam system above the ladder.
- Place the RING SPANNER on the pipes to activate a puzzle.
- Drag the handles to the empty slots in order to block the upper pipes with ice.
- Please look at the screenshot for the solution (M).
- Watch the brief bridge cut scene after the puzzle is solved.
- Go through the opened gate.
Chapter 6: The Power Station

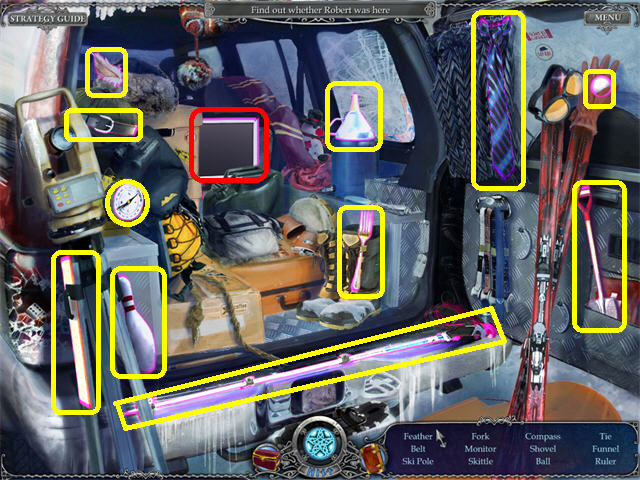
- Go into the upper left side of the scene.
- Play the trunk search scene to obtain the MONITOR.

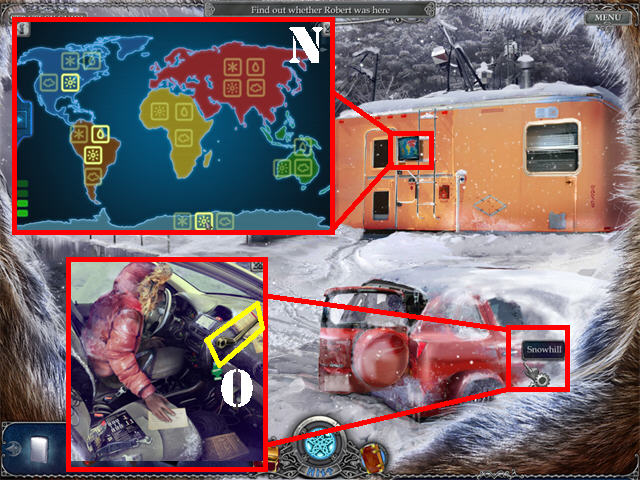
- Place the SHOVEL on the snow hill on the side of the car 3 times to remove the snow.
- Examine the cabin; take the RING SPANNER (O).
- Examine the entrance panel to activate a puzzle (N).
- Click on the play sign on left to activate the puzzle.
- Reproduce the sequence of weather icons that light up. Do it successfully 4 times in a row to beat the game.
- The solution to this puzzle is random.

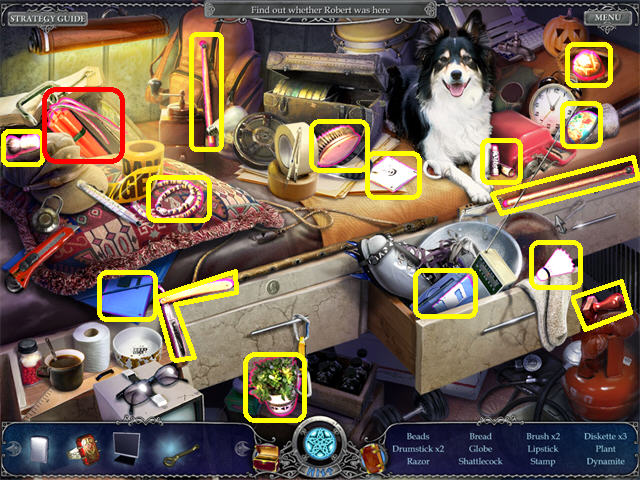
- Go into the door.
- Play the stuff corner search scene to obtain the DYNAMITE.

- Click down and head left towards the hot air balloon.
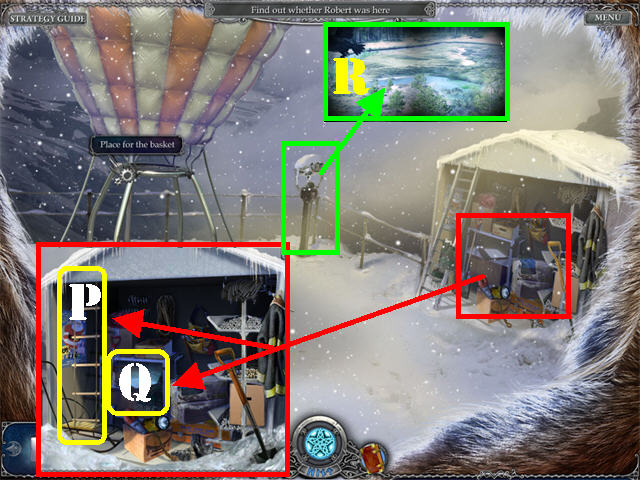
- Zoom into the tent; take the ROPE LADDER (P).
- Click on the shelf inside the tent to add a journal page (Q).
- Zoom into the telescope; click on the telescope to see a raven flying by (R).

- Click down 5 times.
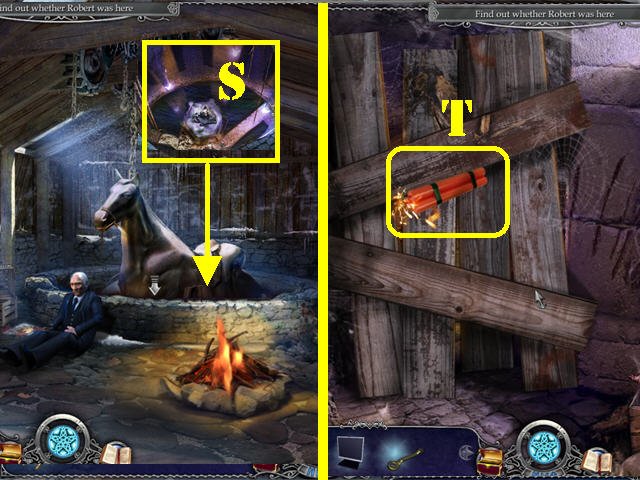
- Click on the horse to make it fall down.
- Click inside the hole; place the ROPE LADDER in the hole and go in (S).
- Head left.
- Examine the barrage; Place the DYNAMITE over the barrage (T).

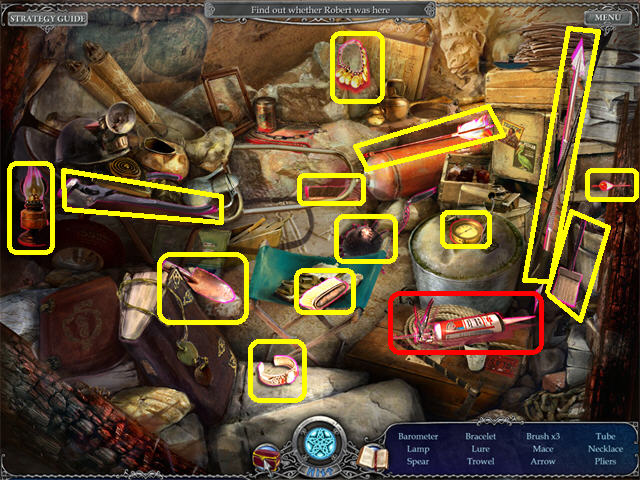
- Exploding the barrage triggers a search scene.
- Play the excavation search scene to obtain the SILICONE.

- Click down, up the ladder, out the door, go to the top of the mountain, through the gate, and head right.
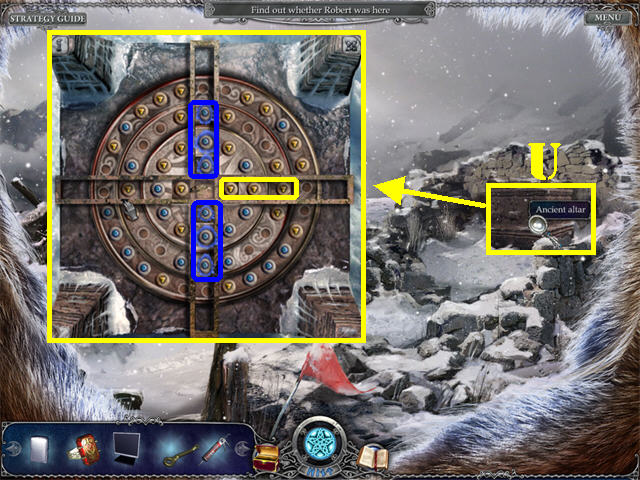
- Click on the ancient altar on the right to activate a puzzle (U).
- Drag the disks so that 3 or more emblems of the same color line up inside the 4 tracks in order to remove the colors.

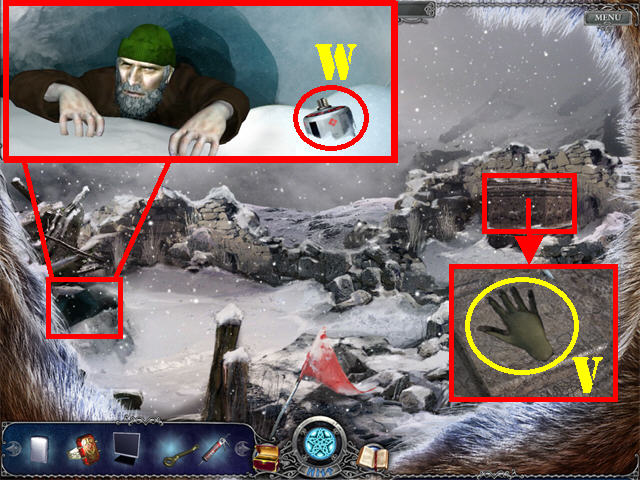
- A structure will rise with the hand symbol after the puzzle has been solved.
- Place the SILICONE in the mould.
- Take the SILICONE MOULD (V).
- Zoom into the hole in the lower left; take the EMPTY GAS BALLOON (W).

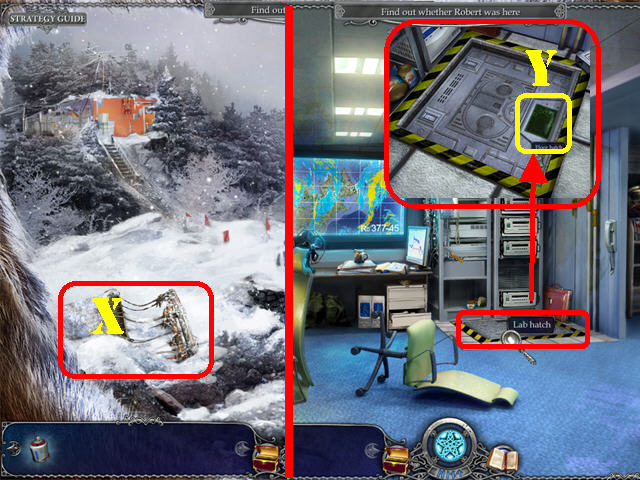
- Click down.
- Take the BALLOON BASKET (X) in the lower left.
- Return to the inside of the Power Station.
- Zoom into the floor hatch and click on it to remove the cover.
- Place the SILICONE MOULD on the HAND SCANNER (Y).

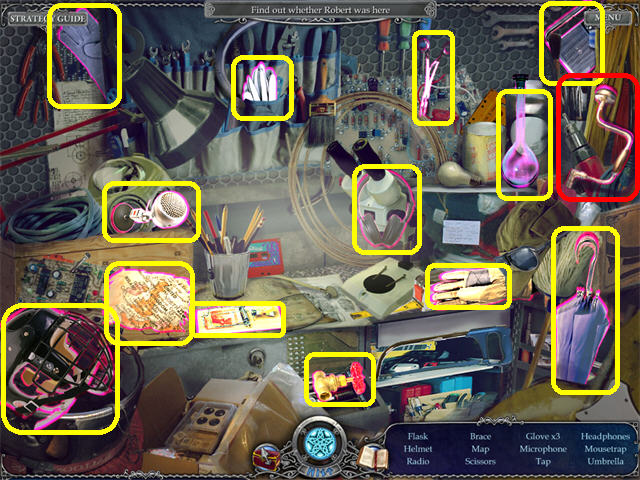
- Go into the hatch.
- Play the tool stand search scene on right to obtain the BREAST DRILL.

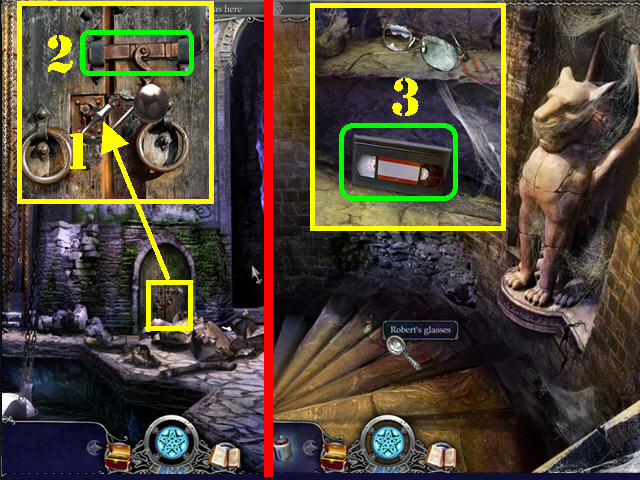
- Return to the inside of the cabin and go through the hole to reach the crypt.
- Examine the crypt door; place the BREAST DRILL into the keyhole (1).
- Click on the latch (2) and go into the door.
- Zoom into Robert’s Glasses on the steps; take the VIDEOTAPE (3).

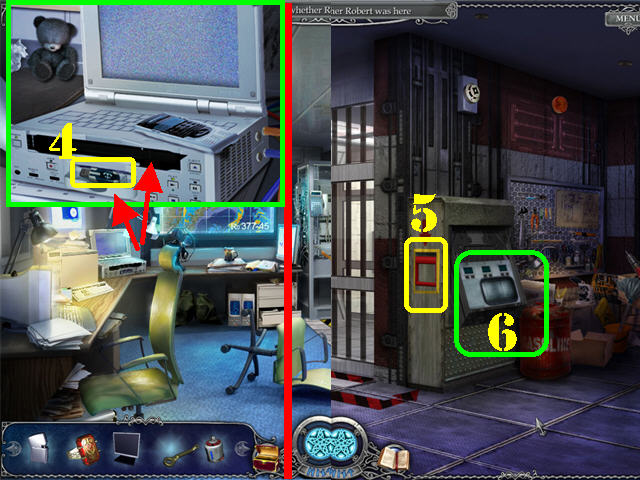
- Return to the inside of the Power Station.
- Zoom into the desktop; place the VIDEOCASSETTE in the slot.
- Take the ELECTRONIC KEY after the video stops playing (4).
- Go down into the hatch.
- Click on the switch next to the gate (5).
- Zoom into the panel; place the ELECTRONIC KEY in the empty slot to activate a puzzle (6).

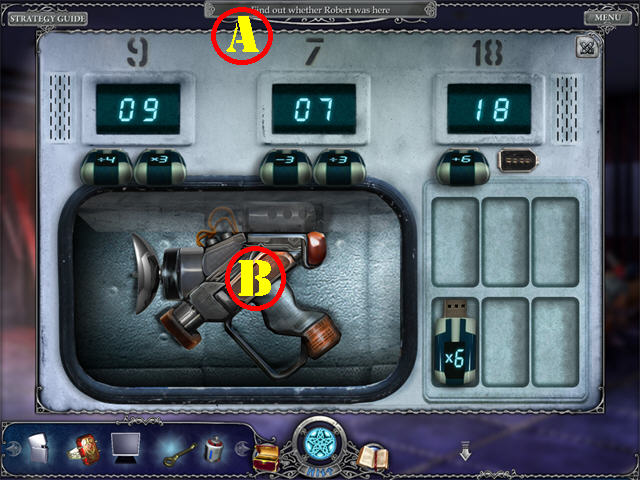
- Place the correct flash drives into the displays so their values correspond to the ones at the top of the machine.
- For example, in the first slot the number 12 is present but your goal is to change the number to 9. Take the divided by 4 flash drive and place it in the first slot. 12 divided by 4 is 3. Then place the X 3 in the second slot. 3 x 3 equals 9.
- Please look at the screenshot for the solution (A).
- Take the PHAZERGUN after the puzzle has been solved (B).

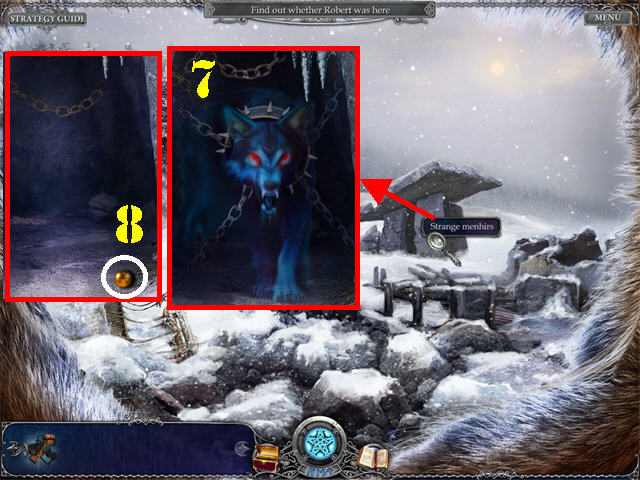
- Go outside and click down once.
- Zoom into the Stonehenge on right.
- Place the PHAZERGUN on the wolf-like creature (7).
- Take the BALL (8) that falls on the ground.

- Return to the crypt door; go through it and down the steps.
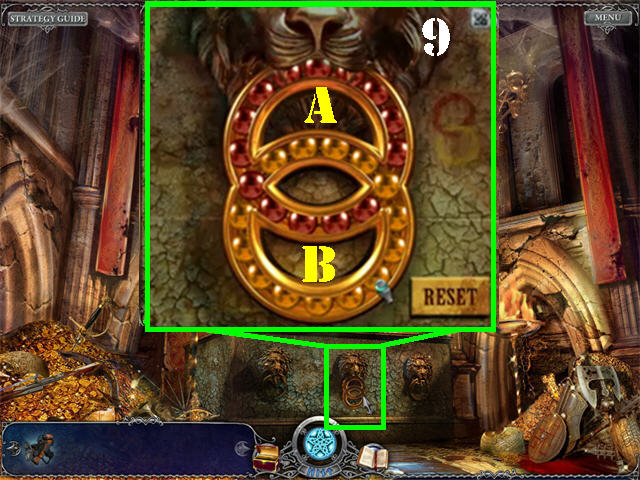
- Examine the lion’s head at the base of the altar.
- Place the BALL in the ring to activate the puzzle.
- Drag the balls around until they resemble the image on the right side of the puzzle.
- Follow these steps to solve the puzzle:
- Drag Ring A twice clockwise – Drag Ring B twice clockwise- Repeat these same steps 2 more times.
- Drag Ring A counter-clockwise until the 2 yellow beads fall in the center ring.
- Drag Ring B clockwise until it falls in the same position as shown in the screenshot to complete the puzzle.
- Check out our video solution!
- Please look at the screenshot for the final solution (9).

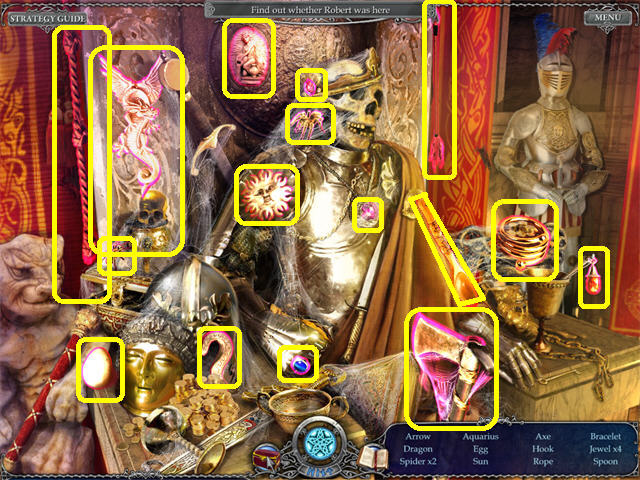
- Click on the king that rises from the altar to activate a search scene.
- The TORCH will be added to inventory.

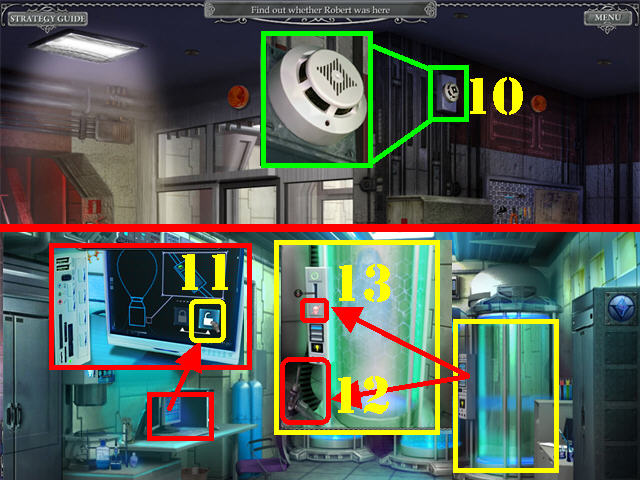
- Return to the hatch inside the Power Station.
- Zoom into the SMOKE DETECTOR in the upper right and place the TORCH (10).
- Go into the door to access the Lab.
- Examine the scientist’s desktop and place the MONITOR on the counter.
- Click on the UNLOCKED ICON (11) on the screen in order to be able to launch the balloon.
- Examine the capsule on the right; take the GASJET WITHOUT BALLOON (12).
- Click on the DESTRUCT button (13).

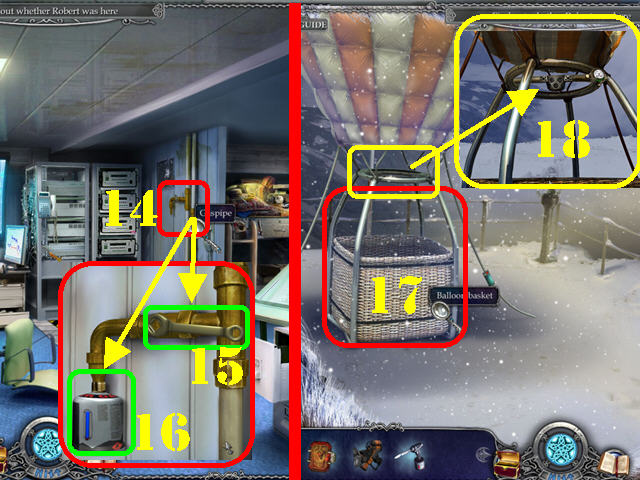
- Return to the inside of the Power Station.
- Zoom into the gas pipe on right; place the EMPTY GAS BALLOON on the pipe (14).
- Place the RING SPANNER on the pipe (15); take the GASJET WITH BALLOON (16).
- Return to the hot air balloon area.
- Put the BALLOON BASKET at the bottom of the balloon (17).
- Take a closer look at the balloon; place the GASJET WITH BALLOON on the metal bar (18).
- Go into the balloon to end this chapter.
Chapter 7: The Wilderness

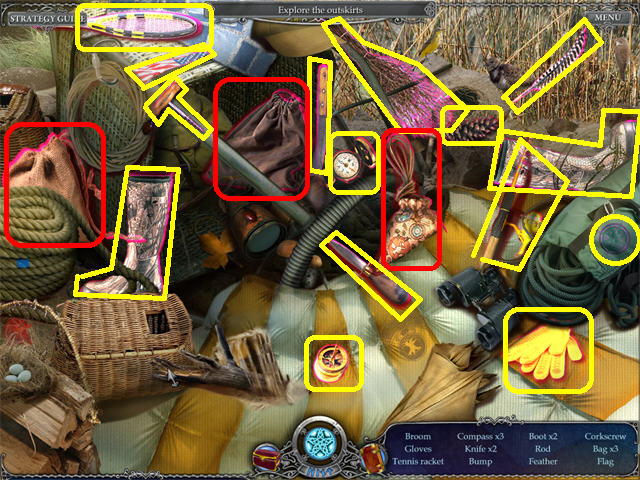
- Play the broken gondola search scene to obtain the BAGS.

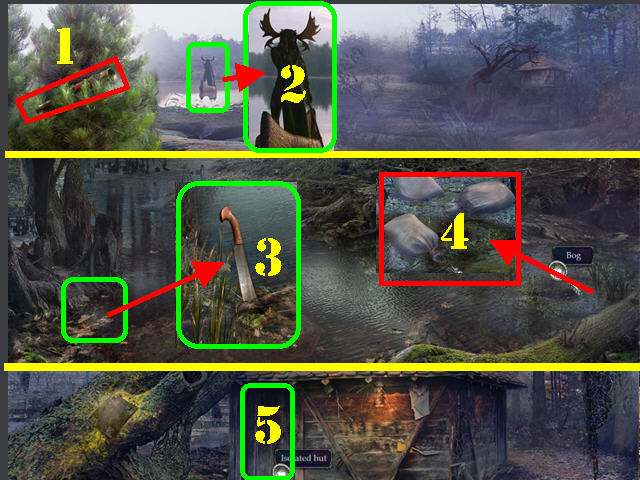
- Take the SPYGLASS on the tree on left (1).
- Place the SPYGLASS on the thing in the river for a closer look (2).
- Head right.
- Zoom into the ground in the lower left; take the MACHETE (3).
- Zoom into the ground on the right; place the BAGS in the water (4).
- Head right.
- Examine the hut door; click on it to add a journal page (5).

- Head right and go into the workshop on the lower right.
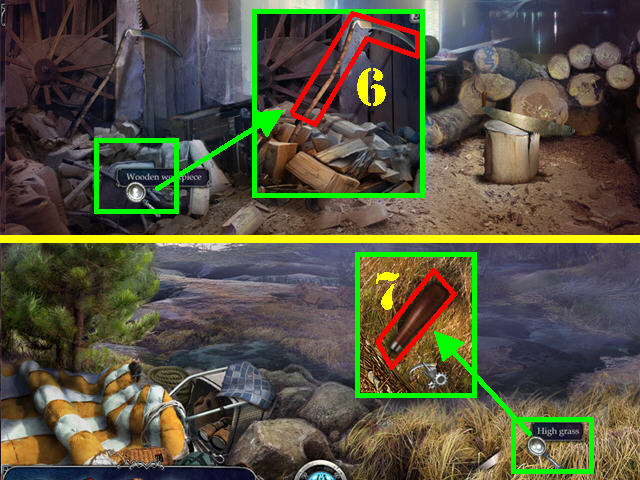
- Zoom into the pile of wood on the left; take the SCYTHE (6).
- Click down 4 times.
- Zoom into the high grass in the lower right.
- Cut the grass with the SCYTHE 3 times; take the SAW HANDLE (7).

- Return to the workshop.
- Zoom into the wooden log on right.
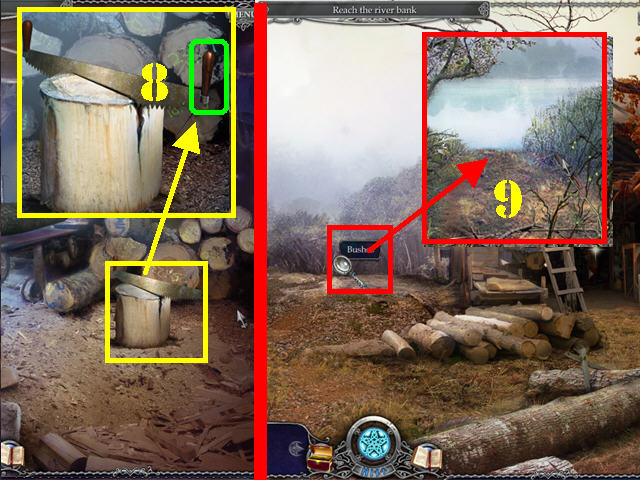
- Place the SAW HANDLE on the broken saw; take the SAW (8).
- Click down.
- Zoom into the bushes in the back; cut the thicket (9) with the MACHETE 3 times.
- Go forward.

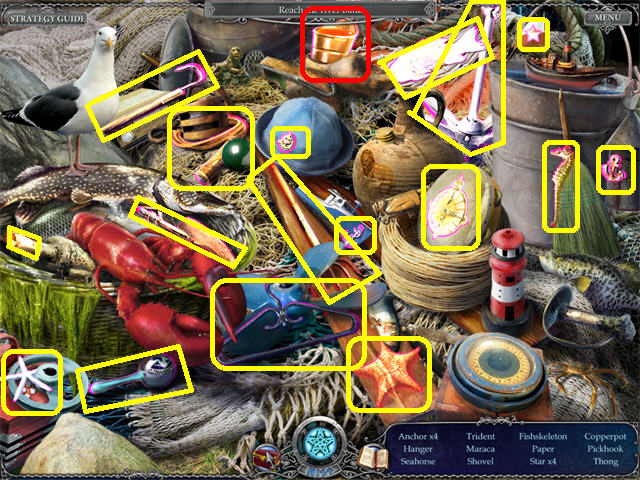
- Play the fishing tackle search scene to obtain the KETTLE WITH RESIN.

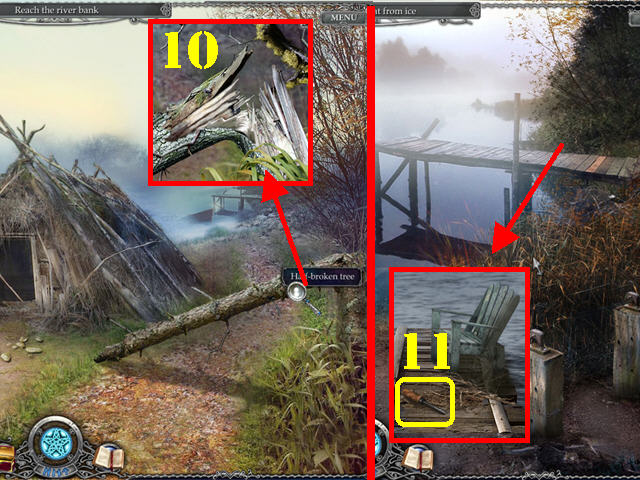
- Examine the HALF-BROKEN TREE; cut it with the SAW (10).
- The WOODS will be automatically entered into inventory.
- Head right.
- Zoom into the dock; take the SCREWDRIVER (11).

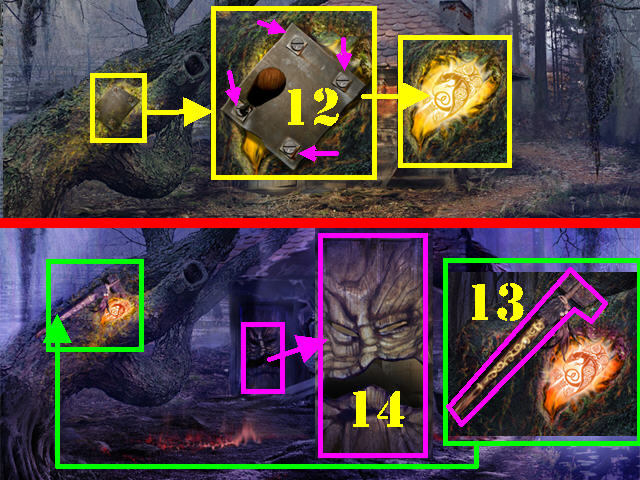
- Click down 3 times.
- Examine the large tree on left.
- Remove the 4 screws with the SCREWDRIVER (12) to reveal the Celtic Dragon.
- Place the DRAGON RING on the Celtic Dragon to darken the scenery.
- Zoom into the tree again; take the CELTIC AXE (13).
- Click on the hut door; hit it with the CELTIC AXE (14).
- Go into the hut.

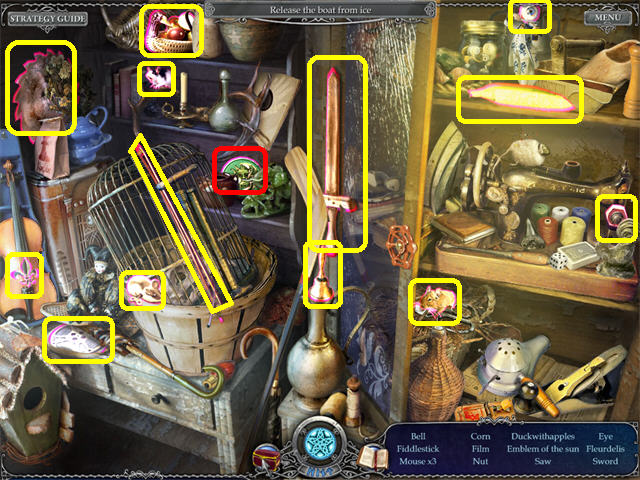
- Play the utensils search scene to obtain the EMBLEM OF THE SUN.

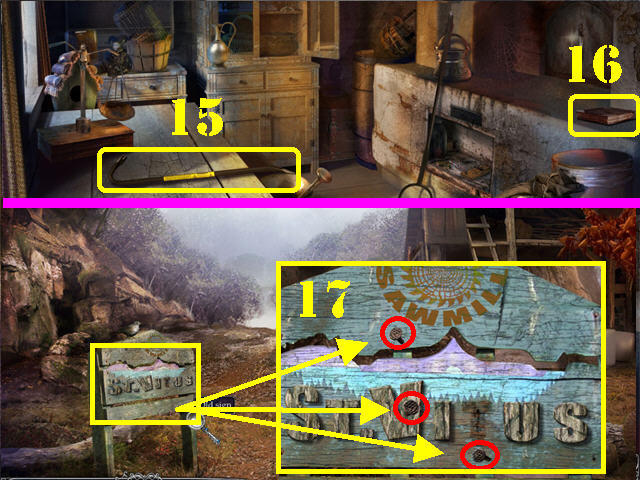
- Grab the CROWBAR (15) in the lower left.
- Click on the OLD BOOK (16) in the lower right to add a journal page.
- Exit the hut and head right.
- Examine the old sign on left; remove the 3 NAILS with the CROWBAR (17).

- Head forward and enter the teepee.
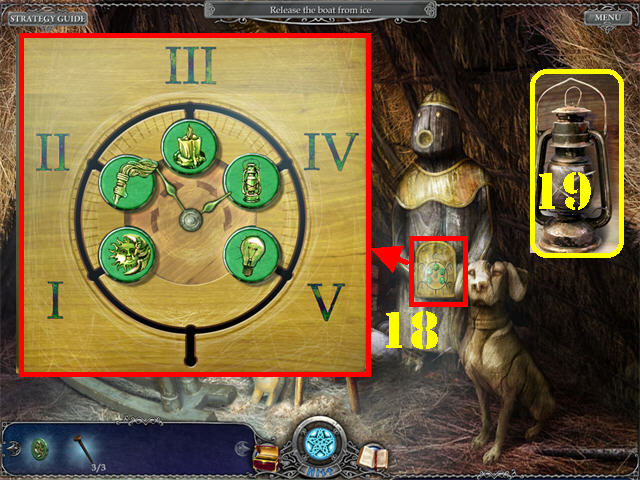
- Examine the wooden doll.
- Place the EMBLEM OF THE SUN on the board to activate the puzzle.
- Arrange the light sources in the order they were invented by dragging the pieces around.
- Use the groove at the bottom to place a piece out of the way so you can begin placing the pieces in the correct spots.
- Please look at the screenshot for the solution (18).
- Take the LAMP after the puzzle has been solved (19).
Chapter 8: The Broken Boat

- Return to the area outside the workshop.
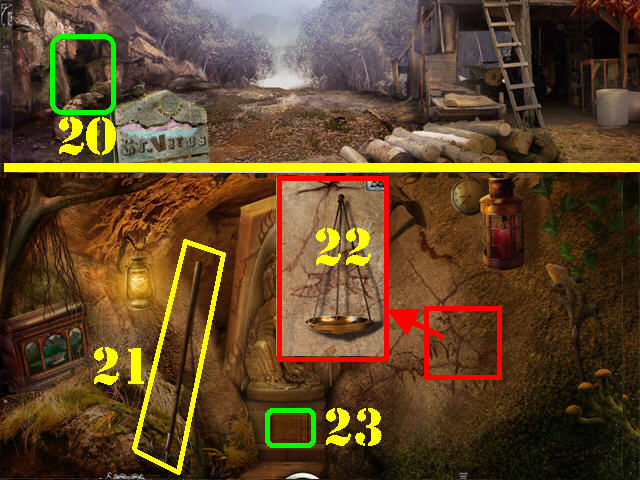
- Examine the cave on the left and place the LAMP inside of it (20).
- Go into the cave.
- Grab the LONG BOAT HOOK (21) on the left.
- Zoom into the cave painting on the right wall; grab the SCALEPAN (22).
- Click on the stone panel at the bottom of the statue to activate a puzzle (23).

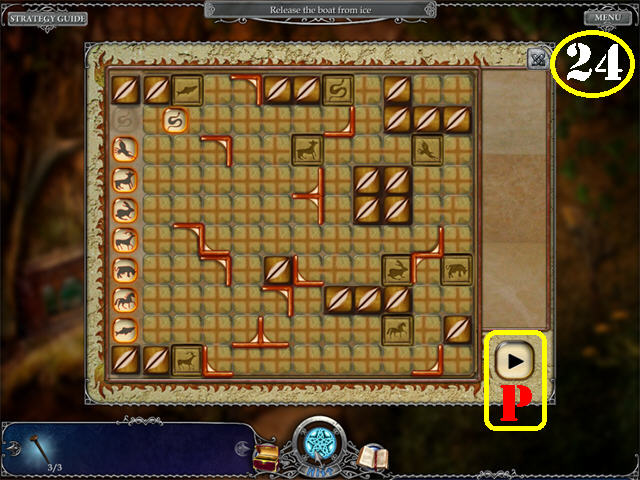
- Drag the orange barriers into the correct spots so the emblem on the left will fall above their matching tiles.
- Click on the black play sign (P) in the lower left to enter your selections.
- If you are incorrect, the game will reset itself.
- Please look at the screenshot for the solution (24).

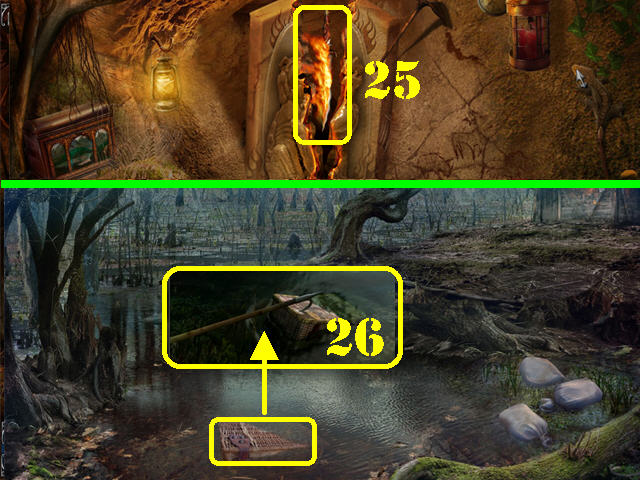
- Take the FIRE SWORD from the wall after the puzzle has been solved (25).
- Click down 3 times.
- Examine the basket in the water (26).
- Place the LONG BOATHOOK on the basket to drag it ashore and activate a search scene.

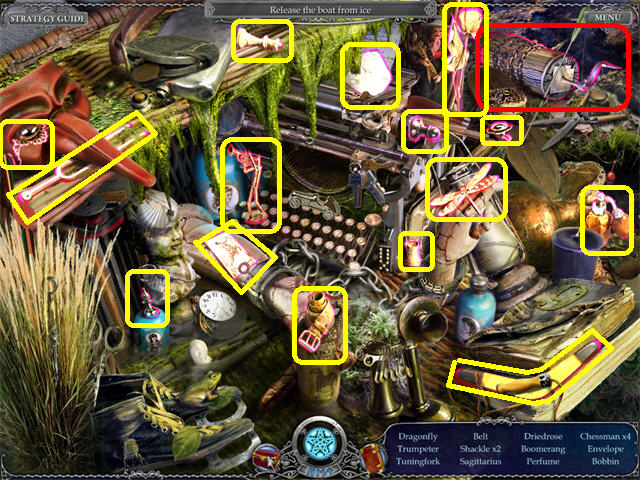
- Play the junk in the chest search scene to obtain the BOBBIN.

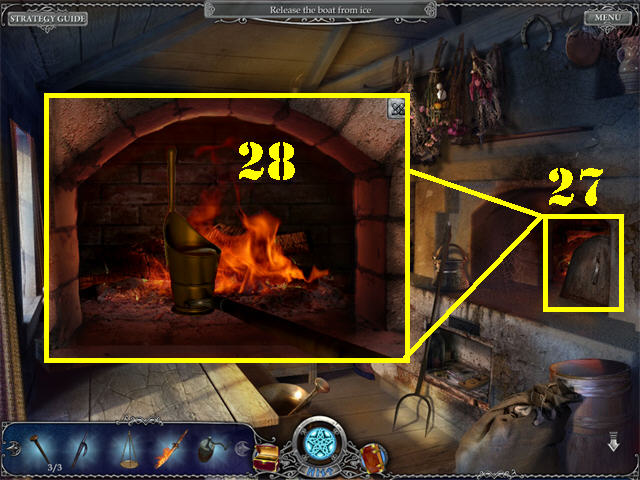
- Return to the inside of the hut to access the kitchen.
- Open the oven door on right and zoom into it (27).
- Place the WOODS into the fireplace to light the fire (28).
- Put the KETTLE WITH RESIN into the oven.
- Push the KETTLE WITH RESIN into the fire with the LONG BOAT HOOK.
- The RESIN will be automatically added to inventory.

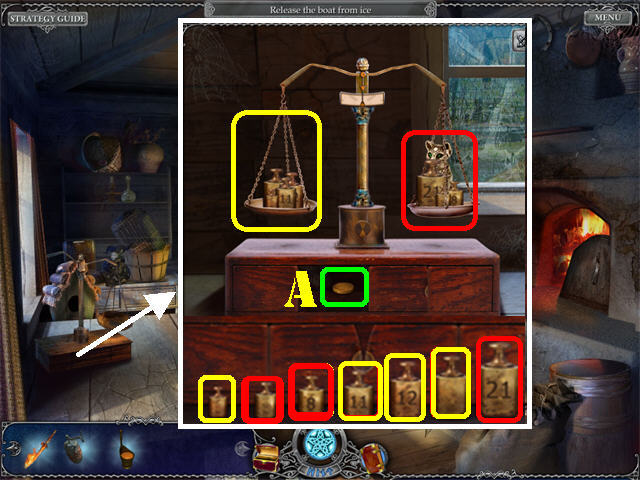
- Examine the scales on left.
- Put the SCALEPAN on the left side of the scale to activate a puzzle.
- Place the right amount of weights on each scale to balance it out.
- To solve the puzzle drag the weights to the correct scales as shown below.
- Left Scale: 12, 11, unmarked large, and unmarked small (yellow).
- Right Scale: Cat, 21, 8, and unmarked medium (red).
- Take the COIN below the scale (A).

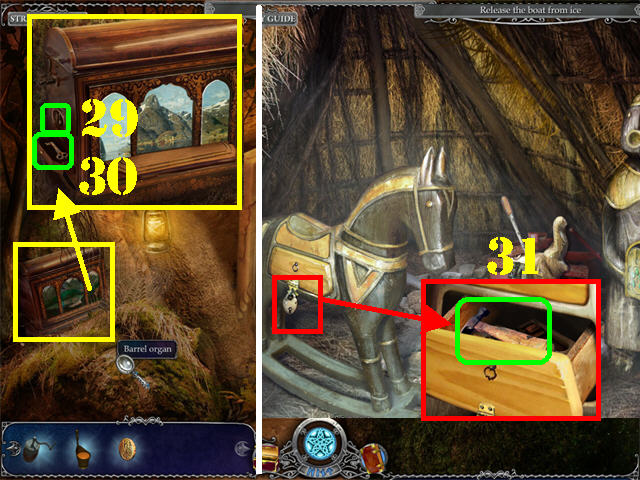
- Return to the cave.
- Zoom into the barrel organ; place the COIN in the slot (29).
- Take the KEY (30) that appears at the bottom of the organ.
- Return to the inside of the teepee.
- Examine the lock on the wooden rocking horse.
- Put the KEY In the lock.
- Take the HAMMER in the drawer (31).

- Exit the teepee and head right.
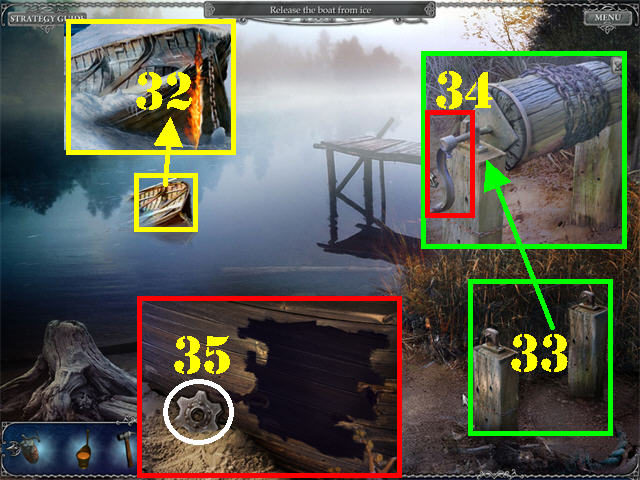
- Zoom into the boat; place the FIRE SWORD on the ice to melt it (32).
- Zoom into the windlass; place the BOBBIN on it (33).
- Click on the handle to reel in the boat (34).
- Zoom into the broken boat.
- Take the GEAR (35) on the ground.

- Return to the workshop.
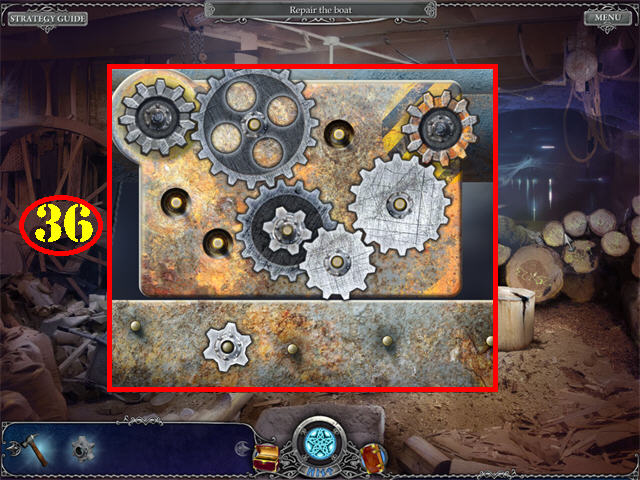
- Zoom into the saw machine; place the GEAR on the bottom of the puzzle to activate it.
- Drag the gears to the correct posts.
- One gear will not be used at all.
- Please look at the screenshot for the solution (36).
- Solving the puzzle activates the saw machine; the BOARD will be added to inventory once the saw machine stops.

- Head back to the broken boat area.
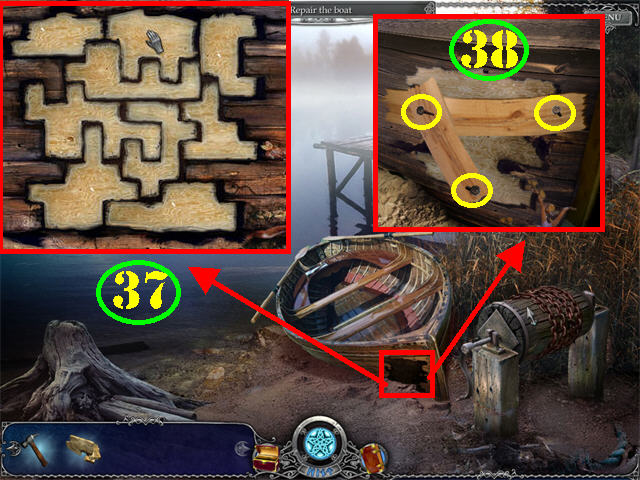
- Zoom into the broken boat; place the BOARD in the hole to activate the puzzle.
- Drag the wooden pieces into the correct slots and they will lock in place.
- Please look at the screenshot for the solution (37).
- Zoom into the broken boat again.
- Place the 3 NAILS on the boards (38).
- Put the HAMMER on the 3NAILS.
- Seal the cracks with the RESIN.
Chapter 9: The Campsite

- Head towards the campsite on right.
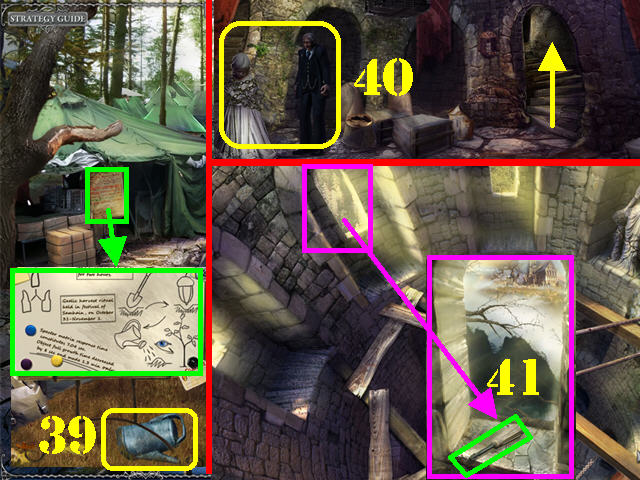
- Zoom into the information board on left; take the FULL WATERING CAN (39).
- Click on the board to add a journal page.
- Head towards the truck in the back of the scene and then into the tower above.
- Talk to the man and he will ask you to save his daughter. Take a closer look at the daughter; you need to find a way to free her from the chains (40).
- Head towards the steps on the right to go up the tower.
- Examine the second alcove; take the SCREWDRIVER (41). Note the loose stone on the right.

- Click down 3 times and go into the hole in the ground at the campsite.
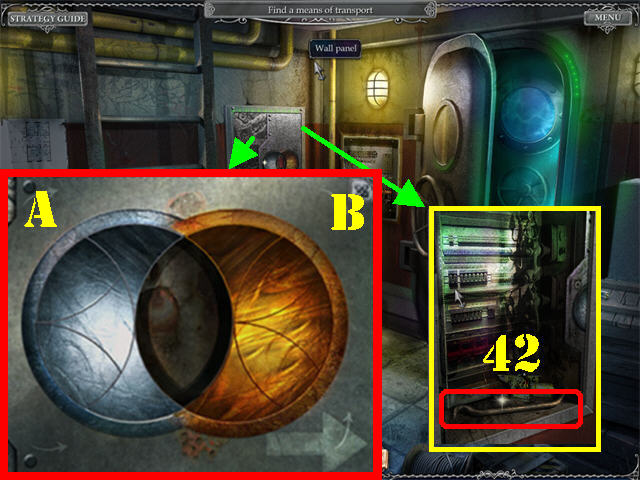
- Examine the wood panel on left.
- Place the SCREWDRIVER on the panel to activate the puzzle.
- Click on any of the 4 screws to turn the metal segments so the gold ones are on the right and the silver ones are on the left.
- Follow these steps to solve the puzzle: B – A – B x 3– A – B x 2 – A – B x 3 – A – B x 2.
- Check out our video solution!
- Zoom into the mechanism after the puzzle has been solved; take the CROWBAR (42).

- Return to the top of the tower.
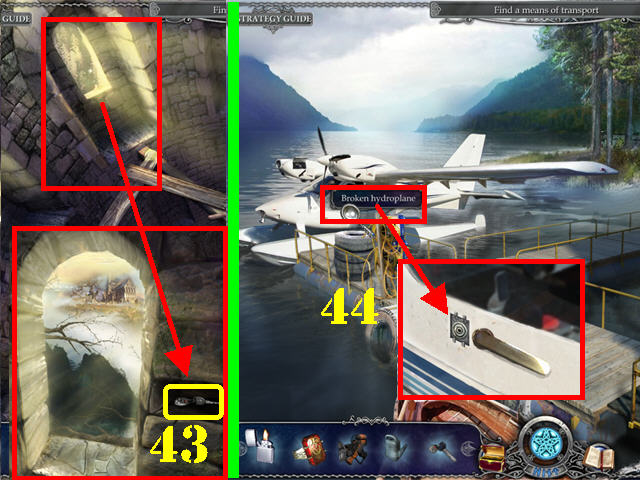
- Examine the second alcove on the left; remove the loose stone with the CROWBAR.
- Take the IRON KEY (43).
- Click down 4 times.
- Zoom into the broken hydroplane; place the IRON KEY in the keyhole (44).

- Go into the hydroplane.
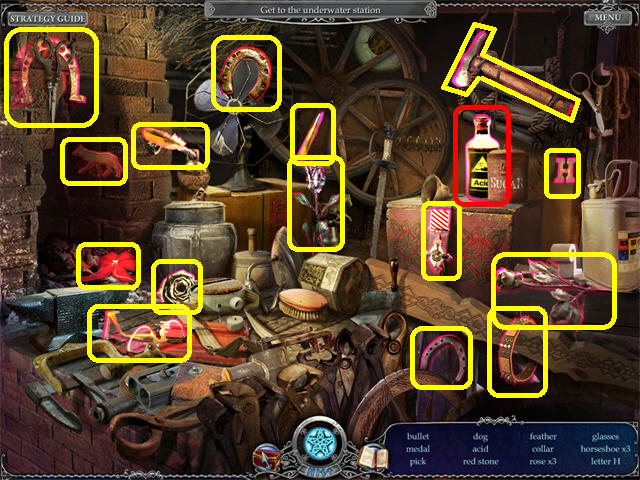
- Play the baggage hold search scene to obtain the ELECTROMOTOR.

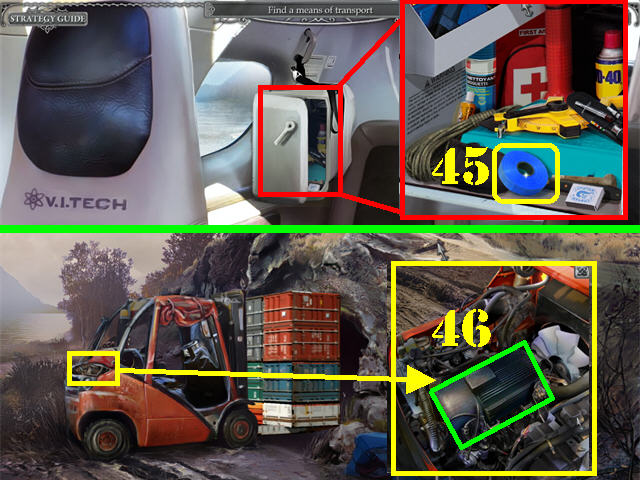
- Examine the MEDICINE CHEST; take the DUCT TAPE (45).
- Return to the area with the truck.
- Zoom into the truck’s engine; place the ELECTROMOTOR in the engine (46).
- Enter the cave.

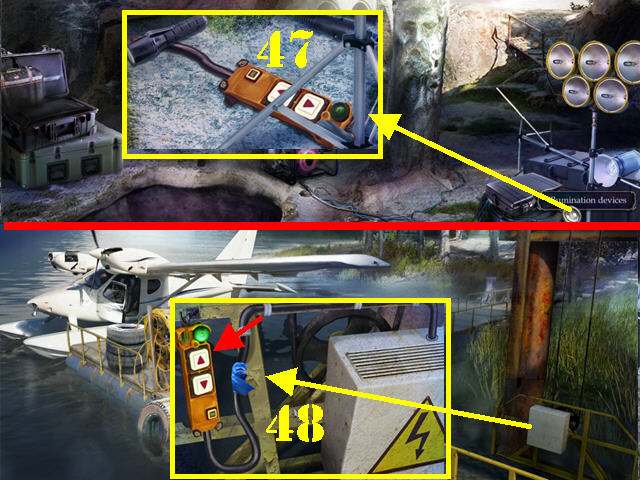
- Examine the lights in the lower right; take the CUT-OUT (47).
- Return to the hydroplane area.
- Examine the lift mechanism on right; place the CUT-OUT on the hook.
- Place the DUCT TAPE over the exposed wires (48).
- Click on the top arrow on the switch to lift yourself up to the pressure chamber.

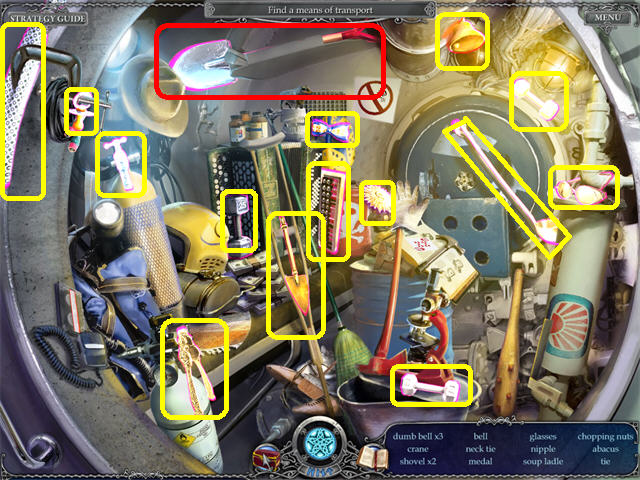
- Play the pressure chamber search scene to obtain the SPADE.

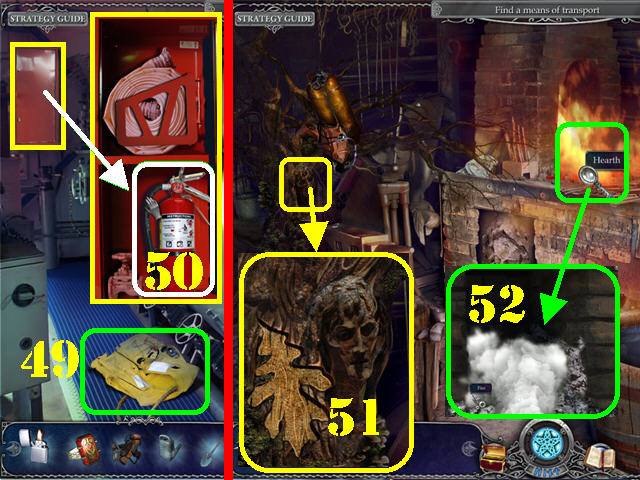
- Take the LIFE JACKET on the ground (49).
- Examine the fire box on the left; open it and take the FIRE EXTINGUISHER (50).
- Return to the cave next to the truck and head forward once inside.
- Zoom into the tree man on left; click on the carved leaf to add a journal page (51).
- Examine the hearth; put out the flames with the FIRE EXTINGUISHER (52) to activate a search scene.


- Play the foundry search scene to obtain the ACID.

- Return to the tower.
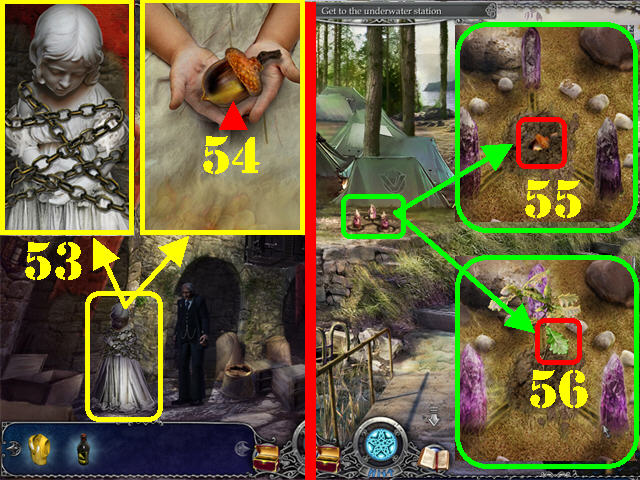
- Zoom into the little girl turned to stone; pour ACID on the chains (53).
- Examine the little girl again; take the ACORN (54).
- Return to the campsite.
- Examine the ritual circle by the tents.
- Dig a hole in the ground with the SPADE.
- Put the ACORN in the hole (55).
- Pour the water from the FULL WATERING CAN over the hole.
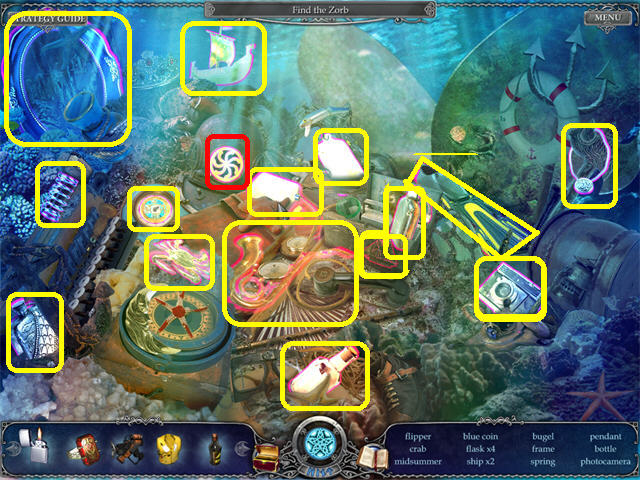
- Take the OAK LEAF (56) that sprouted.

- Return to the cave and head forward.
- Zoom into the tree man; place the OAK LEAF in the recess (57).
- Examine the tree branches; take the AQUALUNG (58).
- Return to the underground area in the campsite.
- Zoom into the door; place the AQUALUNG on it (59).
Chapter 10: Underwater Gateway


- Head right once you enter the underwater area.
- Play the old prop search scene to obtain the SOLSTICE SIGN.

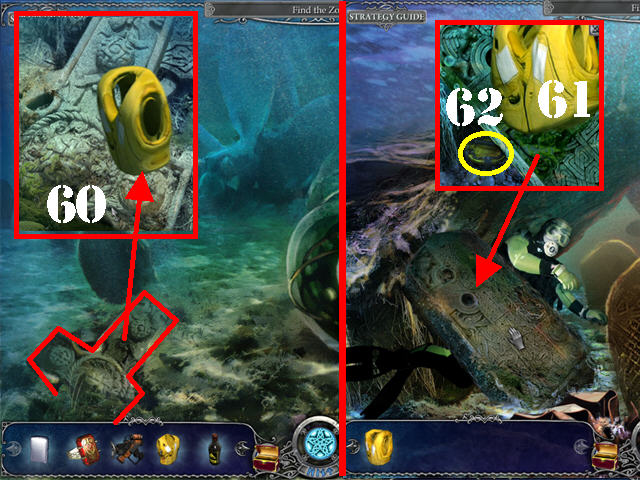
- Examine the stone cross in the lower left; place the LIFE JACKET over the air bubbles to inflate it (60).
- The LIFE JACKET WITH AIR will be automatically added to inventory.
- Head left.
- Zoom into the stone plate covering the diver.
- Place the LIFE JACKET WITH AIR on the heavy plate to lift it (61).
- Take the ROTARY KEY 1/4 (62) below the plate.

- Return to the inside of the hydroplane.
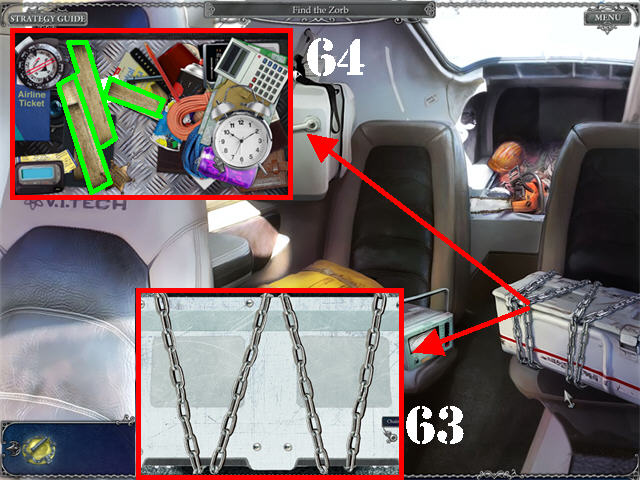
- Examine the footlocker on right.
- Remove the chains with the ACID (63).
- Drag the items out of the way and click on the 12 PLAQUES (64).

- Return to the top of the tower.
- Examine the broken bridge on the right (65).
- Place the 12 PLAQUES on the bridge to activate a puzzle.
- Drag the boards into the correct spots to fix the bridge.
- Please look at the screenshot for the solution (66).
- Zoom into the alcove on the right; take the WIRE (67).

- Return to the cave and head forward once inside.
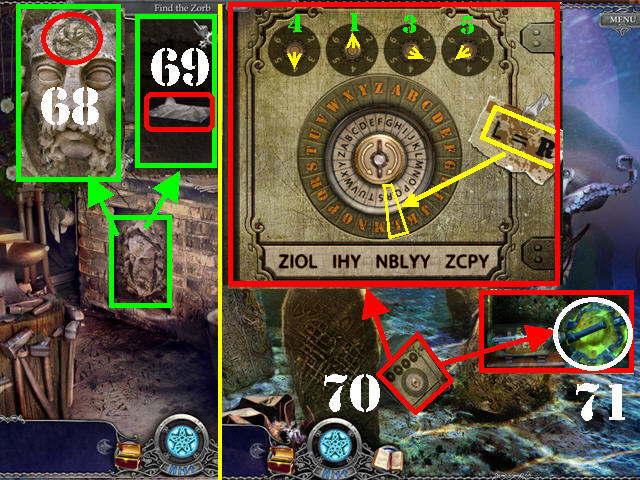
- Zoom into the strange bas-relief; place the SOLSTICE SIGN on the stone forehead (68).
- Take the CIPHER CLUE (69) behind the bas-relief; a journal page will be automatically added to your journal.
- Return to the underwater gateway.
- Examine the safe in the lower center (70).
- Place the CIPHER CLUE on the safe to activate the puzzle. The clue states that L equals R. Move the center dial so that the R and L line up.
- Use the letters at the bottom of the puzzle to decipher the clue using the letters on the dials.
- The solution is: ZIOL equals FOUR, IHY equals ONE, NBLYY equals THREE, and ZCPY equals FIVE.
- After you’ve moved the small dial so that L lines up with R, turn the dials on top from left to right to 4, 1, 3, and 5.
- Take ROTARY KEY 2/4 (71) in the safe.


- Head forward.
- Take the ROTARY KEY 3/4 (A) in the lower left.
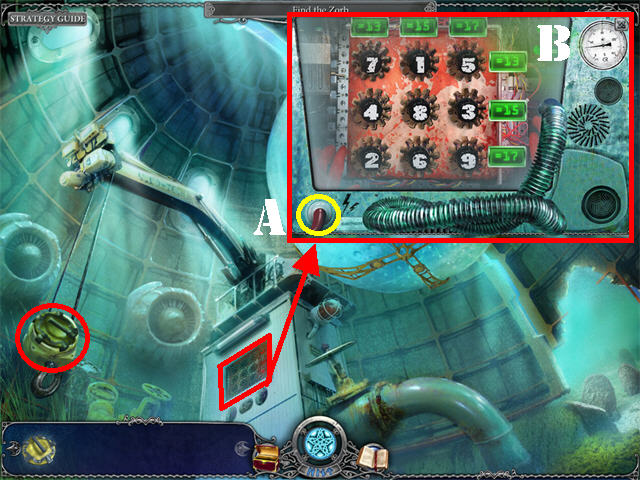
- Examine the electronic console; place the WIRE in the lower left corner to activate the puzzle.
- Click on any 2 dials to swap their positions.
- Arrange the dials so their sum adds up to the numbers in each row and column.
- Please look at the screenshot for the solution (B).
- The HOSE will be added to inventory after you solve the puzzle.

- Return to the cave.
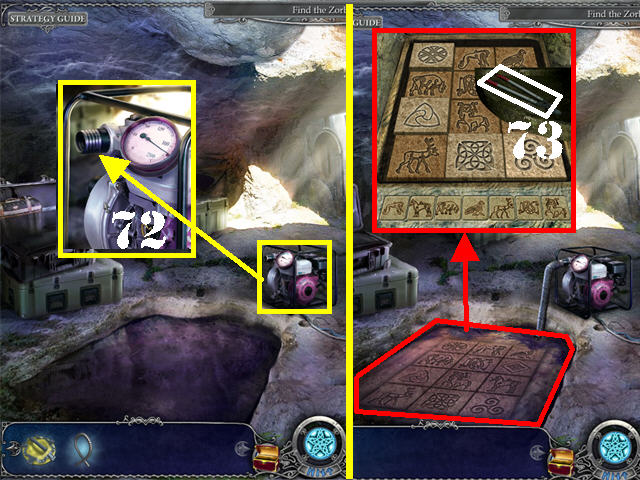
- Zoom into the pump; place the HOSE over the pump to remove the water on the ground (72).
- Examine the stone tiles on the ground to activate a puzzle.
- Click on the tiles in the correct order until they have all been pressed down.
- If you click on an incorrect tile the puzzle will reset and you will have to start over with the same sequence.
- The solution to this puzzle is random.
- Take the GARDEN PRUNER (73) after the puzzle has been solved.

- Return to the tower.
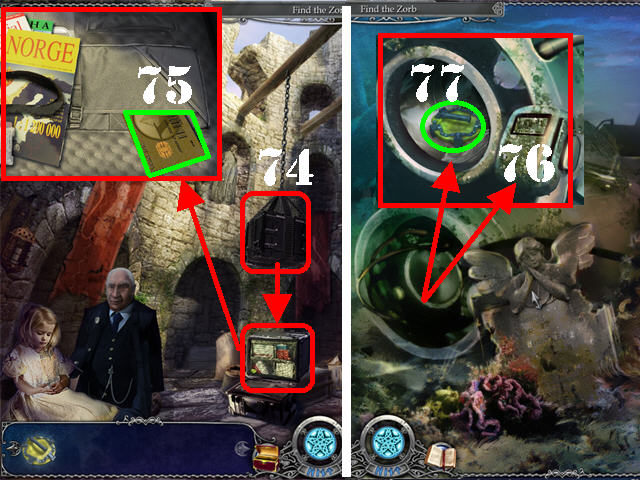
- Place the GARDEN PRUNER on the chained container hanging from the ceiling (74).
- Examine the container on the ground; take the ID CARD (75).
- Return to the underwater gateway and head right.
- Zoom into the device in the center; swipe the ID CARD on the scanner (76).
- Take the ROTARY SWITCH 4/4 (77) inside the device.

- Head left and then forward.
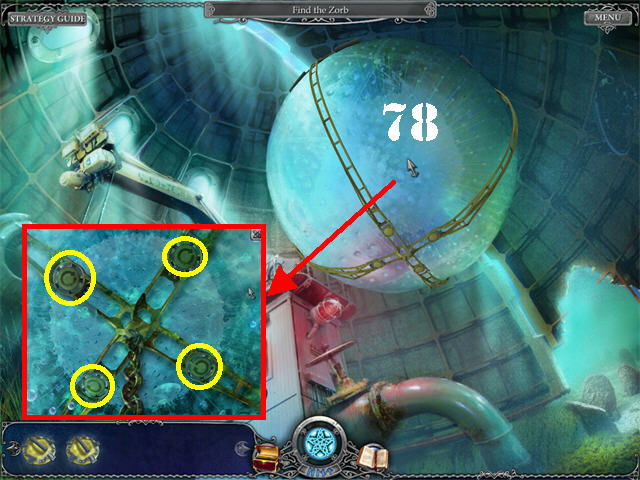
- Examine the Zorb in the upper center (78).
- Place the 4 ROTARY SWITCHES in each of the slots one by one until they have all been released.
- Click on the Zorb to end the chapter.
Chapter 11: The Hotel

- Zoom into the car; click on the number ’2841′ (A) scratched onto the car to add a journal page.
- Head forward twice to reach the hotel.
- Examine the sign on the ground; take the FEATHER (B).


- Enter the hotel.
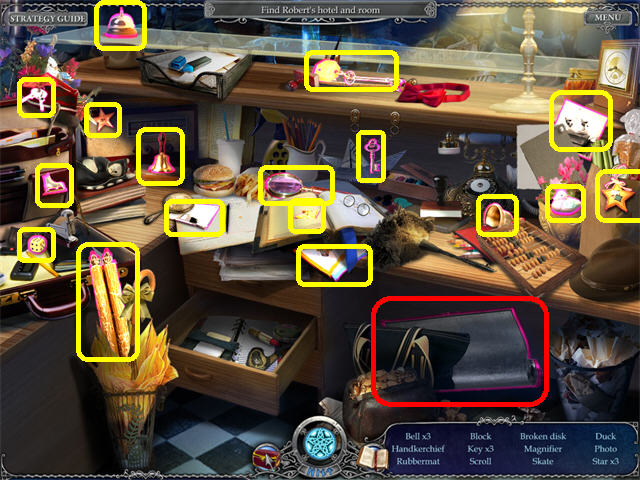
- Play the reception search scene to obtain the RUBBER MAT.

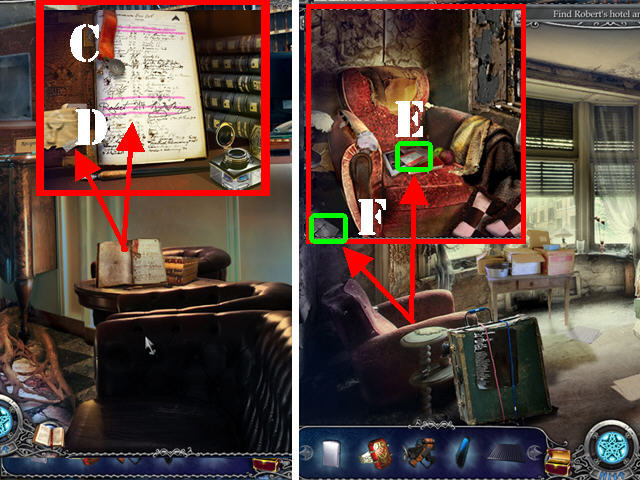
- Examine the guest register on the right; click on the page to add it to your journal (C).
- Note the taped-up key on the left; you need something to cut it loose (D).
- Go up the left steps and into the left door.
- Examine the chair on the left; take the TICKET (E).
- Click on the notebook in the lower left to add a journal page (F).

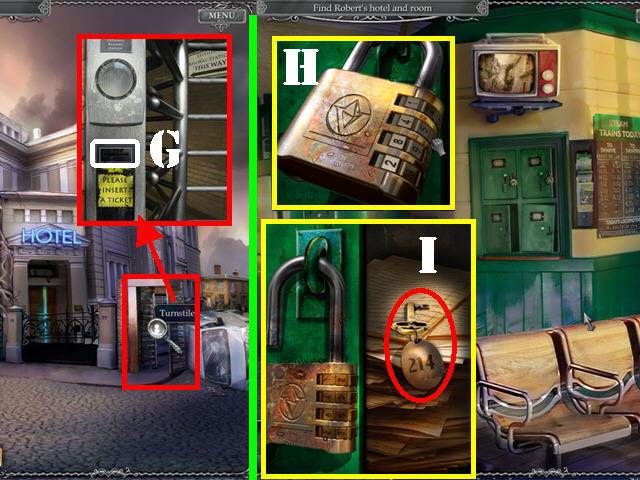
- Exit the hotel and click on the turnstile.
- Insert the ticket into the slot (G) and go through the turnstile to access the train station lobby.
- Examine the locker on the right.
- Change the numbers on the lock to ’2841′ the same as in the scratched car at the beginning of the game (H).
- Take the KEY with the room number 214 (I).

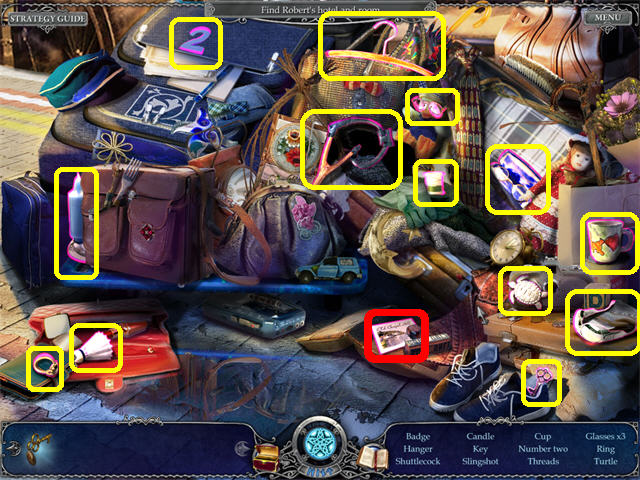
- Head left into the train platform.
- Play the baggage search scene to obtain the BADGE.

- Click down 4 times.
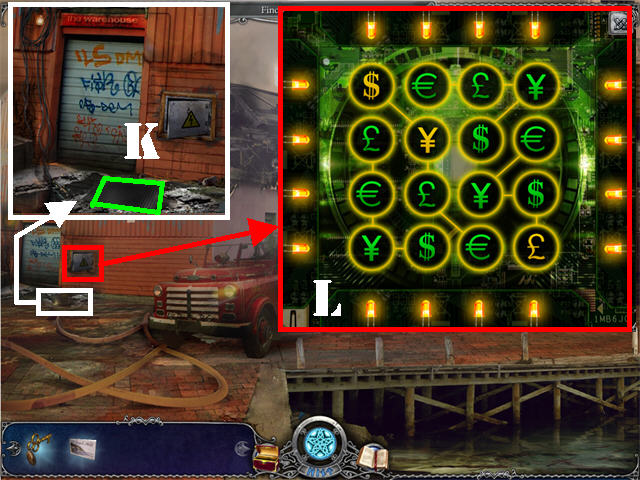
- Examine the entrance to the warehouse.
- Put the RUBBER MAT over the puddle of water (K).
- Examine the electronic board on the right to activate a puzzle.
- Every bundle, line, and column must contain a combination of four different symbols.
- Click on each circle to change the symbols.
- Please look at the screenshot for the solution (L).

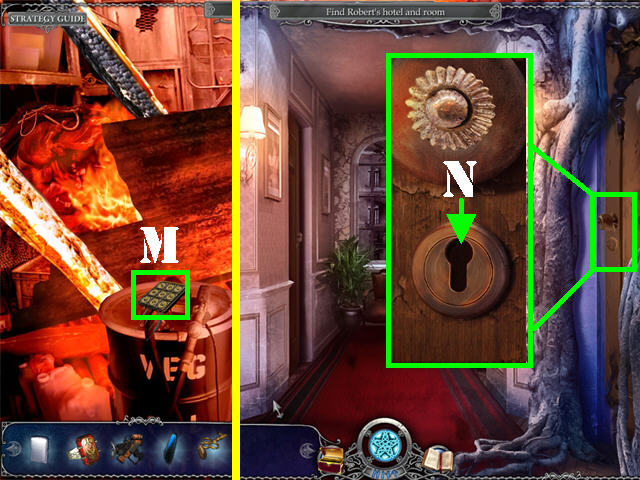
- Enter the warehouse.
- As you enter the warehouse the roof collapses.
- Take the BUTTONS in the lower left (M).
- Return to the upstairs hallway in the hotel.
- Zoom into the right door (Room 214).
- Put the KEY in the keyhole and go inside (N).

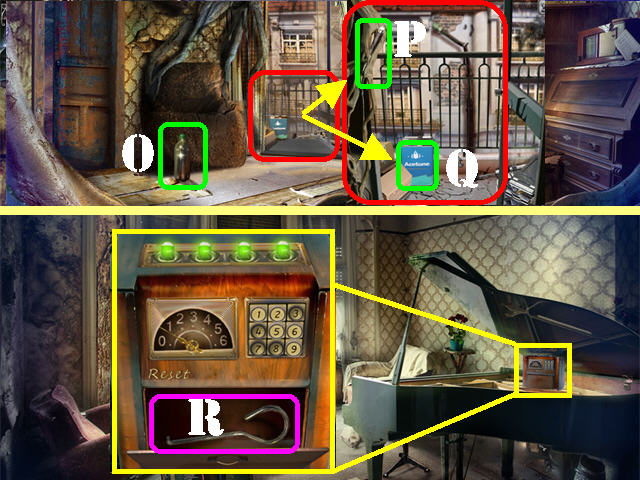
- Take the EMPTY BOTTLE (O) on the ground.
- Examine the balcony; take the CANISTER OF ACETONE (Q) and the KNIFE (P).
- Exit this room and go into the left door.
- Take a closer look at the device above the piano.
- Put the BUTTONS on the device to activate a puzzle.
- You have 6 tries to guess the correct combination to open the cabinet.
- The solid green lights indicate numbers that have been pushed in correctly. Flashing green lights are correct but in the wrong order. Red lights are incorrect.
- The solution for this puzzle is random. The puzzle will reset after 6 incorrect tries.
- Take the HOOK (R) inside the cabinet.
Chapter 12: The Finale

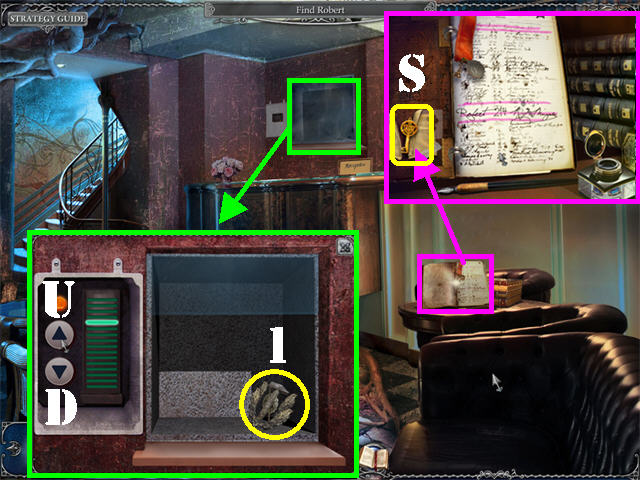
- Return to the reception area.
- Zoom into the guest register; cut loose the SMALL KEY with the KNIFE (S).
- Zoom into the lift shaft on the back wall.
- Place the BADGE in the slot to activate the puzzle.
- To solve the puzzle; press the buttons in this order: U-D-U-U-D-U-D-U.
- Take the STAMP (1) after the puzzle has been solved.

- Go outside and go through the turnstile.
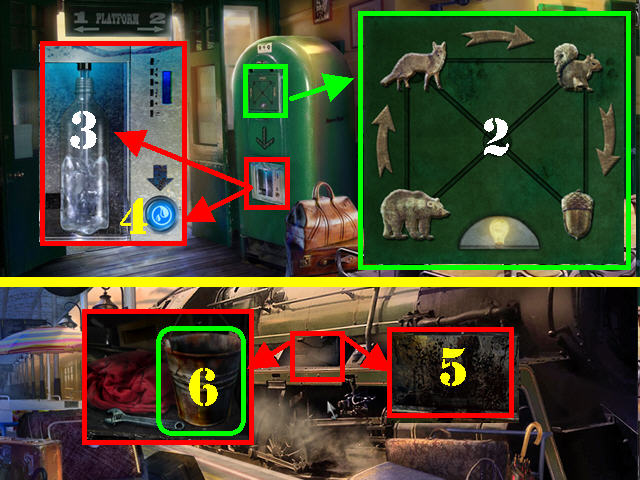
- Examine the vending machine to activate a puzzle.
- Click on the acorn or one of the animals to move them into an empty slot until they all land in the correct spots.
- Please look at the screenshot for the solution (2).
- Zoom into the bottom of the vending machine.
- Place the EMPTY BOTTLE in the window.
- Click on the blue button (4) to fill the bottle.
- Take the BOTTLE OF WATER (3).
- Head left to access the platform.
- Zoom into the toolbox on the side of the train.
- Pour the CANISTER OF ACETONE on the oily area (5).
- Tap on the cover to remove it and take the BUCKET (6).

- Click down thrice.
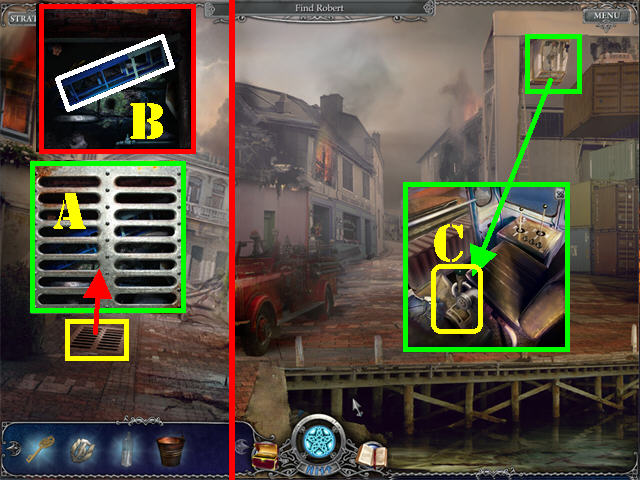
- Examine the drainage area on left.
- Remove the grating with the HOOK (A); take the EXTENDABLE STEPLADDER (B).
- Click down.
- Examine the lift crane cabin in the upper right.
- Put the STAMP on the side of the LEVER (C).
- Click on the lever to drop the container it’s holding.

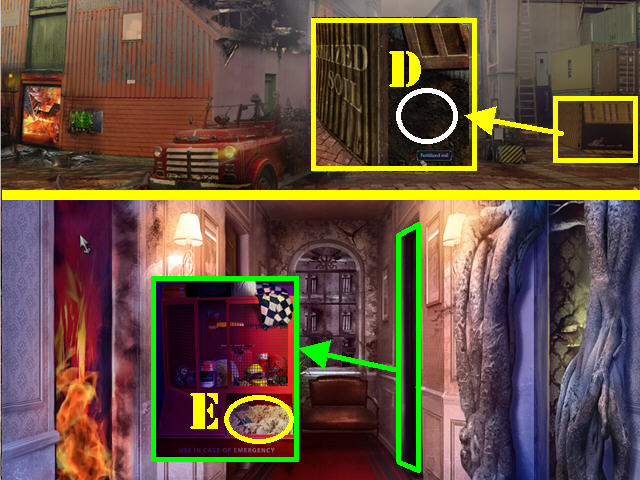
- Examine the transport container on the ground; click on the FERTILIZED SOIL to add it to inventory (D).
- Go into the hotel’s upstairs hallway.
- Zoom into the locker room on the right.
- Place the BUCKET in the SAND to obtain the BUCKET OF SAND (E).

- Head right into Room 214.
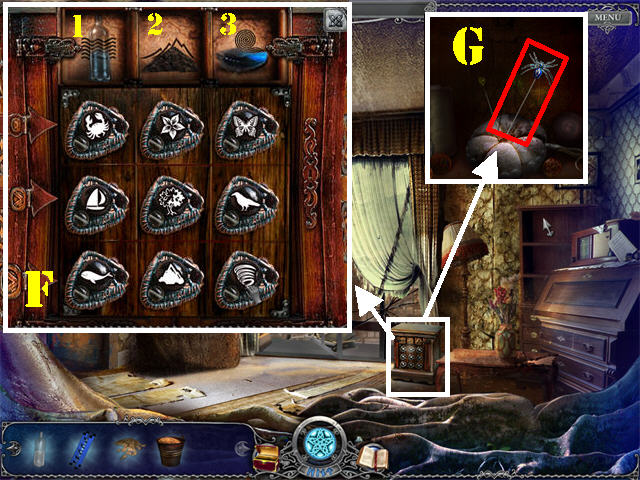
- Zoom into the cabinet by the window.
- Place the correct items into each of the 3 windows using the pictures as clues.
- Place the BOTTLE OF WATER (1) on the left slot.
- Put the FERTILIZED SOIL (2) in the center slot.
- The FEATHER (3) belongs in the last slot.
- Arrange the elements in the correct order according to the images below them from smallest to biggest.
- Click on any 2 stones to swap their positions.
- Please look at the screenshot for the solution (F).
- Take the SHARP HAIRPIN (G) after the puzzle has been solved.

- Return to the inside of the warehouse.
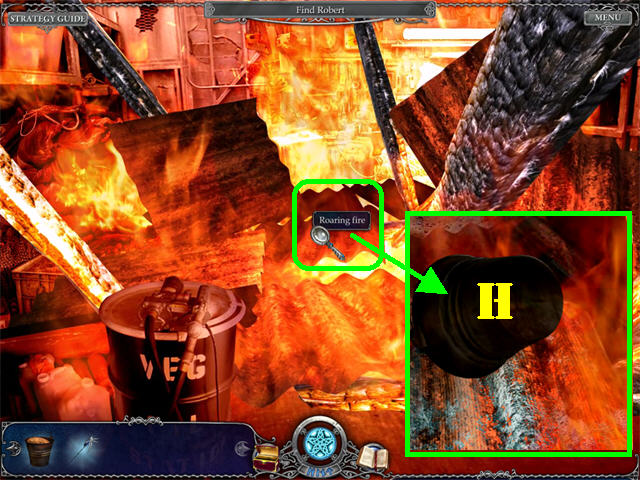
- Examine the roaring fire.
- Pour the BUCKET OF SAND on the fire to extinguish it (H).

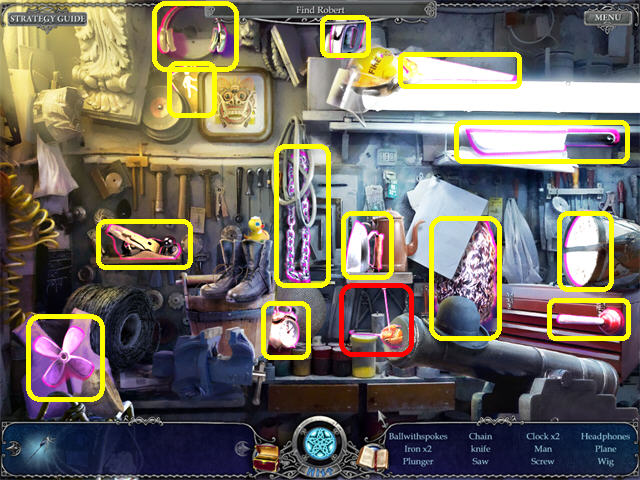
- Play the warehouse equipment search scene to obtain the SPOKES.

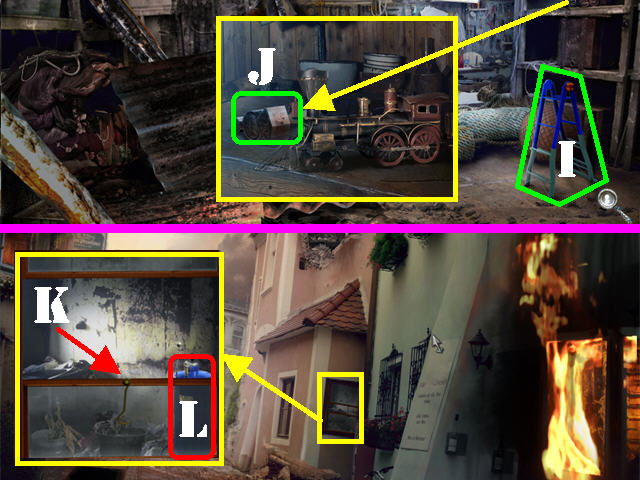
- Put the EXTENDABLE STEPLADDER by the right shelf (I).
- Examine the top shelf; take the RAILWAY STAMP (J).
- Exit the warehouse and go forward to reach the alley.
- Zoom into the window on the right.
- Place the SPOKES on the hook attached to the window (K); take the GARDEN SPRAYER (L).

- Return to the train station platform.
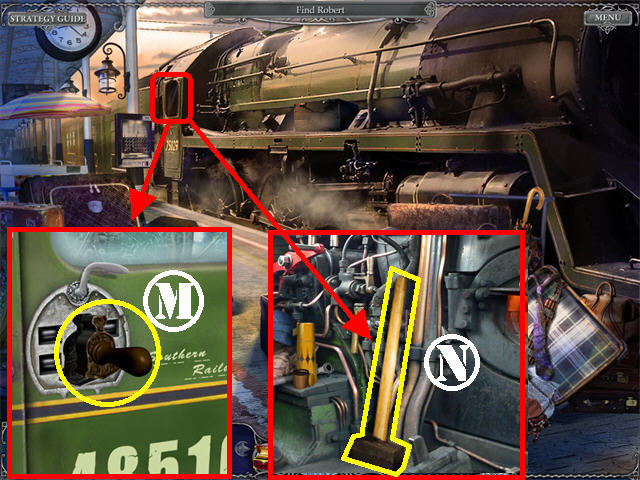
- Take a closer look at the locomotive cabin and put the RAILWAY KEY on the lock (M).
- Take the HAMMER (N) inside the cabin.

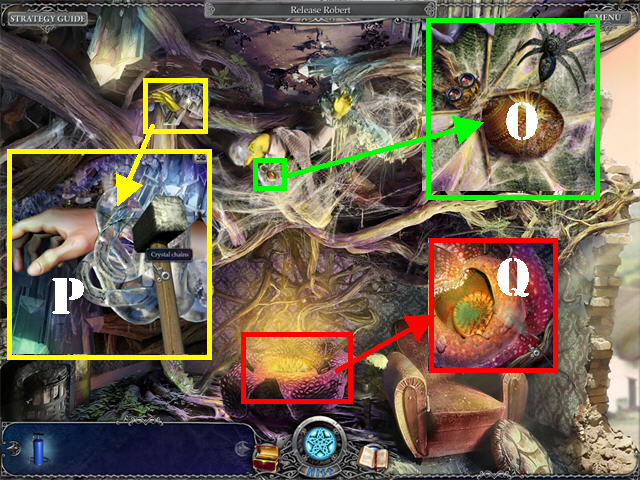
- Return to Room 214 in the hotel and go into the left door.
- Examine the spider web by the man to add a journal page; put the SHARP HAIRPIN on the toy spider (O).
- Examine the crystal chains in the upper left; break them with the HAMMER 4 times (P).
- Zoom into the carnivorous flower in the lower center; spray it with the GARDEN SPRAYER (Q).
- Go through the dialogue with Robert.

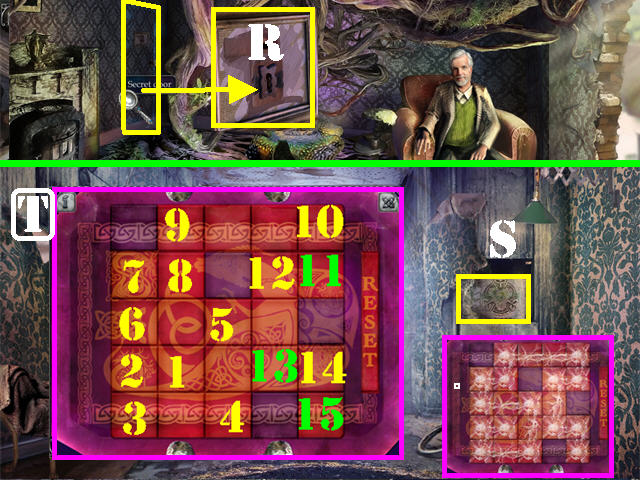
- Examine the secret door on the left; place the SMALL KEY in the keyhole (R).
- Go through the door.
- Zoom into the Celtic Dragon symbol (S) on right and place the DRAGON RING on the symbol for Cernunnos to appear.
- Click on the tiles in correct order you can crack each of the tiles.
- The darkened tiles cannot be clicked.
- Please look at the screenshot for the solution (T).
- Congratulations! You have completed Hallowed Legends: Samhain!


 Iron Roses Walkthrough, Guide, & Tips
 Spirit of Revenge: Cursed Castle Walkthrough, Guide, & Tips
 European Mystery: The Face of Envy Walkthrough, Guide, & Tips
 Destination: Treasure Island Walkthrough, Guide, & Tips
 Theatre of Shadows: As You Wish Walkthrough, Guide, & Tips