Time Dreamer: Temporal Betrayal Walkthrough, Guide, & Tips
Time Dreamer: Temporal Betrayal Walkthrough

Welcome to the Time Dreamer: Temporal Betrayal Walkthrough
After joining a research team you are sent out to mine valuable krawtite. Along the way, however, something goes horribly wrong!
Whether you use this document as a reference when things get difficult or as a road map to get you from beginning to end, we’re pretty sure you’ll find what you’re looking for here.
This document contains a complete Time Dreamer: Temporal Betrayal game walkthrough featuring annotated screenshots from actual gameplay!
We hope you find this information useful as you play your way through the game. Use the walkthrough menu below to quickly jump to whatever stage of the game you need help with.
Remember to visit the Big Fish Games Forums if you find you need more help. Have fun!
This walkthrough was created by Chie, and is protected under US Copyright laws. Any unauthorized use, including re-publication in whole or in part, without permission, is strictly prohibited.
General Tips


- The game has two modes, Casual and Expert.
- Casual mode has easier puzzles, sparkles and shape hints for hidden objects.
- Expert mode has harder puzzles, no sparkles or shape hints for hidden objects.
- On the left side of the interface is a journal (1) that holds your quest information and a bag (2) that will bring up your inventory items.
- On the right side is the hint button and a container of “Krawkite” that shows you how close you are to the next hint.
- In the inventory panel in the middle, click on the question mark if you aren’t sure what an inventory item is.
- When you enter a hidden object scene, the inventory panel will turn into a word list.
- Puzzles always have instructions written somewhere, but you cannot back out of them. If you want to skip the puzzle use the hint bar in the lower right corner.
- If you get stuck, you can click hint (3) at any time and it will tell you where to go and what to do.
Chapter 1: Plane Crash
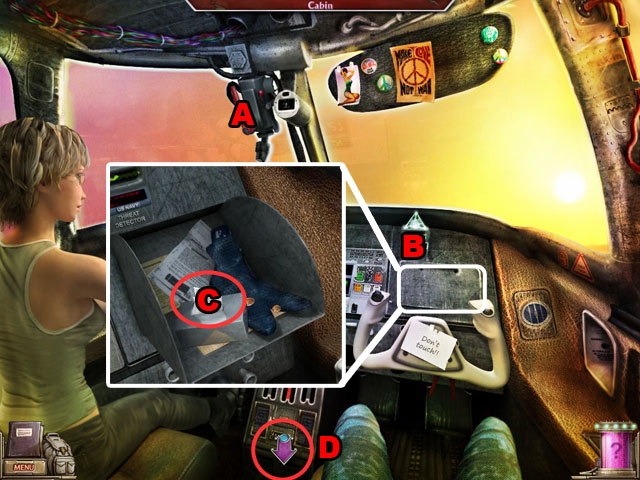
- Pull the lever (A).
- Zoom in on the glove box (B).
- Collect the TISSUE (C).
- Move to the back cabin from the bottom of the screen (D).
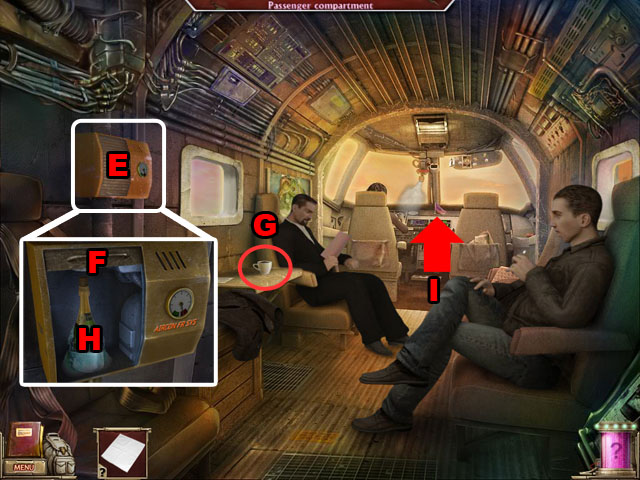
- Zoom in on the air conditioning unit (E).
- Open the shutter (F).
- Collect the CUP OF TEA (G).
- Zoom in on the air conditioning unit again and use the CUP OF TEA to defrost the ice on the bottle (H).
- Return to the cockpit (I).
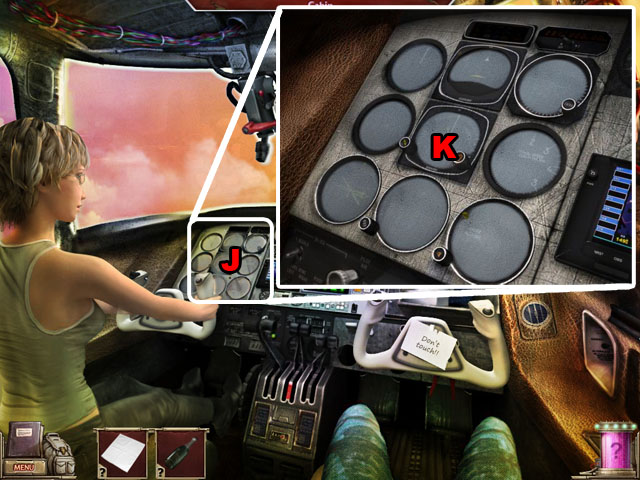
- Zoom in on the cockpit display (J).
- Clean up the display with the TISSUE (K).
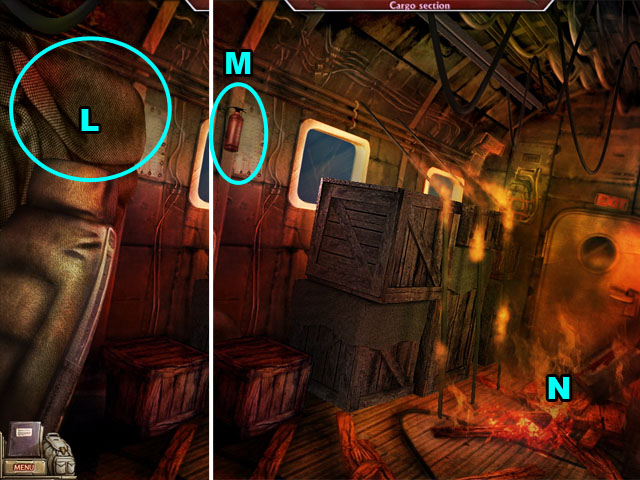
- Take off the rug (L).
- Collect the FIRE EXTINGUISHER (M).
- Use the FIRE EXTINGUISHER to extinguish the fire (N).
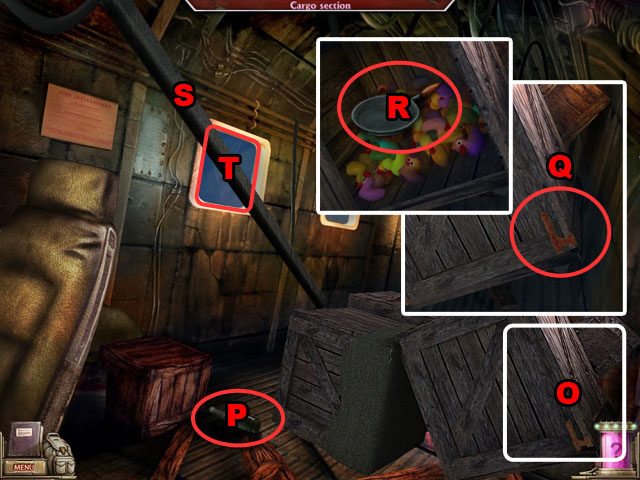
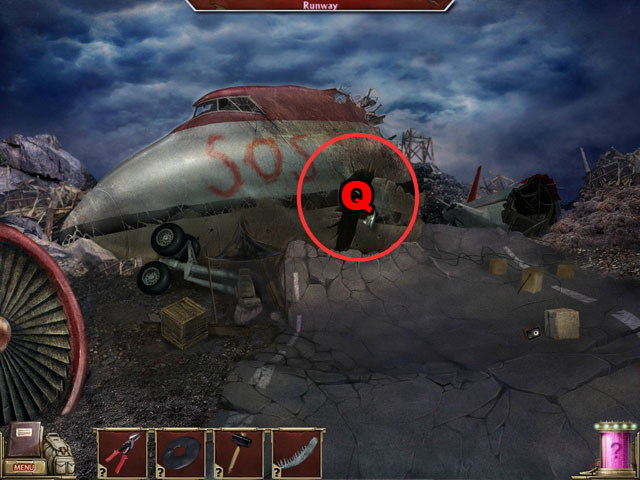
- Zoom in on the box (O).
- Collect the BOTTLE (P).
- Zoom in on the box (O) again and use the BOTTLE to cool down the hinges (Q).
- Open the box. Collect the FRYING PAN (R).
- Move the pole (S).
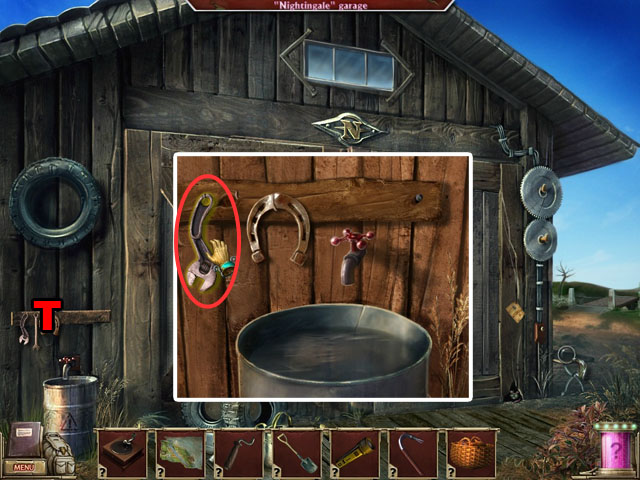
- Zoom in on the window (T).
- Use the FRYING PAN to break the glass.
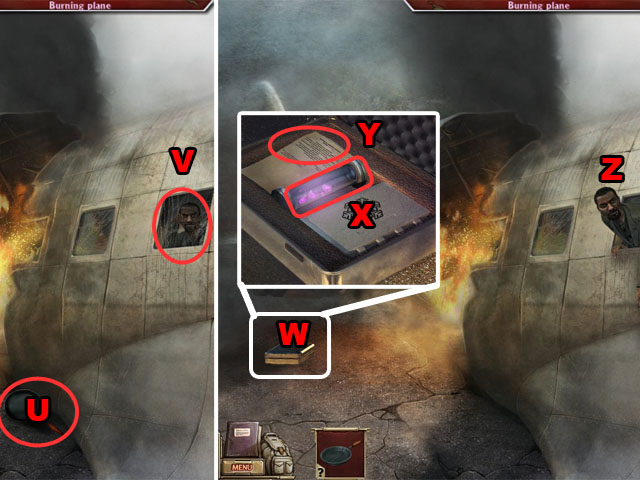
- Collect the FRYING PAN (U).
- Break the window with the FRYING PAN (V).
- Zoom in on the brief case (W).
- Collect the KRAWTITE (X).
- Zoom in on the paper (Y).
- Give the KRAWTITE to the professor (Z).
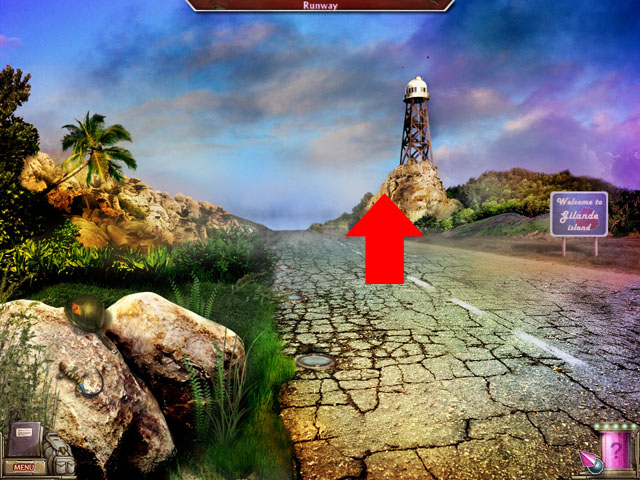
- Move to the next scene (red arrow).
Chapter 2: Fix the Tower
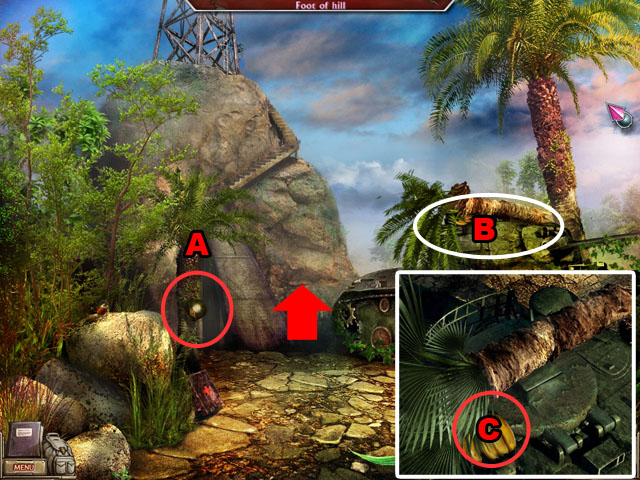
- Take the helmet from the tree and collect the KNIFE that was under the helmet (A).
- Zoom in on the tank (B).
- Use the KNIFE to collect the BANANA (C).
- Move to the next scene.
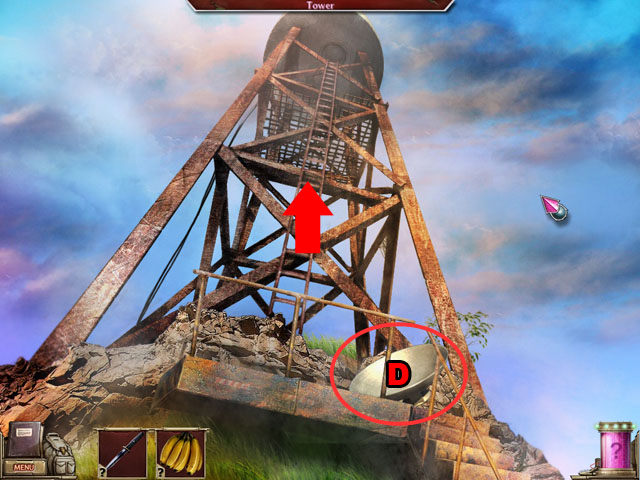
- Collect the DISH (D).
- Go up the ladder.
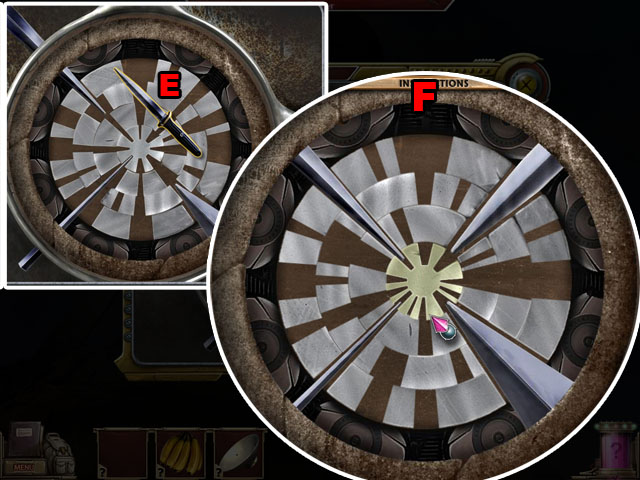
- Open the hatch.
- Place the KNIFE in the center (E).
- Rotate the discs in any direction until all four spikes go through to the center (F).
- Each spike will not go into the center unless the holes in front of it are large enough.
- In the final solution, the four spikes will fit perfectly into the slots in the discs.
- Enter the tower.
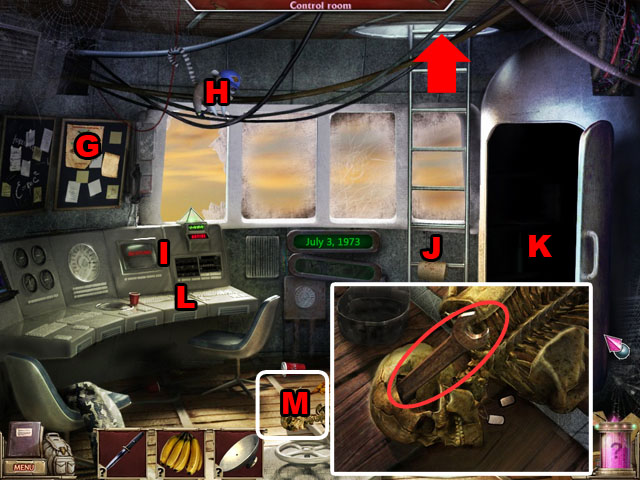
- Zoom in on the paper (G).
- Try to catch the monkey (H), then give the BANANA to the monkey.
- Zoom in on the panel (I) and inspect the computer.
- Zoom in on the memo (J) to read it.
- Open the closet (K).
- Collect the PIECE OF A PAPER (L).
- Zoom in on the skeleton (M) and collect the WRENCH.
- Climb up the ladder.
- Place the ANTENNA PLATE.
- Return to the runway.
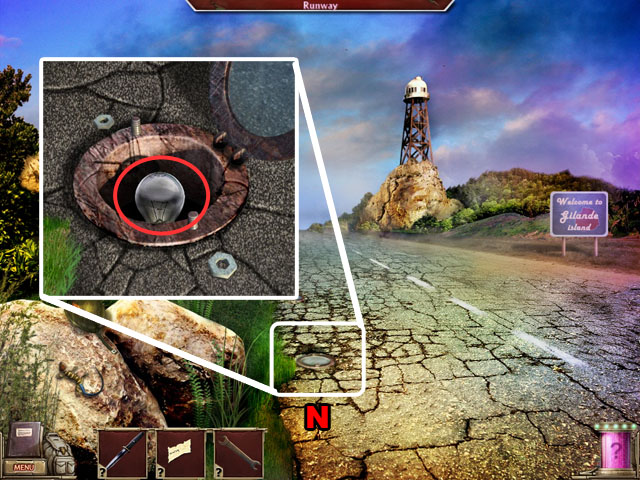
- Zoom in on the light (N).
- Open the cover with the WRENCH.
- Collect the LIGHT BULB.
- Return to the control room.

- Zoom in on the closet (O).
- Set the LIGHT BULB.
- Collect the ROPE (P).
- Return to the foot of the hill.
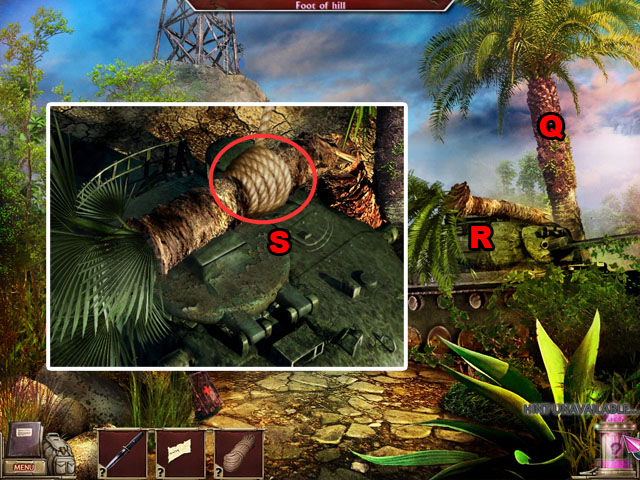
- Tie the ROPE on the palm tree (Q).
- Zoom in on the tank (R).
- Tie the rope on the palm tree on the tank. Exit the window.
- Pull the rope on the palm tree beside the tank (S).
- Zoom in on the tank again.
- Open the hatch and zoom in on the tank turret.
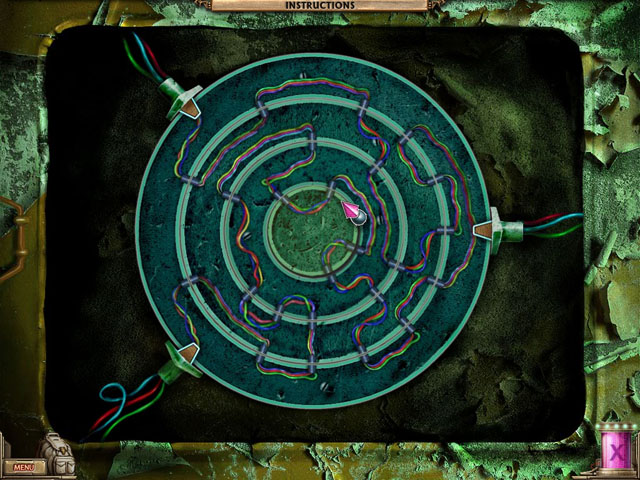
- Rotate the disks until all of the cords connect to each other.
- Start from the outer ring and work your way in to the middle, connecting each wire as you go.
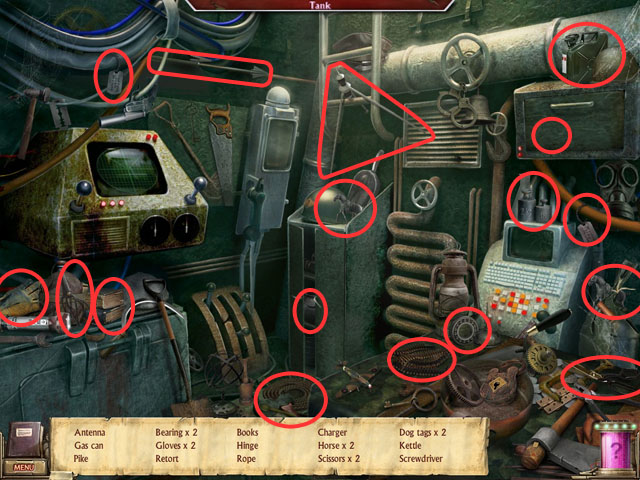
- Find the hidden objects and receive the ANTENNA.
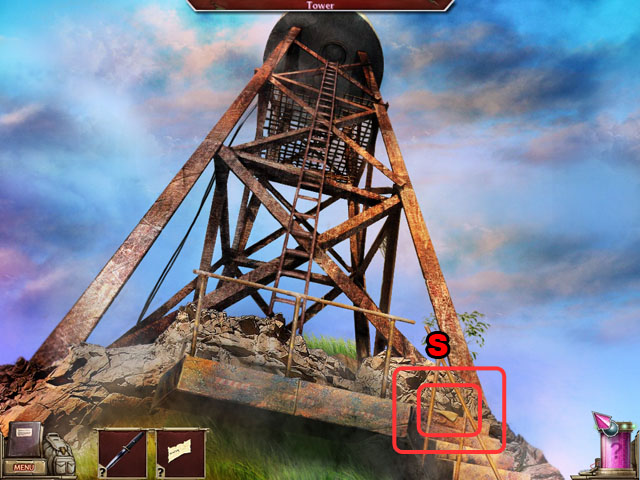
- Climb the tower.
- Collect the PIECE OF A PAPER (S).
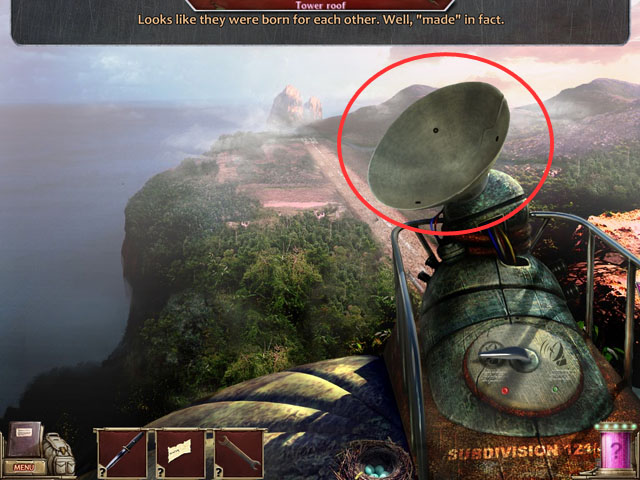
- Return to the tower roof.
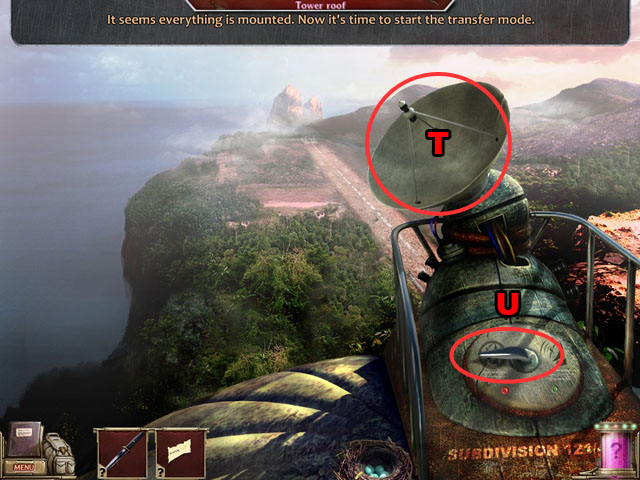
- Set the ANTENNA (T).
- Turn on the dish (U).
- Return to the control room.

- Zoom in on the control panel (V).
- Enter the password: 48151623.
- Press the enter button that is to the right side of the numbers.
- Press the MANUAL CALIBRATION button.
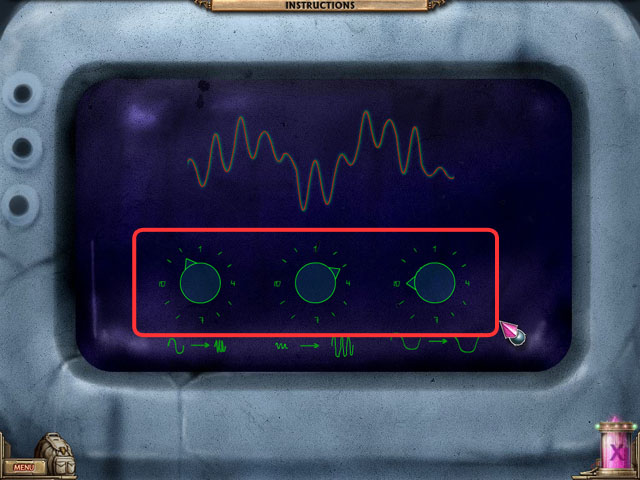
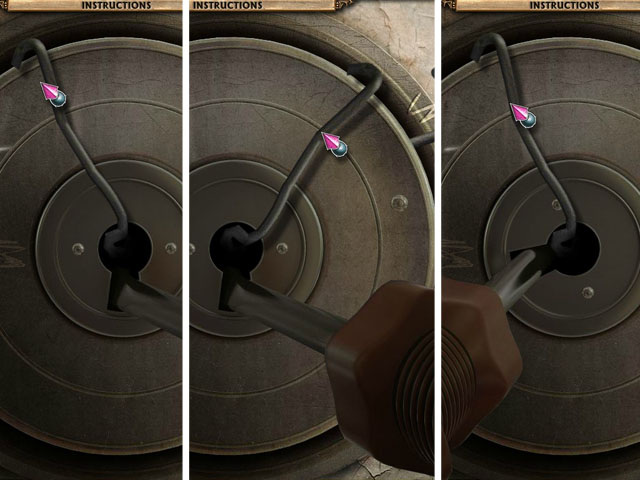
- The goal of this mini-game is to match the red graph to the green graph.
- The shape of the green graph is randomized.
- First, use the left dial until the amount of peaks and placement of the peaks of the red graph match the green graph.
- Next, use the middle dial until the sizes of the peaks are the same as the green graph. The graphs will still be slightly off.
- Lastly, use the right dial until the puzzle is finished.
Chapter 3: Halloween
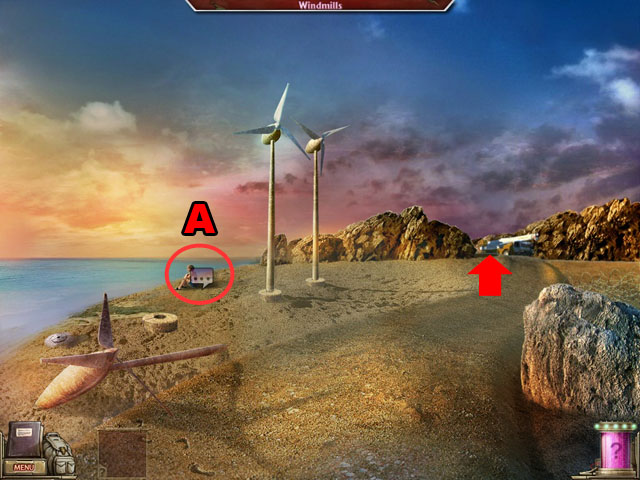
- Talk with your sister (A).
- Move to the next scene.
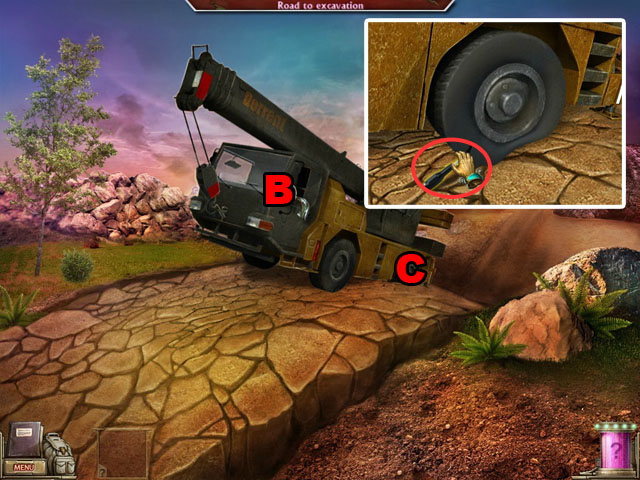
- Zoom in on the driver seat (B).
- Try to move the truck with the steel wheel.
- Exit and zoom in on the flat tire (C).
- Collect the SCREWDRIVER (red).
- Move to the next scene.
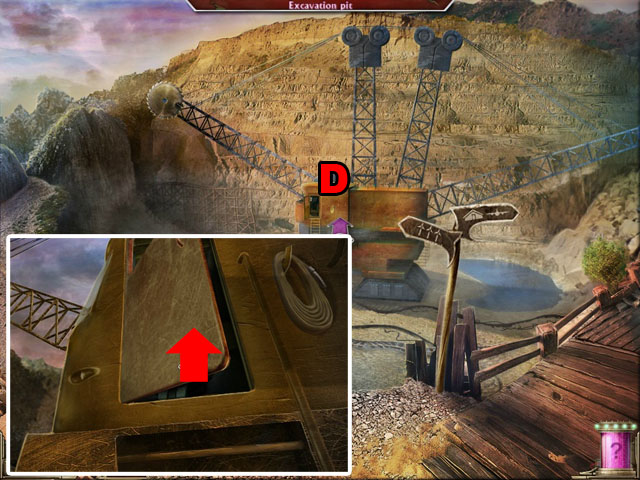
- Zoom in on the cabin of the digger (D).
- Enter the cabin.
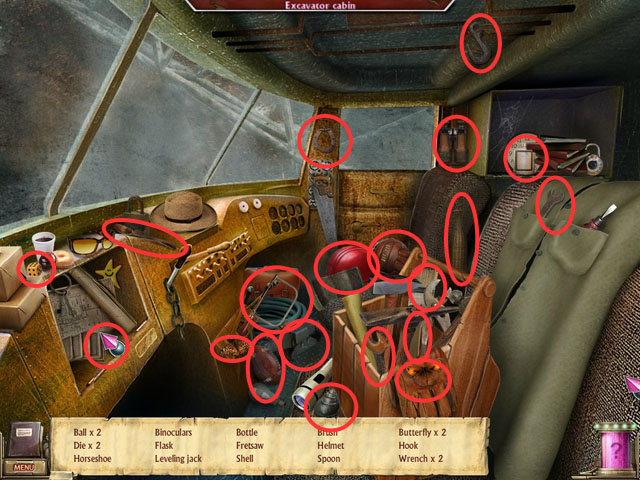
- Find the hidden objects and receive the LEVELING JACK.
- Return to the previous scene.
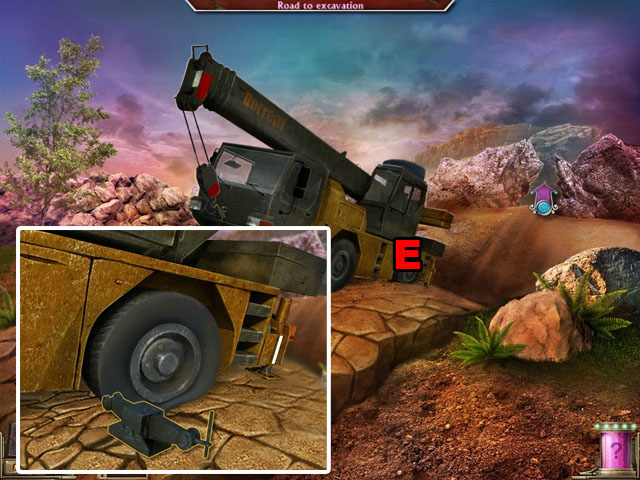
- Zoom in on the flat tire (E).
- Set the LEVELING JACK under the tire.
- Use the LEVELING JACK once to make the car level.
- Return to the excavation pit.
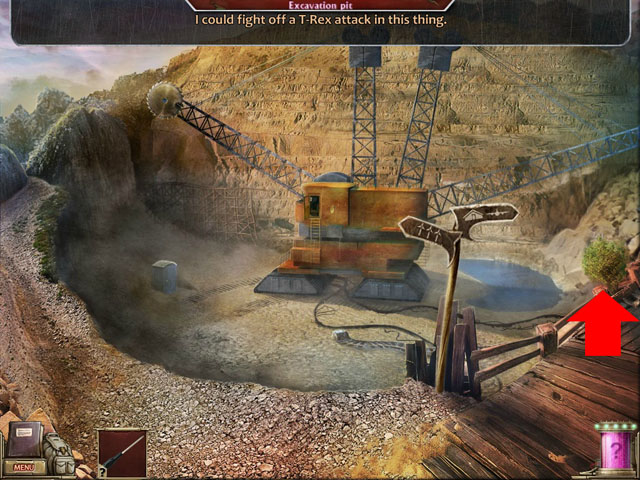
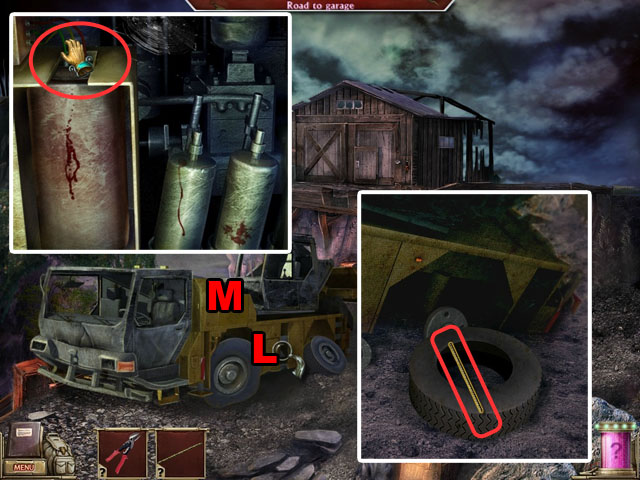
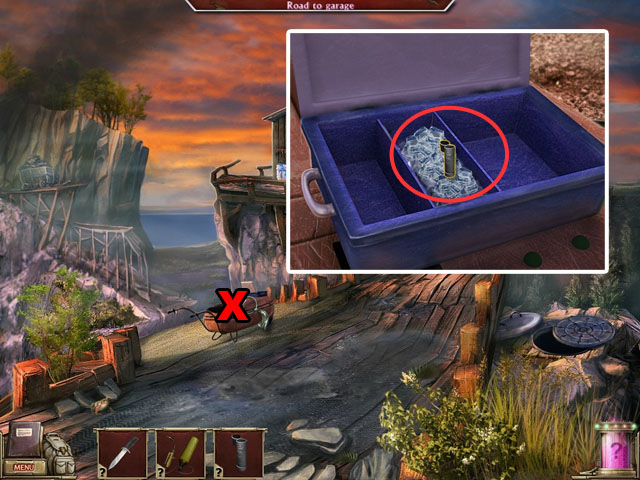
- Move to the road to the garage (red arrow).
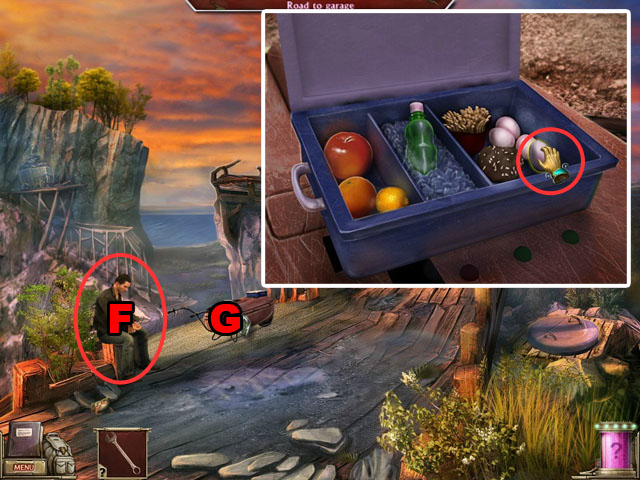
- Talk with Frei (F).
- Zoom in on the dinner case (G).
- Open the case and collect the EGG.
- Return to the truck.
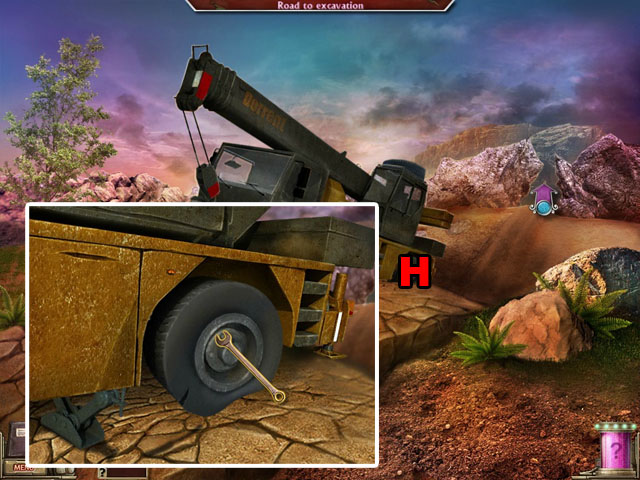
- Zoom in on the flat tire (H).
- Unscrew the screw with the WRENCH.
- Move to the garage entrance.
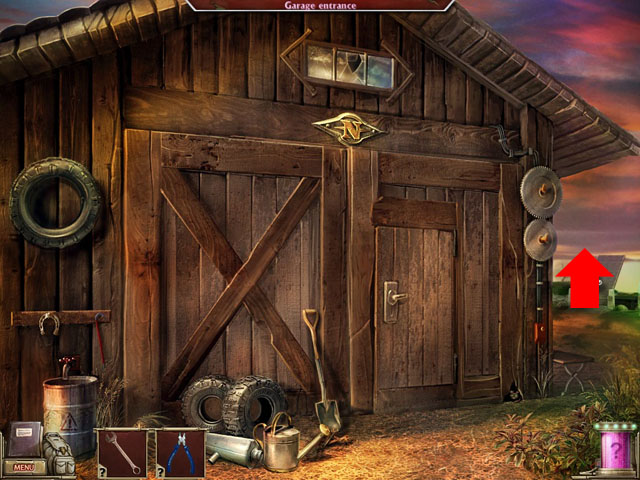
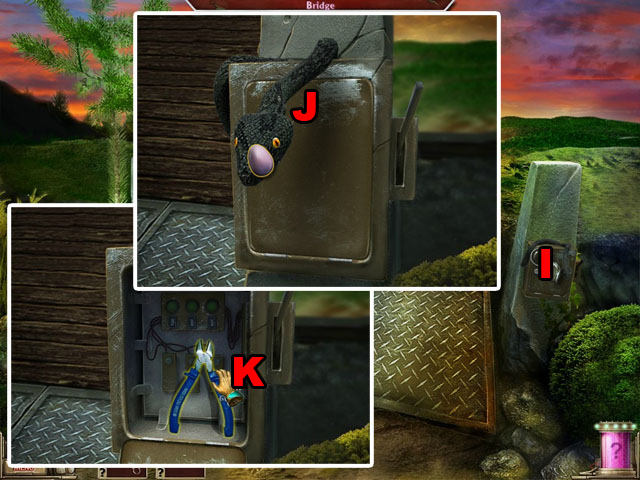
- Zoom in on the cable box (I).
- Give the EGG to the snake (J).
- Open the cable box.
- Collect the PLIERS (K).
- Return to the truck.
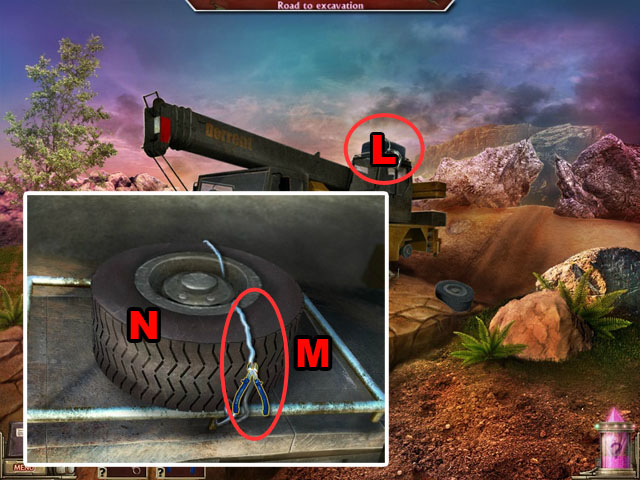
- Zoom in on the spare wheel (L).
- Cut the wire with the PLIERS (M).
- Collect the tire.
- Place the SPARE TIRE (N).
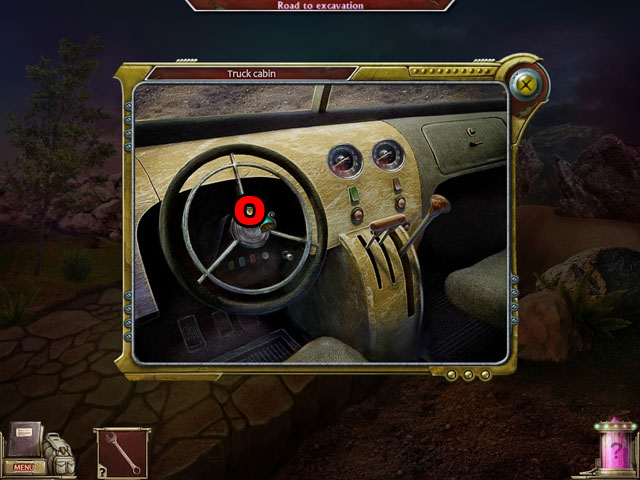
- Zoom in on the truck cabin.
- Try to start the car (O).
- Return to the beach.
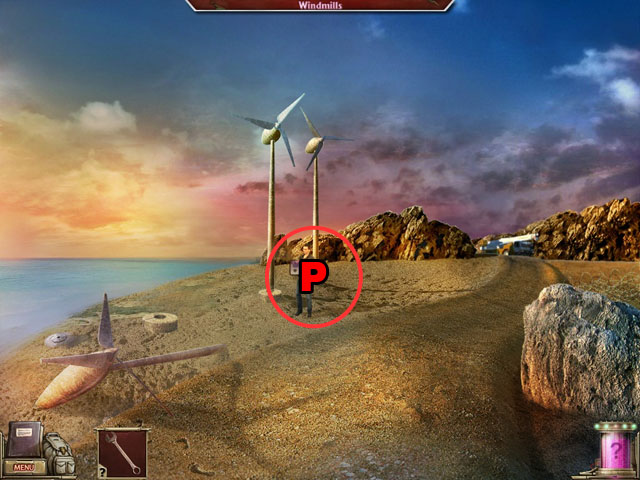
- Talk with Frei (P).
- Return to the garage entrance.

- Open the door with the KEY from Frei (Q).
- Enter the garage.
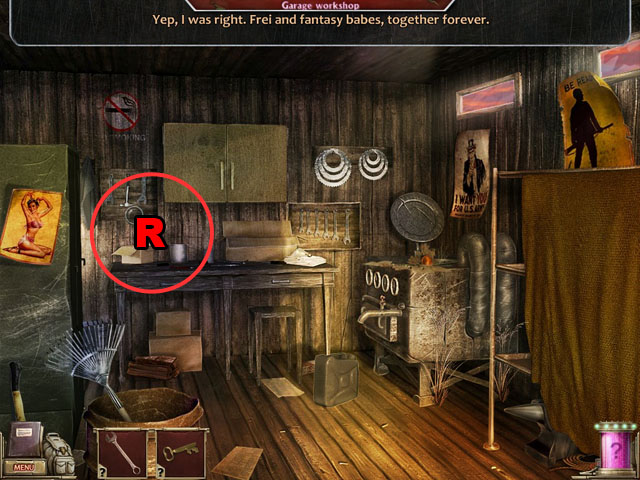
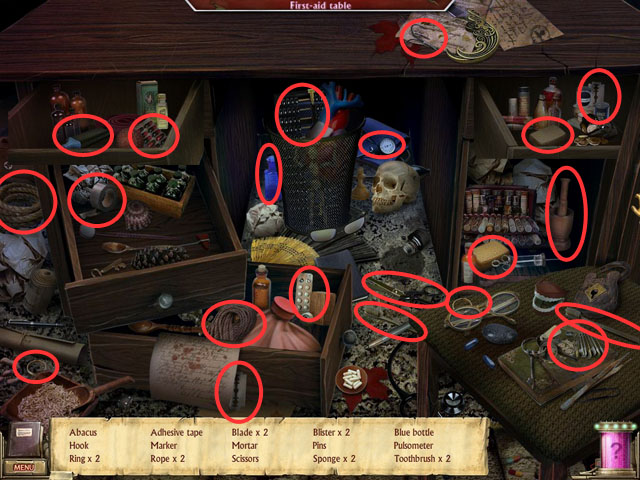
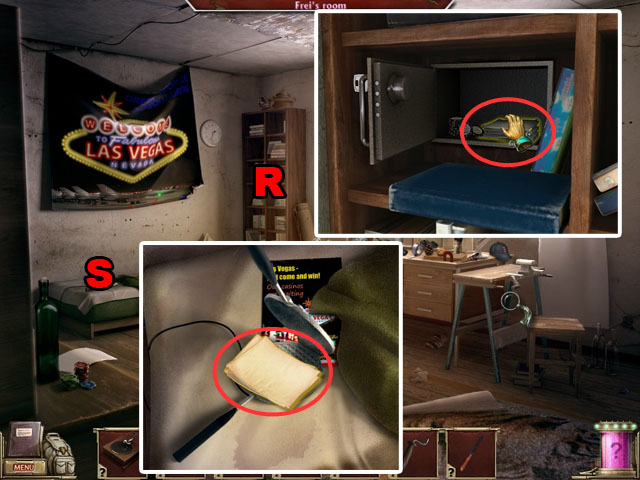
- Zoom in on the table (R).
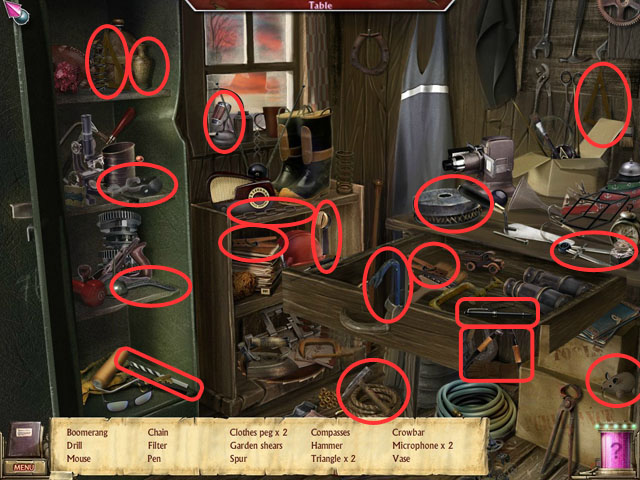
- Find the hidden objects and receive the FUEL FILTER.
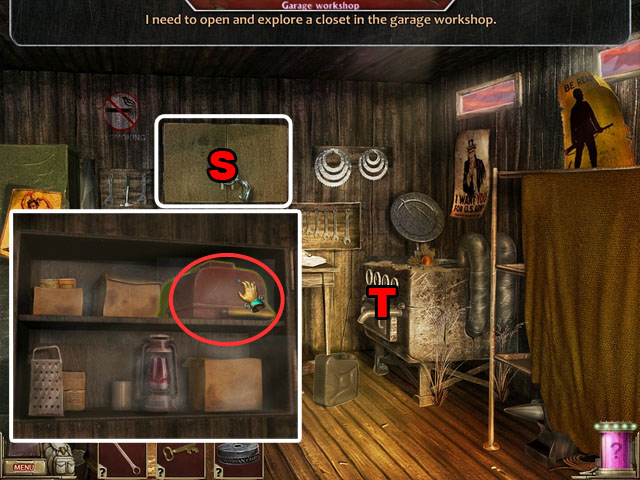
- Zoom in on the closet (S).
- Collect the FUEL PUMP.
- Zoom in on the machine (T).
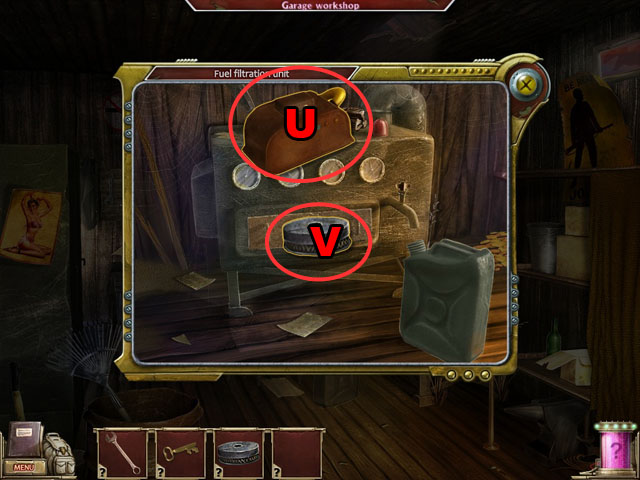
- Set the FUEL PUMP (U).
- Set the FUEL FILTER and open the door (V).
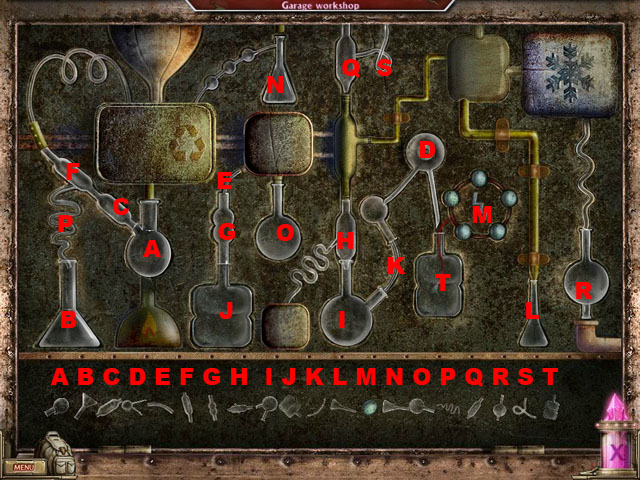
- Set the pieces of the machine in the correct places as indicated by their shape. Each piece only fits in one location as labeled in the screenshot.
- Collect the CANISTER.
- Return to the truck.
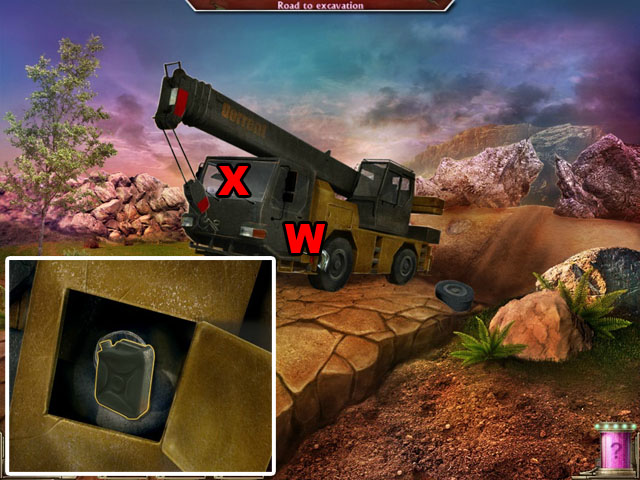
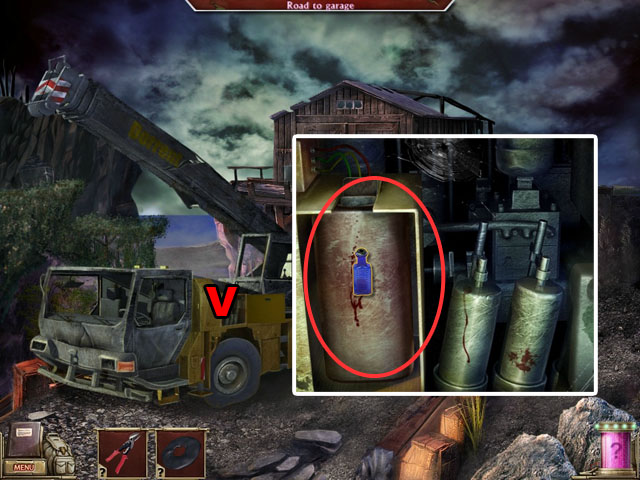
- Zoom in on the fuel tank (W).
- Put the fuel into the FUEL CANISTER.
- Zoom in on the cabin (X).
- Use the steering wheel.
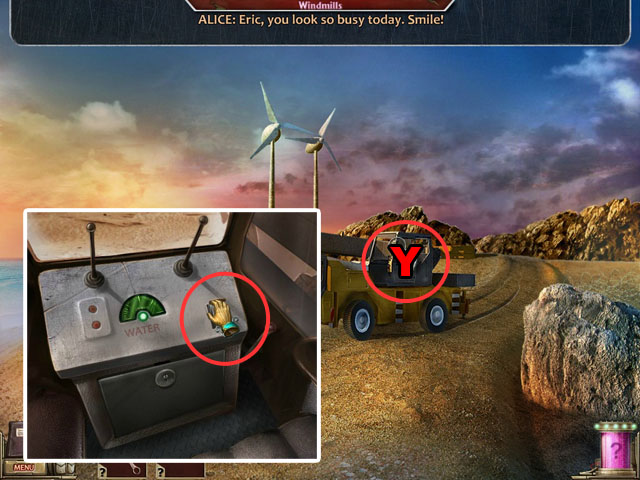
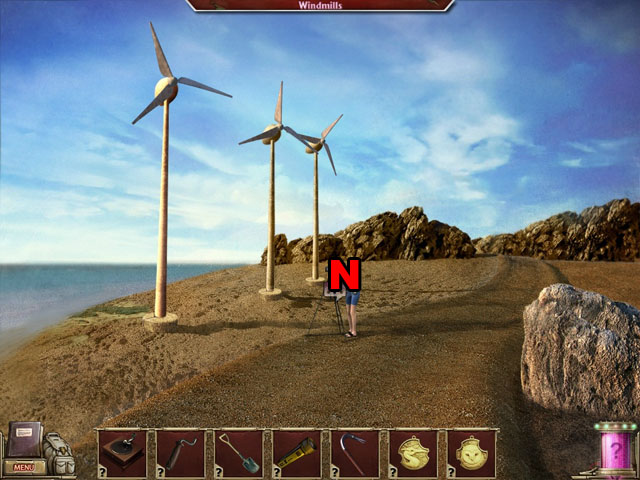
- Zoom in on the crane cabin (Y).
- Pull the lever.
- Use the two levers to move the crane claw to the left, right, up and down.
- Press the open button to let go of the windmill, press the close button to pick it up.
- If you drop the windmill, press the close button to pick it up again, but do not move it with the other levers.
- Pick the windmill up at (1) and place it at (2).
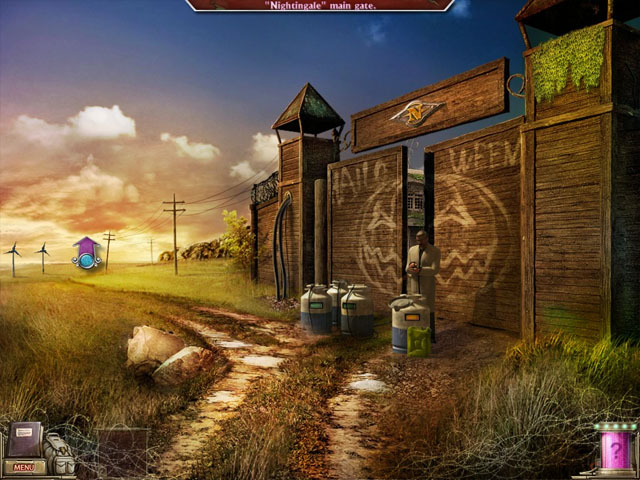
- Return to the main gate and go through it.
Chapter 4: The Future

- Collect the BALLOON (A).
- Zoom in on the wall (B).
- Take off the stones until the wire shows up.
- Collect the WIRE (C).
- Collect the NUT and STONE highlighted in red.
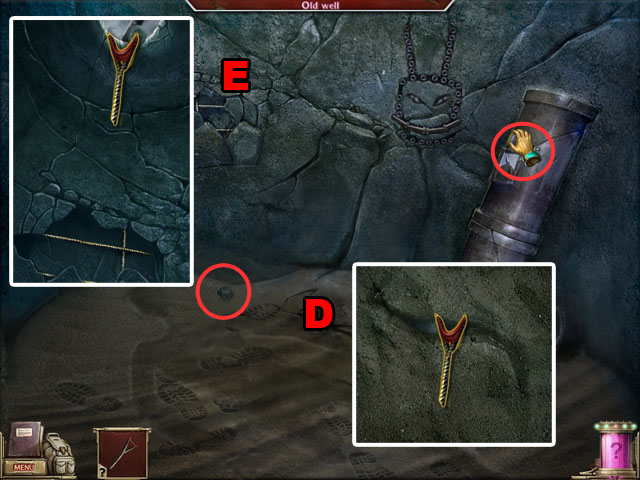
- Zoom in on the crack (D).
- Use the SLINGSHOT to dig out the ball.
- Collect the STONE on the right side of the screen.
- Zoom in on the wall again (E).
- Use the SLINGSHOT until you get the bucket.
- Get out of the well with the bucket.
- Move to the next scene (red arrow).
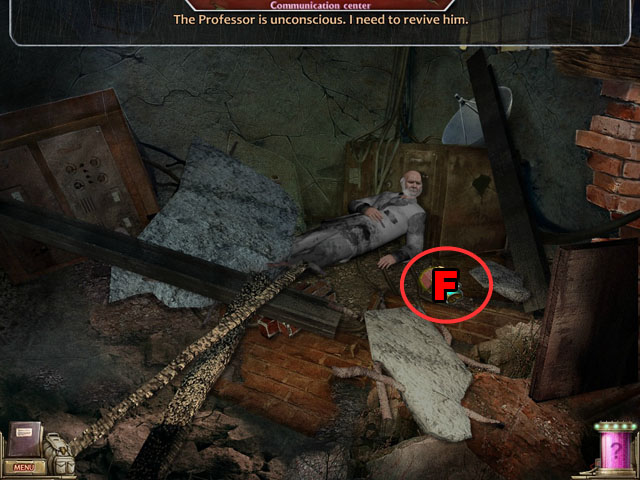
- Move the collapsed building parts until you can see the professor.
- Collect the BRICK (F).
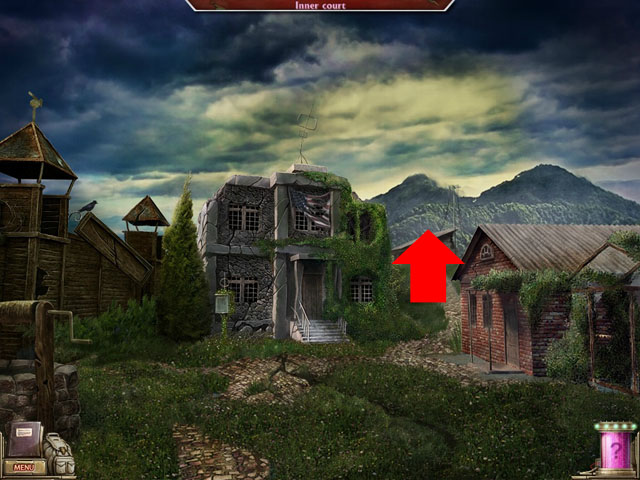
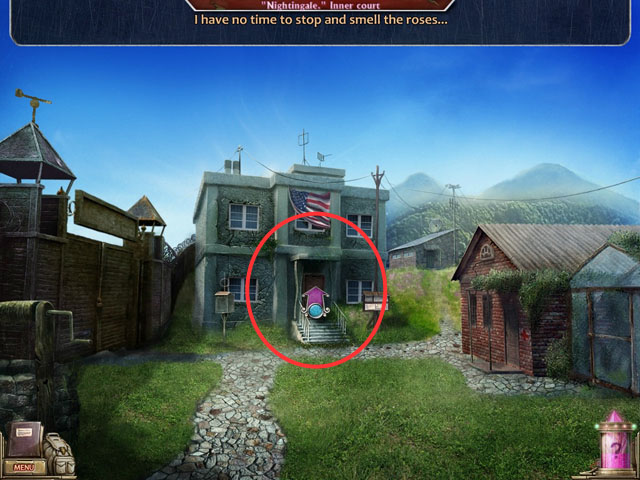
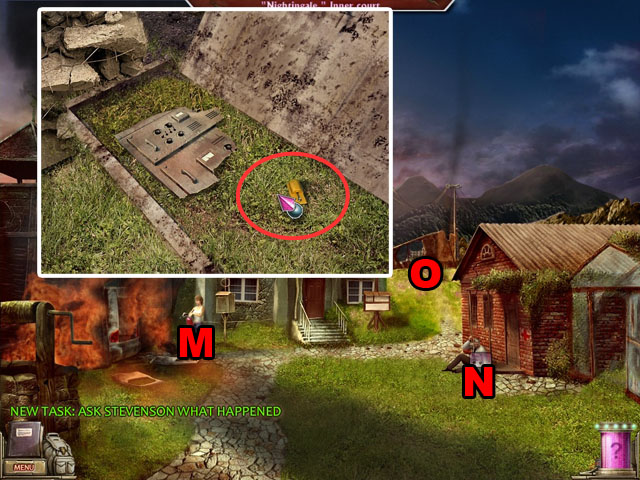
- Return to the inner court.
- Move to the greenhouse from the right side of the screen.

- Zoom in on the stones (G).
- Check the papers in the right bottom corner.
- Collect the PRUNER (red).
- Zoom in on the window (H).
- Break the window glass with the BRICK.
- Collect the LIQUID AMMONIUM.
- Return to the communication center.
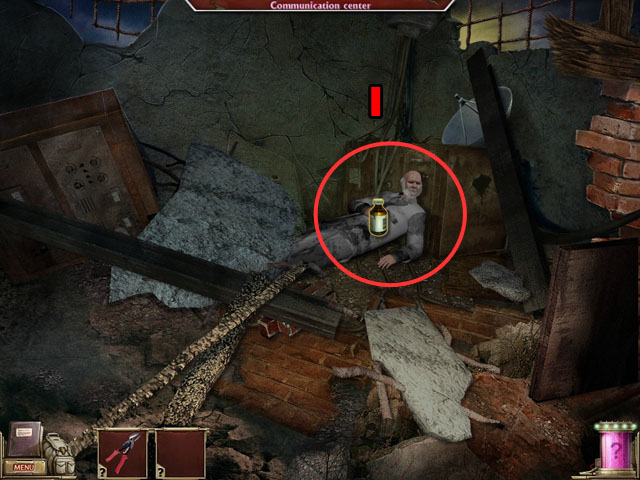
- Give the LIQUID AMMONIUM to the professor (I).
- Collect the KEYS.
- Return to the greenhouse.

- Open the door with the KEYS (J).

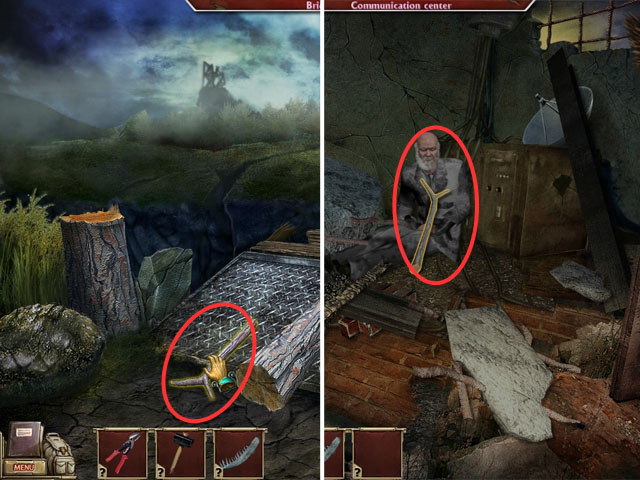
- Collect the IRON ROD (K).
- Move to the next scene.
- Zoom in on the tire (L).
- Take the tire off of the truck.
- Use the IRON ROD to collect the TUBE.
- Open the door of the motor (M).
- Zoom in on the motor and check the battery.
- Move to the garage.
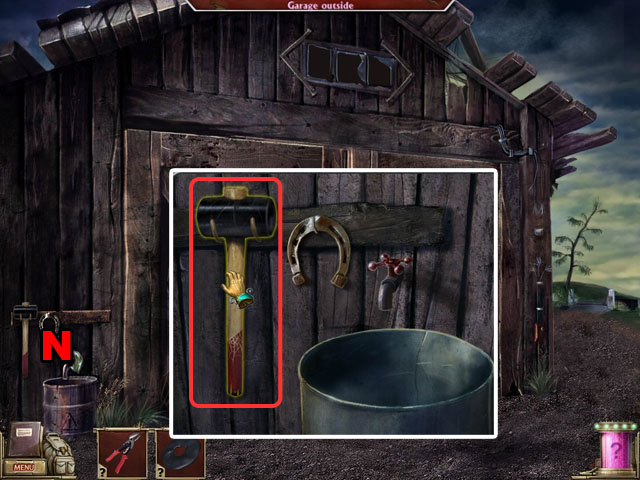
- Zoom in on the water barrel (N).
- Collect the HAMMER.
- Return to the excavation quarry.
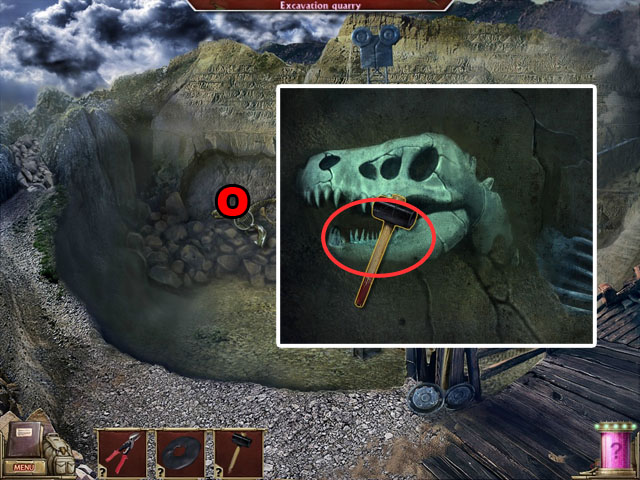
- Zoom in on the dinosaur bones (O).
- Use the HAMMER to collect the BONE SAW.
- Move to the bridge.
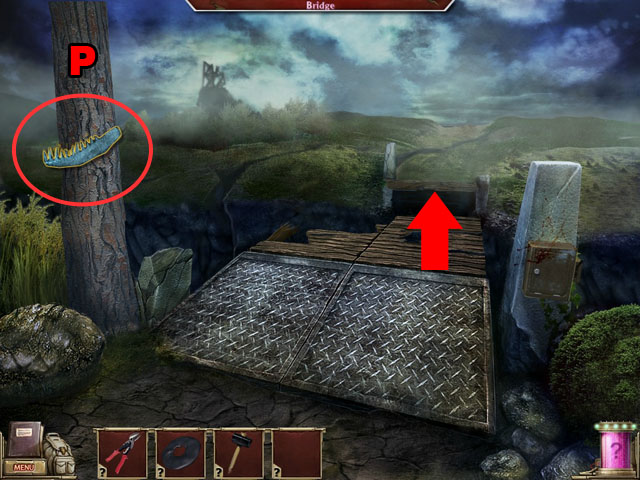
- Cut down the tree with the BONE SAW (P).
- Go across the bridge.

- Find the hidden objects and receive the SCREWDRIVER.
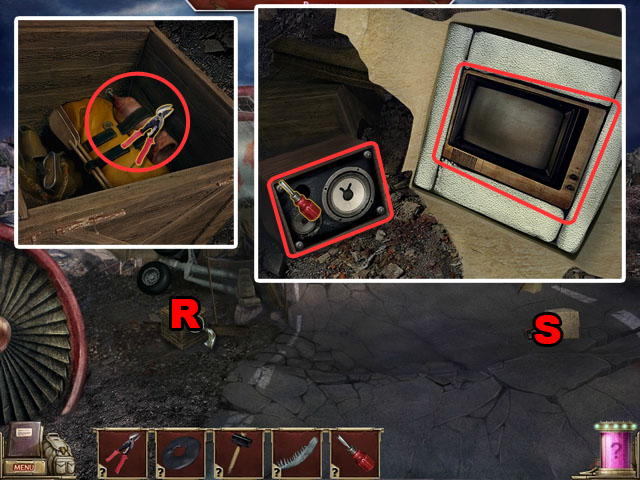
- Zoom in on the box (R) and open it.
- Cut the strip with the PRUNER.
- Collect the CYLINDER.
- Zoom in on the TV set (S).
- Unwrap the paper and watch the TV.
- Unscrew the speaker with the screwdriver.
- Collect the MAGNET.
- Return to the inner court.
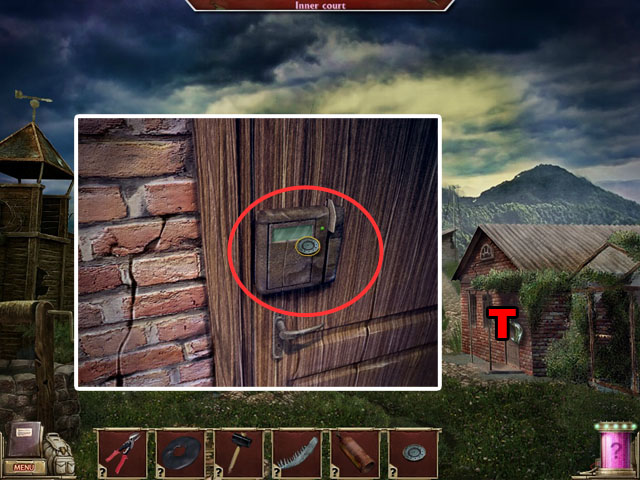
- Zoom in on the door (T).
- Open the lock with the MAGNET.
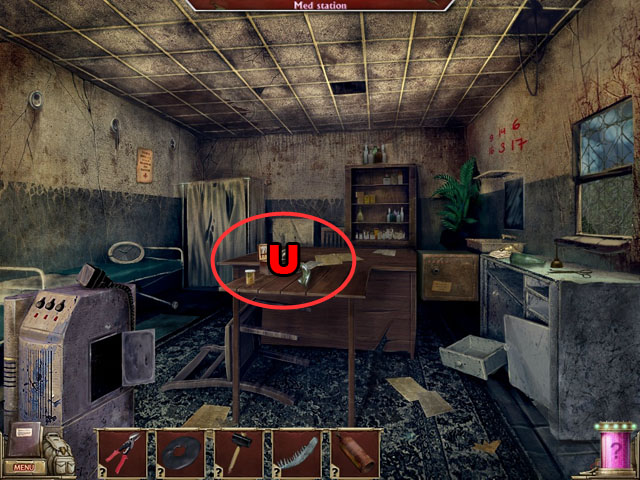
- Zoom in on the table (U).
- Find the hidden objects and receive the ACID.
- Return to the road to garage.
- Zoom in on the crane (V).
- Place the ACID on the motor.
- Collect the BATTERY.
- Return to the Med station.
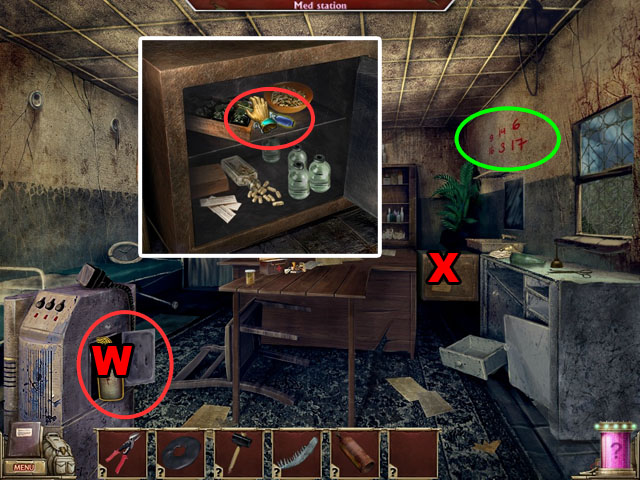
- Open the door on the machine (W) and set the BATTERY.
- Zoom in on the safe (X).
- Open the safe. The lock combination is; 9, 14, 6, 16, 3, and 17 (the numbers are highlighted in green on the wall). Follow this combination in this order: clockwise, counterclockwise, clockwise, counterclockwise, etc.
- Collect the MORPHINE.
- Return to the communication center.
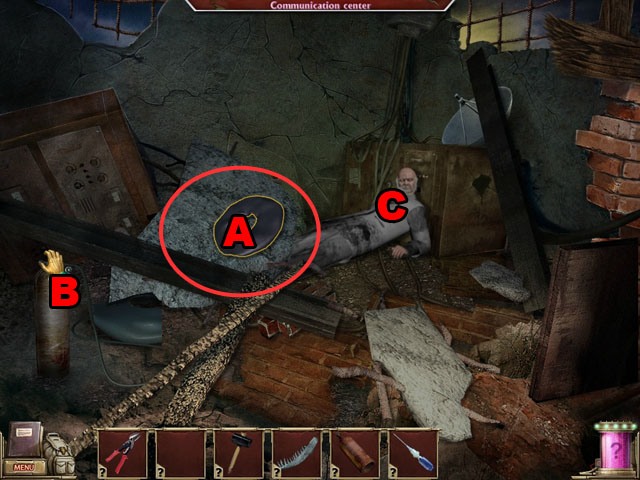
- Place the TUBE (A).
- Use the CYLINDER on the tube (B).
- Pump the cylinder.
- Give the MORPHINE to the professor (C).
- Return to the bridge.
- Collect the CRUTCH highlighted in red.
- Return to the communication center and give the CRUTCH to the professor.
Chapter 5: The Past
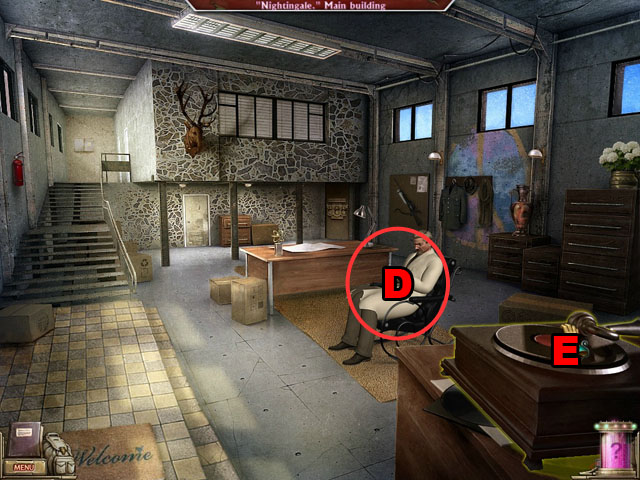
- Talk with the professor (D).
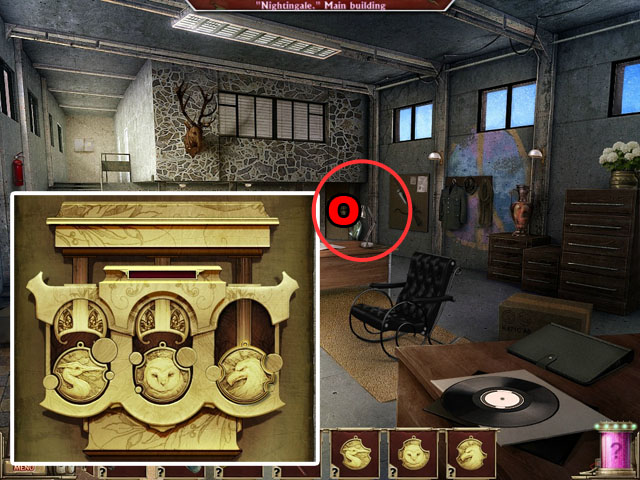
- Collect the GRAMOPHONE (E).
- Return to the inner court.
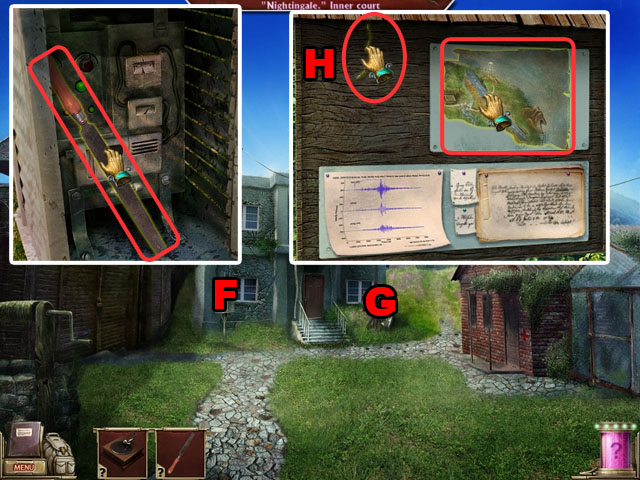
- Zoom in on the box (F) and collect the FILE.
- Zoom in on the information stand (G).
- Collect the MAP PART.
- Take off the paper (H) and collect the WIRE.
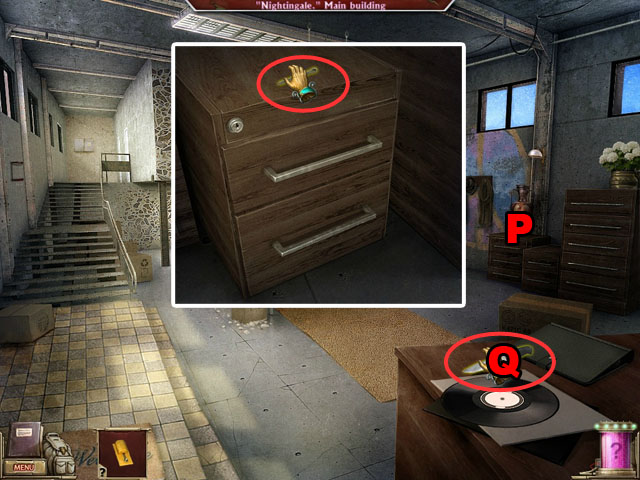
- Return to the main building.
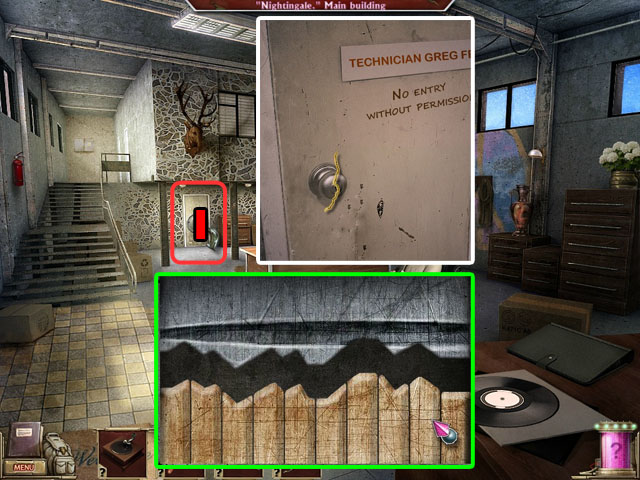
- Zoom in on the door (I).
- Use the wire on the door to start a mini-game.
- Align all of the teeth at the bottom so that they match the top perfectly. You can move the teeth by switching their position.
- Enter Frei’s room.
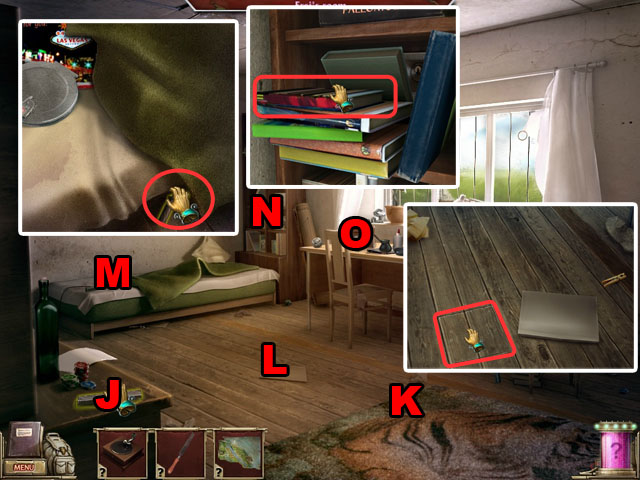
- Collect the PLATE (J).
- Collect the BROKEN KEY (K).
- Zoom in on the floor (L). Open the part.
- Zoom in on the bed (M). Collect the handle.
- Zoom in on the bookcase (N) and move the books.
- Zoom in on the table for a HOS (O).
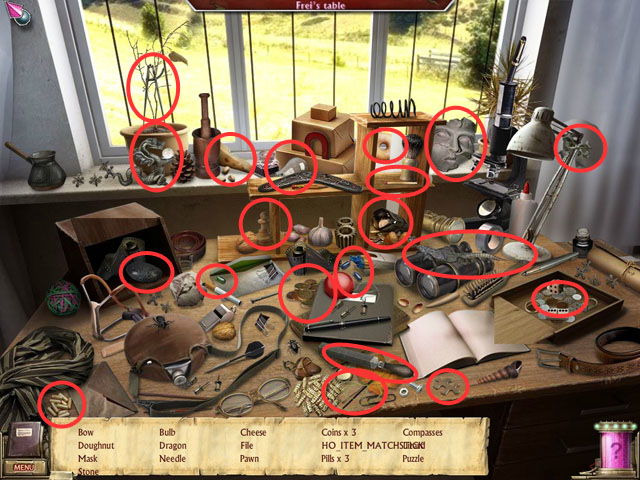
- Find hidden objects and receive another FILE.
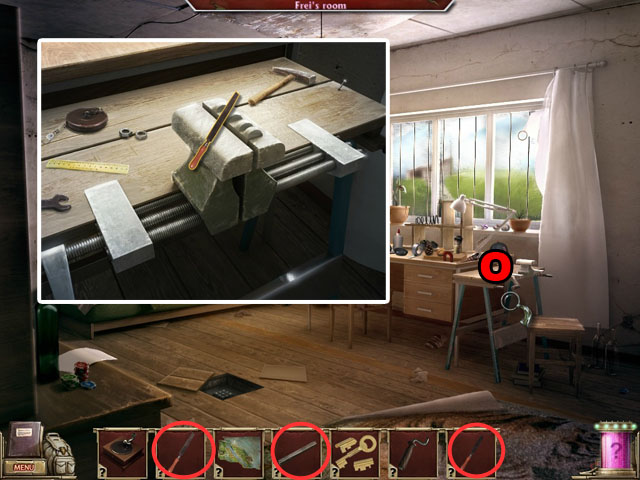
- Zoom in on the vice (O).
- Place the BIG FILE, MEDIUM FILE and PLATE on the vice.
- Return to the main entrance.
- Talk with the professor (P) and receive the SMALL FILE.
- Return to the Frei’s room.

- Zoom in on the vice (Q).
- Place the SMALL FILE on the plate.
- Use the BROKEN KEY on the vice.
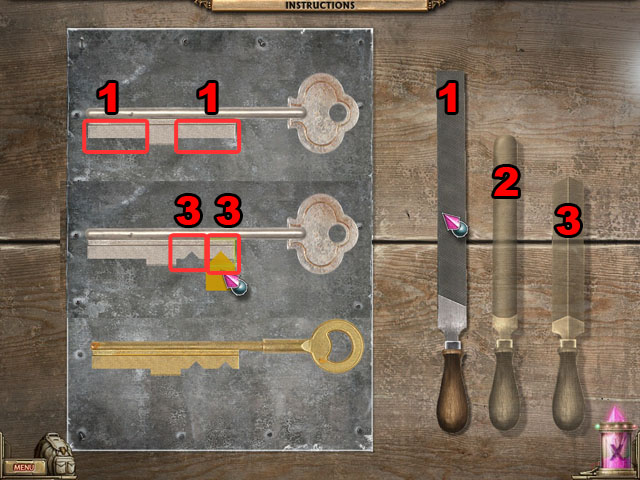
- Use the files to make a matching key out of the blank key on the top.
- First use the large file to make a flat cut (1), then use the (2) medium file to make a round key and the (3) small file to make a triangle cut.
- The solution is randomized.
- Zoom in on the bookcase (R).
- Open the safe with the KEY and take the PAPER.
- Zoom in on the bed (S).
- Open the waffle iron.
- Set the PAPER on the iron to dry it out.
- Take the PAPER from the waffle iron.
- Return to the main entrance.
- Give the PAPER to the professor.
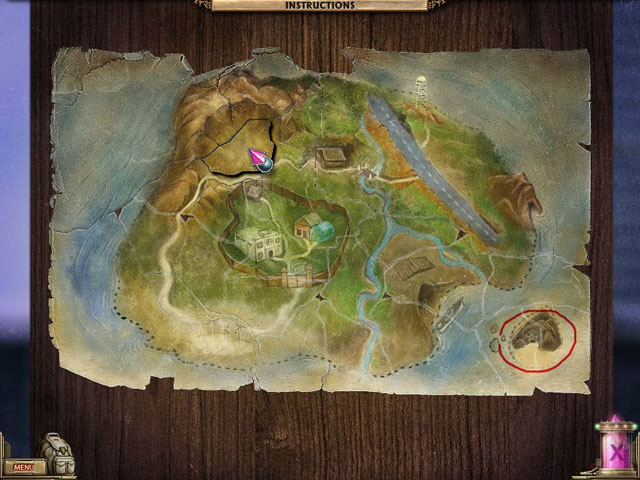
- Return to the main gate.
- Go through the beach and road to go to the garage (red circle).
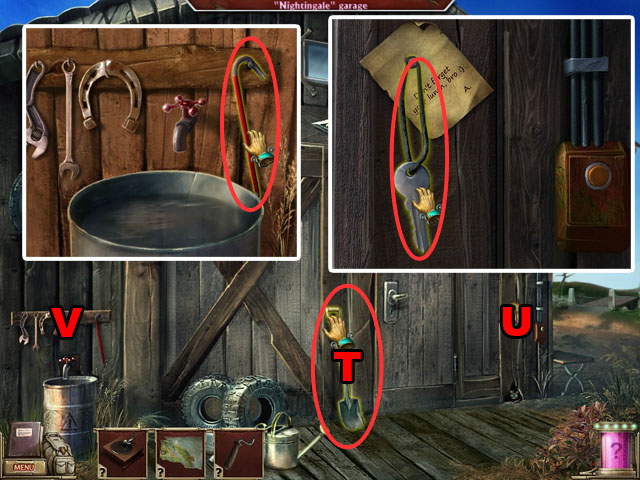
- Collect the SHOVEL (T).
- Zoom in on the doorbell (U). Collect the KEY.
- Zoom in on the water barrel (V). Collect the CROWBAR.
- Return to the road to road.
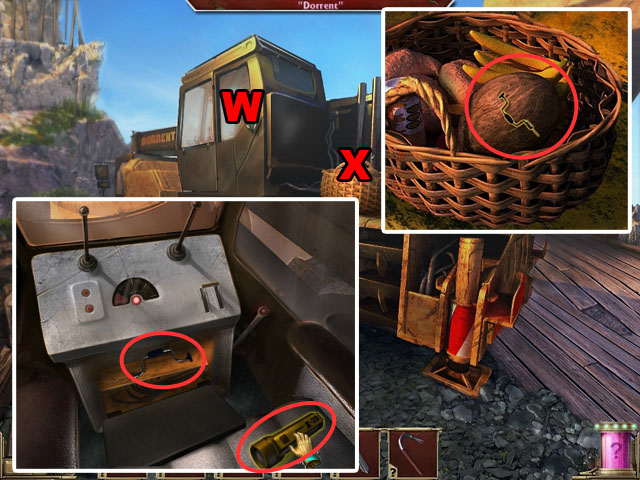
- Zoom in on the truck (W).
- Open the control box with the KEY.
- Collect the DRILL.
- Collect the FLASHLIGHT.
- Zoom in on the basket (X). Make a hole with the DRILL on the coconut.
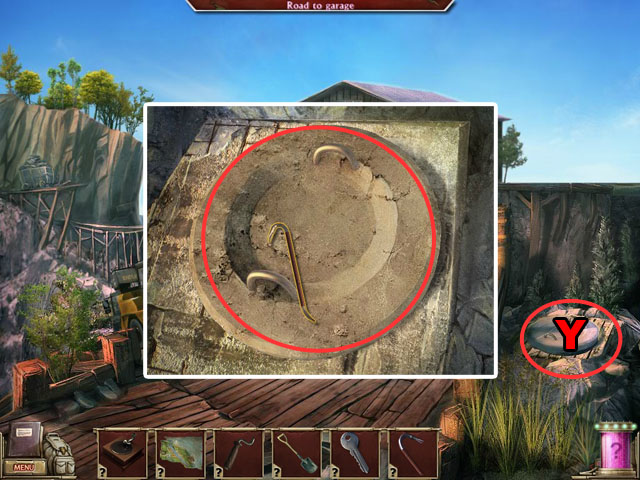
- Return to the road to the garage.
- Zoom in on the hatch.
- Open the hatch with the CROWBAR.
- Zoom in on the puzzle.
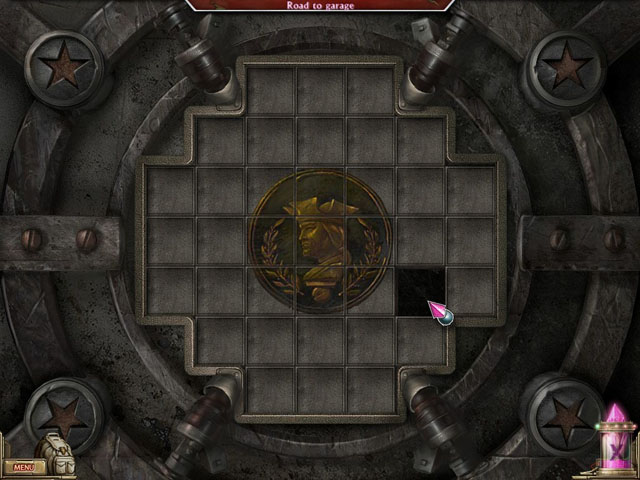
- Move the square pieces around until you complete the medallion in the middle of the puzzle.
- Click on a square to move it into the blank spot.
- The blank spot can be left on any part of the board as long as the center image is correct.
- Go down the hole.
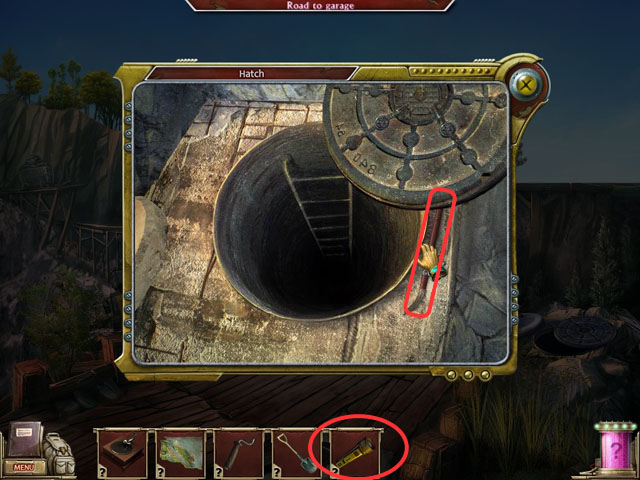
- Collect the CROWBAR again.
- Use the FLASHLIGHT to lite up inside the hole.
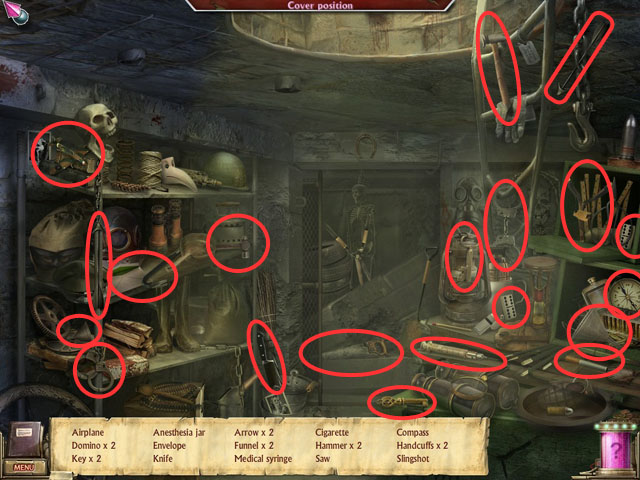
- Find the hidden objects and receive ANESTHESIA.
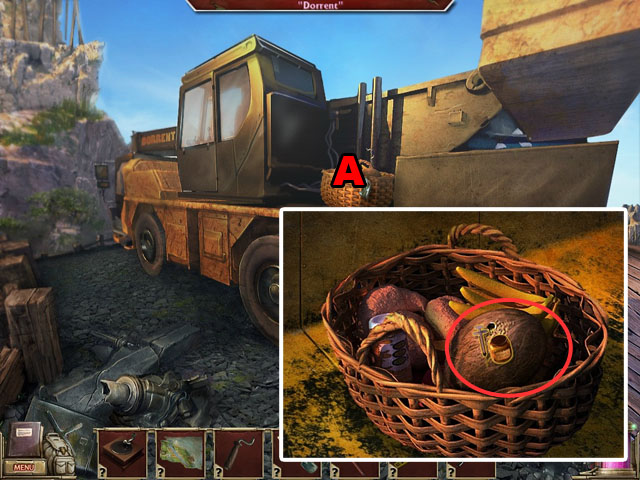
- Return to the truck.
- Zoom in on the basket (A). Put the ANESTHESIA into the coconut.
- Collect the BASKET.
- Return to the garage.
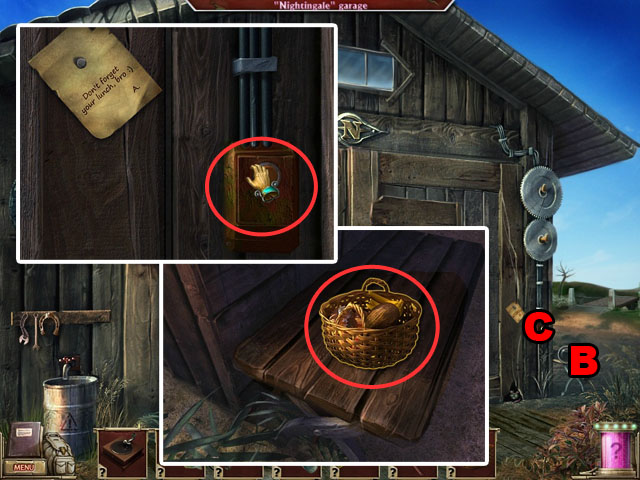
- Zoom in on the bench (B).
- Place the BASKET on the bench.
- Zoom in on the doorbell (C) and press it.
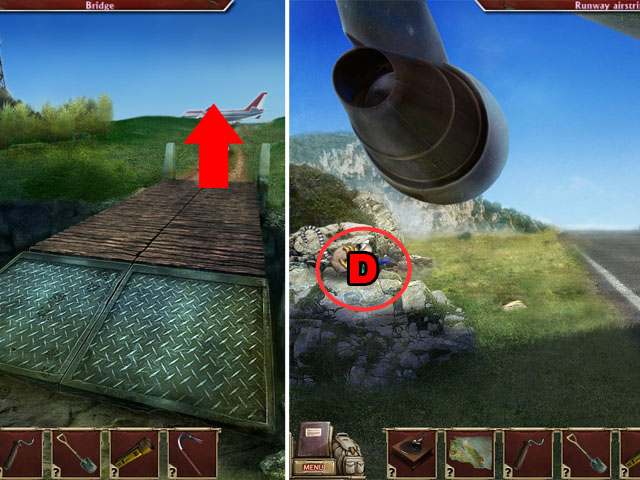
- Move to the bridge and go across.
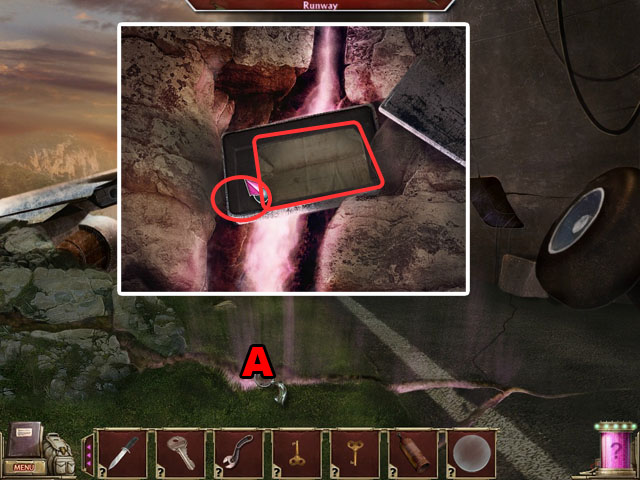
- Move to the runway airstrip.
- Take the blue HAT (D).
- Collect the PENDANT that fell off from the hat.
- Move to the foot of the hill.
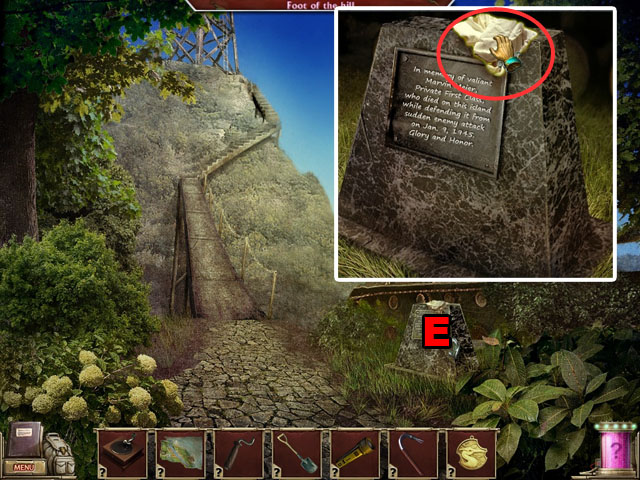
- Zoom in on the memorial plate (E).
- Collect the RAGS.
- Return to the outside of the lighthouse.
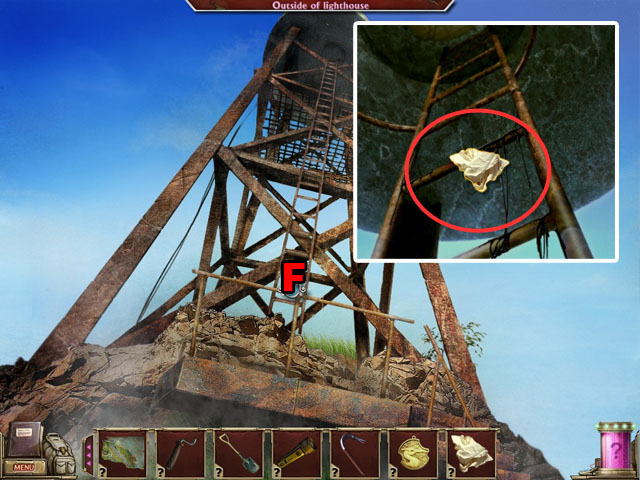
- Zoom in on the ladder (F).
- Use the RAGS on the ladder.
- Enter the lighthouse.
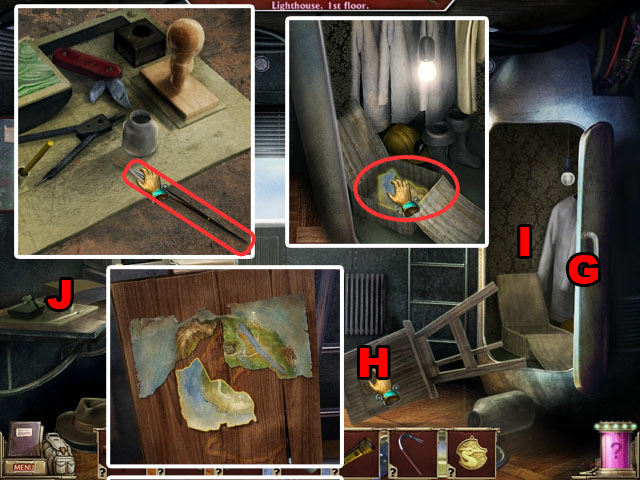
- Open the door (G).
- Fix the easel (H) by pressing it twice.
- Zoom in on the closet (I). Collect the MAP PIECE.
- Zoom in on the table (J). Collect the GLUE.
- Zoom in on the easel again (H). Put the GLUE on the easel.
- Place two MAP PIECES on the easel.
- Return to the bridge.
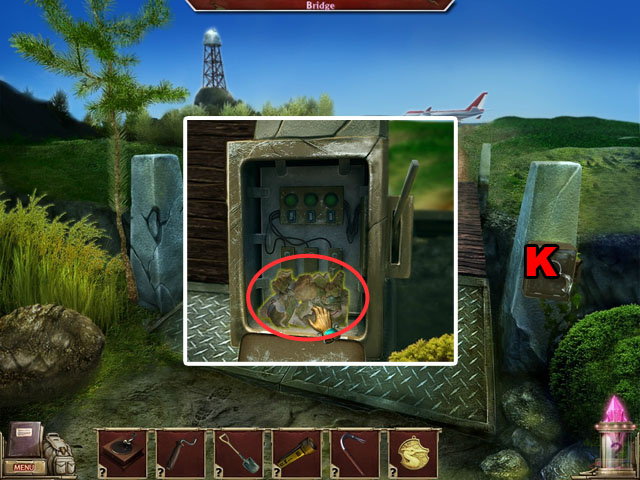
- Open the box (K) and take the MAP PIECES.
- Return to the lighthouse again.
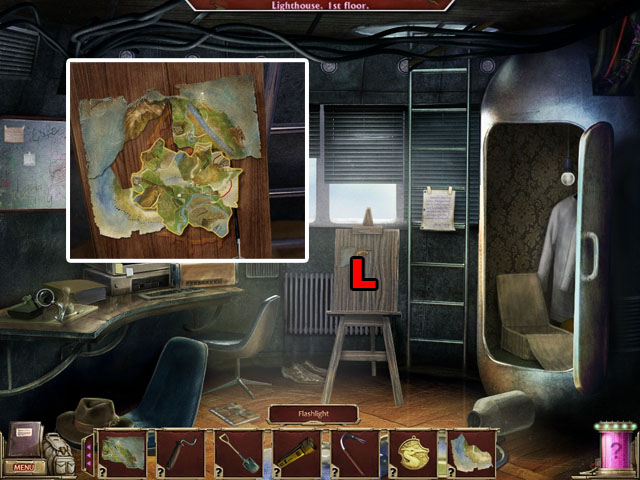
- Zoom in on the easel (L).
- Put the last MAP PIECES on the easel.
- Put together the puzzle pieces to complete the map.
- You do not need to rotate any of the pieces.
- Use the rivers and the lines to help you solve the puzzle.
- Return to the main building.
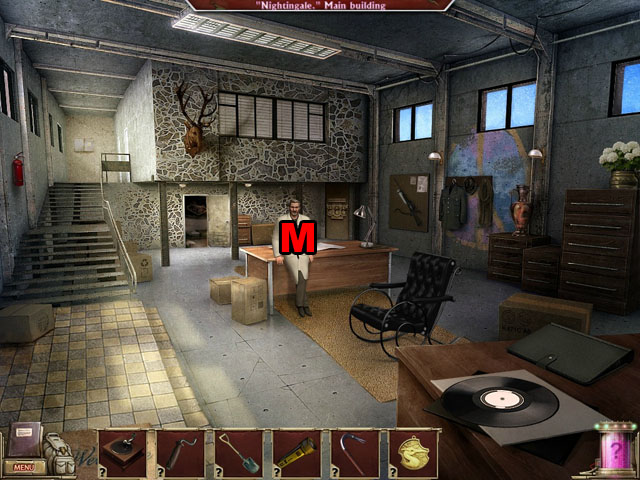
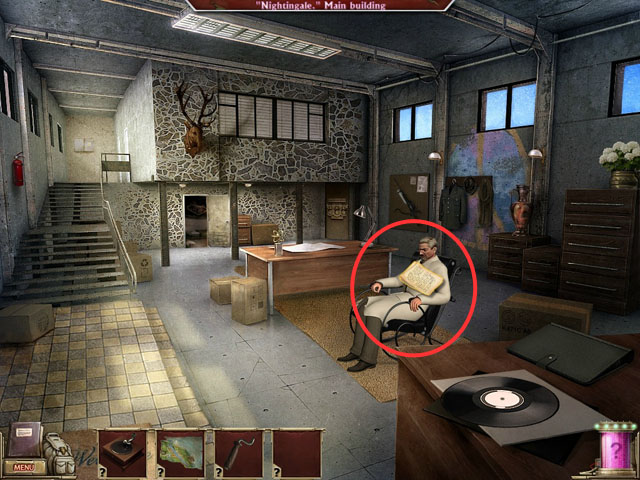
- Talk with the professor (M).
- Return to the beach.
- Talk with Alice (N) and receive the PENDANT.
- Return to the main building again.
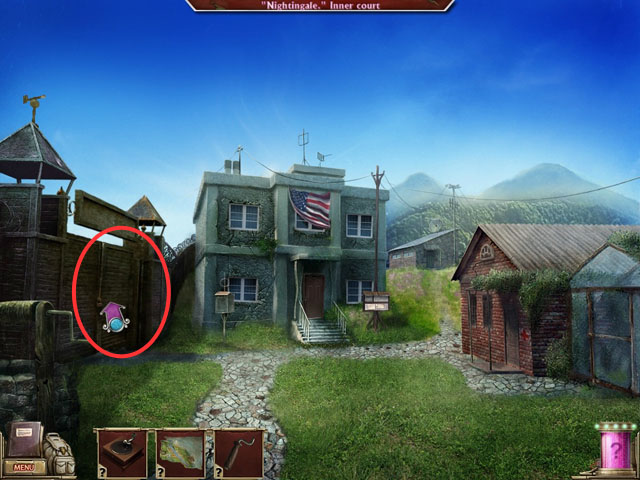
- Zoom in on the secret passage (O).
- Place the three PENDANTS in the matching slots.
- Return to the excavation site.
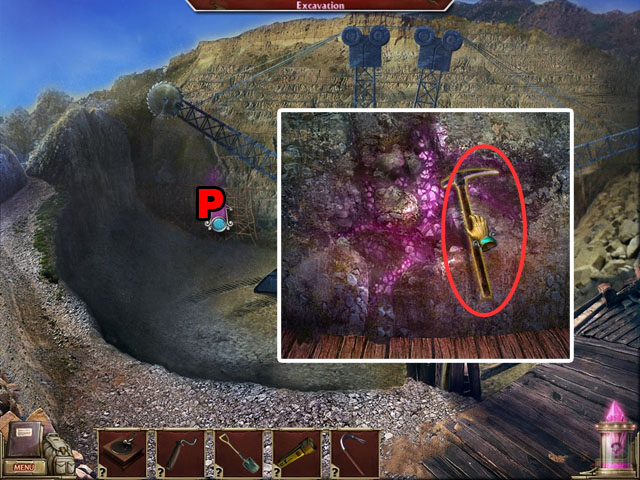
- Zoom in on the krawtite ore (P).
- Collect the PICKAX.
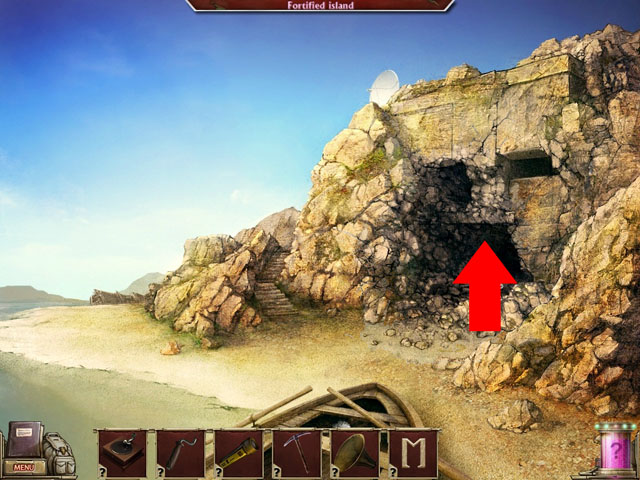
- Return to the secret passage.
- Use the PICKAX to bust the stones (Q).
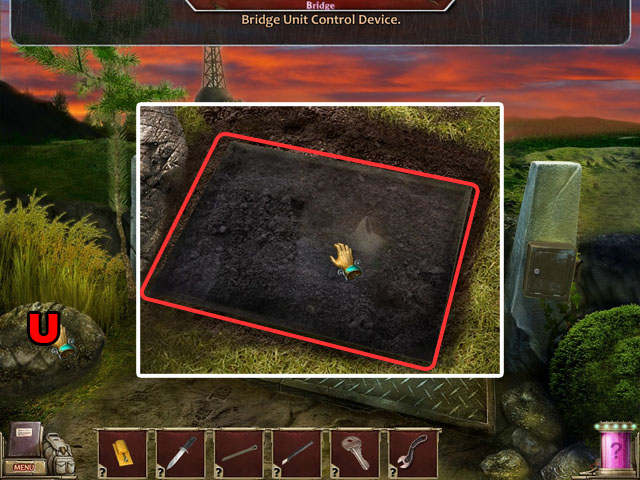
- Use the SHOVEL to dig the dirt (R).
- Enter the hole.
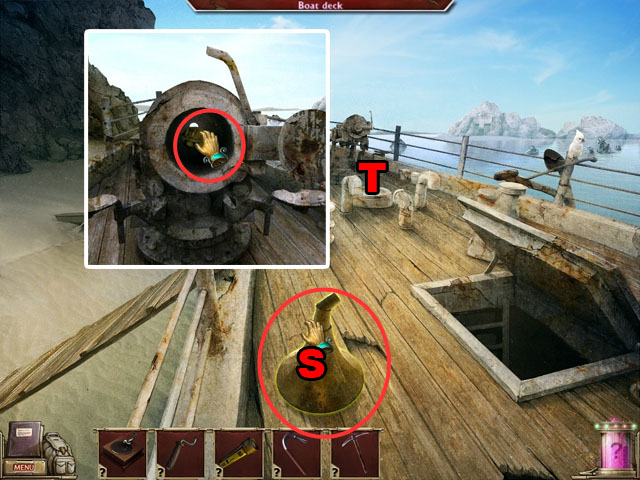
- Collect the GRAMOPHONE TUBE (S).
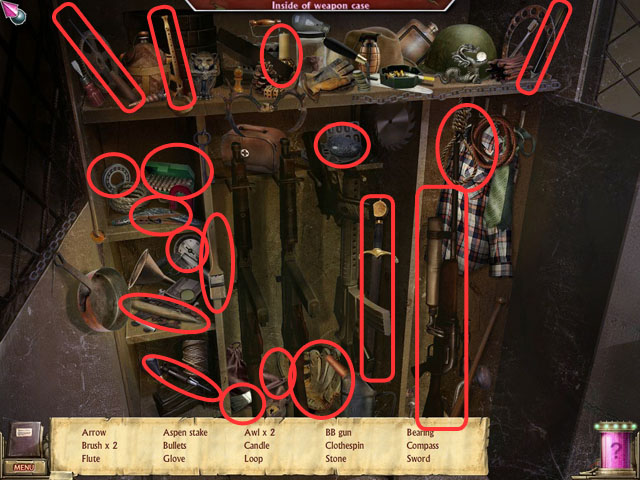
- Zoom in on the gun (T).
- Open the door and see the turtle.
- Go downstairs.
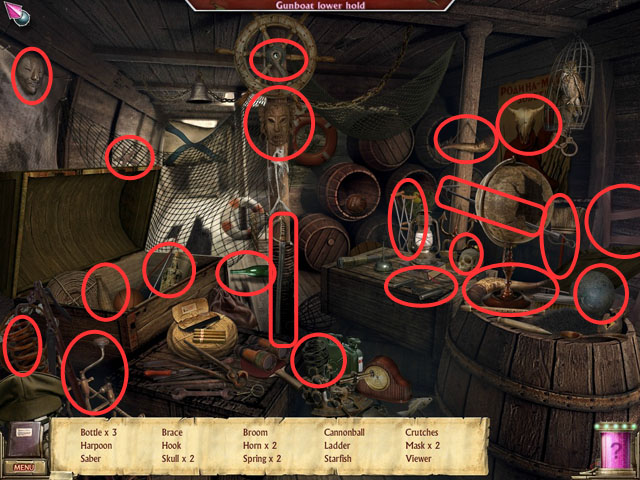
- Find hidden objects and receive the VIEWER.
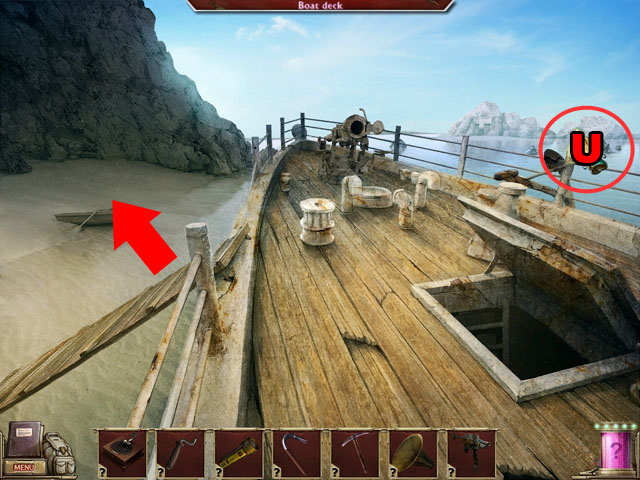
- Collect the STUFFED PARROT (U).
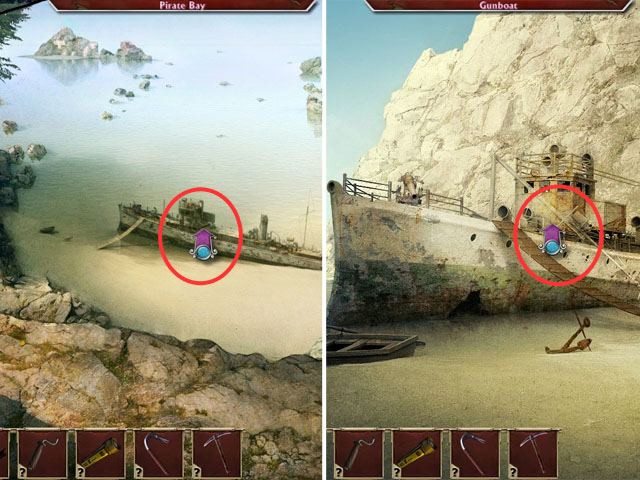
- Return to the boat.
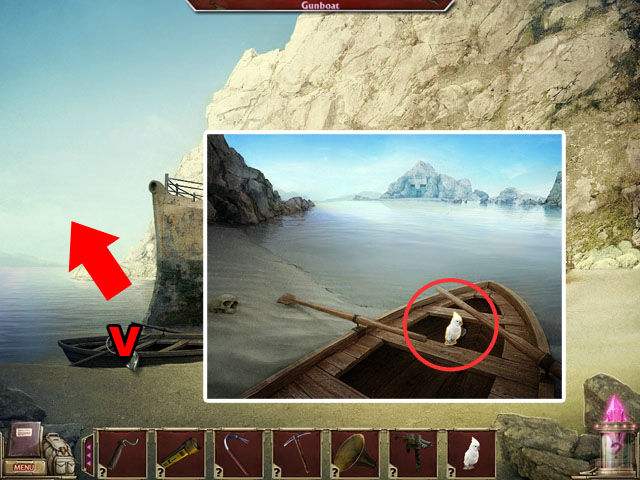
- Zoom in on the boat (V).
- Place the PARROT in the hole on the boat.
- Move to the next scene.
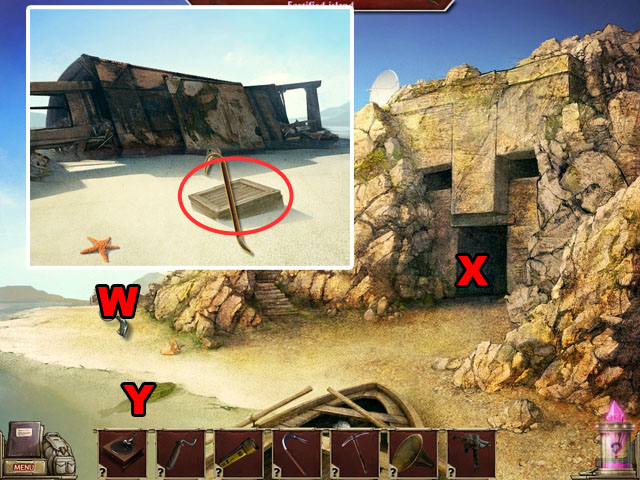
- Zoom in on the ground (W).
- Uncover the box from under the sand.
- Open the box with the CROWBAR.
- Collect the BULLET in the box.
- Try to go in the gate (X).
- Collect the FISH (Y).
- Return to the gunboat.
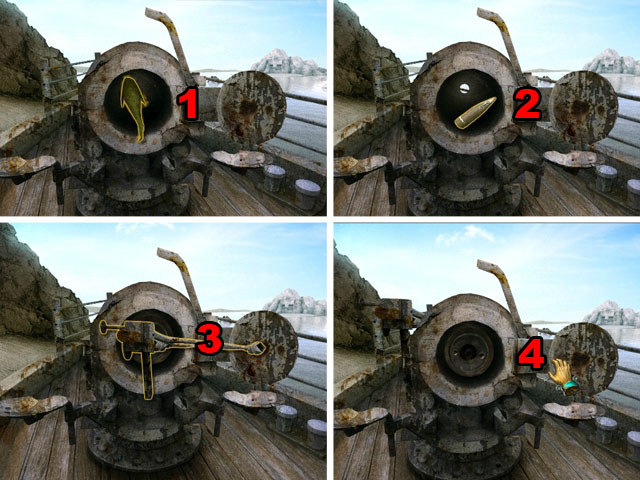
- Zoom in on the Naval gun.
- Place the FISH in the gun (1).
- Pull the FISH.
- Pull the turtle.
- Place the PROJECTILE (2) and then place the GUN SIGHTING (3).
- Close the door (4).
- Fire the gun.
- Return to the beach with the gate.
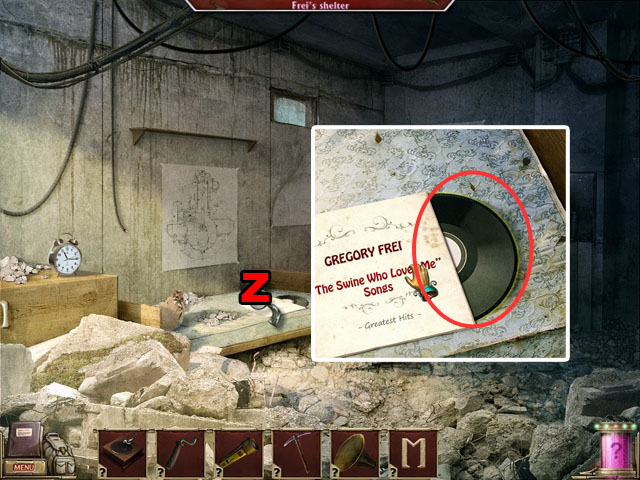
- Zoom in on the record (Z).
- Collect the RECORD.
- Return to Frei’s room.
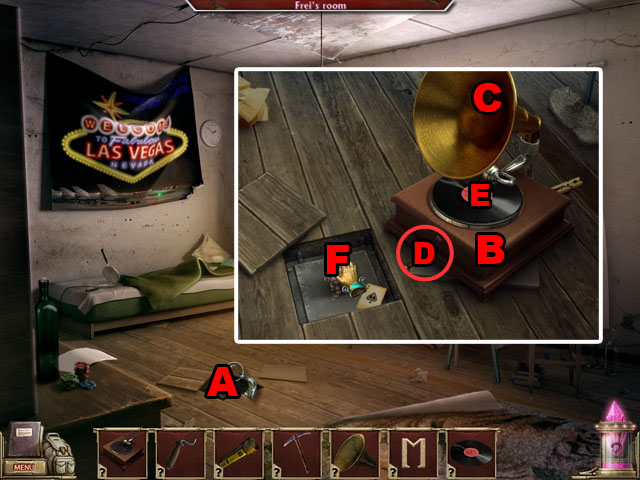
- Zoom in on the safe (A).
- Place the GRAMOPHONE (B).
- Place the GRAMOPHONE TUBE (C).
- Place the HANDLE (D).
- Place the RECORD (E).
- Play the Record.
- Zoom in on the cube (F).
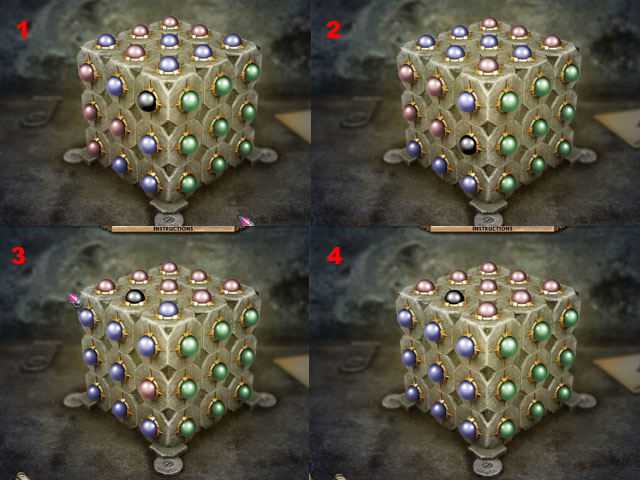
- Complete the cube to finish the mini-game.
- Each side of the cube can only have one color (or the black empty color) showing (4).
- Click on a bubble next to the black bubble to switch their places.
- Work from the outside in on one side and finish that color (1).
- Next finish the top and bottom of the next two colors (2).
- Lastly, work on the middle of the colors (3) where the sides touch to finish.
- The game is randomized.
- Collect the MOUSE KEY that was under the cube.
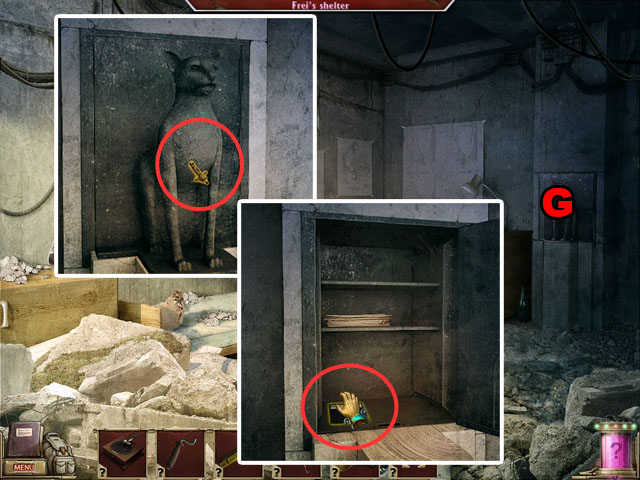
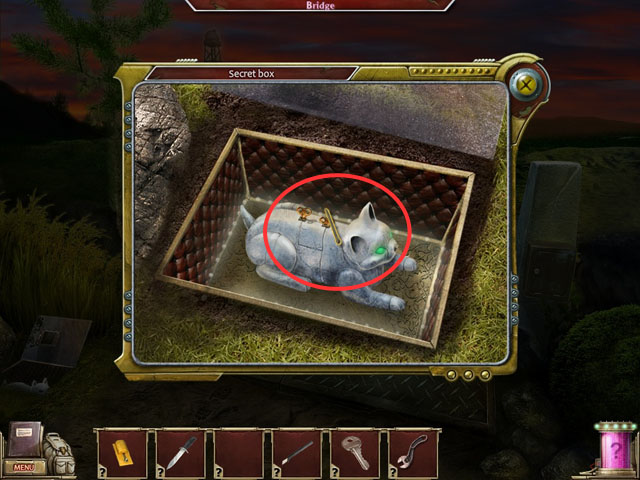
- Return to Frei’s shelter.
- Zoom in on the cat statue (G) and use the MOUSE KEY.
- Collect the FLOPPY DISK.
- Return to the lighthouse.
- Zoom in on the computer (H).
- Insert the FLOPPY DISK in the computer (I).
- Press the printer button (J).
- Collect the PAPER (K).
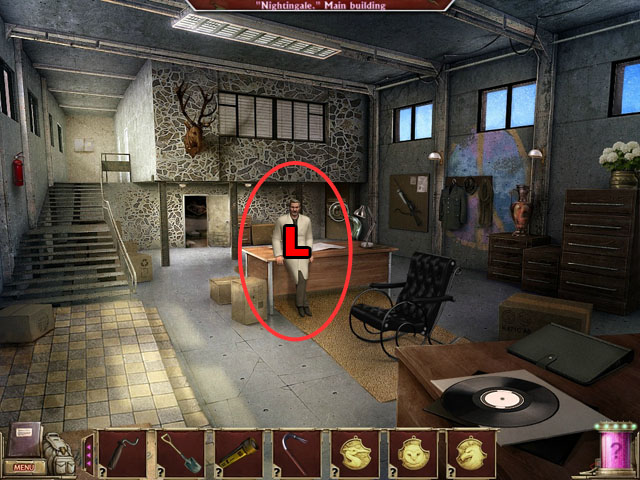
- Return to the main building.
- Talk with the professor (L).
Chapter 6: The Search
- Talk with Alice (M) and the professor (N).
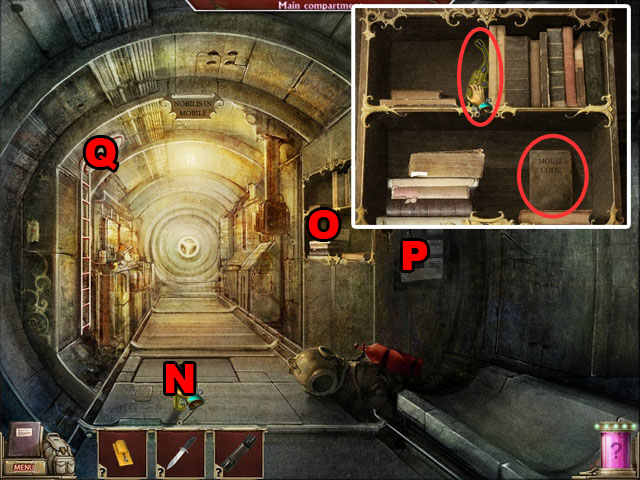
- Zoom in on the signal station (O).
- Collect the MORSE KEY.
- Return to the main building.
- Zoom in on the shelves (P).
- Collect the HAIRPIN.
- Collect the KNIFE (Q).
- Return to the greenhouse.
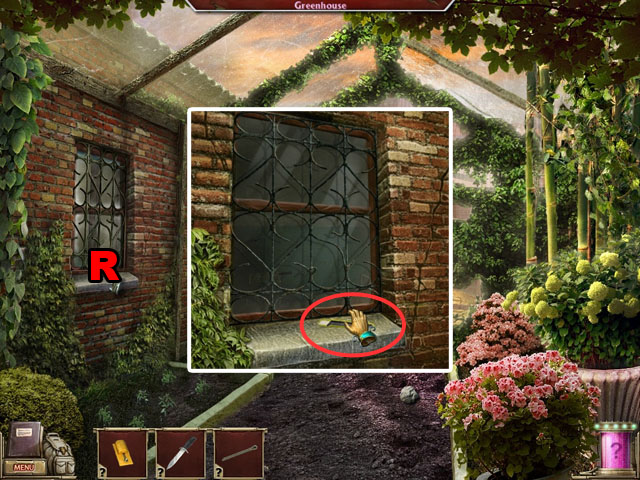
- Zoom in on window (R).
- Collect the GLASS CUTTER.
- Return to the road to the garage.
- Zoom in on the wheel barrel (S).
- Collect Frei’s room KEY.
- Return to the garage.
- Zoom in on the water barrel (T).
- Collect the MONKEY WRENCH.
- Move to the bridge.
- Move the rock (U).
- Zoom in on the secret box that was under the rock.
- Take off the cover.
- Zoom in on the circuit board.
- Rotate the circuit lines until all of the lines have been connected to each other and to the ends around the board.
- Start from the ends of the board and work your way towards the middle.
- Look for lines that have three possible connections but only two sides to help you find the correct path. Straight lines are also easy to place correctly.• Please look at the screenshot for the solution.
- Use the HAIRPIN to open the secret box.
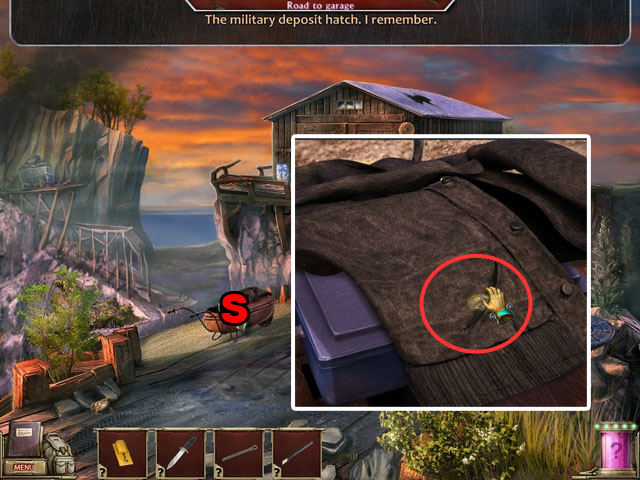
- Move to the airplane.
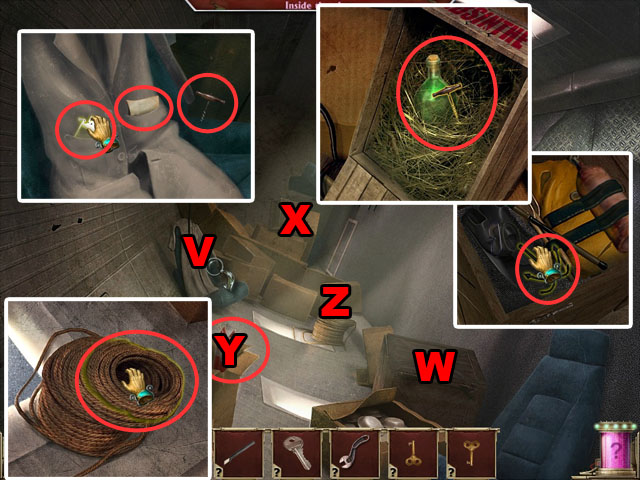
- Zoom in on the jacket (V).
- Collect the LIGHTER and CORKSCREW.
- Open the box (W); collect the HARPOON.
- Collect the AIR CONTAINER by using KNIFE.
- Open the box (X).
- Open the bottle with the CORKSCREW.
- Fill the lighter with the ALCOHOL.
- Collect the ROCKETS (Y).
- Zoom in on the bundle (Z).
- Collect the ROPE.
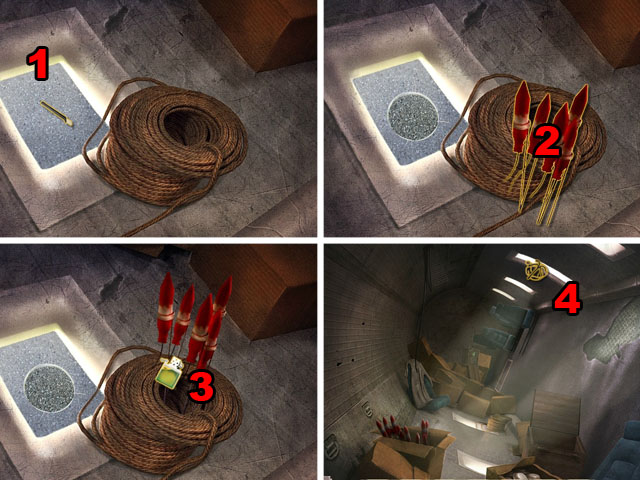
- Cut the glass with the GLASS CUTTER (1).
- Take the GLASS PIECE.
- Place the ROCKETS (2).
- Fire the rockets with the LIGHTER (3).
- Place the HARPOON WITH ROPE on the window (4).
- Get out of the airplane.
- Zoom in on the ground (A).
- Take off the case.
- Read the letter.
- Collect the LETTER E.
- Return to the main building.
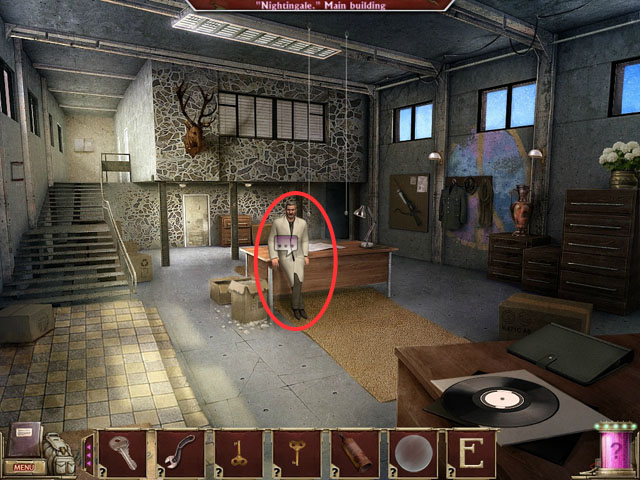
- Talk with the professor.
- Return to the outside.
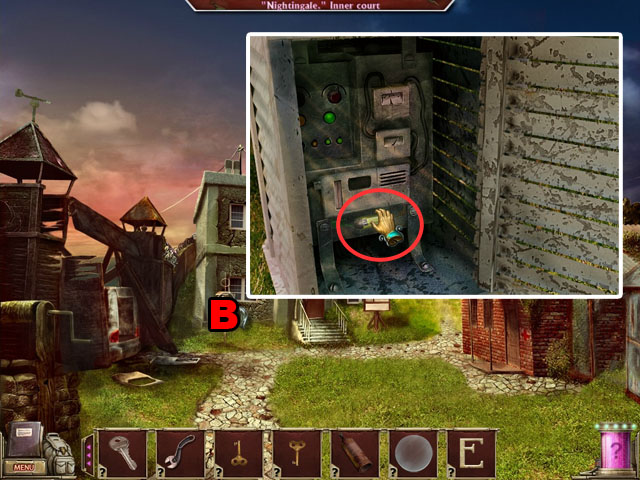
- Zoom in on the seismic indicator (B).
- Collect the FUSE.
- Return to the main building.
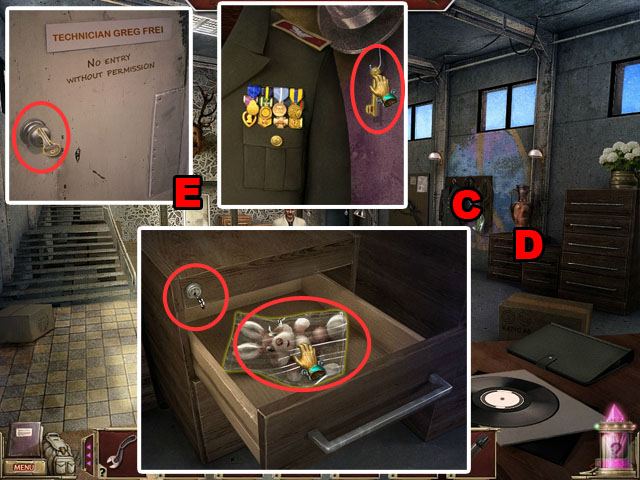
- Zoom in on jacket (C).
- Collect the DRAWER KEY.
- Zoom in on the drawer (D).
- Use the KEY to open the drawer.
- Collect the STUFFED BUNNY.
- Zoom in on the door (E).
- Open the door with FREI’S ROOM KEY.
- Enter Frei’s room.
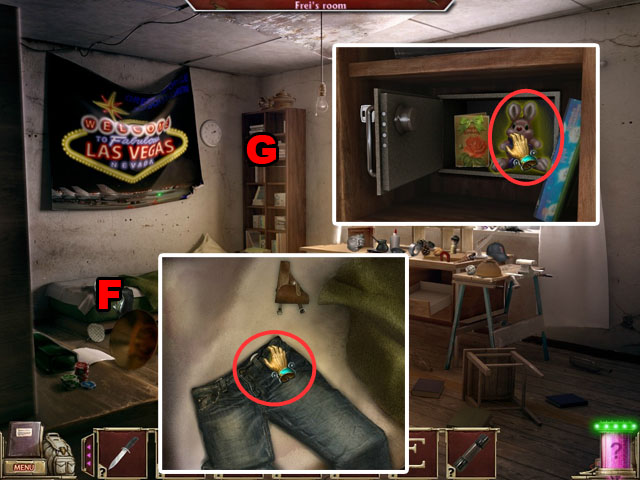
- Zoom in on pants on the bed (F). Collect the SAFE KEY.
- Zoom in on the safe (G); Open the safe with the SAFE KEY and collect the STUFFED BUNNIES.
- Return to the Minefield.
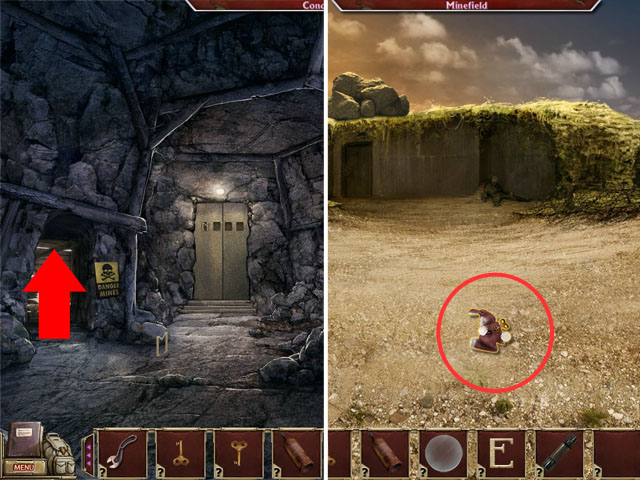
- Place the two charged BUNNIES on the ground.
- Walk forward.
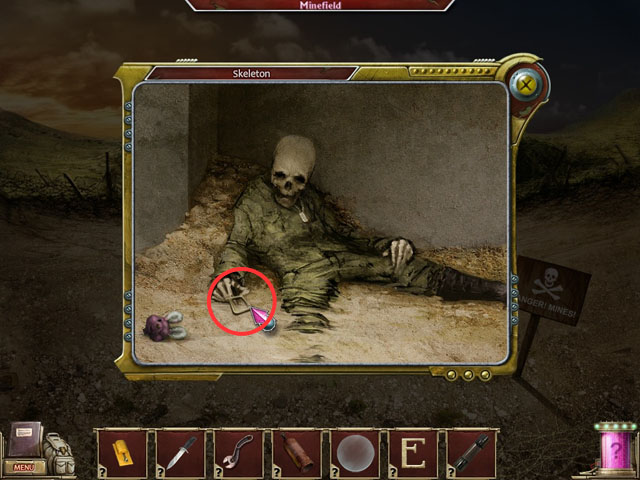
- Collect the LETTER O.
- Return to the Conduit.
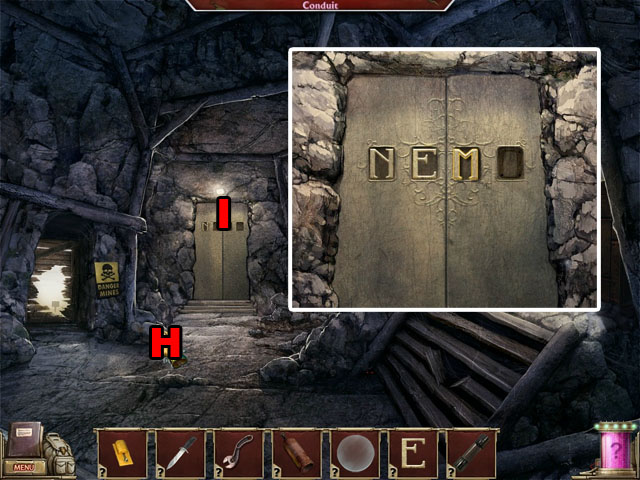
- Collect the LETTER M (H).
- Zoom in on the door (I) and place all of the LETTERS.
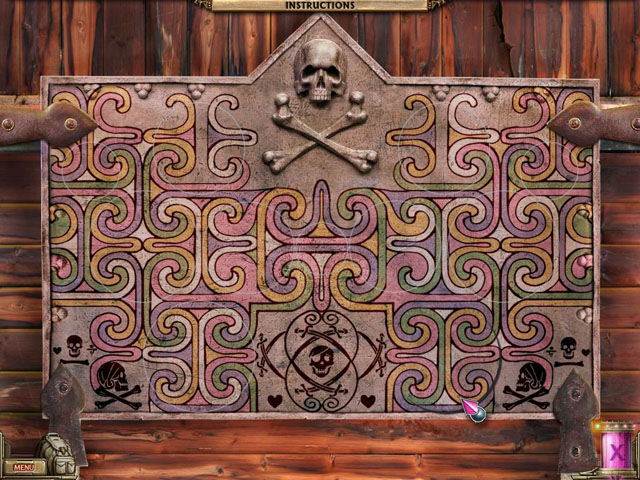
- Rotate the tiles until all of the artwork matches seamlessly.
- You can start from any point because all of the pieces can only fit in one direction.
- Turn each until it fits and then move to the next one.
- Find the hidden objects and receive a diving suit.
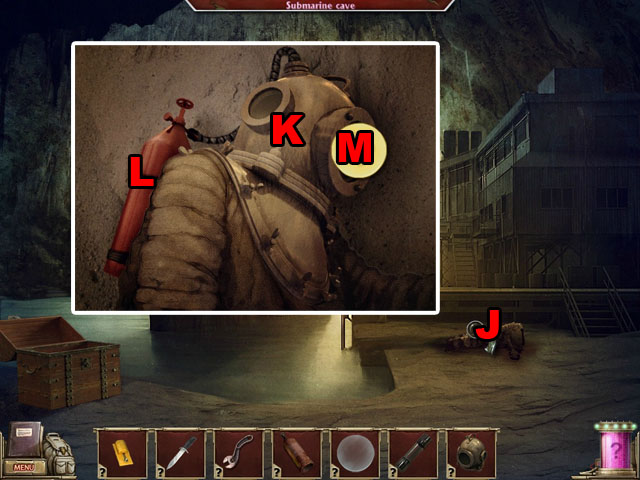
- Zoom in on the diving suit (J).
- Place the diving HELMET (K).
- Set the AIR CONTAINER (L).
- Take off the broken glass and replace it with GLASS from your inventory (M).
- Take the DIVING SUIT.
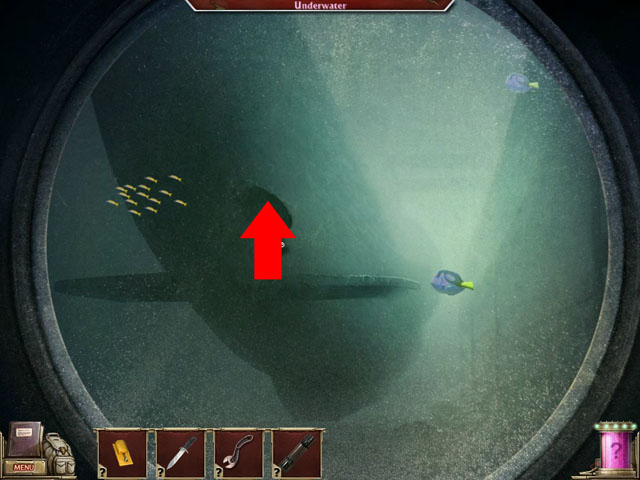
- Zoom in on the Torpedo room.
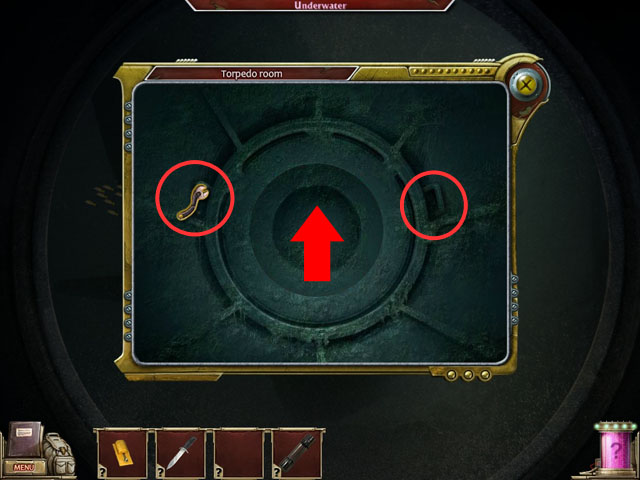
- Open the hatch with the MONKEY WRENCH.
- Enter the Torpedo room.
- Collect the ACETYLENE TANK (N).
- Zoom in on the shelf (O).
- Collect the WELDER’S SET and the BOOK.
- Place the FUSE (P).
- Zoom in on the hatch (Q).
- Rotate the lock pick until you find the correct location that opens the lock.
- When you use the pick, the other tool will either move a little to show that you are close or not move at all to show that you are far away from the correct location. Move the location of the pick and try again until you find the right place.
- Repeat the steps above three times to finish the mini-game.
- The solution is randomized.
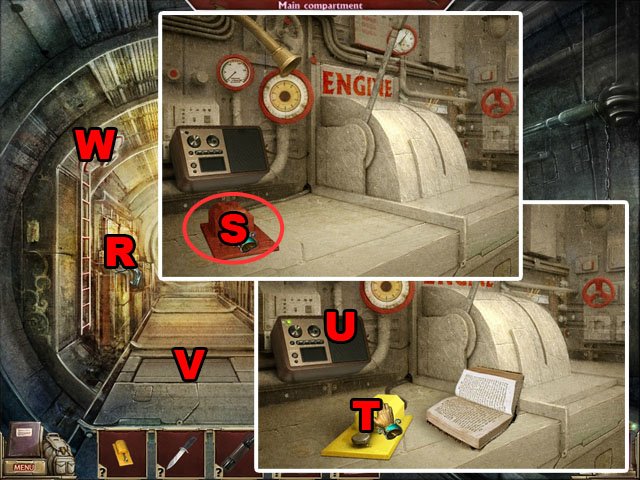
- Zoom in on the cockpit (R). Move the red cover (S).
- Place the MORSE KEY (T).
- Use the CODE BOOK (U).
- Use the MORSE KEY (T).
- Open the floor piece (V).
- Place the WELDER’S SET on the floor (V).
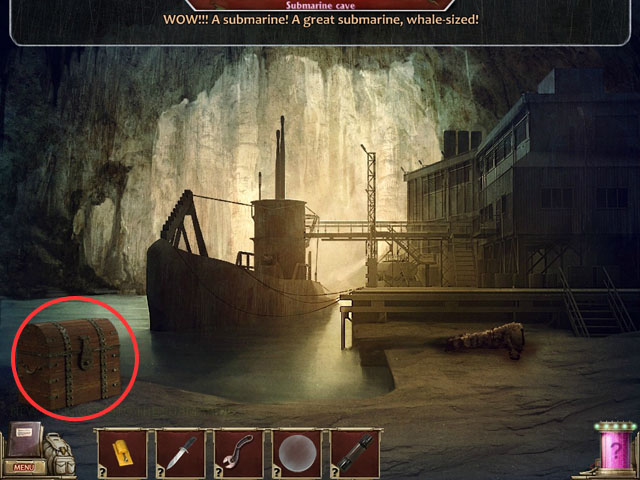
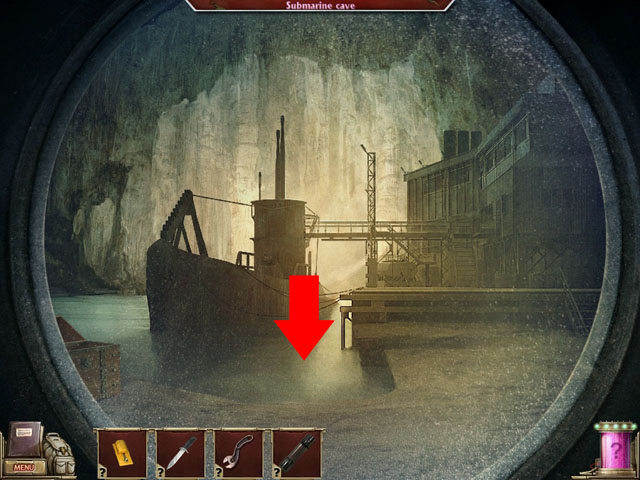
- Move to the submarine cave (W).
- Return to the main building.
- Talk with the professor and get the CONTAINER.
- Return to the road to garage.
- Zoom in on the wheel barrow (X).
- Take off the jacket from the lunch basket.
- Take off the lid.
- Place the CONTAINER to collect the ice.
- Zoom in on the Krawtite ore.
- Place the CONTAINER WITH ICE on the ore to collect it.
- Return to the main building.
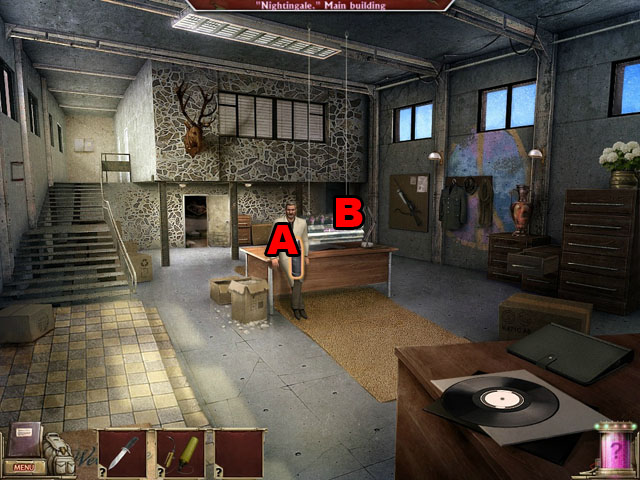
- Give the CONTAINER to the professor (A).
- Collect the KRAWTITE ENGINE (B).
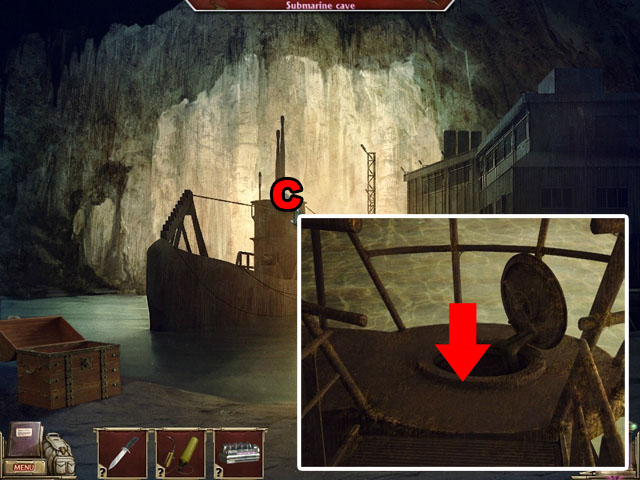
- Return to the Submarine cave.
- Zoom in on the hatch (C).
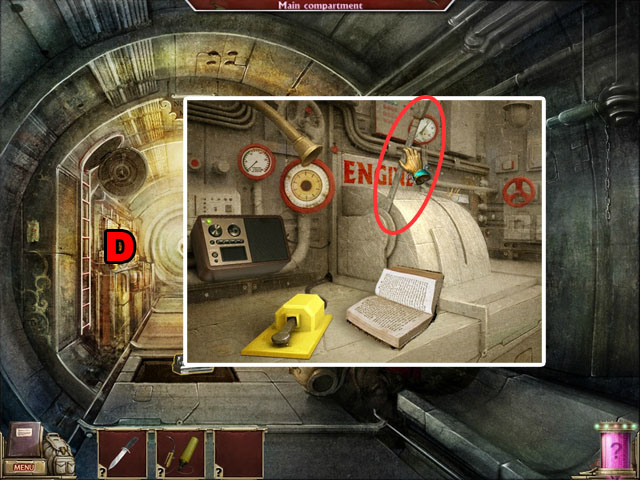
- Move to the main compartment.
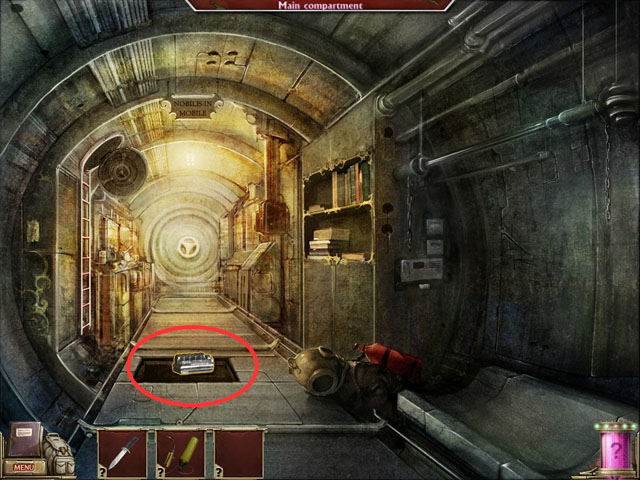
- Place the KRAWTITE ENGINE to the spot highlighted in red.
- Zoom in on the engine.
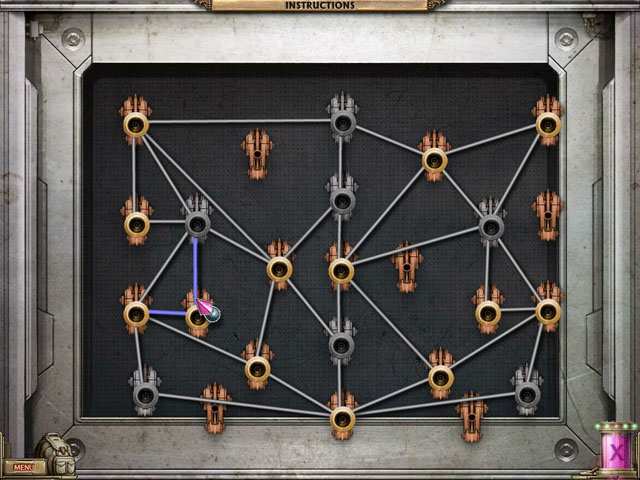
- Move the locations of the hubs so that none of the lines between them are crossing.
- Only the gold hubs can be moved to another empty location. The silver hubs are fixed.
- First, find the gold hubs that are connected to each silver hub and move them close together.
- Next, rearrange the hubs so they do not overlap. This will take some trial and error, especially because some hubs must be moved before another can be placed.
- The hubs can only be placed in an empty holder.
- The solution is randomized.
- Zoom in on the cockpit (D).
- Pull the lever.
Chapter 7: Finale
- Talk with the professor.
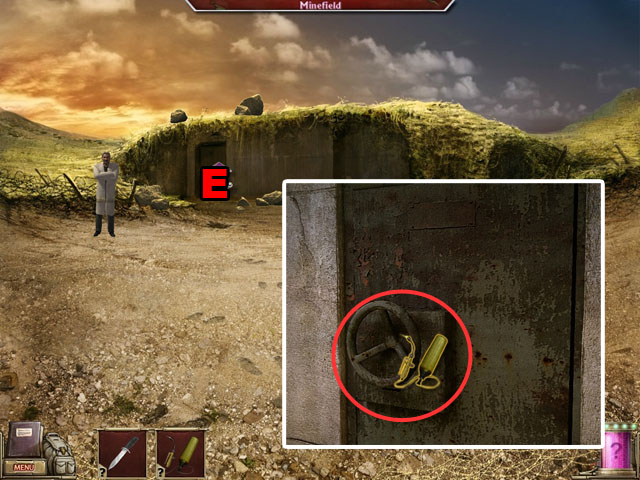
- Zoom in on the bunker door (E).
- Use the WELDER’S SET on the door.
- Talk with the professor (F).
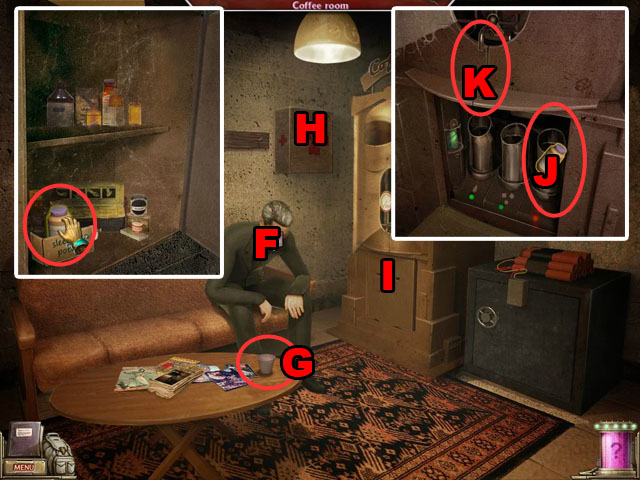
- Collect the CUP (G).
- Zoom in on the first aid kit (H); open the shelf and collect the SLEEPING PILLS.
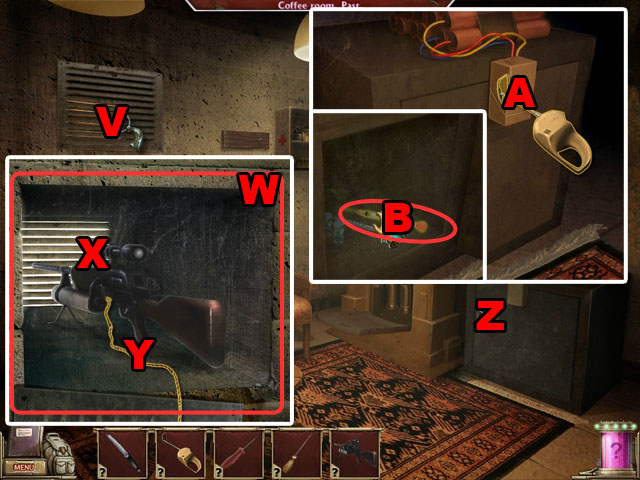
- Zoom in on the coffee machine (I) and open the cover.
- Place the SLEEPING PILLS (J) and set the CUP (K).
- Fill the cup with water.
- Collect the CUP.
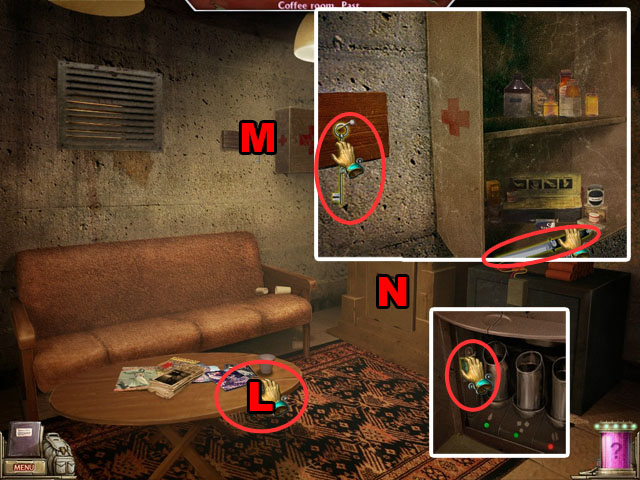
- Collect the LEFT LEVER (L).
- Zoom in on the first aid kit (M) and collect the KEY and KNIFE.
- Zoom in on the coffee machine (N).
- Collect the BATTERY.
- Move to the bunker hall.
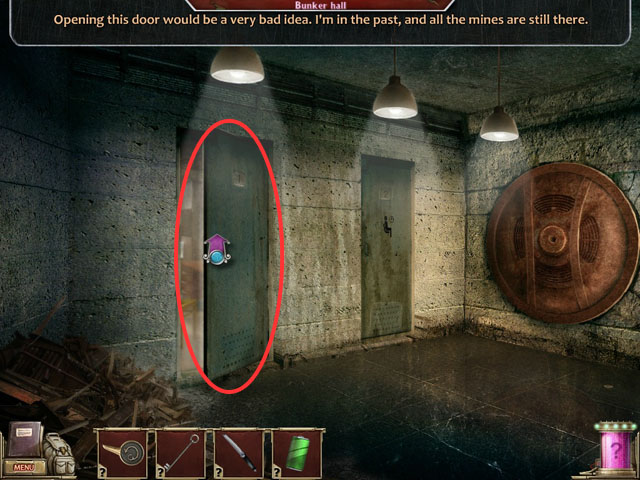
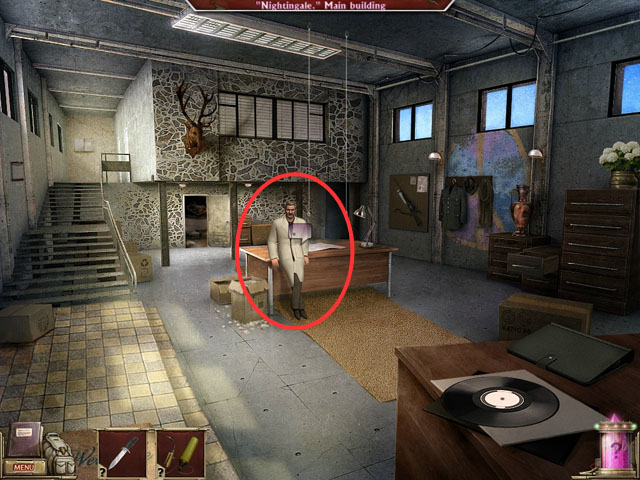
- Enter the Armory room circled in red.
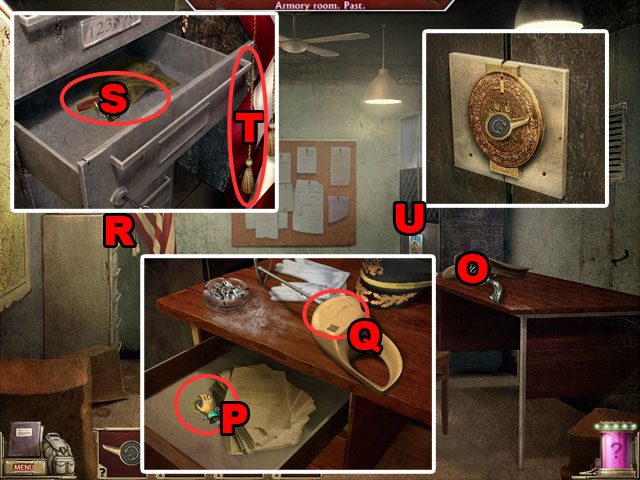
- Zoom in on the table (O). Open the drawer and collect the RIGHT LEVER (P).
- Open the cover (Q) and place the BATTERY.
- Collect the DEMINER unit.
- Zoom in on the shelf (R).
- Open the drawer with the KEY and collect the SCREWDRIVER (S).
- Cut the string with the KNIFE (T).
- Zoom in on the locker (U).
- Place the LEFT and RIGHT LEVER.
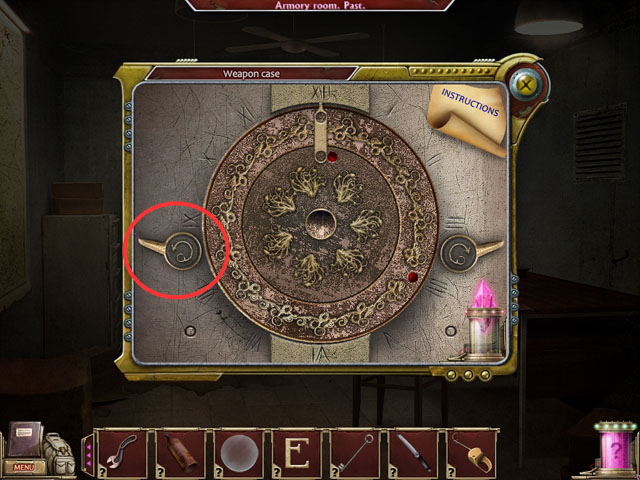
- Pull the left lever twice to match the two red dots in the holes.
- Find the hidden objects and receive the GUN.
- Return to the first room and zoom in on the air vent (V).
- Open the vent cover with the SCREWDRIVER (W).
- Set the GUN inside (X).
- Set the STRING on the gun (Y).
- Zoom in on the safe (Z). Use the DEMINER UNIT on it (A).
- Cut the cord connected to the dynamite with the KNIFE (A).
- Open the safe and collect the TRANQUILIZER (B).
- Zoom in on the gun again (V). Set the TRANQUILIZER on the gun (X).
- Replace the vent cover (W).
- Return to the next room and talk with Frei.
- Congratulations! You finished Time Dreamer: Temporal Betrayal!


 Skymist: The Lost Spirit Stones Walkthrough, Guide, & Tips
 The Secret Order: Beyond Time Walkthrough, Guide, & Tips
 Mystery of the Ancients: Three Guardians Walkthrough, Guide, & Tips
 The Secret Order: New Horizon Walkthrough, Guide, & Tips
 Dark Tales: Edgar Allan Poe's The Fall of the House of Usher Walkthrough, Guide, & Tips