

After defeating Atlas, you can either proceed to Yaschas Massif to the south or Sunleth Waterscape to the west. Sunleth Waterscape is designed for slightly more advanced players, and as such will be difficult but will reward you with better items than you may be accustomed to. Either way, you’ll eventually see both sections of the game, so don’t feel pressed to make a decision. This walkthrough will cover Yaschas Massif first, simply because it is the easiest and most logical route to take next. Head back to the Echoes of the Past area and find the Gate north of Chocolina and use the Eclipse Artefact to reach the Historia Crux. Select Yaschas Massif and you’ll be off.
You will find yourself in a small valley area called the Pass of Paddra. Speak to the researcher with the text bubble above his head to obtain the map of the area and to learn more about where you have ended up. Follow your map to the north until you reach a barrier of some sort. The area around you will be darkened. A tutorial message telling you about Spotlights will appear on the screen. Whenever you stand in the spotlight, your Mog Clock will change to green. This is especially helpful because of the massive beast that roams this area, called the Feral Behemoth.
Run quickly from each lit area to the next. If you manage to make it from one spotlight to the other fast enough, the Feral Behemoth won’t be able to catch up to you. When you reach Chocolina, buy whatever you need and follow the path to the right. Follow your waypoint marker even as the path branches into two. This should take you to the north. When you reach another barrier, prepare for a tough boss battle and speak to the woman standing in front of it. This will mark the beginning of your fight against the boss Aloeidai.
Boss Battle: Aloeidai
Having a Medic such as Cait Sith in your party can be helpful in this battle, but it will mean less chances to stagger Aloeidai so you will have to weigh the pros and cons of healing using magic against attacking with all of your forces. Remember that you should have a fairly large surplus of potions at your disposal, which can be very helpful despite their somewhat weak effects. Aleoidai will use status ailments against your party to weaken them, and there really isn’t much you can do to counter that at this point. The best you can do is to switch to the Relentless Assault Paradigm, as long as your party is strong enough to withstand Aloeidai’s attacks. Try to build up that Chain Gauge as fast as you can using this loadout. If it doesn’t seem feasible to survive the brunt of Aloeidai’s attacks while maintaining an all out assault, you can switch to the Delta Attack Paradigm and use a Sentinel to block damage from hitting your party.
After killing Aloeidai, you will receive the Aloeidai Fragment and meet up with Hope and Alyssa. Speak to them to trigger a cutscene and talk to the nearby guard afterwards to open up the next area. Hope will lead you back to his encampment, which will begin another cutscene. You will receive the Hollow Artefact and a waypoint will appear on your map. Before you head out, speak to Hope one more time to participate in a Live Trigger Event. Then run over to the gate marked by your waypoint and use the Hollow Artefact to unlock it. You may now proceed to Oerba.




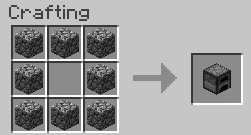 How to make a furnace in Mincraft on the PC
 gamescom 2011: Chillingo iOS Roundup
 . Plays September 16, 2012
 . Plays, 27th June 2015
 Minecraft water temple seed list 1.8 - 1.8.1(8 ocean monuments)