Starhawk Walkthrough Part 6 – Train Robbery
Clear the Platform
you need to make it from one end of the platform over to the other 2 minutes ago. Land, bust out of the pod and get Sprinting. On top of the first ramp, the fire fights start with the Scabs. Once the Outpost is mentioned, called one down immediately for some back up. Do not go down the next ramp without it. Without makes that next stretch infinitely harder.
Build a Vulture Station
Build the Vulture station off to the side then it is time to take to the air in jet packs. While you are not armored this round, you are still very maneuverable. Unfortunately, you also have a limited supply of fuel and ammo to get around with.
Destroy the Flak Turrets
First thing is first, you need to destroy the turret so the Hawk can be brought in safely. There are a good 8 Turrets that need to be destroyed from where you are. The first 3 are very easy, just jump and engage the Jetpack to hover long enough to fire 2 missiles at each turret. The remaining 5 are where you need to get a little more creative.
Jump up onto the nearby crate and then use it to jump the gap over to the next part of the fueling platform with your jetpack limited fuel. Once there, hang around the bottom for a minute to take out a few Outcast that come at you. Destroy any remaining turrets on this level then hop your way up to the next one.
Once again, focus on the Outcast first. There are a few pillars here so you can easily circle one when engaged with an Outcast. For some reason they do not seem to get that a pillar will block their line of fire too well. Wait for them to land and take a crouch. At that point rush them shooting then knife them to finish it. Once they are dead, destroy the turret. The final turret is above you. So, to get up you need to head out to a section of this level without an overhand and just use the Vulture to get up there, plain and simple. Once up there, just blast it with a missile to move onto the next objective.
Destroy the Outcast Dropships
Get a Launch Pad built promptly after the turrets have been destroyed to protect the Rift cargo. Fly around a moment to collect some Homing and Cluster Missiles. Get over to where the drop ships are, revert to Mech and open fire with everything. IT will take most of your ammo and a few gun overheats, but it will take out all 4 Drop Ships quickly and easily.
Protect the Cargo
First, drop a pair of walls in front of where the Outcast will first be appearing. After that, get 2 Beam Turrets in place. This will make sure that you have some protection and plenty of fire power for when they land. You will have 1 minute to make your preparations before they come crashing in.
After a wave of Outcast on the ground, Hawks will come in and engage you and everyone else. You only have so long though. Use the homing missiles to quickly destroy the opposing Hawks so you are free to engage the mechs when they arrive. The good news is you get a 1 minute countdown before they make their appearance.
When the Mechs arrive, get over to the site fast. Drop another Beam Turret nearby your wall and then get ready for a fight. With the Beam Turrets they all go down fast and it is on to the other side of the ship. Here, you have a total of 4 waves coming in. The first are just Scabs, then they have Jetpacks, third are some Apex Warriors then, finally, more Hawks.
For the first 2 waves, have an Auto turret down to make sure they go down quick and easy. After that, drop in an Auto Turret and potentially another ARM for repairs. Just keep a good assault on the Outcast and you will reach the Hawk wave with no trouble at all.
Get away from the ship
After all that, the Captain does something very stupid and very brave. To stop the Outcast from taking the ship's Rift Drive, he sets it to self-destruct. Emmett will have 1 minute to reach the marker. Just boost as much as you can, letting the booster recharge completely between.


 Batman Arkham Origins Guide: Anarky Side Mission Guide
 Rogue Factor on Mordheims year in Early Access
 Top 10 Must-Do Things on The Sims 3
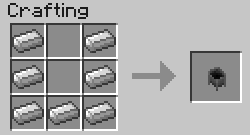 How to make a cauldron in Minecraft for the PC
 Metal Gear Solid 5: The Phantom Pain Episode 46 – Truth: The Man Who Sold the World