Mysterious Face is a monstrous fight, a massive level 25 Mechon of the ‘Face’ category. If you haven’t been doing absolutely everything up until now, you aren’t high enough level to take this fight casually at all. Even with a well-equipped group at level 22, Reyn still takes hefty damage and Sharla and Shulk need to rely on their evasive abilities to keep from becoming a fine paste.
While fighting Mysterious Face, you’re limited to the small platform at the top of the spiralling ramp, so make sure you keep track of the limits of your evasion region- you’ll need to hit the edge of it pretty frequently. Mysterious Face has enough reach to smash you with his hammer from halfway across the area, and takes up nearly a quarter of the space there is just on his own. Thankfully, his size also means you can run around his legs as you fight, but there’s a limit to how much this helps.
Mysterious Face doesn’t so much have special attacks as some really devastating regular attacks. His main attack is a sweep with his hammer that covers a nearly 120-degree arc in front of him. He also unleashes occasional vertical pounds that are much smaller in area, but do far higher damage. To make matters worse, he can jump across most of the arena if you get too far away from him. Reyn can grab his attention, but because of the area-effect of his hammer sweeps, you have to make absolutely sure that Sharla and Shulk are on the opposite side of Mysterious Face from your redheaded tank, otherwise they’ll get cut down in just a few blows.
Sharla should regularly apply her shielding effects to Reyn throughout the fight, and healing is going to be needed frequently. You want to do everything you can to keep Reyn up- if nothing else, just focus on that and wait until you rack up enough spare damage on auto-attacks. Ideally, you would wait for a Chain Attack as you had to against Metal Face, but you’re not going to get the chance.
Surviving long enough to trigger the end of the fight is an ordeal, though. Even at Level 22, you can expect each hit to do hundreds of damage to Reyn, and as much as a thousand to Sharla or Shulk. Additionally, there’s going to be a lot of Assist needed, as you’re going to find your party members getting knocked down a lot. My recommendation here would be to take control of Sharla at least for this combat- this puts you in direct control of all the major healing effects available to the party, making it far easier to ensure Reyn stays in one piece. Alternately, take control of Reyn so you can focus your defensive effects to keep from keeling over mid-fight.
Any way you slice it, this is a horrifying endurance fight against an overwhelmingly powerful enemy- the only saving grace is his low attack speed, which gives you time to patch up anyone who gets smashed.
 . Plays August 5, 2012
 5 Best Super Mario Games for PC,PS3,XBOX
 Luigi's Mansion: Dark Moon Guide - Tree Topping Haunted Towers Boss Guide - GamersHeroes
 DmC: Devil May Cry Secret Door and Key Location Guide
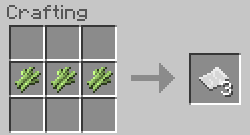 Minecraft: How to Make Books