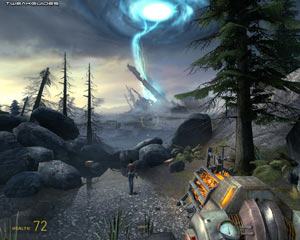
It's been three years since Half Life 2 was released, and to this day it remains a favorite of gamers everywhere. So much so that Valve decided to extend the game by releasing new 'episodes' of Half Life 2 periodically, with HL2: Episode 1 being released in 2006, and HL2: Episode 2 being released in late 2007. An Episode 3 will be released at an unspecified date in the future, concluding the storyline of these episodic chapters. Opinions are mixed as to whether episodic content release is a particularly satisfying way of telling a story, especially since it was originally planned for each episode to come out within a short space of the previous one. Be that as it may, Episode 2 of Gordon Freeman's journey introduces a range of features and surprises, so I'm sure fans will forgive and forget the long wait from Episode 1.

When I first wrote the HL2 Tweak Guide, it proved immensely popular, and over time it has been updated several times. Unfortunately in recent times I haven't kept it as up to date as I should have, primarily due to the demands of writing many other new guides. However I have now taken the opportunity to completely revamp the guide, rewriting major portions of it to bring it fully up to date with the latest build of the Source Engine, which is being used in a range of games released by Valve, the latest being HL2: Episode 2, Team Fortress 2 and Portal. So while the guide is ostensibly for Half Life 2, it applies to all Source Engine-based games, hence the retitling of the guide. Given the technical improvements in the Source Engine over the past three years, it is definitely a fine platform for the new games Valve is releasing. As usual, this guide contains all the basic to advanced details you need to be able to tweak and customize HL2: Episode 2, or your Source Engine game, to look and perform the way you want it.

Note: This guide has been significantly updated as of HL2: Episode 2. Importantly, the tweaks in this guide also apply to every other Source Engine-based game including all Half Life 2 variants, CounterStrike: Source, Day of Defeat: Source, Vampire: The Masquerade, Portal, and Team Fortress 2. Make sure to refer back to this guide for updates.
Before getting into any game-specific settings and tweaks, this section covers the obligatory system optimization information I include in all my guides. If you've followed this advice recently, you can skip this section.
Many people report problems with this game and in almost all cases these are due to general system issues and not the game itself. With that in mind I strongly urge you to take some time and follow the advice below if you truly want this game, and indeed every other game you own, to run at its fastest and most trouble-free.
The place to start is with the TweakGuides Tweaking Companion. It is the complete system optimization guide for Windows users. Designed for novice and advanced users alike, it is written in plain English to help you genuinely understand all aspects of Windows and your PC. The guide covers every major topic, from the correct installation of Windows and critical drivers and software, through to recommendations for every significant setting and feature, all the major performance and convenience tweaks and customizations, as well as detailed troubleshooting advice. There are also links to a range of reliable free applications which can enhance your system and give you viable alternatives to purchasing commercial software. There are separate versions available for Windows XP, Windows Vista and Windows 7.
If you've ever wondered what common graphics and display settings like FPS, VSync, Refresh Rate, Antialiasing and Anisotropic Filtering are, and how they really work, then check out my Gamer's Graphics & Display Settings Guide for all the details in an easy to understand format. The guide also gives you a rundown on exactly how a game goes from a being a set of files on your hard drive to a 3D image on your screen, including relevant performance tips.
Finally, if you run an ATI or Nvidia graphics card, I have written two comprehensive guides which you should check out: the ATI Catalyst Tweak Guide and the Nvidia Forceware Tweak Guide. These guides cover absolutely everything about the latest graphics drivers, how to set them up correctly, as well as advanced tweaking, overclocking and benchmarking tips. They're a must-read for configuring your graphics card correctly.
The above information really will serve you well in the long run, not just in this game. If you don't optimize your system and keep everything updated and maintained correctly you will keep running into "mysterious" problems time and time again. Do yourself a favor and when you get a chance spend an afternoon or two optimizing your machine the right way with the guides above.
The next section goes into more detail about specific troubleshooting tips which address common performance issues with the game.

This section contains specific troubleshooting tips which address many of the common problems experienced by Half Life 2 and Source Engine game players. I can't stress enough the importance of taking the time to go through the checklist of advice below if you're having a problem with the game.
Official Support: If you have a problem with the game, the first place to check is the Steam Support Site, which now provides all official support for all Valve games. If you still can't find a solution, you can seek interactive community tech support on the Steam Forums.
System Requirements: The minimum system requirements for Half Life 2 and Source Engine games has evolved slightly over time due to the way the game engine has been upgraded with new technologies, but in general the minimum requirements are very low. The latest requirements for HL2: Episode 2 and other recent Source games can be found at the bottom of this page.
Steam Issues: Steam is an integral part of Half Life 2 and Source Engine game functionality, so see the Steam section on Page 4 of this guide for more detailed coverage of Steam-related issues and functionality.
Graphical Issues: If you experience any strange glitches or other graphics-related issues, make sure you are using the very latest graphics drivers. In particular Nvidia users should be using the Beta Forceware 163.75 or newer, as these are specifically designed for HL2: Episode 2.
Audio Issues: If you have looping or skipping audio, see further below. If you have missing spoken dialog, change your 'Audio (Spoken) Language' setting to anther language, click Apply, then change it back for the spoken dialog audio to be correctly implemented. See the Audio section on page 5 of the guide for more details.
Stuttering: One of the most famous aspects of the Source Engine is its tendency for Stuttering, including skipping or looping audio at certain points, or periodically. The actual issue revolves around the way the engine is continually loading chunks of texture information on the fly from your hard drive into Video RAM - such as when you walk around a corner into a new area, or see a new creature - the audio pauses or skips at the same time. Let me be clear: it's not actually an audio issue, it's a general game engine issue. The early history of this issue is covered in greater detail here: Half Life 2 Stuttering. Over time Valve has released a range of updates which have minimized this issue with varying degrees of success.
Importantly: If you want to reduce stuttering then you must defragment your hard drive after installing and updating Half Life 2 or your Source Engine games. Make sure you do this after each and every time you update these games via Steam, and also whenever you install new drivers or Windows patches. Using the built-in Windows defragmenter is OK, but a third party defragmenter such as Diskeeper does a much more thorough job. One specific tip which can help reduce stuttering even further is to defragment inside the large .GCF Steam cache files. You can do this within Steam itself by right-clicking on a game, selecting Properties, and under the 'Local Files' tab click the 'Defragment Cache Files' button. Alternatively, to do an even better job, use the free GCFScape utility to defragment the .GCF files. More details on defragmentation, hard drive and virtual memory optimization are in the relevant chapters of the TweakGuides Tweaking Companion. Do not skip these steps as they have a noticeable impact on reducing stuttering in Source games.
Background Programs: Disable all unnecessary background applications - especially virus, trojan and spyware scanners and messaging utilities. These applications can and do use up valuable CPU resources, take up precious RAM, cause memory conflicts and crashes to desktop, but most importantly they interfere with read/writes to your hard drive effectively slowing it down and causing even more in-game stuttering and longer loading times. Full instructions on how to identify your startup programs and services and how to correctly disable unnecessary ones are in my TweakGuides Tweaking Companion. This is an important step you should not miss.
Overclocking: The Source Engine is generally not as sensitive to overclocking, but if you've overclocked any components on your system and are having problems such as crashes, reboots and graphical anomalies, the first thing to do is set everything back to default speeds and try running the game. If you don't experience the same problems at default speed, or they're reduced in severity, then your overclock is the primary culprit. Either permanently reduce your overclock and/or increase cooling to regain stability. Don't assume that because other games run with stability at a particular speed, or that previous versions of Half Life 2 ran without issue, that the latest build of the Source Engine will do the same.
That's just a basic rundown of troubleshooting tips. Read the remainder of this guide for more specific settings and tweaks which can help improve your performance and resolve any problems.
Official Patches
Valve has released many updates for both the Source Engine upon which the game is based, as well as fixes specific to Half Life 2 and other Source games. These patches/updates are released quite often, and should help get smoother gameplay and resolve a range of bugs. All available updates should be downloaded and installed by all users directly through Steam. Whenever you start the Steam Client, it will automatically and periodically check for and install relevant updates as required - see the Steam section further below for configuration details.
Given Valve's commitment to distributing software via Steam, all updates for Half Life 2 and other Source Engine games will continue to be available exclusively through Steam. Keep an eye on the front page of TweakGuides.com for regular notifications of updates for Half Life 2 and other Source (and non-Source) games as they are released.
Note that if you run a 64-bit based CPU as well as a 64-bit based Operating System such as Windows x64 or Vista 64-bit, you can download the 64-bit version of Half Life 2 for your system. This version will not work on any other type of system, and contains no new content. It simply takes advantage of 64-bit systems to improve performance.
Copy Protection
Steam is not only a digital distribution method, it also has built-in online verification for copy protection. As long as you've legitimately purchased a game via Steam, allowed it to verify and update online, and you're using your own account to play on only one PC at any time, then you should have no problems at all. An added bonus of playing a game through Steam is that there is no requirement for any CD or DVD to be kept in the drive, and you can play offline if you wish once the game has been updated. If you ever buy a new PC and/or reformat your hard drive, you simply have to download and reinstall the Steam Client, login to your account and you can instantly download and play your purchased games, so there's no concern over 'losing' your games. If however you want to back up your Steam games to CD or DVD, you can do this easily and legally from within Steam itself. Details of all these features are covered in the Steam section below.
A word of warning - be very careful of any methods or software which allegedly allow you to play without Steam, as they are more than likely to be trojans designed to steal your CD Key or Steam ID for example. You risk having your legitimate Steam Account stolen or permanently banned, which means you lose access to your Steam games. For the most part Steam is an excellent and reasonably priced method of purchasing and playing games, so there should be no excuse for pirating these games.
Mods
The Source Engine by Valve is a powerful and versatile game engine, and continues Valve's tradition of supporting modifications (or 'mods') for their games. Included with some editions of Half Life 2 (and available as separate games for purchase under Steam) are some existing mods which have been remade based on the Source engine - CounterStrike: Source, Half Life 1: Source and Day of Defeat: Source. If you're interested in developing Mods for Source games, the full Source Software Developer's Kit (SDK) is available for download under the Tools tab in Steam, and includes the game code needed to create Source Mods and edit maps among other features. If you want to learn more about the Source SDK, read the Valve SDK Documentation, and discuss your issues on the Source SDK Forums if necessary.
If you're only interested in downloading and playing official and user-made mods for Half Life 2 and Source Engine games then try the following mods and mod sites:
Half Life 2: Lost Coast
Garry's Mod
GoldenEye Source
Cinematic Mod
Wikipedia HL2 Mod List
Half Life 2 Files
Half Life 2 Mod Database
HL2 Top 100 Mods
Black Mesa Source
Steam
Steam is an innovation of Valve's, designed for online software delivery, automatic updates, game authentication and community involvement. You can read about the full history and features of Steam in this Wikipedia Article. Basically Steam is a small program which runs in the background and provides you with the ability to purchase and download full games directly from Valve, it checks to make sure that you are a legitimate owner of any Steam game you attempt to install or play, and it also checks to make sure your game files are the latest version available for that particular game and automatically patches your games to keep them updated. Although you can purchase some Source Engine games independently of Steam, in general it is strongly recommended that you purchase and/or play and update these games via Steam. Below I cover Steam's key features.
To start with, while you can configure most aspects of Steam to suit your personal taste, I recommend that you go to File>Settings and under the Interface tab untick 'Run Steam when Windows starts'. This is because having Steam automatically load up at Windows startup and run in the background is not necessary, particularly when playing other games. Of course if you prefer to run Steam this way, then I recommend manually closing Steam by right-clicking on its tray icon and selecting Exit before you start a non-Steam game - just closing the Steam window doesn't unload it from memory.
If you have any questions or problems regarding Steam, or your game in general, you should definitely make a point of visiting the Steam Support Site. It contains answers to a range of the most common Steam-related questions, including solutions for all the error codes for example, and is always kept up to date. If you find your Steam client is having issues with a particular game download or update, or it won't start, or you're getting an error message, try these Steam Fixes. If none of these solutions help you resolve a Steam-related issue, you can ask for official Tech Support from Valve by using this Ask A Question online form.
To save you some time, here are some quick answers to the most commonly asked Steam-related questions:
Do I have to have an Internet Connection to play Steam-based games: The short answer is Yes, you need an Internet connection to begin playing a Steam-based game. Steam requires online authentication of your game and it may also need to download additional files to activate and complete the game install before it can be played. There is no legal way around this. However once you've registered your CD Key or validated your install and updated the game, you can play it offline at any time without having to have an active Internet connection (see below).
Playing Steam games offline: Once installed, verified and fully updated online, you can play a Steam game without having to be connected to the Internet. To do this, follow the instructions in this Steam Article.
Backing up Steam files: If you purchased a game via Steam and want to back the game up to a CD or DVD there are two ways to do this: Open Steam, go to the 'My Games' tab, right-click on any game you want to backup, and select 'Backup Game Files'. Alternatively, you can go the File menu in the main Steam window, and select ' Backup Games'. You will then enter a backup wizard which lets you choose which installed Valve games to backup, the destination directory, and the media type you'll be using (CD or DVD) so that it can segment the files into CD or DVD-sized portions, ready for burning.
Transferring Steam files: If you have an existing installation of Steam you wish to move to another Operating System (e.g. from XP to Vista or vice versa) or another system, and not just backup to CD/DVD (See below), then simply install the Steam application on the new OS/system, login to Steam as normal, add the game(s) you own that you wish to install and pause or cancel any updating/downloading which commences. Now exit Steam completely (make sure to close the Tray Icon as well) and go to your \Program Files\(Valve)\Steam\steamapps directory in the new OS/System. There you will see all the relevant .gcf files which are needed for the games you want to play. Locate and copy these files across from your existing OS/System to overwrite the files on the new OS/System. Restart Steam, login as normal, right-click on each game and select Properties>Local Files>'Verify integrity of game cache'. Once completed the games should be ready to play.
How do I keep my game updated: Go to the 'My Games' section of Steam, and right-click on the games you want to keep updated. Then select Properties, and under the Updates tab for the game select 'Always keep this game up to date' under the Automatic Updates section. This is highly recommended so that you don't miss important updates. Alternatively, if you don't want Steam to automatically update games as updates are released, select 'Do not automatically update this game' instead. That way you can choose if or when you actually download and install updates. You can see all previously installed updates by clicking the 'View game name Update History' link.
How Do I use Command Line tweaks with Steam: You can enter command line tweaks by going to 'My Games' in Steam, right-clicking on the game you want to tweak, selecting Properties and clicking on the 'Set Launch Options' button. Alternatively you can right-click on the Desktop icon for the game and select Properties, and enter the tweaks in the Target box. Full details are in the Advanced Tweaking section.
In general Steam has evolved to be quite a solid and even quite popular method for purchasing and playing games, so using Steam is only likely to become more common in the future.
The next section of the guide covers In-Game Settings for Half Life 2.
In this section I provide full descriptions and recommendations for Half Life 2's in-game settings, allowing you to achieve a good balance between image quality and performance. I note the performance impact of each setting, although bear in mind that it is impossible for me to give exact performance impacts (e.g. a 10% rise in FPS) because it all depends on your specific hardware combination and your other game and system-wide settings.
To access the in-game settings start Half Life 2, and under the main screen select Options. The various sections are covered in detail below:
Developer Commentary
On the main menu, you can now listen to the developers' commentary as you play through portions of the game. Click 'Developer Commentary' and select the chapter for which you would like commentary, however importantly note that when commentary is enabled, you will not attain Achievements while playing. This is also the case if you have cheats enabled. So if you're trying to complete certain Achievements, disable Developer Commentary and any cheats during your session - restart the game if necessary to ensure these are not enabled.
Difficulty
You can select the difficulty level of the game on this screen. The choices are Easy, Normal and Hard, with the default being Normal. Set the difficulty level to suit your taste - obviously the higher the level the more challenging the game is to complete. There isn't any noticeable performance difference between the settings.
Keyboard
You can assign the various game commands to specific keys on your keyboard here. Highlight the command you wish to change, click the 'Edit Key' button and press the key you wish to replace it with. If you want to remove a key from a function without replacing it with another key, highlight the function and click the 'Clear Key' button. You can return to the default key assignments - which are actually quite good - by pressing the 'Use Defaults' button. Nothing here affects performance, so set to suit your taste. Note that you can also alter key bindings by using the bind command - see the Advanced Tweaking section.
Advanced: The Advanced button leads to two important additional settings. The 'Fast Weapon Switch' option if ticked allows you to switch instantly between weapons by pressing the relevant weapon's number (e.g. 1 to switch to crowbar, 2 for Pistol etc.). If unticked, you can still switch weapons by pressing the weapon numbers, however you will also have to press the Primary Fire button before the weapon actually appears in your hard. This has no impact on performance so set to taste - I recommend enabling it. Note that if you want a method of switching between two specific weapons rapidly, use the 'Last Weapon' key (Q by default) - pressing this key quickly alternates between your current and last used weapon.
Importantly, the 'Enable Developer Console' option available here provides access to the in-game console. If enabled, you can open and close the console at any time by pressing the '~' key (the key under ESC). Access to the console is critical in allowing you to use the tweaks in the Advanced Tweaks section later in this guide, so I strongly recommend you tick this option.
Mouse
Reverse Mouse: If ticked, this option means that when you push the mouse forward, your character will look down, and vice versa. This has no impact on performance so set to suit your taste.
Mouse filter: If ticked, this option attempts to smooth your mouse movements by averaging the movements over two frames. If you find the mouse movements too jerky, enable this setting. Note that this setting does not resolve mouse lag, and might actually make it worse - see Mouse Sensitivity below.
Mouse Sensitivity: This slider allows you to adjust how sensitive your mouse is to movements. The greater the sensitivity slider (the higher the number shown), the more sensitive your mouse is to movements. Note that while this setting has no impact on performance, if you are experiencing a 'laggy' mouse and/or general movement then you will need to reduce your graphics settings, especially any Antialiasing. Mouse lag is almost always due to low framerates.
Enable the gamepad: If you have a gamepad you wish to use with the game, tick this box, otherwise leave it unticked. You can adjust the gamepad characteristics, including horizontal and vertical sensitivity here.
Audio
Game Volume: This slider allows you to adjust the overall volume of sound in the game. Note that this has no impact on performance, and setting it to the far left (0) will not remove sounds or music from memory.
Music Volume: This slider allows you to change the volume level for any background music played throughout the game. Once again, setting this slider to the far left (0) will not yield any performance improvements, and can also disable developer commentary.
Speaker Configuration: This drop down box allows you to select the number of discrete audio channels Half Life 2 will provide for your speakers. You must make sure that the number/type of speakers chosen do not exceed that connected to your system, otherwise you may experience audio glitches and/or missing sounds. On some systems with a 7.1 or 5.1 speaker setup, you may find better audio performance from choosing the '4 Speakers' setup or even '2 Speakers'. The less the number of speakers chosen here, the better your performance since more audio channels require more audio processing which is shared by the CPU and your Sound Card. For most systems the 2 Speaker setup provides the most trouble-free sound performance.
Note that changing the speaker configuration here may also change your default Windows speaker configuration under Control Panel>Sounds & Audio Devices, so keep this in mind if you notice your sound output sounds different for other games or in your media player for example. Also note that you should disable any special effects in your sound card's control panel. On the Audigy range of cards for example this involves going to your SoundBlaster AudioHQ, opening the EAX Control Panel and clicking the 'All Effects Off' button to disable additional EAX effects these can cause audio glitches and problems in Half Life 2. Finally, if you experience audio looping or stutters, see Stuttering under the Troubleshooting Tips section of the guide.
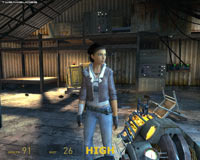
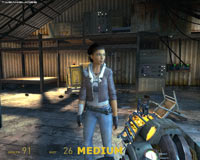
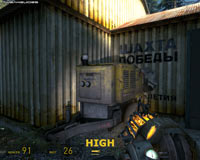
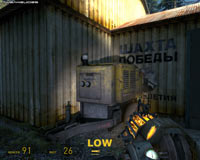
Sound Quality: This setting controls the quality of the audio used in the game. The options are Low, Medium and High, and in experimenting with this setting I found that the general sound quality (sample rate) remains the same for each setting level. At High however the audio has additional special effects which affect its pitch and ambience. At Medium and Low the audio is less rich and atmospheric. However the performance difference between High and Low can be noticeable, so I recommend Medium or even Low sound quality to boost your performance without a significant drop in audio quality, especially if you get lots of audio looping/stutters.
Audio (Spoken) Language: This option affects the language of the spoken dialog in the game. You can choose from English, French, German or Russian. If you experience missing spoken dialog, try changing your language to another, Apply it, then back again to your preferred language and Apply to reload the spoken audio.
Captioning: This option lets you select whether or not the game shows captions for the hearing impaired or for translated text in foreign language editions for example. 'No Captions' provides the best performance and is recommended for those who don't require any captioning/subtitle functionality. 'Closed Captions' provides subtitles for dialog and also provides text indicators of important events and sound effects, however it can reduce your performance slightly if enabled. 'Subtitles (dialog only)' is recommended for those who just want text subtitles for spoken dialog in the game, and there is a mild performance hit.
Video
Resolution: The resolution box allows you to select the Resolution for the game, as shown in pixel width by pixel height. The higher the resolution, the more detailed the image due to the larger number of pixels used, but the greater the performance impact on your machine. If you find your gameplay is 'laggy' or you experience slowdowns in some areas and nothing else helps to reduce this, consider lowering your resolution. Note that only the resolutions supported on your graphics card/monitor combination are shown here. Also note that the Aspect Ratio setting (see below) affects the resolutions shown in this box. To set a custom resolution, see the Advanced Tweaking section.
Display Mode: You can select whether to run the game in 'Full Screen' or Windowed mode. Windowed mode means that the game will run in a window on your Desktop as opposed to taking up the entire screen. Full Screen mode is recommended for the most optimal, trouble-free display; Windowed mode may lead to problems or even reduced performance due to memory management and desktop performance issues in both XP and Vista.
Aspect Ratio: Depending on your display, there are three available settings here: 'Normal (4:3)', 'Widescreen 16:9', and 'Widescreen 16:10'. The aspect ratio is the ratio of the width to the height of a display. The traditional ratio for monitors and standard TVs is 4:3, and this is recommended for most people. A Widescreen (16:9) aspect ratio is the display ratio for a standard widescreen TV which is much wider than it is tall, and 'Widescreen (16:10)' is a slightly taller non-standard display ratio for widescreen TVs. Note that as you change the aspect ratio, the list of available resolutions under the Resolutions drop-down box will change, since you are changing the width to height ratio of the display.
Adjust Brightness Level: Click this button and use the Gamma slider to adjust the overall brightness of the onscreen image. As the setting recommends, you should ideally be able to see all three lines of text, however in my personal adjustment of this setting I noticed that the correct Gamma level to my eyes meant that some of the text was still next to invisible. This setting has no effect on performance, the main aim is to make sure the game image is not too 'washed out' or too dark. The default setting is 2.2 for CRT monitors and 1.7 for LCD monitors, however the "correct" setting is also influenced by your existing monitor brightness and contrast settings.
The next section continues the In-Game settings by covering the Advanced video functions.
Advanced
The settings under this section have a major impact on graphics quality and performance, so you should make sure you are entirely familiar with what they do. The game recommends particular settings based on your system specifications (denoted by a *). While these recommended settings are reasonably good, they are still on the conservative side. Use the information below to modify them to suit your tastes more closely:

Model Detail: This setting controls the number of polygons and extra detailing used for objects in the game. There are three settings: Low, Medium and High. The screenshot comparison above shows that in general the difference is not major. The Low setting provides the best performance, however objects and in particular characters may seem slightly more angular, and some minor additional detailing may be removed depending on the scene. If you have an older graphics card, then reducing this setting can improve performance.
Texture Detail: Textures are the 2D images used as the surface of all 3D objects in the game world. The settings here are Low, Medium, High and Very High. To see an animated screenshot comparison click this link: HL2_Textures.gif (976KB). Note the clarity of the rock to the right, and the ground in front of you. The difference between Very High and High is difficult to notice, but at Medium there is noticeable blurring, and at Low the textures are quite blurred. While increasing the texture setting can reduce FPS slightly, and more importantly may contribute to additional stuttering, given the quality of the textures in HL2 are relatively poor, most systems should run at Medium or above. Note that you may experience a bug with this setting in that if you set it to Very High it will default back to High each time you restart the game. To overcome this add mat_picmip -1 to your autoexec.cfg file to automatically force it to start at Very High each time - see the Advanced Tweaking section for more details of how to use an autoexec.cfg file, and for more details about the mat_picmip variable.
Shader Detail: This option can either be set to Low or High, and controls the level of the special effects drawn by shaders, which are complex graphics functions supported by your graphics card's hardware. The performance difference between Low and High is noticeable in some areas, however the image quality difference is usually not very noticeable. In the screenshot comparison above, at Low the corrugated walls of the shed don't have the same depth and shadowing, and the lighting effects are also milder. Another place where shader effects are more noticeable is underwater - with Shader Detail on Low, the general atmosphere of being under water is far less realistic.
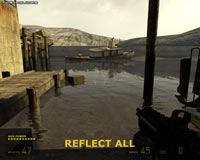
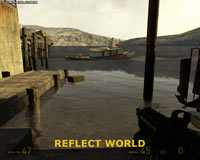
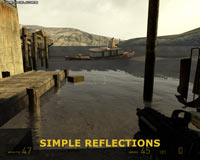
Water Detail: This setting controls the realism of the water in the game by determining how complex the reflections on the water are: 'Simple reflections', 'Reflect world', and 'Reflect all' being the three options; see the screenshot comparisons above for the difference. Note that at Reflect All, there are reflections cast from the ship, the pier on the top left and the box in the water. At Reflect World, only the major terrain is reflected in the water, and at Simple Reflections, though the difference is hard to tell, minor detailing is lost as well in the reflections. If you are getting slowdowns in water areas, Reflect World is a good compromise between performance and image quality, though even Simple Reflections does the job. If you really want to reduce water quality in return for performance see the r_cheapwaterend command in the Advanced Tweaking section.
Shadow Detail: This option can be set to Low or High. At the Low setting, shadows are not visible for most objects, including characters and boxes for example. This provides the best performance, particularly in areas with multiple lights and multiple objects, but can seem quite unrealistic. High provides the most realistic shadow detail, with characters and objects casting accurate, complex shadows, but with a noticeable performance drop - especially in complex combat scenes for example. If you are experiencing slowdowns in such cases I recommend Low shadow detail.
Color Correction: This option can be either Enabled or Disabled. If enabled, it attempts to increase realism in the scene by improving color quality to accurately reflect color temperature. A static screenshot comparison does not show the difference well, so to see an animated screenshot comparison click this link: HL2_Color.gif (381KB). As can be seen, with Color Correction on the scene is slightly 'warmer' in color. The performance impact is minimal to none, so it is generally recommended that you enable this option for the most realistic color reproduction.
Antialiasing Mode: The options here vary based on your hardware capabilities, but you should see some of the following: None, 2x MSAA, 4x MSAA, 8x CSAA, 16x CSAA, 8x MSAA and 16xQ CSAA. Essentially the higher the sample rate of Antialiasing used, the smoother jagged lines in the game will appear, but the greater the performance hit. Note that MSAA is Multisampling AA, which is the standard form of AA most people would be accustomed to. CSAA is available to GeForce 8 and higher users, and CFAA is available to HD2X00 and higher users. Any mode ending in Q is higher quality but also has a higher performance hit. To find out more details about Antialiasing read this page of the Gamer's Graphics & Display Settings Guide. Regardless of whether you want to use Antialiasing or not, I strongly recommend that you set any forced Antialiasing in your graphics card's control panel to 'Application Preference'. You can then set the Antialiasing level in Half Life 2's in-game settings. Forcing AA in the control panel may conflict with the in-game settings and cause slowdowns or glitches.
Filtering Mode: The options here are, depending on your graphics hardware, include Bilinear, Trilinear, Anisotropic 2x, Anisotropic 4x, Anisotropic 8x and Anisotropic 16x. Texture filtering determines how clear textures remain as they fade into the distance - the higher the texture filtering mode used, the clearer distant textures will appear, especially when viewed at sharp angles. Bilinear and Trilinear texture filtering are very similar in appearance, with Trilinear providing a greater performance hit for a tiny improvement in image quality. Anisotropic Filtering is more advanced, providing clearer textures the higher the sample rate used - to find out more about it read the bottom of this page of my Gamer's Graphics & Display Settings Guide. I strongly recommend that you set any forced Anisotropic Filtering in your graphics card's control panel to 'Application Preference' first before using Half Life 2's in-game Filtering Mode setting. Forcing AF in the control panel may conflict with this texture filtering setting and cause problems.
Wait for Vertical Sync: Vertical Synchronization (Vertical Sync, or simply VSync) is the synchronization of your monitor and graphics card's abilities to draw a certain number of frames per second on the screen. More details about VSync are on this page of the Gamer's Graphics & Display Settings Guide. If Vertical Sync is enabled, your maximum FPS cannot exceed your monitor's refresh rate at your chosen resolution, and more importantly your overall FPS can be reduced by 50% or more. If Vertical Sync is disabled, which is recommended, your FPS will improve, and it can now also exceed the refresh rate cap, however you may notice some screen 'tearing' - portions of the screen may seem slightly out of alignment at times, most noticeable when your view is moving quickly. Tearing causes no damage to your monitor, but if you find it annoying then re-enable VSync and then turn on Triple Buffering to negate the performance-draining impact of VSync.
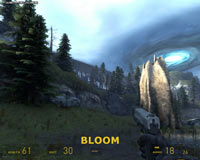

High Dynamic Range: This option allows users to set the type of lighting used in the game, depending on whether the maps/levels support that type of lighting. The basic lighting option is None, which is the way the lighting in the game looked upon release, and is supported on all maps/levels. If you want a brighter, hazier and slightly more vivid look, you can choose Bloom lighting, however it may reduce performance slightly. If you select Full, then full SM2.0 High Dynamic Range (HDR) lighting will be used, giving a very vivid and contrasting lighting look to the game, at the cost of some performance. A screenshot comparison is shown above, however note that HDR is difficult to demonstrate in a static screenshot, since it's a dynamic form of lighting - it is most noticeable for example when you switch your view from a dark to a light area, and HDR simulates the way your eyes adjust to the brightness, by being quite bright initially and then dimming slightly moments after. Note that you can adjust the dynamic aspect of HDR by using the mat_hdr_tonemapscale command, and you can adjust the intensity of the Bloom effect by using the mat_bloom_scalefactor_scalar command - see the Advanced Tweaking section for details.
Use 'bloom' effect when available: This option is a bit confusing in that it seems to duplicate the existing Bloom setting above. While in theory you can enable Bloom and HDR at the same time, and thus this setting may allow that, in practice while testing it I saw no difference from enabling or disabling this option with the various lighting options. I would recommend setting whether to use Bloom or HDR using the 'High Dynamic Range' setting and leaving this box unticked.
Motion Blur: This option can be enabled or disabled, and controls a very slight blurring effect when the character's view moves rapidly. While difficult to capture, the screenshot comparison above shows the slight blurring on the shot on the right with Motion Blur on, as the scene was captured during a rapid turn. The same turn didn't result in any blurring when Motion Blur is disabled, as the left shot shows. You can adjust the intensity of the motion blur effect by using the relevant mat_motion_blur_ commands detailed in the Advanced Tweaking section.
Hardware DirectX Level: This section at the bottom of the Advanced Options box shows you the maximum level of hardware DirectX support your graphics card can provide in the game. Older graphics cards can only provide hardware DirectX7 or DirectX8 support, which in turn means lesser quality special effects and visuals, but improves performance. All recent graphics cards provide full DirectX9 support, which gives optimal image quality, but with varying degrees of performance depending on the particular graphics card. You cannot tweak your graphics card's hardware DirectX capabilities to increase it from DirectX8 to DirectX9 for example, as this is reliant on physical hardware onboard your graphics card. You can however reduce the level of hardware DirectX functionality requested by the game to gain performance or resolve graphical issues at the cost of image quality - see the Advanced Tweaking section for more details.
Software DirectX Level: This section shows you the level of software DirectX functionality currently being utilised by the game. It should show DirectX V9.0 for all systems, since you need to have DirectX 9.0c software installed on your system to play Half Life 2. You should download the latest version of DirectX and install it to provide optimal performance and/or resolve any graphical glitches.
The next section deals with Advanced Tweaks which can be used to further customize Half Life 2 performance and functionality.
In any Source Engine game, you can change more than just the handful of settings available under the in-game options. The Source Engine is highly customizable: there are many different Command Variables (cvars or convars for short) which can be used to alter everything from the way the game looks, the way it allocates memory to providing additional game information, to recording demos and running custom benchmarks. This gives us an excellent opportunity to tweak the game to its fullest potential, making it look and act exactly the way we want it. This section provides details of how to undertake advanced tweaking properly in the Source Engine. On the following pages you'll find a list of the more useful command variables and what they do, but first read the information below on how to correctly implement the tweaks.
Usage
There are four main ways in which you can implement command variables in Source Engine games: In the game's Command Console; through Config (.cfg) files; in the Steam Launch Options box for that particular game; or in the game's desktop icon Target box. These various methods usually result in the same outcome for each command, however they provide flexibility in the ways in which you can test, add, edit and remove cvars for the game. The way to access and use each method is covered below. Make sure you read through this information carefully otherwise the tweaks in the Advanced Tweaking section will not function correctly if at all.
Command Console
To enable the command console, you will first need to go into the in-game options, and under the Keyboard tab, click the Advanced button and tick the 'Enable developer console' option (see the In-Game Settings section). Now you can open and close the console at any time by pressing the '~' key (the key under ESC). The Command Console is a window into the game's Source Engine. It allows you to see a range of information about the game and you can use it to change the way the engine behaves in real-time, which is very useful for experimentation.
Config Files
Source games hold many of the settings you select in the in-game options - along with a range of other custom variables - in a file called config.cfg, which can typically be found in your \Program Files\Steam\SteamApps\[username]\[game name]\[game name]\cfg\ directory. For example for Team Fortress 2 the directory path is: \Program Files\Steam\SteamApps\[username]\team fortress 2\tf\cfg\, while for Portal the path is \Program Files\Steam\SteamApps\[username]\portal\portal\cfg. The config.cfg file can be opened and edited using any text editor, such as the Windows Wordpad. This file is very important, so you should first create a backup of it before you consider altering it in any way, or even just to backup your configuration before reformatting your hard drive for example.
While you can add, edit and remove commands directly in config.cfg, it is recommended that instead you create an entirely new file for adding custom commands. To do this, in the same directory as config.cfg, right-click in an empty area and select New>Text Document. Rename this new text document to autoexec.cfg (not autoexec.cfg.txt), and you can now insert all your custom commands into this config file. By default the Source Engine looks for autoexec.cfg at startup, and if it finds it, it will automatically load and execute all the valid commands in it along with those in config.cfg while starting up your game.
Additionally, you can create any other .cfg files you need, name them as you wish (as long as they end in .cfg), such as mytweaks.cfg, place them in the same directory as config.cfg, and then execute all the commands they contain from the command console (or from within autoexec.cfg) by using the exec command. For example typing the command: exec mytweaks.cfg in the console will execute all the command variables contained in the mytweaks.cfg file. They will not run automatically at startup however - only autoexec.cfg and config.cfg can do that.
Steam Launch Options
You can add various command line variables and cvars into the launch options for your Steam games, ensuring that they are activated each time that game is launched. To do this, launch Steam, then open the My Games tab and right-click on the relevant game and select Properties. In the Properties box which opens, click the 'Set Launch Options' button. You can now enter commands in this box and they will be executed whenever you start that game from Steam or your desktop icon.
Icon Properties
Similar to the way you can add command variables to the Steam Launch Options, you can also add commands to your desktop icon for a game, so that whenever you launch it they're executed at startup. If you don't have a desktop icon for your Steam-based game, open to Steam and under the My Games tab right-click on the relevant game, and select 'Create desktop shortcut'. Right-click on this new desktop icon and select Properties. Under the properties, you can enter command variables in the Target box. For example for the Portal game:
"C:\Program Files\Steam\Steam.exe" -applaunch 400 -heapsize 524288 -novid
The above command line will launch Portal (-applaunch 400) with a memory heap size of 512MB (-heapsize 524288), and the game will start without the introductory Valve video (-novid). You can add as many variables as will fit in the Target box, simply make sure you put a single space between each command. Note that unlike entering the commands in the Steam Launch Options box, if you enter them in the desktop icon's Target box they will not apply when you run that game via Steam; they only execute when you use the particular desktop icon. On the other hand the Steam Launch Option variables will apply to the game even if you launch it from a desktop icon.
Command Line Commands
There are some commands which can only be used in the Target box of your HL2 icon, or in the 'Set Launch Options' box of Steam. They cannot be used in the game's console or in your autoexec.cfg file. These are referred to as 'Command Line' commands, and the most useful of these commands are provided below:
-novid: Prevents the Valve startup movie from playing when loading up the game, speeding up startup time.
-noborder: When a game is run in Windowed mode, using this command will remove the borders around the game window.
-heapsize [Kilobytes]: This command tells the Source Engine to allocate more RAM to the system heap, where it can be accessed by the game to improve performance by caching more game information in RAM and hence reducing loading pauses. The default heapsize varies, but can be 256MB or less. If you have 2GB of RAM you may wish to increase this to 512MB (a heapsize of 524288). You can use higher values if you wish, but I don't recommend exceeding half your physical RAM (e.g. for 2GB RAM, don't set heapsize higher than 1024000). You can't force the game to load completely into RAM, that's not what this command does.
Note: More recent Source games may use the mem_max_heapsize command to determine the maximum possible heap size in MB. See the next page for more details of this command.
-console: Speeds up the loading of a game by not loading up the background 3D graphics on the main menu and instead loading up a blurry background picture and the command console is open. Note you can close this console using the '~' key or clicking the x at the top right of the box.
-dxlevel [version]: Using this command allows you to force the game into only using the specified DirectX version for shaders. For example, use -dxlevel 70 to force Hardware DirectX7.0 level support for shaders. This means a noticeable reduction in image quality but an increase in performance. Other values include -dxlevel 80 -dxlevel 81, -dxlevel90 and -dxlevel95. Note that this only works if you choose a DirectX version which is lower than the current one supported by your graphics card - see the Hardware DirectX Version option under the In-Game settings for more details. Note further that lowering the DirectX Level may also cause glitches and problems, so it should be used mainly as a last resort.
-width [pixels] -height [pixels]: Using these two commands you can set a custom resolution in Pixel Width x Pixel Height (e.g. -width 640 height 480 starts the game with 640x480 resolution). Make sure you choose a resolution supported by your monitor and with the correct ratio of width to height.
-refresh [Hz]: Specifies the refresh rate the game will use upon loading. This is normally not required as your system should already use the optimal refresh rate at your chosen resolution. However if this is not the case you can force it to a specific refresh rate (e.g. -refresh 85). Make absolutely certain that the rate you are trying to apply does not exceed your monitor's capabilities otherwise you may get a blank screen, especially if you change resolutions and forget to change this option.
-32bit: Forces the game to start in 32-bit mode, which is the default on 32-bit systems. This command is only useful if you're running a 64-bit OS and wish to run a game in 32-bit for compatibility reasons.
-dev: Starts the game in developer mode, and usefully also results in the removal of the animated background in the main menu, speeding up startup times. However error/debug text will constantly be displayed on screen during play.
-threads: According to Mike Durand of Valve, the Source engine defaults to taking advantage of no more than three threads due to various issues. However a user can manually override this limitation by specifying -threads 4 (for quad core) on the command line. For anyone using an eight-core CPU, -threads 8 is also possible. Obviously if this causes any problems, remove this command.
Notice that all of the command line commands above have a '-' in front of them. This only applies to these specific command line commands. In general if you want to run any of the command variables listed on the next few pages in your icon's Target box, or in Launch Options, you must add a '+' sign in front of them instead of a '-' before inserting them. For example, if you want to use the exec command to execute a config file at startup, you will actually have to put the command into the Target/Launch Options box in the following way:
-dxlevel 70 +exec mytweaks.cfg
In the example above, when you start your game the DirectX Hardware support is reduced to DirectX7.0, and the contents of the file 'mytweaks.cfg' will be executed if it exists in the appropriate directory.
The simple rule for using commands in the command line is that aside from the few command line-specific commands listed further above, all other command variables, such as those listed on the following pages, require a '+' sign in front of them if used in the Target box or Steam's Launch Options. Note that you must also place a single space between each separate command, and no " " (quote) marks are required around the commands.
The Best Method
In general, the majority of the command variables you will be using will be inserted into a config file after first being tested in the console. To use a command variable in the game's console, open the console and simply type the name of the command variable. This will show you the current setting for the variable as well as its default setting. If you want to change a command variable's value, simply type the name of the variable, then a space, then the value you want to assign it. Some command variables don't require a value, and can be run simply by entering their name and pressing return. You can use the cvarlist, find, and help commands to search for and learn more about specific commands - see Common Commands under the Command Variables list on the next page for more details.
Once you've tested the effects of specific variables in the console, if you only want to change a few you can insert them directly into your game icon's Target box or Steam Launch Options box as detailed further above. However in most cases it is better to create an autoexec.cfg file and insert all your custom command variables one under the other in that file. Note that when using command variables in autoexec.cfg, you don't need to use any '-', '+' or " " signs around the command. Simply enter the command name, followed by a space, and the value you want to assign it - just as if you were entering it into the console. However if for some reason you decide to edit or insert any settings into config.cfg, you will need to use "" marks around the value assigned to any command variable. In general you should avoid editing config.cfg and use autoexec.cfg for your tweaking.
Note that one of the reasons I don't provide "pre-tweaked" autoexec.cfg files in my guides is that I have no way of knowing your image quality and performance preferences, not to mention precisely which hardware is on each system. There are very few commands which give extra performance without any visual quality impact. Therefore it requires testing and learning what the commands do on your part to create a useful autoexec.cfg for your own system. It's not a simple process, and I strongly urge you not to just copy and paste someone else's autoexec.cfg as you will likely run into a bunch of troubles or wind up with effects enabled/disable that you don't want. Understanding what you're doing is the key to tweaking.
That covers the methods used to apply advanced tweaks to the Source Engine. The next few pages go into detail on the actual command variables which can be used for tweaking.
Command Variables
This section lists out all of the major command variables for HL2 and Source Engine games, grouped by general function, and provides descriptions for each of them. The list does not even remotely cover every command variable available in the Source Engine, as there are over 2600 of them. I've refined the list specifically to only include the most relevant and useful working commands. Many command variables are designed primarily for use by the developers in debugging the game for example, or appear to have no impact on the game at all, and so have been omitted. In some cases I simply didn't know what a command variable does despite persistent testing, so I have left the command out rather than take an uneducated guess.
For a complete list of every command variable in the Source Engine go to the command console and type cvarlist. To see specific command variables starting with a particular letter or letters, for example to see all cvars starting with 'a', type cvarlist a, or to see all cvars starting with mat_, type cvarlist mat_. To save you time, you can download the full list (current as of HL2: Episode 2) from here: Source_Cvarlist.zip (50KB).
Some important things to note about this list:
Common Commands
cl_showfps [0,1,2] - Draws a Frames Per Second (FPS) counter at the top of the screen. 0=off, 1=FPS, 2=Smoothed FPS. In general the smoothed fps counter is best for viewing framerates
cvarlist [string] - If entered by itself this command generates a list of all the command variables (cvars). If one or more characters are also entered, cvarlist will list all commands starting with those letter(s).
help [cvar] - Provides any available help text for the specified cvar.
find [string] - Finds cvars with the specified string in their name or help text.
differences - Shows all the cvars which are not at their default values, displaying which have been changed.
exec [configfilename] - Executes all valid commands within the specified configuration file. The file must be a plain text file with the name filename.cfg and reside in the same directory as config.cfg.
clear - Clears all text from the console.
echo [string] - Outputs the specified string to the console (e.g. echo banana prints the text banana in the console).
version - Shows the current version of the game. The version number of the HL2 executable is effectively the version number for the entire game. Also shows the current build of the Source engine being used.
pause - Pauses the game.
unpause - Unpauses the game.
autosave - Saves the current game to the autosave slot. Will not work if autosave is completely disabled as per the instructions in the Conclusion section.
sv_autosave [0,1] - If set to 1, allows the game to automatically save your progress at level transitions. If set to 0, game will not save whenever a new level starts, but may still save periodically at certain trigger points within a level. This can help reduce periodic stutters. To disable all autosaving see the Conclusion section of this guide.
save [savename] - Saves the current game under the savename specified.
load [savename] - Loads a game from the specified savename file.
reload - Reloads the most recent saved game.
restart - Restarts the game on the same level.
kill - Kills your character.
flush - Flushes the cache memory. Can resolve graphical anomalies such as texture glitches.
map_background [mapname] - Runs a map as the background to the main menu. To find the mapnames, use the maps command (see below).
maps [string] - Lists all maps starting with the provided string. Use maps * to list all mapnames.
screenshot - Takes a screenshot.
jpeg [filename, quality] - Takes a screenshot as a .jpg with the specified filename using the quality % specified (e.g. jpeg snapshot 50 saves a screenshot as snapshot.jpg with 50% quality). If no quality is specified the default as set by jpeg_quality will be used (see below).
jpeg_quality [percentage] - Specifies the default quality percentage for screenshots taken with the jpeg command (see above).
path - Shows the engine filesystem paths.
exit, quit - Either command exits the game and returns to the Desktop.
Binding Commands
bind [key, command] - Binds the stated command to the specified key (e.g. bind Z console binds the Z key to opening the command console).
bindtoggle [key, command] - Same as the bind command, except the assigned key can be used to both turn the command on and off (e.g. bindtoggle F cl_showfps 2 means the F key will toggle the FPS counter on or off).
unbind [key] - Removes any bindings from the specified key.
unbindall - Removes bindings from all keys.
alias [aliasname, command] - Gives a command a short name (e.g. alias taunt echo I am your new King! changes 'taunt' into a command which spits out "I am your new King" when used). Use alias as a shortcut for long or complex command strings.
key_findbinding [command] - Find the key bound to the specified command.
key_listboundkeys - Lists all the keys which currently have a binding.
Performance Commands
mat_forcemanagedtextureintohardware [0,1] - If set to 1, attempts to force texture information into your Video RAM at the start of a level, alleviating any stuttering in the game. Note, this setting was introduced with the first 'stutter fix' patch (See Troubleshooting Tips section for details). Also note that from feedback and in my experience this setting can reduce FPS by up to 50%. Setting this variable to 0 may improve performance on some machines.
cl_forcepreload [0,1] - If set to 1 forces all information to preload, reducing loading pauses and stuttering by not loading information on the fly.
sv_forcepreload [0,1] - If set to 1, forces server-side preloading, once again reducing loading pauses.
cl_ragdoll_collide [0,1] - If set to 1, prevents characters from merging into each other due to ragdoll effects, thereby improving realism with no real performance hit. Note however that enabling this option may cause physics glitches in HL2: Episode 2, so on balance it is best to leave it disabled if playing Episode 2.
mat_compressedtextures [0,1] - If set to 1, uses compressed textures for optimal performance. For those with graphics cards which have higher amounts of Video RAM (e.g. 256MB or more) setting this to 0 will improve texture appearance at the possible cost of some performance, but may cause a crash.
fps_max [fps] - Limits the maximum possible framerate to the FPS specified. Has no impact on framerate performance (other than capping it). I recommend setting this to your monitor's refresh rate for smoother FPS, due to less volatile fluctuations (e.g. fps_max 85). Setting it higher does not increase overall framerate; this setting does not work the same way as Vsync.
mem_force_flush [0,1] - If set to 1 forces the cache to be flushed on every allocation, which is not necessarily optimal nor recommended, but can reduce memory-related errors and crashes.
r_fastzreject [-1,0,1] - If set to 1 activates a fast z-setting algorithm which takes advantage of hardware fast z reject for improved performance. If set to -1 detects your default hardware setting for this option. Initially this should be set to -1.
cl_smooth [0,1] - If set to 1 attempts to smooth the view after prediction errors, however this can increase stuttering, so if you want to reduce stutters set this to 0.
cl_smoothtime [seconds] - Time over which to smooth the view after prediction errors. If cl_smooth is enabled, experiment with values to see which gives the best results.
sv_autoladderdismount [0,1] - If set to 1, the player automatically dismounts from ladders when the end is reach. If disabled, the player must press the USE key to mount/dismount ladders and hence cannot accidentally jump/walk off a ladder. Set to taste as there is no performance impact.
mp_footsteps [0,1] - If set to 1, player footsteps can be heard, if set to 0 no footsteps are emitted from the player. Set to taste, has no performance impact, but can affect realism.
violence_ablood [0,1] - If set to 1 shows alien blood when they are hit. Disabling this can improve performance but reduce realism.
violence_agibs [0,1] - If set to 1 shows alien gore when they are hit. Disabling this can improve performance but reduce realism.
violence_hblood [0,1] - If set to 1 shows human blood when they are hit. Disabling this can improve performance but reduce realism.
violence_hgibs [0,1] - If set to 1 shows human gore when they are hit. Disabling this can improve performance but reduce realism.
Update: newer Source 2007-based commands added below. Thanks in particular to Stephen Porter for details on the multi-core related commands:
ai_expression_optimization [0,1] - If set to 1, disables NPC expressions when you can't see them, potentially improving performance.
datacachesize [0-128] - Determines the amount in MB to allocate to the game's general data caches. The default is 32MB, and the maximum is 128MB. Note that in testing this in recent Source games, altering this value even to 128MB can actually reduce the size of certain caches which are already larger by default (or have been made larger by the Heapsize command), so on balance now I recommend leaving this at its default. Note further - if you see strange white textures after altering this setting, return it to its default.
r_threaded_particles [0,1] - Determines whether the particle system is multi-threaded. This should be set to 1 on systems with multi-core CPUs.
r_threaded_renderables [0,1] - Determines whether part of the rendering system is multi-threaded. This can be set to 1 on systems with multi-core CPUs to potentially improve performance.
mem_max_heapsize [MB] - This command tells the Source Engine the maximum amount of memory to be allocated to the system heap. If you are using the -Heapsize command line variable (see previous page), then you may need to increase this value from its default of 256MB to allow a larger heapsize to be used for certain caches.
snd_mix_async [0,1] - If set to 1, this command will allow multi-core CPUs to run most of the sound engine in parallel with the renderer, which can improve performance and reduce stuttering.
mat_queue_mode [-1,0,1,2] - This setting determines the threading mode the material system uses. A value of -1 uses the default for your system, a value of 0 uses synchronous single thread, 1 uses queued single threaded mode, and value of 2 uses multi-threaded mode. Many users report performance increases on multi-core systems when setting this variable to a value of 2.
[Graphics]
cl_detaildist [range] - Determines the range at which detail props are shown (e.g. grass). Reducing this setting can increase performance, and conversely increasing this setting will improve image quality through more detail at the cost of performance.
cl_detailfade [range] - Determines the range at which detail props fade into view. Increasing this value can raise performance.
cl_maxrenderable_dist [distance] - Specifies the maximum distance from the camera at which things will be rendered. The smaller the number, the less will be rendered, improving performance (cheat).
cl_ejectbrass [0,1] - If set to 1, weapons eject shells as they fire. If set to 0 they don't, which can improve performance especially during heavy combat.
cl_show_splashes [0,1] - If set to 1, splashes in water are shown, if set to 0 they are disabled. Can improve performance if disabled at the cost of realism.
crosshair [0,1] - If set to 1, enables the crosshair on the screen, if set to 0 disables it. The performance difference is negligible, so set to taste.
lod_TransitionDist [range] - The distance at which the lod is reduced on objects. The higher this range, the lower your performance but the better distant objects will appear.
mat_bumpmap [0,1] - If set to 1, enables bump mapping which makes flat 2D textures appear three dimensional. If disabled, textures will be loaded without bumpmapping and will appear far less realistic, however performance will be improved.
mat_clipz [0,1] - If set to 1, uses an optimization technique to reduce what is drawn on screen for a performance improvement. Note that some Nvidia FX card owners need to set mat_clipz 0 to fix rendering problems.
mat_diffuse [0,1] - If set to 1, uses diffuse lighting on materials. If set to 0 such lighting is removed and while performance is improved the screen is almost completely black from lack of this diffuse (ambient) lighting and hence is not recommended.
mat_drawwater [0,1] - If set to 1, all water is rendered. Setting this to 0 can remove water for a performance boost at the cost of realism (cheat).
mat_dxlevel [dxversion] - Determines the shader version for special effects applied to materials. Options include 70, 80, 81, 90 and 95 (e.g. mat_dxlevel 81). This is similar to the -dxlevel switch in the Advanced Tweaking section on page 7. Using shader versions lower than the highest level supported by your card will improve performance at the cost of varying degrees of image quality loss (depending on the shader version used).
mat_fastnobump [0,1] - If set to 1, floor textures have all bump mapping removed and will appear flat and smooth. This can improve performance without affecting all bump mapping in the game, but will make floors appear unrealistic.
mat_filterlightmaps [0,1] - If set to 1, static lightmaps are rendered correctly. If set to 0, all areas of pre-rendered lighting will be blocky and unrealistic, but performance will be improved slightly at the cost of realism.
mat_filtertextures [0,1] - If set to 1, textures are rendered smoothly. If set to 0, textures will be blocky and unrealistic (similar to the original Doom!) but performance will be improved.
mat_fullbright [0,1] - If set to 1, lights every texture will up brightly lit up (cheat).
mat_hsv [0,1] - If set to 1, converts everything to black and white.
mat_mipmaptextures [0,1] - If set to 0 disables mipmap textures, which harshens textures greatly but can improve performance.
mat_showlowresimage [0,1] - If set to 1, loads extremely low resolution blocky textures in place of the normal ones for a significant performance boost at the cost of a great deal of realism.
mat_softwarelighting [0,1] - If set to 1, uses only software-supported lighting. Image quality is not greatly affected, but this may increase or decrease your performance depending on whether your CPU is far more powerful than your graphics card.
mat_specular [0,1] - If set to 1, uses specular lighting. If set to 0 materials will not have specular lighting applied to them (which makes things look more shiny) for a performance boost but a slight drop in image quality.
muzzleflash_light [0,1] - If set to 1, weapons firing will emit a light along with the muzzle flash. If set to 0, a muzzle flash is still visible but no lighting is cast from it. Performance will improve in combat scenes with no noticeable drop in realism.
r_decal_cullsize [pixels] - Decals (marks from weapons etc.) higher than the specified size in pixels will be removed straight away. Raising this value can improve performance during heavy gunfire for example, at the cost of some realism depending on how high this value is raised.
r_decals [number] - Specifies the maximum number of decals possible at any one time. The higher this number, the greater the potential for getting slowdowns during large firefights as large numbers of decals are generated. Reducing this setting can improve performance in such situations.
r_drawdecals [0,1] - If set to 1, decals are drawn. If set to 0, no decals are drawn at all improving performance but greatly reducing realism (cheat).
r_drawflecks [0,1] - If set to 1, small chunks of rubble and dirt will be thrown up around bullet impact points. If set to 0, these 'flecks' will be disabled, reducing realism but improving performance.
r_drawmodeldecals [0,1] - If set to 1, decals can be drawn on models, which are pretty much everything excluding walls and floors. If set to 0 these decals will be disabled, improving performance during weapons fire for example, but reducing realism.
r_maxmodeldecal [number] - If r_drawmodeldecals is enabled, this number determines the maximum number of decals which can be drawn on a model. The higher the setting the greater the performance impact when firing at models.
r_drawparticles [0,1] - If disabled, particle effects - which includes smoke and explosions - will not be drawn. This can greatly improve performance around such effects at the cost of a great deal of realism (cheat).
r_DrawRain [0,1] - If set to 1, rain effects will be rendered, however if disabled no rain will be drawn. This improves performance in levels where there is visible rain, however realism is greatly reduced (cheat).
r_drawropes [0,1] - If set to 1, all ropes and rope-like objects (e.g. powerlines) will be drawn as normal, however disabling this setting will remove such objects, perhaps improving performance in places where they existd due to a reduction in physics requirements, but reducing realism as well (cheat).
r_drawskybox [0,1] - If set to 0, the sky textures will be completely removed, improving performance but resulting in visual anomalies in the sky and a large reduction in realism.
r_drawtranslucentrenderables [0,1] - If set to 1, all objects which are translucent (see through), such as the Combine energy shields, will be drawn. If set to 0, these objects will not be drawn, improving performance around them at the cost of realism (cheat).
r_dynamic [0,1] - If set to 1, enables dynamic lighting. If set to 0, disables dynamic lighting which can boost performance without a dramatic impact on realism.
r_farz [-1,0,1] - Controls the far clippling plane, which determines what is not rendered when it is determined not to be visible to the character. A value of -1 is normal, higher values can result in normally visible objects suddenly disappearing from view (cheat).
r_lod [-8 to 8] - Determines the rate at which level of detail (lod) is stripped from objects as they recede away from the player. The lower the value, the more detail remains visible on objects as they progress into the distance, reducing performance but increasing image quality.
r_maxdlights [number] - Determines the maximum number of dynamic lights visible on the screen if dynamic lighting is enabled. The larger this maximum, the more chance of slowdowns during scenes with multiple dynamic light sources. Reducing this value can improve performance in such situations.
r_occlusion [0,1] - If set to 0, disables the occlusion system in the game, which can decrease performance and is generally not recommended.
r_WaterDrawReflection [0,1] - If set to 0, disables all reflections on top of water. This will boost performance at the cost of realism however you may experience graphical anomalies on the water.
r_WaterDrawRefraction [0,1] - If set to 0, disables all refraction - that is images which appear distorted under the water. This will boost performance at the cost of realism, however you may experience some graphical anomalies on the water.
sv_robust_explosions [0,1] - If set to 0, explosions will be less spectacular, but this may improve performance around explosions without a significant drop in realism.
fog_enable [0,1] - If set to 0, will disable fog which can improve or reduce performance depending on whether your graphics card has issues with rendering fog.
fog_enable_water_fog [0,1] - If set to 0, removes all underwater fogging which can result in a performance boost but unrealistic water appearance.
r_waterforceexpensive [0,1] - If set to 1, the highest quality water will be used. If set to 0, performance may improve without a noticeable reduction in water quality.
Note: newer commands added below:
mat_picmip [-10-5] - This variable is the same as the Texture Detail in-game setting, and hence controls how detailed textures appear in Source games. However depending on the game, you can raise this value to further reduce the quality of the textures and possibly improve performance (and more importantly reduce stuttering), or you can use negative values to provide increasingly sharper textures. In HL2: Ep 2, a value of -1 equals Very High, but in games like Team Fortress 2 you can use -10 to get the absolute highest quality textures possible.
mat_parallaxmap [0,1] - If set to 1, enables Parallax Mapping which can improve visual quality but may reduce performance.
mat_motion_blur_falling_intensity [0-?]
mat_motion_blur_falling_max [0-?]
mat_motion_blur_falling_min [0-?]
mat_motion_blur_forward_enabled [0-?]
mat_motion_blur_percent_of_screen_max [0-?]
mat_motion_blur_rotation_intensity [0-?]
mat_motion_blur_strength [0-?]
The above commands control the intensity of the motion blur effect if enabled (See In-Game Settings). The higher the value assigned, the more noticeable the blur effect. For example to alter the general motion blur you see when you turn around, alter the mat_motion_blur_rotation_intensity from its default of 1 to something like 2 or 3 to increase the blur effect. Alternatively you can lower the value to reduce the effect, e.g. to 0.5. Note however that there can be a minor drop in performance as well as added hitching/jittering from raising this too high.
mat_hdr_tonemapscale [0-16] - If HDR is enabled, determines the way in which the dynamic component of HDR works. At 0, the HDR effect does not seem realistic, as your eyes will not 'adjust' to altered lighting by the scene becoming brighter or darker. On the other hand at 16 the effect is most pronounced.
mat_bloom_scalefactor_scalar [0-?] - If Bloom is enabled, determines how extreme the bloom effect is, with the higher the value the more bloom visible in the scene.
r_cheapwaterend [distance] - Determines the range beyond which water effects are reduced. The lower you set this value, the more blurry and unrealistic water will become in return for a potential performance boost. If you want to reduce all visible water quality set this to 1.
[Sound]
dsp_off [0,1] - If set to 1, disables audio DSP (Digital Signal Processing). This may improve performance, but will reduce the richness of audio effects (cheat).
dsp_enhance_stereo [0,1] - If set to 1 enhances the stereo effect, making sound richer and more atmospheric for a slight performance hit.
dsp_slow_cpu [0,1] - If set to 1, reduces the quality of dsp sound effects, improving performance on systems with slower CPUs.
dsp_volume [volume] - Determines the volume of the background dsp effects. If the volume is increased, the impact of dsp enhancement will be exaggerated with no performance impact.
snd_digital_surround [0,1] - If set to 1, enables digital surround sound if you have the appropriate hardware. You may need to set sv_consistency 0 for this to work in some Source games.
snd_profile [0,1] - If set to 1, shows dsp usage stats in the console.
snd_mixahead [value] - Set between 0 and 1, the higher the value the less stuttering and more synchronized sound will be, but performance may be reduced. A value of 0.5 to 0.7 will help reduce stuttering in the game. If you experience no stuttering, lower this value to gain some performance.
snd_async_fullyasync [0,1] - If set to 1, sound may go out of synch with actions but you will experience reduced loading pauses and stuttering. Usually best left disabled, see the snd_mix_async command further above for a better audio-related performance/stuttering solution.
The next section continues the command variable listing.
The list of command variables is continued below:
Demo Commands
record [demoname] - Starts recording a demo of the current gameplay under the specified filename. The demo will be saved as demoname.dem in the \Program Files\Steam\SteamApps\[username]\[game name]\[game name]\ directory along with all its associated files.
stop - Stops recording the current demo.
demoui - Opens a small demo user interface which looks like a media player, but makes the opening and playing of demos much easier, including the capability to FF, REW and skip to specific points in the demo. Alternatively you can use demoui2 to open the advanced demo user interface.
playdemo [demoname] - Plays back a pre-recorded demo of name demoname.dem.
stopdemo - Stops playback of the currently playing demo.
demopause - Pauses playback of the currently playing demo.
demoresume - Resumes playback of the currently paused demo.
listdemo [demoname] - Provides details of the specified demo file.
demo_recordcommands [0,1] - If set to 1, records any commands typed at the console into demo files.
startmovie - Starts recording movie frames, stored in the \Program Files\Steam\SteamApps\[username]\[game name]\[game name]\ directory as .tga files.
endmovie - Stops recording movie frames.
Benchmarking Commands
timedemo [demoname] - Plays the specified demo and reports performance information upon completion, including frames played, time taken, average FPS and FPS variability. Also records the information in a file called sourcebench.csv in your \Program Files\Steam\SteamApps\[username]\[game name]\[game name]\ directory.
timedemoquit [demoname] - Plays the specified demo as per the timedemo command and then exits the game to desktop.
bench_start [filename] - Starts benchmarking your current gameplay and writes information to the specified file in .csv format.
bench_end - Ends any benchmarking.
bench_showstatsdialog - Shows a dialog box displaying the most recent benchmarking results.
bench_upload - Uploads the most recent benchmarking stats to the Valve servers.
benchframe [framenumber] - Takes a snapshot of the specified frame of a timedemo.
perfvisualbenchmark - Runs a series of benchmarks on the current scene.
perfvisualbenchmark_abort - Stops the benchmarking and prints the results for various aspects of the rendering system in average FPS in the console.
View Commands
firstperson - Switches to firstperson (from your character's eyes) point of view, which is the default.
thirdperson - Switches to thirdperson (behind your character) point of view. Note in thirdperson view your character may appear as an incomplete grey model.
centerview - Centers the character's view on the middle of the screen (only when bound to a key).
force_centerview - Centers the character's view on the middle of the screen whenever used.
fov [angle] - Specifies the character's Field of View (fov), i.e. the total angle which can be viewed at once. Default is 75, higher values create more of a 'fish-eyed' view, lower angles create a zoomed view.
default_fov [angle] - Determines the default Field of View. Normal default is 75 (cheat).
gameui_hide - Hides any visible portions of the game user interface, e.g. the console. Primarily used prior to taking a screenshot.
hidehud [0,1] - If set to 1, hides the Heads Up Display (HUD) from view (cheat).
cl_drawhud [0,1] - If set to 1, the HUD is drawn on screen, if set to 0 the HUD is not rendered, which can improve performance (cheat).
Information & Diagnostic Commands
bug - Opens a bug reporting user interface which makes the reporting of game bugs to Valve simple, such as being able to take a screenshot and attach it to the generated report automatically.
cache_print - Shows the amount of memory used by cached information, and the total cache capacity currently used by the game.
cl_precacheinfo - Shows the files which have been precached.
cl_showpos [0,1] - Displays the player's position on the current map in X, Y and Z co-ordinates and velocity in the top right corner if set to 1.
developer [0,1,2] - If set to 1 shows Developer messages in the top left corner, if set to 2 shows more detailed information.
fs_printopenfiles - Shows all files currently open.
listmodels - Lists all models currently loaded.
mat_info - Shows material system information.
mat_reloadmaterial - Reloads all materials which can take quite a while but may resolve any temporary graphical glitches.
mat_wireframe [0,1] - Displays materials in wireframe form (cheat).
mem_dump - Writes memory statistics to the file memstats.txt.
perfui - Opens a user interface which allows easy access to performance tools.
r_drawlightinfo [0,1] - Shows the source of all lights in the current scene and their associated information (cheat).
showbudget_texture [0,1] - If set to 1 displays a detailed control panel which graphs the memory usage for various types of textures.
soundinfo - Shows information about the current sound output device.
soundlist - Lists all known sounds.
snd_restart - Restarts the sound system which can take a while but may clear any temporary audio glitches.
snd_show [0,1] - If set to 1 displays information about sounds loaded (cheat).
stopsound - Stops all sound effects currently playing.
stopsoundscape - Stops all soundscapes currently playing.
surfaceprop - Shows information about the surface currently under the cursor.
Cheat / Fun Commands
Note: sv_cheats 1 must be used for some of these commands to work.
Also enabling cheats can negate the ability to gain Achievements.
sv_cheats [0,1] - Toggle. Enables the use of cheat commands in single player, or on a multiplayer server if set to 1 by the server owner.
god - Toggle. The player becomes invulnerable.
noclip - Toggle. The player can fly and move through solid objects.
notarget - Toggle. The player becomes invisible to NPCs (Non-Player Characters).
ai_disable - Disables all Artificial Intelligence (AI) for NPCs and puts them into their idle animations. Can be used to test the performance hit of AI, or to freeze NPCs.
impulse [code] - Generates objects, e.g. Impulse 101 gives the player all weapons.
give [item name] - Gives the player the named item.
givecurrentammo - Gives the player maximum ammunition for the currently equipped weapon.
buddha - Toggle. Player can take damage but won't die.
map [mapname] - Starts playing on the specified map (see maps command for mapnames).
sv_unlockedchapters [chapternumber] - Allows access to the specified chapters of the game. Chapter number are shown under New Game in the main menu (e.g. sv_unlockedchapters 3 unlocks the first three Chapters of the game).
npc_create [npctype] - Creates an NPC of the given type if that NPC is available on the current level.
npc_destroy_unselected - Destroys all the NPCs not currently specified.
npc_kill [npcname] - Kills specified NPC, or NPC currently under the cursor if none specified.
npc_speakall - Forces the current NPC to speak all their possible responses.
setpos [x y z] - Moves player to the specified co-ordinates on the current map.
Note: newer commands added below:
ch_createairboat
ch_createjalop
ch_createjeep
The above commands create an airboat, jalopy or jeep respectively in front of the character, which can then be driven as normal.
award_achievement [ID] - Awards a specific achievement based on the ID number entered.
Multiplayer Commands
addip [ipaddress] - Add an IP address to the ban list.
banid [userid] - Add a user ID to the ban list.
changelevel [mapname] - Change server to the specified map (see maps command above to find out mapnames).
cl_allowdownload [0,1] - Client downloads customization files.
cl_allowupload [0,1] - Client uploads customization files.
cl_cmdrate [packets/sec] - Max number of command packets sent to server per second.
cl_lagcompensation [0,1] - Perform server side lag compensation of weapon firing events.
cl_rate [bytes/sec] - Max bytes/sec the host can send data. Default is 10,000.
cl_downloadfilter [all, none, nosounds] - Determines which files can be downloaded from a server.
cl_playerspraydisable [0,1] - Enable or disable player sprays.
cl_resend [seconds] - Delay in seconds before the client will resend the 'connect' attempt.
cl_timeout [seconds] - After this many seconds without receiving a packet from the server, the client will disconnect itself.
cl_updaterate [packets/sec] - Number of packets per second of updates you are requesting from the server.
clientport [port] - Host game client port. Default is 27005.
connect [serverip] - Connect to specified server.
disconnect - Disconnect game from server.
hostport [serverip] - Host game server port. Default is 27015.
ip - Overrides IP for multihomed hosts.
kick [username/userid/userslot] - Kick a player by slot, userid or name.
killserver - Shutdown the server.
listid - Lists banned users.
listip - List IP addresses on the ban list.
writeid - Writes a list of permanently-banned user IDs to banned_user.cfg.
writeip - Save the ban list to banned_ip.cfg.
maxplayers [playernumber] - Change the maximum number of players allowed on this server.
mp_allowNPCs [0,1] - Allow NPCs on the server if set to 1.
mp_allowspectators [0,1] - Toggles whether the server allows spectator mode or not.
mp_chattime [seconds] - Amount of time players can chat after the game is over.
mp_fraglimit [frags] - Frag limit for deathmatch games.
mp_friendlyfire [0,1] - If set to 1, friendly fire is enabled.
mp_timelimit [minutes] - Game time per map in minutes.
mp_weaponstay [0,1] - If set to 1, weaponstay is enabled.
net_fakelag [milliseconds] - Lag all incoming network data (including loopback) by this many milliseconds (cheat).
net_fakeloss [percentage] - Simulate packet loss as a percentage of total packets.
net_graph [0,1,2,3] - Draw the network usage graph if set to 1 (More details of usage here).
net_maxfragments [bytes/packet] - Max fragment bytes per packet.
net_showdrop [0,1] - Show dropped packets in console if set to 1.
net_start - Initializes multiplayer network sockets.
password [password] - Current server access password.
ping - Display ping to server.
rate [bytes/sec] - Max bytes/sec the host can receive data. Default is 20000.
rcon [command] - Issue an rcon command.
rcon_password [password] - remote console password.
removeid [userid] - Remove a user ID from the ban list.
removeip [userip] - Remove an IP address from the ban list.
retry - Retry connection to last server.
say [string] - Display player message.
say_team [string] - Display player message to team.
slist - List servers on your LAN.
spec_player [playername] - Spectate player by name.
sv_allowdownload [0,1] - Allow clients to download files if set to 1.
sv_allowupload [0,1] - Allow clients to upload customization files if set to 1.
sv_alltalk [0,1] - Players can hear all other players, no team restrictions if set to 1.
sv_filterban [0,1] - Set packet filtering by IP mode.
sv_lan [0,1] - Server is a lan server (no heartbeat, no authentication, no non-class C addresses, 9999.0 rate, etc.).
sv_maxunlag [seconds] - Maximum lag compensation in seconds.
sv_maxrate [rate] - Max bandwidth rate allowed on server, 0 = unlimited.
sv_minrate [rate] - Min bandwidth rate allowed on server, 0 = unlimited.
sv_maxupdaterate [updates/sec] - Maximum updates per second allowed.
sv_minupdaterate [updates/sec] - Minimum updates per second allowed.
sv_password [password] - Server password for entry into multiplayer games.
sv_specnoclip [0,1] - If set to 1, spectators cannot fly through objects.
sv_timeout [seconds] - Number of seconds without a message from a client before client is dropped.
sv_voiceenable [0,1] - Enable voice on the server.
users - Show user info for players on server.
The descriptions above provide as complete a list as I can compile of what I believe are the most useful command variables for HL2: Episode 2 and the Source Engine. If you feel there have been any serious omissions or errors, please Email Me with the details and I will update the list to keep it as complete and accurate as possible. However please don't email me with obscure commands or general guesses as to command functionality as I cannot post these in the guide.
The next section wraps up the guide with some additional information for optimizing the game.
Here we are, almost at the end of another guide. Stick it out for a few more minutes and you'll find some useful tips and links to valuable resources for the game below.
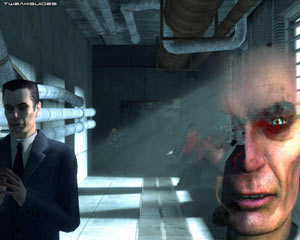
Speeding Up Startup Time
While this is covered under the relevant command variable in the Advanced Tweaking section, I thought I'd spell this one out here for those that may have missed it. You can speed up the time it takes to load to the main game menu by adding the following commands to the end of your game icon's Target box under its properties, or to the Set Launch Options box under Steam (See the Advanced Tweaking section for details):
-novid -console
The -novid command skips the introductory Valve movie, while -console starts the game with an open console, the main change being that the animated 3D background which appears at the main menu won't load, further speeding up startup time.
Disabling Autosave
If you don't want the game to constantly save your progress automatically - as this can increase stuttering at times - you can use the sv_autosave command in the Advanced Tweaking section, as using this will disable the autosaving which occurs at the start of new levels. You'll have to insert sv_autosave 0 in the autoexec.cfg file to disable it. If you want to disable all autosaving altogether, go to your \Program Files\Steam\SteamApps\[username]\[game name]\[game name]\SAVE directory, and find the following files:
autosave01.sav
autosave01.tga
autosave.sav
autosave.tga
Right-click on each file, select Properties and tick the 'Read Only' box to make each unable to be written to. This now prevents the game from actually performing a save onto these autosave files, and in the process you reduce all the saving pauses within levels as you pass certain autosave points. Of course if you do disable both forms of autosaving then it is strongly recommended that you make very sure to manually save often, either by using the Save option or your Quicksave key.
Measuring FPS, Taking Screenshots, Capturing Videos
If you want to display your FPS in any Source game, open the command console and use the cl_showfps 2 command to display an FPS counter. If you want to take a screenshot at any time, open the command console and use the screenshot, or jpeg commands. Note that you can also bind these commands to a particular key for easier access. Full details are in the Advanced Tweaking section.
Alternatively you can use FRAPS, a free utility which can not only measure FPS and take screenshots, but also allows you take in-game videos in .AVI format.
Source Multiplayer Games
In any Source-based multiplayer game, your performance depends on two factors: your graphical performance (measured by your FPS), and your Latency (measured by your Ping). If you are noticing that your multiplayer experience is choppy or unresponsive, first check your framerate - particularly during heavy combat - and if it is below around 20FPS then you will need to reduce your settings to ensure consistently high FPS. If this doesn't improve your gameplay performance, you can initially check your Ping by pressing the TAB button during online play. Ping is a measure of the round trip in milliseconds to the server and back, and the lower the better. A ping which is fluctuating, or is relatively high (e.g. above 100-150) will cause a 'laggy' sensation, and you will find you often miss your target. Check the detailed instructions here to diagnose and improve your connection and multiplayer-related settings. Note that if you are a long distance from the server (e.g. the server is overseas) then your ping will be higher regardless of any tweaking, hence your gameplay will be laggier. Again, it's important to distinguish between Ping lag and FPS lag, so always check your FPS first during heavy gameplay before blaming the server or your connection.
Conclusion
Well that brings this revamped HL2: Episode 2 / Source Engine guide to a close. Over the past three years the guide has taken a lot of time and effort to compile and maintain, so I hope you find it useful. Please Email if you want to give me constructive feedback on this or any other of my guides. Please keep in mind that I can't provide any tech support/advice under any circumstances. If you want this game to run at its best, all the information you need is already in this guide and in the associated guides mentioned in the Essential Optimization section, particularly the completely free TweakGuides Tweaking Companion downloadable PDF guide.
Until next time, take care!


 Destiny Guide: How To Switch Your Sparrow And Ship
 L.A. Noire Newspaper Locations
 Dragon Age Inquisition: Crestwood Side Quest Guide
 GTA Online Verdict
 Saints Row IV Guide - How to Unlock Unlimited Sprinting