Many years ago when you started up a game, all you had to worry about was changing the difficulty settings, and perhaps adjusting the volume; at worst you also had to adjust a couple of other basic settings. Within a few years the number of in-game (and hidden) configurable options exploded to the point where a modern game can have a range of settings, some of which have amazingly obscure and counter-intuitive names.
So is more choice a bad thing? Not really. Game developers realise that with the vast variety of computer hardware in use today, it is better to give the end user as many options as possible to customize their game settings to find the appropriate balance of image quality and performance (and compatibility) for their particular machine. However choice without knowledge of what it is you're choosing between can be bad. Of course TweakGuides offers you specific game guides which give you a good indication of what the various game-specific settings actually do.
However looking around I realised that many of the most basic and commonly used graphical and display-related settings such as FPS, Resolution, Refresh Rate, Triple Buffering and Vertical Synchronization are never really explained in sufficient detail in plain English, particularly with a gaming audience in mind. In fact virtually nowhere can you find even a simple rundown of how exactly a game goes from being a set of files on your drive to an animated image on your monitor. So I ambitiously took it upon myself to do just that, and this guide is the result.
I have to stress that even though this guide appears quite long, it is not a tech-heavy article. It is aimed primarily at making sure that whatever your level of PC knowledge, you gain a clearer understanding of exactly what is happening on your machine when you play games, and how the various fundamental graphics and display settings relate to this process. I truly believe that anyone who reads this guide will gain enough knowledge to be able to not only improve their gaming performance, but also better troubleshoot a range of common game problems. You've got nothing to lose, so give it a try!
Note: This guide was originally released in 2006. It has been updated periodically to maintain both its accuracy and coverage.
The Graphics Process
To get a good understanding of what the various display settings covered later in this guide actually do, we must first understand how a graphics card works in conjunction with the rest of your system to produce the images displayed on your monitor. This is extremely important and will help you see more clearly why certain graphics settings have the impact that they do, and will also help you find ways of improving your overall performance and image quality with some smart changes or upgrades.
However I'm fairly sure that just like me, most of you don't like wading through pages and pages of highly technical discussions and diagrams to understand the underlying process, so this section is an attempt to put everything in simple-to-understand language. This is by no means a definitive look at computer graphics; rather the aim is to give you an overview at what goes on 'under the hood' of your PC when you're playing a game. Again, it's a must to actually understand the fundamentals.
If any of the computing terms in this guide are new to you, refer to the Basic PC Terminology chapter of the TweakGuides Tweaking Companion for clear explanations. In fact if you haven't used the Tweaking Companion yet, I strongly recommend that you set aside some time to go through it, as it has a wealth of information on all manner of PC and Windows-related topics.
I have also provided links throughout this guide to a range of Wikipedia articles which explain particular settings further. These were not my primary sources for researching this guide (See the Further Reading section), however Wikipedia is a readily available, relatively simple and (at least for non-controversial tech articles) reasonably accurate source to link to, so I have used it as a ready resource throughout the guide. Remember that for more specific graphics optimization advice, check the relevant game tweak guide, as well as the ATI Catalyst Tweak Guide or the Nvidia Forceware Tweak Guide. I won't be repeating all the information in those guides here for obvious reasons.
The following steps show the entire process of running a game, from clicking the game icon, to the point where a 3D image appears on the screen. Note that it assumes the use of a fairly recent graphics card, not an integrated (onboard) graphics solution.
Step 1 - The Game is Launched
When you double-click on the icon for a game, this tells the Operating System (OS) to find and start the relevant game executable (.exe) file on your drive. This executable file has the game's specific programmed instructions on where to find and load up the relevant additional resources it needs to start the game.
Performance Tip: Defragmenting a hard drive speeds up the loading process, as all the different fragments of the files your game executable is looking for will be physically arranged on your drive in such a way as to be more rapidly found and read. Defragging also reduces in-game stuttering (see next step) - see the Drive Optimization chapter of the TweakGuides Tweaking Companion.
Step 2 - The Data Loads into RAM
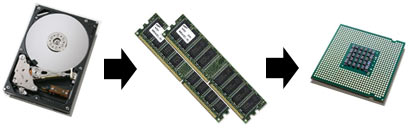
The game executable and the files it needs to start the game commence loading from your drive into your system's Random Access Memory (RAM), coordinated by Windows. The reason for this is that RAM is many times faster than any drive, and for your Central Processing Unit (CPU) to be able to use all this information to perform complex calculations at optimal speeds, it needs it to be stored in RAM first. From there, the CPU uses additional forms of memory storage, such as its own onboard L1, L2 and L3 CPU Caches, to ensure that it doesn't run out of information to process. The bottom line is that at any time if a CPU can't get enough data to process, it will simply sit and wait for the next piece of data it needs to load up. Clearly this can result in reduced or sporadic performance.
It's important to note that not all the information for a game can be completely loaded into RAM - only the portions needed immediately are usually loaded. Most games are far too large to fit into RAM, and furthermore remember that some RAM is also being used by your Operating System and other applications. There is no way to force all of a game program to sit in RAM - even if you set a 0 Pagefile (which is not recommended). Even if a game could comfortably fit entirely into your RAM (e.g. a game with 1GB of data on a system with 2GB of RAM), the Operating System in conjunction with the game program determine how much will be loaded into RAM, and when, and regularly swap information between your drive and RAM. The only way to alter this behavior is if the game specifically has configuration commands for this purpose (usually in .cfg/.ini files) - which if available, I provide in my relevant game tweak guides.
Performance Tip: This step firstly highlights the effect of adding more RAM to your system: it won't increase FPS as such, but it will smooth out your FPS, because the more data can be held in RAM, the less often your CPU has to wait for it to load from your drive. Removing unnecessary background programs and processes from RAM can help increase the possibility of more information being loaded into RAM (See the Startup Programs and Services chapters of the TweakGuides Tweaking Companion). This step also highlights the importance of the Hard Drive, something which is often ignored: the higher your graphics settings and the faster your system, the greater the demand this places on your hard drive to supply new information to keep up this performance. The slower your hard drive - especially when combined with less RAM - the more loading pauses you will get as the CPU waits for data to load from the hard drive into RAM before it can use it. These pauses are commonly referred to as 'stuttering'. Defragmenting your hard drive can help a great deal in reducing stuttering during games, but you may have to consider upgrading your hard drive to a faster model, or switch to a Solid State Drive (SSD) to truly reduce loading times and stuttering in more complex games.
Step 3 - The CPU Processes the Data
RAM is merely a temporary storage area for information that the CPU needs to constantly access. The CPU is the heart of your machine, and everything goes through it. Game data does not travel directly from your drive or RAM to the graphics card; it must first be processed and allocated by the CPU. Your CPU is constantly reading from and writing to RAM, directing information and receiving input from all the devices on your system, all of this occurring through the information pathways on your motherboard.
However systems with a plugin graphics card greatly reduce the CPU workload, since the CPU can immediately offload a large amount of complex graphics calculations directly to the graphics card. A CPU can still process basic graphics information if required, however it does so far less efficiently than a dedicated graphics card which is purpose-built for this type of work. Attempting to run a 3D game without a graphics card (or without even an integrated graphics chipset) - even if possible - would result in a low resolution slideshow at best, not to mention the fact that graphics cards have hardware support for a range of complex special effects which cannot be performed by the CPU in real-time.
Performance Tip: This step highlights an important fact: your graphics card can only work as fast as your CPU can allocate it information. So a fast graphics card will typically perform better on a system with a faster CPU. In fact many high-end graphics cards are artificially bottlenecked because they are on a system with a CPU that is not fast enough to allocate data to them. At the same time, the higher the resolution and graphics settings for a game, the less important the CPU becomes as the bulk of the work will be done by the graphics card.

Step 4 - The Graphics Driver Translates the Data
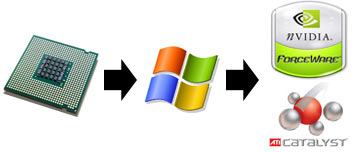
The Operating System helps coordinate the allocation of data by the CPU, by using a specific Graphics Driver to translate the CPU instructions into a format that's optimal for the graphics card you are using. If you don't have a specific graphics driver installed for your card, Windows has generic graphics drivers for most cards and will use this instead. While this generic driver allows your card to perform most graphics functions, it is not optimal at all, and certain advanced graphical effects may not be available to you.
Performance Tip: This is the reason why it is imperative to have the latest official driver for your particular graphics card 'cleanly' installed on your system - for more details see my ATI Catalyst Tweak Guide or Nvidia Forceware Tweak Guide. Many game problems are caused by bad driver installation and/or poor driver setup, and these problems can manifest themselves in many different ways, from crashes to graphical glitches to additional stuttering/hitching.
Step 5 - The Graphics Port Transfers the Data
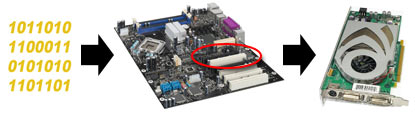
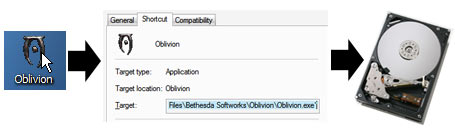
With a range of graphics-related data having been allocated by the CPU to the graphics card, the data is sent along the motherboard and out through the PCI, AGP or PCI-E port - the interface into which you've plugged your graphics card (circled in red above) - to your graphics card. The importance of the port type is that the higher the potential data transfer speed of the port, the quicker data can be transferred back and forward between the CPU and the graphics card. The old PCI standard transfers data at up to 133MB/s; AGP transfers it at 266MB/s (1x) up to 2,133MB/s (8x); and PCI-E being the current fastest interface transfers it at a maximum possible rate of 4,000MB/s (16x), up to 8,000MB/s (32x) for PCI-E 2.0, and even higher in the future. More details on specific transfer rates for a range of devices can be found here.
Remember that these are maximum possible transfer rates, not guaranteed transfer rates. Just like Internet bandwidth, simply having a fast broadband connection doesn't mean you will always get your maximum download speeds from every site. The transfer speeds shown are merely the highest potential rates allowed through these ports.
Performance Tip: More detailed games are more data-intensive, and this is why all recent graphics cards are now based solely on the PCI-E interface and AGP has been phased out. Only PCI-E guarantees that the increasing amount of data to be transferred back and forth between the CPU and graphics card will never be bottlenecked by the port itself. Make sure your BIOS and hardware configuration is set up to use the maximum possible rate on your PCI-E slot. You can check under the Mainboard tab of the free CPU-Z utility to check your currently utilized and maximum potential Graphics Interface speeds.
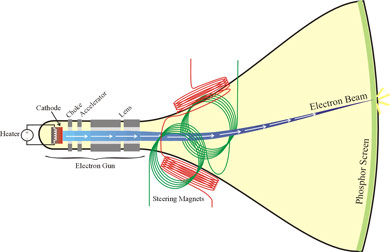
Step 6 - The VRAM Stores the Data
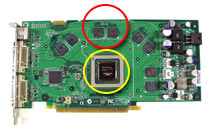
The data entering the graphics card is now stored on the card's own local memory, called Video RAM (VRAM), just two chips of which are circled in red above. These onboard VRAM chips provide a similar service to that of regular system RAM on your motherboard, as a temporary storage area designed to help speed up calculations by the Graphics Processing Unit (GPU) - circled in yellow above. Basically as you can see, your graphics card is almost like a miniature PC within itself, with its own CPU (GPU), RAM (VRAM) and motherboard (PCB), and operates in much the same way. VRAM not only serves as a storage point for data to be calculated for rendering, it also holds completed images (frames) ready for sending to your monitor - see Step 8 for details.
This is the reason why the amount of VRAM is increasingly becoming larger and more important on modern graphics cards. The more information that can be held onboard the graphics card's VRAM, the more quickly the GPU can process data and not have to pause to allow more data to be loaded up into VRAM. For example, games with high resolution textures require more VRAM space. When space runs out in VRAM, existing unused textures have to be switched out and new ones loaded up from your drive and/or system RAM into the VRAM. The slight pause which results from this process is commonly referred to as hitching (when data is switched into/out of VRAM) or stuttering (when data loads up from the drive first), and is most noticeable when you enter new areas or see new objects during a game. Your graphics card literally pauses to wait for new data to be loaded for display before continuing.
Performance Tip: This step highlights the importance of having more VRAM on your graphics card. If running a game on a card with less VRAM, you must lower your texture settings and/or resolution, otherwise you will get more hitching/stuttering as data is constantly swapped into and out of the VRAM. This is particularly true if you have a slow hard drive and less system RAM as well. Cooling the VRAM properly is also essential, as almost all cases of noticeable graphical glitches (also called 'Artifacts'), and many crashes and lockups, are due to overheating VRAM. Remember that the temperature sensor on your graphics card is not located on the VRAM - it is on or close to the GPU; so your VRAM can often run much hotter. Use the free GPU-Z utility to monitor your temperatures and research online to determine what temperature is excessive for your particular model of graphics card.
Step 7 - The GPU Processes the Data
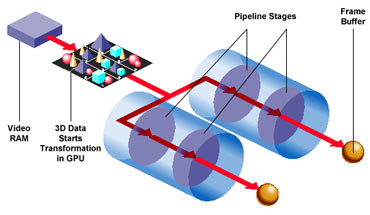
The GPU now accesses the data in VRAM and undertakes a range of complex graphics calculations in what is commonly referred to as the Graphics Pipeline. This 'pipeline' has several stages, the aim of which is to repeatedly convert raw three dimensional (3D) data into something viewable on a two dimensional (2D) display screen:
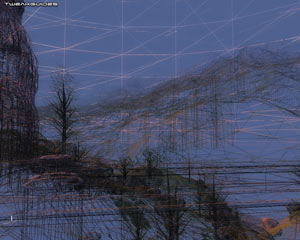
1. Transformation - We start off with raw Vertex data, a vertex being a point in 3D space which, when several are joined together later will make up Wireframe 3D shapes called polygons. In the first stage of the pipeline, this raw 3D vertex data is transformed in such a way as to create and place all 3D objects correctly into what will be a 2D space - that is, the screen surface of your monitor. Everything is scaled and positioned correctly relative to each other. A Vertex Shader may be used at this point to apply certain effects such as warping of objects.
2. Lighting - All the objects are then lit correctly based on the location of the light source(s) and any reflective surfaces. The data is still in vertex form though, so it's basically still just lots of points with different shades of color based on the lighting applied.
3. Viewpoint - The objects are then further adjusted to account for the fact that they will be viewed from a particular angle and distance. So objects closer to the virtual viewer are made bigger, objects further away smaller, and everything is rotated and moved around appropriately.
4. Clipping - Objects that would not be visible to the viewer based on the current Field of View (FOV) are essentially removed. For example, if you have a FOV of 90 degrees, which is typical for most games, the remaining 270 degrees of objects around you which you can't see at any one time will be removed. This is done to reduce the amount of wasteful calculations the GPU would otherwise have to do for something that's not visible.
5. Triangle Setup - At this point all the vertices (points) are joined together to create triangles or polygons, i.e. multi-sided wireframe shapes, which is what we are more familiar with when picturing basic 3D graphics on a computer screen.
6. Rasterization - A Pixel is the smallest unit of graphics information displayed on your monitor. Since everything in a 3D scene will end up being displayed on a flat 2D surface as a pixel, every object in the scene is assigned a particular pixel location on the screen.
7. Culling - This process picks up where clipping left off; every pixel which would still not be visible is removed. Even though they are within your field of view, the rear side of objects that are facing you, objects obscured by other objects, etc. are all removed as they are effectively not visible to the viewer at the current time and hence not worth wasting additional computational power over.
8. Texture & Shading - At this point, each pixel making up the image has any relevant colors or effects applied to it. A Texture is a 2D image which is added to a 3D object's surface to make it look realistic. A Pixel Shader may combine a range of color, depth and texture effects to relevant pixels to create special effects like wrinkled, glossy or transparent surfaces on objects.
The graphics data is now ready for display.
Performance Tip: A modern graphics card actually has multiple pipelines operating at the same time and this multi-threading allows the graphics card to undertake the various stages listed above in parallel and thus perform them much more quickly. As expected, graphics cards with more pipelines generally perform better. It is only relatively recently that graphics cards have been able to render detailed 3D graphics in real-time fast enough to display smoothly. In the past, complex 3D scenes (e.g. for movie special effects) were rendered slowly over a period of sometimes hours or days, whereas now they can be done dozens of times a second. Gaming is one of the most calculation-intensive things you can do on a home PC, so do not underestimate how much stress an entire PC is put under when playing a complex 3D game. It's not just your graphics card which gets a workout; the more recent the game, the more complex it is likely to be, and hence the greater the likelihood that it brings out latent instabilities anywhere on your system and causes crashes and lockups on systems which are not properly configured.
Step 8 - The Data is Sent to the Frame Buffer
The data from the steps above - a single completed image also known as a Frame - is sent for temporary storage to an area of VRAM called the Frame Buffer. As the name suggests, this area buffers (stores) frames, ready to send them through to your computer monitor as required.
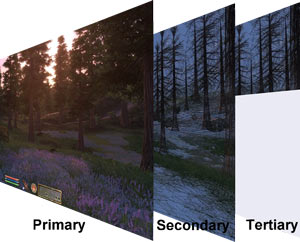
There are usually two buffered images (frames) held at any one time, a process called Double Buffering. One completed frame is held in the Primary (or 'front') buffer, while another one is being composed in the Secondary (or 'back') buffer. The Primary buffer is the one whose output is displayed on your screen at any time. While the contents of the primary buffer are being displayed on the monitor, the graphics card is preparing another frame in the secondary buffer, and as soon as your monitor is preparing to refresh itself again, the buffers are 'flipped' so that the newly completed content of the secondary buffer is then displayed while what was the primary buffer (now secondary) empties itself and composes another new frame. This Page Flipping technique helps prevent a potential bottleneck and increases performance when displaying frames rapidly in a row in 3D applications.
The larger the resolution and the more complex the image, the more data it has and hence the more space it will take up in the frame buffer. If any additional effects are being applied to the frame, like Antialiasing to smooth jagged lines, or Anisotropic Filtering to clear up distant textures, then that will further increase the size of the image (frame).
Performance Tip: Usually only two frames are held in the frame buffer. However Triple Buffering is a technique which provides a third, or Tertiary buffer in the frame buffer, improving performance when Vertical Synchronization (VSync) is enabled, because it gives the graphics card more room to work on completing frames while it is waiting for the monitor to signal that it is ready to receive a new frame. However this also understandably uses up more VRAM and thus can increase stuttering and hitching on some systems. For full details see the Triple Buffering section of this guide.
Step 9 - The Image is Sent to the Screen
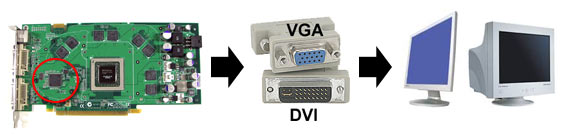
The prepared image is now ready to be displayed. On traditional CRT monitors, the data would be sent from the Frame Buffer through a RAMDAC (Random Access Memory Digital to Analog Convertor), up the video cable to your monitor. The RAMDAC was necessary to convert digital information (i.e. information in 0's and 1's) in your VRAM to an analog format (i.e. video signal voltages) displayable by CRT monitors.
On a modern digital display, such as an LCD monitor, a RAMDAC is not required if you use a pure digital connection such as DVI (Digital Video Interface) or HDMI (High-Definition Multimedia Interface) between your graphics card and display. Using the DVI or HDMI input on digital displays such as an LCD monitor/TV or Plasma TV results in the original digital signal travelling unaltered to be displayed on your screen. Using the older VGA connection requires that the digital signal be converted to analog (by the RAMDAC) and then converted back again to digital by the LCD monitor before being displayed, which is not as efficient.
Performance Tip: As this step highlights, LCD monitors provide the best image quality when connected using a pure digital connection such as DVI or HDMI, as there is no likelihood for data degradation through repeated conversion. A digital display with a digital connection provides the most accurate image reproduction.
That covers the basics of how 3D graphics work on your system. Hopefully you now have a clearer understanding of how your system works when playing a 3D game, and hence you should be better armed in both troubleshooting any problems and working out the best ways to improve performance. Remember though that the best way to configure Windows and your system for optimal performance and stability is by reading the TweakGuides Tweaking Companion.
The next section delves into the details of a range of common graphics settings which gamers often encounter. Understanding precisely how these work is once again critical to both troubleshooting and performance optimization.
The Graphics Settings
Having seen an overview of how your system processes graphics, this section now examines several common, yet very important, graphics and display-related settings which Windows and your games use. On the following pages we look at Frames Per Second, Resolution, Refresh Rate, Response Time, Vertical Synchronization, Triple Buffering, Antialiasing and Anisotropic Filtering. I thought I understood precisely how these settings worked until I started researching for this guide and found that there were still things I hadn't really understood about them.
This guide is designed to cater to a wide range of people, from beginner to advanced, so please bear in mind that often I may state what you consider to be the bleeding obvious. This is purposely done to make sure absolutely everyone is on the same page when it comes to understanding the fundamentals of each setting. However don't fear, I also include more advanced information including things that you may never have seen explained clearly before.
On that point, I have made a special effort to explain each setting in as simple a language as possible, yet in sufficient detail to be actually useful and not just gloss over each setting. This has been a delicate balancing act and in itself is much more difficult than it sounds. Often the underlying reasons behind certain settings working the way they do can be very complex, and there may be a range of technical considerations involved based on different scenarios. I have avoided getting too sidetracked into these issues. For those who want more technical details, I encourage you to delve further into the links provided throughout, especially those in the Further Reading section at the end of this guide. For most people however the information provided here should be more than enough to tell you what is going on for the purposes of gaming and troubleshooting.
Frames Per Second
Frames Per Second, often called Frame rate, or simply FPS, is the most commonly used term in gaming, and yet one of the more complex and often misunderstood ones. Most people generally know that higher FPS is better, but beyond that there are a lot of misconceptions that need to be clarified. Understanding framerate is the key to understanding the rest of the settings in this section, so do not skip it.
A computer image is made up of lots of small dots called Pixels, the number of which at any time depends on your chosen resolution - for more details see the Resolution section of this guide. When viewed from a reasonable distance, your brain can take all these dots, put them together and perceive them as a single image. This single still image is called a Frame, and as we've seen in the Graphics Process section, a 3D game pretty much turns your entire system into a frame factory, with your graphics card constantly producing new frames every second.
However these frames are only still images, like photographs. For a scene to appear fluid and animated on a computer screen, it has to be made up of lots of different still frames shown rapidly one after the other. This happens to be the same way that movies and TV work: a rapid slideshow of still images, each one slightly different than the last, to achieve the appearance of natural motion. The only reason this method works is that your eyes have a property called Persistence of Vision - they retain an image for a tiny fraction of a second even after it has disappeared. This mechanism is absolutely critical to the way in which TV, movies and computer displays work.
This is where we reach our first misconception: FPS and Refresh Rate are two separate and independent things. It is possible to have 20FPS on a screen with an 85Hz refresh rate, or have 100FPS on a screen with a 60Hz refresh rate. FPS is the rate at which your graphics card is producing new frames; Refresh Rate is the rate at which your monitor is refreshing whatever is displayed on your screen. We discuss this further in the Refresh Rate and Response Time sections of this guide.
Measuring Framerate
FPS is not something which is easy to judge with the naked eye. Fortunately though, it is quite easy to actually measure how many frames per second your game is running at. Some games have a built-in FPS counter which you can activate, but the easiest method of enabling an FPS counter in any game is to use the free FRAPS utility. This utility does not impact on framerate in any significant way, and is accurate in all games. Install it, launch it and then launch a 3D game - a yellow FPS counter will appear in the corner of your screen indicating how many FPS is currently being produced by your graphics card.
Once people become aware of their actual FPS, the most commonly asked question is: "Is my FPS high enough?", to which you may hear such varied replies as: "Any more than 30FPS is a waste because the human eye can't see any more than that", or "You need at least 30FPS for the game to be playable". These sorts of arbitrary comments show the confusion that abounds regarding FPS, and I'll attempt to clarify them below.
Minimum FPS
There is definitely a 'minimum' FPS - a point at which, if the FPS in a game becomes low enough, your eyes and brain will begin to notice the fact that an animated image on the screen no longer looks smooth; it becomes quite apparent that it is a series of still images being displayed in sequence, like a slideshow. However the exact minimum number of frames required to keep things smooth in a game is not a set scientific value. It will vary from person to person, and importantly it also varies by game type.
In my experience, the baseline for acceptably smooth graphics is around 25 frames per second, if rendered consistently without stuttering or dipping lower. But this is only a subjective starting point, and not a definitive answer. There are several important factors to consider when talking about minimum acceptable framerate:
The key point to take away from this discussion is that there is no set scientific value for minimum FPS. Your eyes and brain don't have a precise trigger point at which, say 23 FPS appears stuttery but 24 FPS is smooth. It's more complex than that and all the factors above need to be considered. If a game looks and feels smooth to you, you are getting 'enough' FPS as a minimum, but don't expect other people to agree with or experience the exact same thing - it is in large part subjective.
Maximum FPS
The concept that there is a maximum possible FPS beyond which the human eye can't distinguish any real difference is not entirely accurate. For more details, see this article and this article among the many which refute this claim. In particular the common claim that "The human eye can't see more than 24 (or 25 or 30 or 60) FPS" is completely false, and is partly borne of the misconception that TV or movie FPS is the same as PC game FPS, and partly possibly borne out of a need to justify lower framerates.

It's true that movies and TV only use around 24, 25 or 30 FPS, depending on which part of the world you're in. But there are three important differences between Movies, TV and PC games:
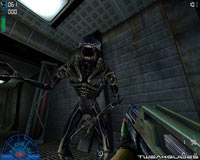
1. Movies and TV use Motion Blur, so that if at any time you freeze a movie scene on your DVD player for example, a large part of the scene may consist of blurred objects. Furthermore, the images in a movie or on TV do not have crisp detailed outlines. In a PC game on the other hand, if you take a screenshot or pause the game at any time, you will notice that everything is usually extremely sharp and distinct regardless of how fast it was moving when the shot was taken. Take a look at the screenshot comparison above: on the left is a fast motion shot of an alien from the movie Alien vs. Predator, on the right a fast motion shot of an alien from the old game Alien vs. Predator 2. Thus 24 often-blurred frames from a movie wind up looking much smoother to the human eye than 24 or even 30 distinct frames from a fast-moving PC game. So why can't games use motion blur? Well indeed most recent games have started incorporating blur effects. This can definitely help to reduce the visible impact of lower framerates, but aside from the fact that not all games have motion blur, the next point addresses why this doesn't always work. Even with motion blur, the graphics in PC games may still have very sharp outlines which only settings like Antialiasing can smooth out, but ironically this usually come at the expense of further lowering FPS.
2. Control responsiveness steps in again to further differentiate between a movie and a game. In a movie or TV show, the viewpoint is not under your control; it is typically a static or smoothly panning camera. In a game however, your control over the viewpoint means that in a rapidly moving gaming at 24 or even 30FPS you will notice the general choppiness due to a lack of responsiveness. The variability of control responsiveness based on variable framerate also helps highlight the next point below.
3. PC games do not have a rock-solid unchanging framerate, while TV and movies do. While some games have a framerate cap of 30 or 60 FPS, very few if any PC games can be locked down to consistently show exactly 24 or 30 FPS - their FPS will vary, sometimes significantly. Movies and TV on the other hand always show exactly the same number of frames per second and do not vary one bit. Therefore the variability in framerate in games also works to exaggerate the impact of lower framerates, making them more noticeable. In Crysis for example, if you walk out of an indoor area which has 60 FPS into a outdoor area with 25 FPS, you will notice the difference, partly due to a change in control responsiveness, and partly because your eyes detect the relative change in framerate.
One way to demonstrate that the human eye can actually detect differences above 30FPS is to use a small program called FPS Compare (11KB) by Andreas Gustafsson (used here with his permission). To use it, simply extract and launch the FPSCompare.exe file. Make sure to read the instructions in the Readme.txt file, and note that this utility is still in beta form. You may need to force VSync to Off in your graphics card's control panel for it to work properly, but if it doesn't work properly for you, you can try the more basic version of it from here: FPS Compare (old) (106KB).
FPS Compare shows the same scene rendered side by side in a split-screen arrangement, but each side is running at a different frame rate. When launching the new FPS Compare program, I recommend pressing F2 to change the scene to one more familiar to gaming. Now by staring at the middle of your screen, you should be able to detect that the portion on the left (at ~60FPS) appears smoother than the portion on the right (at ~30FPS). Even if the difference is not major to your eyes, many people do notice that there is at least some difference - something which refutes the fact that human eyes cannot notice differences in smoothness at an FPS over 30.
As the articles I link to further above discuss, testing has shown that human beings can regularly distinguish differences of one frame in 200 every second. There is no actual theoretical limit on how many frames the eye can distinguish. In the natural world, human eyes don't digest motion in terms of a series of still frames, they take in a constant stream of analog movement data. In particular, we are quick to notice dramatic contrasts, no matter how brief. If there is a gap or brief fluctuation in the flow of visual data, then our eyes and consequently our brain can actually pick this up if it's relevant, even if it's subconscious - it all depends on the context of the data streaming in.
So to come back to the question of how many FPS is enough, in my experience, and for most practical purposes, a framerate of around 60 FPS is completely sufficient as a maximum FPS. Even 25 or 30FPS can be totally sufficient in slow or medium-paced games - particularly if the game has motion blur, softer edges, and does not display significant variability or stuttering. If there's one thing that would be perfect to have in any game, it would be a method of maintaining a fixed framerate. Unfortunately this is not practically possible on many systems because of the different types of hardware used. You can enable VSync to cap the maximum framerate and hence reduce FPS variability, but this may also reduce performance - see the Vertical Synchronization section of this guide.
Resolution
Display resolution, often simply called Resolution, refers to the total amount of visual information on a display screen. In computer graphics, the smallest unit of graphical information is called a Pixel - a small dot with a particular color and brightness. Every computer image on your screen is a pixellated sample of the original 3D information contained in your graphics card, because that is the way a monitor displays 3D information on a 2D screen surface. When you change the resolution in a game, you are telling the game to provide more or less pixels, and hence more or less samples of that original information for your system to process and display on screen. The higher the resolution, the clearer the image will look, but the more effort this will take for your system to calculate this information, resulting in lower FPS.
The resolution setting in a game or in Windows tells you precisely how many pixels are used to display an image. Resolution is typically shown in pixel width x pixel height format. So a game running at 1920x1200 resolution for example means there are 1,920 x 1,200 = 2,304,000 pixels in total on the screen making up the image. This value can also be expressed in Megapixels (millions of pixels), which in this example would be around 2.3 megapixels. The human eye takes in all these separate pixels and at a reasonable distance perceives them as a single smooth image, much like looking at a picture in a newspaper from a distance as opposed to close up.
To understand the practical aspects of resolution better we need to look at the structure of the types of screens on which pixels are displayed.
Dot Pitch
The screen on a traditional CRT monitor is made up of lots of tiny Phosphors. It is these phosphors which glow briefly when struck by the beam from the electron gun inside the monitor and produce the image we see on a CRT screen. In Aperture Grille type CRT monitors, the phosphors are separated into fine red, green and blue vertical strips; in Shadow Mask type CRT monitors, the phosphors are separated into groups of tiny red, green and blue dots.
A pixel may be the smallest unit in computer graphics, but a single pixel on a CRT monitor is still made up of several phosphors. At maximum resolution on a CRT monitor, a single graphics pixel is made up of a 'triad' of phosphors: one red, one green and one blue phosphor. These three are necessary to generate all the required colors of a single pixel.
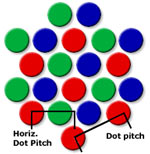
We refer to the distance between similar-colored phosphors as Dot Pitch, which is measured in millimeters. Effectively, this is a measure of how big the smallest possible pixel would be on a CRT. The lower the dot pitch, the finer the image the CRT display can show, and typically the higher its maximum supported resolution. Most modern CRT monitors have around 0.28 to 0.25mm dot pitch.
Importantly, a CRT displays graphics using a moving electron beam which is manipulated magnetically and projected onto the phosphors on the screen. This along with its large number of phosphors basically means that a CRT monitor can rescale an image to a series of resolutions up to its maximum resolution without any noticeable degradation in image quality. The reason for this is covered further below.
Fixed Pixel Structure
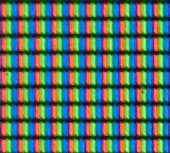
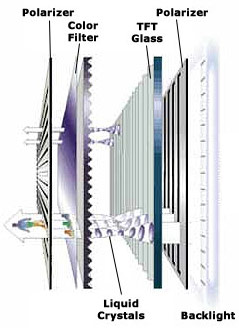
LCD monitors differ from CRT monitors in that they do not have an electron beam or lots of tiny phosphors lighting up. Instead they display images using a grid of fixed square or rectangular Liquid Crystal Cells which twist to allow varying degrees of light to pass through them. This is why they are also known as fixed pixel displays.
Just like a phosphor triad however, each LCD cell has a red, green and blue component to facilitate proper color reproduction for each pixel. Most LCD monitors have now reached the point at which the distance between these cells - their 'Pixel Pitch' - is similar to the Dot Pitch of a traditional CRT. However, because of the way LCDs work and their fixed pixel composition, LCD monitors can only provide optimal image quality at their maximum supported resolution, otherwise known as the Native Resolution. At other resolutions, the image can appear more blurry and exhibit glitches. The reason for this is discussed below.
Analog vs. Digital
The fundamental difference between a CRT and an LCD monitor is that a CRT monitor is based on Analog display technology, while an LCD monitor is a Digital display device. Analog signals are continuous and infinitely variable, whereas digital signals come in discrete steps.
A CRT monitor only accepts analog input. Thus a graphics card's RAMDAC has to convert all the digital image information your graphics card uses to calculate and create an image into analog form before sending it to a CRT monitor. The monitor then uses this analog information in the form of voltage variations, electron beams and magnetic fields to paint the picture on your monitor screen, resizing it as necessary to fit the display space. The results are similar to an image from a movie projector being thrown onto a wall and being adjusted to fit as required, such as moving the projector closer or further away, and adjusting the focus.
An LCD monitor on the other hand can receive either digital or analog information depending on its connection type, but ultimately all data must be in digital form before it can be used. At resolutions which are lower than its native resolution, the monitor has to digitally rescale an image to fit into its fixed pixel structure. When an image doesn't fit evenly into the native resolution, an LCD monitor can do two things: show the image at its original resolution and put black bars around it to fill in the remaining space; or stretch the image to fit the screen space. The end result is that typically when you use any resolution lower than the maximum (native) resolution, the image will show visual glitches and blurring. This is because the monitor has to Interpolate (recalculate with some guessing) the data to make it all fit into its fixed pixel structure. It's like creating a range of different sized objects out of a fixed number of Lego blocks; some objects will look relatively good, while others will look more blocky.
The bottom line is that digital information is discrete and precise, while analog information is continuous and imperfect. That is why an LCD monitor running at its native resolution shows a much sharper image than a CRT monitor at the same resolution. But once resolutions are changed, the LCD monitor has a harder time rearranging everything to fit properly, while a CRT monitor has no trouble at all.
Aspect Ratio
The ratio of the pixel width of any given resolution to its pixel height is called the Aspect Ratio. For example, the aspect ratio for a resolution of 1920x1200 is calculated first as width divided by height (1,920/1,200) = 1.6. To then express this as a proper aspect ratio, find the first integer (whole number) which, when mulitplied by this ratio, results in a whole number. The first integer which turns 1.6 into a whole number is 5. Multiply 1.6 by 5, and you have 8. Thus the aspect ratio is 8:5, which can also be expressed as 16:10. Similarly, a resolution of 1280x720 results in a width to height of roughly 1.78. The first integer which turns this into a whole number is 9, and 9 x 1.78 = 16, so the aspect ratio is 16:9. The standard aspect ratio for traditional computer monitors and televisions used to be 4:3 or 5:4, while the standard aspect ratio for the current widescreen TV and PC monitor format is 16:9 or 16:10. Resolutions which precisely match the aspect ratio of your monitor will display correctly, while those that do not have the same aspect ratio will either result in distortions to the image, or black bars to the sides and/or top and bottom of the screen.
Almost all LCD monitors now being sold are classed as 'widescreen', as the traditional 4:3 monitors have been phased out. But in actuality there are two different widescreen aspect ratios for computer monitors: 16:9 and 16:10. Up till now, the separation has been reasonably clear: 16:9 is considered a movie aspect ratio, used for displays primarily intended for TV/movie playback such as Plasma and LCD TVs. The 16:10 ratio on the other hand is considered a PC-exclusive aspect ratio, and has been used almost solely for LCD computer monitors. In recent times however, more and more computer monitors are being released as 16:9. This isn't necessarily due to more people using their computer monitors for watching movies, it's actually because the hardware manufacturers find the production of 16:9 panels to be more cost efficient for them, as pointed out in this article. What this means is that 16:10 LCD monitors are being deliberately phased out in favor of 16:9.
The 16:10 aspect ratio was a compromise designed specifically for PCs to allow them more vertical room than a 16:9 monitor. Browsing the Internet for example usually benefits from more height than width, as web pages are not designed to efficiently use horizontal space, and more height means less scrolling to read text. The same is true for word processing, since the standard page formats of A4 and Letter have much more height than width. Yet when a 16:9 image is displayed on a 16:10 monitor, there isn't any major issue; while maintaining native resolution, small black bars are simply added to the top and bottom of the screen, without any major loss in image size. However a 16:9 monitor cannot easily accommodate a 16:10 image for obvious reasons, and thus must step down a resolution or two to show the image in its entirety, adding black bars to the sides in the process. In short, at the same screen size, a 16:10 monitor provides more screen real estate. For those who use their PCs for normal desktop tasks such as browsing and writing emails and documents, 16:10 is therefore a better choice at most screen sizes. However if you still prefer a 16:9 monitor, or only have the choice of a 16:9 monitor, then it doesn't make a substantial difference because manufacturers are pushing consumers towards 16:9 and hence support for 16:9 resolutions will only continue to improve as it is the standard.
Importantly, there are various scaling options available in your graphics card control panel and/or monitor options which control how an image is displayed if it does not match aspect ratio of your monitor. The details are provided under 'Adjust Desktop Size and Position' section on this page of my Nvidia Forceware Tweak Guide, and on this page of my ATI Catalyst Tweak Guide under 'Digital Panel Properties'. You can both increase image quality by forcing your graphics card to rescale an image before sending it to your monitor, and also fix any aspect ratio-related problems - such as a 'squished' image - using these settings.
Interlace & Progressive
Something I haven't covered yet are the concepts of Interlace and Progressive. This is not an issue of any major concern on PC monitors, as all of them use progressive which is optimal, and all modern games send progressive data to your monitor. However since more and more people are hooking up their PCs to a High Definition TV (HDTV), this is an area you should understand more clearly.
Without getting into a huge amount of detail, interlacing is a compromise trick developed for traditional CRT TVs early on to allow them to use the existing amount of information to display higher resolution images and also double their refresh rate from 30 to 60Hz to prevent noticeable flickering. It does this by alternately displaying all the odd-numbered horizontal lines in an image, then displaying the even ones, and back again. Our eyes, due to persistence of vision, do not notice the gaps - we see an entire image made up of odd and even lines. Interlace is not as optimal as progressive scanning, which basically draws the entire image on screen as a single completed frame without breaking it up into these odd and even fields. A whole progressive frame displayed at 60Hz provides smoother image quality than interlaced fields displaying at 60Hz.
So when using an HDTV you may see resolutions denoted as 1080p, 1080i, 720p, or 480p for example. The numerical part indicates the pixel height of the screen, and the i or p after the numbers denotes interlace or progressive. In general the same resolution looks better using progressive (if supported on your display), and on fixed-pixel displays like LCD or Plasma HDTV, the closer the pixel height is to your display's native resolution, the better it will look, as otherwise the image has to be rescaled, and as covered before, rescaled images can result in a reduction in image quality.
Resolution Tips
Let's take some time to consider how we can use the information above to enhance gaming. For starters, higher resolutions typically bring with them a reduction in the jaggedness of outlines in computer graphics. This is precisely what Antialiasing tries to do as well. So it is often wise - especially on systems with fast graphics cards combined with slower CPUs - to consider raising your resolution instead of using higher levels of antialiasing to get a performance boost with no real drop in image quality.
For LCD monitor owners, there is a simple trick you can use to boost performance and also get some 'free' antialiasing: that is to run a game just below your native resolution. For example, running a game at 1680x1050 on a 1920x1200 LCD may sound odd at first, but aside from the FPS boost you get from lowering your resolution, the slight blurring from running at a non-native resolution reduces the harshness of jagged lines, courtesy of your monitor's attempts at rescaling the image with interpolation. This is not as good as real antialiasing, but it's worth a try if you need the extra FPS and have no other option.
In general however, for optimal image quality you should increase any resolution setting to the maximum possible - whether in a game, or in Windows - as this matches your LCD monitor's native resolution and provides the crispest possible image.
Refresh Rate
Refresh Rate is not to be confused with Frames Per Second. FPS is how fast your graphics card can output individual frames each second, and is covered under the Frames Per Second section of this guide. Refresh rate is a separate property of your monitor: how many times per second it can 'refresh' the screen, regardless of how many frames are being fed to it by the graphics card, or what type of image is on the screen. Refresh rate is a concept originally used by traditional Cathode Ray Tube (CRT)-based displays. However if you own an LCD monitor, Refresh Rate is equally as relevant for reasons which are explained further in this section as well as the Response Time section of this guide.
To understand the concept of the Refresh Rate, we must first understand how a CRT Display works. A CRT display has a glass picture tube covered in phosphors, and an electron gun sitting at the back. To create an image, the electron gun moves and shoots a beam at the phosphors on the front of the tube, briefly lighting them up with an image. It starts at the top left corner of the screen and rapidly 'paints' the screen line by line, across and down the face of the tube. Once it hits the bottom, the electron gun turns off, goes all the way back to the top left corner and starts again. This pause between refreshes is called the Vertical Blanking Interval. A CRT display refreshes itself many times a second, so that even though at any one point in time much of the screen may actually be blank, waiting to be redrawn by the electron gun, your eyes - due to Persistence of Vision - still see the previous image that was displayed there a fraction of a second ago.
LCD monitors work on a different principle. They do not blank the screen between each refresh; they simply readjust their liquid crystal structure to show the new image. They still face many of the same issues described in this section for a range of reasons covered here and in the Response Time section, but are much less harmful to our eyes precisely because they do not work in the way a CRT display does.
Refresh rate is typically measured in frequency (Hz) which translates into the number of times per second your monitor can redraw the entire screen. Thus a refresh rate of 60Hz means that your monitor can redraw the entire screen contents 60 consecutive times during a single second; 85Hz is 85 times, and so forth. This is fairly straightforward, but remember, this is how fast your monitor can refresh the image on the screen, not how many FPS your system is actually producing or displaying. Let's examine the difference.
FPS vs. Refresh Rate
FPS and refresh rate are two separate things. Even if the image on your screen has not changed in any way (e.g. a still 2D image like your Windows Desktop), or your 3D game isn't actually supplying enough new frames (e.g. the game is running at 25 FPS on a 60Hz refresh rate), the screen can still be redrawn a fixed number of times based on the current refresh rate of the monitor; if your FPS is less than your refresh rate at any time, the same frame may simply be redrawn several times by the monitor.
If your FPS is higher than your refresh rate at any time, your monitor will not actually be able to display all of these frames, and some will come out with a graphical glitch known as Tearing. To prevent this, you can enable an option called Vertical Synchronization (VSync). However here's the tricky part: if VSync is enabled, then your refresh rate and FPS will have a direct relationship with each other - they will become synchronized together. This is all covered in more detail in the Vertical Synchronization section of this guide.
Minimum Refresh Rate
By themselves, frames don't go blank in between each new frame. The old one stays displayed until the new one comes along to replace it. So while low FPS is certainly annoying, it's not particularly bad for your eyes in most cases. The notion of a 'minimum acceptable refresh rate' comes from the fact that our eyes receive and process an endless stream of analog visual information, which does not come in the form of 'frames'. Thus when using a CRT-based display, some people could detect flickering at particular refresh rates, especially below 60Hz. This was not only annoying, it was bad for the eyes if a CRT display was used for sustained periods of time.
Fortunately, LCD monitors do not blank themselves between each refresh like a CRT does, and so there is no flickering and no need to worry about a minimum refresh rate. All LCD monitors have a refresh rate of at least 60Hz, which is perfectly adequate both for comfortable viewing and good performance in games.
Optimal Refresh Rate
To check your monitor's maximum supported refresh rates at each resolution you will need its user manual, or search for the model number on the Internet and find its specifications. LCD monitors can all do at least 60Hz, and while some monitors support higher refresh rates, this is not absolutely necessary or even beneficial. However if you still run a CRT-based display, or if you want to alter an LCD monitor's refresh rate, read on.
To use the highest possible refresh rate supported by your monitor at every resolution, you should first install your monitor's drivers, either from a disk that came with your monitor or through the manufacturer's website. In Windows XP, you can use a small utility called Refresh Force to set a refresh rate higher than the XP default of 60Hz, and this is recommended for all CRT monitors. On other versions of Windows, you can use the settings in your graphics card's control panel to select a particular refresh rate at any resolution - as long as it's supported by your graphics card and monitor. See the relevant section of the ATI Catalyst Tweak Guide or the Nvidia Forceware Tweak Guide as relevant. Do not attempt to use a higher refresh rate than those in your monitor specifications as doing so will give an 'Out of Frequency' error and result in a blank screen.
If you are still using a CRT monitor and it does not support at least 85Hz or more at the resolutions you commonly use, or you notice flickering, or get headaches or eye fatigue after a period of time, then I strongly recommend switching to an LCD monitor. Do not sacrifice the long term health of your eyes over the cost of a monitor upgrade.
Response Time
Unlike a traditional CRT monitor, an LCD monitor does not have an electron gun or a tube with phosphors. It is made up of an array of liquid crystals placed between two pieces of polarized glass. Light is then sent from the back of the glass, and the shape of the crystals are controlled in such a way as to alter the light which passes through this glass and comes out through the screen. As such, an LCD screen does not have to refresh the entire screen constantly like a CRT monitor does just to maintain an image. Whenever an image alters on an LCD screen, a command is sent to the relevant liquid crystals in the array to change shape as required. How quickly they can do this is called the Response Time of the LCD monitor.
As we've seen in the Refresh Rate section, CRT monitors can flicker because of the way they refresh the screen. An LCD monitor on the other hand does not have to go through a repetitive cycle of constantly blanking and refreshing itself many times per second like a CRT monitor. This is because it has no phosphors to constantly light up; instead the liquid crystals will remain open to continuously display an image for as long as required. An LCD monitor does not show a black screen when inactive, or in between updating portions of the screen; it does not fluctuate in brightness. So looking at an image on an LCD monitor is like looking at an image on a piece of paper. The concept of refresh rate does not apply in the same way, at least for the purposes of flickering.
However just like a CRT is physically restricted by how fast the electron gun can redraw the screen each second, an LCD has a physical limitation of its own: the time taken for individual liquid crystals to twist and untwist in response to any changing images it is fed. This Response Time effectively measures how quickly the on screen image can be fully 'refreshed' (minus flickering of course) with a new image. Response time is correctly measured as the total amount of time taken for a pixel on an LCD screen to go from full black to full white and then back again to full black, measured in milliseconds (ms).
Response Time vs. Refresh Rate
Ok, so if an LCD monitor doesn't refresh itself many times a second, why does an LCD monitor still require a particular refresh rate setting in Windows? We previously discussed the fact that refresh rates are something only a CRT monitor needs because of the way it physically operates. Well it appears that LCD monitors need to emulate a refresh rate in Windows primarily for compatibility purposes with games and hardware. Games, Windows and your graphics card are all still designed around composing individual frames in the frame buffer, and sending these whole frames to your monitor one by one, with the timing for buffer flipping typically based on Vertical Blank Intervals - all things which were originally required for CRT monitors. Therefore LCD panels have to try to operate on the same basis, despite the fact that they don't have the same physical limitations of a CRT.
Let's look at an LCD's theoretical refresh rate, based on its response time rating. Consider the example of an LCD monitor nominally rated at an 8ms response time. Given 8 milliseconds is 8/1000ths of a second, in one full second it can refresh all the pixels on the screen (if necessary) 1000/8 = 125 times, which makes it equivalent to a 125Hz refresh rate. Yet no 8ms LCD monitor allows you to set a refresh rate even remotely close to this in Windows. There are two main reasons:
1. Connection Limitations: A single DVI digital connection is like an Internet connection, it has limited bandwidth for digital graphics data; not enough to allow higher than 60Hz refresh rate at full 24bpp Color Depth for all resolutions, so typically all resolutions on LCD monitors using DVI are capped at 60Hz. Some LCD monitors using DVI do allow higher refresh rates, and if you're using the newer HDMI digital interface, you can achieve refresh rates of up to 120Hz on appropriate LCD displays. Alternatively, if you use a VGA analog connector you can often select a refresh rate higher than 60Hz on an LCD, though again nowhere near the theoretical refresh rate limit based on your response time, partly because of the reason below.
2. Monitor Limitations: LCD manufacturers want to ensure that their monitors function satisfactorily in all situations, particularly since they often overstate response times in the published specifications. So typically they set the maximum supported refresh rates on their monitors such that they are relatively conservative and can meet the challenge of refreshing the entire screen as often as required in any situation without any noticeable ghosting. Furthermore, setting too high a refresh rate on an LCD, even if it's available, can actually result in problems in certain games and applications due to timing issues. So for reliability and compatibility purposes, LCD refresh rates are not as high as they could theoretically be.
As you can see, there are a few factors involved in why your LCD monitor may not provide a refresh rate as high as you might expect given its response time. In practice the standard 60Hz refresh rate on an LCD monitor is absolutely fine.
Recommended Response Time
Clearly the lower the total response time of an LCD panel, the better the panel will be for gaming, since it means that no matter how fast your FPS, the monitor can react fast enough to update the image on the screen. Panels with response times which are too high (i.e. slower) can result in blurry, smeared or artifically smooth images, or fast moving objects leaving faint trails during fast gaming. These sorts of effects are commonly referred to as Ghosting, and are the result of the LCD monitor not being able to respond to the request to redraw portions of the image fast enough, so you can still see traces of the previous image for a brief moment.
As a general rule, LCD monitors require a total response time of at least 25ms or less to be remotely considered suitable for gaming or fast motion video, and to prevent very noticeable ghosting. However to be truly suited for gaming, especially fast gaming, I would strongly recommend a response time of at least 8ms and below. Again this is partially subjective; it will vary from person to person as to the exact threshold at which ghosting is visible to their eyes. Some say they can see ghosting at even an 8ms response time, some say they can't.
Importantly, be aware that some LCD manufacturers do not provide correct response time ratings, they often provide only gray-white-gray times, or the fastest possible time, not the average time taken for the panel to go black-white-black. Thus the best measure of all is your own eyes. You need to view fast motion on a particular LCD screen to judge whether you can see any ghosting irrespective of its response time rating.
Refresh Rate Issues on LCDs
An LCD monitor does not flicker, so for the purposes of reducing eye strain it doesn't really matter what refresh rate is chosen. The default of 60Hz in Windows is perfectly fine in that regard. In fact when using a DVI connection, you may be restricted to a 60Hz refresh rate regardless of resolution, so you may not have any choice. HDMI allows a higher refresh rate on suitable monitors, and using an analog VGA connection gives you the choice of a higher refresh rate at the cost of image quality. However the standard 60Hz refresh rate is still recommended by most manufacturers as the most stable and compatible choice. The only times that the refresh rate on an LCD may actually matter is either for the display of Stereoscopic 3D content (which isn't covered here), or for normal gaming when VSync is enabled - discussed below and in greater detail in the Vertical Synchronization section.
The simple fact of the matter is that LCD monitors have to work on the basis of receiving new frames of information from a graphics card's frame buffer like a CRT would: i.e, during the VBI. So when VSync is disabled the graphics card will sometimes race ahead and when the LCD monitor indicates it is ready for a new frame during the blanking interval, the graphics card may provide a partially new frame overlapping an older one, just like it would for a CRT. An LCD monitor will then display this just the same way a CRT monitor would, resulting in visible tearing. The alternative of enabling VSync can resolve this, but in turn can reduce FPS to a fraction of the refresh rate. The lower your refresh rate, the greater the performance drop, which is the only time a 60Hz refresh rate on an LCD may be considered a problem. Fortunately you can either disable VSync, or enable Triple Buffering, to resolve these issues, so see the relevant sections of this guide.
Vertical Synchronization
Vertical Synchronization, also called Vertical Sync, or simply VSync for short, was primarily required because of the physical limitations of CRT monitors as discussed in the Refresh Rate section. A CRT monitor has to constantly light up the phosphors on the screen many times per second to maintain an image, and can only do this a certain number of times per second based on how fast the electron gun in the monitor can move. Each time it has to redraw the entire screen again, it moves the electron gun inside the monitor from the bottom of the screen to point to the top left of the screen, ready to 'repaint' all the lines on the screen from top left to bottom right, and back again for the next refresh. The period during which the electron gun moves to the top of the screen for a new refresh is called the Vertical Blanking Interval (VBI).
Enabling VSync tells your graphics card to synchronize its actions with your monitor. That means the graphics card is only allowed to swap its frame buffer and send a new frame to the monitor when the monitor says it is ready to repaint a new screen - i.e. during the VBI. Your graphics card and monitor do not have to be in sync; they can still operate properly when VSync is disabled, however when VSync is disabled, you can experience a phenomenon called Tearing in periods when your graphics card and monitor go out of sync, precisely because the graphics card and monitor are acting without regard for each other's limitations.
While the concept of VSync originated on CRT screens, it applies to LCD screens as well for various reasons we examine throughout this guide.
Tearing
It is an unfortunate fact that if you disable VSync, your graphics card and monitor will inevitably go out of synch. Whenever your FPS exceeds the refresh rate (e.g. 120 FPS on a 60Hz screen), or in general at any point during which your graphics card is working faster than your monitor, the graphics card produces more frames in the frame buffer than the monitor can actually display at any one time. The end result is that when the monitor goes to get a new frame from the primary buffer of the graphics card during VBI, the resulting output may be made up of two or more different frames overlapping each other. The onscreen image may appear to be slightly out of alignment or 'torn' in parts whenever there is any movement - and thus it is referred to as Tearing. An example of this is provided in the simulated screenshot below. Look closely at the urinals and the sink - portions of them are out of alignment due to tearing:

The precise visual impact of tearing differs depending on just how much your graphics card and monitor go out of sync, but usually the higher your FPS and/or the faster your movements are in a game - such as rapidly turning around - the more noticeable it becomes. This is because the contents of the overlapping portions of new and old frames are more noticeably different from each other in such cases.
Tearing does absolutely no damage to your graphics card or monitor. It just highlights the physical limitation of your monitor in keeping up with the graphics card when the two aren't synchronized. In the example of 120FPS on a 60Hz monitor, at most only 60 whole frames can actually be refreshed during any one second by your monitor, so the other 60 frames your graphics card is producing are pretty much being wasted and are coming out as lots of partially overlapping frames and hence only contribute to tearing. In such a scenario, even if you don't want to enable VSync, it makes sense for you to raise your in-game graphics settings (if possible) to reduce your FPS such that it stays closer to your refresh rate. This will help you get more whole frames and thus reduce tearing. It may seem cool to have a very high framerate, but as you can see it is wasteful and only causes graphical glitches when VSync is disabled.
Tearing is found equally on CRT or LCD monitors, since both work on the same basis for compatibility purposes - see the Response Time section of this guide for more details.
FPS & VSync
When VSync is disabled, your FPS and refresh rate have no relationship to each other as such. This lets your graphics card work as fast as it wants, sending frames to the monitor as fast as it can draw them. Whether the monitor can actually show all these frames properly or not is another matter, which we've already discussed above. Clearly if disabling VSync can cause graphical glitches, however minor they may be, wouldn't it make sense to always enable VSync so that your graphics card doesn't wind up wasting its efforts only to generate more tearing? Well once again, things are not as simple as that.
When VSync is enabled, what happens is that your graphics card is told to wait for your monitor to signal when it's ready for a new frame before supplying a single whole frame, each and every time. It can't race ahead, it can't just pump out lots of partially completed frames over old ones whenever it's ready - it has to provide a single whole frame to the monitor whenever the monitor says it's ready to refresh itself during VBI. The first noticeable impact is that your FPS becomes capped at a maximum equal to your current refresh rate. So if your refresh rate is 60Hz for example, your framerate can now only reach a maximum of 60FPS. By itself this isn't really a problem, since every monitor can do at least a 60Hz refresh rate at any resolution, and as we've discussed under the Frames Per Second section, if your system can produce 60FPS consistently in a game this should be more than enough FPS to provide smooth natural motion for virtually any type of game.
There is however a more fundamental problem with enabling VSync, and that is it can significantly reduce your overall framerate, often dropping your FPS to exactly 50% of the refresh rate. This is a difficult concept to explain, but it just has to do with timing. When VSync is enabled, your graphics card becomes a slave to your monitor. If at any time your FPS falls just below your refresh rate, each frame starts taking your graphics card longer to draw than the time it takes for your monitor to refresh itself. So every 2nd refresh, your graphics card just misses completing a new whole frame in time. This means that both its primary and secondary frame buffers are filled, it has nowhere to put any new information, so it has to sit idle and wait for the next refresh to come around before it can unload its recently completed frame, and start work on a new one in the newly cleared secondary buffer. This results in exactly half the framerate of the refresh rate whenever your FPS falls below the refresh rate.
As long as your graphics card can always render a frame faster than your monitor can refresh itself, enabling VSync will not reduce your average framerate. All that will happen is that your FPS will be capped to a maximum equivalent to the refresh rate. But since most recent monitors refresh at 60Hz, and in many recent games it is difficult to achieve 60FPS consistently at your desired resolution and settings, enabling VSync usually ends up reducing your overall FPS. Fortunately, because this problem is pretty much caused by the frame buffers becoming filled up, there is a solution: enable a third frame buffer to allow more headroom. However this is not a straightforward solution, and to read more about it see the Triple Buffering section of this guide.
So Which is Best, VSync On or Off?
VSync poses a real dilemma for many people: with VSync off, tearing can occur whenever your graphics card and monitor go out of sync, and this can be very annoying for some people, especially in fast motion games. However with VSync on, your FPS can often fall by up to 50%. This can be resolved on many systems using Triple Buffering, but that may bring potential problems with it. So which choice is right for you?
I can't give you a one-size-fits-all answer, but I can provide some suggestions. To start with, I strongly recommend setting VSync to 'Application Preference' (or similar) in your graphics card's control panel. This is because ideally you should set your VSync preference on a game-by-game basis, preferably using the in-game settings, as the choice will differ depending on the type of game you are playing. Newer games with complex graphics for example will be different to older games which your system can run much more easily. Remember, in games where your FPS is consistently above your refresh rate, enabling VSync is perfectly fine and results in no drop in FPS.
In general, I recommend starting off with VSync disabled in any game as this is the most trouble-free method of gaining the fastest possible performance. This is the simplest solution, and on monitors which have a standard 60Hz refresh rate, or for games in which your framerate is not consistently above 60FPS, this appears to be the best solution. You may notice some tearing, but this will generally be minimal if your FPS remains well below your refresh rate. Remember though that whenever VSync is disabled the graphics card and monitor are not strictly in sync, and tearing (however minor) may occur at any time.
In any game if you find the presence of any tearing whatsoever to be annoying, you should enable VSync. To ensure maximum performance, you should then enable Triple Buffering to prevent FPS drops related to enabling VSync. This introduces the possibility of hitching on graphics cards with lower amounts of Video RAM, and possible control lag on some systems. See the Triple Buffering section for details.
Nvidia graphics card owners running the latest drivers can find an Adaptive Vertical Synchronization option under the 'Vertical Sync' setting in the Nvidia Control Panel. When Adaptive is chosen, VSync will only be enabled whenever your FPS exceeds your Refresh Rate. If your FPS falls below your refresh rate at any time, VSync is instantly disabled. This provides an excellent compromise between performance and removing most tearing. However it can still introduce some mouse lag.
Aside from tearing, VSync has no impact on image quality, and performance issues aside, enabling VSync of any kind can increase the potential for mouse and input lag. There is no clear choice for everyone when it comes to VSync, and this is why the option to enable or disable VSync exists both in the graphics card control panel and in games. As long as you understand what it does however, you can make an educated choice on a case by case basis combined with a little experimentation.
For Nvidia GPU users, make sure to refer to the Vertical Sync section at the bottom of this page of the Nvidia GeForce Tweak Guide for more details and advice.
Triple Buffering
In the Graphics Process section of this guide under Step 8, an overview is provided of the way in which the graphics card holds rendered frames in the Frame Buffer. There are actually two buffers on modern graphics cards, the Primary Buffer and the Secondary Buffer, also often called the Front Buffer and the Back Buffer. Both are storage areas on the Video RAM of the graphics card, and the process of using two buffers at one time is called Double Buffering. It was only relatively recently that graphics cards had enough VRAM to provide two buffers at all resolutions, since a single frame of high resolution detailed graphics can take up a great deal of video memory, much less two of them.
The graphics card uses the secondary buffer to compose a new frame while the primary buffer is sending an existing completed frame to the monitor. When these tasks are done, the buffers are essentially 'flipped' around so that the recently completed frame in the secondary buffer now becomes the primary buffer ready to send to the monitor, while a new frame begins composing in what was the primary buffer a moment ago. This is repeated over and over and thus the use of two buffers means that the graphics card is not constantly waiting for a single frame buffer to be cleared before getting on with rendering more frames to store there. It's like putting out a fire using two buckets of water instead of just one - one bucket can be filled with water while the contents of the other is being thrown on the fire, and then they're switched and the process repeated; much faster than just using a single bucket.
There is still a problem with double buffering, and that is when VSync is enabled, the graphics card can often fill both buffers and then have to stop working on any new frames until the monitor indicates it is ready for a new frame for its next refresh. Only then can the graphics card clear the primary buffer, switch buffers and begin rendering the next frame in the secondary buffer. This waiting is what causes a drop in FPS when VSync is enabled on many systems, and is covered in more detail in the Vertical Synchronization section of this guide.
Wouldn't it then make sense to have more than two buffers? Why not three buffers for example - that would give the graphics card more room to render frames without having to worry about where to store them before they're sent to the monitor, even if VSync is enabled. Well there is an option which does just that, called Triple Buffering. And it generally does precisely what the name implies, it creates a third buffer in the VRAM, which we can call the Tertiary buffer.
Enabling Triple Buffering
Some games come with an option to enable Triple Buffering, either from within the in-game settings menus or using advanced tweaks (see my relevant game tweak guide). However if the game you are using does not have any such option, then you can try forcing Triple Buffering on the game using the methods below.
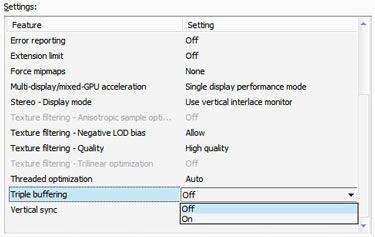
Enabling Triple Buffering for OpenGL-based games such as Doom 3, Quake 4, Prey or Enemy Territory: Quake Wars is very simple - go to your graphics card's control panel and enable it from there. However this won't work for enabling Triple Buffering in Direct3D-based games, which are the bulk of modern games. Instead, you will need to use a utility called Direct3D Overrider (D3DOverrider) which comes with free RivaTuner utility.
Once RivaTuner is installed, go to your \Program Files (x86)\RivaTuner...\Tools\ directory and you'll see the D3DOverrider directory. You can move this entire directory somewhere else, then uninstall RivaTuner if you don't want to keep it - Direct3D Overrider is a standalone utility which doesn't require RivaTuner. Launch the D3DOverrider.exe file and the utility will minimize to your System Tray/Notification Area. To view or alter its settings at any time, click on its icon. The default configuration in D3DOverrider is fine; that is, 'Application Detection Level' of Medium, 'Force Triple Buffering' On and 'Force VSync' On. If you want, you can set the 'Start with Windows' option to On as well, to ensure D3DOverrider is always active.
Now whenever you want to run a game with Triple Buffering, simply make sure D3DOverrider is loaded up in the background first before launching the game. As the game is launched you'll hear a small notification sound indicating that D3DOverrider is working. If VSync is enabled, then Triple Buffering will also be enabled and will work to counter the negative performance impacts of VSync.
Problems with Triple Buffering
It may seem odd that if Triple Buffering resolves the problem of low framerates when VSync is enabled, it doesn't appear as a standard option in many games, or is not enabled by default. There are three main concerns that appear to be the reason behind this:
1. If it is not properly supported by the game in question, it can cause visual glitches. Just as tearing is a visual glitch caused by information being transferred too fast in the buffers for the monitor to keep up, so too in theory, can triple buffering cause visual anomalies, due to game timing issues for example.
2. It uses additional Video RAM, and hence can result in problems for those with less VRAM onboard their graphics card. This is particularly true for people who also want to use very high resolutions with high quality textures and additional effects like Antialiasing and Anisotropic Filtering, since this takes up even more VRAM for each frame. Enabling Triple Buffering on a card without sufficient VRAM results in things like additional hitching (slight pauses) when new textures are being swapped into and out of VRAM as you move into new areas of a game. You may even get an overall performance drop due to the extra processing on the graphics card for the extra Tertiary buffer.
3. It can introduce control lag. This manifests itself as a noticeable lag between when you issue a command to your PC and the effects of it being shown on screen. This may be primarily due to the nature of VSync itself and/or some systems being low on Video RAM due to the extra memory overhead of Triple Buffering.
However it appears that most recent graphics cards and most new games will not experience major problems by enabling Triple Buffering. Given the fact that it can help to both remove tearing while also preventing the significant FPS drop encountered when VSync is enabled, it is at least worth trying for yourself to see the results on your system.
Antialiasing
One of the major problems of computer graphics is that any curved or angular lines exhibit a lot of jaggedness, almost like the steps on a set of stairs. These jagged lines can also shimmer slightly when animated, which makes the problem even more annoying. This jaggedness in 3D graphics is often referred to by gamers simply as 'jaggies', but the effect is formally known as Aliasing. The reason aliasing occurs is because the image on your screen is only a pixellated sample of the original 3D information your graphics card has calculated. At increasingly higher resolutions, as more pixels are used, that sample comes closer to the original source and hence the image is clearer and displays less aliasing. However aside from the fact that higher resolutions can degrade performance, many monitors simply cannot display the very high resolutions needed to effectively remove the problem.
This is where a technique originally called Full Scene Anti-Aliasing (FSAA), and now simply Antialiasing (AA), can be used by your graphics card to make the jagged lines in computer graphics appear smoother without having to increase your resolution. It essentially resamples and blends jagged lines with their surroundings, and can be applied to either 2D or 3D graphics. A screenshot comparison is shown below, demonstrating how AA can work to reduce the jaggedness of lines:

You can also view an animated game screenshot comparison of Antialiasing in action by clicking this link: Antialiasing.gif (763KB).
As always, the obvious question that comes to mind is if antialiasing solves jaggedness, then why don't games come with 'built-in' antialiasing already enabled? The reason is that antialiasing is a graphically intensive task which can use up great amounts of VRAM and GPU calculations depending on just how smooth you want the image to look, and this can dramatically reduce performance. That's why virtually every game, as well as your graphics card's control panel, give you a range of different types and levels of antialiasing you may wish to enable. Or indeed you may choose to disable it altogether for maximum performance.
Antialiasing Levels
The first choice you have to make if you want to enable AA is the sample rate, typically expressed as 2x, 4x, 8x etc. This tells your graphics hardware how many pixel samples to take around the area to antialias - the higher the number, the more pixel samples used to blend the jagged lines, and hence the smoother the image will appear at the cost of greater processing power and hence lower performance.
Importantly, since your resolution can also affect how many pixel samples are already being taken, and hence how smooth your graphics appear in general, you can experiment with altering both your resolution and AA level to see which provides the best combination of performance and image quality. For example 8x AA is typically sufficient at 1280x720, while you may only need 2x AA to achieve the same effect at 1920x1200, and your overall performance may be better as well. There is no hard and fast rule as to which performs or looks best, it depends on your particular hardware combination, monitor limitations and taste. Remember that on LCD monitors, when the display is not at its native resolution, a crude form of antialiasing with no performance impact is already in effect because your graphics card or monitor has to digitally rescale the image and in doing so has to recalculate and blend pixels - see the end of the Resolution section of this guide for more details.
Antialiasing Types
There are different methods of undertaking antialiasing, and although I can't cover them in full detail here, we can take a quick look at what they are and what they basically do.
The most common form of AA a few years ago was Supersampling which is a brute force method that pretty much just increases the resolution of the entire image within the graphics card to remove jaggedness, then rescales it back down to display at your chosen resolution. This method reduces performance a great deal, but works with almost any game.
Multisampling (MSAA) is a newer form of AA which came about through incorporating optimizations into graphics hardware to perform more efficient AA. It can still reduce performance, especially at higher resolutions, but less so on more recent graphics cards. MSAA provides a good compromise between image quality and performance.
Quincunx, Transparency, and Gamma Correct Antialiasing are variations of antialiasing methods used by Nvidia graphics cards and are covered on this page of my Nvidia Forceware Tweak Guide.
Temporal and Adaptive Antialiasing are variations of antialiasing methods used by ATI graphics cards and are covered on this page of my ATI Catalyst Tweak Guide.
From the GeForce 8 series onwards Nvidia introduced Coverage Sampling Anti-Aliasing (CSAA) which can produce better results than the standard Multisampling (MSAA) approach, at around the same performance as MSAA. Similarly, ATI introduced Custom Filter Anti-Aliasing (CFAA) as of the HD 2000 series which can also provide better results than standard MSAA depending on the filter used, but may blur the image slightly.
More recently as of the HD 6000 series, ATI has introduced Morphological Anti-Aliasing (MLAA) which uses post-processing to apply a form of full-scene anti-aliasing to any game, with performance similar to edge-detect CFAA but with better results. Nvidia has also introduced Fast Approximate Anti-aliasing (FXAA), which is similar to MLAA. In both cases, the main drawback is that they can introduce some blurring to the scene. A recent form of MLAA that does not have blurring, but performs quite well is known as Subpixel Morphological Anti-Aliasing, or SMAA.
Finally, the most recent development is the introduction of a form of Temporal Anti-Aliasing by Nvidia known as TXAA. TXAA provides a result that is similar to a blend of MSAA and FXAA; that is, a good reduction in jaggedness similar to MSAA, but with some blurring similar to FXAA. The key benefit of temporal AA is that it reduces the shimmering and crawling of aliased edges while a scene is in motion.
For an example of the visual and performance impact of the various basic levels of AA in a recent game, see this Crysis 3 Antialiasing page.
The key point is that on modern graphics cards, antialiasing can be achieved at a reasonable performance cost because they have been designed to incorporate these techniques into their hardware. The older the graphics card, and/or the less VRAM it has, the more likely that it will suffer a larger performance loss from enabling AA. In the end whether you enable any antialiasing is up to you, and the particular mode you use should be the result of some experimentation on your part to see what looks best in your particular circumstances.
Anisotropic Filtering
In the Antialiasing setting, we saw that AA is a useful method for reducing the jaggedness of lines in graphics, and in particular in games. However AA will not resolve another graphical glitch common in 3D graphics - namely blurry surfaces on more distant objects. Textures are 2D images which have been placed onto the surface of 3D objects in a game to make them look realistic. They can appear at all sorts of angles and distances, depending of course on which part of the game world they've been applied to. A brick patterned texture may be applied to the walls of various buildings for example. A concrete or asphalt texture may be applied to the ground. And so on, until all 3D objects are covered in these wallpaper-like textures.
Depending on your texture detail settings in a game, these textured surfaces should appear crisp and relatively detailed close up. However unfortunately as they recede into the distance away from the viewer, they start to show a strange blurriness, sometimes with clear gradations between levels of blur. Without getting overly technical, the problem is essentially that there just aren't enough samples of the original texture image being shown on screen, leading to distortion, loss of detail and general blurriness.
This is where a technique called Texture Filtering can help to raise the level of detail of distant textures by using increasing numbers of texture samples to construct the relevant pixels on the screen. To start with there are two basic forms of texture filtering called Bilinear Filtering and Trilinear Filtering. These texture filtering methods are 'isotropic' methods, meaning they use a filtering pattern which is square and works the same in all directions. However as we've seen the common problem with texture blurriness in games occurs on textures which are receding into the distance, which means they require a non-square (typically rectangular or trapezoidal) filtering pattern. Such a pattern is referred to as an 'an-isotropic' filtering method, which logically leads us to the setting called Anisotropic Filtering (AF). A screenshot comparison is shown below, demonstrating the way AF improves distant textures:
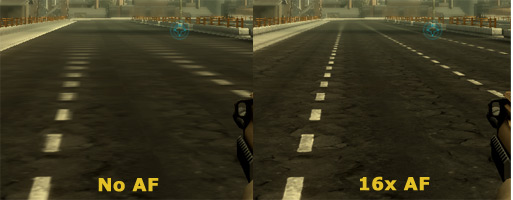
You can also view an animated game screenshot comparison of Anisotropic Filtering by clicking this link: Anisotropic.gif (868KB).
You may wonder why on earth game developers don't just build texture filtering into their games so that it automatically fixes up the blurry textures. The answer as you would expect by now is that advanced texture filtering can be graphically intensive and the higher the texture samples, the better the image quality but the lower the performance especially on older graphics cards. And so, just like Antialiasing, virtually every game, as well as your graphics card's control panel, give you a range of different types and levels of texture filtering you can enable or disable.
Anisotropic Levels
You can select from a variety of texture sample rates that range from 1x to 16x depending on your particular graphics hardware. The higher the sample rate the crisper distant textures will appear at the cost of lower performance. The performance impact will differ, however more recent graphics cards now use highly optimized methods of selective AF, and can do even 8x or 16x AF with minimal impact on FPS, even at high resolutions.
Anisotropic Types
For the most part there are only two modes usually available for AF - Performance and Quality. The image quality difference between the two is not significant, so Performance mode is fine for most people. Performance mode uses bilinear filtering as its basis, while Quality mode uses trilinear filtering as the basis, but in both cases anisotropic filtering is obviously applied on top, giving a combined effect which is more detailed than just using bilinear or trilinear by itself. Remember that isotropic filtering patterns don't help much for textures receding into the distance, which is why anisotropic filtering is always necessary to truly reduce such forms of blurriness.
Texture filtering, like Antialiasing, is also affected by screen resolution. Since a higher resolution provides more pixels to sample, even without texture filtering, it generally makes textures look crisper. Regardless of the resolution, some games may still exhibit noticeable texture degradation as the textures recede into the distance, so some level of AF can always help improve image quality. Or if distant blurry textures aren't a major issue for you, you can disable AF altogether to maintain the highest FPS.
That finishes our look at various graphics and display settings. The next page brings the guide to a conclusion and has a range of resources for you to read if you're interested in finding out more about these settings.
Conclusion
Well that brings the guide to a close, with a huge sigh of relief from me! I'm very surprised at how long it took me to compile this guide, as I initially thought it would be relatively short and quick. Once I got into actually researching and writing it, and trying to explain everything in relatively plain English, I started to realise just how big a task it was going to be. Even though there are no eye-opening revelations in the guide for many people, I can tell you from searching through and reading literally hundreds of pages on various sites and forums that there is not a single place where all of the above is explained clearly and simply, or sometimes even accurately.
In any case I genuinely hope you found this guide useful and informative. I believe that the key to improving performance and stability in PC gaming comes from actually understanding what is going on in your PC, which is the aim of this guide. Of course I am ready as always to expand and enhance the guide based on feedback from the more knowledgeable among you. Please Email Me with relevant constructive feedback, but please keep in mind I can't offer any personal tech support nor any tweaking or tech advice outside of my guides. I also can't customize the guide to provide any specific game or graphics tips - this is what my individual game tweak guides are for. Finally, for anyone truly interested in finding out more about computer graphics, please refer to the links throughout the guide and especially the Further Reading section below.
Further Reading
This guide was borne out of a lot of reading and research. I tried to use a wide range of sources to both clarify and inform my thinking on the topics in this guide. You will note that I link to Wikipedia almost exclusively throughout this guide. This is not the major source of information for researching the guide - the reason I use Wikipedia for these links is that it is a very convenient, reasonably accurate (for non-controversial tech information) and most importantly stable source to link to for pointing out the basics on the various topics here.
The major sites and resources I actually used to compile this guide, and which are definitely worth checking out, include:
Matrox Graphics Guide
NEC Monitor Technology Guide
Nvidia 3D Glossary
HowStuffWorks
ExtremeTech
HardwareSecrets
PCTechGuide
A special thanks to Andreas Gustafsson for providing a beta copy of his FPS Compare utility, and for his work in creating these neat utilities.
As I say at the end of all my guides, until next time, take care!


 Divinity: Original Sin – Getting Started
 A Novel Idea
 Costume Quest 2 Side Quest Guide
 Dishonored Guide: Gamers Heroes Walkthrough Guide Collection For Dishonored
 How to use Nexus Mod Manager to download,install,remove and manage mods for Skyrim,Oblivion,Fallout New Vegas,Fallout 3