Just like Far Cry, FEAR is one of those games that's taken everyone by surprise. When the FEAR Demo came out a few months back, I didn't even think about downloading it. It looked like another generic FPS-on-rails which would quickly slot in somewhere between Soldier of Fortune 2 and Doom 3 on the originality meter. But after a few email requests from readers I decided to download the game and give it a try - and boy, I'm glad I did!
Just like Far Cry, there are two things which make FEAR stand out from the crowd - a gimmicky but genuinely fun twist, and amazing graphics. In Far Cry, the gimmick was the tropical location, something which hadn't been used in any major FPS I'd seen up to that point. In FEAR, the gimmick is SlowMo mode - hardly new (bullet time in Max Payne comes to mind), but it is well executed.
As for the graphics, physics and general atmosphere of the game...well they're pretty much perfect. FEAR doesn't fall into the trap of being a Doom 3 clone with lots of pitch black corridors and rushing monsters. The attention to detail in the environments is left nicely visible, and the special effects really blow you away at times. Even though I'm not a big fan of the supernatural FPS genre, I like FEAR. Bottom line is that this game is the real deal, and well worth purchasing.

Now in the interests of not sugar-coating my introductions as much as I used to, let me quickly cover some of the drawbacks and problems with FEAR. Firstly, the game engine is a real PC-slayer. It takes a great deal of work for FEAR to run smoothly on most machines. You really do need to pay attention to what the various settings do, and try some of the suggestions in this guide to make sure you get good performance, otherwise your FEAR will turn into loathing (and not just in Las Vegas).
Secondly, and perhaps my biggest gripe, is the way in which the game's publishers, Vivendi Universal Games, have decided to use the secuROM copy protection system for the game. They've done this knowing full well how problematic secuROM is, and indeed many legitimate purchasers of the game (including me) are now having problems launching the game because of authentication errors on our original CDs/DVDs. Not to mention the debacle in which FEAR was rushed to market only to have its first official patch made available on the same day as the game's release. Not that the first patch has resolved all problems either - most notably audio-based problems.
Regular TweakGuides readers would know that I had a real go at VU Games for this shoddy state of affairs, with both the game's purchasers, and the game's developers given the shaft just to rush this game into the stores. It's a genuine shame that such a beautiful gem of a game is left in the clumsy hands of companies like VU Games.
But enough of my griping, you came here for the guide, and on the following few pages you'll find that I cover most everything you can do to make this game run better on your machine.
Note: This guide refers to the latest version of FEAR, Version 1.08 as well as FEAR Combat and FEAR Extraction Point. Make sure to check back regularly for updates.
Before getting into any game-specific settings and tweaks, this section covers the obligatory system optimization information I include in all my guides. If you've followed this advice recently, you can skip this section.
Many people report problems with this game and in almost all cases these are due to general system issues and not the game itself. With that in mind I strongly urge you to take some time and follow the advice below if you truly want this game, and indeed every other game you own, to run at its fastest and most trouble-free.
The place to start is my free TweakGuides Tweaking Companion. It is the complete system optimization guide for Windows users. Designed for novice and advanced users alike, it is written in plain English to help you genuinely understand all aspects of Windows and your PC. The guide covers every major topic, from the correct installation of Windows and critical drivers and software, through to recommendations for every significant setting and feature, all the major performance and convenience tweaks and customizations, as well as detailed troubleshooting advice. There are also links to a range of reliable free applications for optimizing and maintaining your system, as well as to important resources for finding out even more about Windows and your PC. There are two separate versions: one for Vista and one for XP.
If you've ever wondered what common graphics and display settings like FPS, VSync, Refresh Rate, Antialiasing and Anisotropic Filtering are, and how they really work, then check out my Gamer's Graphics & Display Settings Guide for all the details in an easy to understand format. The guide also gives you a rundown on exactly how a game goes from a being a set of files on your hard drive to a 3D image on your screen, including relevant performance tips.
Finally, if you run an ATI or Nvidia graphics card, I have written two comprehensive guides which you should check out: the ATI Catalyst Tweak Guide and the Nvidia Forceware Tweak Guide. These guides cover absolutely everything about the latest graphics drivers, how to set them up correctly, as well as advanced tweaking, overclocking and benchmarking tips. They're a must-read for configuring your graphics card correctly.
The above information really will serve you well in the long run, not just in this game. If you don't optimize your system and keep everything updated and maintained correctly you will keep running into "mysterious" problems time and time again. Do yourself a favor and when you get a chance spend an afternoon or two optimizing your machine the right way with the guides above.
The next section goes into more detail about specific troubleshooting tips which address common performance issues with the game.

This section contains specific troubleshooting tips which address many of the common problems experienced by FEAR players. I can't stress enough the importance of taking the time to go through the checklist of advice below if you're having a problem with the game.
Official Support: The first place to look for official support details is in the Readme.txt file in your \Program Files\Sierra\FEAR directory. Importantly you should check out the minimum system requirements in that file, as well as the supported hardware list, since if any of your hardware is not supported then you will experience problems with the game, or quite simply won't be able to run it. Read through the list of compatibility issues and suggested fixes as well. If you're still having problems you should definitely pay the Official FEAR Forums a visit. There you can find such useful things as a range of official fixes for common problems, and you can also post any questions or feedback you have there as well. Also read this Official FEAR FAQ.
Windows Vista Users: If you're having problems running this game under Windows Vista, first make sure that you're using the latest Vista graphics and audio drivers for your hardware, and the latest version of this game (see page 4 for patch details). Next, make sure you don't change your UAC settings after the game has been installed, as due to Virtualization this can change the location of the game files and settings. If you can't launch the game successfully when UAC is enabled, you will need to run the game with full Admin privileges. To do this either right-click on the launch icon and select 'Run as Administrator', or right-click on the launch icon, select Properties and under the Compatibility tab tick 'Run this program as an administrator' then click OK. I strongly recommend that you refer to the TweakGuides Tweaking Companion for Windows Vista for more information - in particular check the 'Gaming in Vista' section of the Graphics & Interface chapter; the UAC section of the PC Security chapter; and the 'Personal Folders' and 'Directory Junctions & Symbolic Links' sections of the Windows Explorer chapter. These will tell you how you can fix game-related issues and also explain the relevant differences of Vista.
SecuROM Issues: The secuROM copy protection system is a method used while creating the game CD/DVD to embed a form of security encryption onto the disc. This is done not so much to prevent copying/cracking by hardcore pirating groups - they defeat it just fine. It's more to prevent casual copying, like making a burnt copy for your friend. Unfortunately secuROM also causes a wide range of annoying problems, from problems authenticating the disc through to irregular crashes and lock-ups. The first thing you should do is go through the list of fixes in this thread on the official FEAR forums. Note in particular the solutions near the bottom of that first post. Also disable or even uninstall all disc emulation/image mounting software - these typically conflict with secuROM. If you're not using any emulation software and you get the 'Required Security Module' error, try this fix. The bottom line is that you may not overcome your problems with secuROM; it is a terrible copy protection method which punishes legitimate users of games.
Sound Issues: FEAR seems to have some issues with sound. These can cause a range of symptoms, from missing sounds, to popping/hissing, to stuttering performance. You must read the Readme.txt file for some of the basic solutions which actually can fix your problems, then if that doesn't work check this thread on the Official FEAR Forums as well as this official FEAR Knowledgebase Article. Check the In-Game Settings section of this guide as well as the FEAR Config Tool section for more details of how to troubleshoot audio problems.
The Latest Graphic Drivers: Since FEAR is so dependent on your graphics card, make absolutely certain you have updated to the latest graphics card drivers. This means the ATI Catalyst 6.9 or newer; or the Nvidia Forceware 91.47 or newer. See page 4 of my ATI Catalyst Tweak Guide or Nvidia Forceware Tweak Guide for details on where to download the latest drivers and how to install them cleanly. If you use an ATI Graphics card, also check the Conclusion of this guide under the 'ATI Performance Boost' section for more details.
In-Game Lag/Freezes/Stuttering: A number of people are complaining about "stuttering" performance in FEAR. There are several possible causes for this problem, and the suggested solutions are covered in this thread on the Official FEAR Forums. One thing not mentioned in that list is the possibility that secuROM is causing the problems, but the only possible fixes for that are mentioned further above. And of course, make absolutely sure that you have run the Windows Defragmenter after installing FEAR, as the game is almost 5GB in size and if its files are fragmented this can greatly increase your stuttering and in-game loading pauses.
Antialiasing and Anisotropic Filtering: To make sure Antialiasing and Anisotropic Filtering work properly in the game, first go to your graphics card's control panel, and for Nvidia cards under the Performance & Quality Settings in the Global Driver Settings section select 'Application Controlled' for Antialiasing and Anisotropic Filtering. For ATI cards go to the 3D section of the Control Panel/Control Center and select 'Application Preference' for Antialiasing and Anisotropic Filtering. Now you can go into FEAR and set the level of Antialiasing (FSAA) and Anisotropic Filtering (Texture Filtering) you wish to use in the Performance>Advanced Video Card Options section. If you are unfamiliar with what Antialiasing or Anisotropic Filtering do, see my Gamer's Graphics & Display Settings Guide. Keep in mind that any Antialiasing can noticeably reduce performance.
Virus Scan: Do a full scan of all your files using the following excellent (and free) tools: AVG Virus Cleaner for viruses, A-Squared for trojans, and Ad-Aware SE for spyware/adware. Viruses, trojans and spyware can cause unexplained behavior, general file corruption and system slowdown, and can also steal your CD Key. It's best to make sure your system isn't infected before moving on to any other optimization measures. However make sure to disable any background scanning programs once you're done (See below).
Background Programs: The game's developers recommend that you disable all background applications - especially virus, trojan and spyware scanners and messaging utilities. These applications can and do use up valuable CPU resources, take up precious RAM, cause memory conflicts and crashes to desktop, but most importantly they interfere with read/writes to your hard drive effectively slowing it down and causing even more in-game freezes and stuttering. Full instructions on how to identify your startup programs and services and how to correctly disable unnecessary ones are in my TweakGuides Tweaking Companion. This is an important step you should not miss.
Overclocking: FEAR is sensitive to overclocking. If you've overclocked any components on your system and are having problems such as crashes, reboots and graphical anomalies, the first thing to do is set everything back to default speeds and try running the game. If you don't experience the same problems at default speed, or they're reduced in severity, then your overclock is the primary culprit. Either permanently reduce your overclock and/or increase cooling to regain stability. Don't assume that because other games run with stability at a particular speed that FEAR will do the same.
There are a range of problems similar to the ones above which people are experiencing with FEAR. However if you follow the advice in this guide, you should be able to play the game more smoothly. Just be realistic about balancing eye candy with performance. Aside from secuROM issues and a range of compatibility issues which are known and noted above and in the game's Readme.txt file, you need to focus on tightening up your system as much as possible. Read the guides I link to under Essential Optimization above for more details on how to do that.
That's just a basic rundown of troubleshooting tips. Read the remainder of this guide for more specific settings and tweaks which can help improve your performance and resolve any problems.
Official Patch
In what is fast becoming a disturbing trend for modern games, FEAR had its first patch (Version 1.01) released online on the very same day the game was officially released in stores. So every retail box of FEAR on every store was out-of-date, right from the day it was released - simply because the game's publishers couldn't wait a few more weeks before releasing a finished product. Worse still, since the first patch was being developed at the same time as the game was being manufactured, it didn't incorporate any fixes based on initial user feedback.
Since then several more patches have been released, with the most recent patch for FEAR bringing it up to Version 1.08. The full version patch contains all the previous patch fixes, but weighs in at 588MB. There is an incremental version of this patch for those who already have the 1.07 patch installed and is only 44MB. The latest patch contains several multiplayer gameplay-related changes, as well as adding widescreen support to the game. Note that as of the 1.07 patch, the game executable has been split into FEAR.exe for the single player component, and FEARMP.exe which launches the multiplayer component, and that the FEAR MP component no longer has a disk check component (see NoCD section below). Note further that as of the 1.03 patch, support was added for PunkBuster anti-cheat software.
A lot of users reporting problems with FEAR patches, mainly because of the SecuROM copy protection system used for FEAR (see further below). If you don't play FEAR Multiplayer or don't actively install many FEAR mods, I recommend sticking with the original Version 1.01 patch as there are no real performance gains or fixes for single player from any of the newer patches. If you still have problems after installing the patch, please see the Troubleshooting Tips section of this guide for things you can try.
No-CD Patch/Disk Image
While I have ranted against secuROM and the many annoyances and problems it has caused FEAR users, for legal reasons I can't give you any details of where to find or how to install a No-CD patch or Fixed Image to circumvent the copy protection system. This is purely for legal reasons and not for moral reasons. Morally I would suggest that game companies are really pushing their luck by continuing to hammer legitimate users with idiotic copy protection systems which pirates already strip away from their games. Anyway the bottom line is please don't write to me asking me how to circumvent secuROM, as I just can't provide that information.
Update: As of FEAR 1.07, the Multiplayer component of the game no longer has a disk check if Multiplayer is launched directly from the desktop. That is, any shortcut which uses the FEARMP.exe file as a target will launch FEAR Multiplayer without the need for having the game CD in the drive.
Mods
FEAR is based on the JupiterEx game engine, and as such it is modifiable. To modify FEAR, you will need to download the FEAR SDK (Software Developer's Kit) which is 598MB. For more details of the SDK, and for help using it, see the FEAR Modding & Fan Content sub-forum on the Official FEAR Forums. If you want to download a mod, this FEAR Mod Database lists some good mods, as well as this Mod Compilation on the Official FEAR Forums. Let me know of your favorite FEAR mods and I'll post more details here as I sort out the most popular/useful ones.
If you want to look into the FEAR data archives - the .arch00 files in the base \Sierra\FEAR\ directory, you can use the Arche Noah FEAR archiving tool. This allows you to extract and view (and modify) the FEAR game files, however this is obviously done at your own risk. Remember, modified files can be flagged by PunkBuster as cheats in multiplayer.
Official Expansion Pack
FEAR will receive an official expansion pack called FEAR Extraction Point due out in late October 2006. This expansion pack is not free, and will take up the story from where FEAR ended. You can download a Demo of the expansion pack to try for yourself.
Importantly, the information in this guide applies equally to FEAR Extraction Point, however note that the FEAR Extraction Point settings.cfg file for advanced tweaking is actually found under the \Documents and Settings\All Users\[Shared] Documents\TimeGate Studios\FEARXP-SPDemo\ directory - see the Advanced Tweaking section for more details.
The next page looks at the In-Game Settings for FEAR and how they work.
This section contains descriptions of all of FEAR's in-game settings, which can be accessed by clicking the Options item in the main game menu screen. Each of the main options sub-sections are covered below, and the performance and visual impacts noted. However the precise performance impact of each setting depends on your particular system hardware. For some good articles which do benchmark the actual difference between these settings on various hardware, see the: Gamespot FEAR Performance, AnandTech FEAR Performance, FiringSquad FEAR Performance and Bit-Tech FEAR articles.
There are screenshot comparisons provided below for some of the settings for which differences are harder to detect.
Display
Resolution: Resolution has a significant impact on FEAR's performance. FEAR is limited to 4:3 aspect ratio resolutions such as 1600x1200, 1280x960, 1024x768, 800x600 or 640x480 if selected here. Note that the actual resolutions available to you depend on your video card and monitor capabilities. The lack of popular resolutions like 1280x1024 is because the developers only officially support proper 4:3 aspect ratio resolutions and further they have also stated that users should avoid any resolution above 1024x768 as it is too strenuous for most current systems. This is not true - I can confirm that the latest 7800GTX and X1800XT cards can indeed perform extremely well at resolutions above 1024x768. Fortunately you can set a custom resolution like 1280x1024 by editing the .cfg files - see Settings.cfg under the Advanced Tweaking section of this guide.
Update: Note that as of the 1.08 Patch, widescreen support has been added to the game (See page 4 for details).
VSync: Vertical Synchronization (VSync) is the synchronization of your monitor and graphics card's abilities to draw a certain number of frames per second (or FPS) on the screen. This is referred to as the Refresh Rate, and is measured in frequency per second (Hz). Different monitors can achieve different refresh rates at various resolutions. For example a monitor which can provide 85Hz refresh rate at 1280x1024 means the screen is redrawing itself 85 times per second at this resolution. If Vertical Sync is enabled, your maximum FPS cannot exceed your monitor's refresh rate at your chosen resolution, and more importantly your overall FPS will be reduced. For this reason it is strongly recommended that you set VSync to off. The only down side is that if VSync is disabled, you may notice some image 'tearing'. This causes no damage to your monitor, but if really annoys you enable VSync. For more details see my Gamer's Graphics & Display Settings Guide.
Force Restart: This option was added from a recent FEAR patch. When set to On, it clears and restarts the graphics rendering engine in between level/map loads. This can increase loading times, but in return there is less chance of graphical glitches and greater likelihood of smoother and improved performance. It is recommended that most people enable this option to begin with, and only disable it if you experience problems or can't stand the increase in load times.
Gamma: Gamma is the overall brightness of the screen. Since FEAR is a relatively dark game, it is important that you don't have too low or too high a gamma, otherwise your image quality will suffer. This setting has no impact on performance, so use the small black box with text inside it below this setting to adjust your gamma correctly. The 'clearly visible' text should, as the name suggests be clearly visible. The 'slightly visible' text should be just legible, while the 'barely visible' text at the very top should be almost totally invisible.
Sound
Sound Effects, Speech, Music: These sliders determine the volume of the various audio elements of the game. Adjust to suit your taste. If you want to completely disable sound or music to improve performance, see under FEAR Config Tool in the Advanced Tweaking section. That is, setting a slider to the far left here does not remove that element from memory and hence there is no performance difference at the various slider levels.
Enable HW Mixing: If set to On, FEAR will use your sound hardware. This provides better performance and audio quality, however depending on whether your sound card is compatible with FEAR (See Readme.txt file), you may experience audio glitches with Hardware support enabled. Generally speaking most Audigy sound card owners should enable HW Mixing, those with onboard sound should disable it.
Enable EAX 2.0: If you own a sound card which supports EAX (Environmental Audio), you can enable this option for a reduction in performance but an increase in audio quality. Once again this can lead to hardware glitches, but before disabling EAX first make sure to go into your sound card's EAX Control Panel and click the 'All Effects Off' button, or untick the 'Enable Audio Effects' option. Also untick 'Enable CMSS 3D' under 'CMSS 3D Effects' if necessary, as this can cause 3D sound effects to come from the wrong locations in FEAR.
Enable EAX Advanced HD: Selecting On for this option enables Advanced HD on Creative sound cards, mainly the Audigy and X-Fi series. This provides even better audio quality and 3D positioning of sounds with a slight performance drop, but firstly make sure you've downloaded the latest sound drivers for your card. Once again if you have any audio glitches disable Advanced HD first, then also disable EAX if the trouble continues.
If you continue to have audio problems in FEAR, disable all three of the above options, and refer to the Troubleshooting Tips section of this guide for more resources which can help you out. The sound in FEAR seems to be problematic for many people
Performance
You can allow FEAR to automatically detect optimal settings here by clicking the 'Auto Detect' option, however it is strongly recommended that you take the time to manually adjust each of the settings below as they have a significant impact on the game's performance. Understanding them and being able to fine tune them will result in both better visuals and better performance than any auto detection method. Make sure that if you're going to use a custom resolution, that you set it first before changing these settings (See Advanced Tweaking section), so you can really judge your final performance at your desired resolution.
There are two main sub-sections here, the first relates to settings which are more CPU-dependant, while the second is for settings which rely almost solely on your graphics card's capabilities. Once you've adjusted these settings as described below, the best way to test the impact of your changes is to click the 'Test Settings' option and watch as FEAR runs through a preset demo sequence. Look out for graphical changes throughout the sequence, and at the end note your performance - pay particular attention to the minimum FPS result. If it's below around 25FPS, and if the '% below 25 FPS' is quite high, then you will get a lot of slowdowns and lagginess in the game. Keep changing settings until the bulk of your FPS lies above 25FPS for smoother gameplay.
Note that the Test Settings timedemo doesn't include any Artificial Intelligence (AI) calculations, since it's a scripted sequence. The performance figures from this test are indicative only, and in the game itself your performance may dip much lower in heavy combat scenes and/or when using SlowMo mode.
Advanced Computer Options
Single Player Physics: This setting determines the level of detail given to advanced Havok physics effects in the game, and the frequency with which the physics engine updates object states. While the game physics can't be turned off completely, lower settings here will improve performance especially for those with slower CPUs. However lower settings also disable some of the interactivity with various objects in the game, like being able to push over bookshelves etc.
Multiplayer Physics: Similar to the setting above, however this allows you to alter the more limited physics settings for multiplayer. Lowering this can help improve performance when online, but remember that everyone is still seeing the same basic information on their screen.
Max Hardware Sounds: This setting determines how many channels of sound are used when HW Mixing is enabled. The higher the setting the more channels used, which improves sound positioning from multiple sources, but reduces performance. Minimum is 32 channels, Medium is 64, and Maximum is 96.
Particle Bouncing: This setting determines the level of special particle effects, such as embers or sparks flying around after an explosion or from fault electrical equipment. The higher the setting, the richer these effects but the lower your performance.
Shell Casings: If set to On, shell casings from expended bullets are ejected from all weapons. This adds to realism but reduces performance slightly particularly in heavy combat scenes.
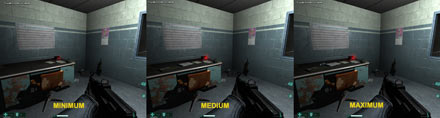
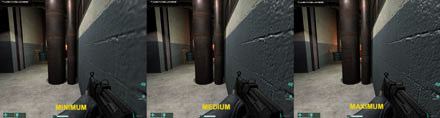
World Detail: Determines the level of detail and number of objects displayed in the game. The higher the level, the more realistic objects will be and the more objects will be displayed - but the slower your performance. Click the screenshot comparison above to see the difference between the three levels of this setting. Note some of the non-important items on the desk disappear. Only the stapler disappears when going from Maximum to Medium. At Minimum however the ledger and stapler are both gone. In other scenes you may notice details like the frosting on glass is removed, etc.
Corpse Detail: Determines the level of detail of corpses and how quickly they are removed. Obviously in situations where there are multiple corpses, such as heavy combat scenes, reducing this setting will noticeably improve performance.
Advanced Video Card Options
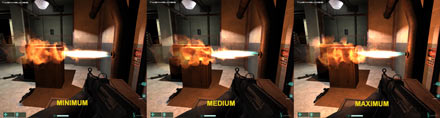
Effects Details: Determines the level of detail for a range of special effects. Lower levels reduce such visual effects in return for performance improvements. As the screenshot comparison above shows, the main change occurs between Maximum and Medium. In the shot above, the heat haze effect around the fire is only visible at the Maximum setting - it disappears at Medium or below.
Model Decals: Determines the number of decals (marks) made on characters in the game, for example when they are shot. Lower levels decrease realism in return for performance increases especially during heavy combat scenes.
Water Resolution: Controls the level of detail given to water in the game. Higher levels improve the realistic appearance of water at the cost of some performance in such areas. However in my comparisons of the three levels, I didn't notice much if any difference in the visual quality of water.
Reflections and Displays: Controls the number and quality of displays in the game, as well as reflective surfaces such as water. Lowering this setting removes some of the less significant displays as well as reducing image quality on the displays and removing reflections, but provides greater performance in such areas.
Volumetric Lights: If enabled this setting allows volumetric light effects - namely effects which light up the air in an area, such as a diffused glow around a character or object. While very realistic, these effects can reduce performance significantly in such areas on older graphics cards.
Volumetric Light Density: If Volumetric Lights are enabled, this setting controls the level of richness or density these effects have. The lower the setting, the less rich the glow and volume of such effects which can be a good compromise between performance and image quality, rather than turning off volumetric lights altogether.
FSAA: FSAA stands for Full Screen Antialiasing, a method of smoothing jagged lines on the screen. The higher the sample rate (i.e. 2x or 4x) the smoother jagged lines will appear in the game. You can read more about FSAA and see examples in my Gamer's Graphics & Display Settings Guide. In FEAR, the developers recommend the use of lower resolutions combined with some FSAA if you want to achieve better image quality, as opposed to higher resolutions with lower or no FSAA. However if you have an older video card or want more performance simply disable FSAA altogether as it can affect performance dramatically.
The next page continues the descriptions of the In-Game Settings.
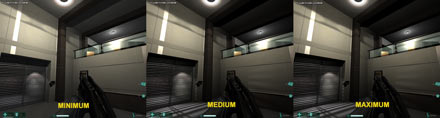
Light Detail: Controls the level of detail as well as the actual number of lights in the game. The higher the setting, the more detailed and more numerous light sources will be at the cost of performance. In the screenshot comparison above, if you look closely you will see that there is a noticeable difference between Minimum and Medium - the number of lights (and hence shadows cast) is less at Minimum - in particular the light behind the grills to the left only appears at Medium. The difference between Medium and Maximum is not noticeable.
Enable Shadows: If set to On, characters and objects will cast shadows. This greatly improves realism, however it also noticeably reduces performance - particularly depending on your Shadow Detail level and the number of light sources visible in certain areas.

Shadow Detail: Determines the types of objects which cast shadows (if Enable Shadows is on). The higher the detail level, the more objects will cast detailed shadows at the cost of a noticeable drop in performance in areas with multiple light sources and/or with your flashlight on. Click on the screenshot comparison above to look at the details. Going from Maximum to Medium there is no noticeable difference. However from Medium to Minimum, the character's gun barrel shadow is removed (as is the character's shadow itself), the red health box and the bucket to the back also lose their shadows.
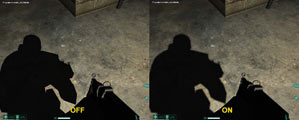
Soft Shadows: If enabled, Soft Shadows adds a bit of a haze to the edge of cast shadows to create a more realistic shadow appearance. The comparison is shown in the screenshots above. Unfortunately this method also brings with it a massive performance hit (at times halving FPS), and it is strongly recommended that all users disable Soft Shadows for optimal performance with little to no noticeable image quality loss. Note that enabling Soft Shadows along with FSAA is not recommended, and can result in graphical glitches. Further note that on ATI graphics cards enabling Soft Shadows along with Pixel Doubling (see below) results in a black screen - this is a known driver bug.
Texture Filtering: This setting determines the appearance of textures in FEAR - textures are the images covering every 3D object in the game. The higher the texture filtering method (i.e. Trilinear, 2x Anisotropic Filtering, 4x AF etc.) the sharper textures will appear as they fade into the distance at the cost of some performance. You can read more about texture filtering methods in my Gamer's Graphics & Display Settings Guide. It is recommended that if you wish to use texture filtering in FEAR, that you set your Anisotropic Filtering setting in your graphics card's control panel to 'Application Preference' and use the setting here.
Texture Resolution: This setting determines the resolution of the 2D images used for textures. The higher the resolution, the better textures will look, but the more video memory they will use. For those with lower amounts of Video RAM (e.g. 128MB or less), I recommend lowering this setting to Medium or below, otherwise you will experience consistently more in-game pauses and longer loading times. This setting can have a dramatic impact on smooth gameplay on lower-end systems, so don't select Maximum unless you have a high-end graphics card at the very least. Click on the screenshot comparisons above and note that from Minimum to Maximum the level of texture detail on the wall in particular becomes clearer and appears more 3-dimensional. This effect is much more apparent while moving around in the game, and the difference is most noticeable between Minimum and Medium.
Videos: Determines the number and resolution of in-game videos used.
Pixel Doubling: Contrary to what this setting sounds like, it doesn't double the resolution of the screen - in fact it halves it. Essentially this takes a single pixel (the smallest element on a screen) and expands it to fill twice the space. This means that at 640x480 the resolution is actually performing the same as if it was running at 320x240, but it expands to fill the 640x480 area of the screen. The result is better performance, but obviously much poorer image quality than the original resolution - the graphics start to look very blocky. Unless you really need the performance boost, leave this option set to Off.
DX8 Shaders: On graphics cards which support DirectX9.0, setting DX8 Shaders to On improves performance by forcing the use of DirectX8.0 shaders rather than the better-looking DX9.0 shaders. The performance improvement is particularly noticeable on older/slower DX9.0 graphics cards. In general the image quality loss is not significant, so if you're struggling for performance set this option to On, but if you want the absolute best graphics quality leave it Off.
Screen Resolution: Same as the Resolution setting under the Display options, however there is one major difference - this displays the current resolution, including unsupported resolutions. This is a good way of checking to see if a resolution you've set in the Settings.cfg file has been successfully implemented (See Advanced Tweaking for full instructions). However if you have set a custom resolution, don't click on this setting as it will force your resolution back to one of the standard resolutions.
Shaders: This setting determines the level of detail for shader effects. Just as with the DX8 Shaders setting above, the higher the level of shader detail, the slower the performance for older/slower graphics cards, but the better the quality of special effects in the game. Shader differences are not necessarily very noticeable, but can be seen in effects like heat hazes, water reflections, lighting etc.
Controls
This section is fairly straightforward - make sure you assign keys/buttons to all the important game functions. Of note, the Invert Mouse option if set to On means that pushing your mouse forward will tilt your character's view down, pulling it back tilts the view up; the Mouse Smoothing option attempts to smooth out jerkiness in mouse movements, and is best reduced as it can cause mouse lag at higher levels.
Game
These options should be set to taste as they have no performance impact with the exception of the SlowMo Effects setting below. Of note, you may want to reduce Head Bob to improve aim; and you can adjust the Difficulty setting at any time in the game if you're having a hard time getting through a particular section for example.
SlowMo Effects: When Slow Motion mode is enabled in the game, you get various blurring, bullet travel/impact shader effects. Disabling these by setting this option to Off can reduce the 'realism' of SlowMo, but noticeably improves any lag during Slow Motion mode for those with older/slower graphics cards.
Weapons
None of the settings in this section impact on performance so set to taste.
The next section covers the various known advanced tips and tweaks you can undertake to improve FEAR's performance and customize the game further.
Config Files
FEAR has three major .cfg (config) files. These are the Default.archcfg and autoexec.cfg files under the \Program Files\Sierra\FEAR directory, and the most important one of all for our purposes: the Settings.cfg file under the \Documents and Settings\All Users\[Shared] Documents\Monolith Productions\FEAR directory. You can edit these files using a text editor like Windows Notepad, however back them up before making any changes just to be safe. The major settings under each file are described below:
Update: The FEAR Extraction Point demo uses the same settings.cfg file structure, however it stores this file under the \Documents and Settings\All Users\[Shared] Documents\TimeGate Studios\FEARXP-SPDemo\ directory instead.
Settings.cfg
"ScreenWidth" "1280"
"ScreenHeight" "1024"
FEAR does not support certain resolutions from within the game. Fortunately you can assign a custom resolution by editing these lines in the Settings.cfg file. However before setting a custom resolution, first go into the Options menu in FEAR and set the Display options you want (aside from resolution). Next, close the game and Edit the lines above - change the ScreenWidth to the pixel width of the custom resolution you desire, and the same for ScreenHeight. Upon restarting the game your custom resolution will be applied. However don't go back into the Display settings screen in the in-game options as this will reset your resolution to one of the default resolutions. To check your new resolution go to Performance>Advanced Video Options and check the 'Screen Resolution' setting which should display the new resolution. You can now adjust and test the remainder of your settings.
If your resolution is accidentally reset, re-edit this file, or make it Read Only once you applied all the tweaks you want. Also, if you find this method doesn't work for you, you may have to create a new Profile and/or delete your other profiles for it to work.
"BitDepth" "32"
By changing the BitDepth to 24 or even 16, you may be able to improve the graphical performance. Lower bit depths can result in more color banding (noticeable gradations). Note you will have to make the Settings.cfg file Read Only for this setting to stick, and it may have no impact on your system.
"HardwareCursor" "1.000000"
If you're having problems using your mouse in the in-game menus or in the game, set this to 0.
"VSyncOnFlip" "0.000000"
This option simply controls whether VSync is On or Off. Recommended is Off (0.000000), however ideally you should set this using the in-game option.
"DisableMovies" "1"
You can add this line either manually or by using the FEAR Config Tool (see below) - the preferred method is to use the tool. Setting this option to 1 skips all the introductory movies in the game allowing for a quicker startup.
"RestartRenderBetweenMaps" "1.000000"
This option controls whether the Force Restart option (covered on page 5 of this guide) is enabled or not. This setting was added recently to FEAR, as well as being standard in FEAR Combat and FEAR Extraction Point. You should alter this setting using the in-game settings as normal.
These are all the known working .cfg file commands at the moment. I will add more as they are discovered.
Default.archcfg
This file simply seems to contain the archive names which the game needs to open upon loading up. While commands may be able to be inserted here just like Settings.cfg, I haven't been able to make any useful commands work from here. Note again that this file is write protected by default and may need to be re-protected for any inserted commands to work.
Autoexec.cfg
This file would be ideal for inserting additional commands rather than placing them in the files above. However I have not found any useful ways of making commands work when placed here.
FEAR Advanced Config Application
To run the FEAR Advanced Config Application, go to your \Program Files\Sierra\FEAR directory and run the Config.exe file. Upon starting this tool up, on the main page you can see it simply allows a choice of resolution, renderer and display adapter. The Resolution setting is useful if you are having problems getting into the game from using a non-standard resolution - reset it here to a standard one by highlighting it and clicking the Save button. The Renderer and Display options have only one choice by default.
Under the Options tab of the tool, you'll find additional options which are explained in more detail in your FEAR Readme.txt file. For the most part these options are for troubleshooting purposes:
Disable Sound: Removes all sound from the game. This improves performance however obviously is not recommended. Use this setting to isolate whether your sound card is the source of a problem. If you tick this option and can run FEAR with reduced problems, your sound settings, sound drivers or sound hardware are one source of the problem.
Disable Music: For a slight boost in available memory and performance, click this option to remove all FEAR music.
Disable Joysticks: Tick this option to disable all joysticks and gamepads. This may resolve any problems you are having with keyboard and mouse controls in the game.
Disable Movies: Disables the startup movies. It is recommended you tick this option to skip the startup movies. Note this option doesn't affect the in-game movies, only the introductory company movies which play before the game menu loads up.
Disable Sound Filters: Sound Filtering effects will be disabled if ticked, meaning EAX reverberation effects. This can help reduce audio glitches such as crackling on cards with EAX 2.0 support, but will reduce audio special effects.
Disable Hardware Sound: Once again used to isolate whether your sound card is a problem by forcing Software Sound support only in FEAR. This can improve performance as well but reduces audio quality noticeably.
Console Commands
Unfortunately since writing my FEAR Demo Tweak Guide, I still haven't found any way of enabling the full in-game console. The best that's been discovered so far is how to enable a range of cheats. To do this, press your Talk key (default is T) while in-game. At the talk prompt, type one of the following commands to enable the relevant cheat.
ammo - Full ammo
armor - Full armor
health - Full health
god - God mode
guns - All weapons
maphole - Next level
kfa - All weapons + full ammo, armor & health
tears - All weapons + infinite ammo
gear - Increased health and boosted reflexes
gimmegun Pistol - Pistol
gimmegun Dual Pistols - Dual pistols
gimmegun Submachinegun - SMG
gimmegun Shotgun - Shotgun
gimmegun Assault Rifle - Assault rifle
gimmegun Semi-auto Rifle - semi-auto rifle
gimmegun Nail Gun - Nailgun
gimmegun Cannon - Cannon
gimmegun Plasma Weapon - Plasma railgun
gimmegun Missile Launcher - Missile launcher
gimmegun Turret -
gimmegun Frag Grenade - Frag grenade
gimmegun Proximity - Trip bomb
gimmegun Remote Charge - Pipe bomb
mods -
baddaboom -
poltergeist - Ghost mode
build - Build version
pos - Player position
I have the strong feeling that the console has purposely been disabled in FEAR, and hence although I have a long list of console commands which might be of use (and which I originally included in my FEAR Demo Tweak Guide), none seem to work regardless of where I used them - whether in the Talk console mode, in one of the config files, or in the Target box of the FEAR icon. If you somehow discover how to access the full in-game console, please Email Me so I can share it with everyone here (and give you full credit for it).
The next section brings this guide to a conclusion, providing some useful information.
We're coming to the conclusion of the guide, but make sure to read the following information as it might come in quite handy.
ATI Performance Boost
It seems the ATI Catalyst Driver Team have made a mistake in customizing the Catalyst AI function in such a way that while it improves performance for the FEAR Demo, it actually reduces performance for the final version of FEAR. This has been discovered on the Beyond3D Forums, and the simple workaround for ATI users is to rename the FEAR.exe file (found in your \Program Files\Sierra\FEAR directory) to something else (e.g. Feat.exe) and then launch that new executable, and the game will perform much faster without any loss in image quality.
ATI have admitted to this mistake, and although they haven't been able to issue a fix as part of the 5.11 Catalysts, it will be included in the next set of Catalysts. For the moment it is recommended that you rename your FEAR executable as described above, create a new icon for it on your desktop, and use that to launch the game for a nice performance boost if you are an ATI graphics card owner.
Update: This issue should be resolved as of the latest Catalysts (6.3 or newer), however you can still experiment to see if renaming the executable still provides a boost or not.
Dual Core vs. Single Core Performance in FEAR
FEAR has been touted in a variety of places as being optimized for dual core CPUs, so given my main system has an AMD X2 4400+ CPU, I thought I'd put this to the test. I did this in two simple ways. Firstly I asked the TweakGuides Forumgoers if someone had a similar system to mine, except with a single core AMD CPU rated at the same speed (2.2GHz), and if so, could they post their FEAR timedemo result running FEAR at 1280x1024, all settings on maximum possible (except Soft Shadows to off), 2xAA and 4xAF, using the 81.85 Nvidia Forceware drivers. Two single-core CPU users (TroyBoy and Bagman) posted their results.
Secondly, I opened up Task Manager, switched to the Performance tab which shows the CPU usage graph, set Update Speed to high under the View menu, and then launched FEAR and played through a short saved game in which I battled against a number of enemy AI in a fairly detailed room. I then quit and looked at the CPU usage history shown in the graphs.
In both cases, I found that using a dual core CPU seems to have no benefit at the moment in FEAR. My performance figures from the timedemo seem to be within a few % of users with similar (single-core) systems, while the Task Manager exercise showed that only one core is actively being used at 100% while the other sits around the 1-2% throughout.
If FEAR is optimized for dual core CPUs, it shows no practical difference in performance terms - at least none that I could detect. Perhaps this is because FEAR is heavily dependent on the graphics card and hence any boost to CPU usage is not going to make much difference regardless. Perhaps a 'dual core' patch will come out for FEAR at some point in the future to enable these optimizations. Who knows - either way you single core users are not missing out on anything.
Disabling Introductory Movies
Just in case you've missed this tip in the Advanced Tweaking section, I thought I'd highlight it again here. If the Introductory movies which appear each time you start up FEAR are annoying you, the quickest way to skip them automatically is to tick launch the FEAR Config Tool and tick the 'Disable Movies' option. Note that this only disables the startup movies, not the in-game movies. Alternatively, you can edit your Settings.cfg file and add "DisableMovies" "1" to the last line - see the Advanced Tweaking section for both methods.
Taking Screenshots
Taking screenshots in FEAR is simple - by default the Function 8 (F8) key takes a screenshot in BMP format and places it in your \Documents and Settings\All Users\Documents\Monolith Productions\FEAR directory. Note that these files can be quite large - up to 5MB each - so periodically check this directory and remove any unnecessary screenshots.
Alternatively, if you want to take screenshots in other formats, you can use the free tool FRAPS, or for more advanced screenshot taking try HyperSnap DX.
Measuring Framerate
The easiest way to measure your framerate accurately is to use the free tool FRAPS. It displays a small yellow counter in any corner of the screen you choose with a very accurate FPS readout, and doesn't impact on your game performance.
Conclusion
Well that brings this FEAR Tweak Guide to a close. I've tried as much as possible to fit in every known performance tip and tweak in this guide. However it is a bit of a disappointment that I've been unable to crack the mystery of the command console for FEAR. As mentioned, please let me know if you figure it out so I can share it with all the guide's readers. If you have any other feedback or suggestions on this guide, or more importantly any additional working tweaks please Let Me Know as soon as possible. Please keep in mind I can't offer any tech support or advice, however you are most welcome to join the TweakGuides Forums and share your thoughts, opinions and problems on this and anything else with a bunch of like-minded members - as long as you observe the strictly-enforced Forum Rules.
Finally, make sure to check back regularly as this guide will be updated over the coming months with new tips and tweaks. I hope you've found the guide useful.
Credits & Links
Official FEAR Site
Official FEAR Forums
GameSpot FEAR Hardware Performance Guide
AnandTech FEAR GPU Performance Guide
Firingsquad FEAR 3D Performance Guide
Until next time, take care!


 Watch Dogs: Not The Pizza Guy – meet Jordi, interrogate Fixer boss
 . Plays July 12, 2013
 Dying Light Guide: Blueprint Location Guide
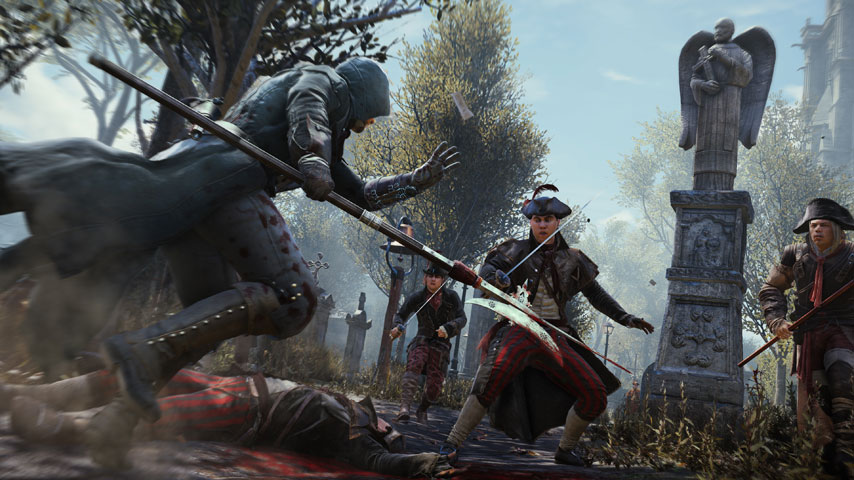 Assassin’s Creed: Unity guide – Sequence 2 Memory 2: Rebirth – Investigate Sainte-Chapelle
 PC Games You Can Play With Your Spouse