SWTOR 3.0 Infiltration Shadow DPS Guide by Artorias of Ebon Hawk. This is to replace Evolixe’s guide since he no longer players the game. Last Updated August 2, 2015
Contents
Infiltration is the polar opposite of Serenity. Serenity being the spec with some intense rotation management and flat sustained, Infil is the burst no set up required spec. Infiltration is closer to it’s older self than the 2.10 version due to some reverts on the devs part.
Infiltration is a positional and stealthing rotational spec, meaning you need to be behind the boss and keep your Stealth out ready for in rotation abilities/buffs and energy Management. Infiltration pulls slightly behind Serenity’s numbers but has great AOE Capability and great burst. It has harder damage to spawn from the spec but if done correctly is viable for all raids.
Infiltration can be brought into any fight so long as your target is not consistently turning to you which can throw off some minor resource windows and damage spikes, so if you’re in a fight where adds may be consistently aggroing to you, Infiltration may not be the best option.
Skillful
Choose between
Masterful
Heroic
Notes:
These utilities are pretty much what you’ll be taking most of the time. How ever a fight may call for some changes to be taken. For example Egress may be needed for Underlurker HM due to the slow, it’s ideal out of all of your abilities to sacrifice Mind Over Matter for such ability. The reason is that there are not a lot of abilities Resilience works against that are continuous damage, most of which is actually one big spike hit i.e (Grav Missile, Heave, Soaring Smash, HK-47 grenades), as such an extra 2 seconds isn’t too important to you if the fight demands something more practical.
For fights such as Sword Squadron, a utility like Cloak of Resilience is ideal to have a second Resilience to use. How ever this is sort of troubled since it may require you to delay Blackout further to use it on the big attacks.
For Torque taking Mental Defense is ideal as it’ll reduce the damage of his Shackles if your healers are a touch slow getting to you, you can easily sacrifice Celerity or Misdirection for this case.
You can also Sacrifice 3% healing from Shadow’s Shelter but if your healers need your particular shelter, it’s best served giving them a 5% heal bonus for their output on the rest of the raid, but this is all dependent on your group composition and how much moving needs to be done on their part.
Alacrity is a decent buff to Infiltration, a fast acting rotation will allow reliance on surge to drop off a touch but too much Alacrity actually hurts the rotation’s finished damage. I’ve tested with a Full alacrity build, even alacrity build (50/50 split with surge) and low Alacrity, the low Alacrity consistently pulled a head for me.
You either want to head for a high power build and rely on the slightly rare but amazing crits to do a bulk of your damage or go a high crit build and rely on more frequent but slightly weaker crits to create your sustained. Both options are viable.
Relics are a given, you should run Revanite as double proccing doesn’t occur often enough in the rotation do benefit from the weaker Resurrected relics as Battle Readiness is your only source of healing.
The old set bonus Vs. the new is a valid argument either way. I have done parses with both and gotten the same numbers. The old set bonus gives better force regen due to stacking the 2-piece with Shadow’s Training and the 15% Crit chance on Clairvoyant Strike means your most used ability will crit more often on top of having Force Synergy, the sacrifice to this is your passive 2% power gain, 1 minute autocrit, 15 second reduced CD on Potency and your Willpower. It would appear the Dread Master 4 piece will be more viable upon acquiring a full Revanite Set, currently in Resurrected Gear, the damage difference isn’t a lot.
Infiltration works in the manner of charging up your main attack, Force breach, to deal a decent amount of damage. The rotation attempts to make Force Breach prepped as fast as possible due to Clairvoyance, the rotation outside of Force Breach is dealing damage and making sure your next Force Breach occurs as soon as possible since it’s a very hard hitting ability, though this is where the minor rotational RNG comes into play for Infiltration.
Reserve use for when target is out of range.
Cost: 20 Force.
![]() Spinning Strike: Deals high amount of weapon damage and has a low cost. Makes your Execute flow nicer as a result and also generates Circling Shadows, becomes your highest priority Melee ability in the execute.
Spinning Strike: Deals high amount of weapon damage and has a low cost. Makes your Execute flow nicer as a result and also generates Circling Shadows, becomes your highest priority Melee ability in the execute.
Cost: 15 Force
![]() Whirling Blow: Your only AOE ability. Very powerful as a result of the Whirling Edge passive, making it competitive to even Serenity’s AOE level. Is buffed even further by Lambaste. Also generates stacks of Circling Shadows and Clairvoyance, allowing you to maintain 100% uptime on these buffs during down time or to pre proc.
Whirling Blow: Your only AOE ability. Very powerful as a result of the Whirling Edge passive, making it competitive to even Serenity’s AOE level. Is buffed even further by Lambaste. Also generates stacks of Circling Shadows and Clairvoyance, allowing you to maintain 100% uptime on these buffs during down time or to pre proc.
Costs: 22 Force
![]() Saber Strike: Your main and only filler, used to buy you some time and generate resource. The force regen on Shadow Training is per hit which means you can generate anywhere from 1-3 Force per activation, as such is slightly RNG plagued.
Saber Strike: Your main and only filler, used to buy you some time and generate resource. The force regen on Shadow Training is per hit which means you can generate anywhere from 1-3 Force per activation, as such is slightly RNG plagued.
There are a few ways of opening with Infiltration. Each one is up to personal preference and fight situations. It is always ideal to open from stealth to allow Shadow’s Respite to linger in the opener and as such counter act the greedy force requirement of your opening abilities. The rotation for Infiltration comes from a priority method as the rotation floats to an extent due to the RNG timing of Breaching Shadows Generation and your Force Regeneration.

The Simple Opener is how it sounds. It lacks difficulty but is a bit less effective than the alternative. It opens out of stealth with breach, keep in mind you can activate breach while stealthed and you will not exit stealth. You pop Potency, gain your stacks and hit your adrenal right before Force Breach. From there you hit Clairvoyant Strike twice to gain both Clairvoyance stacks to generate Breaching Shadows off of the rate limit and Circling Shadows to reduce the cost of the following Psychokinetic Blast. Your opening Breach will proc Infiltration Tactics, allowing you to use it at greater damage and a reduced cost, then fill in with a Clairvoyant Strike to get your third and final stack of Force Breach, allowing you to use it at max damage. If you’re unlucky, your 3rd Clairvoyant Strike will fail to generate a third stack, if this happens, merely use another one. Pyschokinetic Blast will then generate the 1st stack of your next cycle of Breach Shadows and Blackout will help undo any of the Force Cost previously encountered.

The Pre-cast Opener frontloads your Clairvoyance and Circling Shadow stacks prior to pulling the boss/dummy by using Whirling Blow twice before going into stealth. This means you can skip the opening Clairvoyant Strikes of the Simple Opener in favor of Psychokinetic Blast and Shadow Strike occurring earlier, thus better damage and easier Force Consumption since 2 Clairvoyant Strikes = 44 Force Vs. Psychokinetic Blast (16) and Shadow Strike (10) = 26 Force. This isn’t a big deal since we have Blackout coming soon.
The window to pulling is rather tight as you need to hit Force Breach and Psychokinetic Blast before Circling Shadows falls off. After your second Pyschokinetic Blast, Infiltration Tactics will be procced off of your first breach and you fill in the time before the CD of Pyschokinetic blast by using Clairvoyant Strike twice. Your second Breach will be coupled with Blackout to undo the cost of the rotation.

The Mind Crush Opener is my preferred opener. It makes use of Mind Crush to apply an opening decent hit and apply a short timed but powerful DoT while you’re hitting the target. It also front loads the precast to circumvent the Double Clairvoyant Strikes in the opener. You pre-cast your stacks with Whirling Blow, stealth, generate 3 stacks with Potency, Precast Mind Crush, activate your Adrenal shortly before hitting the target with Breach then Pyschokinetic Blast. The Damage will cause Infiltration Tactics to Proc, which you then couple with a double Clairvoyant Strike until Pyschokinetic blast comes off CD again to generate your third and final stack of Breach which then goes with Blackout. This rotation is a bit hard to get your head around at first but deals decent damage and is worth the time to learn Vs. the Simple rotation.
All of these openers a susceptible to the same problem of not knowing when your Shadow Tecnique will proc. This can cause it to occur later (or even earlier) than you may anticipate. It’s worth your while to keep an eye on when your non-Psychokinetic Blast stack was generated as it’s at least 4GCD’s (6 seconds) from that point when the second one can occur, same as the cooldown of Pyschokinetic Blast.
You can use Battle Readiness to increase the chance of it proccing, but in my opinion Battle Readiness is best saved for the defensive capability when in raid situations due to how minimal of a damage increase it is over all. This is where most of the RNG comes from in the spec, the other RNG spots are the previously mentioned Saber Strike RNG and the Potency 60% chance which means even under a Potency Window abilties are not guaranteed to crit.
Infiltration has rules to follow, these are what creates your rotation instead of a usual A -> B -> C rotation which is used for other classes.
First and foremost. When Breaching Shadows Procs, it needs to be used instantly, any delaying could result in the generation of a 4th stack of Breaching Shadows which obviously will be consumed and not actually be of any benefit to you. You want to ensure every stack of Breaching Shadows goes to use in rotation since you can sometimes strain to get your third stack, so there’s no point throwing them away. You’ll notice the stacks hitting 3 due to the unique body animation which takes form of blue rings cascading from your arms and the border of Force Breach turning golden.
2) You should maintain a 100% uptime on Clairvoyance. This may sound easy but if you get too DPS hungry you can let it fall off in the execute by using Shadow Strike, Spinning Strike, Psychokinetic Blast and Breach on Cooldown as well as juggling Saber Strike. Outside of the execute, this task is rather simple due to how over Clairvoyance is used in rotation, but sub 30% the rotation and force management benefit from the use of Spinning Strike being used. Don’t get cocky kid.
3) Psychokinetic Blast should be used only under 2 Clairvoyance stacks and 2 Circling Shadow stacks. For the first point, a 50% chance on a rotation that demands the stacks of Breaching Shadows ASAP isn’t favorable to be dared upon, play it safe and spend the extra GCD to get your second stack. 12 Force, even 6 is a big difference in rotation, every costly melee ability that’s supposed to be used will generate a stack of Circling Shadows, as such there is no reason to go flat out with 1 or no stacks.
4) Your Execute should be an Execute, make use of Spinning strike and don’t worry about using it on cooldown so long as this priority doesn’t delay the use of Force Breach or the use of Psychokinetic Blast. You may need to delay the use of Spinning Strike to refresh Clairvoyance, it is ideal to do this by delaying Shadow Strike. Infiltration Tactics lasts a long time, long enough that delaying it will not cause you to sweat to try and use it before it falls off, the ICD of Infiltration Tactics triggers upon gaining the buff not expiring. As such you can delay Shadow Strike in favor of Saber Strike if resource demands it.
5) Never Shadow Strike outside of an Infiltration Tactics window. This can cause huge DPS loss in the form of both resource drain and a sub par damage output. Shadow Strike does a lot more harm than good if used outside this window and occurs often enough so that you won’t feel obligated to touch Shadow Strike outside of this time frame.
6) Saber Strike should be used to gain Force when needed. Blackout has a 45 second cooldown and you will spend a lot of force during the 6 second down time. You will have moments of back to back Blackout and it’s nice, but do not relly on it coming off cooldown in say 9 seconds so go a head and burn yourself out. 50% Force regen isn’t a lot so make use of it, make sure you balance out your saber strikes enough that you don’t over do it and that you don’t need them. I find a good balance of location is around your infiltration Tactics, you’re using your lowest costing ability of 10 coupled with a free ability that also gains your Force.
7) Force Cloak is destructive to your rotation if you don’t know how / when to use it. Using Force Potency at an inconvenient time is also just as bad. You never want to Force Cloak and clip Blackouts CD nor do you want to Stealth out if your Potency is pushing to nearly off cooldown. Blackout and Potency take priority over Blackouts use, you can waste a 3rd Blackout and a 2nd Potency if you carelessly use it. As I mentioned above if you use Potency with stacks generated of Breach, you’ll over write the original stacks, effectively wasting it. It’s more ideal to wait the extra few seconds and do a back to back Potency combo, keep in mind it is costly.
Execute
In the execute window, priorities can shift. When Spinning Strike is available, it’s optimal to delay Force Breach if the third stack generated on Breaching Shadows is not the result of your Psychokinetic Blast. What this means is, when you use Spinning Strike after the ability that has generated your 3rd stack i.e Saber Strike, Shadow Strike, Clairvoyant Strike and so on, Spinning Strike is not capable of generating a third stack, as such delaying will pose no issue for possibly wasting a potential stack of Breaching Shadows. This in turn means you can use Spinning Strike more often with the potential of Force Breach remaining the same.
 This is a parse taken from one of my Parsely logs. Notice the big opening spike that slowly drips to sustained (blue line) and at the end begins to curl up as it begins to enter the execute. If you look at the Red which is the damage done rather than the DPS, you’ll see the massive spikes of the rotation.
The optimal APM for Infiltration sans any Alacrity is 44 minimum, 1 alacrity is a rough zone of 45.3 or higher. Two alacrity would begin to enter the realm of a 46 APM. I’m a clicker and I still reach this APM so it’s not impossible. It’s all how about and when you hit your Blackout, Battle Readiness, Potency Adrenal and Blackout since all are off the GCD.
Hey there! My name is Artorias, I wrote both the Rage and Immortal guide for juggernaut. I have decided to do the Infiltration/Deception guide from here on due to Evolixe leaving the game. I currently run HM TOS and Ravagers on my Shadow Sinais in both DPS specs.


 SWTOR 3.0 Scoundrel Sawbones Healing Guide by Orderken
 SWTOR 3.0 Powertech Advanced Prototype and Pyrotech DPS Guide by Kwerty
 SWTOR Life Day 2015 Event Guide
 SWTOR 3.0 Seer Sage Healing Guide by Orderken
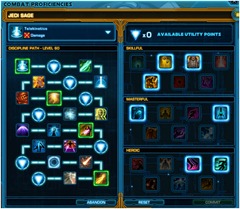 SWTOR 3.0 Telekinetic Sage Class Guide by Soulkuun