SWTOR 3.0 Telekinetic Sage Class Guide written by Soulkuun.
Contents
- 1 Intro to Telekinetic Sage
- 1.1 Class Ratings
- 1.2 Passives
- 1.3 Offensive Cooldowns
- 1.4 Utilities
- 1.5 Operation/Flashpoint CD/Ability Usage
- 1.6 Gearing/Stats
- 2 Abilities and Rotation
- 2.1 Main damage abilities for rotation
- 2.2 Opener
- 2.3 Priority List
- 3 Parsing Sample
- 4 About the Author
Intro to Telekinetic Sage
Telekinetics, one of the two Damage Per Second (DPS) Specs of the Sage advanced class, is the best viable option for PvE content if your raid needs a good sustained burst ranged DPS. Telekinetics is a very mobile spec compared to its Balance counterpart, we survive based off of our procs. That being said, we are a very high burst, sustained damage, and bring in useful buffs and abilities for the benefit of a group.
Class Ratings
- Sustained DPS: 7 (8 on short and/or bursty fights)
- AoE Damage: 8
- Group Utility: 8 (9 with no Jedi Sage healer)
- Burst: 9
- Rotation Difficulty: 5
- RNG dependance: 6
Passives
- Inner Strength – Reduce the force consumed by force abilities by 10%.
- Force Studies – Attuned to the force, your maximum force is increased by 500.
- Force Reach – Increases the range of Telekinetic Throw, Project, Mind Snap, and Force Slow by 20 meters. Also increases the duration of Force Lift to 60 seconds.
- Armor Proficiency:Focus – Able to equip a Force focus to your offhand.
- Jedi Healer: – Reduces the cooldown of Revive by 100%.
- Tidal Force (level 12) – Disturbance, Telekinetics Burst, Turbulence and Forcequake grant Tidal Force when Activated. Finished cooldown on Telekinetic Wave, reduces the force cost by 50% and makes it an instant cast. Available every 10 seconds.
- Resonating Vibrations (level 16) – Increases Forcequake crit chance by 15% and critical bonus damage by 30%.
- Telekinetic Effusion (level 20) – Direct force attacks grant Telekinetic Effusion when the critically hit, reducing the force cost of your next two non-channeled force attacks by 75%.
- Concentration (level 24) – Reduces the pushback suffered when activating Telekinetic Wave, Disturbance, Mind Crush, Turbulence, and Telekinetic Burst by 75%. Additionally, you have a 25% chance when taking direct damage to gain Concentration, which causes your next Disturbance or Telekinetic Burst to activate instantly. This effect cannot occur more than once every 8s and lasts for up to 15s.
- Mental Momentum (level 28) – Mind Crush has a 25% chance to tick twice and make its target vulnerable for 45s. Vulnerable targets take 5% more damage from Force attacks. In addition, when you activate Turbulence, there is a 25% chance the ability will produce a second blast that strikes the same target for 25% damage.
- Cascading Force (level 32) – Increase the maximum range of your Force attacks by 5 meters. Additionally, Telekinetic Wave immobilizes all affected targets for 0.5s and slows all affected targets by 50% for 6s.
- Clamoring Force (level 36) – Force Speed give 2 stacks of Clamoring Force which allows Disturbance and Telekinetic Burst to be activated instantly.
- Telekinetic Momentum (level 40) – Disturbance, Telekinetic Wave, Telekinetic Gust and Telekinetic Burst have a 25% chance to produce a second arc of Telekinetics that strikes the same target for 25% damage. Additionally, Telekinetic Wave overwhelms its targets for 45 seconds. Overwhelmed target takes an additional 10% damage from area attacks.
- Telekinetic Focal Point (level 44) – Damage dealt by Telekinetic Wave and Telekinetic Gust has a 100% chance and damage dealt by Disturbance and Telekinetic Burst have a 50% chance to grant Focal Telekinetics, which increases alacrity by 1%. Stacks up to 5 times. Lasts 15s.
- Flowing Force (level 48) – Telekinetic Momentum is twice as likely to trigger while Mental Alacrity is active. Additionally, increases the duration of Mental Alacrity by 5s and reduce its cooldown by 15s.
- Reverberation (level 52) – Increases critical damage dealt by Telekinetic Wave, Telekinetic Gust, Mind Crush and Turbulence by 30%.
- Tremors (level 56) – Each Telekinetic Momentum and Mental Momentum reduces the active cooldown of Mental Alacrity by 1s. In addition, being interrupted grants Unshakeable for 4s. This can only occur once every 15s.
- Mental Continuum (level 59) – Direct damage dealt by your Mind Crush and Telekinetic Wave abilities refreshes the duration of your Weaken Mind on affected targets. In addition, Telekinetic Burst increases your Force regeneration by 10% for 10s. Stacks up to 3 times.
Offensive Cooldowns
- Mental Alacrity (90 second cooldown) – Grants 20% alacrity and immunity to pushbacks and interrupts for 10 seconds.
- Force Potency (90 second cooldown) – Grants 2 charges of Force Potency, which increases the Force critical chance of your direct attacks and heals by 60% and increases the range of Telekinetic Throw and Cascading Debris to 30 meters. Each time a direct Force ability critically hits or each time a channeled ability is activated, you lose 1 charge. Lasts 20 seconds.
- Attack Adrenal (3 minute cooldown) – Increases Power by 750 and reduces all healing done by 20%. Lasts 15 seconds. (Advanced Anodyne Attack Adrenal grants the 750, this is the purple adrenal. If you are on a budget and cannot A. Buy Adrenals, or B. Craft the Purples, I have found the blue Anodyne Attack Adrenals which grant 685 power for 15 seconds work just as well.)
- Force Empowerment (5 minute cooldown) – Increases Strength, Presence, Aim, Cunning, Endurance, and Willpower for you and your group members within 40 meters by 10%. Lasts 10 seconds.
Utilities
Listed Below are each utility and what they do. Following this list will be preferences for fights.
Skillful
- Psychic Suffusion: Force Wave heals you and up to 7 affected allies for (Results vary).
- Upheaval: Project gains a 25% chance to throw a second chunk of debris that deals 25% damage.
- Jedi Resistance: Increases damage reduction by 3%.
- Tectonic Mastery: Increase the damage dealt by Forcequake by 25%.
- Pain Bearer: Increase all healing received by 10%. Does not affect redistributed life.
- Humility: Targets stunned by your Force Stun suffers Humility when Force Stun wears off, which reduces all damage dealt by 25% for 10 seconds.
- Pining Resolve: Reduces the cooldown of Force Stun by 10 seconds. In addition, your Force Lift affects up to 2 additional standard or weak enemies within 8 meters of the target.
Masterful
- Blockout: Activating Cloud Mind grants Blockout, which increase damage reduction by 25% for 6 seconds.
- Mind Ward: Reduces damage taken by all periodic effects by 15%.
- Egress: Force Speed grants Egress, removing all movement-impairing effects and granting immunity to them for the duration.
- Valiance: Reduces the health spent by Noble Sacrifice by 25%, and increases the healing done by Force Mend by 30%.
- Kinetic Collapse: Force Armors you place on yourself erupt in a flash of light when they end, blinding up to 8 nearby enemies for 3 seconds. This effect breaks from direct damage.
- Force Wake: Force Wave unbalances its targets, immobilizing them for 5 seconds. Direct damage dealt after 2 seconds ends the effect prematurely.
- Telekinetic Defense: Increase the amount absorbed by your Force Armor by 10%.
Heroic
- Metaphysical Alacrity: Mental Alacrity increases your movement speed by 50% while active. In addition, Force Speed lasts 0.5 seconds longer, and when Force Barrier ends the active cooldown of Force Speed is finished.
- Mental Defense: Reduces all damage taken while stunned by 30%.
- Force Haste: Reduces the cooldown of Force Speed by 5 seconds, Force Slow by 3 seconds, and Force Barrier by 30 seconds.
- Force Mobility: Turbulence, Healing Trance, and Force Serenity can be activated while moving.
- Confound: Targets affected by Weakened Mind are slowed by 30% for its duration.
- Life Ward: Your Force Armor, Force Barrier, and Enduring Bastion heal you for 2% of your total health every second for as long as they last. This healing scales up to 8% with the charges for Enduring Bastion.
- Containment: If your Force Lift breaks early from damage, the target is stunned for 2 seconds. In addition, Force Lift activates instantly.
Suggestions
A basic Utility point usage is copied below (These points are for every day fights with single target burst)
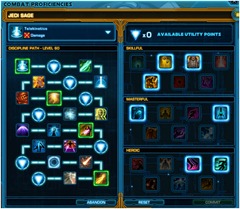
Featured Utilities:
- Upheaval, Pain Bearer, Jedi Resistance
- Blockout, Valiance
- Force Haste, Force Mobility
The next image is for fights which you encounter groups and AOE damage such as SM/HM Underlurker. (For HM Commanders change the point in Force Haste to Containment for Instant cast Force Lift in order to use on adds)

Featured Utilities:
- Jedi Resistance, Tectonic Mastery, Pain Bearer
- Blockout, Egress
- Force Haste, Force Mobility
Operation/Flashpoint CD/Ability Usage
- Force Empowerment – This is the lovely Sage Raid Buff everyone will love because it will increase your Raid’s stats (Willpower, Strength, Cunning, Presence, Endurance and Aim) by 10% for 10 seconds. Now, for raids it is up to the raid when a Sage should use this ability. Some may prefer it at the beginning for a big opener, or closer to the end of the fight during the burn phase. Force Empowerment is also good if used for a raid wide heal as it will increase Endurance (Endurance being your health) by 10%.
- Force Speed – Force Speed has several uses when it comes to raids, you can use it to make a speedy getaway, use it to get 2 instant Telekinetic Bursts, or use it just because you want to go fast. I personally do my best to save it for times I need to get out of damage circles, but that is just me.
- Cloud Mind – This lovely ability is a Sage’s aggro drop. With dropping aggro it is best to use when the tank is having issues keeping aggro or after they taunt/AOE taunt in order to establish them above you on the aggro table. (((Dropping aggro after the tank taunts will set your raid up for success in terms of agro control)) If you did choose Blockout as a utility it will offer damage reduction on top of keeping you off the top of your raid’s agro table)
- Restoration – This is your cleanse for any negative Force or mental effects on you or a raid member. The healers should take care of cleanses, but if they need help please do not be rude, just use it as a self-cleanse.
- Force Stun – This is a 4 second long hard stun; during a boss fight I would not even touch it unless the adds are interruptible.
- Forcequake – This is good to use on trash in flashpoints and operations when they are grouped up. This will allow you to damage the trash mob together instead of single burst. (Also useful during the Underlurker fight to down Underlurker and Lurkerlings)
- Revival – This is your in combat revive. Keep in mind there is a 5 minute cooldown on this, and once you use this ability your raid will not be allowed to combat revive for another 5 minutes. With this in mind, revive your most needed teammates, usually a tank or healer. If your healers are under pressure, it falls to the DPS to combat revive, make sure you know who you are reviving and that you will not revive them in a damaging circle. (They will revive right where you are standing during the channel, I do not know how many times I have witnessed someone be revived and then killed instantly because the reviver was not paying attention.)
- Rescue – This is what is known in game as the Sage Pull. This ability offers an instant aggro drop and pulls a friendly grouped player to your position. This ability should never be used on a tank because they must have aggro in order to be a tank. (If coordinated properly, this ability can save your raid from a wipe by pulling the teammate out of danger)
- Force Mend – This is a Sage DPS most powerful Self Heal which responds off the global cooldown. There is absolutely no reason as to why you should not be using this ability off cooldown during a heal intensive fight.
- Rejuvenate – This will offer you an instant heal and then lesser heals over time. It is good to use this ability when you think your healers are overwhelmed and want to help them out by healing yourself.
- Benevolence – This ability is probably the last heal a Sage DPS should use. I say this because it is very costly to your Force and is a channeled heal. The other two self-heals a Sage brings to the table are instant and only one of them actually costs Force to use. Now this being said, if your healers are having trouble and you, as a DPS, have some downtime, it is okay to use this ability to help your healers out. (Channeling this ability when not necessary can cost your DPS to falter, so use this heal as a last resort and make sure you understand how long it will take to channel based on your alacrity)
- Force Wave – This ability is the knockback of a Sage. I personally do not see the usefulness of this ability except during the Temple of Sacrifice operation last boss. (If you for some reason chose Psychic Suffusion on your utilities it offers health for up to 7 people, plus yourself, standing in front of you; for a DPS, Psychic Suffusion is not viable as stated above)
- Force of Will – This is your crowd control break. Use this ability if you are in danger of “standing in stupid” and stunned at the same time. (If there is another Sage in the raid, have them Rescue you in order to pull you out of the danger)
- Noble Sacrifice – This ability is very dangerous if used too much. In a pinch it will give you Force back in order to keep up your DPS. This being said, it takes out health in order to get Force, this ability should never be used unless you are low on Force and know your healers can heal you back. (It is best to let your healers know you need force and are going to use Noble Sacrifice; this will let them be prepared for when they see your health drop more than usual((Valiance will give you the decrease cost for Noble Sacrifice if you have chosen that utility)))
- Force Barrier – This ability is an instant agro purge and an instant relief from damage. It will stop all damage coming at you for the duration of the channel. When paired with the Life Ward utility, it will also offer you heals during its channel. This ability should be used if you are in a bad mechanic and want to instantly ignore the mechanic’s damage.
- Force Armor – This ability is very useful when you want to reduce incoming damage. It is also important to use when you having incoming damage you foresee, such as the grenade on Sword Squadron in Temple of Sacrifice. (It will mitigate the damage you take so your healers do not have to worry about healing you up from say a 20% damage tick) This ability can also be used on fellow raid members in order to help them reduce damage they take, especially when using Telekinetic Defense utility. (If the Life Ward utility is chosen as well it will offer heals over time for you and only you)
Being a Telekinetic Sage, we do not have issues in Force management. This being said, do not be afraid to help out the healers with using Force Armor, your Force will be able to expend itself to help your healers. (If you are grouped with a Sage Healer, coordinate if they will want Force Armor assistance ((you do not want to waste Force if it is not necessary)))
Gearing/Stats
- Accuracy: Having 110%+ accuracy is a must, if you do not have at least 110% accuracy, you either do not have the 1% companion bonus, or you do not have the proper enhancement/augments. (You are looking for at least 758, or close to 758, Accuracy rating).
- 186 gear (Dread Master) – 7 Accuracy pieces (~109.57% Accuracy) (must add one accuracy augment to go over cap)
- 192 gear (Resurrected) – 6 Accuracy pieces + 1 Accuracy augment (~109.61% Accuracy) (must add one more accuracy augment to go over cap)
- 198 gear (Revanite) – 6 Accuracy pieces (~109.63% Accuracy) ( must add one accuracy augment to go over cap)
- Critical Chance: – After many times playing around with Crit Chance, I have found my consistent parses to be from a Crit Chance of at least 22.5%-25%. (You are looking for anywhere between 0-250 Critical Rating.) My predeccesor KTap did an excellent job of testing crit chance and his test can be found here,
- Power: – Power is everything after Crit Chance. (There has been debate 20% Crit Chance is all you need, I have parsed using both 20% and 25%. With 20% I have been able to hit higher parses but not as consistent as with 25%. This being said if you are looking for more consistent parses go with 23-25%, otherwise 20% is all we need.)
- Surge: –Look for at least 240 or 360 Surge or 70% Crit Multiplier.
- Alacrity: – It is best to have at minimum 102 Alacrity, most likely a 102-120 enhancement depending on the item rating. Either 120 or 240 should be used, however this is based on personal preference. (If you would like more alacrity place in an alacrity augment, but a Telekinetic Sage is able to get 5% alacrity through our rotation)
- Augments: – When it comes to augments you will want to prioritize after you reach the desired stats stated above. I have found, along with Theory Crafters, is that Power is the new thing you will want to stack with augments. (Augments are a fantastic way to get stats you are missing from your enhancements.)
- Relics: – Serendipitous Assault & Focused Retribution. (Plain and simple here, just make sure to augment these as well)
- Set bonus: – With 3.0 and beyond, at least till 4.0, the new Set Bonus is the 192-198 Force-Master from Ravagers and Temple of Sacrifice Storymode/Hardmode. Theorycrafters have shown the old Dread Master 186 4 piece set bonus is the choice when it comes to gearing. (The Dread Master 2 piece bonus is the same as the Resurrected/Revanite 4 Piece and the Dread Master 4 Piece offers Weakened Mind having a 30% chance for 5% increased alacrity for 15 seconds((cannot occur more than once for 20 seconds)))
Abilities and Rotation
Main damage abilities for rotation

Weaken Mind – This ability is required to be on your target in order to get the 100% critical hit on Turbulence when used. Ideally, using this in your opener should be the first and only time it is needed as Telekinetic Wave and Mind Crush will reapply it. However, you may need to manually reapply Weaken Mind if it was allowed to fall off your target.

Turbulence – This is a Telekinetic Sage’s bread and butter, it is the highest priority in the rotation and should be used off of cooldown.

Mind Crush – This ability is second on our list in order of priority. ( if and only if combined with the Telekinetic Gust proc((explained further on)))

Telekinetic Gust – This ability falls to our number three spot on our priority list. (Using this ability also decreases the channel time on Mind Crush/Turbulence; this being said you have 10 seconds to use this “proc”, you should never let this proc fall off before utilizing it)

Telekinetic Wave – This ability is our number four on the priority list. If the proc from Turbulence/Telekinetic Burst is about to fall off, this ability becomes number three. It also gains a buff in damage from Reverberation and hits up to 8 targets within 8 meters of your current target.

Telekinetic Burst – This ability has replaced Disturbance in the Telekinetic rotation and offers us our main filler ability. (It is a channeled or instant cast if combined with Force Speed/having a 25% chance of instant cast upon damage taken)

Disturbance – Once a Telekinetic Sage hits level 57 Disturbance should be moved out of your rotation and replaced with Telekinetic Burst.

Forcequake – This ability is no longer viable to a Telekinetic Sage unless used during trash mobs or fights requiring large Area of Effect damage.

Project – This is another filler ability which should be used if you are on the move in a fight. Combined with the Upheaval utility it can offer some very good last second damage before running for cover.
Opener
Parsing Opener
Precast Mind Crush > Weakened Mind > Mental Alacrity + Adrenal + Force Empowerment > Turbulence > Force Potency > Telekinetic Gust > Telekinetic Wave > Force Speed > Telekinetic Burst(x4/x5) > Priority list
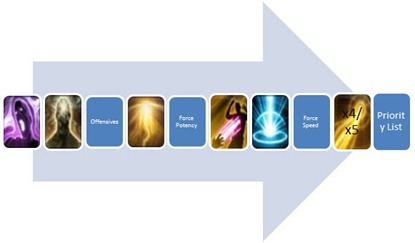
Raid Opener
Force Speed > Precast Mind Crush > Weakened Mind > Mental Alacrity + Adrenal + Force Empowerment > Turbulence > Telekinetic Burst(Instant) + Halfway through Global Cooldown use Force Potency > Telekinetic Gust > Telekinetic Wave > Telekinetic Burst(x4/x5) > Priority list
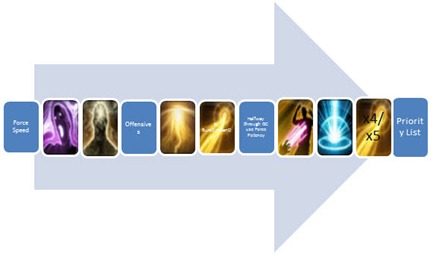
The difference between these two openers is the reliability, the Raid opener is more reliable based on internet connections and damage output. Using this Raid Opener, you will not have to worry about Turbulence using up a Force potency stack. Another benefit is the mobility offered by this opener by using Force Speed on cooldown before the pull starts.
Priority List
Make sure to never let Weakened Mind fall off your target, if it does the first thing you should do is reapply it.
- Weakened Mind
- Turbulence (with Weakened Mind)
- Mind Crush (with the decreased channel time from Telekinetic Gust)
- Telekinetic Gust (use this off cooldown)
- Telekinetic Wave (with the instant cast from Turbulence)
- Telekinetic Burst (use Telekinetic Burst by channel or with Force Speed)
Mobile Priority List
- Turbulence (with Weaken Mind)
- Telekinetic Gust
- Telekinetic Wave
- Telekinetic Burst (combined with Force Speed)
- Project
AoE Priority
If you have Weakened Mind on a target you will keep Turbulence in your AoE Rotation, otherwise your two main AoE moves are TK Wave and Forcequake. (Use Forcequake on groups of 3 or more adds.)
Force Speed Usage
Force Speed has two useful uses during a parse, the first is getting in one extra ability while having a relic proc and the second is getting in that extra attack during Mental Alacrity’s duration. (Mental Alacrity increase the proc chance on Telekinetic Momentum which will allow for Mental Alacrity to be used more often. During a raid you will find it more useful to use when you need to be/stay mobile, an example is during HM Sword Squadron after gravity, Quartermaster Bulo during Mass Barrage, Master/Blaster for moving locations (if you are not using the 2 Vanguard cheese method), etc) Force Speed is also useful to help with negating some pushback effects during raid wide damage. (For example, Underlurker and the core on HM Revan. With this situation it is a definite DPS gain.)
Force Potency Usage
When using Force Potency it is best to use on Telekinetic Gust and Telekinetic Wave. Those two abilities are the two main you will want to increase Force Crit on since Turbulence will have an auto crit as long as Weakened Mind is on your target. You can also use Force Potency during your AoE Priority list if used with Forcequake > TK Wave.
Parsing Sample
Here is a screenshot (and badly cropped screenshot at that) of a parse using the above Opener and Priority List. (Pie Chart is using Maraauditore’s Parsely damage log)
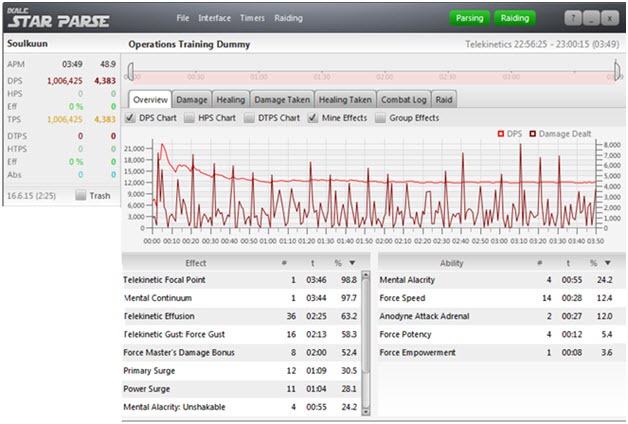
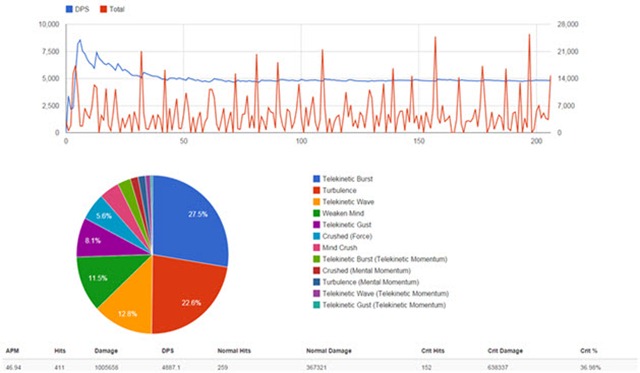
When parsing on my ship I do have a slight ability delay simply from my computer’s lag. However, as my predecessor has already stated, Ability per minute for dummy parses is dependent on how many times Force Speed is used. When you are in an actual raid, your ability per minute ratio varies wildly due to mechanics so please do not worry about ability per minute ratios during raids or even parsing. This being said, if you are properly using the priority list you are looked at minimum 47.5 APM or higher.
About the Author
Hiya everyone! Well after reading this guide and the work I have put into it I would first like to say, I hope you learned something new about Telekinetic Sage and how we work as a DPS, along with the hope I was helpful in any way, shape, or form! But I am Soulkuun from Begeren Colony/Harbinger and I have been playing SWTOR for just about a year now. I have been a Sage through the entirety of my playtime and absolutely love the class. I am not just a Sage player though, I have a couple other classes I play but by far I find Sage/Sorc to be the most fun. I am the guildmaster of Galactic Lounge here on Begeren Colony/Harbinger. I am also a member of Rise and Fall on Harbinger as well.
I would like to state this guide is by far not just my own work, my predecessor KTap had a play in this guide as a basis for a lot of this information along with several other Sages I know from in game (Thank you Bora, Foccan, Maraauditore along with Foccan’s source). I am not the best Sage DPS and will never claim to be. I am here to simply share and learn along with everyone who reads this guide. I truly appreciate any and all constructive criticism to make this guide better, whether it be formatting, adding in new stats or updating the rotation to a better one.
And to kind of wrap this all up because I know we all want to get back to playing, I’ll make a note about PVP. I am a rather avid PVPer, however I do not PVP in Telekinetic; I am a Balance Sage in PVP based on personal preference and sustainability. While Telekinetic is amazing for a burst DPS, Balance just brings a whole new aspect to life steal and DoTs.
Alright, that’s enough from me! If you have anything you want to suggest, have me add, something to change, etcetera etcetera. Drop me a comment below or email me at [email protected]. I would love to hear from everyone and I hope I was able to help in some way!
Thank you!


 Weaken Mind – This ability is required to be on your target in order to get the 100% critical hit on Turbulence when used. Ideally, using this in your opener should be the first and only time it is needed as Telekinetic Wave and Mind Crush will reapply it. However, you may need to manually reapply Weaken Mind if it was allowed to fall off your target.
 Turbulence – This is a Telekinetic Sage’s bread and butter, it is the highest priority in the rotation and should be used off of cooldown.
 Mind Crush – This ability is second on our list in order of priority. ( if and only if combined with the Telekinetic Gust proc((explained further on)))
 Telekinetic Gust – This ability falls to our number three spot on our priority list. (Using this ability also decreases the channel time on Mind Crush/Turbulence; this being said you have 10 seconds to use this “proc”, you should never let this proc fall off before utilizing it)
 Telekinetic Wave – This ability is our number four on the priority list. If the proc from Turbulence/Telekinetic Burst is about to fall off, this ability becomes number three. It also gains a buff in damage from Reverberation and hits up to 8 targets within 8 meters of your current target.
 Telekinetic Burst – This ability has replaced Disturbance in the Telekinetic rotation and offers us our main filler ability. (It is a channeled or instant cast if combined with Force Speed/having a 25% chance of instant cast upon damage taken)
 Disturbance – Once a Telekinetic Sage hits level 57 Disturbance should be moved out of your rotation and replaced with Telekinetic Burst.
 Forcequake – This ability is no longer viable to a Telekinetic Sage unless used during trash mobs or fights requiring large Area of Effect damage.
 Project – This is another filler ability which should be used if you are on the move in a fight. Combined with the Upheaval utility it can offer some very good last second damage before running for cover.




 SWTOR Bounty Contract Week Henchman Bounty guide
 SWTOR 3.1 Darkness Assassin Tanking Guide by Aelanis
 SWTOR 3.0 Telekinetic Sage Class Guide by Soulkuun
 SWTOR 3.0 Powertech Advanced Prototype and Pyrotech DPS Guide by Kwerty
 SWTOR 3.0 Sharpshooter Gunslinger Guide by Shulk