Welcome to Guide of the Godslayer part 2, your week-by-week strategy guide to the Age of Conan Rise of the Godslayer expansion here at MMOHUB.org. Last week, we started out by looking at the many different Factions scattered around the Northern Grasslands, and at which might benefit your class the most; then, we jumped right into the Alternate Advancement system, and took a brief look at the many different paths you might take, and how they all come together. It was a lot to get through, but it over now, and today, it time for the fun stuff: Dungeons. Buckle up; it time to take on the Fat Man.
6-MAN DUNGEON — KANG PAGODA Kang Pagoda, home of the dungeon boss Po-Sha (A.K.A The Fat Man), is the first dungeon encounter in the Northern Grasslands, and too, the first you’ll find in Khitai. It a benchmark, of sorts, introducing you to your first taste of Khitai difficult dungeon encounters, and also letting you know if your group is ready to progress further into the difficult and dangerous unknown. Fortunately, Kang Pagoda is a very small dungeon. Though, that doesn’t make it any easier. It a difficult encounter that requires a group of players both adept with their classes and wearing equipment of ‘culture’ quality or higher, and Tier gear, especially for the Tank(s) is recommended. As for the group makeup, there are a few notes to remember. First, this encounter is significantly easier with 2 Tanks and 2 Healers. Second, at least one of those Tanks should be a Dark Templar, and at least one of the healers a Priest of Mitra. We’ll get to why later. Depending on a number of factors, Kang Pagoda could very easily be completed with a significantly less powerful group; however, this is by far the easiest option, and it what we’ll be using as an example today. Feel free to experiment yourself and find your own strategies as you go. When you enter Kang Pagoda, ascend the stairs and clear the room of the enemies in it. There are only a few, and they should pose you no threat. Once you’ve cleared the room, search it for a sack of potatoes, a fish rack, and a ruby. They can all be found in the room, and are an essential element in making this dungeon as easy as possible. Once you’ve found them, place the potatoes into the cooking pot, and kill the enemy it summons. Then, feed the raw meat to the tiger, and again, kill the enemy it summons. Finally, give the ruby to the concubine, and once more, kill the enemy it summons. These enemies guard the boss, Po-Sha, upstairs, and if they aren’t summoned and killed first, increase the difficulty of the boss encounter exponentially. Of course, this also increases the rewards, too, as it begins a ‘Trial of the Godslayer’ (A.K.A Hard Mode), but is advised for veteran players only. Once they’re dead, head up the stairs and prepare yourselves for battle.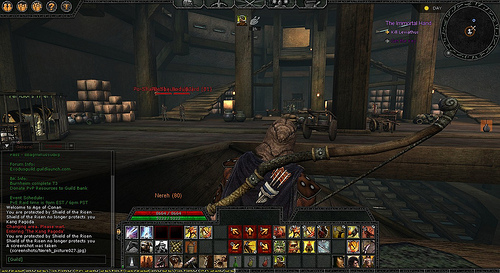 BOSS ENCOUNTER: PO-SHA
Po-Sha is a dangerous encounter, and will likely take you several attempts to topple him on your first try regardless of which strategy you use. Though, as he can’t move at all, he can be defeated quite easily with the right timing. To begin, think of the room as though it were a clock; with 12 o’clock representing the far back side of the room, and 6 o’clock representing the entrance. In the beginning, all DPS and Healers should make their way to 12 o’clock by sticking closely to the walls so as not to begin the fight prematurely. Your Tank(s) should move to 3 o’clock, as they will begin the battle by charging from that position, ensuring that Po-Sha is not facing the other members of the group when the battle begins.
Once the Tank(s) charge in and begin the battle, their primary concern will be maintaining aggro, and ensuring that Po-Sha does not face the other members of the party at any time, as his lead attack, Spew, will cause devastating damage to anyone he is facing. The Healer(s) should of course focus their efforts on keeping the Tank(s) alive, and the DPS on bringing him down as quickly as possible, without pulling aggro. This will be the basic premise for the entire fight. Easy.
Things become more difficult with the addition of 2 alternate attacks Po-Sha will use, Mental Assault and Gas. Mental Assault, so long as the Healers and Ranged DPS stay far enough away, should always be directed at the Tank(s), and will drain Mana and Stamina until it is depleted, then begin draining Health at an alarming rate. It is for this reason that a Dark Templar is recommended, as they can use their Mana to shield their Health, preventing them from taking damage. Mental Assault can be dangerous if not properly prepared; however, it Gas that you should focus your attention on. Simply, Po-Sha will release Gas intermittently throughout the fight in a cone that covers two directions. If you’re found standing in it, you will die. It is for this reason that two Tanks are advised, as they can swap aggro throughout the fight, allowing them to ensure that they are not standing in the Gas. When Po-Sha releases this Gas, it is imperative that the Tank(s) move out of its radius, and that the remaining group members shift their positions accordingly, so that they remain behind Po-Sha to avoid his Spew attack, and too, to ensure that they are not standing in the Gas.
BOSS ENCOUNTER: PO-SHA
Po-Sha is a dangerous encounter, and will likely take you several attempts to topple him on your first try regardless of which strategy you use. Though, as he can’t move at all, he can be defeated quite easily with the right timing. To begin, think of the room as though it were a clock; with 12 o’clock representing the far back side of the room, and 6 o’clock representing the entrance. In the beginning, all DPS and Healers should make their way to 12 o’clock by sticking closely to the walls so as not to begin the fight prematurely. Your Tank(s) should move to 3 o’clock, as they will begin the battle by charging from that position, ensuring that Po-Sha is not facing the other members of the group when the battle begins.
Once the Tank(s) charge in and begin the battle, their primary concern will be maintaining aggro, and ensuring that Po-Sha does not face the other members of the party at any time, as his lead attack, Spew, will cause devastating damage to anyone he is facing. The Healer(s) should of course focus their efforts on keeping the Tank(s) alive, and the DPS on bringing him down as quickly as possible, without pulling aggro. This will be the basic premise for the entire fight. Easy.
Things become more difficult with the addition of 2 alternate attacks Po-Sha will use, Mental Assault and Gas. Mental Assault, so long as the Healers and Ranged DPS stay far enough away, should always be directed at the Tank(s), and will drain Mana and Stamina until it is depleted, then begin draining Health at an alarming rate. It is for this reason that a Dark Templar is recommended, as they can use their Mana to shield their Health, preventing them from taking damage. Mental Assault can be dangerous if not properly prepared; however, it Gas that you should focus your attention on. Simply, Po-Sha will release Gas intermittently throughout the fight in a cone that covers two directions. If you’re found standing in it, you will die. It is for this reason that two Tanks are advised, as they can swap aggro throughout the fight, allowing them to ensure that they are not standing in the Gas. When Po-Sha releases this Gas, it is imperative that the Tank(s) move out of its radius, and that the remaining group members shift their positions accordingly, so that they remain behind Po-Sha to avoid his Spew attack, and too, to ensure that they are not standing in the Gas.
 If things are beginning to look grim during this process, pray that you listened earlier and have with you a Priest of Mitra; their Holy Cleansing ability is invaluable in this fight, as it converts all poison and unholy damage your group takes into health, and as Po-Sha only uses Unholy and Poison damage, it a much needed ‘Ace up your Sleeve’, that could be the difference between a wipe and a new piece of gear. And with that, you should be well on your way to finishing Po-Sha off once and for all. Or so you might think.
When Po-Sha reaches 10% Health, he has another surprise in store for you, though thankfully, it not as bad as it will undoubtedly seem when it happens. Upon reaching 10%, Po-Sha will die, and a demon will burst from his stomach and attack your group. That right; another boss. Fortunately, this one is much easier to defeat, as it follows the age-old principle and music to any raider ears: ‘Tank and Spank’. The only real ‘trick’ here is to ensure that all members of your group ‘stack’ on the demon (stay as close to him as possible), as he will randomly change target and charge them. Outside of that, ensure that your Tank(s) maintain aggro as best as they can, and that you don’t step into any lingering Gas from the previous battle, and the demon should fall easily.
And with that, you’re done. Not so bad after all, right? Well, maybe. One small slip-up in the battle and chances are you’re going to need to start over. Stick at it though, and bring a Conqueror if you can; their battle resurrection can be a real lifesaver. Once you’re done, it time to enjoy your first taste of Khitai dungeon gear, and a number of other little treats. Then, well, wait an hour and do it again. Trust me; you’re going to need all the practice you can get if you’re ever going to attempt to defeat him on Hard Mode. It a challenge to remember.
NEXT WEEK ON”
Thanks for reading; with any luck, this guide was useful to you in some way, and if not, well, hopefully the future instalments will be! Next week, we’re going to take a quick look at what you can do in order to get yourself a new mount or battle companion, and then, jump right into the next dungeon in the Northern Grasslands: the Warmonk Monastery. Stay tuned.
If things are beginning to look grim during this process, pray that you listened earlier and have with you a Priest of Mitra; their Holy Cleansing ability is invaluable in this fight, as it converts all poison and unholy damage your group takes into health, and as Po-Sha only uses Unholy and Poison damage, it a much needed ‘Ace up your Sleeve’, that could be the difference between a wipe and a new piece of gear. And with that, you should be well on your way to finishing Po-Sha off once and for all. Or so you might think.
When Po-Sha reaches 10% Health, he has another surprise in store for you, though thankfully, it not as bad as it will undoubtedly seem when it happens. Upon reaching 10%, Po-Sha will die, and a demon will burst from his stomach and attack your group. That right; another boss. Fortunately, this one is much easier to defeat, as it follows the age-old principle and music to any raider ears: ‘Tank and Spank’. The only real ‘trick’ here is to ensure that all members of your group ‘stack’ on the demon (stay as close to him as possible), as he will randomly change target and charge them. Outside of that, ensure that your Tank(s) maintain aggro as best as they can, and that you don’t step into any lingering Gas from the previous battle, and the demon should fall easily.
And with that, you’re done. Not so bad after all, right? Well, maybe. One small slip-up in the battle and chances are you’re going to need to start over. Stick at it though, and bring a Conqueror if you can; their battle resurrection can be a real lifesaver. Once you’re done, it time to enjoy your first taste of Khitai dungeon gear, and a number of other little treats. Then, well, wait an hour and do it again. Trust me; you’re going to need all the practice you can get if you’re ever going to attempt to defeat him on Hard Mode. It a challenge to remember.
NEXT WEEK ON”
Thanks for reading; with any luck, this guide was useful to you in some way, and if not, well, hopefully the future instalments will be! Next week, we’re going to take a quick look at what you can do in order to get yourself a new mount or battle companion, and then, jump right into the next dungeon in the Northern Grasslands: the Warmonk Monastery. Stay tuned.

 Here's A Temporary Fix To Get DualShock 4 Working On Windows 10
 Listed: 7 Television Characters and the Online Games They'd Play .
 The End of the Golden Age of MOBAs .
 Terraria 1.3: This Almost-MMO is a MMO Fan's Dream .
 FAQ: What MMO Are You Most Anticipating in 2015? .