The PzKpfw VI Tiger (P) on paper seems like a very tough tank to face for a lot of the tanks it faces in tier 5-7 and it is if you do not know where the weak spots are since it has very good frontal armor for tier 7. However, deep beneath the surface stats and you will find this tank is much weaker than what it’s listed armor values portray.
Green= Best chance to penetrate
Yellow= Second best chance to penetrate
Red= Worst chance to penetrate
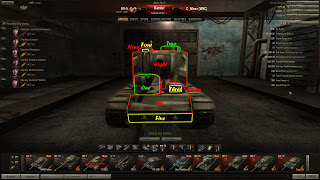
Frontal View
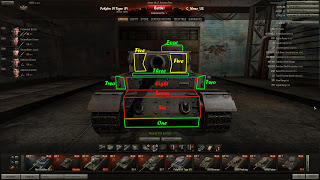
Frontally the Tiger (P) is at it’s strongest as it’s sides are very weak(80mm) while it’s frontal armor is as thick as 200mm. Even with 200mm armor the Tiger (P) has easily exploitable weaknesses that are easy to hit at close to mid range.
Area One:
Lower hull armor is only 80mm thick around a 35 degree angle. This makes it susceptible to guns with 100mm of penetration which will penetrate it the majority of the time since it’s effective armor is around 90mm. Keep in mind the closer you are to the Tiger (P) however will make it more difficult to penetrate as the angle increases.
Area Two:
These two “cheek” sections are part of the side armor scheme and while angled away from you are rather easy to damage. It’s effective armor is higher than the lower hull(roughly 108mm) but for most tanks it is an easy spot to damage.
Area Three:
This section underneath the gun is easily penetrated by guns with over 110mm of penetration and can damage the turret ring.
Area Four:
Commander’s hatch is very large and unprotected on this tank. A bit tougher to damage for those tanks who’s guns hover around 120mm of penetration since it’s actually 130mm of effective armor on the commander’s hatch. Nonetheless most tanks facing the Tiger (P) can go through it like butter.
Area Five:
Unlike a lot of heavy tanks the turret armor on the Tiger (P) is not very strong. Frontal values are listed at 120mm however it is closer to 150mm due to the large mantlet armor that overlaps the actual turret on the front. Almost no angle on that 150mm however making it easy prey for most, just avoid shooting the thicker portions around the gun.
Area Six:
Finally a strong point for this “heavily armored” tank. This portion of the front is 200mm thick at a 45 degree angle making it around 250mm of effective armor.
Area Seven;
This portion of the frontal armor is at such a sharp angle that it will bounce almost all shots at it unless you are on a cliff looking down onto the Tiger (P).
Area Eight:
The gun and driver’s slits are able to be damaged(mostly 0% critical hits however) but overall aren’t weak spots. Armor here is 200mm with hardly any angle on it.
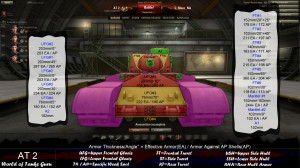
Angled View
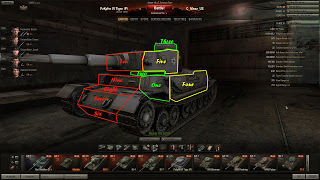
At an angle the Tiger (P)’s frontal armor becomes difficult for almost any tank to damage. However, if it’s side armor is exposed in any way it is a very easy opponent.
Area One:
That side portion of the armor visible from the frontal view becomes even easier to penetrate. At only 80mm of armor it is roughly flat here(depending on the specific angle) and is easy to damage. 100mm+ penetration will go through it easily.
Area Two:
This section of the turret ring is the flattest part and is easy to damage for tanks with 110mm+ of penetration.
Area Three:
That tall commander’s hatch is visible from nearly every angle and while 120mm thick and tougher than area one/two most tanks facing the Tiger (P) around tier 7 won’t have any issues.
Area Four:
Side armor is only 80mm thick and depending on the specific angle can be very easy or very difficult to penetrate. Use your best judgement but typically just aim for area one as it is the better option.
Area Five:
Side turret armor like the sides is only 80mm thick and depending on the specific angle is very weak or somewhat tough.
Area Six-Nine:
At this angle the entire front is difficult to penetrate(especially area 7,8,9) as they are extremely angled and 7/9 are already 200mm thick. Lower hull while 80mm thick becomes much tougher to penetrate from this angle and it is usually easiest to just aim at the easier weak spots. If the Tiger (P) is angled less than this provided angle above the lower hull can be penetrated by 140mm+ pen guns. Even then just aim for the less protected portions and avoid annoying random bounces.
Area Ten:
Depending on the specific angle the frontal turret can be very difficult to penetrate if angled away as that 150mm of armor drastically scales up with additional angles.
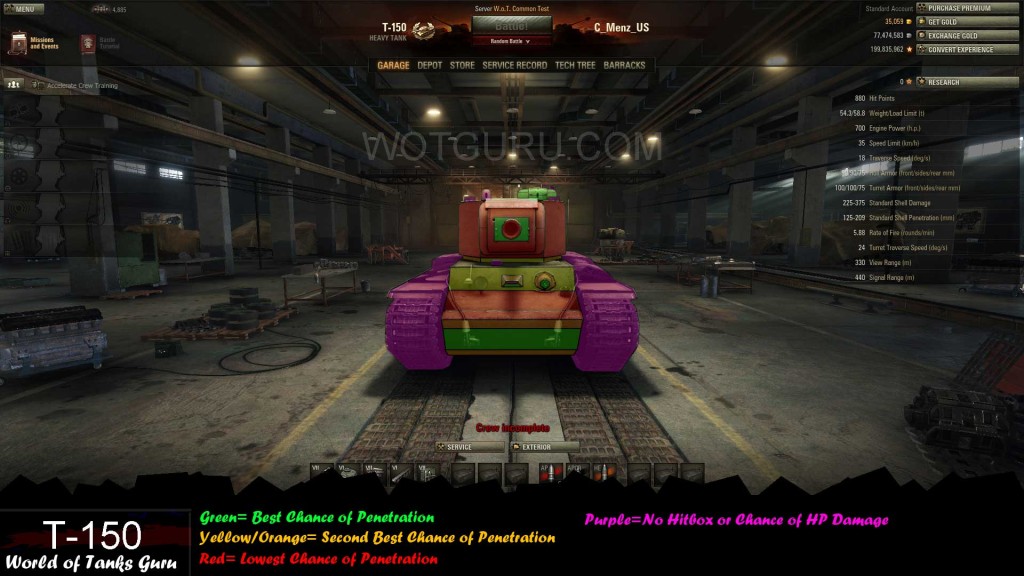
Side View
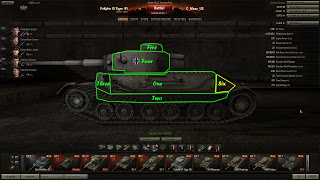
Nothing to difficult here as the Tiger (P) lacks any sort of side armor.
Area One-Three:
80mm of side armor with hardly any angle on it. Just avoid shooting the track areas and you will be alright.
Area Four:
Side turret armor is only 80mm thick and easy to damage.
Area Five:
Commander’s hatch is actually tougher to damage due to it being 120mm then the 80mm side armor but is still a viable option.
Area Six:
The only “tough” spot on the side armor is this rear plate that is at an odd angle. It can be damaged from this view by 140mm+ guns but does have some odd bounces associated with it. Best to just avoid shooting here from the side.
Rear View
Entire rear section of the tiger (P) like the sides is only 80mm thick(even the back of the turret) making it one gigantic weak spot as long as you avoid shooting any odd angles.
 Weak Spot Guide: KV-5 - World of Tanks Guru
 World of Tanks Guide - StuG III
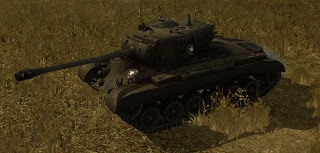 Tank Guide: M26 Pershing - World of Tanks Guru
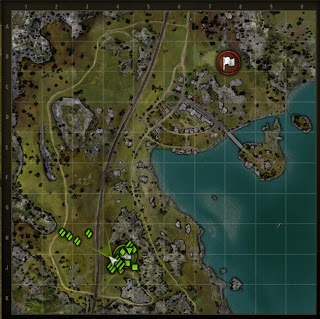 Map Strategy: Serene Coast - World of Tanks Guru
 Weak Spots Guide: Type 59 - World of Tanks Guru