100 Floors
By: Tobi Apps Limited
DownloadThis is a walkthrough guide for anyone who needs help, cheats, hints, tips, answers or solutions for the iPhone/iPod game 100 Floors. If you like this game, try these other escape games and walkthroughs from AppUnwrapper.com.
Floor 1: Tap the green “up” button to open the door, then press the green arrow to continue to the next level.
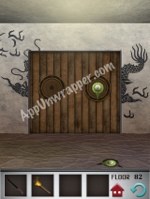
Floor 2: Slide the garbage can to the side. Pick up the green triangle. Tap it in your inventory and put it in the empty slot to the right of the elevator. Press it to open the door.
Floor 3: Tilt your phone.
Floor 4: Grab both doors with your fingers and pry them open.
Floor 5: Shake the screen so the ladder falls.
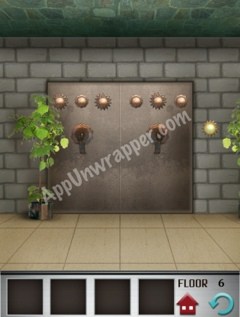
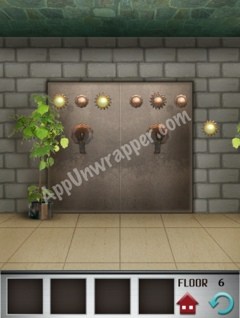
Floor 6: Move the right plant. Tap the little sun button to make it yellow. Then tap all three buttons on the doors that match that sun to turn them yellow.
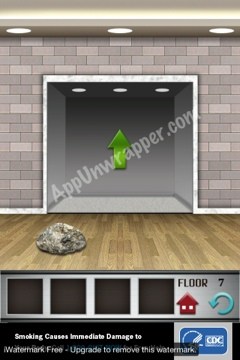
Floor 7: Tilt your phone left until the rock on the right moves onto the red button.
Try these other escape games and walkthroughs from AppUnwrapper.com.
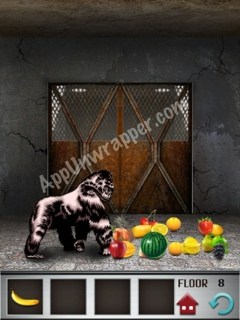
Floor 8: Move the fruits until you find a banana. Take the banana, then select it and use it on the gorilla.
Floor 9: Tap the big circles until they match the little circles.
***Get FREE iTunes Credits***
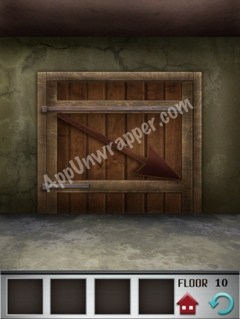
Floor 10: Turn your phone upside-down an shake really hard to get rid of the snake. Then trace the arrow on the door to open it.
Floor 11: This is like a labyrinth game. You need to tilt your phone to get both balls in the hole at the same time, causing the lights above the door to light up green.
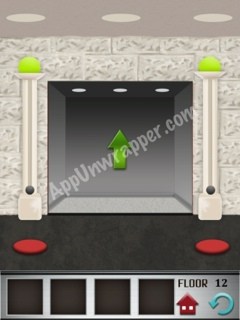
Floor 12: Hit each red button until it hits the top, turning the light green.
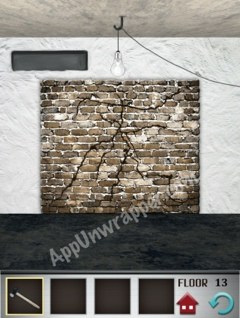
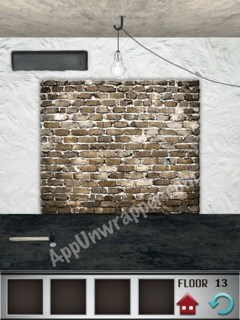
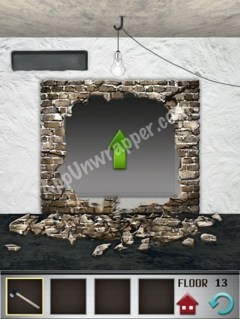
Floor 13: Shake your phone until the hammer falls. Pick it up and use it on the wall until you break through.
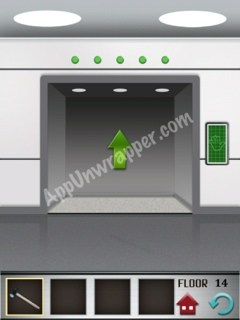
Floor 14: hold your thumb down on the green handprint until all five lights turn green.
Floor 15: Tap the keys 1, 6, 4, 3 to open the door.
Floor 16: Pick up the screwdriver. Unscrew the four screws and remove the plate. Turn the phone upside-down to open the doors.
Try these other escape games and walkthroughs from AppUnwrapper.com.
Floor 17: Use the lines on the doors as a guide for pressing the buttons. Start from the top, so 1 left, 2 right, 3 left, 2 right.
Floor 18: All five squares need to be lit at the same time for the door to open. I did it by quickly lighting up the left side from up to down, then the right side up to down.
Floor 19: Pick up the rag off the floor. Use it to remove the cobwebs from the door. Keep cleaning the doors until they’re clean.
Floor 20: Move the sign. Take the screw from the ground and place it in the hole. Use the screwdriver to tighten it.
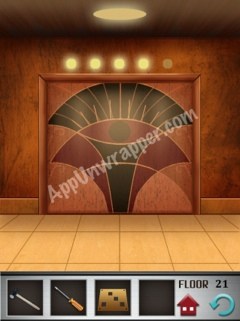
Floor 21: All I did was hold my phone upright so the eye was open, until all the lights went on.
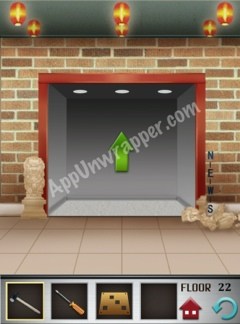
Floor 22: Use the hammer to break the right statue. Then follow the directions to open the door. Swipe up, right, left, down.
Floor 23: Tap the green spot to turn on the lights. Place the metal plate on the doors. Tap the buttons in the order from most petals to least petals.
Floor 24: Use two fingers to slide the door up. Use a third finger to tap the arrow to the next level.
Floor 25: Slide the circles on the door up and down to match the locations of the circles on the floor.
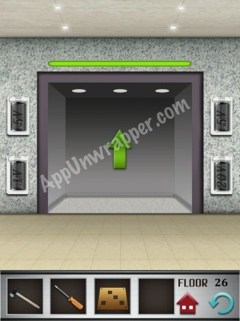
Floor 26: Remove all the batteries, then places them in the slots to make the bar green. You can follow my screenshot, just put the last two on the door:
Floor 27: Move the white block on the right to reveal a crack in the wall. Use the hammer to break the wall and take the crank. Place the crank in the hole in the door and turn it until all the lights turn green.
Floor 28: Treat the dots above the door like morse code. Tap two times quickly, then wait for the rainbow to disappear. Then continue, waiting at each space. So 2 taps, pause, 3 taps, pause, 1 tap, pause, 2 taps. And it should open.
Floor 29: Lay the phone flat on its back and wait for the numbers to count down to 1. Then the bomb will explode the doors open.
Floor 30: Look at the current time and set the clock to that time. Then pull the lever down to open the door.
Floor 31: Unscrew the two screws, then turn the sign upside-down.
Floor 32: Couldn’t get a photo in time, so I’ll try typing it out. The numbers should look like this:
6,7
3,4,5
1,2
Floor 33: Just tap the correct button for the color of the item that appears. They go fast, so act quick. You need to light up all the lights above the door. If you get one wrong, it restarts.
Floor: 34: Type out “IOOFLOORS” (use an “i” and two “o”s for the 100).
Try these other escape games and walkthroughs from AppUnwrapper.com.
Floor 35: Make the two digits spell out “35”.
Floor 36: Tap the fish, dog, apple, plane, moon.
Floor 37: Move the little square up on the upper left hand corner. Then take the little round piece from it and the first light will light up. Then move the drum/barrel aside and the second one will light up. Lay the phone flat on its back and the door will open.
Floor 38: Tap the left, then upper right, then lower right quickly after each other so all three hit the green strip at the same time.
Floor 39: Start drawing from 2 across, 3 down and make a triangle. The fourth line goes from 2 across, 4 down to to upper right corner.

Floor 40: Lower your volume until it’s muted.
Floor 41: Tap on each ant a few times to see what shape it forms when it moves. Then change the shape near that ant to correspond with it.
Blue = triangle
Pink = straight line
Purple = double triangle (hourglass)
Green = triangle
Floor 42: Turn off the lights, and take note of the shapes that appear. Then slide the doors apart. Turn off the lights to see two more shapes. Then slide those doors away. Match the shapes you saw to the four slots in front of you to unlock the door.


Floor 43: Move the plants to find a hole on the left and a tube on the right. Place the black ball you have in the hole, then guide it into the tube on the right by tilting your phone.

Floor 44: Move the plant. Then tap the panels on the doors until they’re in this order: Grey, white, black, white.
Floor 45: Pick up the knife off the floor on the left side. Use the hammer on the projector to break it. Use the knife to cut the balloon (swipe at the string) and then tilt your phone to guide the balloon to the red button.

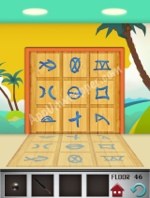
Floor 46: Match the images to the reflection on the floor. It should look like this, except the bottom right corner needs to be rotated more:
Floor 47: Create a path from the circle to the lightning bolt, using all the puzzle pieces. You can use the screenshot below, just rotate the second piece down all the way to the right.

Floor 48: Use the knife to cut away as much of the vines as you can. Then count the flowers of each color on the door and press the buttons in relation to them. So, White = 5, Yellow = 5, Pink = 4.
Floor 49: Tap the buttons in the right order to spell out “PASSWORD”.
Floor 50: Do this with multiple fingers, or you’ll get frustrated fast. Just tap at the door quickly and the green bar above it will start to fill up. This is an annoying one if you don’t have a good multitouch screen.
Floor 51: The sword is the clue here. You want to copy its shape in the black and white squares. So make the middle four squares black, then the top and bottom in the 2nd row.
Floor 52: Change the numbers to 1225, which stands for Christmas (December 25th).
Floor 53: Pull the hook down to pick up the box. Unplug the wire. Take the cutters and cut the fence with them.

Floor 54: The clues here are “A = 01” and “CODE”. You need to spell out CODE in numbers. C = 03, O = 15, D = 04, and E = 05. So “03150405” is the password.
Floor 55: This was absolutely the dumbest level ever. Very frustrating. Just rotate your phone for a while until you see some other shapes slide across the screen. They move quickly, so once you figure out the movement that makes them appear, do it slowly to fill in the spaces and make a square.
Floor 56: If you’ve played MineSweeper, this level is like that. You need to count the flags around each number and change the piece to that number. It should look like this:
4
3, 5
5
2, 4
Floor 57: The red button moves the hook sideways. Press it until it’s above the wrecking ball, then drag the hook down to the ball. Press the Byron again until it’s directly in front of the door. Then tap the ball a few times until it breaks through the door and you see the familiar green arrow.

Floor 58: Ignore the black keys. You only need the three white keys. Basically, the lower frequency is first (261.6), then 293.7, and the third key is 329.6. Just follow the sequence on the door and it will open!
Floor 59: Pick up the tock and stick. Rotate the magnifying glass so it points at the pile of sticks. Tap the light above the magnifying glass to get it to shine on, lighting a fire. Then use the stick on the fire to get a torch. Use the torch on the frozen lever and pull the lever down to open the door.

Floor 60: Light the torches on either side of the tiki face so the eyes open. Then hit the drums in order from left to right, as many times as that color appears on the door. So, Red x 4, Dark Blue x 2, White x 1, Light Blue x 4.
Floor 61: The clock says 6:30, which is also 18:30. You need to drag the pieces of numbers from the sides up to the top to spell out 1830:

Floor 62: Use the knife to cut the red wire on the left. Then use the two arrows to move the one remaining laser above the door.

Floor 63: Tilt your phone so the rock lands on the left button. You then need to match the pattern on the floor to the pattern on the ceiling.

Floor 64: Grab the little black dot in middle of the eye and spin it really fast in circles until the green line fills up and the door opens. (This is similar to the knocking level.)
Floor 65: You can roll the ball around, but don’t bother. Instead, pick it up so it’s in your inventory. Then put it in the hole at the bottom of the tube. Use the torch on the smoke alarm and the sprinkler will go on, causing the ball to float to the top and hit the button.

Floor 66: Pick up the stick lying among the spikes. Use it to get the grappling hook off the wall. Use the grappling hook on the ring on the door, then pull on it to pull the door out of the wall.
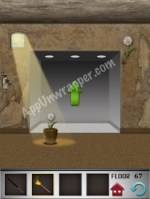
Floor 67: Tap the dandelion seed pod on the right to see where the seeds blow. Then move the pot of soil to the spot where it lands (under the light coming in from the window). Once the seed is in the pot, move it under the faucet and turn on the water. A dandelion will grow. Then move it back to the light and it will turn into a seed pod and open the door.
Floor 68: You need to be quick with this one. Pick up the star-shaped piece from the floor. Then hold the lever down until the boxes is high off the floor. Quickly take your finger off the lever and grab the wooden piece under the box (you can use your other hand for this to make it easier). Then select the star piece in your bag. Lift the box up again and quickly place the star under it before it drops again.
Floor 69: This takes a little bit of trial and error. You need to tap the glass light fixture on the ceiling so it starts falling. Then you need to get the timing right and tap the fish on the right so it hits the light fixture into the octopus, chasing it off the drain. The water will then go down the drain. Wipe away the seaweed from the door and it will open.
Floor 70: I honestly don’t know the logic behind this. I just kept playing with the arrows until I saw new rooms. Once you see room 6, press the right arrow and you’ll get to the spaceship and open the door.
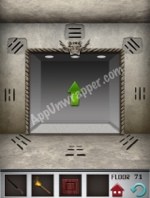
Floor 71: Tap the empty spaces until they’re the opposite of the patterns already there:
Floor 72: Place the shapes on the dash that corresponds to the number of sides that shape has.
Floor 73: You just have to do the math to get 73. You start at 0. Slide towards +20 to get 20, then
*2 to get 40,
-10 to get 30,
*3 to get 90,
/2 to get 45,
+15 to get 60,
/4 to get 15,
*5 to get 75,
-5 to get 70,
+3 to get 73.
Floor 74: The colors go like so:
Yellow
Green, Blue
Purple, Light Blue
Red
Floor 75: The three bigger weights go on the right side, and the smallest one goes on the left.
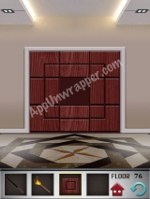
Floor 76: This is a sliding block puzzle. Slide the pieces so they look like the photo below, then place the middle piece from your inventory.
Floor 77: Hold down the green button until it lands on the green light. It will blink a few times and the door will open.
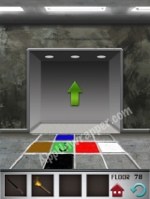
Floor 78: Use the diagrams to get this:
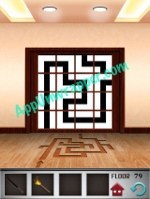
Floor 79: Match the tiles to the floor like a maze. You can follow the photo below, just change the one piece that’s wrong.
Floor 80: The number is a mirror image, and the torches go in the order of the mirrored numbers, so you start counting 1 – 5 from the right. The button on the floor represents the decimal. So, light torch 1, 3, 2, button, 5, 4, button, button, 5, 3, button.

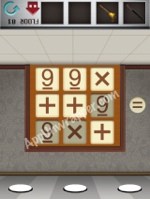
Floor 81: I’m not really sure why this works, but you need to turn your phone upside-down and then tap 9 X 9 = to open to door.
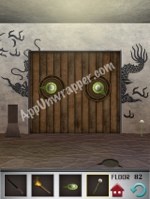
Floor 82: The dial for the left door is hidden in the floor. Tap the spot to reveal it, then pick it up:
Place the dial in the slot on the left door, then turn the dials so they look like this, revealing a lever. Take the lever.

Place the lever in the hole to the right. It’s a bit hard to see.
Then hold the lever down with one finger and tap on the green arrow with another.

Floor 83: Fit all the pieces into the square like so:

Floor 84: Another annoying one. This requires you to be incredibly precise. What you need to do is tap the buttons in this order:
All three at exactly the same time.
Then the red button.
Then both blue buttons at exactly the same time.
Then all three again.
The tricky part here is that the sounds tell you of you correctly pressed those buttons (try pressing the red button to see what the “correct” sound is like, and a single blue button to see what the “error” sound is like). So if you press one red and one blue, it will make an error sound. Same thing if you press only one blue. But if you press any of the correct combinations, (all three, just red, or both blue), you get the “correct” sound. Where the game can drive you crazy is that you might think you pressed all three buttons at the same time, when in fact your finger hit the red button before the two blue, still creating the “correct” sound, but messing up your sequence without you knowing.
So, long story short — just keep trying until you get it. If you get an “error” sound at any point, start over.

Floor 85: This level’s a breeze after that last one. Number the candles 1 through 3 from left to right. Then look at the numbers above the door. An orange number means you need to light that candle, while a black number means you need to put that candle out. To light a candle, select the torch and then tap that candle. To put a cancel out, make sure to UN-select the torch and then touch that candle. Just follow the sequence and the door will open.

Floor 86: This is a clock, and the numbers above the door tell you which numbers to set it to. When you press the numbers at the top, they spin in the direction you need to move the hour hand. So, here’s how you do it:
Tap the 11, see it spins counter-clockwise. Move the hand counter-clockwise to 11:
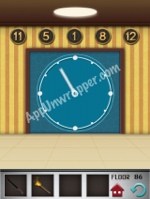
Tap the 5. See it spins clockwise. Move the hand clockwise to 5:

Tap the 1. See it spins clockwise. Move the hand clockwise to 1:

Tap the 8. See it goes counter-clockwise. Move the hand counter-clockwise to 8:
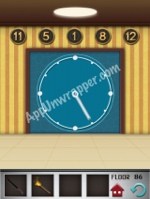
Tap the 12. See it goes clockwise. Move the hand clockwise to 12 and the door will open:

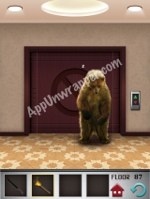
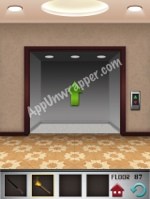
Floor 87: Shake your phone front to back until the bear wakes up. While he’s awake, tap him and move him to the side. Let him fall asleep again, then tap the elevator button and the door will open.

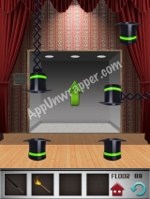
Floor 88: Arrange the hats like the photo below, then drag and drop the ball into the hat in the upper right corner.
Floor 89: Each square has the first two letters of a number from 1 (On) to 9 (Ni). Notice the arrow on the right, going up, as well as the roman numeral V on the apple. Start from the fruit at the bottom, counting the number of letters and press the right order.
Coconut (7) – Se
Banana (6) – Si
Pineapple (9) – Ni
Apple (5) – Fi
And don’t forget the pear on the ceiling (4) – Fo
Floor 90: Tap the bottom buttons the right number of times to get the ‘stars’ to all light up. I labeled the ‘stars’ 1-7, from left to right.
Left bottom button-
Tap 1: ‘stars’ 2 & 3 light up
Tap 2: 4 & 6
Tap 3: 1 & 3
Tap 4: 2 & 6 *
Middle bottom button-
Tap 1: 1 & 5
Tap 2: 3 & 6
Tap 3: 1 & 4 *
Tap 4: 2 & 5
Right bottom button-
Tap 1: 2 & 4
Tap 2: 3 & 5 *
Tap 3: 1 & 2
Tap 4: 4 & 5
So, simply put, tap the left bottom button 4 times, the middle bottom button 3 times, and the right bottom button 2 times.
What about ‘star’ #7? Press the blue button on the top right corner.
(Thanks Lucy for the detailed description!)


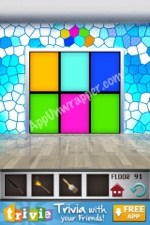
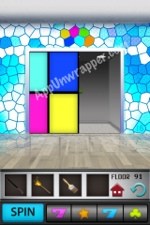
Floor 91: Pick up the brush. Select it and rub the right corner of the wall to revel a “16”, or upside-down “91”. Then tap the number. Colored panels will appear on the doors. They change color when you tap them. Change them all to match the colors above the doors, only flipped around the same way the 91 is. So it looks like this (just change the bottom right piece to yellow):
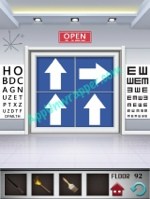
Floor 92: “O P E N” above the door is the clue. The arrows should point:
Up, Right
Up, Down

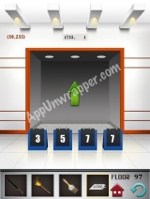
Floor 93: The stopwatch above the door is the clue. You need to hold each button down for the number of seconds written on the door. Practice with the 3 because it’s easier. Hold it down for exactly 3 seconds and it will stay lit. Then hold the button in front of the 9 for 9 seconds an it will stay lit and the doors will open.
Floor 94: The clue is the “11” above the door. Arrange the spotlights to spell out “XI”, the Roman Numerals for 11.

Floor 95: The clue is a sideways green “8/26”. The solution is to make a sideways green “H” because H is the 8th letter of the alphabet. So make the top and bottom lines green and the middle dot green as well. The remaining two buttons should be yellow, like so:

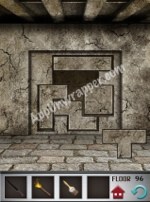
Floor 96: You need to fit the Tetris pieces together like a puzzle. Tap a piece to rotate it. It should look like this. The last piece goes in the middle:
Floor 97: Use the knife to pop the balloon. A piece of paper will drop to the floor. Pick it up. Then put it next to the piece of paper above the door. Change the numbers below the door like so:
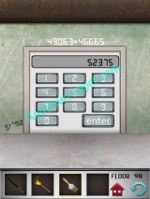
Floor 98: Use the brush on the lower left corner of the wall to reveal some numbers. Then count the number of pieces in each number (ie. 8 = 7) and enter them into the calculator, like so:
Floor 99: You need to fill in the signs in this equation. The clue is “15”. FYI, you can use the volume controls to make the “+” and “-” signs. It should look like this, making both sides of the equation equal to 15:

Floor 100:
If you liked this game, check out these other escape games.


 100 Pics – Arsenal FC Level 1-100 Answers
 Zoom Pics Quiz Game Level 41-50 Answers and Solutions
 LINE Hidden Catch Cheats & Hack for Gems - AppGameCheats.com
 Talking Ginger Hack for Toothpastes & Jigsaw Puzzles - AppGameCheats.com
 Iconica Pack 5 Answers Level 1-75