The Sherlock Holmes: Crimes and Punishments game guide contains a lot of tips useful when playing the seventh part of this great detective series. It is a thorough, illustrated solution, which will guide you through all the actions that need to be performed in order to solve six complex criminal cases. At the end of each case, you have to make a moral choice: you can either condemn the culprit or absolve him. It influences the rank you obtain and the final screen of a given investigation informs you how many players made the same decision. However, before you confirm the decision, you will have the opportunity to check all the possible variants by naming different culprits or changing your mind about the punishment. To make using the game guide easier, each chapter has been divided into subchapters that describe the tasks that Holmes has to deal with. Moreover, puzzles, mini-games, Character Portraits and Deduction Space actions are all titled with headings that allow the reader to locate them quickly in the text. The achievements are listed in the last chapter. In the game, you take control mainly of Holmes, but sometimes also Watson and even Toby - the dog. This time, each case is a different story, connected to the rest only by one clue - the existence of a group of rebels.
The Sherlock Holmes: Crimes and Punishments Game Guide contains:
Katarzyna "Kayleigh" Michalowska
Casebook
The Casebook acts as a substitute for Holmes's equipment. It consists of the following tabs: Tasks, Map, Evidence, Documents, Dialogues, Chronicles, Trophies, Echoes and Character Portraits. Each time when something new appears in a given tab, the icon of it will appear on the screen and an exclamation mark can be seen next to the tab. It is good to view them, most importantly the Tasks tab, Documents and Evidence, as they make it easier to draw conclusions and decide what the next step should be.
Evidence
Some of the Evidence have a special icon that informs the player what can be done with them - ask someone about it, analyze it, look for further details in the archives or some other actions.
Magnifying glass icon
When a given object has been examined completely, the icon turns green. If it's white, it means that the item can be further investigated. Sometimes, an information appears that the object will be of use in the nearest future.
Close-ups
After examining a given object in the close-up mode, normal view should be enabled automatically. If it doesn't happen, it means that some element that should've been investigated was overlooked.
Steering and manipulating objects
Assigning hotkeys can be done by pressing F1 (PC) or both analog sticks simultaneously (consoles). An important change is that you no longer have to "drag out" the items from your equipment. When you have an item that can be used on some object or place, the action will appear on the screen automatically.
Puzzles and mini-games
Escaping the close-up mode when solving a puzzle serves as a reset button - it sets the default state. It is useful when you feel like you're in a dead-end and need to start over or use a solution from the game guide. You can also skip those mini-events with no consequences to the gameplay, besides not obtaining the Achievement for completing them.
Holmes's talent and imagination
New skills that allow Sherlock to see things that a normal person would overlook. Use them each time when the proper icon appears on the screen.
Travelling
Sherlock very often moves from one location to another, which you select on the Map in your Casebook. During these travels, you can view the Casebook and the Deduction Space, so you can make connections between Clues or draw Conclusions, name the culprit, view the Evidence and Documents as you wait.
Deduction Space
It is good to make the connections immediately, not waiting until you stack a lot of Clues and it will be difficult to make head or tail of it. Every time when Sherlock draws a new conclusion, the deduction icon appears.
Alternative endings
Some Conclusions obtained in the Deduction Space rule out one another. This means that you can go the wrong path and name the wrong culprit in result. If it is important to you to find the right criminal, you can check if your investigation was successful before you make the final decision. You can also check if you've collected all the necessary Evidence.
Moral choices
Each case has only one correct solution, but the choice whether to condemn or absolve the culprit is left to the player to make. Attention! Being consistent in making these decisions will earn you an Achievement.
Color markings
All the Evidence are marked in red, Documents - in blue, QTE answers - green and puzzle solutions or important information are bolded.
As Watson, hide behind the sofa after entering the living room, then behind the table (in the middle) and lastly, behind Sherlock himself.
As Sherlock, after talking to Lestrade (an Evidence will appear in the third tab of the Casebook: Profile of the victim) and Watson, go to Holmes's room (the door on the right, opposite the window).
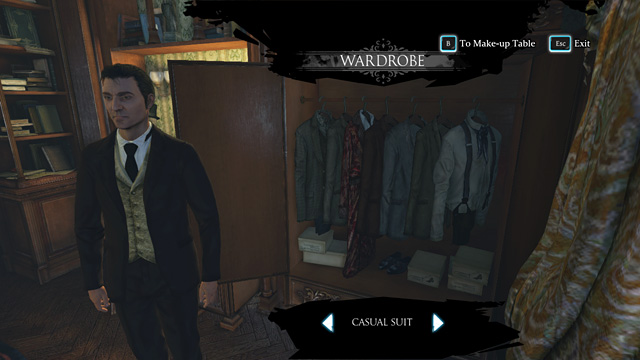 Holmes in wardrobe.
Approach the Wardrobe (to the left of the window), open the door and choose a suit (using the arrows at the bottom of the screen), for example - Casual Suit.
Exit the close-up mode and open the Casebook. Enter the second tab and select Woodman's Lee on the map.
When at the place, walk along the fence (its right side), towards a house visible in the distance. Turn right a little and approach a woman sitting in an armchair by the table. Talk to Mrs. Carey about all the possible topics.
Judith Carey portrait:
Click the icon of Mrs. Carey (on her body). Using the keys shown at the top, move the screen and click those objects on the character and near it, on which a blue circle appears. Those objects are:
When a QTE icon appears during the conversation, press the right key before the time runs out. Choose Pilgrimage from the possible variants (you also have an Evidence like this in the Casebook).
Say goodbye to the woman and go down the road, with the fence to your left, then turn left - to the garden. Halfway through the path, near a policeman, when a special icon will appear, activate Holmes's talent and investigate the footprints on the ground. Examine the Unidentified Footprints in a close-up.
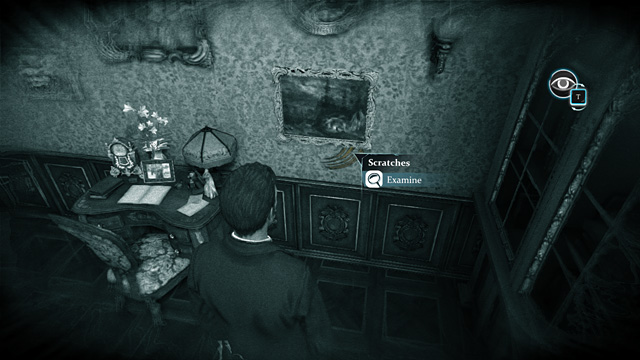
Approach the hut and try to open the door. After the inspector's reproof, activate Holmes's talent and Examine the lock - specifically, the Scratches on it. Go inside and investigate Peter Carey's body.
Peter Carey portrait:
Pick up the Sea knife from the ground and Examine the Wooden handle and the Blade. Also, pick up the Notebook and Examine the Inscription and Blood in the bottom-right corner. Open it and Examine the Abbreviations.
In the hut, examine also the Ship's nameplate (to the left of the body) and the objects on the Table: a Bottle and a Dirty glass. Take the Tobacco pouch, so you can examine the tobacco.
Identifying the kind of the tobacco
You need to match two elements (Tobacco Leaf and Smoking Pipe) to the picture. Rotate it 180 degrees, so that the leaf is on the right and the pipe is on the left side of the ship. Now, manipulate the ship to connect the two parts of it. Move the pipe up and down so that the lines from its bottom are attached to the prow. The white stripe on the leaf should become the end of the stern. You can see the complete ship on the picture below.
 The tobacco puzzle.
Examine also the Harpoon rack (opposite the table) and the content of the Wooden chest below. Take the Navigation tools and Peter Carey's boots. Examine the Ship's logs on a shelf on the left.
You should also take a look at the Sperm whale tooth on another shelf (closer to the door) and most importantly, the Outline in the dust (to the right of the tooth) - to see it, you have to activate Holmes's talent.
At the end, examine the map to the right of the door (Hammerfest and Dundee).
Leave the hut and examine the footprints in the garden once again, this time trying to match Peter Carey's boots (drag the boot onto the footprint). An information about the boots not matching the footprints will appear in the Evidence tab (Boots don't match). Go and talk to Peter's wife once again. Select all the dialogue options.
Deduction
Enter the Deduction Space. Connect "Notebook" (click) and "Break-in attempts" (click). View the effect of this connection (a neuron with an exclamation mark) - Holmes will decide to prepare an ambush.
Return to the hut and talk to Lestrade. Then, go to the back of the hut (from the left side) and examine the window with open shutters (Hiding place). When the inspector catches the burglar, circle the hut and go inside.
When in Scotland Yard, approach the policeman behind the counter and talk to him. Enter the corridor on the left and go through the first door on the right, to the Evidence Room. Examine Neligan's belongings on the table by the wall (on the left). You will see a Notebook (with some Abbreviations in it), a Pocket knife, a Handkerchief and a Ring.
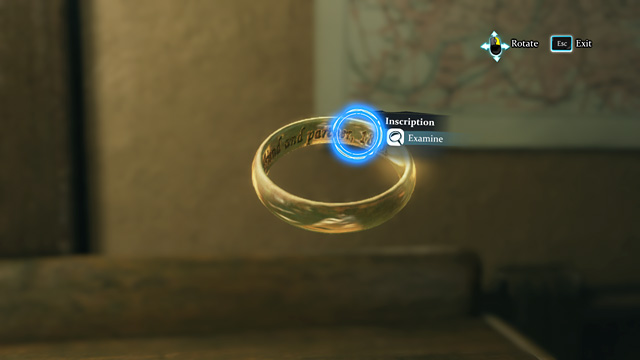 The Inscription on Neligan's ring.
Take the ring and rotate it to see the Inscription on its inner part (in three parts). The name Dawson will come up.
Leave the room and walk further along the corridor. Open the bars that block your way and enter through the door on the left - into the Interrogation Room. Talk to John Neligan. In the QTE sequence, select: Ring's engraving (you also have an Evidence like this in the Casebook).
John Neligan portrait:
Talk to the boy once again and select: Father's jacket in the QTE (also an Evidence in the Casebook).
Deduction
Connect "Break-in attempts" with "Neligan's notebook". You will obtain: "Retrieving the notebook".
Return to the Clues using the appropriate key (options at the top) and connect "Swift actions" with "Pinned to the wall". You will receive a task: "Experiment required".
Return to Baker Street and approach the Newspapers (to the right of the fireplace) to look for the name Dawson. Select Dawson and Neligan are bankrupt and read the article (3 pages). Leave the close-up mode.
Talk to Watson and head to Woodman's Lee. Take a Harpoon from the hut. Using the map, reach the Whitechapel Butcher. Talk to Watson and after the conversation, focus on throwing the Harpoon at the carcass.
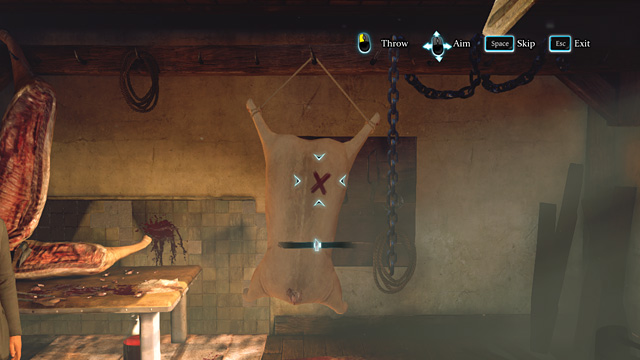 Hit the red X.
Hold your breath and aim at the red X. Press the right key (options at the top) when the marker is in the middle of the line. The harpoon has to go clean through the carcass.
Deduction
Connect "Strength requirement" with "Pinned to the Wall". You will obtain two options that rule out one another: "Feat of strength" and "Lucky throw".
Head to Scotland Yard and take the corridor on the left. Walk to the end of it and enter the Interrogation Room. Talk to Neligan about his father.
Move to Woodman's Lee and once again examine one of the Ship's logs. The important entry is the one from August.
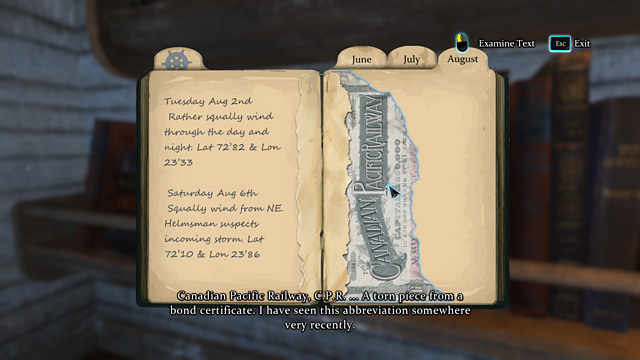 Canadian Pacific Railway - C.P.R.
Notice the torn-out pages and a piece of Bond certificate (click). Return to Baker Street.
After talking to Watson, approach the window and call Wiggins.
Head to Scotland Yard to talk to Lestrade. Go to the Evidence Room (the first door on the right in the corridor on the left). Examine Hurtley's belongings (on the left). Take his Boots and Stained letter. Examine the pen.
 The right abbreviation.
Now, take a look at Neligan's things once again. Compare the abbreviations in the Notebook with the Bond certificate. Underline C.P.R (fifth from the bottom). An Evidence will appear in the Casebook: Neligan's Story Proven.
Deduction
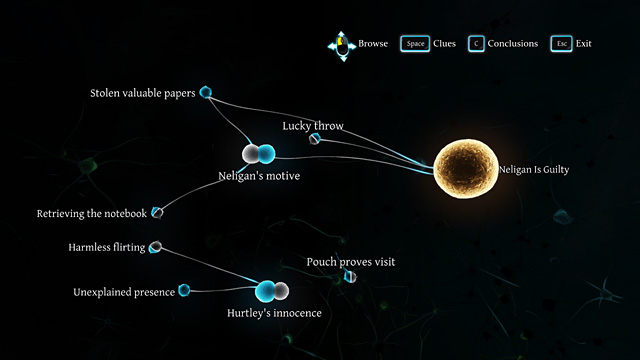
Connect "Missing papers" with "Missing tin box". You will obtain "Stolen valuable papers" and then, "Neligan's motive".
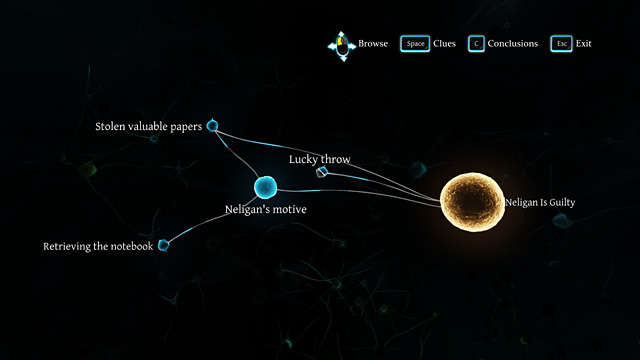 If you select Lucky throw, you can end the investigation now (the conclusion might not be right).
Connect "Missing papers" with "Break-in attempts". You will obtain "Looking for papers" and later - "Neligan's innocence".
Leave the room and walk to the end of the corridor. Click on Neligan, locked in the cell on the right. In the Interrogation Room, ask him about the burglary. In the QTE, select: Bond certificate. Leave the room and click on the other man in the second cell and interrogate him. This man is Liam Hurtley.
Liam Hurtley portrait:
In the Casebook, an Evidence will appear: Gardener.
Return to Baker Street.
Approach the Analysis table (to the left of the window). Select: Recover Hurtley's letter.
In order to do that, prepare a chemical agent by mixing the chemicals in a flask in the following order: Blue, Green, Blue, Orange, Colourless, Orange, Colourless (according to the rules shown on the paper - Orange always has to be third after Blue and Colourless goes right after Orange; all the reagents have to be used). Wipe Liam Hurtley's letter content with a cloth soaked in the chemical agent that you've just made. An Evidence will appear in the Casebook: Hurtley's letter
Head to Woodman's Lee and try to match Hurtley's boots to the footprints in the garden.
Deduction
Connect "Hurtley's footprints" with "No gardener". You will obtain "Unexplained presence".
Go to Scotland Yard and interrogate Hurtley once again. In the QTE, select: Hurtley's boots match (also an Evidence in the Casebook). Then, select: Gardener and Hurtley's letter. An Evidence will appear in the Casebook: Something hidden.
Return to Woodman's Lee and talk to Mrs. Carey about Liam Hurtley and the garden tools. Sherlock will receive a bunch of Small keys that open the shed.
Open the door of the shed (behind Mrs. Carey) and go inside. Activate Holmes's talent and examine the Wooden floor (on the right). Open the Ill-fitting plank and Take the Small wooden box.
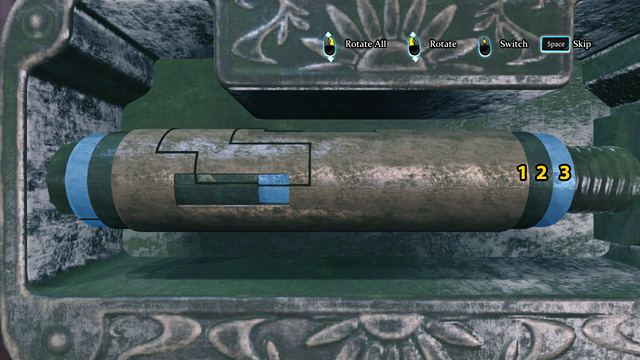
Opening the Small wooden box
A puzzle will appear, in which you have to rotate the parts of the lock in such way, so that the lines would connect.
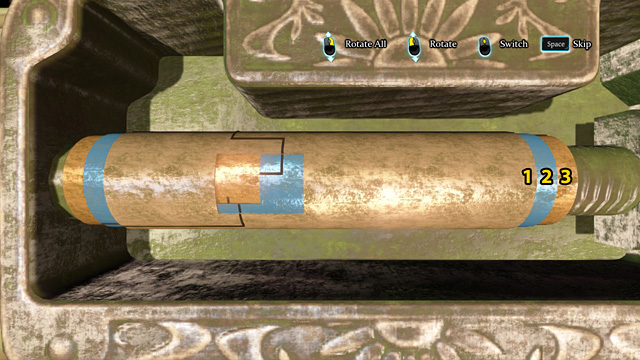
Switch (1 click) to number 2 and turn it upwards to make the small window visible and connect the lines in it with the lines on the part number 1.
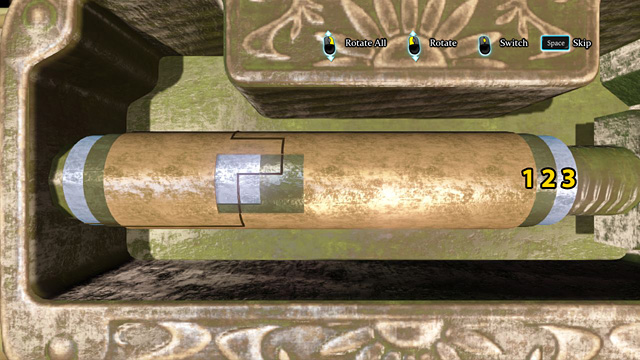
Switch (1 click) to number 3 and rotate it to match the lines with the ones on number 1.
Take a Bunch of letters from the box. Read Judith Carey's letter content (2 pages). Talk to Mrs. Carey about that. Select: Romantic Correspondence in the QTE (also an Evidence in the Casebook).
Deduction
Connect "Judith Carey's confession" with "Liam Hurtley's letter". You will obtain "Harmless flirting".
Connect "Judith Carey's confession" with "Judith Carey's letter". You will obtain "Desperate jealousy" and then, "Hurtley's motive".
 If you combine the following Conclusions: Lucky throw, Neligan's innocence and Hurtley's motive, you can end the investigation now (the conclusion might not be right).
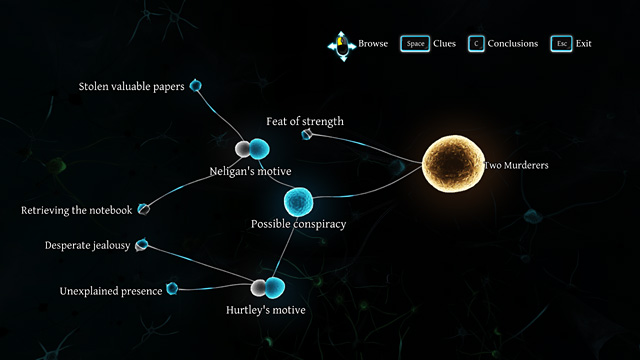 You can also end the investigation by combining Hurtley's motive, Neligan's motive and Feat of strength (the conclusion might not be right).
Go to Baker Street. After talking to Wiggins, on the list that you've received, underline the name: Patrick Cairns, harpooner.
Deduction
Connect "Patrick Cairns" with "Peter Carey a non-smoker". You will receive a task to check Patrick Cairns.
Go to Holmes's room and take Sailor Outfit from the wardrobe. Using the map, head to the "Sea Witch" pub.
Armwrestling
When in the pub, go to the table opposite the entrance. Talk to Patrick and challenge him.
Notice that when you restrain, the level of your stamina rises and when you push, it lowers. In both cases, you have to press the right key quickly (options at the top of the screen). Focus mainly on pushing, as it is the only way to win. Be careful with your stamina, but even if its level falls to zero, it doesn't mean that Cairns will defeat Holmes right away. Try to push when the sailor is loose and restrain when he frowns. You have to defeat him two times before he talks.
Ask about all the topics (The following Evidence will appear in your Casebook: Story of August 1883 and Concealed Murder).
Patrick Cairns portrait:
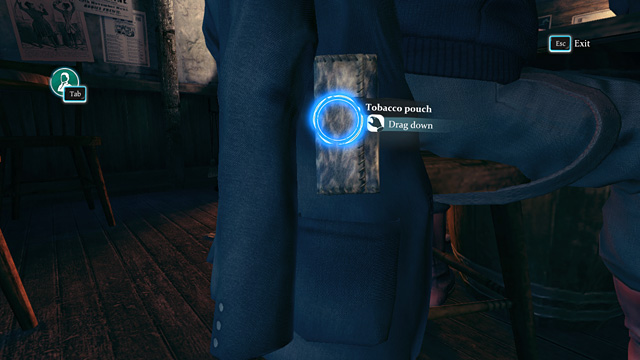 Planting the pouch.
Tell the man that you have to go to the toilet and go behind his chair. Put the pouch from the crime scene inside the pocket of his jacket (drag it down in the close-up mode). Ask Patrick for tobacco (an Evidence will appear in the Casebook: Cairns is a smoker).
Deduction
Connect "Patrick Cairns' pouch" with "Patrick Cairns". You will receive two options that rule out one another: "Pouch proves visit" and "Pouch proves guilt". It is time to name the culprit.
Cairns Is Guilty
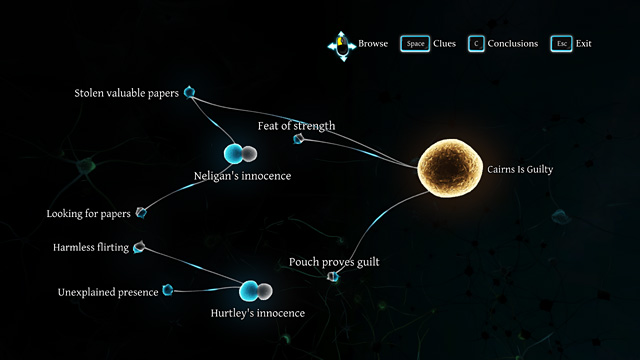 The right result of the investigation.
Required Conclusions:
After pointing out the culprit, you can either let him go or send him to jail.
When the sailor shows up in Holmes's house, you will get into a fist fight with him. Hit him in the face a few times - aim for the blue circle. To perform the final punch, press the W key (Y on a pad) when the icon shows up on the screen. Attention! This fight can be lost.
Before you make the final decision, you can check out the rest of the variants (the "Replay Ending" option).
Neligan Is Guilty
Required Conclusions:
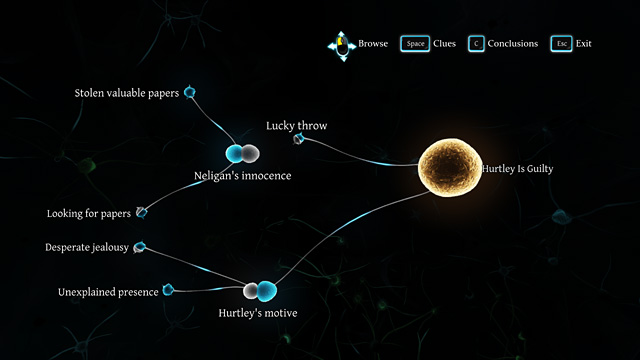
Hurtley Is Guilty

Required Conclusions:
Two Murderers (later you decide which one of them is the initiator)
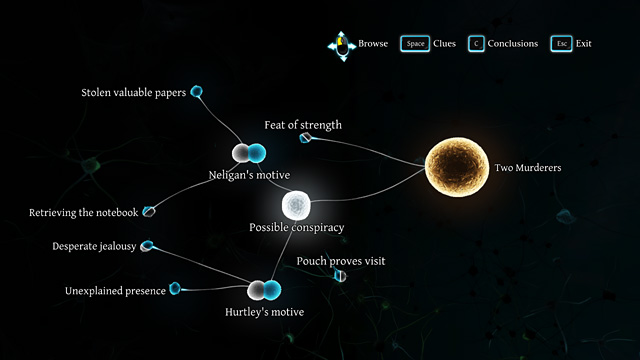
Required Conclusions:
After Mycroft leaves, open the main door.
Head to the carriage in front of the station, take the stairs leading to the platform and walk along. When the icon appears, activate Holmes's imagination.
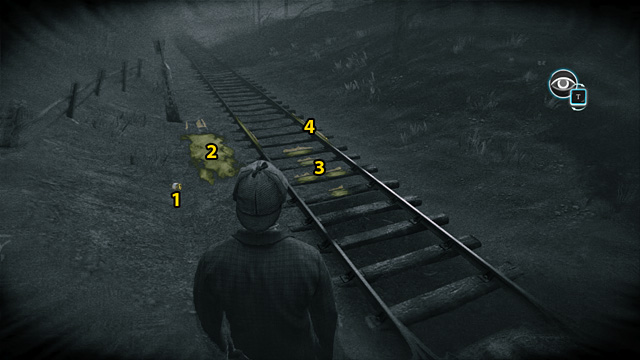 1 - Empty bottle, 2 - Ground near the rails, 3 - Sleepers, 4 - Rails.
Examine the Empty bottle and Ground near the rails (on the left), as well as the Sleepers and the Rails (on the right).
Return to the station, go to the platform and talk to Evesham Station Master.
Everett (Evesham Station Master) portrait:
Ask the man about the train and the Railway Map.
Go to the Waiting Hall (glazed door, second on the right). Take the Railway Map from the wall on the left. Go to the platform and enter the Warehouse (the next door).
Examine the Junk pile on the table by the door: Locomotive bell (on the left), Spare parts (on the right) and a big Spare part on the floor, opposite the table. Leave the room.
Turn back, towards the Station Master and go to the Ticket Office (right side of the building). Take the corridor on the right and enter the room. Examine the objects on the Office table. Take the Telegram (Message to all stations) and read it in the close-up mode. Also, take and examine Train composition (an Evidence will appear in the Casebook: Train composition). Lastly, take a look at the Telegraph located near the wall opposite the door.
Now, go talk to the Station Master (Special wagon, Passengers of the train, Bridlington station - you will learn that the Train was delayed). Select Bridlington on the map.
Enter the Waiting Hall (first glazed door on the right). Talk to the Angry passenger, who stands near the exit.
Angry passenger portrait:
Ask him about the train incident.
Next, talk to Mr. Robinson sitting on a bench near the fireplace.
Thomas Robinson portrait:
Continue the conversation and you will learn that Robinson stepped off to meet somebody at the station and that there were some Barcazas directors on the train.
Deduction
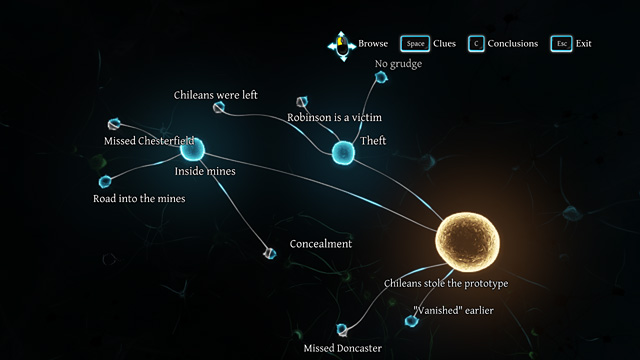
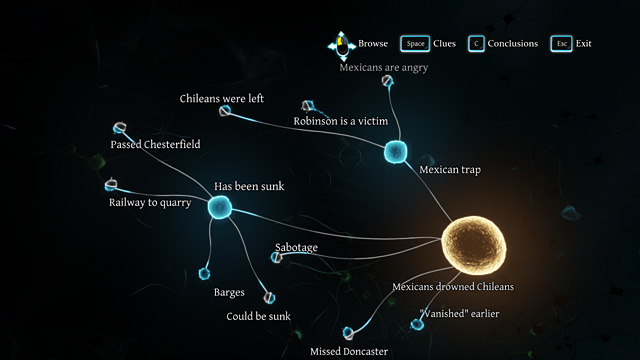
Connect "Train vanished with the people" with "Chileans stayed on the train". You will obtain two options, from which you will have to choose only one: "Accident" and "Chileans were left".
From the Waiting Hall, go to the Station Master's office (the door on the right, in the corner, near the entrance to the Waiting Hall). Look at the telegraph opposite the door. Activate Holmes's talent.
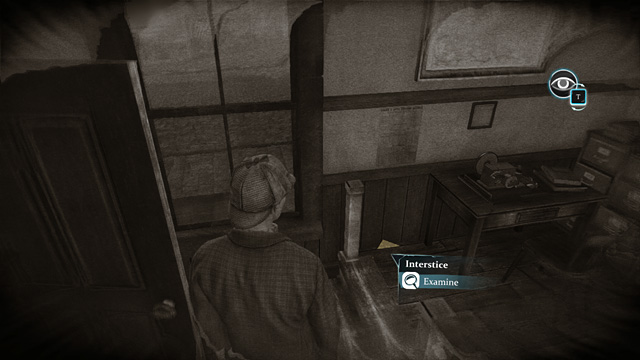 Prototype Insurance Policy is in the Interstice.
Sherlock will notice an Interstice in the floor, by the wall, near the telegraph. There is a document in it. Take Robinson's Prototype Insurance Policy out (also an Evidence in the Casebook).
Talk to the Station Master about problems with passenger.
Bertram (Bridlington Station Master) portrait:
Continue the topic of yesterday's events. In the QTE, select: Rookie station master (also an Evidence in the Casebook). As a result of the conversation, Telegram from Chesterfield St. will appear in the Documents tab and Chesterfield's report in the Evidence tab.
Leave the office and talk to Robinson again. The topic of his baggage in the left luggage room will turn up. Go to the platform (the door next to the Angry passenger) and head right, into the next room. You will find Robinson's luggage there.
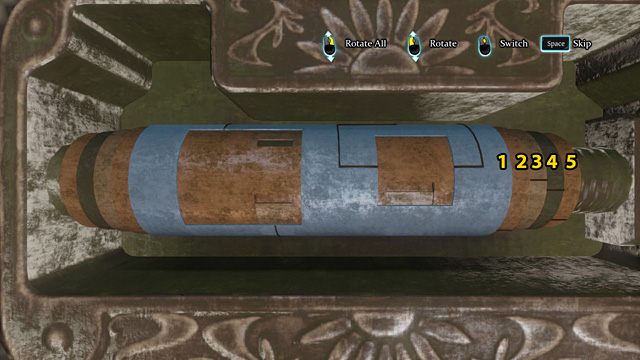
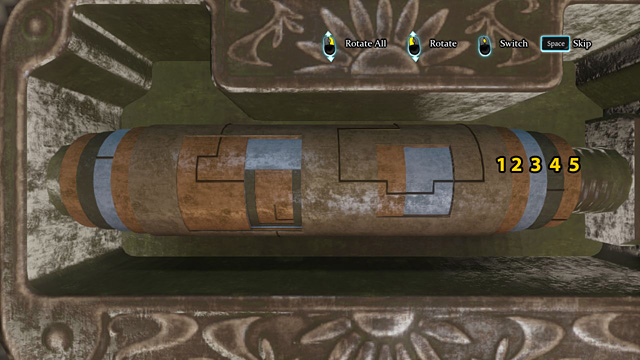
Opening Robinson's luggage
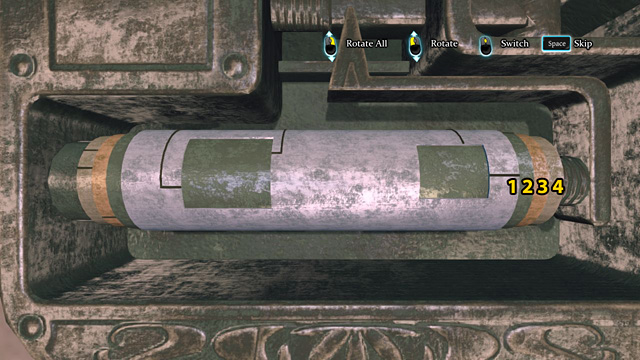
Rotate cylinder nr 1, so you can see two windows.
Switch to cylinder nr 2 (1 click) and match the lines in the left window to those on nr 1.
Switch to cylinder nr 3 (1 click) and rotate it so that there is a hole in the second window, through which you can see cylinder nr 4 and match the short horizontal line on the right edge of cylinder nr 3 with the short horizontal lines on the right edges of cylinders nr 1 and 2.

Switch to cylinder nr 4 (1 click) and match the line in the right window to the line on cylinder nr 1.
Take Business papers from the suitcase. Move the magnifying glass around the contract and underline the text that turns red - fragments: "exclusive sales contract" and "Mr. Thomas. L. Robinson". Do the same with three other contracts.
Deduction
Connect "Special wagon" with "Prototype has insurance". You will obtain "Robinson's motive".
Connect "Special wagon" with "Prototype has many customers". You will obtain "Robinson is a victim".
Now, using the Map, head to Chesterfield.
Enter the station (wide glazed door on the left) and open the door near the ticket office (on the right). Look at the Telegraph near the entrance and examine the piece of paper with Morse code alphabet.
Try to waken the Station Master. After you've done it, ask him about the passengers of the train.
Chesterfield Station Master portrait
Continue the conversation and select: Binge drinking in the QTE (also an Evidence in the Casebook).
Deduction
Connect "Chesterfield telegram" with "Chesterfield Master is untrustworthy". You will have to choose between two Conclusions: "Passed Chesterfield" or "Missed Chesterfield".
Leave the room and go to the platform (use the door next to the ticket office). Head left and try to open the next door in the building (left luggage room). It turns out that they're closed, so you need to use a lockpick.
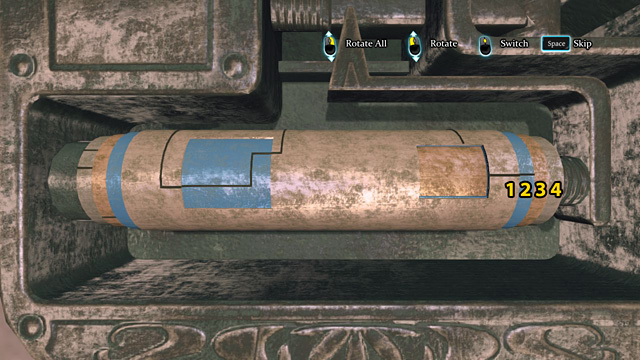
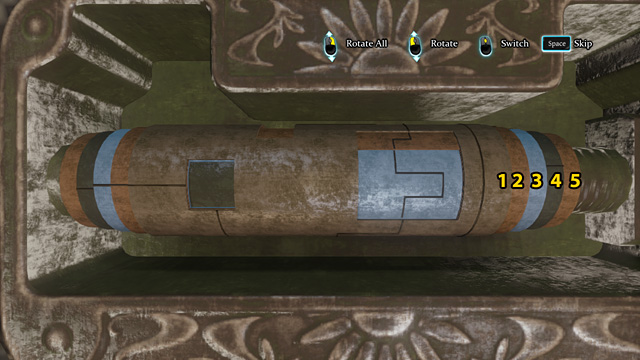
Opening the door to the left luggage room

Rotate cylinder nr 1 so that a window in the middle is visible.
Switch (1 click) to nr 2 and match the lines in the window to those on nr 1. The lines in the upper window will align automatically as well.
Rotate all the cylinders at once so that you can see the lower window.
Switch (1 click) to nr 3 and match the lines in the window with nr 1.
Enter the left luggage room. Examine the Instruments on the right. Holmes will notice that they are dirty. Activate the detective's talent. Sherlock will see some Traces on the floor. Examine them. Move one of the Sacks on the right and examine the Bottles.
Return to the ticket office and talk to the Station Master about Dirty Instruments and Workers. Then, go to the Warehouse (to the right of the left luggage room) and examine the Handcar wheelbase.
Deduction
Connect "No traces of train" with "Spare parts of a handcar". You will receive a task: "Fake Train experiment".
Select this option on the wheelbase.
Constructing the Handcar
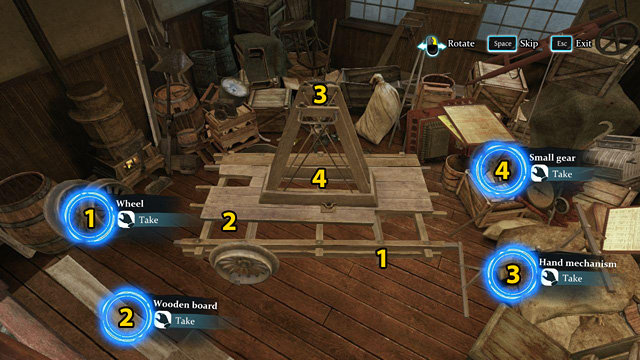
To conduct the experiment, you need to put the Handcar together. Install one of the wheels onto the axle (1). Take the Wooden board and attach it to the base (2). The Hand mechanism should go onto the top of the Handcar (3). Install the Small gear into the center of the machine (4).
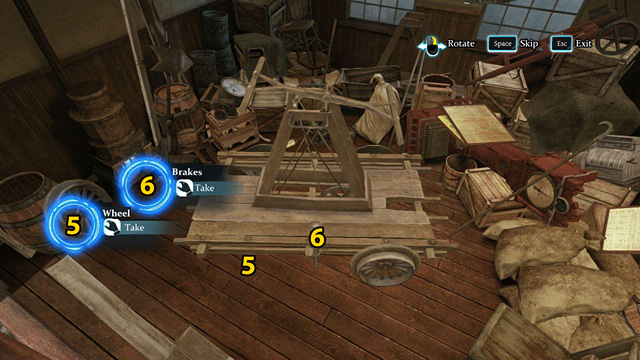
Rotate the Handcar so that you can see the other side of it. Take the other Wheel and install it onto the axle (5). Lastly, Put the Brakes between the wheels (6).
Look at the Handcar (Fake train) standing on the rails. Holmes will notice that there should also be a headlight and a steam whistle (exit the close-up mode).
Go back to the Warehouse and look for Train spare parts (on the left). Take Train Steam Whistle and Headlight with dynamo machine. Also take the Long pole standing near the sacks. There's also a Fire extinguisher on the table, which you should take with you.
Leave the Warehouse and examine the Fake train once again. Place the Long pole on the machine, install the Headlight and the Steam Whistle. Pump the air from the Fire extinguisher, blow the whistle and push the lever (on the right).
Deduction
Connect "Spare parts of a handcar" with "Fake Train". You will obtain "Vanished" earlier.
You need a more specific map. Go to the place where the carriage is. Approach the big suitcase at the back of it and select: Search "old map".
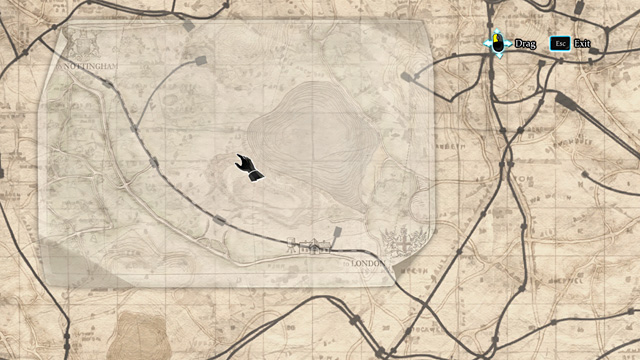
Now, you have to put the small map onto the big map from the suitcase so that the pictures match. Move the small map across the big one - notice that the lines from the big map can be visible through the other one. You can see the proper alignment of the maps in the picture above.
After matching the maps, you will obtain Detailed railway map.
Examine the rail switch (the red arrow on the right, below the sign). Read the inscription on the signpost on the left, near the road to the woods. Activate Holmes's imagination. Use the map to reach the Mines.
Walk a bit forwards and notice the Fallen sign on your left. It is an Information board (examine it). Pick up the Board from the ground and attach it in the right place, between the two other boards. Wipe the dirt off the boards. Holmes will be able to read the information: WEA Coal Company.
Now, examine the Vehicle traces on the road (to the right of the board). In the close-up mode, measure the distance between them and examine them. Also check the Wooden beam on the right. Walk towards the Mines until the Holmes's talent icon appears. Activate it and take a look at the Screws on the ground.
Climb the embankment on the left and head towards the wooden huts. Enter the one on your left. Notice that there is a Metal box lying on the floor, in the left corner. It's a small safe and you have to use a lockpick to open it.
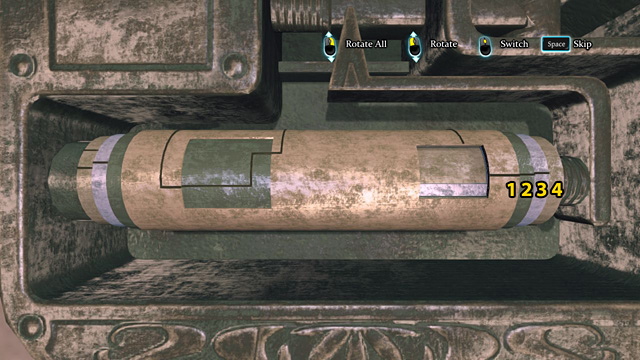
Opening the Metal box in the hut near the Mines
Rotate cylinder nr 1 so that the two windows are moved a little upwards (the left one is slightly bigger than the right one).

Switch (1 click) to nr 2. Rotate it to match the lines in the right window to those on nr 1.
Switch (1 click) to nr 3. Match the lines in the right window with those on nr 1.
Rotate the two remaining cylinders downwards (simultaneously) so that you can see two windows (left one is smaller than the right one).
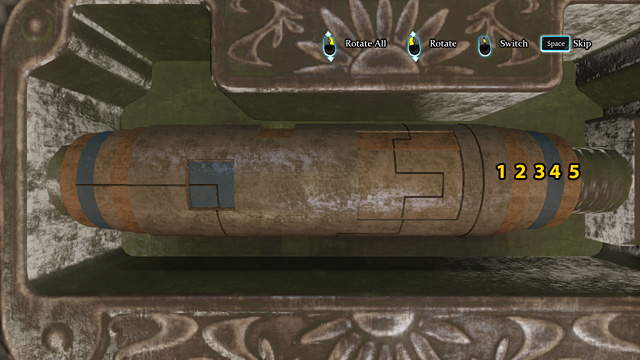
Switch to nr 4 and match the lines in the left window with those on nr 1. The window on the right is ready.
Switch to nr 5 and match the short horizontal line with the rest of them on nr 1, 2, 3 and 4.
After opening the safe, take New security instructions from it.
Leave the hut and head to the collapsed entrance to the Mines. Activate Sherlock's talent. Notice a Paper package lying in the rocks. Approach it and examine the Strange package in the close-up mode. Examine the box and pull aside the Paper cover. Take a look at the Sawdust.
As Watson, shoot at the package, aiming a little below it.
Deduction
Connect "Mines were blasted" with "Mines are collapsed". Two Conclusions will appear that rule out each other: "Concealment" and "Sabotage".
Use the map to move to Evesham.
Take the stairs near the carriage to reach the Ticket Office. Enter the room with a Telegraph inside (the door on the right in the corridor) and select: Contact Mycroft. You will receive an answer about WEA Coal Company.
Deduction
Connect "WEA Coal and Chileans" with "Mexicans vs Chileans". You will obtain "No grudge".
Leave the building and head right, along the rails. Cross them near a fenced square and open the wooden gate. You will reach the Dismantled warehouse.
Examine the Remains of building (on the right). Approach the two deep lines on the ground (to the right of the remains). Activate Holmes's talent. Examine the Heavy vehicle traces and take measurement.
Return to the station and talk to the Station Master about the Disassembled warehouse.
Deduction
Connect "Stolen rail track" with "Rails to mines are missing". You will obtain "Road into the mines".
Use the Map to reach the Station between Chesterfield and Evesham.
Enter the Waiting Hall at the Doncaster Station. Notice a Cigar stub lying on the floor near one of the benches in the center of the hall. Pick it up and sniff it.
Recognizing the kind of the cigar
Rotate it 180 degrees so that the smoke would be on the left side and the mint leaves on the right side of it. Tilt it a bit to match the sombrero with its missing part. Move the leaves to the right so that the lines would fill up the empty space in the sombrero. Drag the smoke down to align all the parts of the hat. You can see the complete hat in the picture below.
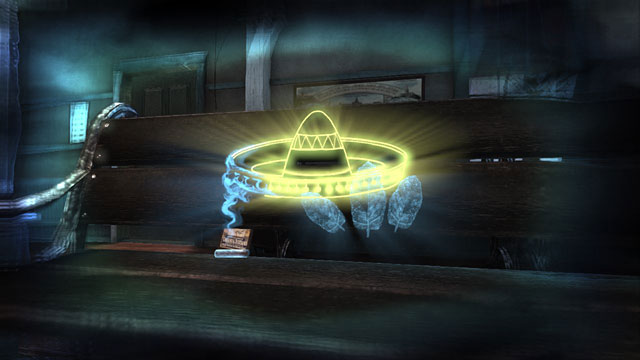 Cigar puzzle solution.
Activate Sherlock's talent and approach the ashtray next to the bench. Take the Piece of burnt paper and read the text. Examine the Cigar stub on the left (bigger than the others) and the rest of the Ashtray.
Head to the ticket office on the left, namely to a corridor leading into that room, near the exit to the platform. Examine the Horse racing magazines and Horse racing tickets on the table. Look at them from both sides using the close-up mode.
Leave the building using the door leading to the platform. Watson will notice a Flooded area behind the tracks and a new Evidence will appear in the Casebook. Head right, go past the second entrance to the Waiting Hall and open the next door, leading to the left luggage room. You will see Station master's bag hanging on the wall (on your right) - examine it. Take out A letter to lawyer and read it. Do the same with A letter to wife (2 pages).
Go to the platform and talk to Doncaster Station Master, who is sitting on some luggage.
Duff (Doncaster Station Master) portrait:
Select topics: Flooded area, The passengers and Gambling man. In the QTE, select: Horse racing tickets. Lastly, ask about the Mexican.
Deduction
Connect "Doncaster telegram" with "Doncaster Master received money". You will obtain two Conclusions, from which you will have to choose only one: "Passed Doncaster" and "Missed Doncaster".
When assuming that Robinson is a victim, Chileans were left, the train Missed Chesterfield and Doncaster and that the train was Inside mines, you can end the investigation now (the final conclusion may not be right).If you assume the following Conclusions: Accident, Robinson's motive, Missed Chesterfield, Missed Doncaster and Inside mines, you can end the investigation now (the final conclusion may not be right).
Head to the right side of the building (walking away from the Station Master) and walk along the tracks until you reach a Rail switch (on your left). Examine it.
Now, walk along the tracks leading to the lake. When an icon appears, examine the Rails. You will reach a place when the tracks suddenly end. Examine it.
Deduction
Connect "Stolen rail track" with "Old railway to the quarry". You will obtain "Railway to quarry".
Connect "Old railway to the quarry" with "Flooded quarry". You will obtain two Conclusions, from which you will have to choose only one: "Could be sunk" and "Cannot be sunk".
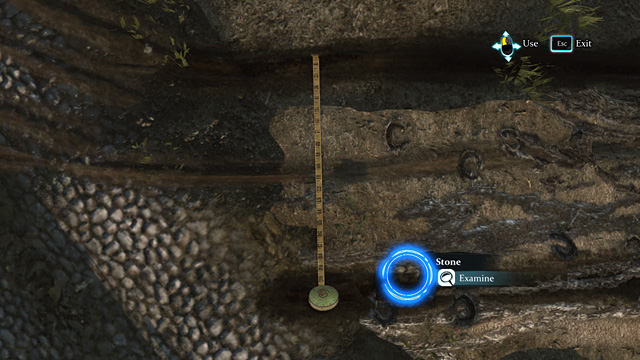
Use the map to go to the Beach. Walk along the path leading to the lake. Examine the Heavy vehicle traces.
In the close-up mode, measure the distance between the traces and examine the Stone nearby.
Walk along and take a look (2x) at the Boat trip advertisement (on your right). Head towards the water until the icon of Sherlock's talent appears. Activate it and approach the Refuse left on the sand. Notice the Metal label in the sand. Take it out and examine the Inscription: Las Zarpas.
Turn back and head to the carriage, where you should check "Las Zarpas" in your Portable archives. Search the Encyclopedias and find the Technology tab. Select: Las Zarpas - Barge transportation.
Return to the Doncaster Station and enter the Waiting Hall. You will be able to talk to the Mexican before he leaves.
Mexican portrait:
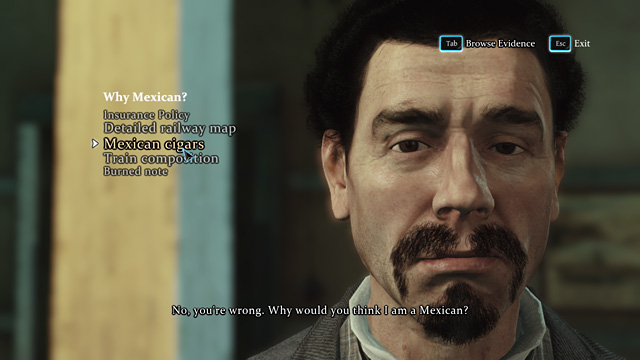 This man doesn't speak the truth.
Ask him about his nationality and select: Mexican cigars in the QTE. Continue the conversation.
Deduction
Connect "WEA Coal and Chileans" with "Suspicious Mexican at Doncaster". You will obtain "Mexicans are angry".
Connect "Mexican Caracal have barges" with "Special transport". You will obtain "Barges".
It's time to name the culprits.
Mexicans drowned Chileans
 The right final conclusion.
Required Conclusions:
After naming the culprits, you will have to decide whether to give them to the court or let the politicians gloss over the case. At the end, as Watson, shoot at the Mexican, aiming at his shoulder. Attention! You can be late or shoot the man in the head.
Mexicans sealed in Chileans
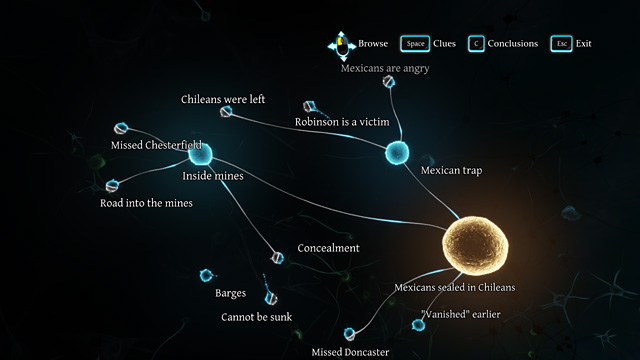
Required Conclusions:
Chileans stole the prototype
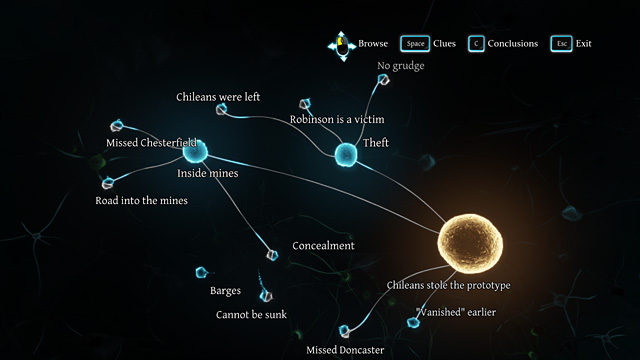
Required Conclusions:
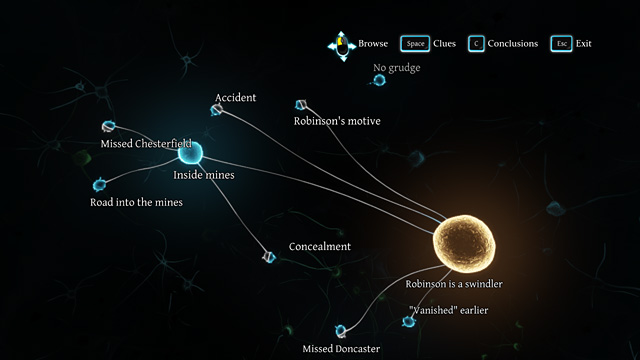
Robinson is a swindler
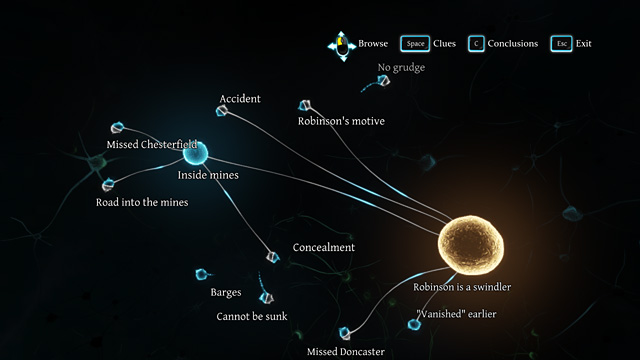
Required Conclusions:
As Watson, having found Sherlock unconscious, examine his Pupil (the left one - from player's perspective). Check temperature (Forehead) and Measure heart rate (Wrist).
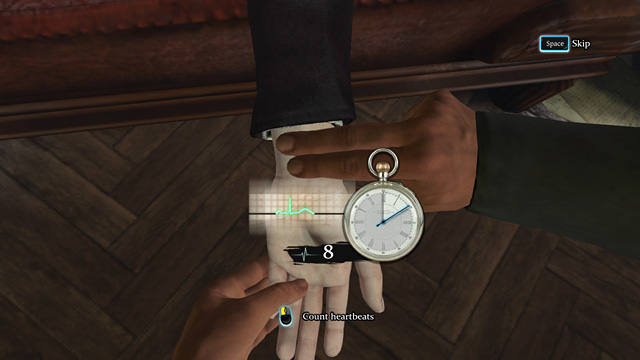 Measuring heart rate.
A stopwatch will appear, which you should of course switch on and click LMB (or the proper button on the pad) each time, when a vertical impulse appears on the cardiogram. You should count 8 heartbeats in 10 seconds.
After the inspector's visit, use the map to move to Strand Lane Bath.
Ask Lestrade about everything that he knows about the case. Then, talk to Philips, who is sitting behind the desk.
Alan Philips portrait:
Head to the door to the left of the desk. In the Apodyterium, examine the Champagne bottle (Chilled Champagne). Take a look at the Cork and the Wine label. Rotate the bucket and examine the Melted Ice.
Now, go to the Sudatorium. Examine the body in the niche: Face, Wound, Blood on the left side, Right hand: Dirt behind the nails, Ring finger and Wrist. You will obtain an Evidence - Earth sample.
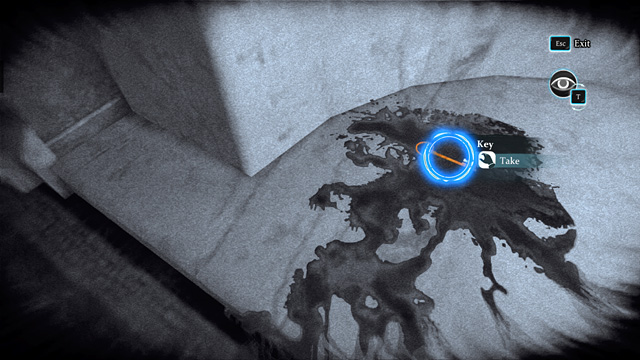 A Key in the pool of blood.
After the police takes the body away, examine the blood. Take a Blood sample and activate Holmes's talent. You will notice a Bloody key, which you should take.
Go to the right - behind another niche, there is a Steam switch. Examine it, as well as the Builder's plate above it. Use the switch to fill the place with steam. Activate Sherlock's talent to locate the switch in the steamy room and use it again.
Check also the Brazier on the pedestal. Among the coal, you will notice some Melted metal. Examine the glasses left on the edge of the brazier. In the close-up mode, check the Thick glass and the Crack.
Now, approach the three men standing by the wall. Garrow, Pitkin and Blinkhorn. Try to learn something about each one, but mind that they're all in shock and they will repeat the same things again and again. Examine the Blood on Mr. Garrow's towel (2x). Leave the room and go talk to the inspector. Allow him to take the suspects to the Yard.
Talk to Philips again. Ask him about the keys and the champagne. Also, learn if he had left the building before. In the QTE, select: Morning telegram.
Head to Scotland Yard.
Go to the Evidence Room (the corridor on the left, first door on the right). On the table, you will see the belongings of the victim and the witnesses. Examine them one by one.
Among Pitkin's belongings, check the Handkerchief, Fountain pen and the Visiting card. Rotate the card in the close-up mode to read the inscription.
In Garrow's belongings, you will find the Bloody towel and a Drug phial. Take it - Holmes will ask Watson about its contents: it's St. John's Wort powder.
In Blinkhorn's belongings, there is a Pencil and a Letter from Pitkin (also an Evidence in the Casebook). Take it and read it (2 pages).
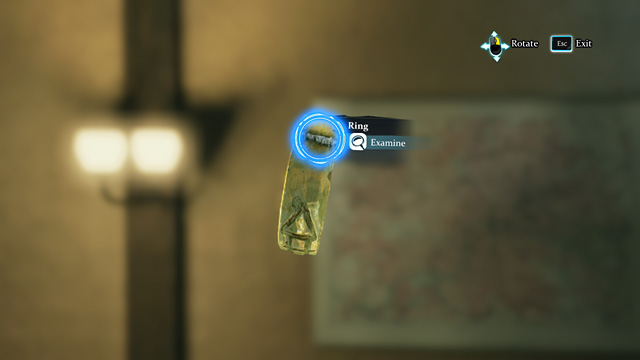 Silver join in the ring.
From Bentcliffe's belongings, take Sir Rodney's ring and examine it in the close-up mode. Rotate the ring to find an Old symbol and a silver join - the result of a bad repair. Examine the old Roman coin.
Take the Hand-drawn map and the Notebook, which you should examine in a close-up. Notice the Torn pages. Smudge the remaining page with a pencil and wipe it. Sherlock will see Sir Rodney's last note. Report from coroner (3 pages), brought by a policeman, will also appear in the Documents tab. In the Evidence tab, you will find: Weapon shape.
Leave the room and go through the next door on the right. Take the stairs and go downstairs, to the morgue. Examine the body once again: Wound (face), Chest scar and Stomach scar.
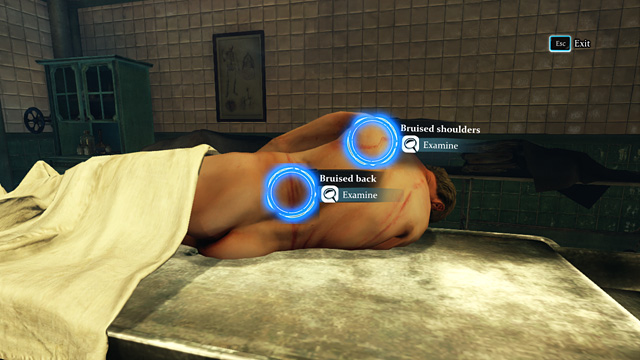
Rotate the body (grab the right - from player's perspective - side). Take a look at the Bruised back (at the bottom) and Bruised Shoulders.
Go back upstairs and go through the bars, to the corridor. In a cell on your right, there are three suspects. Call one of them, for example Pitkin (on the right), to interrogate him. Ask the suspect about his profession, Sir Rodney, The murder, Champagne, Drug and his work - a QTE will appear, during which you should select: Pitkin's letter.
Gregory Pitkin portrait:
Now, talk to Blinkhorn (in the middle of the cell). Ask him similar questions and mention Sir Rodney's ring. When talking about the work, a QTE will appear - select: Pitkin's letter.
Percival Blinkhorn portrait:
Lastly, interrogate Garrow (he's sitting on a bench on the left). Ask him the same questions and mention the Old coin found in the victim's belongings.
Tristram Garrow portrait:
Deduction
Connect "Sir Rodney's lie" with "Stolen notes". You will obtain "A mortal secret" and also a task: "The last expedition".
Go to Baker Street and approach the Analysis table (to the left of the window). First, select: Analyse dirt. A Dirt sample will appear on the stage plate - examine it. When looking through the eyepiece, sharpen the image (options at the top of the screen).
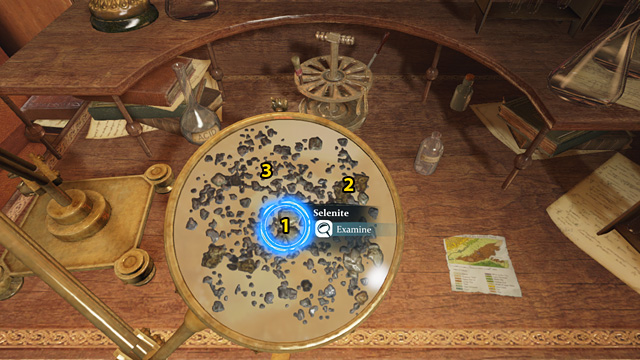 1 - Selenite. 2 - Pyrite, 3 - Kaolinite.
Identify Selenite (in the center), Piryte (on the right) and Kaolinite (on the left). On the geological map, select the purple area in the middle - the place where kaolinite can be found.
When Holmes finishes the analysis, select: Analyse blood. Examine the Blood sample on the stage plate and when the eyepiece appears, sharpen the image (Holmes will say something when the view is right). Examine the Blood. Sherlock will notice that he should use Peroxide. Take a Pipette from the stand, gather some Peroxide and use 3 drops on the blood, under the eyepiece.
Deduction
Connect "Strange wound" with "Very liquid blood". You will obtain two Conclusions, from which you will have to select only one: "Steam moisture" and "Unexplained clue".
Go to Strand Lane Bath again. Enter the Frigidarium (the door to the right of Philips's desk). Behind the door, on the right, you will find Sir Rodney Bentcliffe's office. Go inside.
Examine the Shelves on the right - on the third one from the bottom, there is a Box. Take a look at it and read the label in the close-up mode. Open the box. Examine one of the Glass plate negatives and the empty slot (Missing plate).
Approach the Table opposite the entrance. Take two Newspapers lying on the right: Daily Mirror (2 pages) and Times with the Baths Reopening article (2 pages). Also take Sir Rodney's draft (4 pages - on the left; also an Evidence in the Casebook).
Deduction
Connect "Effective arrival" with "Pitkin's fight". You will obtain two Conclusions that rule out one another: "Blinkhorn's humiliation" and "Blinkhorn's interest".
Approach the Table on the left. Take the Document (Bentcliffe's research), which is lying on the Perforated plate and take the plate also (Metal plate Evidence in the Casebook). Rotate it in the close-up mode and look at the carved shape. Check out the Archeological findings on the right.
Lastly, search the table near the door - you will find some Archeological tools. Take the Tongs (on the left).
Leave the room and enter the corridor to the right of the door. After the entrance collapses, examine the Fallen block (2x). Return to the hall and head to the Bath (the door to the left of Philip's desk).
Approach the Brazier and select: Search the ashes. Move the tongs in such way so that you grab the Melted metal with them and take it out of the heat. Head to Baker Street.
Go to the bookcase with the Newspapers (to the right of the fireplace) and select: Search for Sir Bentcliffe. Move the date to 1893 and select: Bentcliffe's mummy.
Now, approach the Analysis table, where you will be examining the metal. Take a look at it on the stage plate - Holmes will put the Silver coin next to it. Take the Pipette from the stand and use some Acid from the flask on the left. Drop the acid onto the coin and then onto the metal. Sherlock's presumptions were right - it's Melted silver.
Deduction
Connect "Broken glasses" with "Inside brazier". You will obtain "Possible silver weapon".
Approach the map hanging on the wall to the left of the main door. You need to locate the place from Sir Rodney's Hand-drawn map.
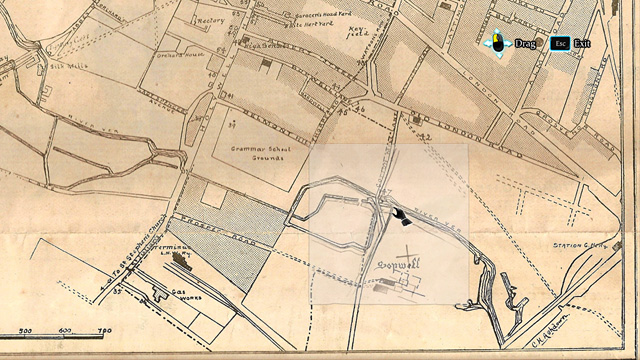
Move the small map across the big one to place it near the bottom-right corner. Put the small map onto the other one so that the roads on both maps are aligned. The correct placement of the map can be seen on the screen above.
Using the Map in the Casebook, move to a new place - Saint Albans, which you've just found.
Examine the Restricted access sign, open the Wicket on the right and enter the excavation site. Walk along, until you reach Domum Hadriano. Go inside through the wide open door (click on it to hear Sherlock's comment). From the Desk opposite the entrance, take a Document (Hidden temple of Mithras; 2 pages). Look at the Map hanging above the desk.
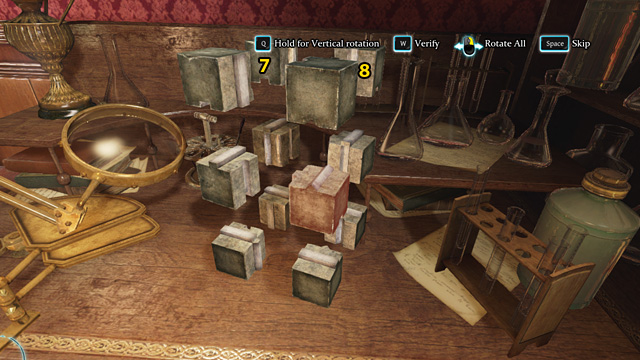
Examine the Shelf on the wall. Take another Document (Curses and beliefs). Approach the low Desk near the door and look at the things on top. You will notice the next Document (Tauroctony knife; 2 pages) which you should take and some Metal cubes (Mould pieces) and one more Document (Mithraic Mysteries; 2 pages; also an Evidence in the Casebook).
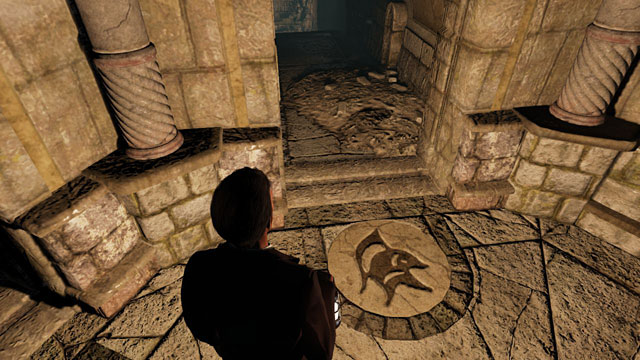
Leave this place and head to a wooden platform opposite the building. Go left, towards a sign saying "Area 1 - Triclinium". Go downstairs and examine the Fresco on the floor - you will see Cyclops and Vulcan.
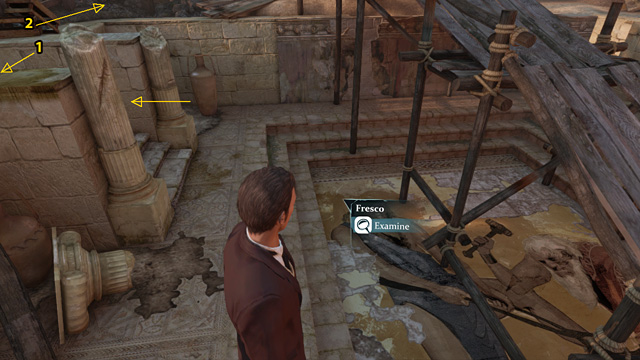 1 - to Area 2, 2 - to Area 5
Leave the area using the stairs on the left and head left towards some barrels and a sign saying "Area 2 - Pits". Go behind the barrels and take a look at the Ropes. Examine the deep Pit below the scaffolding (on the right) - Holmes will pull up the rope hanging from the top. Examine the Archeological tools that you obtained this way and take the Trowel.
Now, head to the right, towards some ruined columns and a sign saying "Area 5 - Temple" (to the left of the hut where Watson is waiting). Go to the end of the ruins (take a look at the Hooks in the box as you go) and examine the statues: Neptune and Minerva. There is also a Bull statue nearby.
From there, head left towards another hut (by the river, on the right), but before you go inside, step onto a small platform to the right of the hut. Examine the Map and the Schematic on the Board.
In the hut (Arturus Domum) examine the objects on the Shelves opposite the entrance. From the top shelf, take one Document (Bentcliffe's power; 2 pages) and from the bottom shelf, another one (Gastraphetes; 2 pages).
Go to the right, towards the table with a Dismounted device on top of it. Examine the Schematic on the wall and the device itself.
Deduction
Connect "Effective arrival" with "Pitkin's complaint". You will obtain two options: "Pitkin's worries" and "Pitkin's hopes".
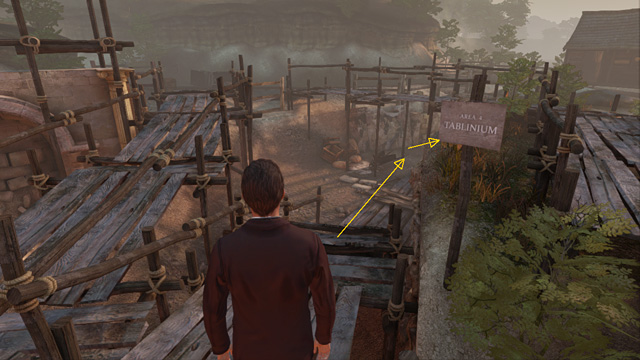
Leave the hut and walk along the track on the right. Step onto the first one from two wooden platforms on your left. Walk along the platform until you reach a sign saying "Area 4 - Tablinium". Go to the bottom of the excavation site (to the right). Approach the wall in front of you and activate Holmes's talent. Examine the Wall - Sherlock will notice that it was recently covered with mud. Use the trowel that you've found in the pit to scrape the mud off the wall - the most important part to uncover is the inscription at the top (Frigidarium).
Use the map to go to Strand Lane Bath.
Head to Frigidarium of course - after opening the door in the hall (to the right of the Philips's desk), walk along the corridor to the end and open another door to get to the right place. There, examine the Helmet on the base of the first column on the left. Push the plate and a hidden symbol will appear (examine it).
Go left, past the column with a ship on its base (there's no symbol behind it) and examine the next one with a One eyed face. Push the tile and check out the symbol. Go to next columns - you can check each one, but the important column base is the one with a Trident on it. Push the tile and discover the third symbol.
The hint about what columns should interest Sherlock are the mythological characters that you viewed at the excavation site: Minerva, Cyclops and Neptune (Evidence in the Casebook).
Activate Holmes's imagination. Now you have to connect the white lines between the symbols.
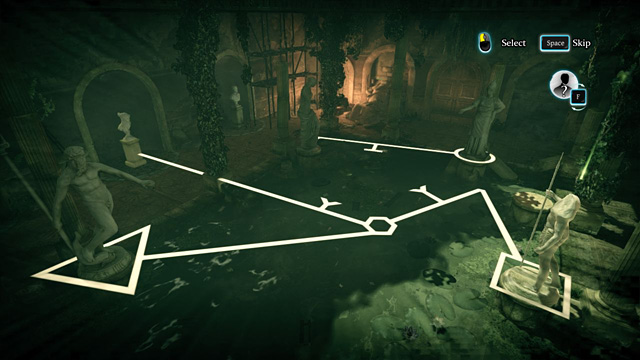 Two symbols connected.
Manipulate the two statues in the front, moving their symbols in such way so that the lines are connected (to select another statue, you have to deselect the previous one first).
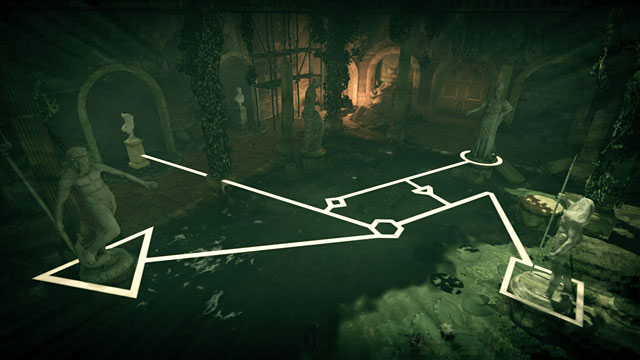 Solved symbols puzzle.
Now, select the statue in the back and move its line towards the two others, connecting the Y-shaped flap to the left statue and the T-shaped flap to the right statue.
The lines will point to a Bust of a young woman. Activate Holmes's talent and approach the statue. Rotate the bust and a secret passage will open.
Head towards the passage (facing the bust - go to the right, go past a pile of rubble and go to a passage under an arcade on the left). Go inside and use the Rope to get to the Frigidarium.
First, examine the items on the ground in the right corner. Take the Lamp, Broken glass plate and Ice box (Ice-maker). Take a look at the Salt sack.
Move along and examine the Fresco on the right, depicting Mithras. Then, take a look at the rest of them, depicting the Seven grades of Mithras initiation (also an Evidence in the Casebook).
Walk further, until you reach the collapsed part of the tunnel - examine the Fallen blocks. Take a look at the Shovel on the left as well.
Turn back and go between the columns on the left. Examine the Skeleton by the wall. Check the Dead man's face and his Shoes.
Next, take a look at the Pillar opposite the skeleton. Use the Brushwood inside. The fire will cast a shadow in the shape of a human face.
Approach the Pillar on the left and do the same. The shadow will be in the shape of an animal. Light the fire in the Pillar opposite the previous one. The fire will cast a shadow in the shape of a trident.
Unfortunately - the fourth Pillar is collapsed. Examine it and activate Holmes's imagination.
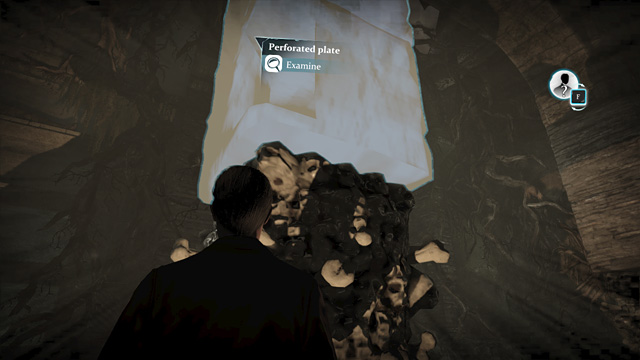 Holmes's imagination.
Approach the "reconstructed" pillar, examine it and place the Perforated plate in the hole. You will see an arch-shaped shadow on the floor. Examine all to shadows: Face, Arch, Animal head and Trident.
Go to Baker Street.
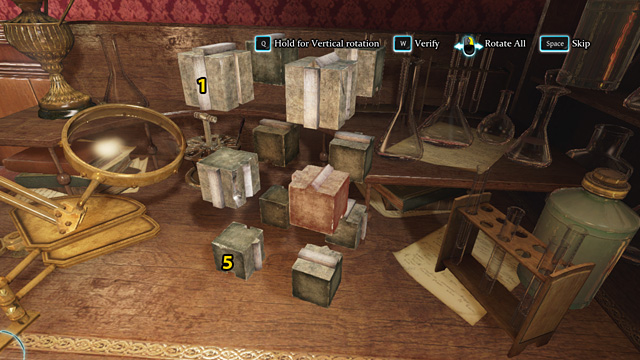
Approach the Analysis table and select: Combine the cubes.
Reconstructing the mould
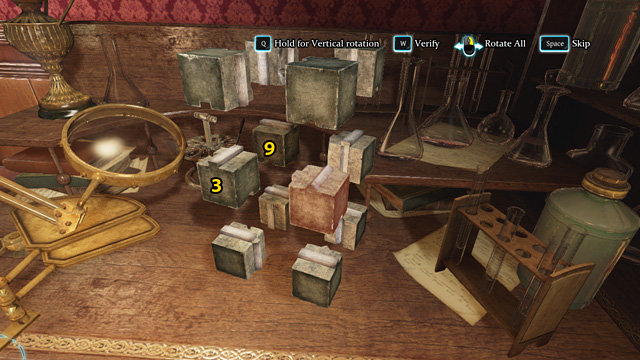
The basic thing in this puzzle is to recognize which cubes are already on the right places (or at least on the right level) and which should be swapped. In order to do that, rotate all the cubes horizontally and vertically to look at all the joins and sides. The result of this examination is as follows (remember that the numbers on the pictures describe the positions, not the cubes themselves):
Front:
The cube which is currently at number 1 should be at the bottom, the cube at nr 2 should also be at the bottom; the cube at nr 3 should be at the top, the cube at nr 4 is on the right place, the cube at nr 5 should be at the top and the cube at nr 6 is on the right place.
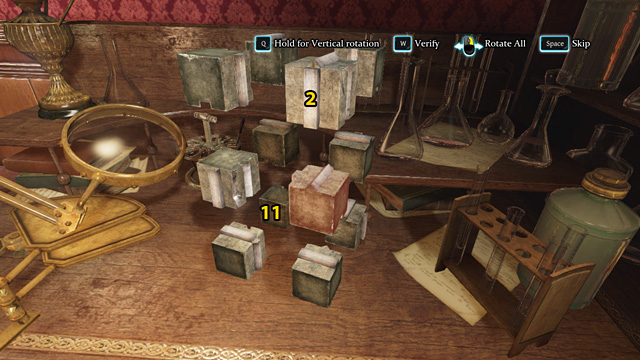
Back:
The cube at nr 7 should be in the middle, the cube at nr 8 should be at the top; the cube at nr 9 is on the right level, the cube at nr 10 should be at the bottom, the cube at nr 11 should be at the top and the cube at nr 12 should be in the middle.
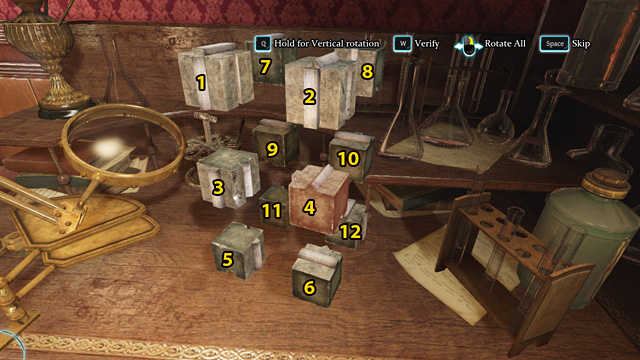
Verify the order using the right key (options at the top). You will notice that two of the cubes are already on the right place: middle right (4) and bottom right (6). Now you have to swap the rest so that they are on the right levels and on the right places in those levels.
Select number 1 and swap it with nr 5. This way each one is on the right level.
Rotate nr 5 so that its smooth edges face the outside and verify. The cube should be on the right place.
Attention! Sometimes, when verifying, the cubes won't join. It is not because they're on the wrong place, but you may need to move them a little.
Swap nr 2 with nr 11. Rotate nr 2 so that its smooth edges face the outside and verify. The cube should be on the right place.
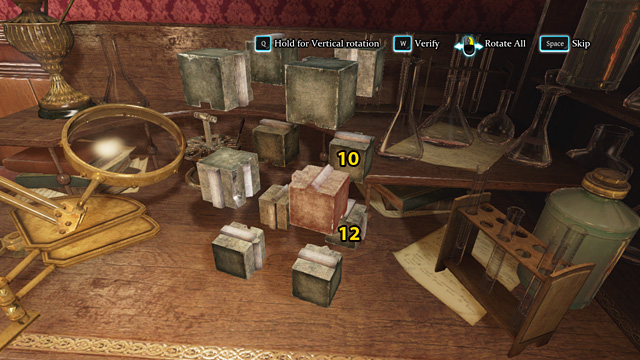
Swap nr 10 with nr 12. Rotate nr 10 so that its smooth edges face the outside and it should be on the right place.
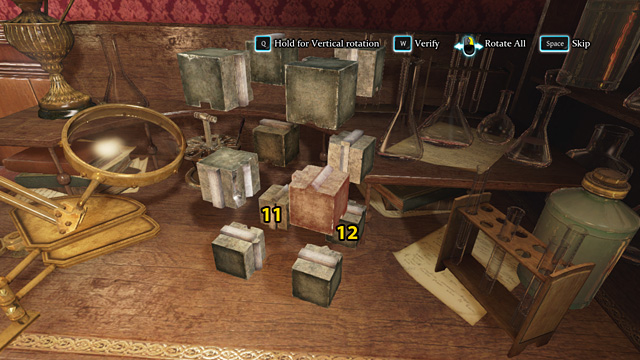
Swap nr 11 with nr 12. Now rotate both of them so that their smooth edges face the outside. Verify the order. Both cubes should be on the right places. Remember to deselect one cube before you select another. Otherwise, you will swap the cubes instead.
Swap nr 3 with nr 7.
Swap nr 3 and nr 9 and rotate both so that their smooth edges face the outside. Both cubes should be on the right places.
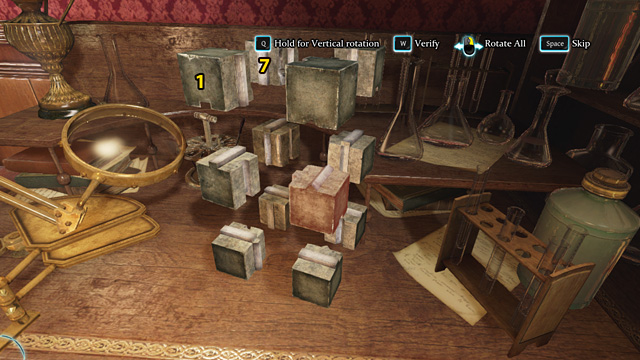
Swap nr 1 and nr 7. Rotate nr 1 and verify. It should be on the right place.
Swap nr 7 and nr 8. Rotate both so that their smooth edges face the outside and Verify.
Both cubes should be on the right place and the Mould should be complete.
Examine the Melting pot and pour some Water from the flask on the left. Mix it with the Spoon and pour the Plaster solution into the Mould. Take the Mould and open it in the close-up mode. Take out the Cast (on the right). Examine the Knife.
Deduction
Connect "Strange wound" with "The mould form". You will obtain "Moulded weapon".
When connecting "Silver weapon" with "Mould weapon", you will receive a task: "Create a silver knife". Select: Silver experiment near the Analysis table.
Silver experiment
Take the Silver piece from the table and put it into the Saucepan on the left. Activate the Gas burner (use the knob at the bottom). When the silver melts, pour it into the Mould.
Take the Mould, open it and take out the Cast. Examine the Knife.
Deduction
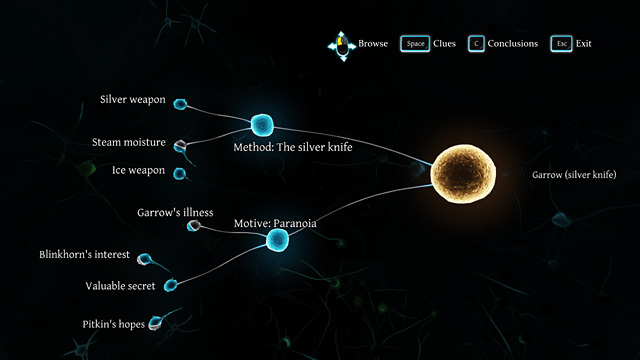
Connect "Silver knife" with "Inside brazier". You will obtain "Silver weapon".
Connect it to "Steam moisture" and you will obtain "Method: The silver knife".
Now, select: Photographic development near the analysis table.
Photographic development
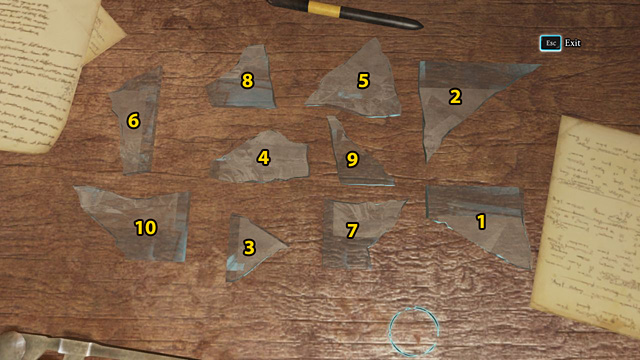
Move the fragments of the glass plate trying to match them together. Notice that the edges are slightly more transparent. The complete plate can be seen on the picture below.
Now, using a cloth with chemical agents, wipe the plate so that all its elements are visible. Examine all the elements of the picture: Pyramids, Inscription (top-right corner), Archeologist (on the left), Rodney Bentcliffe (on the right), ice in the bucket, Ice-cream and Salt.
Deduction
Connect "Glass plate negative" with "Salt and ice". You will obtain "Ice trial".
When connecting "Moulded weapon" with "Ice trial", you will receive a task: "Create and ice knife". Select: Ice experiment at the Analysis table.
Ice experiment
Take the Water (on the right) and pour it into the Mould. Take the Ice pick (on the left, next to the salt) and crush the Ice brick in the bucket. Holmes will pour the ice into the Ice-cream maker.
Now, observe the scale on the right - the temperature will fall until some level. When the indicator stops and a "=" sign appears, pour the Salt into the machine quickly. When the "=" sign appears again, take the Ice pick and crush the ice again. You need to repeat it 4 times. Try to not let the temperature rise. The indicator has to fall to -20 degress.
When it does, take out the Mould, open it and take out the Cast (on the right). Examine the Ice knife.
Deduction
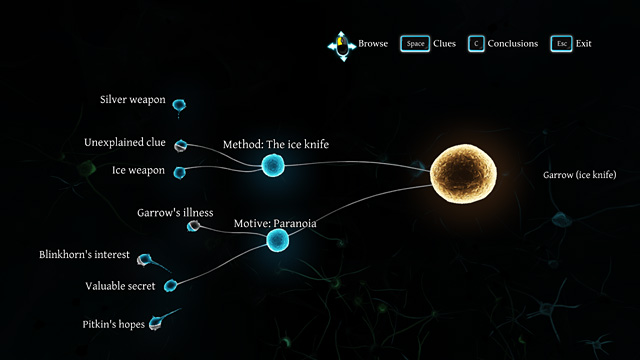
Connect "Ice weapon" with "Champagne". You will obtain "Ice weapon".
Connect it with "Unexplained clue" and you will obtain "Method: The ice knife".
Head to Scotland Yard, where you should interrogate the suspects again, one after another. Ask about the following topics: Mithras, Melted Silver and when talking to Blinkhorn: The Golden knife.
Deduction
Connect "Garrow's behavior" with "Garrow's drug". You will obtain two options: "Garrow's illness" and "Garrow's weakness".
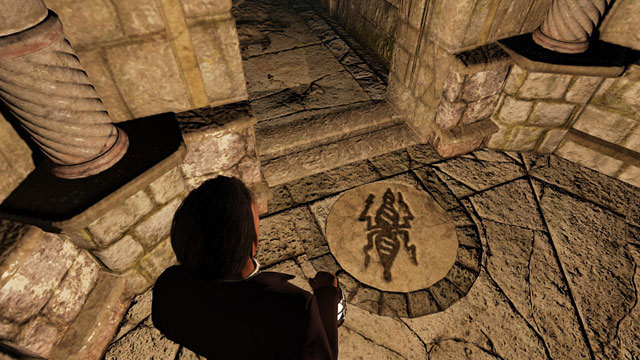
Head to Saint Albans. After entering the excavation site, go through the platform (near the first hut) and head left, to Area 2. Take the Ropes on the box.
 1 - to Area 2 (Ropes), 2 - to Area 5 (Hooks)
Turn back and go to Area 5, where you should take the Hooks from the box near the columns. From here - using the clues from the Frigidarium (Neptun, bull and arch will show you the way to Mithras) - walk straight, onto the wooden platform by the river (near the second hut). Approach the barrier and examine the Bridge and the Iron ring. There are three such rings and a Hidden place in the middle.
Go to the hut nearby, approach the table (on the right) and examine the Dismounted device.
Assembling the gastraphetes
Attach the Mechanism to Mechanism housing. Attach the Shutter groove to the shutter. The Handle should go onto the Handle joint. Now, rotate the weapon 180 degrees and attach the Bow to the Bow rabbet. This is how you obtain the Gastraphetes - a hand-held crossbow of the Ancient Greeks.
Going across the bridge
Head to the platform and use the gastraphetes on the pillar on the other side, to create a rope bridge. Hold your breath (options at the top of the screen) and aim at one of the Iron rings. Aim a bit above the ring and shoot. You have to shoot three times to create the bridge.
When you're done, Select: Bridge, Cross. Walk only when the white arrow can be seen. When the red one appears, stop and press the right key so that you maintain balance.
When you are on the other side, go to the underground corridor and reach a place where there are several paths. Use the symbols (seven grades of Mithras initiation) to find your way through the maze.
 The symbol of the first grade.
Take the path starting with the symbol of the first grade of initiation.
 The symbol of the second grade.
When the paths split again, take the one with the symbol of the second grade of initiation.
At the third grade, the passage will remain closed until you place the right stones on the Scales (on the pedestal in the center of the room).
Place the green one (on the left) and the white one (second from the left) on the left scale, Place the pink stone on the central scale. On the right scale, place the brown and the grey one.
 The symbol of the third grade.
Take the path starting with the symbol of the third grade of initiation.
 The symbol of the fourth grade.
When the paths split again, find the one starting with the symbol of the fourth grade of initiation (first path on the left).
 The symbol of the fifth grade.
Next, take the first path on the right, starting with the symbol of the fifth grade of initiation.
 The symbol of the sixth grade.
Again, go through the first corridor on the right, starting with the symbol of the sixth grade of initiation.
You will see two paths inside the corridor. You can take whichever you want, as they lead to the same place.
 The symbol of the seventh grade.
Next, take the path behind the pedestal, starting with the symbol of the seventh grade of initiation.
When in the corridor, take the left turn and walk along, until you reach a hall in the shape of an oval. Approach the gate, behind which you can see the statue of Mithras with the ritual Golden Knife. Examine (x2) the Broken lamp on the right.
To reach the knife, you have to of course find a way to open the gate. First, with your back facing Mithras, turn left and go behind the fence (beneath the stairs). Activate the Lever on the wall.
In this moment, you will be able to switch to Watson. Press the appropriate key and, as Watson, head right (beneath the stairs) and again right, to another Lever. Activate it.
You will open the passage for Sherlock, so switch to this character, let go of the lever and go left, to a place where you can see three such levers on the wall. Activate the first one on the right and switch to Watson.
As Watson, let go of the lever and go right, to a place with two more levers. Activate the first one on the left to open the passage for Holmes, who is locked now.
As Holmes, deactivate the lever, go right and head to the center of the chamber. Approach the gate, behind which you can see Mithras statue.
As Watson, let go of the first lever and activate the second one, opening the passage for Sherlock.
As Holmes, approach Mithras statue and take The Golden Knife (the passage to the corridor will close) and return to the center of the room.
Now you have to use the same system to open the gates so that both gentlemen could get into the corridor and leave the Mithraeum.
As Watson, deactivate the lever that you're currently holding and activate the first one so that Holmes can approach the three levers.
As Sherlock, activate the first lever on the right to free Watson.
As Watson, go left, to the place with one lever.
As Holmes, deactivate the lever on the right and activate the one in the middle to open the passage for Watson.
As Watson, go up the stairs, to the gate that leads to the corridor (opposite Mithras statue).
As Sherlock, let go of the lever and activate the first one on the left to open the passage for your friend.
As Watson, enter the corridor and activate the lever on the right (with your back facing the chamber). You will open the passage to the stairs for Holmes.
As Sherlock, head right and go up the stairs, to the gate, behind which you can see Watson.
As Watson, activate the second lever (opposite the first one) to let Holmes in.
As Sherlock, join your friend and go through the corridor, until you reach the exit.
Deduction
Connect "Stolen notes" with "Golden Knife". You will obtain "Valuable secret". Its time to name the culprit.
Blinkhorn (ice knife)
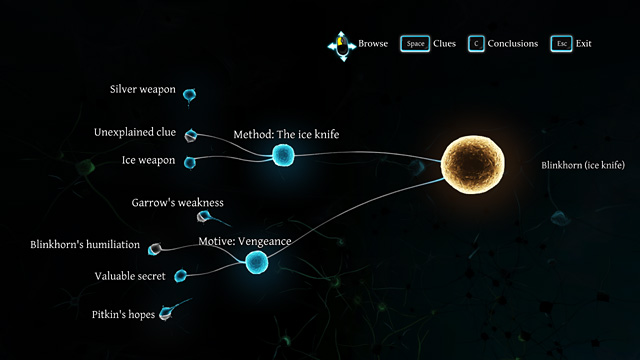 The correct result of the investigation.
Required Conclusions:
As always, you have two options now: give the criminal to the police or let him go. You can also select a different weapon.
Before you confirm your decision, you can check other potential endings of this case (Replay Ending).
Blinkhorn (silver knife)
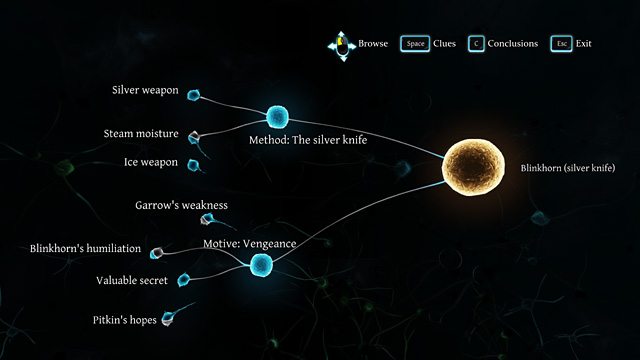
Required Conclusions:
Pitkin (ice knife)
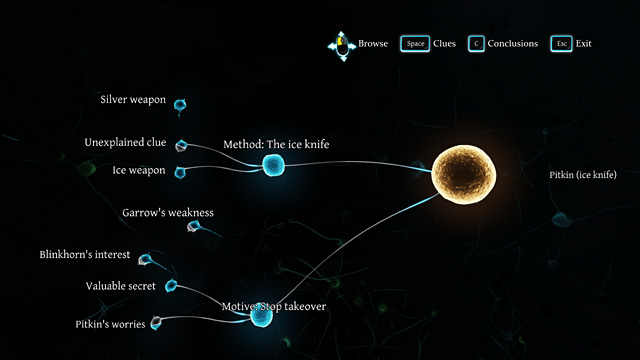
Required Conclusions:
Pitkin (silver knife)
Required Conclusions:
Garrow (ice knife)
Required Conclusions:
Garrow (silver knife)
Required Conclusions:
Approach the Table near the main door and take the Letter (Inspector's letter; 2 pages). Examine the Address, Wax seal and the Coat-of-arms (on the other side of the letter) and read it. After talking to Watson, use the Map to go to Abbey Grange.
After Lestrade introduces Sherlock to the new case (Lestrade's statement will appear in the Evidence tab), head to the door to the left of the inspector, who is sitting in the hall. Enter the room where Lady Brackenstall is resting.
Lady Brackenstall portrait:
Continue the conversation and select: Old bruises, when the QTE appears (also an Evidence in the Casebook).
Talk to Theresa, the maid.
Theresa portrait:
Approach the low Table by the wall (to the left of the door) and take the Newspaper (Times). Read the article (Randall gang's burglary; 2 pages).
Deduction
Connect "Randalls are well-known" with "Criminals Identified". You will obtain two options: "Randalls Blamed" and "Randall Gang".
 There is a safe hidden behind the Picture.
Go to the next table (on your left) and activate Holmes's talent. You will notice some Scratches on the wall, near the Picture. Move the Picture and examine Brackenstall's safe.
Take a look at the items on the Small table. Take the Photograph and look at the Two women. Rotate the object, move the Fasteners and Remove the Backing board. Examine the Writing on the back (Photograph note).
Opening the Safe
Ask Lady Brackenstall about the safe. Unfortunately, she doesn't know the combination. Approach the Safe and try to open it. Rotate the dial slowly, observing the red marks. When one of them starts to vibrate (and doesn't stop), confirm the setting (options at the top of the screen) by moving the handle on the left. This will happen at number 15, 5 and 17. The red marks should align in a vertical line.
From the Safe, take the Medical report (3 pages) about Sir Eustace state (an Evidence will appear in the Casebook: Poor health). Examine the Money and the Coins.
Talk to Theresa and select: History of violence.
Leave the room and ask Lestrade about Sir Eustace's reputation.
Deduction
Connect "From Australia" with "No personal life". You will obtain two options: "No acquaintance" and "Acquainted with a sailor".
Connect "Inspector's Tale" with "Violent behaviour". You will obtain "Domestic Violence".
Head to the door to the right of where Lestrade is sitting. Enter the dining room and approach the Body near the fireplace. Examine it. In the close-up mode, examine the Head wound and the Poker. Examine the bare Feet and the Stick lying next to them. Look at the Fireplace grate (the blood stains on it).
Deduction
Connect "Dead Body" with "Bent Poker". You will obtain "Poker Blow".
Connect "Dead Body" with "Fireplace grate". You will obtain "Deadly Accident".
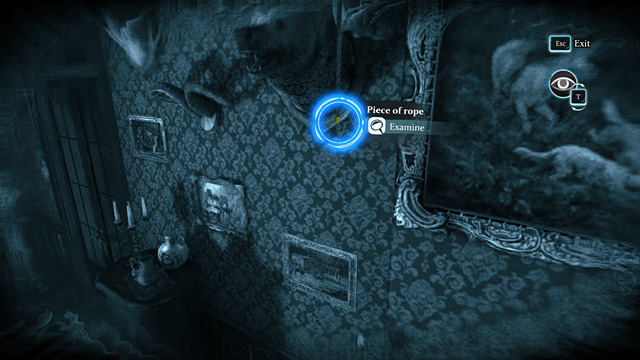 A Piece of rope.
Approach the fireplace (from the left side) and activate Holmes's talent. Examine the Piece of rope on the wall.
Go to the table and examine the Glasses (Three wine glasses). Take a closer look at each one and pay attention to the wine traces. Also, examine the Wine bottle and the Decanter.
Deduction
Connect "Two Glasses" with "Glass with beeswing". You will obtain two options: "Three People" and "Two People".
Next, examine (2x) the Chair that was moved away from the table (between the table and the sideboard). Take the Piece of rope (Sailor's knots).
Approach the Sideboard (in the corner, between the door and the window) and use the close-up mode to examine the following objects: Candlestick, Bottle, Empty cell and the Silverware box.
Leave the room through the door behind Watson and go talk to Lady Brackenstall. Ask her about the glasses.
Head to Baker Street, where you should approach the Analysis table to examine the rope. Select: Bell rope, Examine and take the Scissors. Move them in such way so that the rope is between the blades and cut it. Next, make a cut with the Cutters on the left and also one more with a Knife.
Deduction
Connect "Knotted Rope" with "Sharp knife". You will obtain "Sailor background".
Approach Toby lying near the window and take him with you. Head to Abbey Grange.
As Toby, follow the green trail. Walk along the left side of the room, until you reach a French window. Bark to call Sherlock. When the door opens, leave the building and follow the trail again, towards the fountain. Go past it from its right side and take the path leading to the Shed (behind the fountain, a bit to the right).
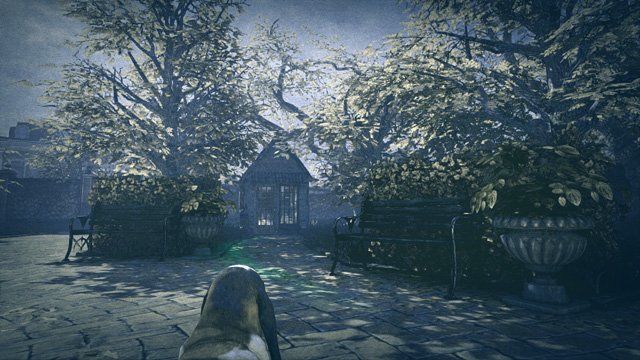 To the Shed, Toby!
Sniff the area around the Shed gate, cross the lawn to the left of the Shed and the path leading to it. Behind the fountain, take the path leading to the Well and sniff it.
Now, go behind the Well and go right, towards the Wall. When you reach the place where the trail ends, sniff the Wall and Call Sherlock.
 To the Shed, Sherlock!
As Sherlock, walk towards the Shed and cross the lawn to find yourself in front of the gate. Look inside and take the Hook on the left. Examine the Bags on the right, the Tool box on the shelf and Suitcase above it.
Leave the Shed and walk towards the Well (go to the fountain and turn right when you reach it). Open it and look inside. You will notice some Glittering object. Remove the Bucket over the Well and attach the Hook to the Chain. Use the windlass on the left and open the Bag that you've pulled out. You will find an Item of silverware. Take a Fork. Rotate it in the close-up mode and examine the Coat-of-arms.
Deduction
Connect "Silverware Found" with "Criminals Identified". You will obtain two options: "Robbery is the motive" and "Imitated Robbery".
 At this stage, you can assume the following Conclusions to end the investigation (the result may not be right): Three People, Randall Gang, Poker Blow and Robbery is the motive.
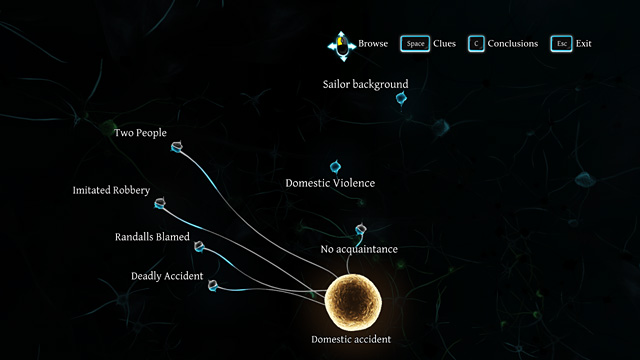 You can also assume: Two People, Imitated Robbery, Randalls Blamed, Deadly Accident and No acquaintance to end the investigation now (the result may not be right).
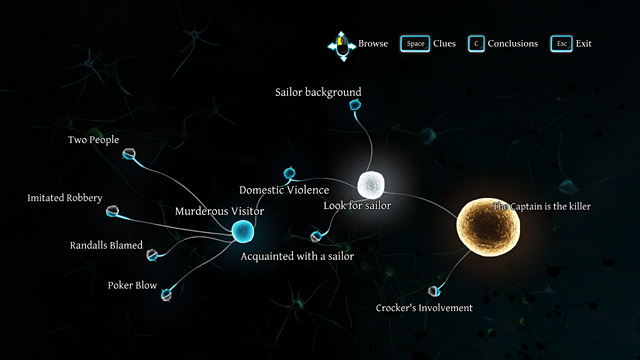
When you assume: "Two People", "Imitated Robbery", "Randalls Blamed", and "Poker Blow", you will receive a Conclusion: "Murderous Visitor". Connect it with "Acquainted with a sailor" and you will obtain a task: "Look for sailor".
Return to the house (use the main entrance) and inform Lestrade, who is sitting in the hall, about your discovery. Go talk to Lady Brackenstall and Theresa about the same thing. Then, head to Baker Street.
Approach the bookcase with Newspapers and select: Search "Rock of Gibraltar, 1893". Select the right date and choose: Rock of Gibraltar's arrival (2 pages). A task for Wiggins will appear in the Evidence tab - Ship crew.
After talking to Watson, approach the window and call Wiggins. When the boy completes his task, approach the desk near the door and look at the Register that he's brought.
Now, on the list on the right, you have to look for the names from the List of the Senior Officers on the left. From Gaia ship, it will be: Henry Soufhward and Ernest J. Woods (the third and the fourth name on the list). Underline them on the list on the right and Holmes will cross them out from the list on the left. Click on the edge of the next list.
On Rock of Gibraltar list, underline two names: Charles W. Chill and William Partledge (the first and the last name).
On Bass Rock list, underline Jack Crocker (the first one) and on Saint Thomas list, underline Thomas Walker and Herbert Whittington (the fourth and the fifth name).
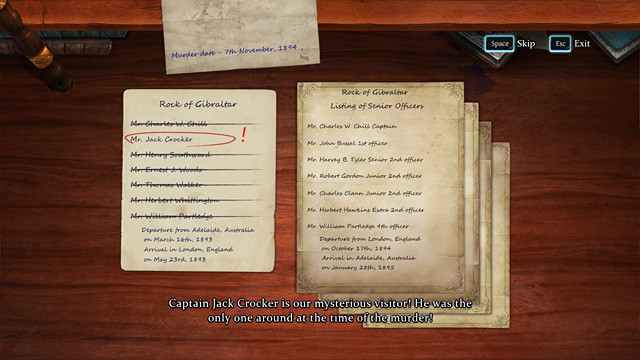 The result of the investigation.
Talk to Wiggins, standing by the door, to get him to bring Captain Crocker here. Talk to Crocker when he arrives.
Captain Jack Crocker portrait:
Continue the conversation and select: Sailor's knots in the QTE.
Deduction
Connect "Crocker's Statement" with "Captain Crocker". You will obtain two options to choose from: "Crocker's Involvement" and "Crocker's Alibi".
Captain is the killer
 The correct final conclusion.
Required Conclusions:
As always, you can choose between condemning the culprit or letting him go.
When the Captain shows up again, in the critical moment, grab the hand with which he's holding a gun and start clicking LMB quickly (X button on a pad). End the scuffle by pressing W button (Y on a pad) when the proper icon appears.
Before you confirm your decision, you can check out other potential endings of this case (Replay Ending).
Domestic accident

Required Conclusions:
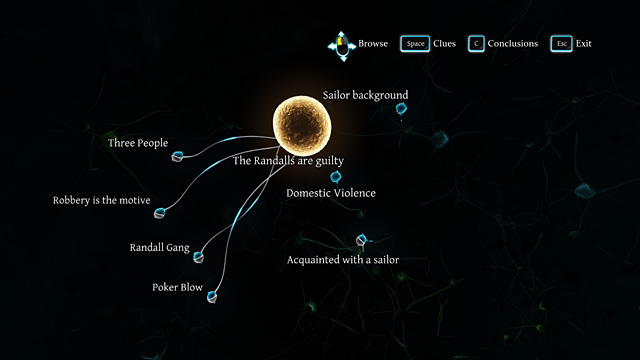
The Randalls are guilty
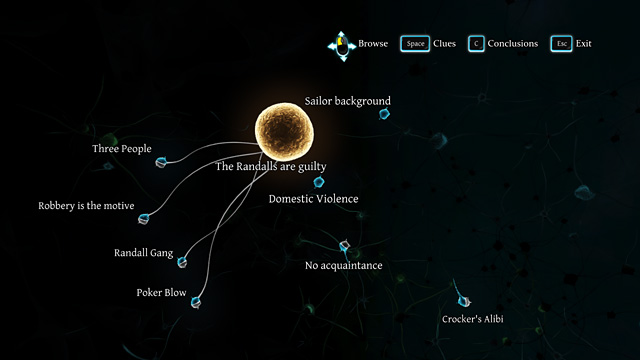
Required Conclusions;
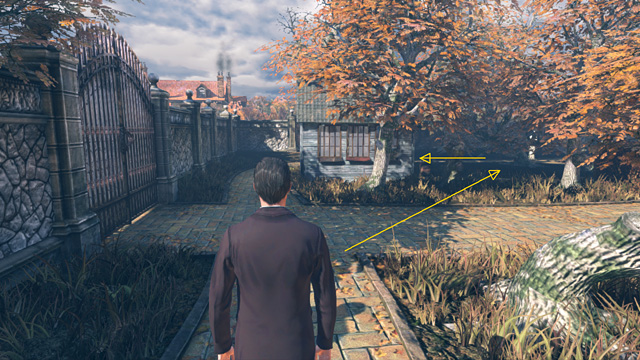
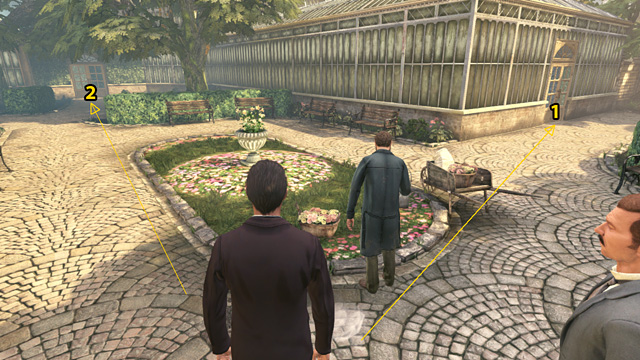
Use the Map to get to Kew gardens, Approach the two men near the flower bed. After talking to Hamish and Albert, walk around the pond (go left) in the center of the room, until you reach the place where you will notice a Broken sign. Examine it, as well as the Blood on the edge of the pond.
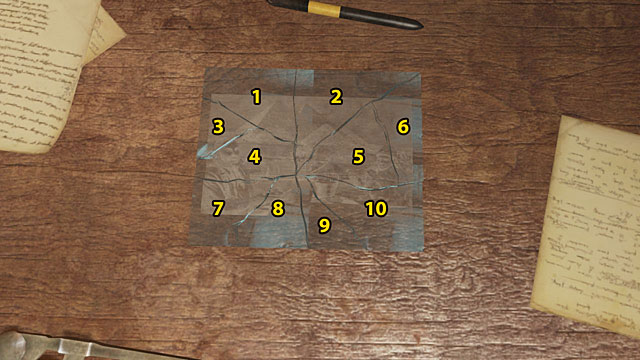
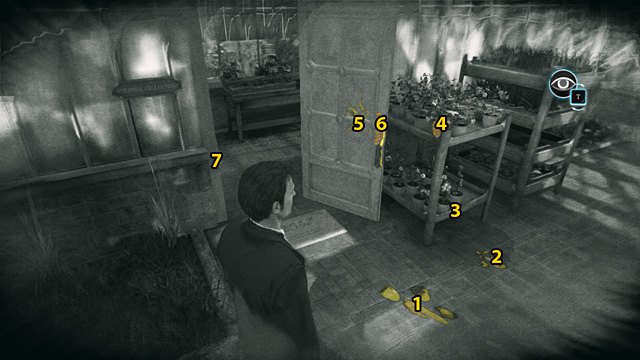 1 - Footprints, 2 - Broken pot, 3 - Dirt, 4 - Broken pot, 5 - Damaged panel, 6 - Handle, 7 - Broken esconson.
Activate Holmes's talent and notice the Footprints on the floor, near the door - examine the Thin and the Large black tracks. Walk a bit forward and examine the Fragments (Broken pot). Activate Holmes's talent again to look at the Dirt on the floor and on the bottom shelf. Examine also the Broken pot on the top shelf. On the Door, examine the Damaged panel, the Handle and the Broken esconson.
Finding out how Montague Dunne died
Walk a bit back, towards the pond, to get a better view at the crime scene. Facing the door, activate Sherlock's imagination. A sequence of the last moments of Dunne's life will appear - you have to set the proper order of events. Select: Breaking the door (number 1 will appear above this action), then: Knocking over the pot (2) and lastly: Falling on the fence (3). View the whole sequence (options at the top of the screen).
Go to the room with low ceiling, behind the damaged door. Examine the Plants on the right and head to the empty part of the room. Activate Holmes's talent.
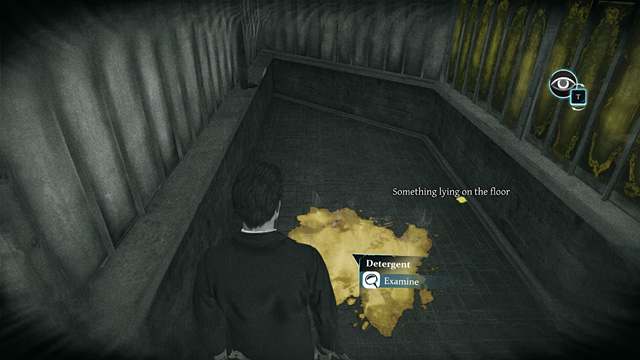 The Detergent and the Stone chip.
Examine the Detergent on the floor and the Stone chip a bit to the right. In the close-up mode, take a look at it (from both sides). Holmes will notice that it is a Fragment from a statue. Activate his talent once again and examine the Window panes.
Deduction
Connect "Emptied Colonial Collection" with "Dunne was trapped". You will obtain a task: "Perform autopsy".
Using the Map, head to Scotland Yard.
When you arrive, go to the evidence room (the first room on the right in the corridor on the left) and examine the victim's belongings. You will find the following items there: a Watch, a Pen, a Club card (rotate it in the close-up mode and read what it says) and a Letter to Mr. Wayne.
Leave the room and head to the morgue (the next door on the right), where you should examine the Body. Take a closer look at the Face (Forehead, Eyes, Nose and mouth), check the Chest and the Skin on both arms.
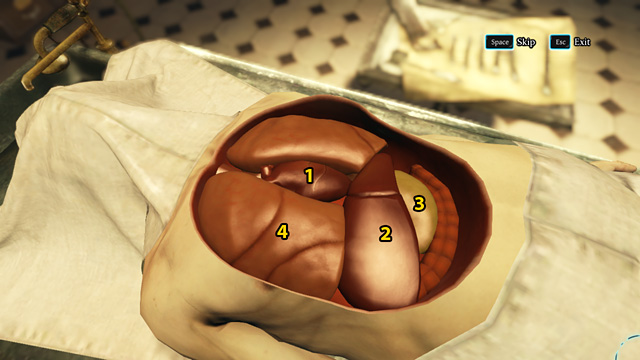 1 - Heart, 2 - Liver, 3 - Stomach, 4 - Lungs.
Next, examine the state of the internal organs, taking them out one by one from the opened torso. Take a look at the Heart (Heart vessels, Heart tissue), the Liver (its consistency and its tissue), Stomach (Stomach consistency, Stomach tissue) and the Lungs (consistency and the Damaged area on the right lung).
Deduction
Connect "Poisoning" with "Dunne was trapped". You will obtain "Dunne was poisoned".
Return to Kew Gardens.
Talk to Martyn Hamish, who is currently watering the plants, and ask him about the Colonial Collection, Dunne and some lethal plants. An Evidence will appear in the Casebook: Weekly inspection.
Martyn Hamish portrait:
Head to the big glazed building to the right of the flower bed and Hamish. In the vestibule, notice two shelves with Housekeeping tasks book in one of them (on the wall, to the left of the door). Talk to Albert Dunne about Miss White, the Colonial Collection, his work and relationship with father. Ask also about Martyn Hamish. An Evidence will appear in the Casebook: Over-ranked.
Albert Dunne portrait:
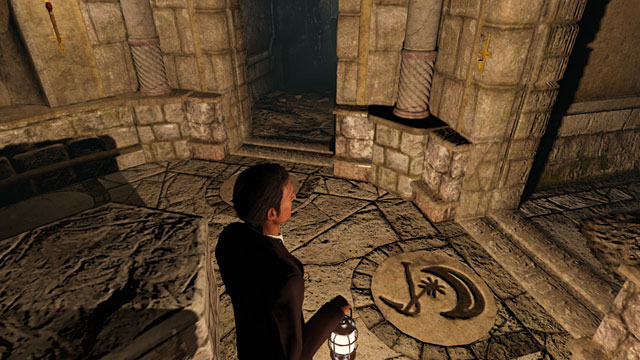
 1 - to the Palm house, 2 - to the Seed house.
Head to the Seed house, where Miss White is. From the flower bed, head towards the buildings in front of you and enter through the door on the right. Then, through another one. Head left and open the door to the building on the right.
Talk to Margaret White about the following topics: Theft of plants, The incident, Emptied colonial collection, Do you work here, Relationship with the director, How did you get in. An Evidence will appear in the Casebook: Cleaning lies.
Margaret White portrait:
End the conversation with Miss White and look around the Seed house. Search the Work desk in the corner, to the right of where Margaret is standing. You will find: Navigation book, Gloves, Study book. It's Albert's workplace. Open the Window near his desk.
Leave the Seed house using the second door and head right. You will notice some smoke near the wall - go there to find its source. Near the Fireplace, activate Holmes's talent. Examine the things that were meant to be burnt. Take the Broken pot and rotate it in the close-up mode so that you can see its bottom and examine the Symbol. You will obtain an Evidence: Symbol on a broken pot. Check out the Gas mask and its Singed par. Notice also the Burned broom, Door handle, A piece of plant and Picture frame.
When going back, enter the Dry tropics building and examine the empty Pots in the center of the room. In the close-up mode, rotate one of them so that you can see its bottom. Sherlock will notice that the pots do not belong here (Branded flower pots). Leave the room using the second door, go through the corridor and enter the Waterlily house (the place where the director died). Approach the empty exhibition covered with material and examine the Plants list (Stolen plants list) on the board on the left. Look at the Warning and the Exhibition booth.
Leave through the second door, go through the corridor and enter the Palm house. Go through it, as there is nothing interesting inside. Open the next door and you will reach the vestibule, where Albert is. Go outside.
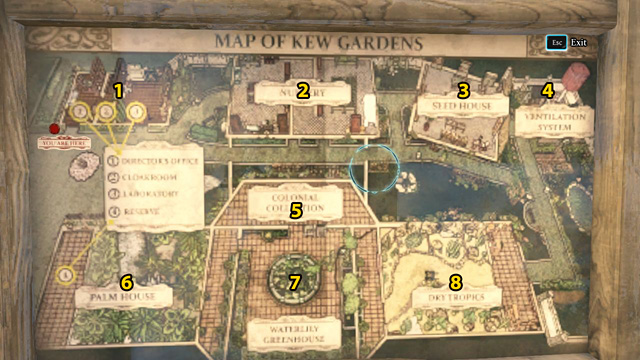 Map of Kew Gardens: 1 - Office house, 2 - Nursery, 3 - Seed house, 4 - Ventilation system, 5 - Colonial Collection, 6 - Palm house, 7 - Waterlily greenhouse, 8 - Dry tropics
Head to the square were the flower bed is and try to open the Office door, near the map. Talk to Hamish and ask him about the keys, about Albert and also about Margaret. Next, go to the vestibule of the Palm house again to ask Albert for Keys for Kew Gardens. You will obtain a whole bunch of them, but the one that opens the Cloakroom is not there.
Go back to the Office door and open it with the keys. Enter Dunne's office. Approach the table (in front of you) and examine the Champagne and the Wine on top. Go through the things on the Director's desk. Take one of the Newspapers on the left (article: Kew Garden's success) and a Letter (next to the hat), in which Montague informs Margaret about The break-up. Examine also the Photograph on the shelf to the right of the desk.
Opening the Director's safe
When leaving, take a look at the Director's safe. To open it, you need to rotate the dial 2 fields to the left, then go back to the pointer and rotate the dial 2 fields to the right.
Go back through all the unlocked fields (left) and rotate the dial 3 fields to the left. Go back again, this time to the right, and rotate the dial 3 fields (right).
Go back through all the unlocked (left) and rotate the dial 5 fields (left). Go back again (right) and rotate it 5 fields (right).
From the safe, take out a Letter (Lawyer's help; top shelf; 3 pages), a Letter of complaint (2 pages; middle shelf; an Evidence will appear in the Casebook: The Divine Syndicate) and a Letter from the bottom shelf (Personal loan).
Deduction
Connect "White and Dunne" with "White's expulsion". You will obtain "Disagreement".
Leave the office and use the keys to open the next door in the building. Enter the laboratory. Examine the Protective equipment in the wardrobe. Take a look at the Mask, the Protective cloth and the gloves. Notice the Empty place in the middle.
Go to the center of the room and activate Holmes's talent. Check out the Laboratory table: Wet bottle trace, Drops (on the table and on the floor) and Gold dust.
Examine the University book lying on the fireplace. Read the title and rotate it to check the Name at the bottom. Notice the Chemistry cupboard in the corner, to the right of the fireplace and the Chemistry bottles inside.
Take a look at the Phonograph on your right. You can take one of the Cylinders next to the device, install it on the Phonograph, turn the Handle and listen to the recording. Do the same with the other one. Examine the Table for experiments (in the corner, by the window).
Lastly, try to open the door to the Cloakroom (to the right of the wardrobe). You won't be able to do that, as Holmes doesn't have the key. You need to break in instead.
Opening the door to the Cloakroom
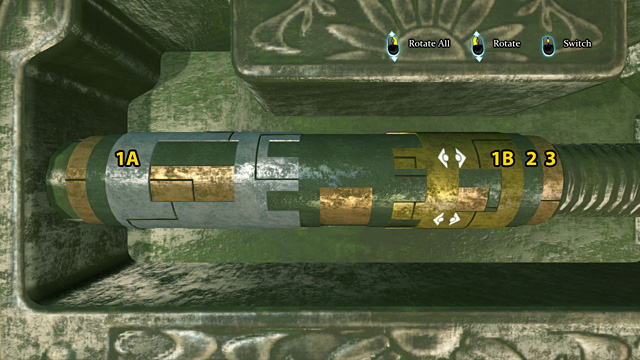
Rotate all downwards so that you can see the big window on the left short cylinder (1A) and the small window on the right one (1B).
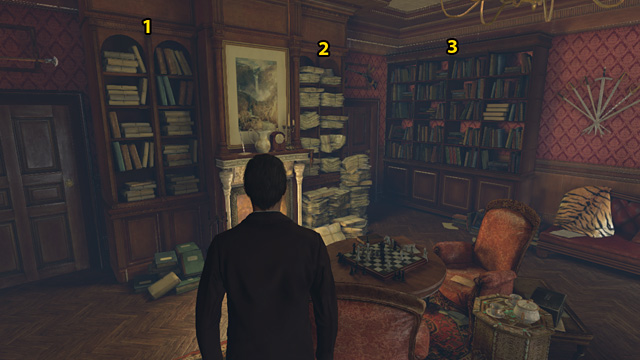
Switch (1 click) to the right short cylinder (1B). Match the lines on it with the ones on the left short cylinder (1A) and move it to the left to join the cylinders.
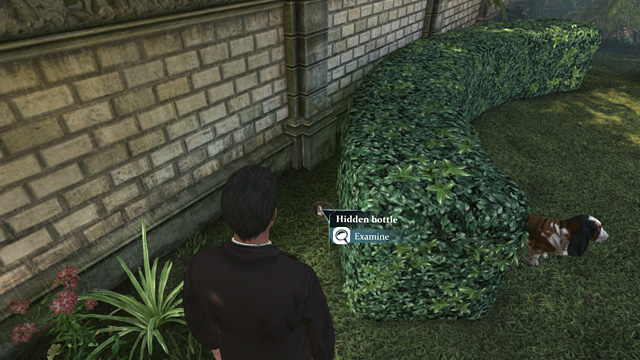
Switch (1 click) to nr 2. Rotate it upwards so that all three windows are fully opened.
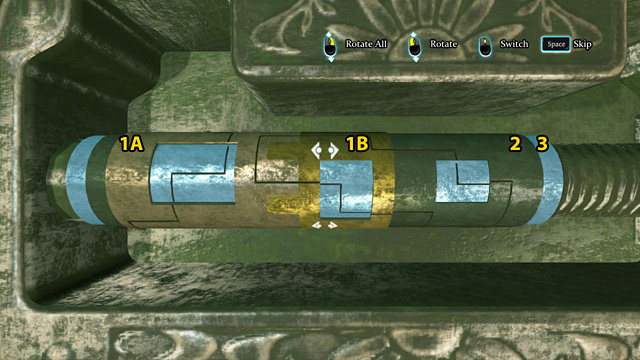
Switch (1 click) to nr 3. Rotate it so that the lines in the three windows match the ones on nr 1A, 1B and nr 2.
Enter the Cloakroom and check the contents of each locker. In Albert's locker, examine the Naval architecture book and read the Refusal letter (The Royal Navy's letter of refusal; 2 pages). An Evidence will appear in the Casebook: Albert's hopes. Activate Holmes's talent and examine the Photograph on the left.
In Martyn Hamish's locker, examine the Chemistry books, A letter from Martyn Hamish (Martyn Hamish's ambition; 2 pages), Botanical magazine and Photograph with father, which you should rotate and read the Inscription on the back.
Open Miss White's locker and take White's request (Letter to her family), Diploma and Jewel box. Open it and rotate so that you can see the Jewels inside.
Also take the Letter lying next to the box (Albert's letter to Miss White). Examine the Vanity purse on the right. Rotate it in the close-up mode to see the Letter from the family (Family's reply; 2 pages).
Deduction
Connect "Miss White's family" with "White and Dunne". You will obtain "White's situation".
Leave the laboratory and head left, to the Nursery (the first door on the left). Open the door with the key and take a look at the Work desk (on your right). Notice a Glasses case and Martyn Hamish's book. Apparently, it's Hamish's workplace. Open the Window near the desk. Examine the Posters on your right and take a look at the Plant nursery in the center of the room. Leave the room through the other door.
Examine the Bust in a box in the corner of the corridor. Take it and read the Name plate at the bottom. Rotate it slightly and check out the Broken part above the right (from player's perspective) temple. Match the piece of marble that you've found in the Colonial Collection room to the bust.
Enter the next room and examine the New seeds in the center. Leave the room through the other door, which you need to open using a key.
Now, head to the vestibule of the Palm house, where Albert is. Talk to him about his Dream of entering the navy. When the QTE appears, select: Albert's hopes.
Deduction
Connect "Albert's ambition" with "Albert's humiliation". You will obtain "Albert's motive".
Go to the square with the flower bed and talk to Hamish about Kew Gardens (select: Photograph with father in the QTE) and the Bust (select: Fragment from a statue). An Evidence will appear in the Casebook: Marble bust.
Deduction
Connect "Hamish's anger" with "The new director". You will obtain "Hamish's motive".
Use the Map to go to Bakers Street. Approach the bookcase with Encyclopedias (opposite the door) and select: Search "Rare plants, Botany". Find the Botany tab and select: Exotics plants, Vol. 4, Poisonous. A Document will appear in the Casebook: Information on the deadly plants; 2 pages. Leave the close-up mode (Continue).
1 - Research, 2 - Newspapers, 3 - Encyclopedias.Look for the symbol that you've seen on the broken pot in the bookcase with Research (to the left of the fireplace). Find the Marks and Symbols tab and select: The Divine Syndicate. An Evidence will appear in the Casebook: Trewan, the god-king. Leave the close-up mode (Continue).
Now, search for the symbol that you've seen on the exhibition pot (in the same tab). Select: London Garden Supplies. Holmes will be able to identify the Suppliers that provide the pots for Kew Gardens. Leave the close-up mode (Continue).
Lastly, in the Newspapers bookcase (to the right of the fireplace), select: Search the case of June 14, 1889 and choose: Scandal at the Divine Syndicate (3 pages). Leave the close-up mode (Continue).
Deduction
"Deadly plants stolen" with "Poisoning". You will obtain "Theft and murder".
Collect Toby from the house and take him to Kew Gardens.
As Toby, in the laboratory, go behind the table in the center of the room and follow the green trail. Go outside and walk along the benches (to the left of the flower bed). Head to the building opposite the laboratory. Go past it (from the left side) and step onto the lawn (between the wall and the hedge). When in the corner, sniff the Hidden place.
This is what Toby's found.As Holmes, approach the wall to check the place. Examine the Hidden bottle (Buried chemistry flask). In the close-up mode, look at the Chemical solution and a caterpillar at the bottom.
Enter the Palm house and talk to Albert about the Divine Syndicate. Ask Hamish and Margaret about the same thing.
Go to Baker Street. Approach the Analysis table and select: Analyse unknown liquid. Click on the bottle on the table. Take the Pipette from the stand and gather some of the liquid. Pour it into the test tubes in front of you.
Look at one of the Test tubes in the close-up mode: inhale the Unknown liquid and taste it. When Holmes places the test tube back on the stand, activate the Gas burner on the left. When the liquid evaporates, Holmes will examine the precipitate in the test tube.
Take the Pipette again and take some of the Reagent from the flask, which Watson gave to Sherlock. Pour it into the second Test tube. Take it and examine the Unknown liquid once again. Evidence will appear in the Casebook: Deadly experiment and Caterpillars.
Use the map to go to The Divine Syndicate headquarters. Go along the path, straight to the house and try to open the door - it's locked. Go left, to the end of the terrace, and activate Holmes's talent. You will notice some fragments on the ground, in two places. Holmes will find out that they are Pot pieces. Take the Cover from an object behind the big rock. Take one of the pots, rotate and examine the Brand on the bottom. It's the Kew Gardens symbol.
Go back to the house, go through the terrace and step onto the path leading towards the exit. When you reach a hill (on your left), go up the stairs and talk to Guru. Ask for permission to look around and say that you are ready to test your knowledge about the Syndicate. In the QTE, select: Trewan, the god-king. You will receive The Divine Syndicate's key.
Guru portrait:
Deduction
Connect "Deadly plants stolen" with "Divine Syndicate thieves". You will obtain two options: "Sect stole everything" and "Partial theft".
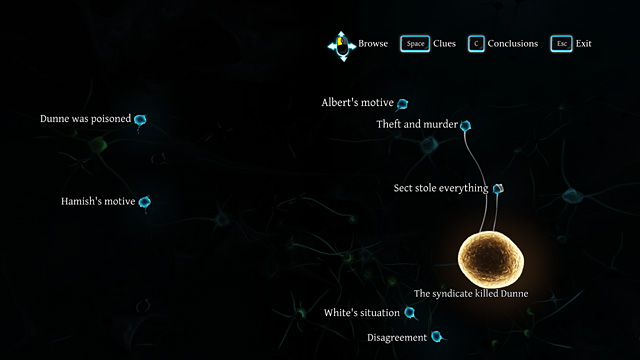 If you assume that Sect stole everything, you can end the investigation now (the result may not be right).
Walk again towards the house and open it with the key. When inside, head left and examine the Drugs table. In the close-up mode, take the Spoon full of some white powder. Walk along and open the door on your left. In the room with Cages, examine the one opposite the door. Open it (both sides) and look inside the Cage with Caterpillars. Take a few.
Walk to the end of the room and open the Flower Cage. The species in it are the Deadly plants that could be seen on the exhibition.
Deduction
Connect "Suspicious ingredients" with "Poisoning". You will obtain a task: "Set up the experiment".
Leave the room with cages and go to the right side of the hall (you can examine also the statue of Trewan and talk to the Adept). Try to open the next door.
Opening the locked door in The Divine Syndicate headquarters

Move the left short cylinder (1A) to the left. Switch (2 clicks) to the right short cylinder (1C) and move it to the right.
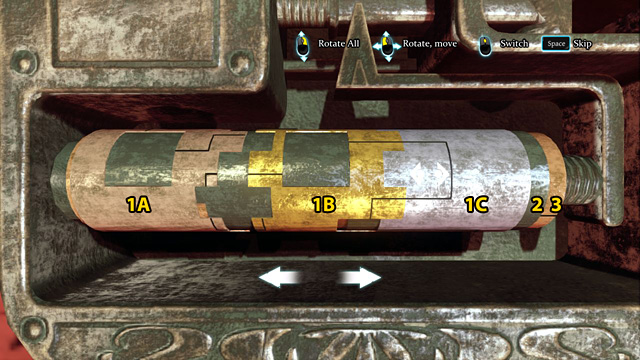
Match the lines on the right short cylinder (1C) to the ones on the central short cylinder (1B) and join the cylinders by moving the right one (1C) to the left.
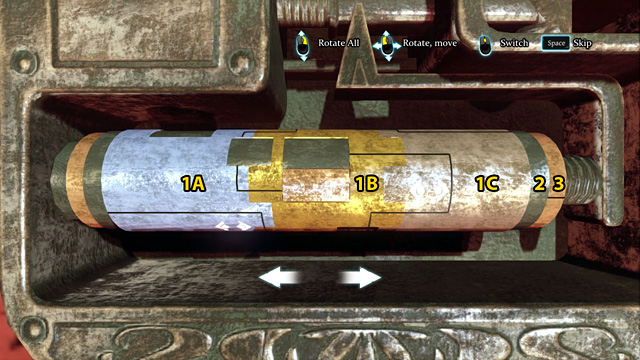
Switch (3 clicks) to the left short cylinder and rotate it so that the lines in the left window match the lines on nr 1A and 1B.
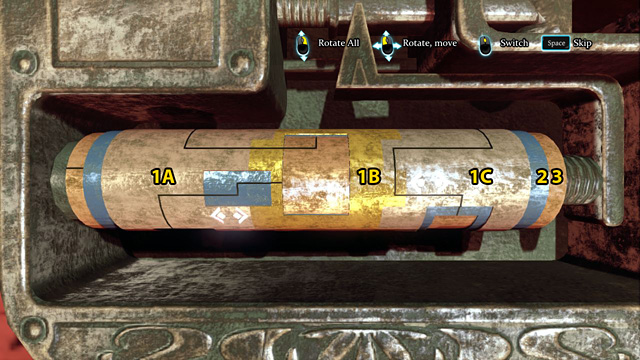
Rotate all in such way so that you can see two windows in the middle - a wider one on the left and a higher one on the right
Switch (3 clicks) to nr 2 and rotate it so that the lines in the left window match the ones on nr 1A and 1B.
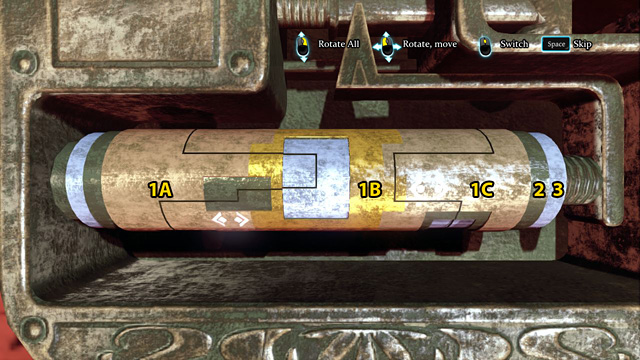
Switch (1 click) to nr 3 and rotate it to match the lines in the second window to those on nr 1B.
Enter the room. In its left part, take a look at the Plate for opium smoking. In the right part, examine the Chemistry cupboard, from which you should take the Chemistry bottle standing in the middle (an Evidence will appear in the Casebook: Fertiliser with alkaloid). Also, check the other Chemistry bottles (the lower shelf) and the Table for experiments. Lastly, examine the Opium balls to the left of the fireplace.
Return to the main hall and head towards the exit. Notice the list of Benefactors on the wall. Go to Baker Street.
Approach the Analysis table and select: "Deadly plant" experiment. First, test the reaction of each plant to different stimuli: Liquid with alkaloid, Caterpillars and stabbing with a Pin.
Notice that Carlina inebriare and Dionea carnivorus close when in contact with alkaloid, and Florem diabolica opens instead. The first one (from the left) shoots a spike after being stabbed with a pin, the second one covers itself with its leaves and the third one shoots a cloud of gas (as long as its leaves are opened). The second plant (in the middle), steals caterpillars from its neighbours. The first one reacts to this by shooting spikes and the third one - a cloud of gas (unless its leaves are closed).
To provoke the third plant to a stronger reaction, you need to swap the first one (Carlina inebriare) with the second one (Dionea Carnivorus).
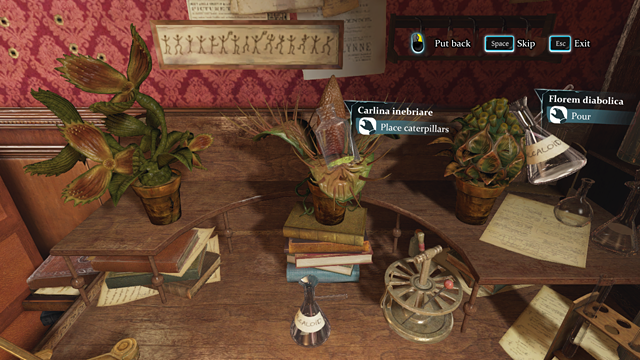
First, pour some alkaloid on Florem diabolica to make it open and put a caterpillar on Carlina Inebriare. When the first one steals the caterpillar, the second one will shoot spikes, hitting the third one, which will shoot toxic gas.
Deduction
Connect "Missing deadly plants" with "Deadly precision". You will obtain two options: "Sect's scheme" and "Sect is not involved".
When assuming the first one, you still can say that the Divine Syndicate is the culprit.
Connect "Albert's ambition" with "Deadly precision". You will obtain: "Albert's lack of experience" and "Albert's studies".
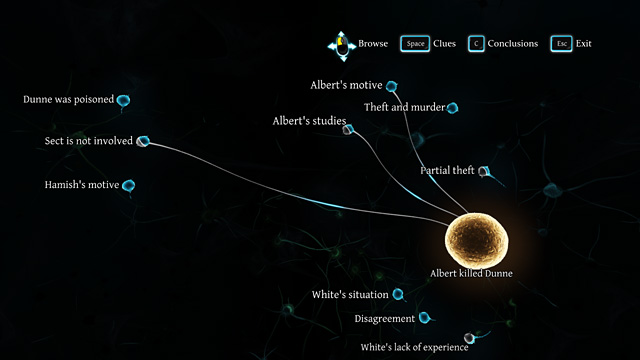 You can end the investigation now, when assuming the following Conclusions: Sect is not involved, Albert's studies and Theft and murder (the result may not be right).
Connect "White's studies" with "Deadly precision". You will obtain two options: "White's lack of experience" and "White's knowledge".
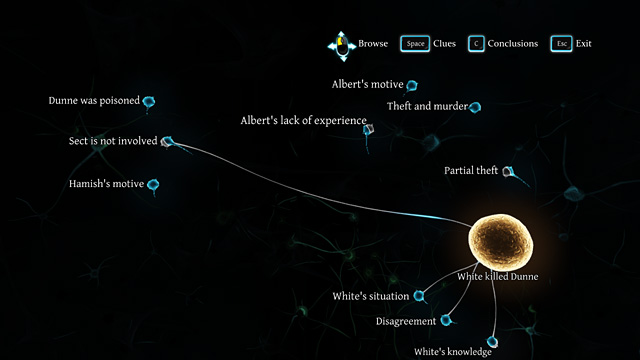 When assuming the following Conclusions: Sect is not involved, Albert's lack of experience, White's knowledge and Theft and murder, you can end the investigation now (the result may not be right).
Use the Map to go the Kew Gardens and talk to Hamish about his activities at the morning when Dunne died. Ask Albert and Margaret the same question. Also, ask Miss White about her records.
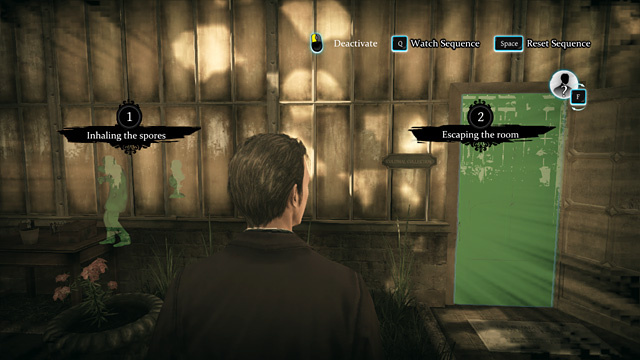
When the gardens are empty, activate Holmes's investigation and go to the Waterlily greenhouse. Move towards Watson for a better view. Look through the windows of the Colonial Collection room. When the action titled: Inhaling the spores appears, mark it as number 1. Now, look at the door and mark Escaping the room as nr 2. Watch the sequence (options at the top of the screen).
When you're done, stay in the Colonial Collection room and place some caterpillars in the Ventilation grid on the ceiling. Go to the place when the Ventilation system engine is (by the wall, near the second door to the Nursery). Start the machine by switching on the Power button, turning off the Transmission, pressing the Starter and then turning the Transmission back on.
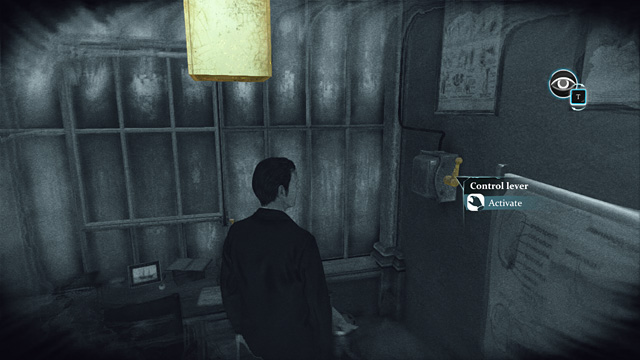 Albert's desk.
Now, activate Holmes's talent and go along the glowing ventilation pipes. As you can see, they lead to the Seed house first. Go inside, approach Albert's desk and activate the Control lever on the right.
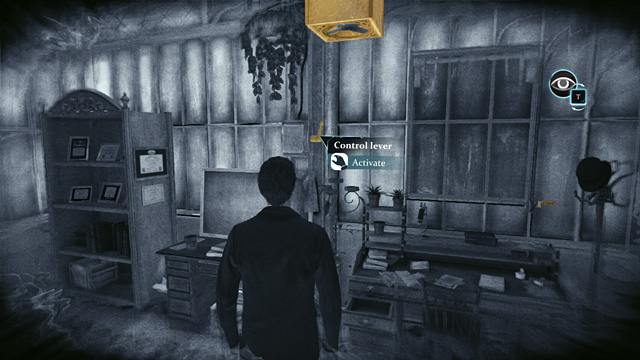 Hamish's desk.
Walk along the pipes, until you reach the Nursery. Activate the Control lever on the wall, above the desk.
Deduction - Hamish is guilty
Connect "Deadly precision" with "Ventilation used". You will obtain "Hamish's opportunity".
Other required Conclusions:
When connecting all the Conclusions above, you will obtain: "Hamish is guilty", and also a task: Arrest Martyn Hamish.
Head to Scotland Yard. Go through the corridor on the left and open the Door to Inspector's office (second door on the left). Go inside and talk to Lestrade.
When in Kew Gardens again, head to the Palm house. Examine the body in the vestibule: Neck, Martyn Hamish's letter (Martyn Hamish's regret) and his feet (the left one).
Deduction
Connect "Hamish's confession" with "Club foot". You will obtain "Hamish acted alone?" and a task: "Talk to Lestrade".
It's time to check if Miss White is trustworthy. Head to the laboratory and open a cupboard to the right of the fireplace. Examine the Phonograph cylinders inside and take Cylinder 320.
Approach the Phonograph on the desk and select: Use cylinder. Turn the handle and listen to the recording. It will confirm Margaret's words.
Return to the Palm house and talk to Lestrade.
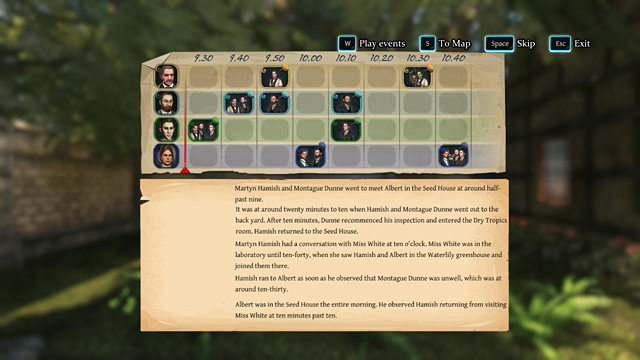 The timeline of the murder.
The timeline
Albert meets his father and Hamish - 9.30 (green row).
Dunne and Hamish go out to the backyard - 9.40 (blue row).
Dunne comes to the Dry Tropics room - 9.50 (yellow row).
Hamish returns to the Seed House - 9.50 (blue row).
Margaret talks to Hamish in the laboratory - 10.00 (blue row).
Hamish returns after talking to Margaret - 10.10 (blue row).
Albert notices Hamish coming back - 10.10 (green row).
Dunne is poisoned - 10.30 (yellow row).
Margaret joins Hamish and Albert in the Waterlily greenhouse - 10.40 (purple row).
When you set the right chronology, select: Play events.
Deduction
Connect "Hamish's timeline" with "Albert's timeline". You will obtain two options: "Albert is not involved" and "Albert had time".
Connect "Hamish's timeline" with "White's timeline". You will obtain two options: "White had time" and "White is not involved".
White is an accomplice
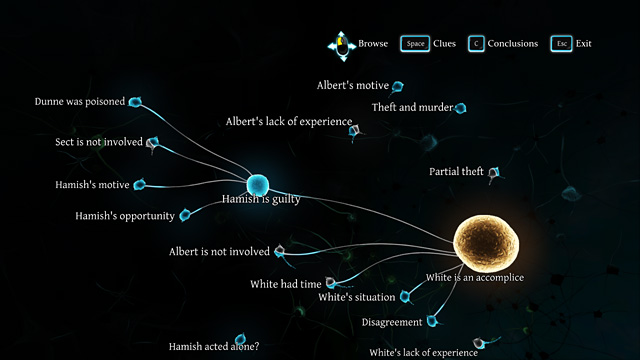 The correct result of the investigation.
Required Conclusions:
After naming the accomplice, you have two more options: condemn or absolve her.
In the critical moment, in The Divine Syndicate headquarters, press the W key quickly (Y on a pad) and, as Watson, knock the flask out of Miss White's hand. Attention! You can be late.
Before you confirm your decision, you can check other potential endings (Replay Ending).
Albert is an accomplice
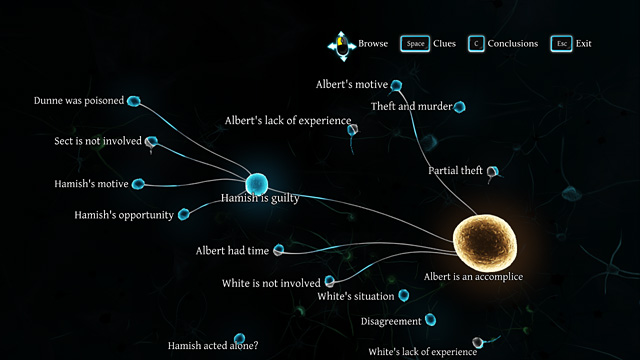
Required Conclusions:
Hamish did it alone
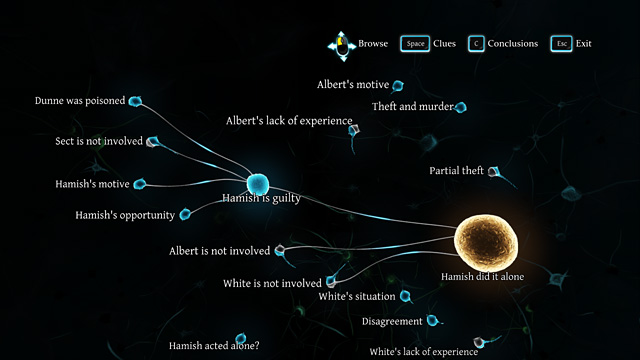
Required Conclusions:
The syndicate killed Dunne (available only at some point of the investigation)
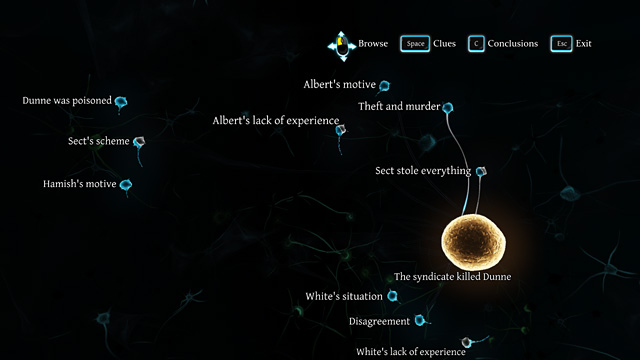
Required Conclusions:
Albert killed Dunne (available only at some point of the investigation)
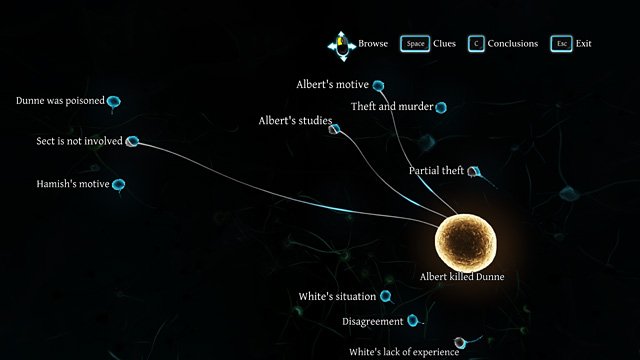
Required Conclusions:
White killed Dunne (available only at some point of the investigation)

Required Conclusions:
Use the Map to go to Half Moon Street. When you arrive at the place, go into a narrow passage to the right of the carriage and then turn right. Talk to Constable Marrow about all the available topics.
Examine the victim's body lying to the right of Marrow. It's Brian Vercotti. Check his Head, his left (from player's perspective) Hand, the Wound and Tattoo on his right Hand.
Next, Take a look at the body on the other side. It's Kenneth Butler. Examine the Head wound and his Left pocket. Take a Door key out of it.
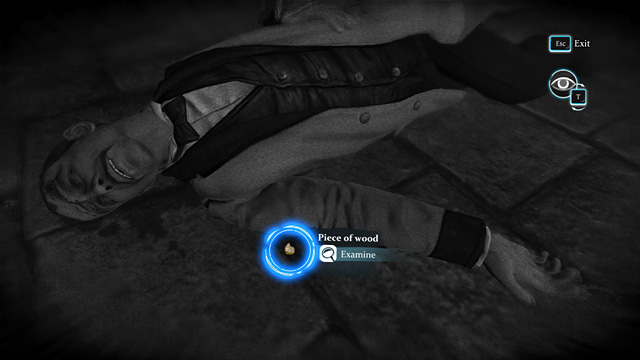 A Piece of wood near the victim.
Activate Holmes's talent and notice the Piece of wood lying between the cobblestones, next to the victim's right arm. Take it out and rotate it in the close-up mode so that you can see the part where it broke.
Go further into the alley and talk to Ryan Turner, who is standing in the door. Listen to his testimony.
Ryan Turner portrait:
An Evidence will appear in the Casebook: Turner's limp.
Deduction
Connect "Turner's view" with "Dark window". You will obtain a task: "Conflicting statements" (Turner's contradiction).
Go to the end of the street (head left from Turner's door) and talk to Polly Powell, standing on the corner of the street. Listen to her testimony.
Take a look at the Mirror on the carriage on the other side of the street (to the left of Polly).
Return to Turner and talk to him again. Tell him about the contradiction of statements. In the QTE, select: Turner's contradiction. As a result, Holmes will be able to enter the veteran's house.
In Turner's house, examine the Fireplace. Take a look at the Fire and activate Sherlock's talent. Examine the Burnt paper that you can see now (on the right). Observe it from both sides.
Approach the Book shelves on the wall (to the right of the door to the bedroom). Examine the Books and the Walking stick below. In the close-up mode, rotate it so that you can see the Broken end. Examine it and select: Attach piece of wood.
Go to the bedroom (the open door on your left) and Examine the Bed. Leave the room and head to the kitchen, where Turner is sitting. Take a look at the Kitchen table.
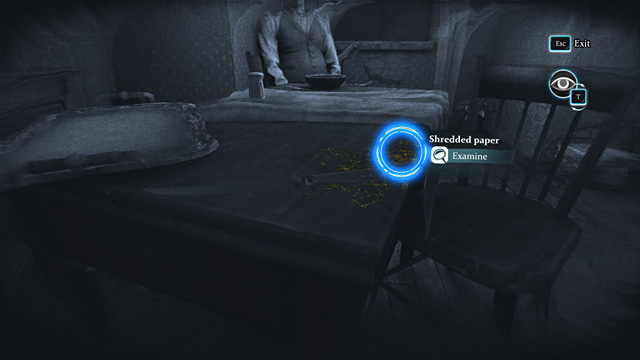 Shredded paper on the table.
Examine the Kitchen knife and activate Holmes's talent so that you can notice the Shredded paper.
Approach the Window in the kitchen, open it and examine the bodies from this perspective. Activate Sherlock's imagination.
Sequence of events
Head towards the open door in Turner's bedroom and select: Got up from bed, Took the stick as number 1.
Look at the window and select: Opened the window, Looked down as nr 2 and Approached the body, Took something, Broke the stick as nr 3.
Now, look at the shelves and select: Placed the broken stick, Took something as nr 4.
Face the kitchen table and select: Cut papers with knife as nr 5.
Lastly, look at the fireplace and select: Threw something into fire as nr 6.
Watch the whole sequence (options at the top of the screen).
Approach the shelves and activate Holmes's talent. Examine the Book on which you can see some greasy fingerprints. Open it in the close-up mode. You will find an Antique bracelet inside. Examine the Ram's head on it.
Talk to Turner about his walking to the window. Select: Turner's limp in the QTE. Ask him about the validity of his testimony. In another QTE, select: Antique bracelet.
Use the map to go to Scotland Yard. After talking to Lestrade, head to the Evidence Room and take a look at Leighton's belongings: Rolled cigarettes, Watch and Leighton's gun, which you should examine in the close-up mode.
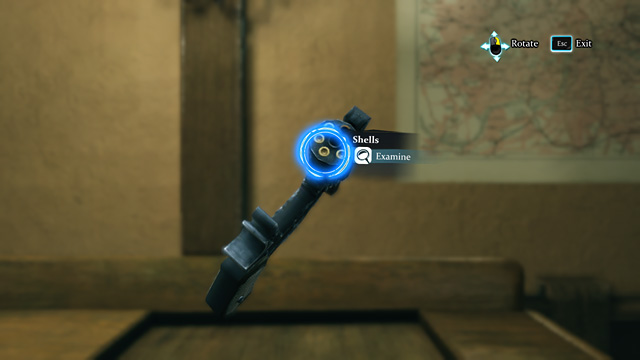 The Shells in Leighton's gun.
Look at the Cylinder and then rotate the gun so that you can open it. Examine the Shells.
Deduction
Connect "Leighton's revolver" with "Different shots". You will obtain two options: "Simultaneous shots" and "Firing position".
Connect "Two victims" with "Leighton's revolver". You will obtain "Double murder".
Connect "Common statement" with "Leighton's revolver". You will obtain "Compelling evidence".
Head to the cell and call Leighton Chapman for interrogation. Ask him to tell you his side of the story.
Leighton Chapman portrait:
In the QTE, select: Westgate prisoners (also an Evidence in the Casebook) and continue the interrogation.
Deduction
Connect "Old acquaintance" with "Lootless". You will obtain "Personal motive".
Connect "Leighton's statements" with "Common statement". You will obtain "Imaginary man".
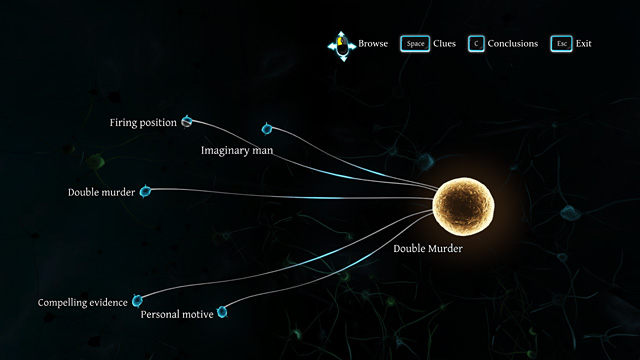 If you assume that the Firing position Conclusion is correct, you can end the investigation now (the result may not be right).
Go to Baker Street. Approach the bookcase with Encyclopedias and select: Search for bracelet. In the Art and Architecture tab, select: Antique Art of British Museum. An Evidence will appear in the Casebook: Five Rams of Mytilene.
Continue searching through the archives. Approach the Newspapers and select: Use article about antiques. Go to the 1885 tab and select: Hellenistic Treasures stolen. An Evidence will appear in the Casebook: Jailed thief.
Use the Map to go to Pawn Shop.
Butler's Pawn Shop.Walk straight and turn right. Head almost to the end of the street and open the door to Butler's Pawn Shop with the key that you have.
Examine the Shelves on the left and notice the Climbing equipment at the bottom. Approach the Counter and open the Counter door. Look at the Shelves on your right and examine the Flare pistol.
Turn around so that you face the Counter and open its Left drawer. Take out the Necklace (Antique necklace) and examine the Ram's head in the close-up mode, as well as Brian Vercotti's letter. Open the Right drawer and take a look at the Accounting book.
Deduction
Connect Butler's jewels with Two victims. You will obtain Burglary motive.
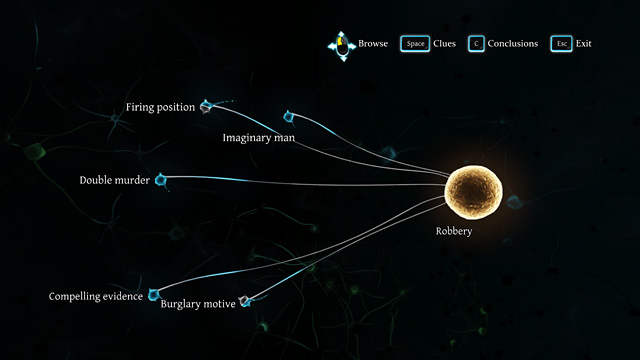 If you assume the following Conclusions: Firing position and Burglary motive, you can end the investigation now (the result may not be right).
Use the Map to go to Half Moon Street.
Head to the crime scene (take the narrow passage and then turn right). Activate Holmes's imagination (you have to choose: Simultaneous shots in the Deduction Space; otherwise the icon won't appear). Select the man to the right of the Constable as the one who fired first. Now, approach the Wall on your right and try to find the place where the bullet hit it. You won't be able to see it, as it's too high and there's not enough light. Take the Pole standing next to a barrel, to the right of Vercotti's body.
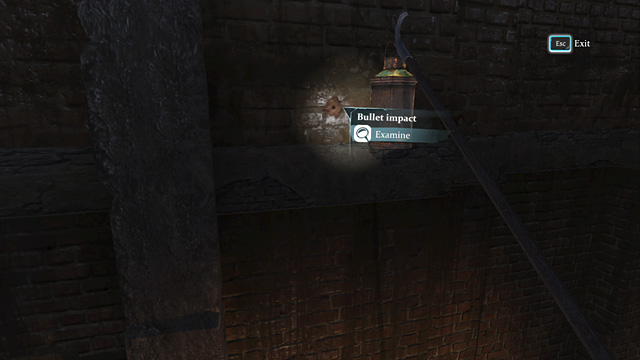 The place where the bullet hit the wall.
Approach the Wall again and search for the spot. You will see the Bullet impact to the right of a concrete join.
Deduction
Connect "Two victims" with "Third shot". You will obtain "Crossfire".
Connect "Third shot" with "Leighton's statements". You will obtain a task: "Disappearing man".
Ask Marrow for help.
As Marrow, walk straight until you find Holmes in a niche in the wall. The second time, take a few steps forward and locate Sherlock in the corner, on your left. The third time, walk straight, turn right and then turn left to find the detective in the corner. Each time, you have to talk to Sherlock.
Deduction
Connect "Leighton's statements" with "Corners in sight". You will receive a task: "Up the walls".
Using the Map, go to the Pawn Shop and take the Climbing equipment, as well as the Flare pistol (on one of the shelves behind the counter). Return to Half Moon Street. Ask Marrow for help again.
In the place where Holmes was hiding himself during the last attempt, activate the detective's imagination and select: Climb the wall.
During the climbing, press the keys that appear on the screen and click LMB very fast (on a pad, press the proper button) when the icon shows up.
Next, open the door on the right (Marrow will lead you to it). When in the attic, go left to stand under the Broken window. Examine it, as well as the Pocket of the jacket lying there.
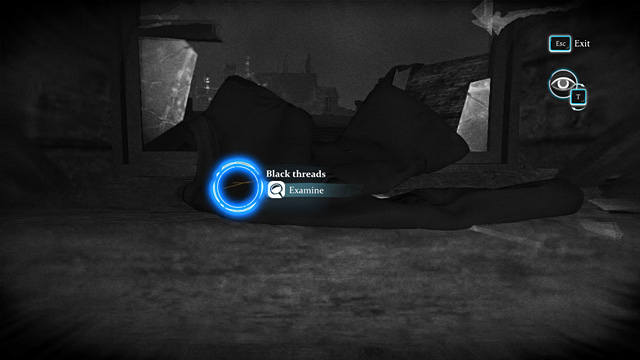 Black threads on the killer's jacket.
Activate Holmes's talent and take the Black threads that he finds near the collar of the jacket. Lastly, examine the Glass shards on the floor.
Deduction
Connect "Leighton's statement" with "Wall climber". You will obtain "Leighton's innocence".
Go to Baker Street, approach the Analysis table and select: Examine black threads. Take a look at one of them on the stage plate and when the eyepiece appears, sharpen the image. Examine the thread through the eyepiece.
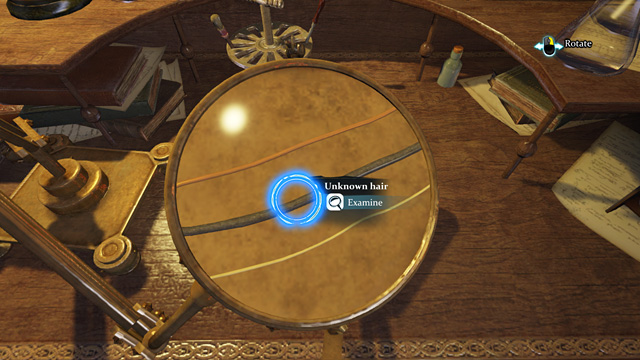 Three different hair strands.
It turns out, that you have a hair strand in front of you. Two other strands will appear on the stage plate. Examine all of them.
Deduction
Connect "Exotic animal hair" with "Wall climber". You will obtain "Circus acrobat".
When connecting "Circus acrobat", "Simultaneous shots", "Crossfire", "Leighton's innocence" and "Burglary motive", you will receive a task: "Vanishing act".
Head to Half Moon Street. Ask Wiggins, who is standing in the corner where Holmes climbed the wall, to find out what circus is currently performing in London.
When the boy brings you the Circus Poster, examine the Picture of elephant and the inscription above. Use the Map to go to Duval Bros Circus and after talking to Circus guard, return to Baker Street.
Go to Holmes's room and open the Wardrobe. Choose: Bandit Outfit. Then, approach the Make-Up Table (options at the top of the screen) and select a proper hat (for example nr 11). Then choose your facial hair (for example nr 6). Exit the close-up mode and head to the circus.
After talking to the guard once again, go to the building with stairs and open the door. When inside, examine the Barrels near the place where Sherlock saw some men talking. Take a look at the Barrels on top, the one on the ground and the Crack on it. Examine also the Paint.
 The Crest on the barrel - visible only when Holmes's talent is active.
Activate Holmes's talent and notice the Crest on top of the barrel. Lastly, hit the Crack and examine the Powder that comes out.
Go right, to the other side of the arena and examine the Printing press. Take a look at the Poster (Rebellious poster). Examine the Picture of a man and the Slogan. Also, look at the Blank papers to the right. Talk to Charles Foley when he appears.
Charles Foley portrait:
Deduction
Connect "Antique ring" with "Foley's revolver". You will obtain "Man in jacket".
Approach the table near the barrels and open the Lock.
Opening the lock in the circus
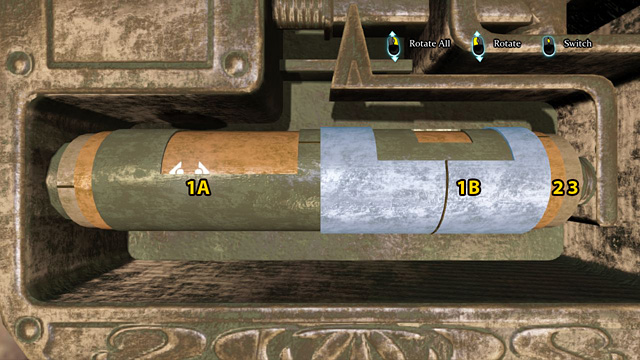
Rotate all so that the horizontal line on the edge of cylinder nr 3 is visible.
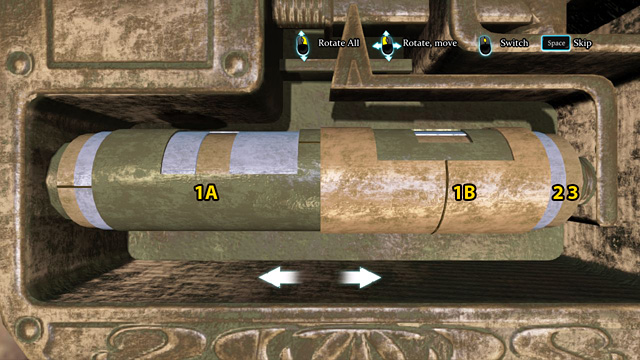
Switch (2 clicks) to nr 2 and rotate it so that the horizontal line on the edge of it matches the one on nr 3.
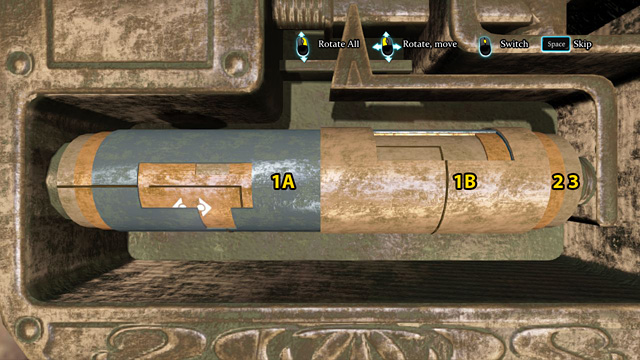
Switch (3 clicks) to nr 1A and rotate it so that the horizontal line matches the previous ones (on nr 2 and 3).
Rotate all so that you can see the horizontal lines on the right side of nr 2 and 3.
Switch (3 clicks) to nr 1B and rotate it so that the horizontal line on its right side matches the ones on nr 2 and 3.
Rotate all so that the you can see the vertical lines on nr 1A and nr 2.
Switch (2 clicks) to nr 2 and move it to the left so that the vertical lines on it match the ones on nr 1A.
Talk to Charles Foley. Select: Jailed thief in the QTE. Next, use the Map to go to Notting Hill Manor.
Approach the Door and try to open it. You have to break in of course.
Opening the Door to Notting Hill Manor
Switch (1 click) to nr 1B. Move it to the right and match the lines on it to the lines on nr 1A. Connect both cylinders by moving nr 1B to the left.

Rotate all so that you can see the horizontal line on the edge of cylinder nr 3.
Switch (1 click) to nr 2 and rotate it so that the upper horizontal line matches the one on nr 3.
Switch (2 clicks) to nr 1A and rotate it so that the horizontal line on its edge matches the ones on nr 2 and 3.
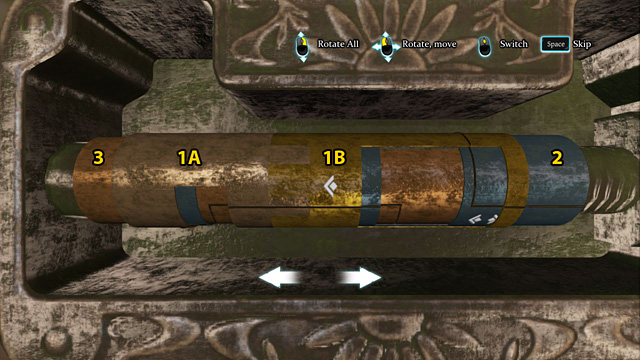
Rotate all so that you can see the vertical lines on nr 1B and nr 2 in the window on the right.
Switch (2 clicks) to nr 2 and move it to the right, to match the lines to those on nr 1B.
Go inside and go through the first door on the right (the second door leads to the kitchen). Enter the living room. Approach the Bookcase (the second one by the wall) and examine it, as well as the Books on the floor. Move the Bookcase and try to open the Safe behind it.
Opening the Safe in Notting Hill Manor
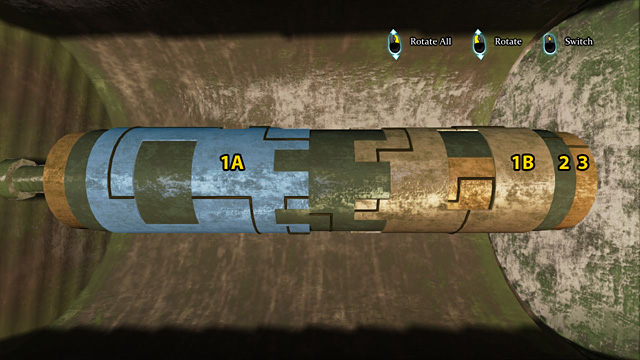
Rotate all so that you can see two tall windows.
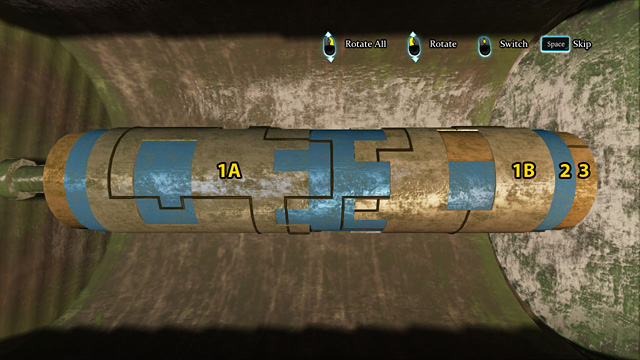
Switch (2 clicks) to nr 2 and rotate it so that the lines in the left window match the ones on nr 1A.
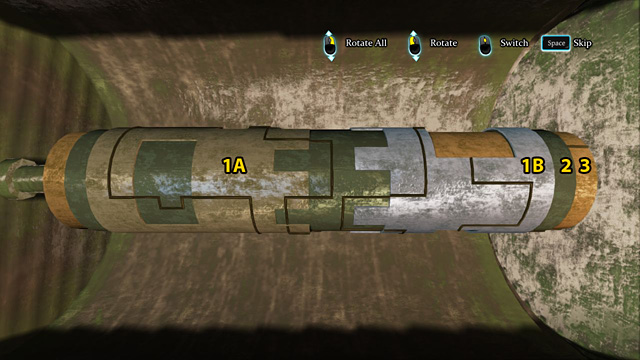
Switch (3 clicks) to nr 1B and rotate it so that the lines in on its left edge match the ones on nr 2.
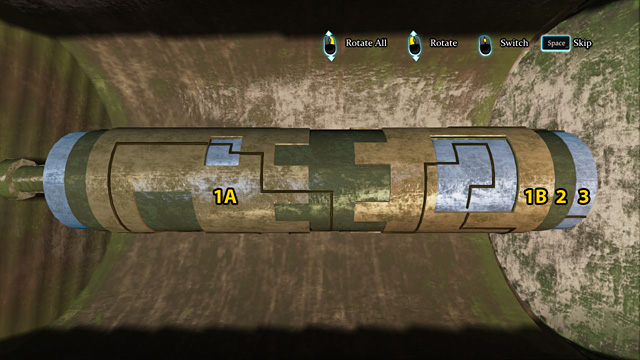
Rotate all so that you can see two empty windows - a small one on the left and a big one on the right.
Switch (2 clicks) to nr 3 and match the lines in those windows to those on nr 1A and nr 1B.
Another Lock will appear - try to open it. Unfortunately, this time you will need a key.
Check the possible means of escape: The Door in the kitchen, the Window in the corridor on the ground floor (behind the stairs) and the Window in the corridor on the first floor.
 A trap at the top of the stairs.
When in the corridor on the first floor, examine the Top stair. Take a look at the Table near the stairs and take a Bead-necklace. Select: Drop bead-necklace on the Stair.
In the corridor on the ground floor, approach the Cupboard covered with some material. Move the cupboard to block the way through the window. Activate Holmes's imagination.
In the kitchen, notice the Solid chair in the Corner. Examine the Kitchen door that lead to the living room and select: Block with chair on the Door handle.
Notice the Hatch in the kitchen floor (near the door to the corridor) and open it. Go to the living room and take the Carpet by the wall, next to the bookcase. Select: Cover with carpet on the Hatch. Activate Holmes's imagination.
Examine the Stove and take the Rope. In the living room, take a look at the Chandelier.
 The chandelier trap.
Select: Attach rope on the Chandelier and tie the rope to a big Hammer nearby. Next, hang the Chandelier. Activate Holmes's imagination.
After the thieves' visit, open the Safe with the key that you've taken from Foley. Examine the things inside.
Deduction
Connect "Precious safe" with "Long-lost art". You will obtain "Hidden art".
Foley's Vengeance
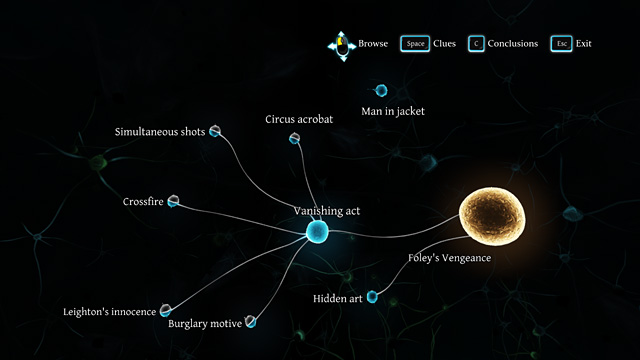 The correct result of the investigation.
Required Conclusions:
As always, you can decide whether to condemn the culprit or let him go. Before you confirm the decision, you can check out other potential endings (Replay Ending).
When you solve the last case in the game, Sherlock will have to make one more moral choice - you can either throw the cigarette on the Powder trail or into the Bucket of water.
Robbery
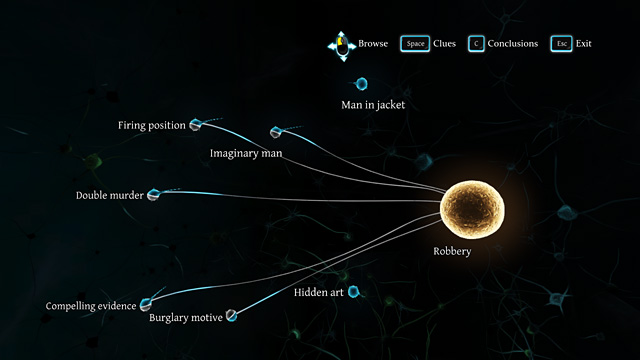
Required Conclusions:
Double Murder
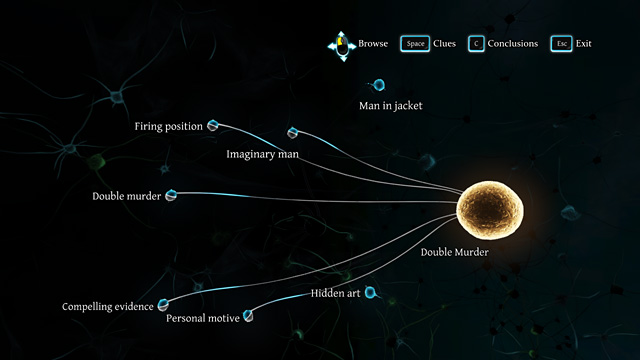
Required Conclusions:
Bruiser - Beat Cairns in a fight (case 1).
Aye Aye, Captain! - Finish Black Peter Case (case 1).
I Never Fail - Finish 10 Dialogue QTEs without a failure.
Sharpshooter - Disarm Mexican by shooting the gun from his hand (case 2).
Off the Rails! - Finish Train Case (case 2).
Child's Play! - Finish 25 mini games and puzzles without skipping.
Elementary! - Finish 35 mini games and puzzles without skipping.
My Grey Matters - Finish 45 mini games and puzzles without skipping.
Raider of the Tombs - Retrieve the Golden Knife from the ancient temple of Mithras.
Blood and Ice - Finish Blood Bath Case (case 3).
An Omnivorous Reader - Receive 3 messages from those whom you condemned or absolved.
Keen Observer - Finish 15 Character Observations without skipping.
Hold your Herrings, Captain! - Save Crocker from committing suicide (case 4).
Vox populi, vox Dei - Finish Abbey Grange case (case 4).
Suicide is Not an Option! - Prevent Miss White from suicide (case 5).
A Deadly Flower - Finnish Kew Gardens case (case 5).
A Methodical Man - Gather 26 Character Portraits.
Haunted House - Catch the thieves at Notting Hill Manor (case 6).
Guilty Brotherhood - Finish Half Moon case (case 6).
Dog-fancier - Interact with Toby in every case.
A Man of Character - Receive maximum personality ranking.
I Never Guess - Reach 6 correct conclusions for all 6 cases.
A Complex Mind - Reach all possible conclusions in the game.
Perfectionist - Collect all possible in-game achievements.
Their crimes, Your punishments - Complete the game.


 Sid Meiers Railroads! Game Guide & WalkthroughSilent Hill: Homecoming Game Guide & Walkthrough
 Star Wars: Battlefront Game Guide & WalkthroughSleeping Dogs Game Guide & Walkthrough
 SOMA Game Guide & Walkthrough