In this unofficial game guide to Armed Assault 2: Operation Arrowhead you'll find a complete walkthrough for single-player campaign. Missions in this campaign don't offer, in my humble opinion, such a freedom as they offered in basic version of this game: now they surprise a gamer less often with their unpredictability and they're also more repeatable. That's why the character of my hints is so precise and rather quite detailed. My scrupulousness is also dictated by the fact that this guide is addressed mainly to these (younger) players, who are making their first, unsteady footsteps on the battlefield of ArmA. This game guide has been prepared on the basis of a Polish ver. 1.52 of the game, so you should notice also that missions' titles, objectives' names and some codenames may not be translated into English literally... Before you start your gameplay, it's a good idea to familiarize yourself with in-game tutorial.
Designations used in this guide:
- in the text: (#x) - the consecutive pictures, objectives - green.
- in the text and on my maps: the enemy - red (but in the text only then, when it is related to the sign on the map of a unit which is not changing its position!), locations - orange.
- on my maps: Allies - blue.
Pawel "PaZur76" Surowiec
The singleplayer campaign starts with a short intro. A socialist regime, which rules the Takistan with a heavy hand since the moment of taking up the reins in 1992 (which was done with a considerable military aid of Soviet Union), is now threatening the neighboring Karzegistan with Takistani chemical weapons, if the tableland Sharig (rich in oil) won't be "immediately returned to the people of Takistan". On the border with the neighbor the Takistani Army has disposed tactical ballistic missiles (SCUDs) which are able to strike Allied targets in Karzegistan and on Green See. This threat made by the Highest Socialist Bureau is a desperate attempt to maintain the remains of power which is now endangered by the attacks of the internal, royalist guerilla (supported by CIA). Guerillas try (with successes) to paralyze the production of petroleum and the mining of coltan (a precious metal ore) which are both used by local military junta to enlarge and enhance Takistani army and security services. Obviously this threat, made by Colonel Muhhamad R. Aziz (#1), who is in charge of socialist regime, wasn't accepted by United Nations Organization (UNO/UN) and North Atlantic Treaty Organization (NATO). They both gave an ultimatum to Aziz, demanding him to withdraw the Takistani Army from the border with Karzegistan. There was no reaction from Aziz, though, so on June 1, 2012, the allied forces established their bases in regions controlled by guerilla and started Operation Arrowhead, whose task is to neutralize ballistic missiles and preclude Takistani Army from attacking Karzegistan. That's all for starters. As you can easily guess now, you'll be taking part in Operation Arrowhead by playing alternately the roles of a simple infantryman, tankist, gunship's pilot and Special Forces operator.
![[1] - Mission 1 - Backstab - Operation Arrowhead - ArmA II: Operation Arrowhead - Game Guide and Walkthrough](https://game.lhg100.com/Article/UploadFiles/201512/2015121215540898.jpg) [1]
[1]![[2] - Mission 1 - Backstab - Operation Arrowhead - ArmA II: Operation Arrowhead - Game Guide and Walkthrough](https://game.lhg100.com/Article/UploadFiles/201512/2015121215540820.jpg) [2]
[2]
In the first scenario you're a US Special Forces Sergeant Terry Graves. His task in this Friday evening, May 25 (so before the beginning of a big scale operation) is to eliminate colonel Aziz. In order to do this a team of commandos managed to get under cover to Zargabad, the main town of Takistan. Aziz owns a villa near this city, but now he is residing at the Palace located in the centre of a town. On the streets of Zargabad you may see a lot of Takistani soldiers (#2).
When the car with commandos inside is traveling through the city you don't have a big influence on your character's actions - you can only turn his head around. And that's all you can expect in this scenario, which is, in fact, a prelude to a proper gameplay. Graves with his sniper rifle SWD in hands will wait for Aziz who is leaving the Palace (#3).
![[3] - Mission 1 - Backstab - Operation Arrowhead - ArmA II: Operation Arrowhead - Game Guide and Walkthrough](https://game.lhg100.com/Article/UploadFiles/201512/2015121215540917.jpg) [3]
[3]![[4] - Mission 1 - Backstab - Operation Arrowhead - ArmA II: Operation Arrowhead - Game Guide and Walkthrough](https://game.lhg100.com/Article/UploadFiles/201512/2015121215540946.jpg) [4]
[4]
You can't aim at the target or pull a trigger, all of this is still happening without your participation. This is probably the reason why Graves flubs his job - instead of shooting dead the colonel he hits his bodyguard (#4) and Aziz manages to escape alive.
Date and place: Friday, June 1, 2012, 7:00, South of Takistan, near Loy Manara airfield.
Mission: Seize the Loy Manara airfield (1) and the military base (2) situated nearby, which are defended by Takistani mechanized and armor units and by republican militia. Clear Loy Manara (3) and Jaza (4) villages of enemy combatants. The airfield will then become a bridgehead, FOB (Forward Operating Base) for Allied forces in Takistan.
Support: there's no support given over directly to your disposal, but in the Area of Operations (AO) there will be some US attack helicopters AH-64 Apache and tanks M1A1 Abrams which should help you during the battle.
Proposed equipment: Your name is Howard Drake and you're just a simple infantryman in this whole war machinery, a simple private of infantry squad, so you don't have a big choice of weapons in this scenario. You have at your disposal only an assault rifle SCAR-L (Mk 16) cal. 5.56mm with attached grenade launcher cal. 40mm, with EOTech holographic sight mounted on your weapon, which is designed for CQC (close quarter combat). You can't change your weapon during the briefing, but you can do this later, in a helicopter, while being transported to AO. There's a possibility of grabbing M249 SAW (squad automatic weapon), which fires 5.56x45mm NATO rounds, or an assault rifle SCAR-H (Mk 17) cal. 7.62mm with collimator sight (also for close combat encounters). Btw, the easiest way to distinguish the calibers and models of SCAR assault rifles is by their clips. Obviously, it's also a matter of your individual likings what weapon will you use on the battlefield, but I'd suggest staying with Mk 16 with attached grenade launcher - this last thing may be useful when facing enemy cars or APCs (Armoured Personnel Carriers).
Successive objectives in the scenario:
![[1] - Mission 2 - Good Morning Takistan - p. 1 - Operation Arrowhead - ArmA II: Operation Arrowhead - Game Guide and Walkthrough](https://game.lhg100.com/Article/UploadFiles/201512/2015121215540910.jpg) [1]
[1]![[2] - Mission 2 - Good Morning Takistan - p. 1 - Operation Arrowhead - ArmA II: Operation Arrowhead - Game Guide and Walkthrough](https://game.lhg100.com/Article/UploadFiles/201512/2015121215540993.jpg) [2]
[2]
Well, it must be written here that the Americans in this scenario show their courage by landing (#1)... exactly on the airstrip of the airfield of Loy Manara (1), which is located in grid 080018 and occupied by the enemy. This daring assault will cost some Americans their lives, because landing helicopters will encounter heavy AA fire from the ground. Among other things, there's a self-propelled AA gun ZSU-23-4 Shilka shooting from there - its position is located on the hill to the north from the airstrip. Shilka manages to shot down at least one American chopper before it is annihilated by the attack helicopters AH-64 Apache which are covering the landing. If you want to change your weapon, do it now, while in chopper, as I wrote above.
After the landing on the airstrip follow your comrades from the squad. Your first task is to secure this LZ (Landing Zone). You'll find cover behind the nearby sandbags (#2). From behind there kill the Takistani soldiers who will be probably appearing on the left side of this wall which is visible on my screen (I'm pointing my gun at this wall on this picture). Some of the enemies may present an admirable skill of running through this wall - they were trained probably by Russian spetsnaz... Other Takistani may appear in the azimuth 45 deg (more or less) on your compass, near the parked truck and some green tents and also hangars.
![[3] - Mission 2 - Good Morning Takistan - p. 1 - Operation Arrowhead - ArmA II: Operation Arrowhead - Game Guide and Walkthrough](https://game.lhg100.com/Article/UploadFiles/201512/2015121215540945.jpg) [3]
[3]![[4] - Mission 2 - Good Morning Takistan - p. 1 - Operation Arrowhead - ArmA II: Operation Arrowhead - Game Guide and Walkthrough](https://game.lhg100.com/Article/UploadFiles/201512/2015121215540937.jpg) [4]
[4]
You can eliminate them by strafing along the sandbags with your weapon pointed towards these hangars of the airfield (#3). Watch out during the fight and don't fire accidentally at your comrades - they love to get in the sight...
When the game considers the task of securing the LZ as completed it's time to move with your companions deeper into the airfield, towards the control tower and the military base (2), which are both situated behind the hangars. You have to seize this airfield now. More or less in this moment of a gameplay on the airfield there may appear some off road cars which are driven by Takistani combatants. These cars are armed with HMGs and they may appear, but... may also not. That's because this game contains in its missions some random elements often used by scenario designers. So these cars in number of two may appear on the airfield by entering it by the road which is running from the north. Of course they may appear only if they weren't destroyed earlier by other American units (like Apache gunships and Abrams tanks) which are also operating in the area and attacking the airfield (2). You're not alone here, son... You can easily deal with these off road cars of Takistani combatants by shooting at them from your grenade launcher mounted under the barrel of your assault rifle (#4). Alternatively you may treat them with a rocket fired from M136 AT-4 launcher which you can take from the corpse of one of your dead comrades (if anyone of them had bad luck to die here...). Although it's a rocket wasting and you should also try to save your 40mm grenades, because you don't have too many. Proceed along the hangars (by running under their walls) towards the control tower.
[5]![[6] - Mission 2 - Good Morning Takistan - p. 1 - Operation Arrowhead - ArmA II: Operation Arrowhead - Game Guide and Walkthrough](https://game.lhg100.com/Article/UploadFiles/201512/2015121215541094.jpg) [6]
[6]
Under the control tower you may encounter several more Takistani soldiers - kill'em all by carefully leaning from behind the corner of the hangar (#5).
On the control tower there are hiding also some Takistani - it's again a great occasion to practice a little shooting from the grenade launcher attached to your assault rifle. Perhaps you'll be able to eliminate from this grenade launcher these three bad guys on the control tower (#6) before they thin out the rows of your squad.
![[7] - Mission 2 - Good Morning Takistan - p. 1 - Operation Arrowhead - ArmA II: Operation Arrowhead - Game Guide and Walkthrough](https://game.lhg100.com/Article/UploadFiles/201512/2015121215541099.jpg) [7]
[7]![[8] - Mission 2 - Good Morning Takistan - p. 1 - Operation Arrowhead - ArmA II: Operation Arrowhead - Game Guide and Walkthrough](https://game.lhg100.com/Article/UploadFiles/201512/2015121215541009.jpg) [8]
[8]
Afterwards you can approach this building and slowly enter it, then move inward upstairs. Before you do this, it's worth to change your clip and switch to full auto mode. Shot dead two Takistani soldiers who are lurking on the staircase (#7) - you may had problems with killing them earlier, when using your grenade launcher.
Afterwards you can use the next stairs to climb up even higher on this control tower, to check if these three Takistani (including pilot) had been eliminated by the fire of your grenade launcher. It's wise to go crouch on the stairs, in order to avoid being shot (#8). Watch out, the pilot is hiding in the corner right in front of the stairs!
![[9] - Mission 2 - Good Morning Takistan - p. 1 - Operation Arrowhead - ArmA II: Operation Arrowhead - Game Guide and Walkthrough](https://game.lhg100.com/Article/UploadFiles/201512/2015121215541050.jpg) [9]
[9]![[10] - Mission 2 - Good Morning Takistan - p. 1 - Operation Arrowhead - ArmA II: Operation Arrowhead - Game Guide and Walkthrough](https://game.lhg100.com/Article/UploadFiles/201512/2015121215541086.jpg) [10]
[10]
After checking the control tower, exit this building and take a peek into the tent situated behind the UAZ car (#9). If you wish you may use this car later to travel - somebody has left the keys in the ignition switch...
In the tent you'll encounter three Takistani officers, perhaps still alive (#10). I leave it to your conscience what to do with them, they're unarmed...
![[11] - Mission 2 - Good Morning Takistan - p. 2 - Operation Arrowhead - ArmA II: Operation Arrowhead - Game Guide and Walkthrough](https://game.lhg100.com/Article/UploadFiles/201512/2015121215541064.jpg) [11]
[11]![[12] - Mission 2 - Good Morning Takistan - p. 2 - Operation Arrowhead - ArmA II: Operation Arrowhead - Game Guide and Walkthrough](https://game.lhg100.com/Article/UploadFiles/201512/2015121215541059.jpg) [12]
[12]
Afterwards it's time to follow your comrades towards the nearby village named Loy Manara (3), which is located in grid coordinates 084024, in order to seize it. If you don't know where currently your commander is, you can press the key combination 5-5. Stay behind your comrades while they are running towards the village (#11), try not to run onto the hill situated to your left (to the north), to avoid exposing your silhouette to enemy combatants from the village. Press 5-4 combo, if you were wounded during the fight and you need medical assistance - after a while (rather longer than shorter...) there should appear a medic near you, who will know what to do (but he acts like he has no clue...). When closing to this Takistani village (3), try to use as a cover any rocks and walls you'll encounter on your way.
In the village, on the road leading northwards, you'll encounter probably an obsolete armoured car used by enemy combatants (#12). Although I don't know if it is functional in this scenario (I mean - if its HMG may hurt you), or it's only a decorative element of the scenography, but it's worth to treat this car with a grenade fired from your grenade launcher. Just in any case. Alternatively you can use a hand grenade against this vehicle, if you have such a grenade in your arsenal.
![[13] - Mission 2 - Good Morning Takistan - p. 2 - Operation Arrowhead - ArmA II: Operation Arrowhead - Game Guide and Walkthrough](https://game.lhg100.com/Article/UploadFiles/201512/2015121215541045.jpg) [13]
[13]![[14] - Mission 2 - Good Morning Takistan - p. 2 - Operation Arrowhead - ArmA II: Operation Arrowhead - Game Guide and Walkthrough](https://game.lhg100.com/Article/UploadFiles/201512/2015121215541048.jpg) [14]
[14]
Kill all the combatants you'll spot in the village. The only sign that allows you to distinguish them from the civilians are the weapons of multifarious origin which they hold in their hands. First of all kill the crew of HMG (heavy machine gun) which is hiding behind the sandbags on the left roadside of the road leading from the village to the east (#13). This HMG emplacement is situated on the margin of Loy Manara village (3).
After the fight and after clearing of the hostiles this Takistani settlement it's time to seize Jaza village (4), which is located to SE, in grid 093017. Before you move towards it, you can search the pockets of the dead Americans, if anyone of them had a bad luck to be killed here, in this rathole..., ekhm, in this distant and very exotic country... It's worth to search for a rifle equipped with a thermovisual or optical sight - in a minute such a weapon (#14) may be very useful.
![[15] - Mission 2 - Good Morning Takistan - p. 2 - Operation Arrowhead - ArmA II: Operation Arrowhead - Game Guide and Walkthrough](https://game.lhg100.com/Article/UploadFiles/201512/2015121215541087.jpg) [15]
[15]![[16] - Mission 2 - Good Morning Takistan - p. 2 - Operation Arrowhead - ArmA II: Operation Arrowhead - Game Guide and Walkthrough](https://game.lhg100.com/Article/UploadFiles/201512/2015121215541163.jpg) [16]
[16]
Follow your comrades towards the next Takistani village (4). In this area the enemy disposes also of some tanks and APCs (Armoured Personnel Carriers), but they all should be destroyed already by American Apache gunships and Abrams tanks. So you shouldn't have an opportunity to fight against such a dangerous, armored opponent. Thanks God! On the southeastern margins of the Loy Manara village (3) there's a household of some Takistani peasant (#15).
By climbing up to the roof of the mud hut (#16), which is located inside the yard, you'll obtain quite a nice view on the surroundings, especially on the village (4), which you should seize now. It's a good position to fire from the assault rifle equipped with the scope with a large magnification. But if you weren't able to obtain such a weapon, then you have nothing to wait for and you must follow your comrades directly to Jaza village (4). From this distance you'll only waste your ammo when trying to hit anything in Jaza (4) from the weapon with EOTech holographic sight installed on it.
![[17] - Mission 2 - Good Morning Takistan - p. 2 - Operation Arrowhead - ArmA II: Operation Arrowhead - Game Guide and Walkthrough](https://game.lhg100.com/Article/UploadFiles/201512/2015121215541171.jpg) [17]
[17]![[18] - Mission 2 - Good Morning Takistan - p. 2 - Operation Arrowhead - ArmA II: Operation Arrowhead - Game Guide and Walkthrough](https://game.lhg100.com/Article/UploadFiles/201512/2015121215541118.jpg) [18]
[18]
But if you have an assault rifle with ACOG (Advanced Combat Optical Gunsight) or thermovisual sight mounted on it, then you can take a look through it at the buildings of Jaza village (4). You should see two HMGs on the roofs of two houses which are situated on the northern outskirts of this settlement. There may be some combatants hanging around the one which is situated easternmost (#17). Fire at all the visible silhouettes - it may be more difficult to hit a guy who is operating HMG, because from your current position you're probably able to see only his little head.
Try to hit at the head and eliminate the gunner of the second HMG (located westernmost) (#18), while covering your comrades when they're running towards this village (4).
![[19] - Mission 2 - Good Morning Takistan - p. 2 - Operation Arrowhead - ArmA II: Operation Arrowhead - Game Guide and Walkthrough](https://game.lhg100.com/Article/UploadFiles/201512/2015121215541131.jpg) [19]
[19]![[20] - Mission 2 - Good Morning Takistan - p. 2 - Operation Arrowhead - ArmA II: Operation Arrowhead - Game Guide and Walkthrough](https://game.lhg100.com/Article/UploadFiles/201512/2015121215541189.jpg) [20]
[20]
Leave the roof (don't jump, use the stairs!) and follow your companions (#19). Prey for a squad leader who is intelligent enough to choose the best way of the approach to Jaza (4). And the best approach is from the west, from the airfield (1) captured recently by the Allied forces. That's because the village (4) is situated on the side of the hill which is descending from west to east and by approaching the settlement from this first direction you'll have a better view on enemy positions in Jaza (4). During the battle you and your squad should be supported by M2 Bradley IFVs (Infantry Fighting Vehicles). It doesn't mean, though, that you may put a finger into your nose and wait until they'll do your job (of clearing the village of hostiles), or leave this task to your squadmates, because it's easy then to take unnecessary casualties. And this mission ends with failure if Americans lose in the battle too many soldiers or too much equipment!
So support your comrades and eliminate enemy combatants who are taking their positions mostly along the road which is running through the village (4). On this road you may also spot another car armed with HMG. Take care of it using your grenade launcher, alternatively shot dead the gunner first, then the driver. Do it while carefully leaning from behind the corner of the building or the wall (#20). This scenario ends after clearing the village (4) of Takistani combatants.
Note: this map was prepared when this mission was almost finished and the route to Timurkalay was cleared of the enemy forces, thus blue color which is dominating on this picture may suggest that the journey will be idyllic, but it won't be!

Date and place: Friday, June 1, 2012, 10:20, South of Takistan, FOB (Forward Operating Base) Revolver on the airfield near Loy Manara village.
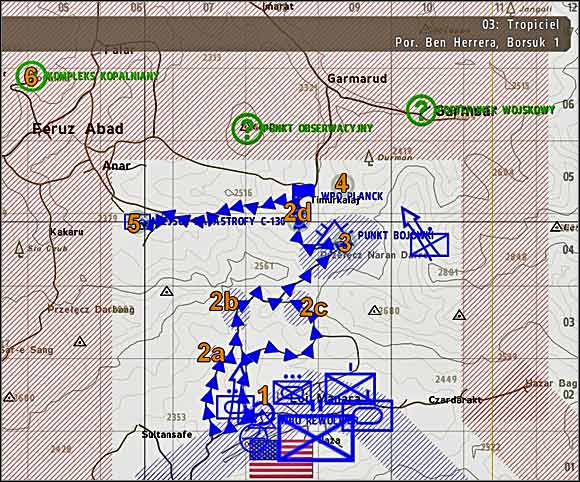
Mission: Your task is to lead an American military convoy of armoured vehicles (1) towards the Naran Darre mountain pass (3), which is located to the north from Loy Manara village. You have to get along the road to Timurkalaj village (2d) and establish there a FOP (Forward Observation Point) Planck. During your journey you'll have to neutralize enemy strong points (2a, 2b, 2c and 2d) situated along the road.
Support: you have at your disposal an artillery support and CAS (Close Air Support) of A-10 Thunderbolt II.
Proposed equipment: you have a carte blanche when it comes to select your weapons, but it is a wise idea to have a rifle with a good optical sight with big zoom. You can also grab MAAWS (multi-role recoilless rifle). Anyway, you shouldn't be forced to use these weapons not even once during this mission - you're a tankist in this scenario, so you'll be rampaging around with your Abrams tank. However, it's worth to take a rangefinder with you which you can use to point targets for your artillery or CAS support.
Successive objectives in the scenario:
![[1] - Mission 3 - Pathfinder - p. 1 - Operation Arrowhead - ArmA II: Operation Arrowhead - Game Guide and Walkthrough](https://game.lhg100.com/Article/UploadFiles/201512/2015121215541151.jpg) [1]
[1]![[2] - Mission 3 - Pathfinder - p. 1 - Operation Arrowhead - ArmA II: Operation Arrowhead - Game Guide and Walkthrough](https://game.lhg100.com/Article/UploadFiles/201512/2015121215541130.jpg) [2]
[2]
After starting this mission listen patiently to your superior (#1) - and he roughly repeats what you've read during the briefing.
When he finishes his speech it's time to exit this control tower and move northwards, to grid 082022, towards the road on which awaits you the American convoy of military vehicles (1). You're a tank commander so embark the Abrams tank which is leading the column of M2 Bradley Infantry Fighting Vehicles (IFVs) (#2). During this mission you have primarily to protect this military convoy (1) you're leading and don't let the enemy to destroy too many of your vehicles. After taking a seat of a commander in the Abrams tank it is worth to go to the options screen for a while and increase the view distance up to approx. 3km, or even more, if you play on really strong PC. Reducing or turning off the post effects would be also a wise idea... Thanks to this operation you'll be able to spot the enemies for a long time before they harm your vehicles. It's time to have a blitz on neutralizing enemy strong points (2a, 2b, 2c and 2d).
![[3] - Mission 3 - Pathfinder - p. 1 - Operation Arrowhead - ArmA II: Operation Arrowhead - Game Guide and Walkthrough](https://game.lhg100.com/Article/UploadFiles/201512/2015121215541273.jpg) [3]
[3]![[4] - Mission 3 - Pathfinder - p. 1 - Operation Arrowhead - ArmA II: Operation Arrowhead - Game Guide and Walkthrough](https://game.lhg100.com/Article/UploadFiles/201512/2015121215541290.jpg) [4]
[4]
You may order your subordinates in other vehicles to follow your Abrams in a column formation (key combination 8-1). Your tank should lead this column all the time, because sending one of M2 Bradleys as an advance guard may end with losing this vehicle. First, drive amongst the buildings located to the west, in grid coordinates 075019, and then turn right on the crossroads and proceed northwards. On the margins of this village, near the last of the mud huts you'll encounter first humans (#3) - don't shoot, they're all civilians. Generally, in this scenario you should pay attention to who you open fire at, because there are some neutral units (the rebels) operating in the area and you may easily mistake them with Takistani, pro-government combatants.
Proceed along the road. A little further to the north, in grid 076030 (#4) you'll see the first enemy strong point (2a) you should take care about.
![[5] - Mission 3 - Pathfinder - p. 1 - Operation Arrowhead - ArmA II: Operation Arrowhead - Game Guide and Walkthrough](https://game.lhg100.com/Article/UploadFiles/201512/2015121215541270.jpg) [5]
[5]![[6] - Mission 3 - Pathfinder - p. 1 - Operation Arrowhead - ArmA II: Operation Arrowhead - Game Guide and Walkthrough](https://game.lhg100.com/Article/UploadFiles/201512/2015121215541228.jpg) [6]
[6]
Open fire at it from a maximal possible distance. It's easiest to search for hostiles by using for this purpose one of two available thermovisual channels of your tank's sights (#5). You can switch between these channels with the N key. If you want to personally fire from the cannon you can also switch to gunner's seat. Well, this isn't the right place of the guide to describe tank's controls and all of you who play this game their first time should ruthlessly familiarize themselves with the tutorial first...
The strong point (2a) (#6) consists of several obsolete, armoured cars, HMG, some infantry and most of all - of an old tank T-34 which should be situated somewhere behind the bushes on the left roadside. On the hills to the right there also may appear some combatants who are wearing turbans and holding rifles in their hands. Watch out, don't mistake them with neutral guerillas. These targets aren't a big threat for your convoy (except the T-34 tank), so if you want to avoid making the mistakes during the identification of the hostiles, then you can rely on the crew of your vehicle. If AI starts to fire at the targets that means that these targets are hostile. Besides this one T-34 which is waiting in ambush on the left roadside, there may also appear two other tanks of this old type - they may enter the arena by the road leading from the north. Use your coaxial machinegun against enemy infantry, you can also fire from the MG mounted in loader's hutch. Use commander's HMG against hostile armoured cars, eventually you can use against them the high explosive rounds (HE) of your main cannon. Burn enemy tanks using AP rounds (sabots) of your cannon.
![[7] - Mission 3 - Pathfinder - p. 1 - Operation Arrowhead - ArmA II: Operation Arrowhead - Game Guide and Walkthrough](https://game.lhg100.com/Article/UploadFiles/201512/2015121215541287.jpg) [7]
[7]![[8] - Mission 3 - Pathfinder - p. 1 - Operation Arrowhead - ArmA II: Operation Arrowhead - Game Guide and Walkthrough](https://game.lhg100.com/Article/UploadFiles/201512/2015121215541258.jpg) [8]
[8]
At one point the crew of one of your Bradleys will notice that their vehicle runs low on fuel. Morons... You'll have to disembark from your tank for a while (actually - you'll be thrown outside it by force), meanwhile the crew of the Bradley will take care about its "malfunction". If you're attacked by combatants in this moment, then it's better to hide behind the armour of one of your vehicles and let these vehicles to finish the fight without your participation. Goldbricks live longer here... Throwing a commander outside his tank seems to be only the pretext to show him the catastrophe of a military transport aircraft C-130 Hercules which will be hit with Takistani surface-to-air rocket and will crash somewhere behind the mountains to NW (#7). In the latter part of this scenario you'll have to get to the crash site and check if anybody survived the crash - but it will happen later.
Now, when the crew of a Bradley makes this vehicles functional again, return to your Abrams tank and lead the whole convoy towards the next enemy strong point (2b), which is situated in grid coordinates 0703 to the north (#8).
![[9] - Mission 3 - Pathfinder - p. 2 - Operation Arrowhead - ArmA II: Operation Arrowhead - Game Guide and Walkthrough](https://game.lhg100.com/Article/UploadFiles/201512/2015121215541259.jpg) [9]
[9]![[10] - Mission 3 - Pathfinder - p. 2 - Operation Arrowhead - ArmA II: Operation Arrowhead - Game Guide and Walkthrough](https://game.lhg100.com/Article/UploadFiles/201512/2015121215541235.jpg) [10]
[10]
Climb along the road to the top of the hill you have in front of you, but don't expose the whole silhouette of your tank to the enemies who may be hiding on the other side of the slope. There should be only the upper part of your tank (the turret) visible from behind this hill, but not the main, lower body (hull). You can describe the tank which is standing in such a position that it is in "hull-down position". The enemy may have problems with hitting and destroying this tank, or even with spotting it (especially when there's a tree, for example, behind this vehicle, which makes spotting this threat even more difficult). There's also a term of "turret-down position" in use, which means that from behind the slope there's visible only a half of a silhouette of a... tank's commander who is standing in his hatch. The commander of the vehicle may order to take a "turret-down position" to recon. Let's go back to the mission. About 600 meters further to the north you should see some trucks parking on the road near the enemy strong point (2b). Order your gunner to destroy them using HE shells, or you can fire personally from commander's HMG, if you don't want to waste the precious ammo for the main cannon on such soft targets (#9). You may also order to reverse after each shot of tank's cannon, to reload this cannon while being completely hidden and out of sight of hostiles. But do this only if you really want to emulate the real tankist... Kill the combatants who are hanging around the trucks then start driving downhill carefully. Carefully, because there's a recoilless gun SPG-9 emplacement amongst the buildings located to the left from the road. You should destroy SPG-9 right after spotting it in your sight. Kill also a Takistani guy who is operating the HMG situated near SPG-9 emplacement and one more gunner of the HMG located on the right roadside, on the hill, near some rocks - it's best to spot it on thermovision.
Afterwards, it's time to move towards the enemy strong point number three (2c) (#10).
![[11] - Mission 3 - Pathfinder - p. 2 - Operation Arrowhead - ArmA II: Operation Arrowhead - Game Guide and Walkthrough](https://game.lhg100.com/Article/UploadFiles/201512/2015121215541212.jpg) [11]
[11]![[12] - Mission 3 - Pathfinder - p. 2 - Operation Arrowhead - ArmA II: Operation Arrowhead - Game Guide and Walkthrough](https://game.lhg100.com/Article/UploadFiles/201512/2015121215541226.jpg) [12]
[12]
Keep going along the road. It goes over the top of the hill - have a peek from behind it. Carefully! You'll see a road crossing and at the right leg of this road, to the east, you'll spot some armoured car and HMG emplacement on the left roadside, and the second HMG with some combatants on the right roadside (#11). Kill them all!
Follow the road and when you reach this crossing take the left leg which is leading NE. You'll reach another hill - there's an electric line running over the top of this hill (#12).
![[13] - Mission 3 - Pathfinder - p. 2 - Operation Arrowhead - ArmA II: Operation Arrowhead - Game Guide and Walkthrough](https://game.lhg100.com/Article/UploadFiles/201512/2015121215541315.jpg) [13]
[13]![[14] - Mission 3 - Pathfinder - p. 2 - Operation Arrowhead - ArmA II: Operation Arrowhead - Game Guide and Walkthrough](https://game.lhg100.com/Article/UploadFiles/201512/2015121215541376.jpg) [14]
[14]
It is more or less grid 088041, its northwestern corner (point 1-9 in the slang of some fans of this game) (#13). Behind this hill, in grid coordinates 093045, there's located the Naran Darre mountain pass (3), which you have to clear of enemy forces. A little further to the north, on the road, in grid 087048, near Timurkalaj village you have to get to, there is situated the main strong point (2d) of the enemy, his base. There are parked some tanks in this base and an attack helicopter Mi-24.
The grid 088041, mentioned above, which is a top of the hill with an electric line over it, is also a good place to disembark from your tank again, to make a little reconnaissance. After disembarking your Abrams tank order your other vehicles to stop and their crews to observe various directions - you want them to cover you, when you're going for a walk. The Abrams tank which is leading the convoy may, for example, observe the road running towards the mountain pass - if something appears on this road it should be quickly annihilated. However, don't get with your tank on top of the hill. Instead of doing this, sneak like an ordinary infantryman to the rocks, which are situated on the left roadside, under the electric line, and take a look at the main Takistani strong point (2d) located to the north. Draw out your rangefinder, take a look through its ocular and call for artillery support first (key combo 9-2, if my memory works fine). Afterwards you may also call for CAS (Close Air Support) of A-10 Thunderbolt (key combination 9-1 or 8-1) to eliminate enemy remnants on the strong point (2d). (#14) In this simple way you'll use this well-known and colossal, military advantage of US Army to quickly destroy the whole enemy base. By the way you'll also dispose of this Takistani gunship mentioned above, which would take off in the latter part of the game and be a pain in the...ekhm...
![[15] - Mission 3 - Pathfinder - p. 2 - Operation Arrowhead - ArmA II: Operation Arrowhead - Game Guide and Walkthrough](https://game.lhg100.com/Article/UploadFiles/201512/2015121215541370.jpg) [15]
[15]![[16] - Mission 3 - Pathfinder - p. 2 - Operation Arrowhead - ArmA II: Operation Arrowhead - Game Guide and Walkthrough](https://game.lhg100.com/Article/UploadFiles/201512/2015121215541333.jpg) [16]
[16]
If there is still something moving on the strong point (2d), then you can return to your Abrams tank and get with this vehicle closer to the rocks located under the electric line, in order to finish off enemy remnants (#15). In enemy base (2d) there are some tanks (T-55 probably), one, equally old T-34, HMG emplacements, Mi-24 gunship mentioned above, some IFVs (probably BMP-2) and lots of infantry.
Afterwards, return with your tank on the road and lead your convoy of military vehicles towards the Naran Darre mountain pass (3). Behind the top of the hill with an electric line over it you'll encounter some outpost (probably abandoned) with HMG emplacement and UAZ off road car parked near the tent on the left roadside. But first of all you should destroy the next enemy tank which is patroling the road in front of you (#16). Fire also at the infantry you'll spot in the distance through your thermovisual sight.
![[17] - Mission 3 - Pathfinder - p. 2 - Operation Arrowhead - ArmA II: Operation Arrowhead - Game Guide and Walkthrough](https://game.lhg100.com/Article/UploadFiles/201512/2015121215541375.jpg) [17]
[17]![[18] - Mission 3 - Pathfinder - p. 2 - Operation Arrowhead - ArmA II: Operation Arrowhead - Game Guide and Walkthrough](https://game.lhg100.com/Article/UploadFiles/201512/2015121215541316.jpg) [18]
[18]
Behind the road bend there's a mud hut which you can destroy with HE shell, because you'll see a HMG at the entrance and some cars parked in front of this building. These cars aren't rather in possession of allied or neutral forces (#17)...
Proceed with the whole convoy along the road towards this mud hut. You may alternatively stop your column nearby this hut, disembark from your tank again and check this building, if you didn't destroy it earlier. Perhaps you'll encounter a gentleman inside - I didn't ask for whom he fights... (#18)
![[19] - Mission 3 - Pathfinder - p. 2 - Operation Arrowhead - ArmA II: Operation Arrowhead - Game Guide and Walkthrough](https://game.lhg100.com/Article/UploadFiles/201512/2015121215541314.jpg) [19]
[19]![[20] - Mission 3 - Pathfinder - p. 2 - Operation Arrowhead - ArmA II: Operation Arrowhead - Game Guide and Walkthrough](https://game.lhg100.com/Article/UploadFiles/201512/2015121215541399.jpg) [20]
[20]
Near the mud hut, in grid coordinates 092046, there's a hill located, marked on your map as a "governmental combatants hideout" (or something similar - sorry, I played on Polish version of this game, not English) (#19). You may arrange one or several your vehicles in the way which allows them to cover you and then take a walk uphill with some soldiers.
It seems that there are really some positions of enemy combatants on this hill, but their owners should be all dead now. It's probably the work of American commandos - you'll encounter some of them on the hill (#20). They aren't communicative, though, so return downhill to the convoy which is waiting on the road.
![[21] - Mission 3 - Pathfinder - p. 2 - Operation Arrowhead - ArmA II: Operation Arrowhead - Game Guide and Walkthrough](https://game.lhg100.com/Article/UploadFiles/201512/2015121215541347.jpg) [21]
[21]![[22] - Mission 3 - Pathfinder - p. 2 - Operation Arrowhead - ArmA II: Operation Arrowhead - Game Guide and Walkthrough](https://game.lhg100.com/Article/UploadFiles/201512/2015121215541462.jpg) [22]
[22]
And you may alternatively burn the vehicles located on the hill, after ensuring yourself that they belong to the enemy (#21).
Embark your Abrams tank again and lead your convoy of military vehicles downhill along the road, towards the already destroyed strong point (2d), which is situated near Timurkalaj village (#22).
![[23] - Mission 3 - Pathfinder - p. 3 - Operation Arrowhead - ArmA II: Operation Arrowhead - Game Guide and Walkthrough](https://game.lhg100.com/Article/UploadFiles/201512/2015121215541489.jpg) [23]
[23]![[24] - Mission 3 - Pathfinder - p. 3 - Operation Arrowhead - ArmA II: Operation Arrowhead - Game Guide and Walkthrough](https://game.lhg100.com/Article/UploadFiles/201512/2015121215541451.jpg) [24]
[24]
After reaching strong point (2d) the task of neutralizing enemy strong points should be marked by the game as completed. There will appear other American forces in the village of Timurkalaj, and they'll establish there a Forward Observation Point (FOP) Planck. In the settlement there will appear support vehicles (among other things): repair, refuel and ammo truck. And you'll talk with local villagers - they'll inform you about the Takistani pro-government combatants who are harassing their settlement. I'd suggest saying "Yes!" (#23), when these poor villagers are asking you, if you want to help them and save them from these bad combatants.
The position of enemy combatants (4) is located quite close, to the east from the village of Timurkalaj, on the margin of the wood in grid coordinates 093053. The enemy isn't rather strong and you should easily deal with him (#24).
![[25] - Mission 3 - Pathfinder - p. 3 - Operation Arrowhead - ArmA II: Operation Arrowhead - Game Guide and Walkthrough](https://game.lhg100.com/Article/UploadFiles/201512/2015121215541453.jpg) [25]
[25]![[26] - Mission 3 - Pathfinder - p. 3 - Operation Arrowhead - ArmA II: Operation Arrowhead - Game Guide and Walkthrough](https://game.lhg100.com/Article/UploadFiles/201512/2015121215541470.jpg) [26]
[26]
Return to your vehicles which are parked on the road at FOP Planck and embark your Abrams tank. I'd suggest repairing all the vehicles which may demand it before you drive northwards through the village of Timurkalaj. But first of all you should rearm your tank at the ammo truck - this is one of three trucks which you'll see parked near the road (#25).
Deal with enemy combatants (4) who are harassing Timurkalaj by using for this purpose only your tank, as your best armoured vehicle. For the moment leave the rest of your vehicles at FOP Planck. Drive northwards through Timurkalaj, then go off road to the right (to the east) and towards the nearby slope. Open fire when you see in your sight the first enemy. First of all destroy the recoilless gun SPG-9 which has its position somewhere amongst the tents situated on the margin of the wood (#26). It's best to locate hostiles using the thermovisor and you don't have to save your ammo, because after the fight you can rearm again at ammo truck in Timurkalaj. Kill also the enemies hiding in the wood. When game considers the task of saving the villagers as completed you can return to FOP Planck in Timurkalaj, in order to repair and rearm your tank, if needed.
![[27] - Mission 3 - Pathfinder - p. 3 - Operation Arrowhead - ArmA II: Operation Arrowhead - Game Guide and Walkthrough](https://game.lhg100.com/Article/UploadFiles/201512/2015121215541441.jpg) [27]
[27]![[28] - Mission 3 - Pathfinder - p. 3 - Operation Arrowhead - ArmA II: Operation Arrowhead - Game Guide and Walkthrough](https://game.lhg100.com/Article/UploadFiles/201512/2015121215541424.jpg) [28]
[28]
Finally, it's time to secure the crash site (5) of a military transport aircraft C-130 Hercules. You observed the crash of this plane earlier. Order your other vehicles (M2 Bradley IFVs) to return to the column formation and move along the road which is running westwards, through the top of another, quite a high hill. Make sure that all the vehicles of the convoy are following your Abrams tank! If one of them stays too far behind, this mission may end with failure! That's because all the time you have to protect this American convoy of military vehicles and have an eye on it. If some of your Bradleys don't want to follow, then the reason is there's probably no one seating on driver's seat. In such a case depress an appropriate function button in order to select one of Bradley's crewmembers and order him to take a driver's seat by pressing the 6 key and then choosing suitable option from the available actions. The process of driving on this high hill (#27) is laborious and it may take some time, so it would be a wise idea to play a little with time compression keys (+ and -).
When closing to the top of this hill you should watch out for enemy combatants who may appear on the left roadside. First of all, kill at least two guys who are carrying AT rocket launchers before they make use of their weapons (#28). It's easily to recognize these gentlemen exactly by these long tubes which are sticking from behind their backs. A little further and on the right roadside there's a HMG emplacement - eliminate its gunner.
![[29] - Mission 3 - Pathfinder - p. 3 - Operation Arrowhead - ArmA II: Operation Arrowhead - Game Guide and Walkthrough](https://game.lhg100.com/Article/UploadFiles/201512/2015121215541479.jpg) [29]
[29]![[30] - Mission 3 - Pathfinder - p. 3 - Operation Arrowhead - ArmA II: Operation Arrowhead - Game Guide and Walkthrough](https://game.lhg100.com/Article/UploadFiles/201512/2015121215541403.jpg) [30]
[30]
Carefully get with your Abrams tank on the top of the hill and take a look at the surroundings while presenting to the potential enemies only the turret of your vehicle. You should see two old T-34 tanks which are driving back and forth on the road below and in front of you - destroy them both (#29). Then you can drive downhill with the whole convoy and order your Bradleys to form echelon left formation, for example (key combo 8-4). In the distance, behind the destroyed T-34s, to the west, in grid 065048 you'll see a wreck of a downed Hercules transport aircraft (5). Unfortunately, the Takistani army was able to get to it first, but for the moment these soldiers have to deal with some neutral (but only towards you) rebels who are also trying to reach the crash site. You can distinguish these first gentlemen from the rebels by their helmets and military uniforms (guerillas wear turbans and clothes designed in local, trendy styles).
Additionally, the rebels along with their vehicles are closing to the crash site from the left side (from the south) and the Takistani soldiers (your enemies) are already near the wreck of a plane, on its right (northern) side (#30). Fire at the soldiers, do not shot at the rebels. In thermovision you can see all of them very nicely, but it's rather difficult to recognize who is who on this channel of your sight.
![[31] - Mission 3 - Pathfinder - p. 3 - Operation Arrowhead - ArmA II: Operation Arrowhead - Game Guide and Walkthrough](https://game.lhg100.com/Article/UploadFiles/201512/2015121215541491.jpg) [31]
[31]![[32] - Mission 3 - Pathfinder - p. 3 - Operation Arrowhead - ArmA II: Operation Arrowhead - Game Guide and Walkthrough](https://game.lhg100.com/Article/UploadFiles/201512/2015121215541505.jpg) [32]
[32]
After killing all the Takistani soldiers and getting with the whole American column of military vehicles to the wreck of a downed Hercules (5) the tasks of securing the crash site and protecting the convoy should be considered as completed. If you didn't kill near the wreck these neutral guerillas, then now you'll be able to talk with them (the cutscene should start automatically). Unfortunately, they'll tell you that you're late and the civilians (physicians) from a downed Hercules were taken by the Takistani trucks to the coltan mine. I think that you can trust these rebels (#31).
But if you killed all the guerillas near the Hercules (probably because of mistaking them for Takistani soldiers, right?), then the HQ will order you to find the prisoners from a downed plane by using a reconnaissance UAV (Unmanned Aerial Vehicle) named Vampir-3. You can obtain the access to the console which lets you to control UAV by approaching to the rear of one of your M2 Bradley IFVs. The suitable option will then appear in your action's menu (#32).
![[33] - Mission 3 - Pathfinder - p. 3 - Operation Arrowhead - ArmA II: Operation Arrowhead - Game Guide and Walkthrough](https://game.lhg100.com/Article/UploadFiles/201512/2015121215541560.jpg) [33]
[33]![[34] - Mission 3 - Pathfinder - p. 3 - Operation Arrowhead - ArmA II: Operation Arrowhead - Game Guide and Walkthrough](https://game.lhg100.com/Article/UploadFiles/201512/2015121215541575.jpg) [34]
[34]
Select this option to start searching the area with the help of the camera mounted on UAV (#33). You need to check three locations in which the prisoners from a downed Hercules may be held in captivity. On your map these three spots are indicated with green circles with question marks (?) inside them. You'll direct your UAV over the chosen place by left clicking on your map. When UAV starts circling over the selected point, you have to observe through its camera (which also has several channels of vision) the area located under the plane (#33).
Inasmuch as this mission shouldn't be played for too long (not longer than 2 hours), because it'll end with failure then (in such case the game concludes that the combatants have managed to dig in and you can't win with them) I'll write straightaway that the captives from a downed Hercules plane (5) are being held in the coltan mine in the spot (6). So this is the westernmost one (#34) of these three locations which are marked green on your map and you should search them with your UAV. When you've finally pinpointed it, while looking at this coltan mine through the camera mounted on UAV, the task of finding the prisoners will be completed, as the whole mission.
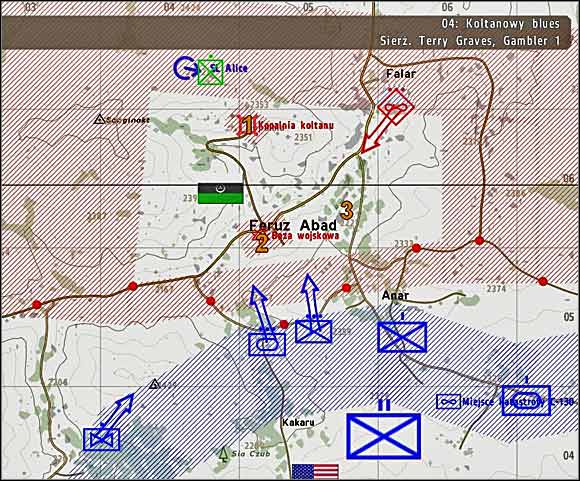
Date and place: Friday, June 1, 2012, 13:00, to the north from Feruz Abad (2).
Mission: You have to find and free the civilians from the downed C-130 Hercules - they're being held in the coltan mine (1) to the north from Feruz Abad. This task will be conducted by a small team of US Special Forces operatives (codename "Gambler"). At the same time the rest of Allied forces will seize a military base (2) in Feruz Abad and the town itself.
Support: as a sergeant Terry Graves, a commander of this small US Special Forces team, you'll have at your disposal a reconnaissance UAV (Unmanned Aerial Vehicle).
Proposed equipment: You don't have to throw away this movable terminal which is used to control UAV and to get a view from its camera, though they both (UAV and the terminal) are rather useless in this scenario (I'll write more about it later). On the briefing screen you may equip all your commandos with silenced weapons - two assault rifles SCAR-H (Mk 17) with collimators for CQC and two sniper versions of Mk 17. Although, the usefulness of these weapons is also a little controversial here, because this mission takes place during the day, so enemies can locate us even if we're noiseless. Besides, before we even start to attack hostiles they are already alerted by the ruckus made by other Allied forces. I'd suggest throwing away from the equipment of all of your commandos these side arms like pistols and submachine guns - AI has a nasty tendency to draw out these weapons when it should use the guns with longer range. Before you start your game, it is also worth to equip yourself with a ball-pen and a piece of paper - the real ones, not virtual!
Successive objectives in the scenario:
![[1] - Mission 4 - Coltan Blues - p. 1 - Operation Arrowhead - ArmA II: Operation Arrowhead - Game Guide and Walkthrough](https://game.lhg100.com/Article/UploadFiles/201512/2015121215541520.jpg) [1][2]
[1][2]
Your special ops team will be inserted via a small chopper (#1) into the point Alice (marked on the map), 500m to the NW from the coltan mine (1). Your first task is to find the prisoners who are being held in the coltan mine (1), so after a while you'll receive an order of seizing this location (1). The game orders also to seize enemy military base (2), but don't even think about this objective - it'll be completed by other American forces.
After the landing I'd suggest ordering your soldiers to hold fire, in order to stop them from opening it too soon accidentally and give away their location to the enemies. First, move towards the rocks located to the east, in grid 047072, bypassing a wreck of some helicopter (#2).
![[3] - Mission 4 - Coltan Blues - p. 1 - Operation Arrowhead - ArmA II: Operation Arrowhead - Game Guide and Walkthrough](https://game.lhg100.com/Article/UploadFiles/201512/2015121215541537.jpg) [3]
[3]![[4] - Mission 4 - Coltan Blues - p. 1 - Operation Arrowhead - ArmA II: Operation Arrowhead - Game Guide and Walkthrough](https://game.lhg100.com/Article/UploadFiles/201512/2015121215541545.jpg) [4]
[4]
Amongst the rocks you'll find guerilla squad (it's also marked on map with a green NATO sign), which is hostile towards the Takistani army (#3). And on the same map, in the tab named "Situation", you can check what the relation of these guerillas with US Army is. Now, if you helped earlier, in the previous scenario, these Takistani villagers from Timurkalaj to save their village from governmental hit squad, and you also talked later with the partisans (instead of killing them all) on the crash site of C-130 Hercules, then in this scenario the relationship with US Army of these guerillas should be "good". And they should propose you their help during the assault of coltan mine (1). This help will have a form of an attack of the guerillas in the moment when there's the alarm blaring out in the mine (1). This alert rises on in the moment of the assault of other American forces on the military base (2) in Feruz Abad. But if the relationship of the guerillas with US Army is "neutral", then they'll only describe you the defensive emplacements in the mine (1). Anyway, your actions in both cases should look similarly, probably more or less as I've described them below.
After the conversation with the rebels who are tenting amongst the rocks on the hill you should move to the SE, towards the coltan mine (1) situated in grid coordinates 050068. Right after spotting this place (1) in the distance, at the foot of the mountain you're on, you can hide behind one of the rocks and use your UAV, by selecting the appropriate option from your actions' menu (#4).
![[5] - Mission 4 - Coltan Blues - p. 1 - Operation Arrowhead - ArmA II: Operation Arrowhead - Game Guide and Walkthrough](https://game.lhg100.com/Article/UploadFiles/201512/2015121215541625.jpg) [5]
[5]![[6] - Mission 4 - Coltan Blues - p. 1 - Operation Arrowhead - ArmA II: Operation Arrowhead - Game Guide and Walkthrough](https://game.lhg100.com/Article/UploadFiles/201512/2015121215541631.jpg) [6]
[6]
However, it's a waste of precious time. That's because when looking at the mine (1) through the camera mounted on the UAV you won't spot anything more than the rebels described to you (two HMG emplacements), or what you expect to find there (some Takistani soldiers) (#5).
So I'd suggest quitting the games with the UAV. Instead of playing with UAV, move promptly downhill, towards the mine (1). Bow down and jump with your subordinates from one rock to another - you may confidently not come to a halt, the enemy shouldn't see you. What it boils down to is to get to the rocks located close to the mine (1) as fast as possible. It's best to be there already then, when you see on your screen the message telling you that the Takistani military base (2) in Feruz Abad was captured by other American forces (#6). At that time the alarm rises in the mine (1) and you really haven't a lot of time left to seize the coltan mine. Go prone (you may also order your subordinates to do this) and open fire at the Takistani soldiers who are guarding this mine (1) (your commandos may also start firing).
![[7] - Mission 4 - Coltan Blues - p. 1 - Operation Arrowhead - ArmA II: Operation Arrowhead - Game Guide and Walkthrough](https://game.lhg100.com/Article/UploadFiles/201512/2015121215541644.jpg) [7]
[7]![[8] - Mission 4 - Coltan Blues - p. 1 - Operation Arrowhead - ArmA II: Operation Arrowhead - Game Guide and Walkthrough](https://game.lhg100.com/Article/UploadFiles/201512/2015121215541629.jpg) [8]
[8]
First, I'd advice taking out the bad guy located on the roof of the building (#7). He's a sniper armed with a sniper rifle with a thermovisual sight mounted on his weapon, so he may be very dangerous! Afterwards, take a look through your collimator sight more to the right, at the entrance to this mine and kill a soldier who may try to take position behind the HMG situated near the entrance. Then check quickly if there's another opponent under the building on which you spotted a sniper - this guy may try to fire from the HMG installed in the corner of the square. Have a peep at the APC (Armoured Personnel Carrier) which is parked on the courtyard of this mine - this car is also armed with HMG. Lastly, quickly kill other Takistani soldiers who are patroling the mine (1).
When you think that you killed most of the hostiles it's time to move promptly downhill, towards the fence which is surrounding the mine. Perhaps you'll encounter near this fence a squad of guerillas (#8), if they proposed you earlier their help on the attack of this coltan mine (1). Proceed towards the building, or the hangar rather, which you can see behind the parked Ural trucks. You'll find the entrances to this hangar from its left and right sides.
![[9] - Mission 4 - Coltan Blues - p. 2 - Operation Arrowhead - ArmA II: Operation Arrowhead - Game Guide and Walkthrough](https://game.lhg100.com/Article/UploadFiles/201512/2015121215541679.jpg) [9]
[9]![[10] - Mission 4 - Coltan Blues - p. 2 - Operation Arrowhead - ArmA II: Operation Arrowhead - Game Guide and Walkthrough](https://game.lhg100.com/Article/UploadFiles/201512/2015121215541670.jpg) [10]
[10]
Very carefully, but also very quickly, take a peek into the building and kill two Takistani soldiers who will be probably hiding inside (#9). Unluckily, you'll also see the body of one of the prisoners lying on the ground inside this hangar. This is the corpse of the TV reporter. You're not able to save him in this scenario - this guy is dead from the beginning. What is worse, there's a bomb ticking on the barrels situated in the middle of the hangar! It seems that the coltan mine (1) was booby trapped by Takistani army and the countdown to explosion has started already with the alarm. At this moment the task of seizing the coltan mine (1) will be considered as completed, the objective of finding the prisoners cancelled, and you'll receive a new order - now you have to disarm these bombs (there are at least two), which are located in the mine (1).
Don't focus on these bombs, it's just better to find a detonator these bombs are connected with. And you'll find this detonator in the building on which you spotted the Takistani sniper. The entrance to this building is located near other Ural trucks (#10) - don't mistake this entrance with the opened doors situated nearby! Approach the entrance, open the doors and quickly kill a Takistani soldier who is hiding inside.
![[11] - Mission 4 - Coltan Blues - p. 2 - Operation Arrowhead - ArmA II: Operation Arrowhead - Game Guide and Walkthrough](https://game.lhg100.com/Article/UploadFiles/201512/2015121215541699.jpg) [11]
[11]![[12] - Mission 4 - Coltan Blues - p. 2 - Operation Arrowhead - ArmA II: Operation Arrowhead - Game Guide and Walkthrough](https://game.lhg100.com/Article/UploadFiles/201512/2015121215541600.jpg) [12]
[12]
This soldier was guarding the civilian (#11), who says that he was forced to booby trap this mine (1). Don't kill this gentleman - instead of this approach him and he should pass you the code needed for disarming the bombs.
The code will be displayed on your screen for a short time - to short, though, to remember it - and it will be also written in the tab "Notes" of your journal on the map. It's best to reach for a sheet of paper and a ball-pen, which I advised to prepare in the beginning of this chapter of my guide, and quickly write down these signs in Takistani language, in the moment when the code is displayed on your screen (#12). This code is generated randomly and it's different each time you play this mission! So don't suggest yourself with this character string which you can see on my picture! If you accidentally shot dead this civilian who is hiding this code in his pocket (or this nice oldie was massacred by his Takistani guard), then... not all is lost. In this case just search the pockets of the body of this old gaffer... ekhm, I mean - man, and you should find the code.
![[13] - Mission 4 - Coltan Blues - p. 2 - Operation Arrowhead - ArmA II: Operation Arrowhead - Game Guide and Walkthrough](https://game.lhg100.com/Article/UploadFiles/201512/2015121215541632.jpg) [13]
[13]![[14] - Mission 4 - Coltan Blues - p. 2 - Operation Arrowhead - ArmA II: Operation Arrowhead - Game Guide and Walkthrough](https://game.lhg100.com/Article/UploadFiles/201512/2015121215541609.jpg) [14]
[14]
After writing down the code on your piece of paper approach the desk which is located nearby and select the appropriate option from your actions' menu in order to start rewriting this character string (#13). Lastly press their Enter key which is situated in the lower right corner of this virtual keyboard and... that's it. The green LED on the keyboard which is being visible on your screen means that you didn't make a mistake and you may breathe a sigh of relief. The task of disarming the bombs will be completed then. After a while you'll receive a new order - it seems that the HQ has some informations about the attack on Feruz Abad planned by the enemy. This attack will be conducted by three Su-25 jet aircrafts which will fly towards Feruz Abad from SE. Your new task is to protect Feruz Abad - in order to complete this objective you'll be transported (alone, without your commandos) by a chopper to the new location. This is the abandoned by the enemy AA gun emplacement (3) (of ZU-23-2 autocannon) which is situated on the hills located to the east from Feruz Abad, in grid 057062.
The small helicopter which is going to transport you to this new spot (3) will land soon on the courtyard of the mine (1). You may spend the moment you have till its arrival on searching the corpses of Takistani soldiers (#14). One can find Igla surface-to-air missile launcher near the body of one of these soldiers - you can recognize this corpse by a long tube sticking out of it.
![[15] - Mission 4 - Coltan Blues - p. 2 - Operation Arrowhead - ArmA II: Operation Arrowhead - Game Guide and Walkthrough](https://game.lhg100.com/Article/UploadFiles/201512/2015121215541783.jpg) [15]
[15]![[16] - Mission 4 - Coltan Blues - p. 2 - Operation Arrowhead - ArmA II: Operation Arrowhead - Game Guide and Walkthrough](https://game.lhg100.com/Article/UploadFiles/201512/2015121215541733.jpg) [16]
[16]
After a while on the courtyard of the mine (1) there will land a chopper and UNPROFOR soldiers wearing blue berets and helmets will disembark from this vehicle (#15). Embark this helicopter as a passenger.
Afterwards this chopper will transport you to the abandoned emplacement of ZU-23-2 anti-aircraft autocannon, which is situated on the hill (3) located to the east of Feruz Abad, in grid coordinates 057062. (#16)
![[17] - Mission 4 - Coltan Blues - p. 2 - Operation Arrowhead - ArmA II: Operation Arrowhead - Game Guide and Walkthrough](https://game.lhg100.com/Article/UploadFiles/201512/2015121215541718.jpg) [17]
[17]![[18] - Mission 4 - Coltan Blues - p. 2 - Operation Arrowhead - ArmA II: Operation Arrowhead - Game Guide and Walkthrough](https://game.lhg100.com/Article/UploadFiles/201512/2015121215541713.jpg) [18]
[18]
Right after the landing in this place (3) you may rush quickly towards the wooden crate lying under the cam-net near the AA gun (#17), in order to grab from there an Igla or Striela surface-to-air missile launcher (if you didn't equip yourself earlier with such a launcher). When plundering this crate, it's worth to throw away your assault rifle (you won't need it anymore in this scenario) and all the smaller junk, in order to free your equipment's slots for two surface-to-air rockets.
These three Su-25 will fly soon, one after one, in short time intervals, from NE direction - point your Igla (or Striela) rocket launcher in this direction. When its warhead locates the target you hear an acoustic signal, which then changes to another "beep", if the target is locked by the warhead. This is the sign on which you should fire the rocket. Although, don't do this when the aircraft is still pretty far (let him get closer) and also don't "dangle" your launcher, because the warhead may lose its target then, and the locking of the target will again take some precious seconds. After hitting with the rocket the first Su-25 jet aircraft do not admire for too long the spectacle and the crash, but promptly load the second missile into the launcher (#18). Locate and lock the next aircraft (they all are closing along the same trajectory) and fire your rocket in order to shot down your target. The last Su-25 you'll probably have to destroy by using the AA gun located nearby. In order to take gunner's seat you have to probably hide your Igla rocket launcher, or throw it away, by choosing the appropriate option from your actions' menu.
![[19] - Mission 4 - Coltan Blues - p. 2 - Operation Arrowhead - ArmA II: Operation Arrowhead - Game Guide and Walkthrough](https://game.lhg100.com/Article/UploadFiles/201512/2015121215541797.jpg) [19]
[19]![[20] - Mission 4 - Coltan Blues - p. 2 - Operation Arrowhead - ArmA II: Operation Arrowhead - Game Guide and Walkthrough](https://game.lhg100.com/Article/UploadFiles/201512/2015121215541774.jpg) [20]
[20]
Aim your AA autocannon at the target, make some adjustment on its movement and fire a long burst (#20). With a bit of luck you'll be able to shot down also this last Su-25 jet aircraft. Though, it should be enough to destroy only two of these jets, in order to complete the task of protecting Feruz Abad. When it's done, this mission should end successfully.
In conclusion you should only see a cutscene, which is presenting the American soldiers who are talking about the possible fate of the prisoners of a downed C-130 Hercules (#20).
Date and place: Friday, June 1, 2012, 17:30, FSP (Forward Supply Point) Winchester in Feruz Abad (1).
Mission: Attack helicopter AH-64 Apache, codename Renegade-1, has to recon the area situated to the west and SW of Nagara. This gunship has a task of neutralizing AA (anti-aircraft) gun emplacements (4) and the line of defense (5) of the enemy airfield in Rasman. In the Area of Operations, on the ground, there are also other US forces.
Support: You may return with your AH-64 to FSP Winchester in Feruz Abad (1) in any moment, in order to refuel, rearm and repair your gunship.
Proposed equipment: You, as a pilot of AH-64, and your subordinate, an armament operator of Apache gunship, have at your disposal only SCAR-L (Mk 16) assault rifles with simple iron-sights. There are no other weapons to choose, but there's also no need for this, because you won't use your rifles in this scenario if all things go according to the plan.
Successive objectives in this scenario:
![[1] - Mission 5 - Open Season - p. 1 - Operation Arrowhead - ArmA II: Operation Arrowhead - Game Guide and Walkthrough](https://game.lhg100.com/Article/UploadFiles/201512/2015121215541784.jpg) [1]
[1]![[2] - Mission 5 - Open Season - p. 1 - Operation Arrowhead - ArmA II: Operation Arrowhead - Game Guide and Walkthrough](https://game.lhg100.com/Article/UploadFiles/201512/2015121215541832.jpg) [2]
[2]
Your first task is to perform a combat patrol (2) over the road which is connecting the villages of Gospadni (grid 0308) and Mulladost (square 0207). You have to neutralize all enemy forces spotted in this area. After starting this mission it's worth to wait a while with taking off with your attack helicopter, to disembark from this chopper and to get a little closer to the helipad with ammo truck, because it is parked a little too far and may complicate the rearming of your gunship in the future. It's also worth to increase view distance up to 4-6 km (#1), if you play on strong PC, in order to make possible spotting the targets from long distances. You'll be able then to hit them with your guided AGM-114 Hellfire air-to-ground missiles, but these targets (enemy units) weren't be able to harm your gunship. Go back to your AH-64 Apache and take off.
To the NW from Forward Supply Point (FSP) Winchester located in Feruz Abad (1), in grid 040068, there is a high mountain named Sanginakt (#2). This is a very good spot for firing position for your Apache. You can acquire and engage targets while hovering over the top of this hill - when you're in danger you may lower your altitude and hide behind the mountain crest.
![[3] - Mission 5 - Open Season - p. 1 - Operation Arrowhead - ArmA II: Operation Arrowhead - Game Guide and Walkthrough](https://game.lhg100.com/Article/UploadFiles/201512/2015121215541851.jpg) [3]
[3]![[4] - Mission 5 - Open Season - p. 1 - Operation Arrowhead - ArmA II: Operation Arrowhead - Game Guide and Walkthrough](https://game.lhg100.com/Article/UploadFiles/201512/2015121215541812.jpg) [4]
[4]
From this position you should already have a possibility to fire your Hellfire missiles at several tanks which are located N/NE, in the vicinity of Nagara (#4). These tanks form probably one of the strong points of the line of defense (5) - this is a strong point situated northernmost. If you wish you can fire at these vehicles all your Hellfire rockets, but it's worth to choose for them only the most important or precious targets - tanks or infantry fighting vehicles eventually.
Afterwards you can focus finally on completing the first task - you have to perform a combat patrol over the area (2) located between villages Gospandi and Mulladost. In order to locate the units of enemy combatants which are situated there you may fly over them once (#4), or you may get closer slowly from the E/SE direction by "hopping" from one slope to the next. The first method seems to be more efficient. Although, when flying over the point (2) you should watch out to not fly too far to the NW (behind the mountain crest there's a zone guarded by enemy AA guns!), or too far to the NE (over enemy line of defense). You should also fly low, below the altitude of 30 meters, in order to avoid being locked on and shot down by the enemy.
![[5] - Mission 5 - Open Season - p. 1 - Operation Arrowhead - ArmA II: Operation Arrowhead - Game Guide and Walkthrough](https://game.lhg100.com/Article/UploadFiles/201512/2015121215541837.jpg) [5]
[5]![[6] - Mission 5 - Open Season - p. 1 - Operation Arrowhead - ArmA II: Operation Arrowhead - Game Guide and Walkthrough](https://game.lhg100.com/Article/UploadFiles/201512/2015121215541898.jpg) [6]
[6]
After flying over the point (2) the task of performing a combat patrol will be completed. You'll receive new orders - you have to destroy the post (you've just spotted) of Takistani combatants which is situated also in point (2). There are only few off road cars which you can show to your gunner (armament operator) by switching amongst them with the Tab key. It should be enough to fire at them from the cannon, in order to fulfill the task of destroying enemy outpost (#5).
Afterwards, the HQ will inform you about the convoy of enemy vehicles (3) which should drive soon along the road running from west to NE direction through the villages of Mulladost, Gospandi and Nagara (#6). I'd suggest answering "Yes!" on the question if you want to attack this column of vehicles (3).
![[7] - Mission 5 - Open Season - p. 2 - Operation Arrowhead - ArmA II: Operation Arrowhead - Game Guide and Walkthrough](https://game.lhg100.com/Article/UploadFiles/201512/2015121215541897.jpg) [7]
[7]![[8] - Mission 5 - Open Season - p. 2 - Operation Arrowhead - ArmA II: Operation Arrowhead - Game Guide and Walkthrough](https://game.lhg100.com/Article/UploadFiles/201512/2015121215541869.jpg) [8]
[8]
To take a good position for attacking this convoy (3) you need only to fly a little further along the road to the west and hover over the mountainside in grid coordinates 0207 while waiting in ambush for the enemy. Attack the enemy when you see the first Takistani vehicles riding down the slope. I'd propose not shooting from the hover, but quickly rushing towards the enemy and using unguided rockets against him. Probably it's best to switch to manual fire. First, destroy IFV which leads the column (#7) - when you're aiming well there's also a green circle on the square of the locked target. Attack on low altitude in order to avoid being fired upon from the mountain crest and from beyond this crest which is located on your right (to the north) - there are enemy on foot patrols on this crest and AA guns behind it! Obviously, you can also destroy this IFV with Hellfire missile, if you haven't anything against wasting it on such a vehicle. Burn other vehicles in the column (3) (UAZ, two trucks) and kill the infantry disembarking from these vehicles. The objective of destroying the convoy will be completed then and you can return to the task of destroying AA gun emplacements which are situated in the area (4).
But first you'll probably have to return to FSP (Forward Supply Point) Winchester in Feruz Abad (1) and land on the helipad in order to rearm your gunship at the dislocated ammo truck. You'll need mostly the Hellfire missiles (#8). You can load max. 8 rockets of this type.
[9]![[10] - Mission 5 - Open Season - p. 2 - Operation Arrowhead - ArmA II: Operation Arrowhead - Game Guide and Walkthrough](https://game.lhg100.com/Article/UploadFiles/201512/2015121215541835.jpg) [10]
[10]
After rearming your Apache I'd propose returning to the hill Sanginakt (one of the highest in the vicinity) in grid 040068. Hover over the top of this mountain. This is really very good firing position, if you play with a long view distance of several kilometers, to engage targets located in the area (4) without risking too much. Maybe you'll be able already to lock one or even all the targets of the AA battery. These are: two AA guns ZU-23-2, a self-propelled AA gun ZSU-23-4 Shilka and Igla surface-to-air missile system. I've marked their positions on my map with more or less accuracy. But before you start to think about destroying them you have to ascend to the altitude of approx. 100 meters, so quite high. The HQ gave also at your disposal a reconnaissance UAV (Unmanned Aerial Vehicle) which you can use now to acquire the exact locations of the targets of AA gun battery (4). You can take control over this UAV by selecting adequate option from your actions' menu (#9).
For the moment this UAV is located a little too far from hostile positions, but you only need to order it to fly a little closer to the road Mulladost-Gospandi by left-clicking on your map (#10).
![[11] - Mission 5 - Open Season - p. 2 - Operation Arrowhead - ArmA II: Operation Arrowhead - Game Guide and Walkthrough](https://game.lhg100.com/Article/UploadFiles/201512/2015121215541888.jpg) [11]
[11]![[12] - Mission 5 - Open Season - p. 2 - Operation Arrowhead - ArmA II: Operation Arrowhead - Game Guide and Walkthrough](https://game.lhg100.com/Article/UploadFiles/201512/2015121215541947.jpg) [12]
[12]
Don't get too close to the hostiles, though, with your UAV and also Apache gunship, if you don't want to lose them both! Afterwards you need to ascend to the appropriate, quite a high altitude also with your UAV and search the area (4) located to the N/NW, using UAV's camera. Three available channels (one ordinary and two thermovisual) should make easier the task of finding these four targets mentioned above. The first target is the AA gun ZU-23-2 (one of two) which is situated somewhere in grid 0108, on the mountain crest (#11). There should be the off road car UAZ (hardly visible in thermovision because it has its engine turned off) in the vicinity of this AA gun - use this information to locate your target. Mark this AA gun as a target for your Apache gunship which is hovering behind the nearby mountain. Make sure that your attack helicopter is on an adequate altitude to effectively hit this target before you fire the Hellfire missile!
Search for the next AA gun ZU-23-2 after destroying the first one. This gun should be situated somewhere in grid 0208, on the adjacent mountain crest which is located a little more to the east in regard to the previous one. Far away behind this AA gun (assuming that you had taken with your UAV the position more or less in grid 0207), near some wood, you'll see (after maximal zooming in your view) a self-propelled AA gun ZSU-23-4 Shilka. It only waits for your Hellfire missile. Somewhere more to the E/SE there should be located Igla surface-to-air missile system - this is a stationary, little thing operated by only one soldier. These last three targets are visible on my screen (#12), but rather very poorly. On this picture you can see the smoke from the burning already Shilka right under the circle of the radar, the second AA gun ZU-23-2 is situated near some rocks on the hill being visible in the foreground, and Igla is marked with a green square visible on the right.
![[13] - Mission 5 - Open Season - p. 2 - Operation Arrowhead - ArmA II: Operation Arrowhead - Game Guide and Walkthrough](https://game.lhg100.com/Article/UploadFiles/201512/2015121215541907.jpg) [13]
[13]![[14] - Mission 5 - Open Season - p. 2 - Operation Arrowhead - ArmA II: Operation Arrowhead - Game Guide and Walkthrough](https://game.lhg100.com/Article/UploadFiles/201512/2015121215541972.jpg) [14]
[14]
After eliminating with your Hellfire rockets all four targets the task of destroying AA guns emplacements will be considered as completed and you'll receive new orders. This time you have to strike enemy line of defense (5) which ranges to the S/SW from the airfield in Rasman. You have to attack three enemy strong points located on this line of defense and marked on your map. Start getting closer to them from the Sanginakt mountain. For your Hellfire missiles select only these precious targets as the tanks T-55 in the first instance, if there are such vehicles left in the vicinity of the westernmost strong point (#13).
Afterwards deal with the enemy which is taking the next positions on this line of defense (5). From the list of available targets, which is visible after pressing the 2 key, select again only these most precious targets (#14). First of all a tank T-34, plus alternatively a truck-mounted multiply rocket launcher BM-21 Grad, an APC BTR-60, etc.
[15]![[16] - Mission 5 - Open Season - p. 2 - Operation Arrowhead - ArmA II: Operation Arrowhead - Game Guide and Walkthrough](https://game.lhg100.com/Article/UploadFiles/201512/2015121215541981.jpg) [16]
[16]
If you need you can return again to the American helipad (1), in order to rearm or repair your gunship. You should have in your mind, though, that in this scenario you have approx. 45 minutes to complete all the assigned tasks, so you need to fire accurately and not to fly too often to the FSP in Feruz Abad (1). When all the most important or dangerous targets on the line of defense (5) are destroyed with your Hellfire missiles, you may fly a little forth and back along this line (#15) and hunt for the enemy remnants using your cannon and unguided rockets.
Finally the HQ will consider this task of striking the enemy line of defense as completed and you'll be ordered to return to base (1). Land on the helipad in this base, shut off the engine and this mission should end (#16). What is interesting, this scenario ends successfully also then, when you were shot down but you've managed to survive the crash on the territory controlled by the allied units. In case when you were shot down over the hostile territory, but you've also survived the crash, you'll be captured by enemy forces and the next mission which you'll play will be titled "From hell". Of course, all these ArmA's professionals don't count on their luck and a miracle in the situation when they have to make an emergency landing, but instead of this they try to land safely on autorotation...
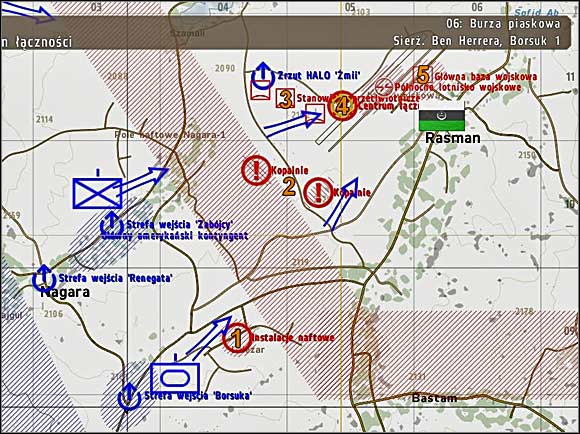
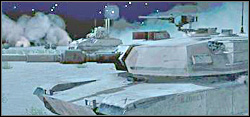
Date and place: Friday, June 1, 2012, 22:00, to the SW from Rasman airfield.
Mission: A unit of tanks and IFVs (Infantry Fighting Vehicles) leaded by sergeant Ben Herrera (this means - you) has to seize the enemy airfield in Rasman. During the fight you have to destroy comms centre (4) and then strike the main base (5) of the enemy.
Support: there's artillery support at your disposal and you can also call for ammo, repair and refuel trucks.
Proposed equipment: You, as a commander of this unit and one of its tanks, and your subordinates (tankists), have an access only to standard firearms. Although, you won't be using these rifles here, because you'll inflict coup de grace with your real beasts - tanks and IFVs.
Successive objectives in this scenario:
![[1] - Mission 6A - Sandstorm - p. 1 - Operation Arrowhead - ArmA II: Operation Arrowhead - Game Guide and Walkthrough](https://game.lhg100.com/Article/UploadFiles/201512/2015121215541923.jpg) [1]
[1]![[2] - Mission 6A - Sandstorm - p. 1 - Operation Arrowhead - ArmA II: Operation Arrowhead - Game Guide and Walkthrough](https://game.lhg100.com/Article/UploadFiles/201512/2015121215541977.jpg) [2]
[2]
Before you start your game, it is worth to set the view distance (in options) to at least 3 km. You command your sections of tanks and Infantry Fighting Vehicles (IFVs) in High Command mode (#1). In order to proficiently command your units in this mode it is advisable to play also a respective chapter of the tutorial. In this scenario you have at your disposal: two sections of tanks, with one M1A1 Abrams tank in each section, one section composed of one tank of the same type and one IFV M2 Bradley, and finally one squad of mechanized infantry with one IFV. I suggest keeping this last unit back during the whole gameplay, because it is very vulnerable to enemy fire. If US Army's relationships with neutral, Takistani partisans are good (mainly because of your own efforts), then the grateful guerillas will mark on your map the mine fields located in the vicinity of the airfield. Before you start working on the first, main objective of this scenario (which is to attack the airfield in Rasman), you should secure the nearby oil installations (1), in order to not let the Takistani army to set fire on them.
To do this I'd propose directing all of your tanks to a flat slope located to the right (to E/NE) from the road which is leading towards these installations (1) (#2). For the moment leave your mechanized infantry squad on its current position.
![[3] - Mission 6A - Sandstorm - p. 1 - Operation Arrowhead - ArmA II: Operation Arrowhead - Game Guide and Walkthrough](https://game.lhg100.com/Article/UploadFiles/201512/2015121215542072.jpg) [3]
[3]![[4] - Mission 6A - Sandstorm - p. 1 - Operation Arrowhead - ArmA II: Operation Arrowhead - Game Guide and Walkthrough](https://game.lhg100.com/Article/UploadFiles/201512/2015121215542015.jpg) [4]
[4]
From this flat slope you should have quite a nice view on the surroundings. However, try not to push your own tank too far on this flat slope, in order to avoid presenting too big target for your enemies. To the north from the oil installations (1) and also among these installations you'll see after a while the first enemy units. There are: some infantrymen and a car armed with HMG among the installations (1), and to the north from this location you'll see mainly the Takistani tanks (probably T-55s) and infantry. In skies you may also see enemy (attack) helicopter (#3).
It's best to detect all enemy units by using one of two thermovisual channels of your sight (#4). In the High Command mode there are also red NATO signs appearing over enemy units spotted by friendly forces - these signs specify unit type and size. That's why it's worth to use also the HC mode to locate the enemy - this mode makes this task a little easier.
![[5] - Mission 6A - Sandstorm - p. 1 - Operation Arrowhead - ArmA II: Operation Arrowhead - Game Guide and Walkthrough](https://game.lhg100.com/Article/UploadFiles/201512/2015121215542076.jpg) [5]
[5]![[6] - Mission 6A - Sandstorm - p. 1 - Operation Arrowhead - ArmA II: Operation Arrowhead - Game Guide and Walkthrough](https://game.lhg100.com/Article/UploadFiles/201512/2015121215542024.jpg) [6]
[6]
In this scenario I preferred to switch to gunner's seat and fire personally from tank's cannon and machineguns without trusting the AI. Shooting from the cannon at the hostiles is very enjoyable here. After aiming at the target and reading the distance to it from the rangefinder (numbers are displayed below the cross-hair) you have to make an adjustment of firing by pressing the PageUp and PageDown keys, in order to match (more or less) your distance of shooting (visible in the upper right corner of the screen) with the value taken from the rangefinder. Afterwards you only have to fire - that's the whole philosophy. Use AP shells (sabots) against enemy tanks and coaxial machine gun against hostile infantry. Alternatively you can treat these infantrymen with HE rounds if you see them gathering together in small groups (#5). Though they may spread out again before your loader switches the type of the shell... You can open fire at the enemy off road cars from a remotely operated HMG of the commander of the tank. Generally in this scenario you should save the ammo for tank's cannon and don't waste it on small things.
In order to prevent the enemy from setting the oil installations (1) on fire you have to try to get to them as fast as possible - right after burning the majority of enemy tanks, which are visible on the horizon, or even during the fight with this armored units. I'd suggest sending one or two Abrams on these flat slopes located near the installations (1) in order to let your tanks fire from there not only at enemy tanks but also at the "arsonists" (#6).
![[7] - Mission 6A - Sandstorm - p. 2 - Operation Arrowhead - ArmA II: Operation Arrowhead - Game Guide and Walkthrough](https://game.lhg100.com/Article/UploadFiles/201512/2015121215542028.jpg) [7]
[7]![[8] - Mission 6A - Sandstorm - p. 2 - Operation Arrowhead - ArmA II: Operation Arrowhead - Game Guide and Walkthrough](https://game.lhg100.com/Article/UploadFiles/201512/2015121215542045.jpg) [8]
[8]
You can also get with your own tank as fast as possible to the oil installations (1) and kill all the "arsonists" (#7).
When this area is cleared of the hostiles you can send here your mechanized infantry squad with a task of securing these oil installations (1) (#8).
![[9] - Mission 6A - Sandstorm - p. 2 - Operation Arrowhead - ArmA II: Operation Arrowhead - Game Guide and Walkthrough](https://game.lhg100.com/Article/UploadFiles/201512/2015121215542035.jpg) [9]
[9]![[10] - Mission 6A - Sandstorm - p. 2 - Operation Arrowhead - ArmA II: Operation Arrowhead - Game Guide and Walkthrough](https://game.lhg100.com/Article/UploadFiles/201512/2015121215542088.jpg) [10]
[10]
Now it's time to deal with a proper objective - you have to destroy enemy comms centre (4) situated on the airstrip of the airfield in Rasman. Try not to push forward with the whole platoon, all four vehicles simultaneously, while relocating your tanks towards the comms centre. Two of them should stay on their positions and cover the movement of the rest of your platoon which is taking his new positions. Afterwards switch the roles. Try to take with your tanks the firing positions on every gentle slope you'll find on your map (#9).
Proceed towards the nearby mines (2) first, but do not drive on these hills which are noticeably higher than others, because they're probably mined! Instead of doing this I'd propose driving with your platoon in between both mines (2) (#10). You'll reach the airstrip in this way.
![[11] - Mission 6A - Sandstorm - p. 2 - Operation Arrowhead - ArmA II: Operation Arrowhead - Game Guide and Walkthrough](https://game.lhg100.com/Article/UploadFiles/201512/2015121215542016.jpg) [11]
[11]![[12] - Mission 6A - Sandstorm - p. 2 - Operation Arrowhead - ArmA II: Operation Arrowhead - Game Guide and Walkthrough](https://game.lhg100.com/Article/UploadFiles/201512/2015121215542151.jpg) [12]
[12]
Uh, I forgot about one thing. Before you move towards the mines (2), you should fire from the surroundings of the oil installations (1) at all enemy tanks which are visible on the horizon, nearby the mines (2). You may see only their turrets sticking out of the slopes, so it may be a little hard to hit them (#11).
In the same way destroy all the choppers being visible in the distance which are standing on the airfield in Rasman (#12) - it would be better to not allow them to take off.
![[13] - Mission 6A - Sandstorm - p. 2 - Operation Arrowhead - ArmA II: Operation Arrowhead - Game Guide and Walkthrough](https://game.lhg100.com/Article/UploadFiles/201512/2015121215542147.jpg) [13]
[13]![[14] - Mission 6A - Sandstorm - p. 2 - Operation Arrowhead - ArmA II: Operation Arrowhead - Game Guide and Walkthrough](https://game.lhg100.com/Article/UploadFiles/201512/2015121215542185.jpg) [14]
[14]
Hold your platoon when closing to these mines (2) and don't let your tanks to engage the enemy for a while. That's because there are hordes of enemy units clambering around the airstrip! There are at least a dozen or so of tanks, helicopters and jets, off road cars, infantry, etc - many of them! So before you start your attack it's worth to peep out with your tank (and only with it!) from behind the mine (2) situated in grid 0510, in order to see how the situation looks. And most of all - to call a fire mission on this numerous enemy in order to thin out his rows. Call your artillery support in High Command mode by aiming at the cluster of enemy tanks and pressing the button combination which starts with the 8 key, if my memory works fine (#13).
During the time when artillery shells fall down on the enemy you can summon your tanks and open fire at the opponents from your vehicle's cannon (#14). First, burn all enemy tanks which were able to survive this killing fire-storm.
![[15] - Mission 6A - Sandstorm - p. 2 - Operation Arrowhead - ArmA II: Operation Arrowhead - Game Guide and Walkthrough](https://game.lhg100.com/Article/UploadFiles/201512/2015121215542130.jpg) [15]
[15]![[16] - Mission 6A - Sandstorm - p. 2 - Operation Arrowhead - ArmA II: Operation Arrowhead - Game Guide and Walkthrough](https://game.lhg100.com/Article/UploadFiles/201512/2015121215542113.jpg) [16]
[16]
If you're running low on ammo or you need repairs, you can use your next available support and call for one of these repair, rearm and refuel trucks. You bring them on your current position, so before you call for them it'd be wise to withdraw, in order to avoid losing these precious support units from enemy fire. You'll rearm or repair your vehicle by getting closer with your tank to the adequate support truck (#15).
Afterwards move with all your tanks towards the Takistani airfield in Rasman. Engage enemy units which you were able to spot. It's best to locate them in High Command mode (red NATO symbols over enemy units) (#16) and in thermovision. When driving towards the airfield destroy the helicopters and jets (among other things) which are standing near the hangars.
![[17] - Mission 6A - Sandstorm - p. 2 - Operation Arrowhead - ArmA II: Operation Arrowhead - Game Guide and Walkthrough](https://game.lhg100.com/Article/UploadFiles/201512/2015121215542194.jpg) [17]
[17]![[18] - Mission 6A - Sandstorm - p. 2 - Operation Arrowhead - ArmA II: Operation Arrowhead - Game Guide and Walkthrough](https://game.lhg100.com/Article/UploadFiles/201512/2015121215542118.jpg) [18]
[18]
Perhaps you'll be able also to spot on this airfield or in its vicinity a self-propelled AA gun (#17) which has to be destroyed (if it wasn't already destroyed by other American units operating in the AO).
First you should proceed towards the comms centre (1) which is located on the airstrip. Your current task is to destroy this comms centre. Encircle its fortification and kill with HE round a group of infantry which is guarding the centre. Afterwards use exactly the same shell (or few of them) against the comms centre (1) situated inside the fortification (#18) in order to destroy it completely.
![[19] - Mission 6A - Sandstorm - p. 2 - Operation Arrowhead - ArmA II: Operation Arrowhead - Game Guide and Walkthrough](https://game.lhg100.com/Article/UploadFiles/201512/2015121215542179.jpg) [19]
[19]![[20] - Mission 6A - Sandstorm - p. 2 - Operation Arrowhead - ArmA II: Operation Arrowhead - Game Guide and Walkthrough](https://game.lhg100.com/Article/UploadFiles/201512/2015121215542112.jpg) [20]
[20]
Now you'll receive another order - you must strike enemy base (5) which is located deeper into the airfield, NE direction. It should be already a piece of cake for your armored beasts (#19). Finish the work of destruction by eliminating the enemy remnants - on this phase of a gameplay these should be only single off road cars and some infantry.
Afterwards you'll see a short cutscene presenting another chat of American soldiers which takes place in one of the hangars on the captured airfield (#20).
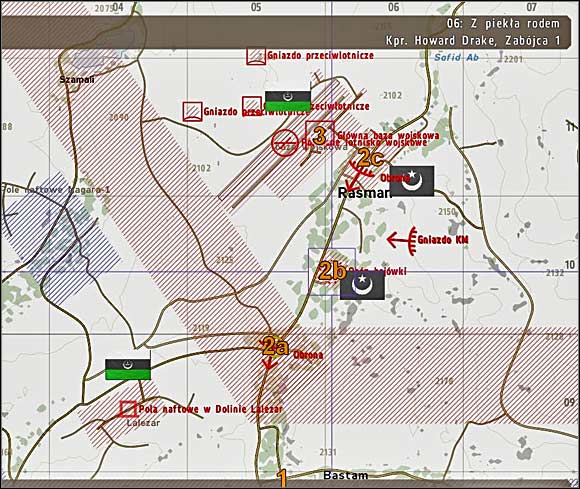
Note: this mission is available and you can play it instead of "Sandstorm" scenario, but only then, when your AH-64 Apache was shot down over the enemy territory in mission "Open Season" and you, as a pilot of this gunship, have been captured by the enemy.
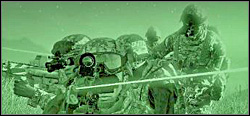
Date and place: Friday, June 1, 2012, 22:00, the surroundings of Takistani airfield in Rasman (3).
Mission: A squad of mechanized infantry under the command of corporal Howard Drake, codename "Assassin-1" (1), has to find and save captain Pierce, codename "Renegade" - a pilot of AH-64 gunship (2b) downed in previous scenario. Furthermore, you have to clear Rasman (2a, 2b, 2c) from enemy forces and attack the airfield (3) occupied by the enemy.
Support: Before "Assasin-1" moves to the AO (Area of Operations), there will be conducted a bombardment of enemy positions on the airfield.
Proposed equipment: This mission takes place at night, so every weapon with thermal imaging sight mounted on it may be useful here. To increase the firepower of your unit you can also take squad automatic weapons and light machineguns - as many as you can. And you have quite a nice choice of them here: there's M249 in two versions, M240, M60E4, Mk 48 mod 0 (this is FN Minimi/M249 version armed with 7.62x51mm NATO ammo). And you can reserve for yourself one of the weapons with thermovisual sights, or SCAR-L (Mk 16) assault rifle with grenade launcher attached and two sights - optical, with nice zoom (ACOG - Advanced Combat Optical Gunsight), and a collimator (mounted on ACOG) for CQC. This is very universal weapon. You may also grab some IR strobes, just in case.
Successive objectives in this scenario:
![[1] - Mission 6B - From Hell - p. 1 - Operation Arrowhead - ArmA II: Operation Arrowhead - Game Guide and Walkthrough](https://game.lhg100.com/Article/UploadFiles/201512/2015121215542232.jpg) [1]
[1]![[2] - Mission 6B - From Hell - p. 1 - Operation Arrowhead - ArmA II: Operation Arrowhead - Game Guide and Walkthrough](https://game.lhg100.com/Article/UploadFiles/201512/2015121215542219.jpg) [2]
[2]
Mission starts in Bastam (1) to the south from Rasman's outskirts (2a) and the airfield (3). Your mechanized infantry squad has at the disposal a High Mobility Multipurpose Wheeled Vehicle (HMMWV or Humvee) with a Common Remotely Operated Weapon Station (CROWS) of M2 .50 caliber HMG (a remote-control weapon system that gives his operator the ability to acquire and engage targets while inside a vehicle, protected by its armour). You have at your disposal also ICV Stryker (wheeled armored infantry combat vehicle) armed with Mk 19 40mm automatic grenade launcher which is mounted in a PROTECTOR M151 Remote Weapon Station (RWS) (#1). All your soldiers are already inside these vehicles. You're a driver of a Hummer which is leading the column, but there are no contraindications to rearrange your subordinates, or switch from driver to gunner's seat during the ride. You can also abandon Humvee and pack the whole squad (with yourself) into the Stryker ICV, but it's not worth to do this, because at the rear of a HMMWV you'll find a reconnaissance UAV (Unmanned Aerial Vehicle) which you can use later to scout enemy positions before you drive into them.
Wait a moment until HQ informs you about the completion of the bombardment of the airfield (3) and then proceed northward along the road. It's best probably to drive with NV goggles on your face and the easiest way to spot the targets is to use the thermovision. While driving a Humvee you can also turn on GPS which should help you to find the route (#2) (as a driver of a Stryker you don't have such a convenience at your disposal).
![[3] - Mission 6B - From Hell - p. 1 - Operation Arrowhead - ArmA II: Operation Arrowhead - Game Guide and Walkthrough](https://game.lhg100.com/Article/UploadFiles/201512/2015121215542235.jpg) [3]
[3]![[4] - Mission 6B - From Hell - p. 1 - Operation Arrowhead - ArmA II: Operation Arrowhead - Game Guide and Walkthrough](https://game.lhg100.com/Article/UploadFiles/201512/2015121215542229.jpg) [4]
[4]
Get close carefully to the outskirts of Rasman (2a) - your first task is to clear Rasman (2a, 2b and 2c) of enemy forces. Furthermore, you have to strike enemy base (3), but don't even think about this task - it will be completed by other American units. After switching to gunner's seat and looking through the thermal imaging sight at the buildings (2a) you should see the first targets (#3). These are: some old APC parked on the road, the HMG sandbagged emplacement on the left roadside, a sniper on the roof of the building located nearby and also some foot patrols of the enemies. Select the appropriate range on your sight and open fire, killing the guy who is operating HMG in APC as first, then the combatant in HMG emplacement and finally the sniper. Afterwards spend a while on shooting at enemy infantry. Be advised that some of the opponents may rush towards your position through the woods/copses situated on both roadsides! Eliminate these hostiles quickly, have in your mind that your vehicles aren't well armoured and it's easy to immobilize them even by shooting at their wheels! Perhaps you'll be able also to spot some more infantrymen in the distance, on the slope of the hill which should be already visible behind these buildings (2a).
Afterwards you can carefully drive along the road in the direction of these buildings (2a) and the roadblock organized on this road which is running through these outskirts (#4). All the time observe the road ahead of you (from time to time take a look at your flanks too) and fire at the consecutive HMG emplacements which will gradually occur in your sight while driving slowly towards the buildings (2a). It's best to engage these targets with your HMG mounted on Humvee, because these enemies who are operating HMGs are surprisingly resistant towards the projectiles fired from a grenade launcher of your Stryker. There are three sandbagged HMG emplacements along the main road running through the outskirts (2a) to NE: one of them is located on the left roadside and two are on the right roadside (the second a little further to the north). You should be able to neutralize first two emplacements by getting to the roadblock as close as possible.
![[5] - Mission 6B - From Hell - p. 1 - Operation Arrowhead - ArmA II: Operation Arrowhead - Game Guide and Walkthrough](https://game.lhg100.com/Article/UploadFiles/201512/2015121215542251.jpg) [5]
[5]![[6] - Mission 6B - From Hell - p. 1 - Operation Arrowhead - ArmA II: Operation Arrowhead - Game Guide and Walkthrough](https://game.lhg100.com/Article/UploadFiles/201512/2015121215542253.jpg) [6]
[6]
Further way of proceedings depends mainly from your preferred methods of fighting. You may, for example, order your troops to disembark from the vehicles to search the area (2a) on foot. In this case you have to quickly kill the combatant operating another HMG mounted in the emplacement which is situated right behind the roadblock, in a side street leading west (#5).
Afterwards you have to deal with the last HMG gunner whose emplacement is located on the margin of the area, on the right roadside of this main road leading N/NW (#5). On this main street you should also see a parked truck - I'm not sure if it is not loaded with explosives, so better fire at this vehicle and destroy it before it explodes and hurts your soldiers.
[7]![[8] - Mission 6B - From Hell - p. 1 - Operation Arrowhead - ArmA II: Operation Arrowhead - Game Guide and Walkthrough](https://game.lhg100.com/Article/UploadFiles/201512/2015121215542230.jpg) [8]
[8]
Then you have to quickly dispose your troops in the area in order to prepare your squad for a probable counterattack of Takistani combatants - they should approach through the copses located on both sides (western and eastern) of these outskirts of Rasman (2a) (#7). Kill them all and finally the HQ will consider these outskirts (2a) as cleared of the hostiles (they'll change their color on your map from red to blue). Now you can move forward, towards the urban area (2b).
If you lost your vehicles during the battle for the outskirts (2a) then you may find there many of the abandoned Takistani cars, you have to only look around well (#8).
![[9] - Mission 6B - From Hell - p. 2 - Operation Arrowhead - ArmA II: Operation Arrowhead - Game Guide and Walkthrough](https://game.lhg100.com/Article/UploadFiles/201512/2015121215542371.jpg) [9]
[9]![[10] - Mission 6B - From Hell - p. 2 - Operation Arrowhead - ArmA II: Operation Arrowhead - Game Guide and Walkthrough](https://game.lhg100.com/Article/UploadFiles/201512/2015121215542323.jpg) [10]
[10]
Another way of clearing the suburbs (2a) (and also all the remaining outskirts (2b and 2c)) relies on driving in between them with your Stryker. But first you have to make with this vehicle a breach in the wall which is surrounding the buildings. (#9)
Obviously, first you have to kill all the bad guys you can see from the distance. After getting with your wheeled ICV in between the buildings (2a) you should use Stryker's automatic grenade launcher against these not neutralized yet HMG emplacements (including HMG in the side street) and against the truck parked on the main road. Afterwards repel the counterattack of enemy combatants (#10). To do this you may order your subordinates to disembark or you may let them stay inside their vehicles - do what you like, what you prefer or what you're good at.
![[11] - Mission 6B - From Hell - p. 2 - Operation Arrowhead - ArmA II: Operation Arrowhead - Game Guide and Walkthrough](https://game.lhg100.com/Article/UploadFiles/201512/2015121215542373.jpg) [11][12]
[11][12]
Finally proceed along the road towards the next buildings (2b) in order to clear them of the opponents too - your task is still to clear Rasman of enemy forces. Meanwhile, the HQ should send via the radio two messages: first of them informs you that the Allies have managed to gain the air superiority over the Area of Operations (AO) and the second tells you that American forces have seized the enemy base (3) on the airfield. So you may not worry any more about the task of striking this base. While driving along the road towards the suburbs (2b) it's worth to hit finally on an idea of using the reconnaissance UAV which is transported in a trunk by your Humvee (#11). Disembark from your current vehicle, approach the rear of a Hummer and select the proper option from your actions' menu in order to switch to UAV which is already in the air.
By left clicking on the map (#12) you can indicate the place your UAV should start circling over.
![[13] - Mission 6B - From Hell - p. 2 - Operation Arrowhead - ArmA II: Operation Arrowhead - Game Guide and Walkthrough](https://game.lhg100.com/Article/UploadFiles/201512/2015121215542322.jpg) [13]
[13]![[14] - Mission 6B - From Hell - p. 2 - Operation Arrowhead - ArmA II: Operation Arrowhead - Game Guide and Walkthrough](https://game.lhg100.com/Article/UploadFiles/201512/2015121215542328.jpg) [14]
[14]
When you use the UAV's thermovison camera to take a look at the outskirts (2b), you should be able to see (after zooming in) the Takistani combatants who are patroling this area (#13). What's even more important - you should be able also to locate the pilot of AH-64 Apache, Captain Pierce, who was shot down in the previous scenario. The place where he is being held should be marked with a blue NATO icon. This poor guy is in very bad situation: the enemies keep him in one of the ruined houses near the helipad which also should be visible on your screen as a white circle. Thanks to the thermovision and after zooming in a lot you're even able to see the silhouette of this pilot through the walls of the ruin - he's lying on the floor.
You have to save him. Everybody knows that a Yankee can survive without his coca-cola and hot-dogs only one day and this gentleman is in captivity for... several hours already ;-P. In order to free him you have to carefully get closer along the road to these buildings (2b) and eliminate all the targets which you'll see in your thermal imaging sight (#14). These are at least three UAZ cars with HMGs, an APC and a dozen or so of infantrymen patroling along the main road and close to it. There's also one more HMG emplacement you should be able to spot behind the trees which grow on the right roadside. Watch out for enemy combatants who may rush in your direction through this copse!
![[15] - Mission 6B - From Hell - p. 2 - Operation Arrowhead - ArmA II: Operation Arrowhead - Game Guide and Walkthrough](https://game.lhg100.com/Article/UploadFiles/201512/2015121215542358.jpg) [15]
[15]![[16] - Mission 6B - From Hell - p. 2 - Operation Arrowhead - ArmA II: Operation Arrowhead - Game Guide and Walkthrough](https://game.lhg100.com/Article/UploadFiles/201512/2015121215542336.jpg) [16]
[16]
After eliminating all visible targets you can try to relieve Captain Pierce. I've marked his exact location on the picture above (#15). As it was mentioned above he is being kept in a ruined building near a helipad in a camp of Takistani combatants which is situated near the side road.
This camp of combatants should be empty, I mean - there should be only the corpses and burnt wrecks (#16). It's probably the effect of actions of the allied units - US gunships, to be precise. Disembark from your vehicle after reaching the camp and enter the ruin in which you expect to find Pierce still alive.
![[17] - Mission 6B - From Hell - p. 2 - Operation Arrowhead - ArmA II: Operation Arrowhead - Game Guide and Walkthrough](https://game.lhg100.com/Article/UploadFiles/201512/2015121215542310.jpg) [17][18]
[17][18]
And indeed he lies on the floor in rather bad shape - he should turn on his belly when you're approaching him and... ask for a hamburger ;-P (#17). The HQ sends a chopper, another AH-64 Apache, one of Renegades, for Captain Pierce. You have to mark the LZ (Landing Zone) for this helicopter with your IR strobes (you and your soldiers should have some IR strobes in your equipment). Don't bother yourself about this task, though, because AH-64 Apache will land also on this unmarked with IR strobes helipad located nearby. The HQ orders also to hold the LZ, but during my gameplay it wasn't attacked by the enemies. Obviously you can have a look around for the opponents by walking upstairs to the roof of the ruin. You can also act like a pro and dispose your troops and vehicles in a fashion that allows you to secure the area, all the possible directions of approaching the helipad. It's even advisable to do this because such behaviour teaches you good habits in this game.
When Apache lands finally on a nearby helipad, Pierce also should stand up on his feet and run towards the chopper. Be patient, though, because it may take a while! When he flies away the game considers both tasks (of finding the pilot and holding the LZ) as done (#18).
![[19] - Mission 6B - From Hell - p. 2 - Operation Arrowhead - ArmA II: Operation Arrowhead - Game Guide and Walkthrough](https://game.lhg100.com/Article/UploadFiles/201512/2015121215542426.jpg) [19]
[19]![[20] - Mission 6B - From Hell - p. 2 - Operation Arrowhead - ArmA II: Operation Arrowhead - Game Guide and Walkthrough](https://game.lhg100.com/Article/UploadFiles/201512/2015121215542421.jpg) [20]
[20]
Now you have to only finish the job of clearing Rasman of enemy units. Go back to the main road and proceed along it towards the last buildings (2c). As usual get closer to them very carefully and all the time watch out for the opponents (#19). Amongst the buildings (2c), along the main road which is running through them, you'll see three HMG emplacements - two of them closer to you, on the right roadside and one of them a little further, on the left roadside. Of course there are also Takistani combatants patroling the area. First, deal with these sandbagged HMG emplacements - again the most effective is an accurate fire opened from your own HMG mounted on Humvee or another vehicle (there's really something wrong with these grenades of Stryker's grenade launcher).
Watch out! When you're getting closer to these buildings (2c) you should see one more HMG emplacement situated in the side road leading SE (#20) - quickly kill its gunner.
![[21] - Mission 6B - From Hell - p. 2 - Operation Arrowhead - ArmA II: Operation Arrowhead - Game Guide and Walkthrough](https://game.lhg100.com/Article/UploadFiles/201512/2015121215542479.jpg) [21]
[21]![[22] - Mission 6B - From Hell - p. 2 - Operation Arrowhead - ArmA II: Operation Arrowhead - Game Guide and Walkthrough](https://game.lhg100.com/Article/UploadFiles/201512/2015121215542483.jpg) [22]
[22]
The main road running through this urban area (2c) is blocked again with a roadblock, so you have to find a detour. When searching for it, eliminate all the opponents on your way. You'll encounter another HMG emplacement near the road running along the northwestern periphery of the area (2c) (#21). This mission should end successfully after clearing Rasman (2c) of enemy forces.
Then you'll meet with your friends on the captured airfield (#22). One of them tells you that the prisoners from C-130 Hercules, which was shot down earlier, are being held in the building called "the Palace" in the centre of Zargabad, the main town of Takistan.
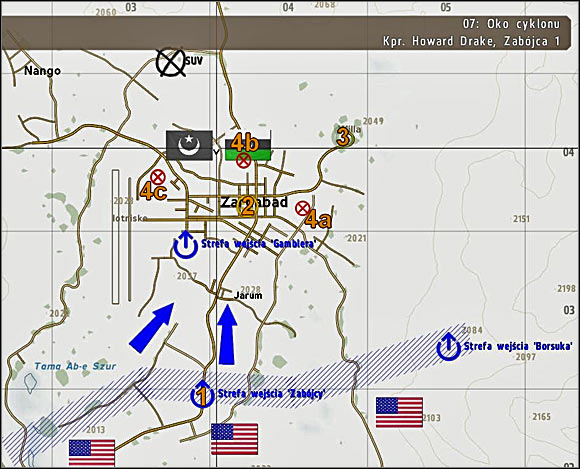
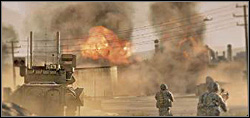
Date and place: Saturday, June 2, 2012, 6:00, the surroudings of Zargabad.
Mission: A squad of mechanized infantry under the command of corporal Howard Drake, codename "Assassin-1" (1) has a task of eliminating colonel Muhhamad R. Aziz who is hiding in his villa (3) to the NE of the town and guarded by elite Takistani soldiers.
The military intelligence says that this primary Takistani bad guy is going to escape from the town using his helicopter for this purpose. Obviously the CIA is wrong again - Aziz is going to escape, that's right, but he'll try to do this in his black SUV (Sport Utility Vehicle). You have also one more task - to destroy SCUD launchers (4a, 4b and 4c) which Aziz disposed in the town and which he uses to threat other Takistani... ekhm... metropolises. During this mission you'll also have an occasion to free the hostages (2) from a downed C-130 Hercules. They're being kept in the Palace, a building located in the centre of Zargabad. Traditionally, you have to avoid civilian casualties when conducting your military actions.
Support: there's a battery of mortars at your disposal, available by standard procedures (the 8 key).
Proposed equipment: A multi-role recoilless rifle MAAWS may prove its usefulness in this scenario - your squad is capable to take max. 2 pieces of this weapon and I'd suggest putting one of them on your shoulder. I was choosing for myself also SCAR-L Mk 16 assault rifle with attached grenade launcher and two sights mounted on this weapon - ACOG (for taking the bad guys down from a distance) and a miniature collimator (for close combat situations). This is very universal weapon: you may switch between available sights at any moment if you need to do this. Obviously, on the battlefield there may be also useful M249 SAW with optical sight and a sniper rifle SCAR-H Mk 17 may be a good option too - these are weapons for your subordinates, of course.
Successive objectives in this scenario:
![[1] - Mission 7 - Eye of the Hurricane - p. 1 - Operation Arrowhead - ArmA II: Operation Arrowhead - Game Guide and Walkthrough](https://game.lhg100.com/Article/UploadFiles/201512/2015121215542498.jpg) [1]
[1]![[2] - Mission 7 - Eye of the Hurricane - p. 1 - Operation Arrowhead - ArmA II: Operation Arrowhead - Game Guide and Walkthrough](https://game.lhg100.com/Article/UploadFiles/201512/2015121215542419.jpg) [2]
[2]
After starting this mission you'll notice an abandoned Infantry Fighting Vehicle M2 Bradley parking in front of you at the place where Assassin-1 (1) starts this scenario. Now, if you want to perform all of your actions on foot, then I may only assure you that you won't be able to complete your tasks here. So I'd suggest hopping with the whole squad into this IFV (#1). One of your subordinates wears a helmet which is typical for American tankists so he can, for example, take a driver's seat in this Bradley. Furthermore, you may order your medic, for example, as a very precious soldier, to take a seat of a gunner. Then hop into this IFV as a commander and order the rest of your soldiers to get inside as passengers. In this way you'll be capable to use these better armed soldiers (with squad automatic weapon, sniper rifle, AT launcher, etc.) after ordering them to disembark (if there's a need to do this), as ordinary infantry, to cover your IFV in urban terrain, for example. De facto you shouldn't order them to disembark in this scenario not even once if you care about completing all the objectives. You'll be the only person who will disembark from your IFV several times. You should also notice immediately that your unit isn't the only unit which operates in this scenario and there are other American IFVs, tanks and gunships attacking Zargabad. Well, this is quite a nice battle... You'll be on the horns of a dilemma probably when still embarking your IFV. That's because the HQ sends via the radio the information that they know now where the hostages (2) are being held and asks if you want to save these poor civilians, or you still want to hunt for Aziz. This first option doesn't exclude the second one and SCUD launchers may also wait a while, so I'd propose freeing the hostages (2) first.
In order to save these hostages who are being kept in the Palace in the centre of Zargabad (2) you have to act fairly quickly. My tactic of saving their lives was relying on driving my Bradley to the Palace as fast as possible and even on getting with my IFV right under the doors of the Palace. Probably it's best to drive IFV by yourself, by taking the seat of a driver (#2), because AI likes to snake (as usual in this game's serie). I played this scenario couple of times and my IFV wasn't even once destroyed when I was driving through the city to the Palace (2), so it's not a suicidal action as it seems.
![[3] - Mission 7 - Eye of the Hurricane - p. 1 - Operation Arrowhead - ArmA II: Operation Arrowhead - Game Guide and Walkthrough](https://game.lhg100.com/Article/UploadFiles/201512/2015121215542438.jpg) [3]
[3]![[4] - Mission 7 - Eye of the Hurricane - p. 1 - Operation Arrowhead - ArmA II: Operation Arrowhead - Game Guide and Walkthrough](https://game.lhg100.com/Article/UploadFiles/201512/2015121215542526.jpg) [4]
[4]
But if you see enemy vehicle in your sights (and there are several tanks T-55, T-72 and IFVs in the town) then you should quickly switch to the gunner's seat this time and personally destroy these armoured targets using Bradley's guided anti-tank missiles - TOWs (#3). That's because the gunner controlled by AI may have problems with this task. Pay attention that you must guide TOW missile until it hits the target. Takistani soldiers are also good targets for Bradley's 25mm cannon, this time, or for coaxial machine gun, especially if they carry with themselves very dangerous AT rocket launchers (RPGs). Don't pursue other soldiers if they're escaping into city streets - there's no time for this. When you're closing to the town's centre you'll surely see the Palace (2) - it's hard to miss it, it's very big. If you have a clean, not obscured line of fire then you can use Bradley's coaxial machine gun (but only this weapon!) to fire at the soldiers who are occupying the walls surrounding the Palace. But watch at what you fire, because the hostages (2) are being held exactly on the roof of the Palace! It's not worth to disembark from your IFV and play as sniper even if you have a sniper rifle.
Get with your Bradley right under the doors leading to the Palace (2) (even AI can do this!) - I was entering there through the gate situated on the east (#4). Park your vehicle near the entrance to the building, switch to gunner's seat and turn Bradley's turret in order to clean the walls and the courtyard of hostiles. This time you can use your cannon without killing the prisoners. You can disembark from a Bradley (but alone, your squad stays inside the vehicle) only when the area is cleared of the enemies - cautiously enter the building, the Palace (2).
![[5] - Mission 7 - Eye of the Hurricane - p. 1 - Operation Arrowhead - ArmA II: Operation Arrowhead - Game Guide and Walkthrough](https://game.lhg100.com/Article/UploadFiles/201512/2015121215542551.jpg) [5]
[5]![[6] - Mission 7 - Eye of the Hurricane - p. 1 - Operation Arrowhead - ArmA II: Operation Arrowhead - Game Guide and Walkthrough](https://game.lhg100.com/Article/UploadFiles/201512/2015121215542520.jpg) [6]
[6]
Be very careful when entering this building and eliminate Takistani soldiers hiding near the entrances (they should be at this one located far and also on the sides of the entrance you're entering the building!). Kill also enemy soldiers who are crouching on the galleries above the entrances (#5) - there should be three opponents on these balconies, if my memory works fine.
Kill all these bad guys by cautiously walking upstairs and scouting around (#6). There are two ladders which lead to the roof of the Palace: it's safest to use the one which is situated - I don't want to lie now - on the southern wall of the Palace (2). When climbing up the second ladder you may be shot by the bad guy who is guarding the hostages.
[7]![[8] - Mission 7 - Eye of the Hurricane - p. 1 - Operation Arrowhead - ArmA II: Operation Arrowhead - Game Guide and Walkthrough](https://game.lhg100.com/Article/UploadFiles/201512/2015121215542597.jpg) [8]
[8]
When you're on the roof quickly draw out your weapon and kill both soldiers guarding the hostages (2) who are sitting under the wall - watch out and don't shot accidentally at these prisoners! (#7) The task of saving the hostages should be completed now. But if you want to complete this objective and find the prisoners still alive you must get to the Palace (2) really quickly: I was able to do this within approx. 5 minutes. Freed prisoners will then stand up and your job here is done - there should be another unit which will care about the hostages now.
It's time to eliminate Aziz now - he is hiding in his villa (3) located to the NE from the Zargabad. Go downstairs and return to your IFV. After getting with this Bradley outside the Palace (2) you'll probably have to fight against some armoured enemy vehicles which are patrolling the streets of Zargabad. Unfortunately you can count on these Allied units (Abrams tanks, Apache gunships, etc), because it seems that they are commanded by a band of idiots... Destroy all enemy vehicles like IFVs and tanks using your guided TOW missiles. Bradley's 25mm cannon isn't able to do anything to enemy tanks and even if its AP rounds are able to harm enemy IFVs it will take too much time - the time you simply don't have. There are short distances of firing in this urban terrain so fire your rockets after aiming at target's tracks or even lower, at the silhouette of the target (#8). Otherwise you may easily miss a shot. Pay attention also that you can fire in a short time interval only two rockets, one after one, from your Bradley's TOW launcher and the loading of the next rockets will take some time. So it's not a bad idea then to hide your IFV somewhere or at least to move out of sight of the hostiles. There should be several, two or three tanks, which may stand a threat to you now.
![[9] - Mission 7 - Eye of the Hurricane - p. 2 - Operation Arrowhead - ArmA II: Operation Arrowhead - Game Guide and Walkthrough](https://game.lhg100.com/Article/UploadFiles/201512/2015121215542539.jpg) [9]
[9]![[10] - Mission 7 - Eye of the Hurricane - p. 2 - Operation Arrowhead - ArmA II: Operation Arrowhead - Game Guide and Walkthrough](https://game.lhg100.com/Article/UploadFiles/201512/2015121215542556.jpg) [10]
[10]
Somewhere in the beginning of a gameplay, after freeing the prisoners (2), the HQ should contact with you via the radio with information about Aziz who is going to escape from his villa (3) located on the slope NE of Zargabad. He uses his car, the black SUV for this purpose. When you're receiving this dispatch on your screen, you should get with your Bradley IFV to the eastern/northeastern outskirts of Zargabad in order to ambush from there this Takistani, primary bad guy. However, the surroundings must be safe and cleared earlier of enemy armoured vehicles. Turn the turret of your Bradley towards the villa of Aziz on the slope (3) and wait patiently until this bad guy appears in his black SUV on the road leading from the slope to Zargabad. While waiting for him you can spend your time on firing at the positions of elite Taistani soldiers who are guarding the drive-in entry to the villa (#9). Even when you play with a short view distance (of approx. 1,5 km) you should be able to see from Zargabad's outskirts the sandbagged emplacement of AT launchers (or soldiers with this kind of weapons) on the left roadside of the road leading to the villa, under the wall which is surrounding this property. There's also a HMG emplacement nearby, under the lodge on the right roadside, and a BTR (APC) parked on the road behind this lodge. There should be also UAZ with mounted HMG on the same road behind a BTR. You can use your Bradley's 25mm Bushmaster cannon to fire at these enemies from this safe distance. You can even destroy BTR with TOW missile. After a moment you should see on the road leading from the villa (3), next to the burning (on my picture) UAZ, a black SUV of Aziz. Engage this vehicle with your cannon, fire also at the silhouettes of the soldiers who are disembarking from the vehicle and if you were able to hit also the most important one of them, colonel Aziz (which isn't difficult), then the task of eliminating Aziz should be assumed as completed right now.
Or you may - if you're not so patient but very brave instead of this - drive along the road leading to the villa (3) and get closer to this property situated on the slope. Quickly neutralize these positions of elite Takistani Guard near the first entrance to the property which I described above (#10). The second and the proper gate is located in the wall a little further on this road, behind BTR APC. You can also use your mortar support which you have at your disposal in this scenario and treat with it these already spotted enemy positions.
![[11] - Mission 7 - Eye of the Hurricane - p. 2 - Operation Arrowhead - ArmA II: Operation Arrowhead - Game Guide and Walkthrough](https://game.lhg100.com/Article/UploadFiles/201512/2015121215542509.jpg) [11]
[11]![[12] - Mission 7 - Eye of the Hurricane - p. 2 - Operation Arrowhead - ArmA II: Operation Arrowhead - Game Guide and Walkthrough](https://game.lhg100.com/Article/UploadFiles/201512/2015121215542567.jpg) [12]
[12]
Eliminate three guards in the second gate in the wall while driving through it with an intention of getting to the property of Aziz (3). Next you have to quickly destroy the truck with ZU-23-2 AA gun mounted on it which you'll see on a small slope on this property - this vehicle is parked near the helipad (#11). Now, if you were very fast and you moved towards the villa (3) right after receiving the message about escaping Aziz, then you'll find a colonel hanging around his black SUV still parked near the villa (3). The colonel and his SUV - these are very nice targets for Bradley's cannon...
After massacring everyone in the closest vicinity (some bodyguards of Aziz may disembark from his fired upon SUV) it's worth to get out your vehicle for a while. In order to take away from Aziz killed in action his golden revolver with ammo (#12), as a souvenir. This is a good time for a small note: don't let Aziz fool you with his tricks and don't mistake him with his doppelganger. I mean - with the officer who looks just like Aziz, disembarks from his SUV and tries probably to divert your attention from the real colonel. You can easily recognize that you killed the correct guy by game saving its status right in the moment of Aziz's death. Obviously there's also an appropriate prompt-note appearing on your screen when the task of eliminating Aziz is completed.
[13]![[14] - Mission 7 - Eye of the Hurricane - p. 2 - Operation Arrowhead - ArmA II: Operation Arrowhead - Game Guide and Walkthrough](https://game.lhg100.com/Article/UploadFiles/201512/2015121215542699.jpg) [14]
[14]
After grabbing colonel's golden revolver you can also run to his villa (3) for a while in order to see what happened to the pilot - the last hostage from a downed Hercules. You'll find him on the roof of the villa (3) - you can get there using the stairs located inside the building. But if you pointed earlier this building as a target for your mortar support, then don't expect now that the roof is still there...
In other cases you'll find the pilot on the roof - unfortunately he is dead already (#14). And I'm pretty sure that there's no way to save him in this scenario - as like as not he's dead from the beginning of this mission.
![[15] - Mission 7 - Eye of the Hurricane - p. 2 - Operation Arrowhead - ArmA II: Operation Arrowhead - Game Guide and Walkthrough](https://game.lhg100.com/Article/UploadFiles/201512/2015121215542634.jpg) [15]
[15]![[16] - Mission 7 - Eye of the Hurricane - p. 2 - Operation Arrowhead - ArmA II: Operation Arrowhead - Game Guide and Walkthrough](https://game.lhg100.com/Article/UploadFiles/201512/2015121215542676.jpg) [16]
[16]
But if you are too slow and you let Aziz to escape in his black SUV from the villa (3) then... you still have the chances to get him. This bad guy escapes using the roads which lead northward (it's rather stupid to expect him escaping to the south, from where the Americans are attacking...). You can recognize where he is at the current moment by ordering the gunner of your Bradley to aim at a black SUV when one of crewmembers reports the detection of this vehicle. In such a case there will be a green square around Aziz's vehicle - try to concentrate a burst of rounds fired from the cannon of your Bradley in the centre of this square (#15). Afterwards, shoot at the silhouettes hanging around enemy vehicle or running northwards through the fields and I'm sure that you'll get the colonel. During one of my games I found this primary bad guy exactly on the road located to the north from Zargabad - and I marked this place on my map with a black icon signed "SUV". Remember though, that it's only an example of where you can find Aziz if he escaped from his villa (3). And there's also one more option - this Takistani bad guy may be eliminated by... other American forces which are operating in the area, completely without your participation. But even then the objective of eliminating Aziz should be considered as completed.
Finally, it's time to care about the last task - you have to destroy three SCUD launchers (4a, 4b and 4c). Perhaps you'll be able to spot and neutralize one of them (4a), or even two of them (4a and 4b) when cruising with your IFV on the slope where the villa of Aziz (3) is situated. Don't waste TOW rockets on these SCUD launchers, they're not worth of them - a long burst of HE rounds fired from Bradley's 25mm cannon should be enough to burn a SCUD (#16).
![[17] - Mission 7 - Eye of the Hurricane - p. 2 - Operation Arrowhead - ArmA II: Operation Arrowhead - Game Guide and Walkthrough](https://game.lhg100.com/Article/UploadFiles/201512/2015121215542653.jpg) [17]
[17]![[18] - Mission 7 - Eye of the Hurricane - p. 2 - Operation Arrowhead - ArmA II: Operation Arrowhead - Game Guide and Walkthrough](https://game.lhg100.com/Article/UploadFiles/201512/2015121215542673.jpg) [18]
[18]
If you're unable to spot SCUDs from this slope (3), then you have no choice and you must get closer. Proceed towards the first SCUD launcher (4a) - it is guarded by several infantrymen and the UAZ with mounted HMG (#17). Kill all hostiles in the area and destroy both vehicles using your cannon.
Afterwards drive promptly towards the second SCUD (4b). If you were able earlier to handle with these several Takistani armoured vehicles, then the way to the SCUD should be safe enough. Watch out only for soldiers armed with RPGs - it's easy to miss such a one and then get a rocket from him to the rear of your IFV. The second SCUD (4b) is guarded by BTR APC: fire 25mm HE rounds at the wheels to force its crew to abandon the vehicle, or fire AP rounds at BTR's turret and armour, or even fire a TOW rocket to quickly destroy this APC. If you see a SCUD almost ready to launch its missile (as on my picture (#18)), then it means that you have really not much time left to complete your objective. Burn this SCUD launcher, don't bother about the infantry if you don't have time (unless you see RPGs in their hands!). In order to destroy the third SCUD launcher (4c) you can try to get with your Bradley on this hill located very close to the position of a previous SCUD (4b).
![[19] - Mission 7 - Eye of the Hurricane - p. 2 - Operation Arrowhead - ArmA II: Operation Arrowhead - Game Guide and Walkthrough](https://game.lhg100.com/Article/UploadFiles/201512/2015121215542687.jpg) [19]
[19]![[20] - Mission 7 - Eye of the Hurricane - p. 2 - Operation Arrowhead - ArmA II: Operation Arrowhead - Game Guide and Walkthrough](https://game.lhg100.com/Article/UploadFiles/201512/2015121215542609.jpg) [20]
[20]
Although it may be a risky maneuver, because the third SCUD launcher (4c) should be guarded by one more tank which was not spotted by anybody yet - and this tank may easily destroy your IFV with only one shot. That's why it is probably safer to bypass the slope and to sneak through the streets of Zargabad towards this last SCUD launcher (4c). At least I performed such a maneuver and... that was it! So you can even bypass this enemy tank without even spotting it or you can also destroy it with TOW rocket (#19) if you've got it in your sight. Afterwards you have to only get to the vicinity of the last SCUD (4c) which is parked near the airfield and burn this vehicle (#20). Then the whole mission should end successfully.
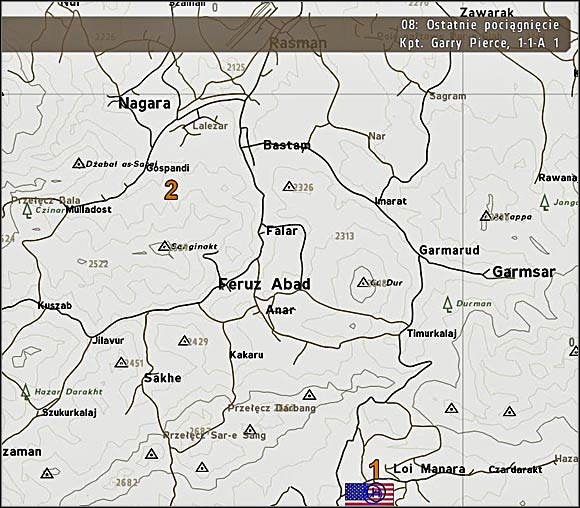
Note: this scenario is available and you can play it only when you weren't able to get Aziz in the previous mission called "Eye of the Hurricane", additionally you were shot down over enemy territory in "Open Season", and finally you saved this poor AH-64 pilot in the episode titled "From Hell". But if you were able to kill Aziz in "Eye of the Hurricane" then you'll pass from mission 7 directly to the last one (9th scenario - "The Press Conference").

Date and place: Tuesday, June 12, 2012, 7:00, FOB (Forward Operating Base) Revolver (1) near Loy Manara village.
Mission: After the take-off from the base (1) your attack helicopter AH-64 Apache (codename "Renegade") will hunt for "Wacko" (2) - UH1H chopper used by colonel Aziz for his escaping purposes.
Support: a nice, female voice will keep you informed during your flight about the current course and altitude of Aziz chopper.
Proposed equipment: you don't need any firearms because as a pilot of a gunship you've got more powerful "toys" for Aziz.
Successive objectives in this scenario:
![[1] - Mission 8A - Finishing Touch - Operation Arrowhead - ArmA II: Operation Arrowhead - Game Guide and Walkthrough](https://game.lhg100.com/Article/UploadFiles/201512/2015121215542797.jpg) [1]
[1]![[2] - Mission 8A - Finishing Touch - Operation Arrowhead - ArmA II: Operation Arrowhead - Game Guide and Walkthrough](https://game.lhg100.com/Article/UploadFiles/201512/2015121215542738.jpg) [2]
[2]
Right after starting the mission hop as a pilot into the attack helicopter AH-64 Apache which is standing on your right - this is the chopper in the foreground (hint for noobs) (#1).
Take off and fly northwards - after a while you'll hear this nice, female voice instructing you (also with hints written blue at the lower edge of the screen) on what azimuth you should fly (#2). She gives you three values but only two of them really count: the first (altitude) and the last one (optimal course). So climb up to this given altitude and fly along the optimal course to intercept "Wacko" (2). There are also other Apaches in the air and you can count on them in the latter part of this scenario, but, to be honest, their help shouldn't be needed. You have to find and kill Aziz.
![[3] - Mission 8A - Finishing Touch - Operation Arrowhead - ArmA II: Operation Arrowhead - Game Guide and Walkthrough](https://game.lhg100.com/Article/UploadFiles/201512/2015121215542748.jpg) [3]
[3]![[4] - Mission 8A - Finishing Touch - Operation Arrowhead - ArmA II: Operation Arrowhead - Game Guide and Walkthrough](https://game.lhg100.com/Article/UploadFiles/201512/2015121215542761.jpg) [4]
[4]
On my map for this mission I've marked the position of "Waco" (2), on which position I was usually intercepting him: this is the grid 0407 (more or less). It doesn't mean obviously that you'll also get him on this position, but it should happen somewhere in this area (#3), because UH1H takes always the same route: to W/SW, towards the road Gospandi-Mulladost and along it.
When you hear on the radio a conversation which leads to the conclusion that you've finally get close enough to UH1H helicopter of Aziz (2) and the enemy was identified positively, then you can order your gunner (armament operator) to lock the target. It's best to press the 2 key and select the adequate option (UH1H) (#4). Otherwise you can easily make a mistake with the Tab button (there are also other enemy helicopters in the air - gunships Mi-24). Focus on Aziz chopper, don't bother too much about these two Hinds. You can lock UH1H (so you'll have it marked with a green square/circle on your HUD) only if you order your gunner to use a cannon. Hellfire missiles are useless in this mission, unlike the unguided rockets.
![[5] - Mission 8A - Finishing Touch - Operation Arrowhead - ArmA II: Operation Arrowhead - Game Guide and Walkthrough](https://game.lhg100.com/Article/UploadFiles/201512/2015121215542782.jpg) [5]
[5]![[6] - Mission 8A - Finishing Touch - Operation Arrowhead - ArmA II: Operation Arrowhead - Game Guide and Walkthrough](https://game.lhg100.com/Article/UploadFiles/201512/2015121215542708.jpg) [6]
[6]
While you're chasing Aziz helicopter (2), the HQ is proposing you via the radio the help of other Apaches, in order to let you escape from these Takistani Hinds on your tail (#5). But if you're really fast with shooting down Aziz, then this help won't be even needed (as I wrote somewhere above). I didn't use it during my gameplay. If you're attacking UH1H chopper with your cannon then it's best to switch to "manual fire" and fire long series. Your gunner controlled by AI was trained to fire short bursts which are definitely less effective in this particular case (the pursuit lasts too long).
Obviously you can also treat UH1H of Aziz (2) with your unguided missiles - it's more difficult to hit the target, but if you can hit him then the effect is tremendous (#6). After shooting down Aziz you'll be ordered to return to base (1). You won't be able to do this, though, because after a moment your screen should fade out and this weakest mission of the whole campaign should end.
Note: this scenario is available and you can play it only if you weren't able to eliminate Aziz in the previous mission titled "Eye of the Hurricane". But if you killed him in this mission then you'll pass from mission number seven directly to the last scenario ("The Press Conference").
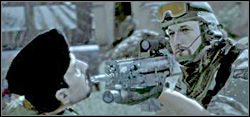
Date and place: Tuesday, June 12, 2012, 4:30, near Ravanay village.
Mission: Military intelligence says that colonel Muhhamad R. Aziz (codename "Mad Dog") was able to get to Ravanay village and hide in the old mosque. Military intelligence is wrong again, though, because Aziz is hiding in one of the mud huts (1) in grid 114081 on the margin of the wood near this village.
You're in charge of Special Forces team (codename "Gambler") which has to find and eliminate this primary Takistani bad guy.
Support: US gunships (codename "Renegade") patrol the skies above the village, but you can't count on their support during this mission.
Proposed equipment: Silenced weapons, naturally. There is no big choice and you can give a sniper rifle SCAR-H (Mk 17) to one of your commandos, if he hasn't it already. I'd strongly advise to toss out from the equipment of all of your commandos all the side guns, like silenced pistols and submachine guns, if you don't want your soldiers to draw out these weapons when they should use their primary arms.
Successive objectives in the scenario:
![[1] - Mission 8B - Operation Phoenix - Operation Arrowhead - ArmA II: Operation Arrowhead - Game Guide and Walkthrough](https://game.lhg100.com/Article/UploadFiles/201512/2015121215542773.jpg) [1]
[1]![[2] - Mission 8B - Operation Phoenix - Operation Arrowhead - ArmA II: Operation Arrowhead - Game Guide and Walkthrough](https://game.lhg100.com/Article/UploadFiles/201512/2015121215542711.jpg) [2]
[2]
It would be wise to take a look at Aziz photo during the briefing and remember this gloomy face - pay attention that colonel wears a black beret (#1). It is also worth to take a good look at the map, to visualize yourself the terrain in the area of future action and to choose a new LZ (landing zone) for your soldiers. That's because the LZ proposed by a game (and already marked on the map with a black sign) isn't good. You can straightaway mark on this map a new LZ you'll be parachuted in. I'd propose landing on the glade (2) near Aziz hideout (1), to the south of Ravanay. Aziz always hides in this place, because there's a landing ground nearby, on the margin of the village, used by the chopper which appears in the area in order to give a lift to Aziz. The village and the area around the hideout are patrolled by a handful of Takistani combatants. They're outstandingly blind, though, and you can successfully land right under their noses, near the hideout, on the glade (2) located in grid coordinates 115079, and they shouldn't spot you.
C-130 Hercules which is transporting your commandos will fly towards the target from the S/SW direction. When you see a red light on the board of this plane it's a sign that you should jump out of the Hercules by choosing the respective option from your actions' menu (#2). Before you do this, it's worth to turn on the GPS on which you should have your new LZ marked. If you don't want to get confused by similarly looking signs, you can mark your new LZ with an icon that looks differently from the sign proposed by the game.
![[3] - Mission 8B - Operation Phoenix - Operation Arrowhead - ArmA II: Operation Arrowhead - Game Guide and Walkthrough](https://game.lhg100.com/Article/UploadFiles/201512/2015121215542857.jpg) [3]
[3]![[4] - Mission 8B - Operation Phoenix - Operation Arrowhead - ArmA II: Operation Arrowhead - Game Guide and Walkthrough](https://game.lhg100.com/Article/UploadFiles/201512/2015121215542840.jpg) [4]
[4]
You'll perform a form of parachute jump better known as HALO (High Altitude, Low Opening) or Military Free Fall (MFF). In other words you'll open your parachute at a low altitude (game suggests an altitude of 500 meters or even less) after free-falling for a period of time. You can control your flight when free falling and later, after opening the parachute and during gliding (#3). It's a good idea to train this form of parachuting and work on the accuracy of landing by playing one of the tutorial's missions. Pay attention that you open your parachute through the actions' menu! Yet during the glide you can point your commandos to the LZ (by pressing the tilde key ~ and left-clicking on the terrain) - perhaps they'll be able to land there, instead of landing far from the target...
If you and your soldiers have managed to land on the glade (2) then you may spend a while on deploying your subordinates in the vicinity of Aziz hideout (1). (#4) First of all you may order your sniper to take position on some hill located nearby, in order to have an eye on the spot where enemy chopper lands when Aziz tries to escape. This helicopter lands on a field situated within a stone's throw from the hideout (1). It seems that in this mission you can also switch among your subordinates - use this patent to quickly take a suitable position when playing for a while as a sniper. But if your commandos have landed far away from the selected LZ and it would take too much time to gather them together, then... don't even bother about this. You can find and kill Aziz by yourself, when acting alone - this task is trivial, really.
![[5] - Mission 8B - Operation Phoenix - Operation Arrowhead - ArmA II: Operation Arrowhead - Game Guide and Walkthrough](https://game.lhg100.com/Article/UploadFiles/201512/2015121215542823.jpg) [5]
[5]![[6] - Mission 8B - Operation Phoenix - Operation Arrowhead - ArmA II: Operation Arrowhead - Game Guide and Walkthrough](https://game.lhg100.com/Article/UploadFiles/201512/2015121215542852.jpg) [6]
[6]
So, after landing on the glade (2), head to these mud huts (1). In one of them you're supposed to find Aziz. This is the building situated northernmost. When sneaking among other huts, kill a guy who is standing nearby or puttering around. Then eliminate the next combatant who is operating the adjustable spot light mounted on the roof of the hut (there's Aziz hiding right in this hut). Finally, shot dead the third guy who is operating HMG situated near this hut and aimed at the landing ground of the chopper (#5). There's no need to attack other combatants who are patroling the margin of the village located to the north.
Afterwards enter this mud hut (1) and kill Aziz - as a trophy you can take his gold revolver with ammo (#6). You can also eliminate Aziz without even entering his hut - simply shoot him through the window. The objective of finding and killing Aziz will be considered as done then, the screen should fade out after a while (you don't even have to escape from the area) and this mission should be completed.

Time and place: 16:30, the main base of US Army, Zargabad.
It's hard to treat as a mission this 9th episode of the campaign, because it's only a... cutscene, or rather outro. Colonel Kane, who was in charge of the operation "Arrowhead", announces its end. And this gentleman has at least three speeches prepared for this occasion. What you hear from his mouth depends on the results of your actions in previous missions. The best end is when you were able to free the hostages in the scenario "Eye of the Hurricane" and you also killed Aziz (preferably - in the same mission).
In this case Kane's soldiers will be awarded with an ovation of press reporters. The next speech is prepared by Kane for an occasion of killing Aziz in one of these three missions in which you have a chance to do this, but at the expense of finding the prisoners dead. The worst final is when you weren't able to save the hostages and kill Aziz. I think there's also one more oration prepared for an occasion titled "prisoners saved and alive, but Aziz escaped". I don't know although how one can flub all two or three attempts of eliminating primary bad guy...


 Armikrog Game Guide & Walkthrough
 Alien Rage - Unlimited Walkthrough InfiltrationArcheAge Game Guide & Walkthrough
 Alpha Polaris Game Guide & Walkthrough
 Assassins Creed III Game Guide & Walkthrough