Living Legends: Frozen Beauty Walkthrough, Guide, & Tips
Living Legends: Frozen Beauty Walkthrough

Welcome to the Living Legends: Frozen Beauty Walkthrough
The Queen has chosen your sister as her successor, but are her promises too good to be true?
Whether you use this document as a reference when things get difficult or as a road map to get you from beginning to end, we’re pretty sure you’ll find what you’re looking for here.
This document contains a complete Living Legends: Frozen Beauty game walkthrough featuring annotated screenshots from actual gameplay!
We hope you find this information useful as you play your way through the game. Use the walkthrough menu below to quickly jump to whatever stage of the game you need help with.
Remember to visit the Big Fish Games Forums if you find you need more help. Have fun!
This walkthrough was created by BrownEyedTigre, and is protected under US Copyright laws. Any unauthorized use, including re-publication in whole or in part, without permission, is strictly prohibited.
General Tips

- This is the official guide for Living Legends: Frozen Beauty.
- Select Options to adjust Music, Sound and Voice. You may also adjust Full Screen, Default Cursor and Maintain Aspect Ratio.
- You may choose between Casual, Advanced and Expert. This setting may be changed during gameplay by choosing Options.
- The Hidden-object puzzle scenes will be referred to as HOP throughout the guide.
- Items labeled in orange in the find list require an extra step to find. All items are highlighted in yellow in the screenshots. The find lists are random and yours may be different from the ones in the guide.
- Puzzles may be skipped after a short wait.
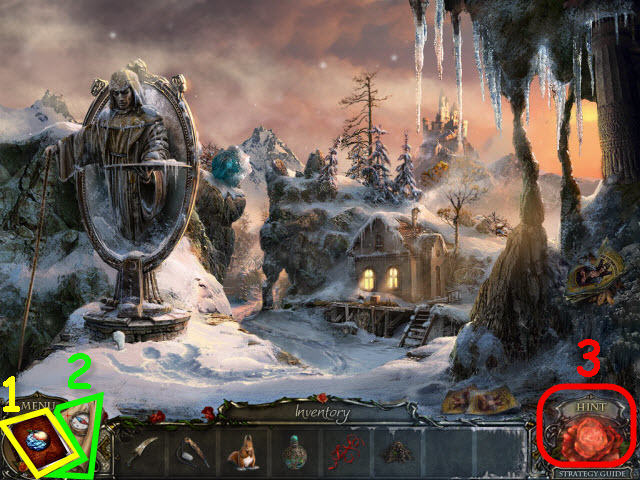
- Open your diary (1) to view your story updates and stored clues.
- Select the Map (2) to see what locations have tasks to complete. You can also fast travel to any location by selecting the desired area on the map.
- You may select the Hint button (3) for help in game play or HOP areas.
Chapter 1: Riverside
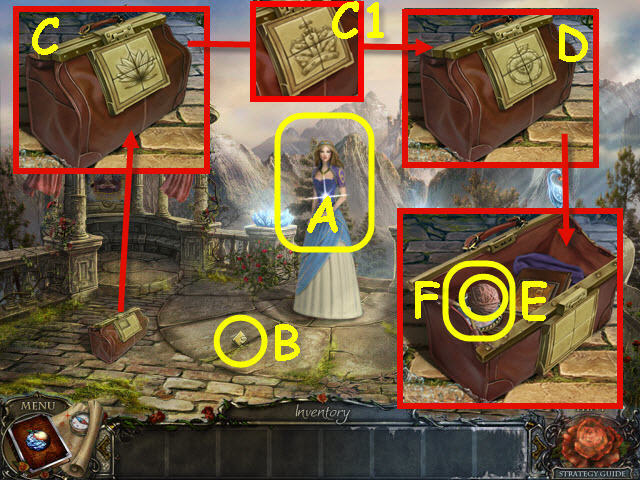
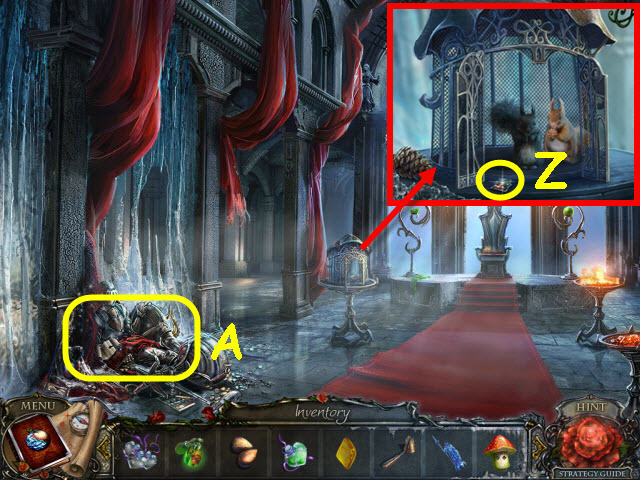
- Speak to Elizabeth (A) and take the letter.
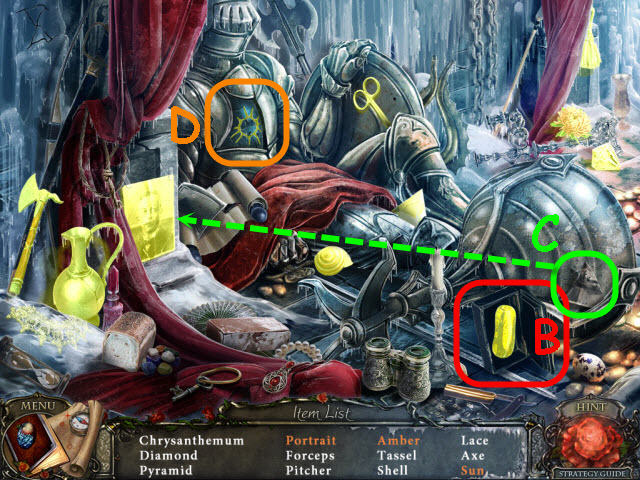
- Examine the landing; take the TILE (B).
- Examine the bag and place the TILE on it; select the tiles to complete two of the three pictures (C, C1 and D).
- Take the YARN (E) and MIRROR (F).
- Go forward.
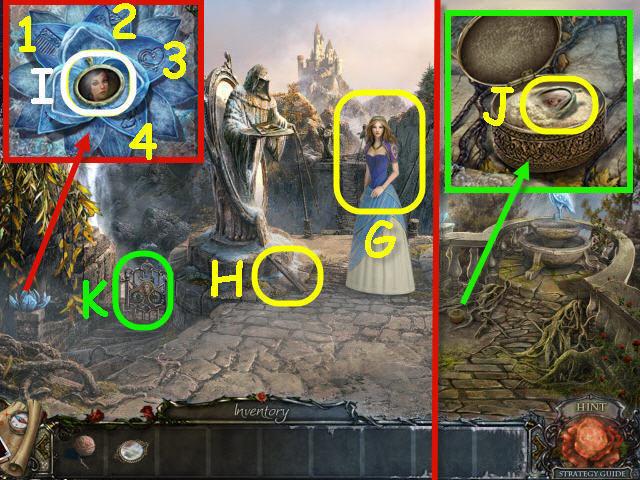
- Speak to Elizabeth (G); receive a LUCKY GEM.
- Take the BOARD (H).
- Examine the lotus; open the petals in the order marked (1-4).
- Take the PORTRAIT (I).
- Back out.
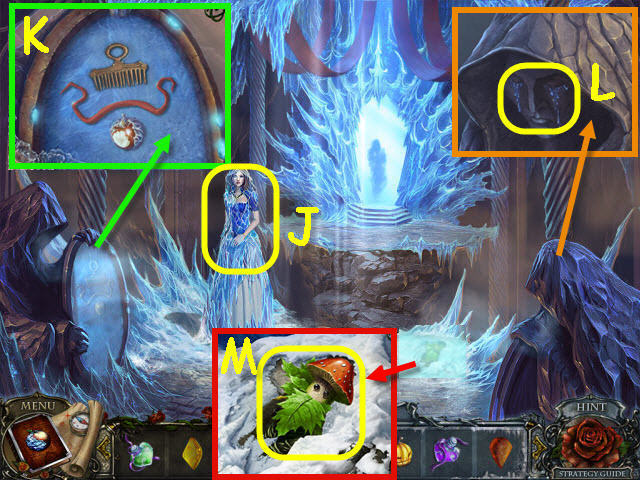
- Examine the jewelry box and place the LUCKY GEM on it; take the 2nd PORTRAIT (J).
- Go forward.
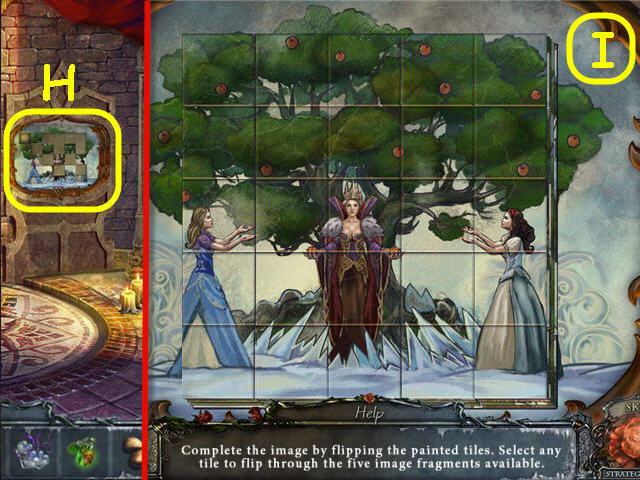
- Examine the gate and place the 2 PORTRAITS in their matching recesses it to trigger a puzzle (K).
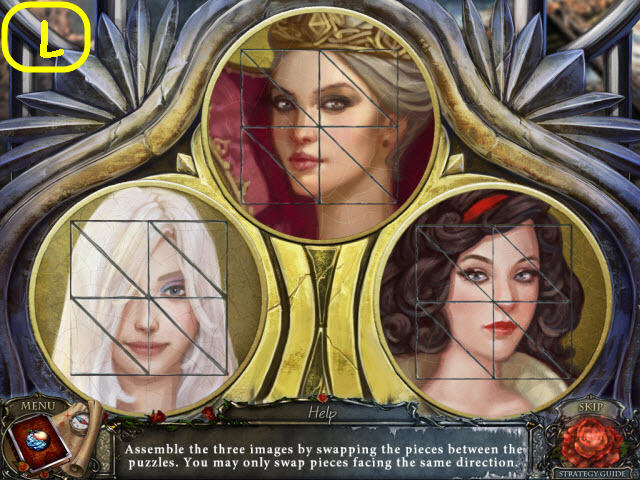
- Swap the pieces to complete the portraits.
- See screenshot for solution (L).
- Go forward through the gate.
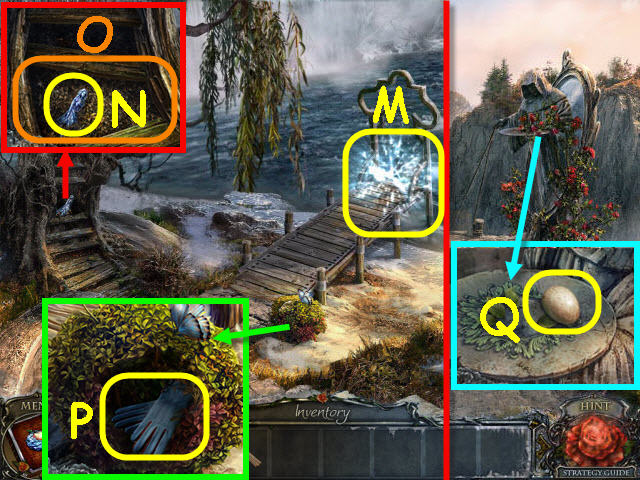
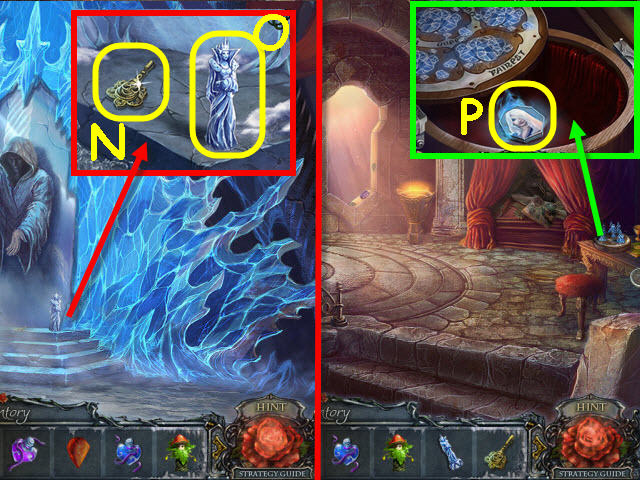
- Select the orb (M).
- Examine the tree trunk; take the FIGURE (N).
- Place the BOARD on the steps (O).
- Examine the bush, remove the twigs three times and examine the note. Take the GLOVES (P).
- Back out.
- Examine the statue on the right and use the GLOVES on the thorns twice: take the EGG (Q).
- Back out.
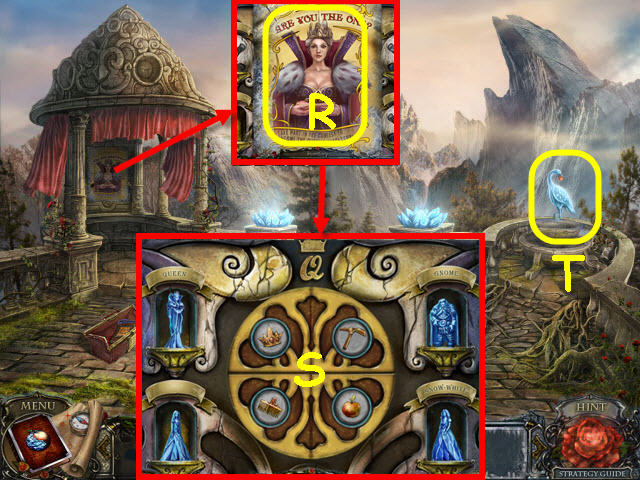
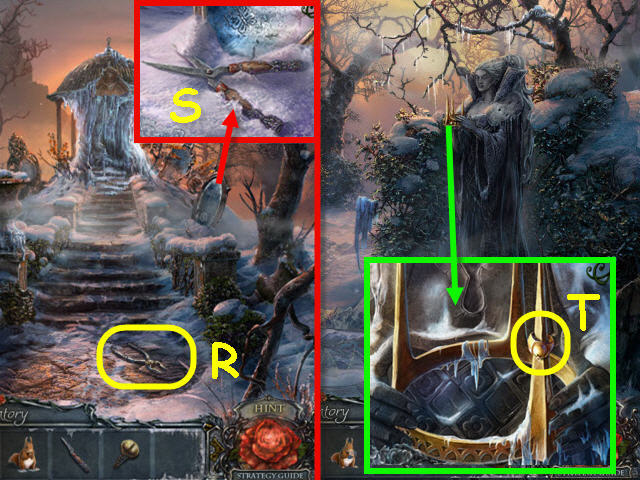
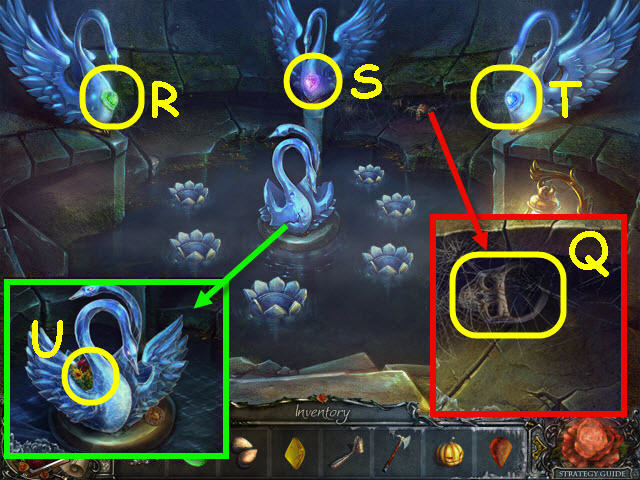
- Examine the gazebo; take the PAPER (R) and place the FIGURE in the lower left.
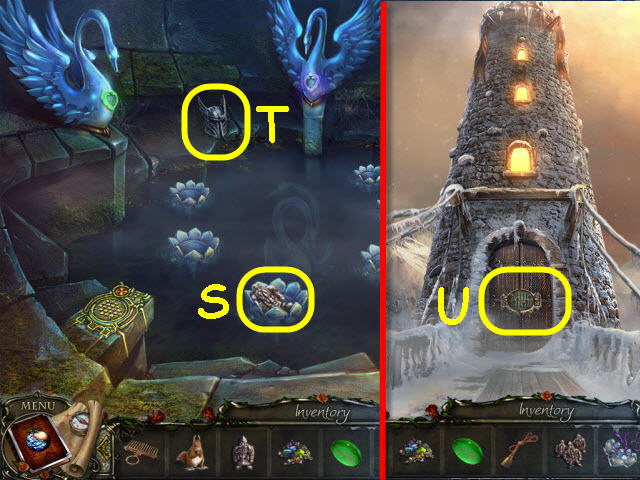
- Swap the items in the center to correspond with the figures (S). Take the CROWN.
- Examine the bird and place the CROWN on its head to trigger a puzzle (T).
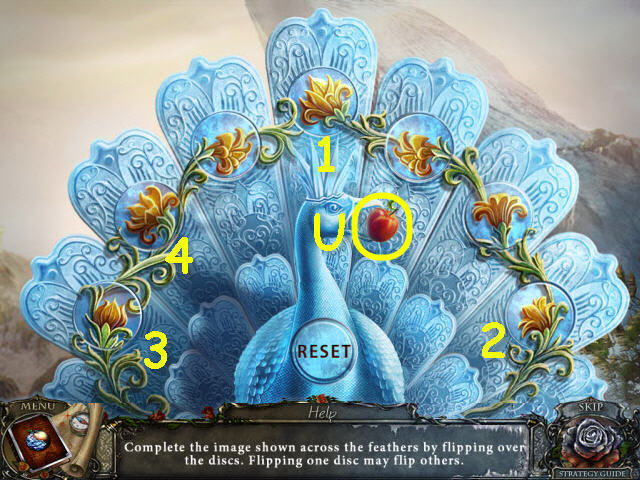
- Turn over all the disks.
- To solve the puzzle, select the disks in the order marked (1-4).
- Take the APPLE (U).
- Go forward and down the left stairs.
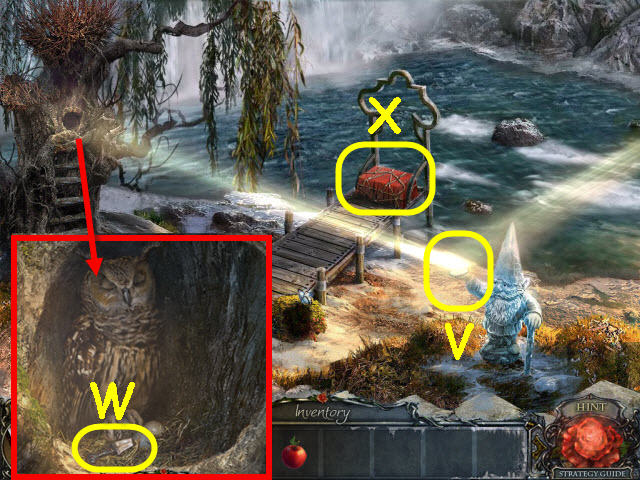
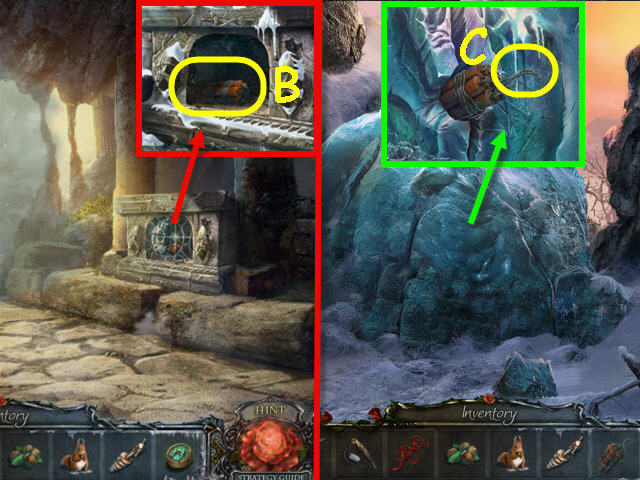
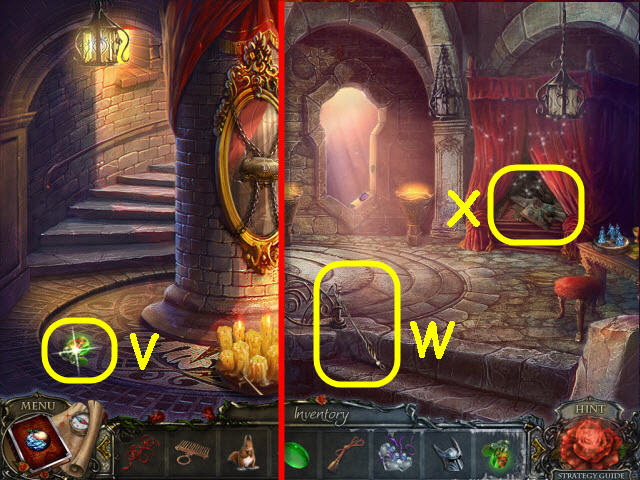
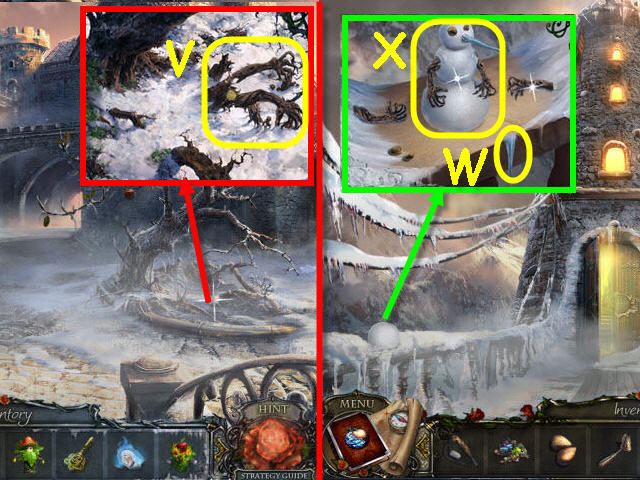
- Examine the gnome’s hand and place the MIRROR in it (V).
- Examine the hole in the tree and place the EGG by the owl’s foot; take the KNIFE (W).
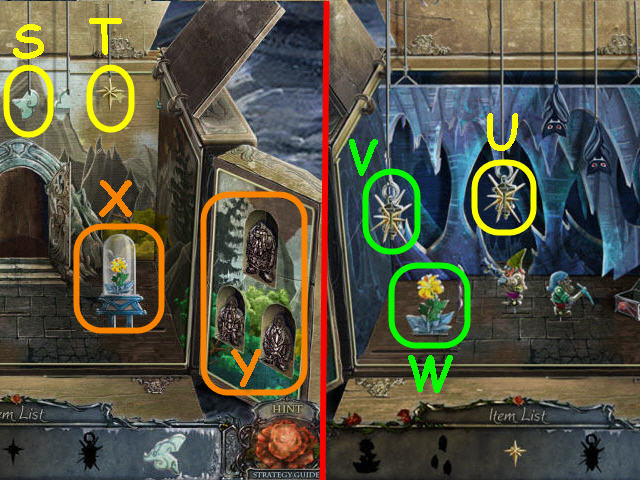
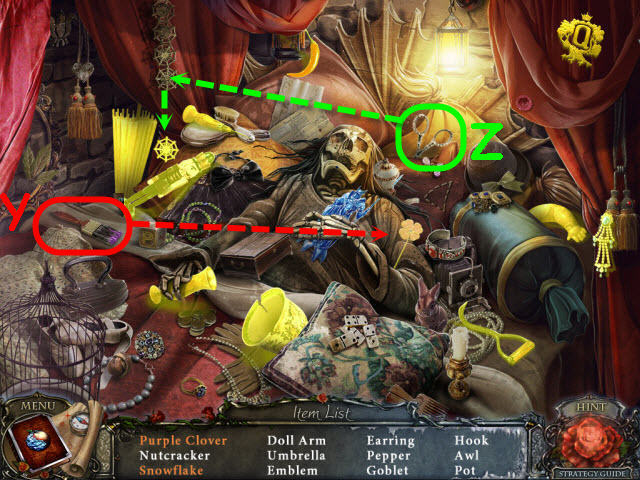
- Examine the package and use the KNIFE on the ropes; remove the cloth to access a HOP (X).
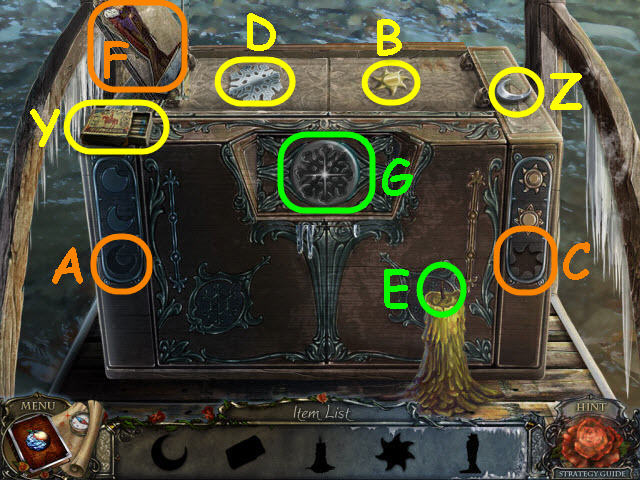
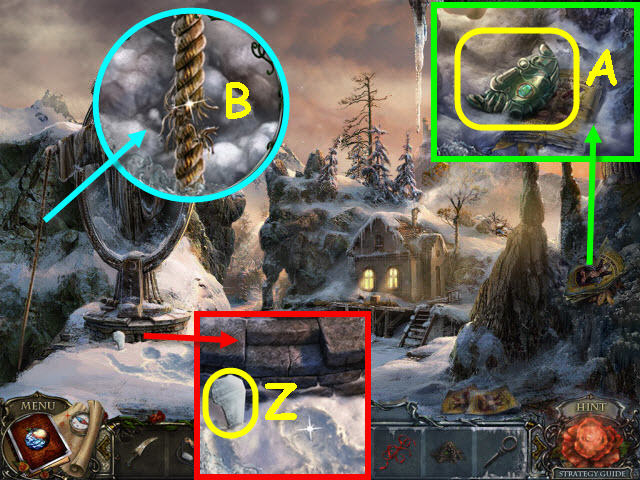
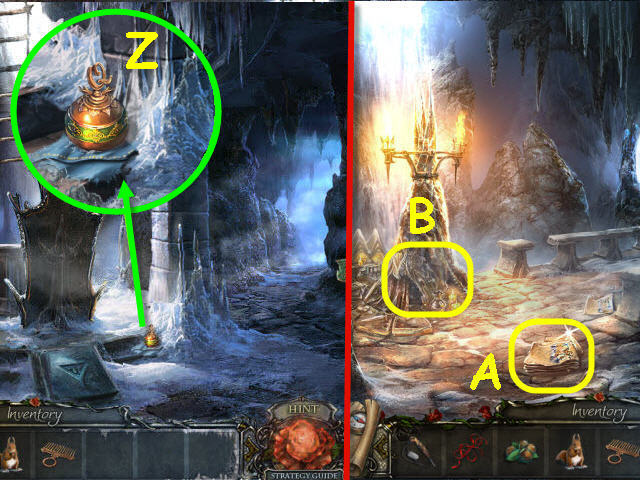
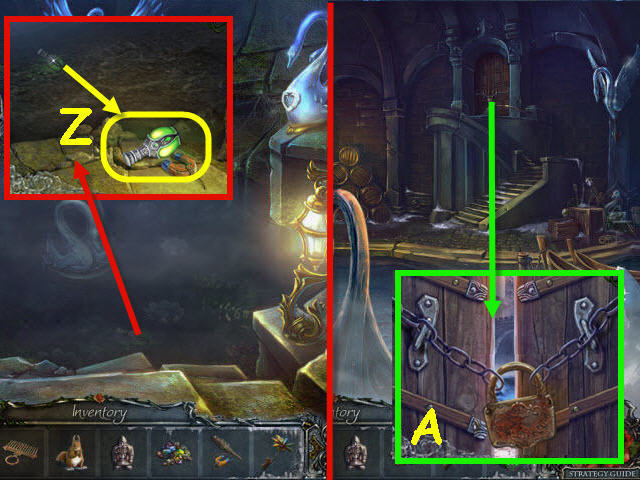
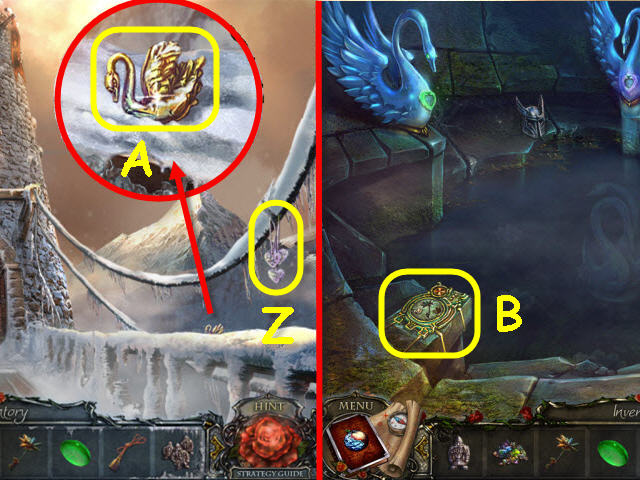
- Take the matchbox (Y) and the moon (Z).
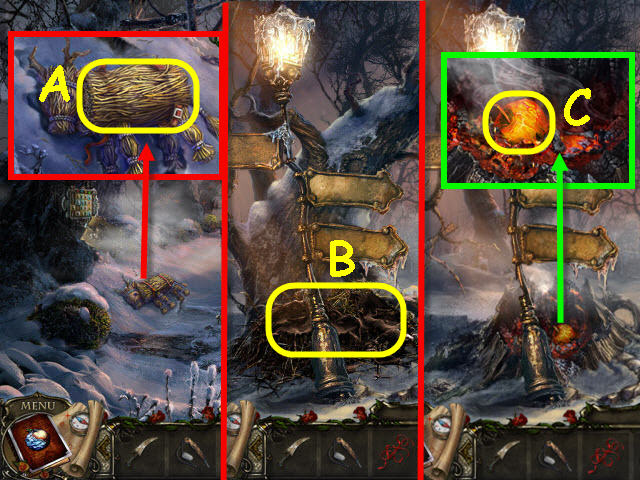
- Place the moon in the slot (A); take the sun (B).
- Place the sun in the slot (C); take the snowflake (D).
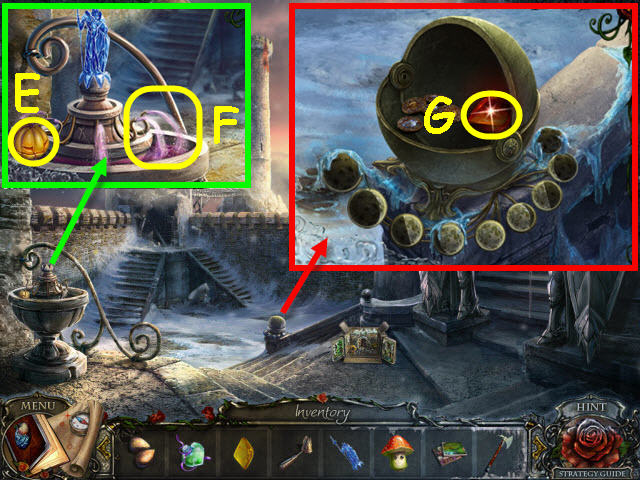
- Use the matchbox on the candlewick (E); take the lit candle.
- Take the queen (F).
- Use the lit candle on the ice; place the snowflake in the slot (G) that was behind the ice.
- See next screenshot for part two.
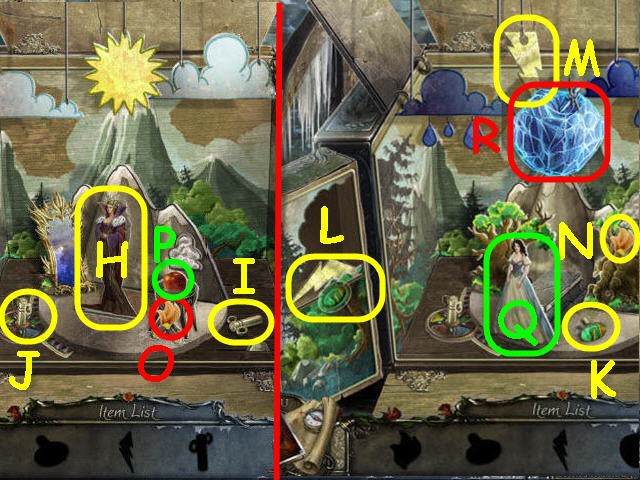
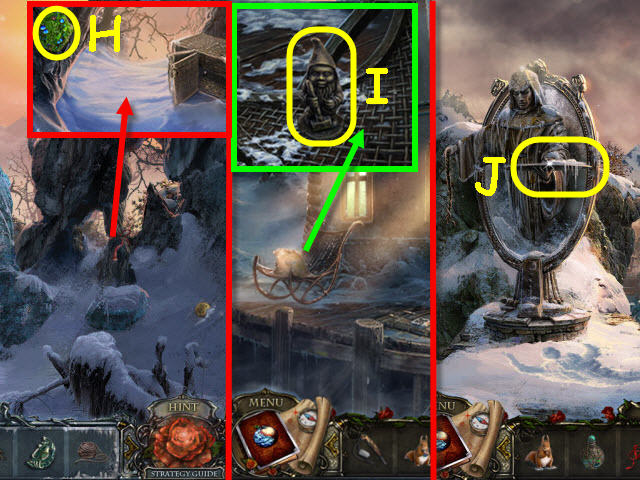
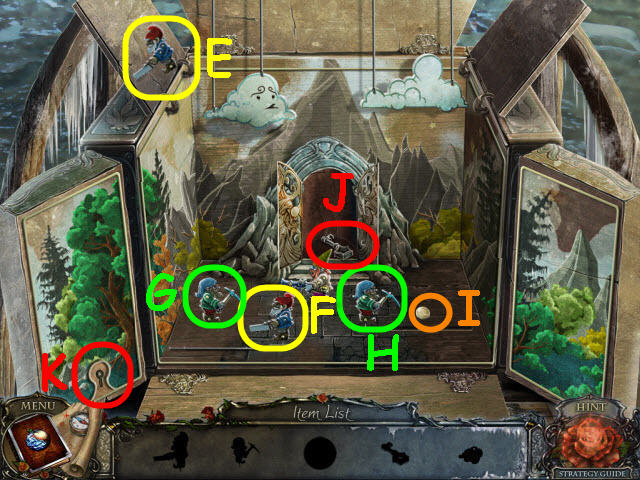
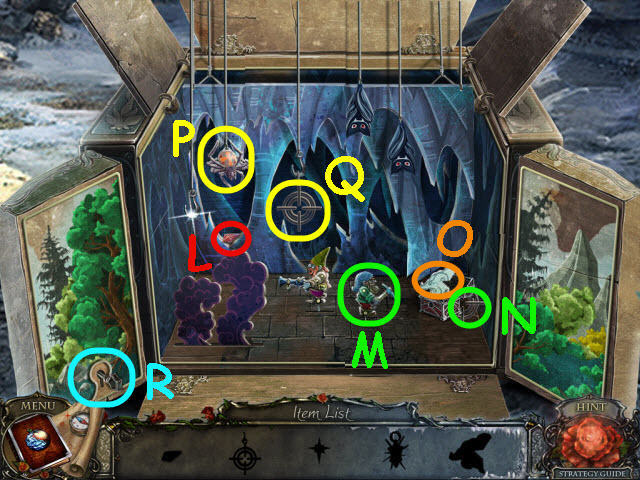
- Place the queen on the stand (H).
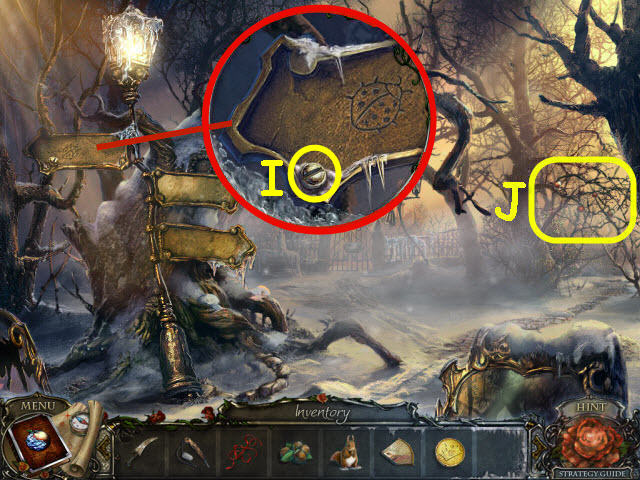
- Push down the small mountain; take the key (I) that was behind it.
- Place the key in the colored gear (J); turn the key.
- Take the knob (K).
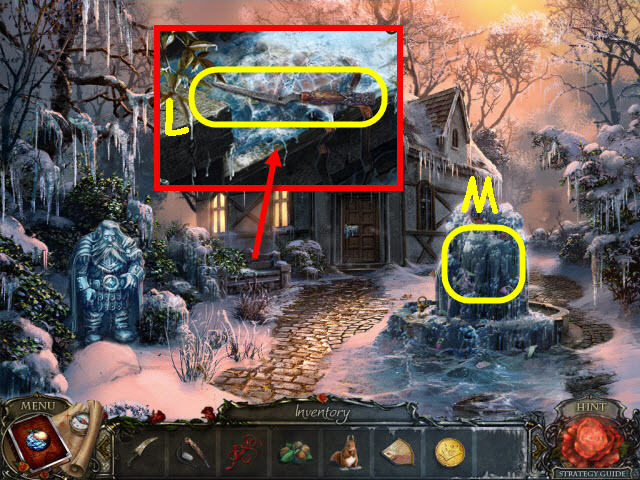
- Place the knob in the hole; take the lightning (L).
- Hang the lightning on the bolt (M).
- Take the fire (N).
- Turn the key.
- Placed the fire under the cauldron (O); take the apple (P).
- Turn the key.
- Give the apple to Snow White (Q); take the FROZEN APPLE (R).
- Back out.
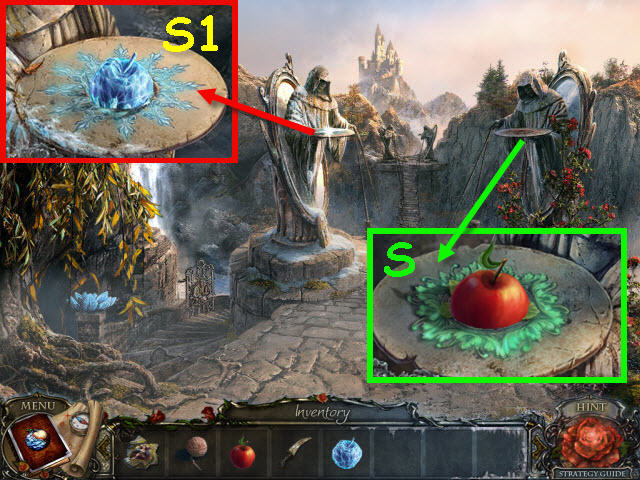
- Examine the left statue; take the note and place the FROZEN APPLE on the plate (S1).
- Examine the right statue and place the APPLE on the plate (S).
- Go forward across the bridge.
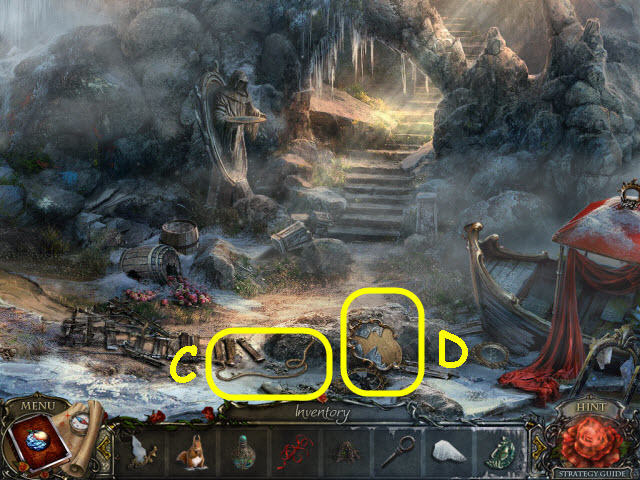
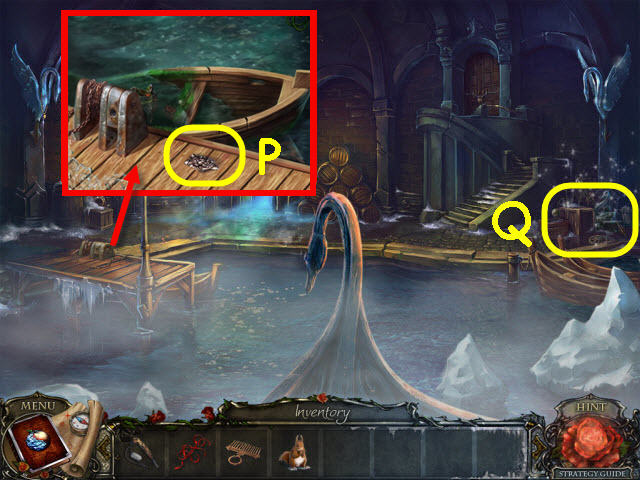
- Examine the boat to access a HOP.
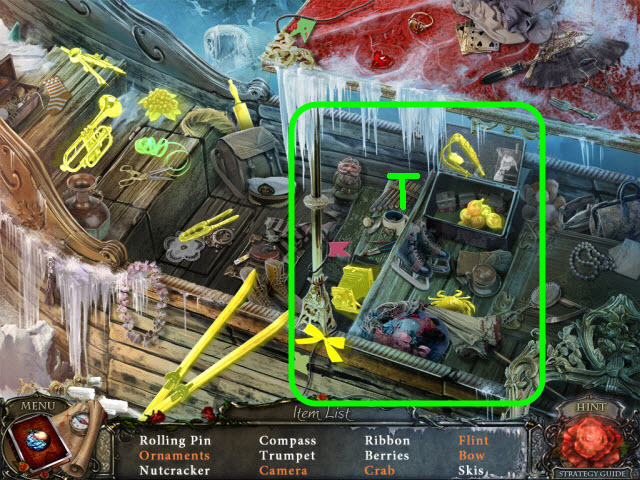
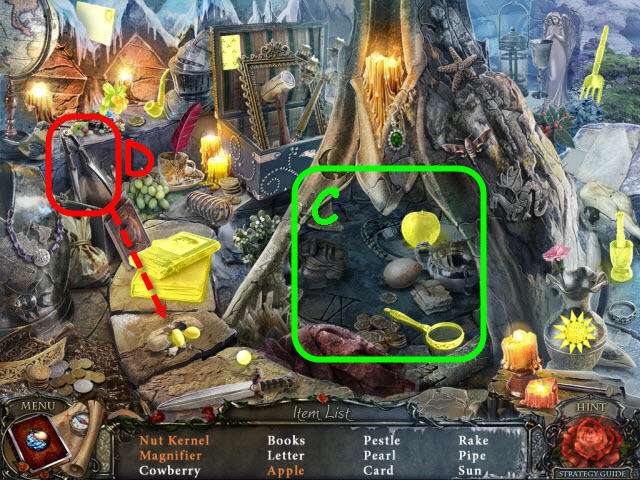
- Find the items listed.
- Move the cloth and open the case to find the objects listed in orange (T).
- You will earn a FLINT AND STEEL.
- Go up the stairs and left through the passage.
Chapter 2: Snow White
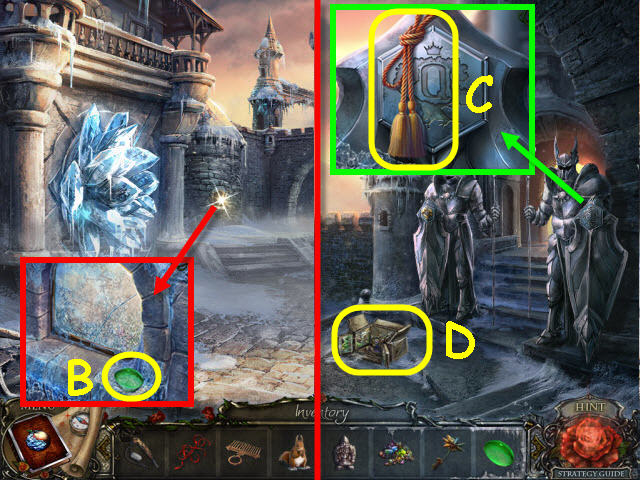
- Examine the puzzle part; take the PUZZLE PART (U).
- Back out.
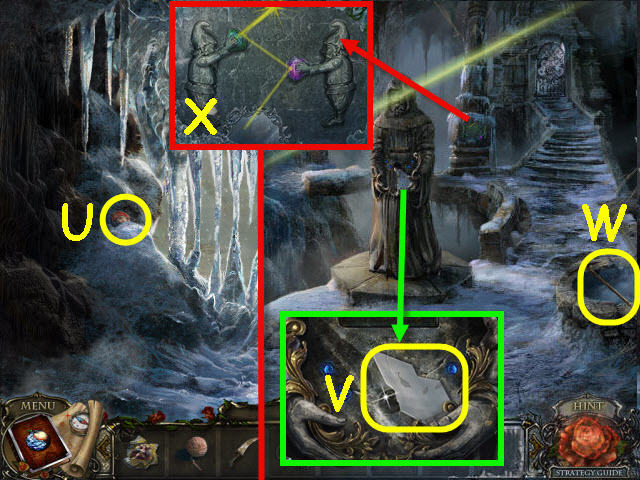
- Examine the statue; take the MIRROR SHARD (V).
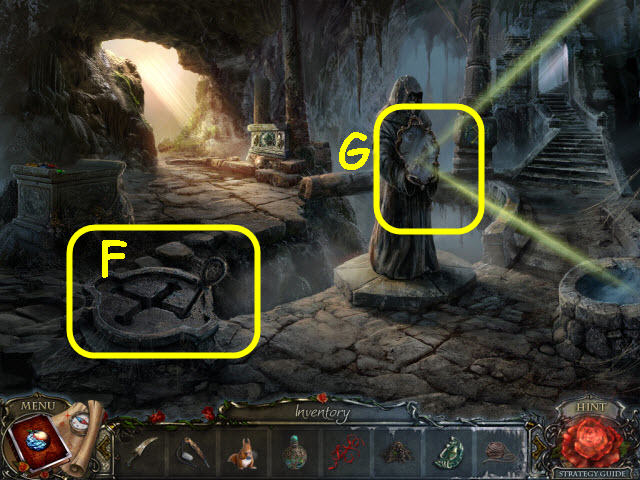
- Examine the well; take the PICK (W).
- Examine the pillar and position the gnome’s arms to complete the beam. Select the green gem and the red gem once each (X).
- Back out.
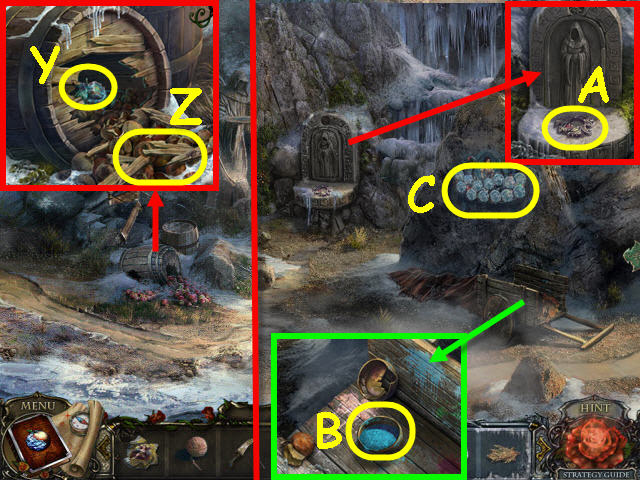
- Examine the barrel and use the PICK on it two times; take the FROZEN NUT (Y) and WOOD SCRAPS (Z).
- Go left.
- Examine the altar take the PUZZLE PART (A).
- Examine the cart; remove the leaves and read the note. Take the PAINT (B).
- Remove the cloth and examine the mural; place the round PUZZLE PART on it to trigger a puzzle (C).
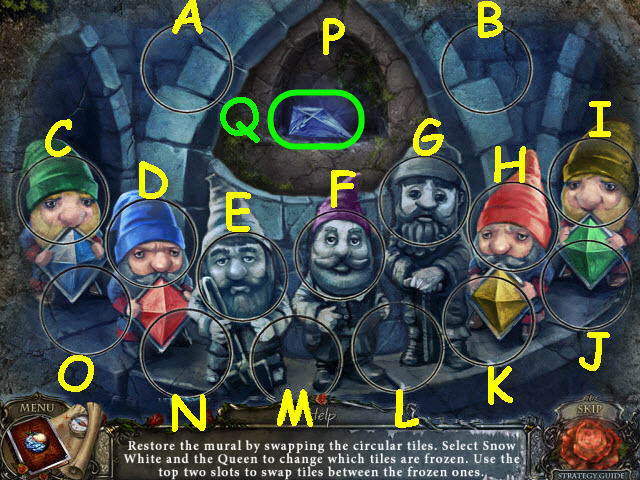
- Restore the mural.
- To solve the puzzle, select the following: D, M, P, A, G, A, N, B, E, B, I, P, L, O, L, B, A, J, P, A, K, B, N, C, B, P, A, D, B, F, P, B and C.
- Take the CRYSTAL (Q).
- Go right.
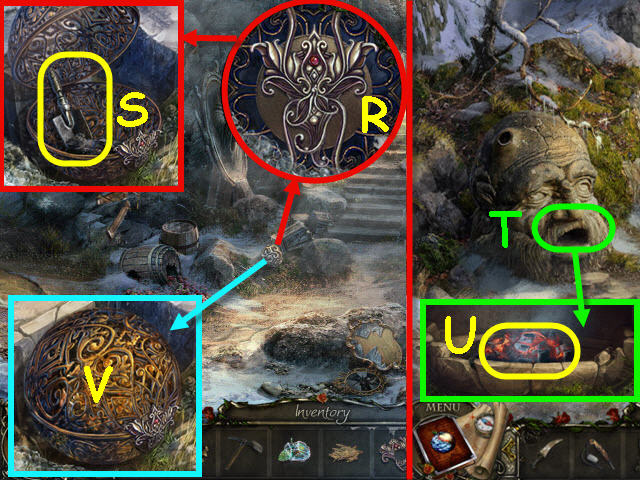
- Examine the sphere and then zoom in. Place the PUZZLE PART on it and rotate the outer ring and then the middle ring to match the screenshot (R).
- Take the SHOVEL (S).
- Go left.
- Use the PICK on the rocks and examine the mouth; use the WOOD SCRAPS, PAPER and FLINT AND STEEL on it (T).
- Use the SHOVEL on the coals to get HOT COALS (U).
- Go right.
- Examine the opened sphere and place the HOT COALS in it; close the lid and take the HOT SPHERE (V).
- Go up the stairs.
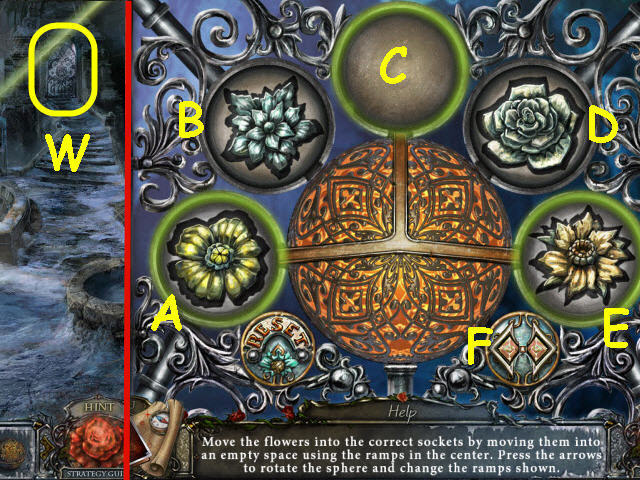
- Examine the door and place the HOT SPHERE in the center to trigger a puzzle (W).
- To solve the puzzle, select the following: A, F, D, F, B, F, E, F, and C.
- Go up through the newly-opened doorway.
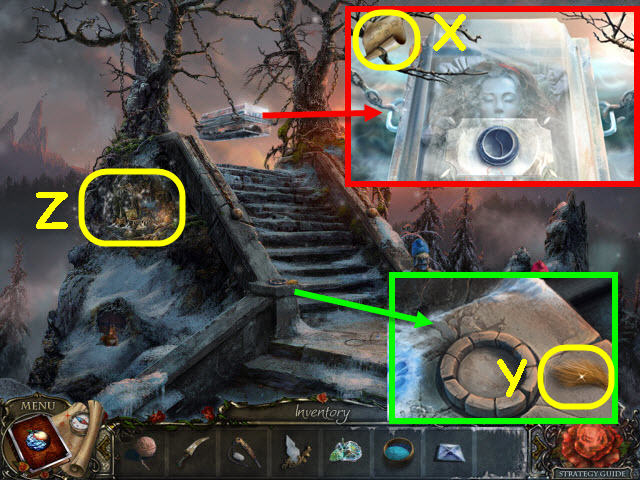
- Examine the coffin; zoom into and take the clue (X).
- Examine the empty pedestal; take the FUR (Y).
- Examine the area under the tree to access a HOP (Z).
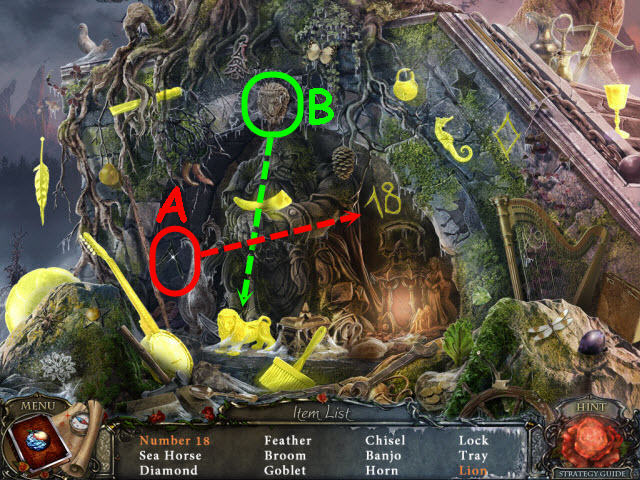
- Find the items listed.
- Place the 1 by the 8 to get a number 18 (A).
- Place the lion head on the lion body to get a lion (B).
- You will earn a CHISEL.
- Go to the Stone Oven.
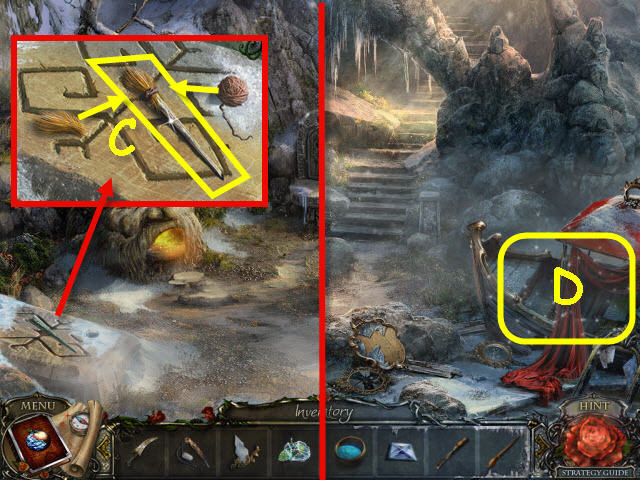
- Examine the etched stone and place the YARN and FUR on it. Place the fur on the stick and then tie with the yarn; take the BRUSH (C).
- Go right.
- Examine the boat to access a HOP (D).
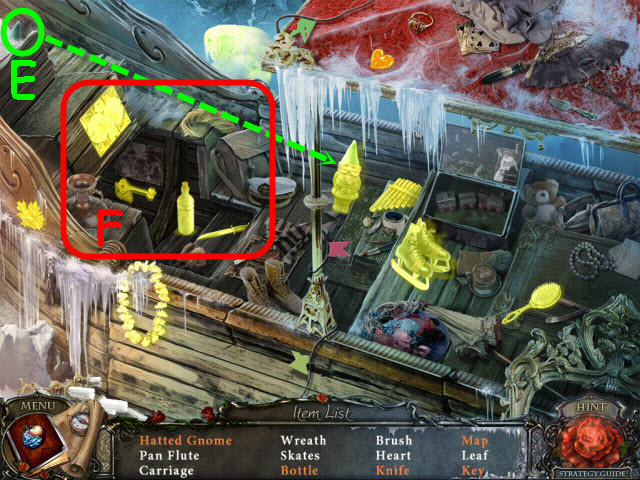
- Find the items listed.
- Place the hat on the gnome to get a hatted gnome (E).
- Open the compartment to get the remaining items in orange (F).
- You will earn a KEY.
- Go left.
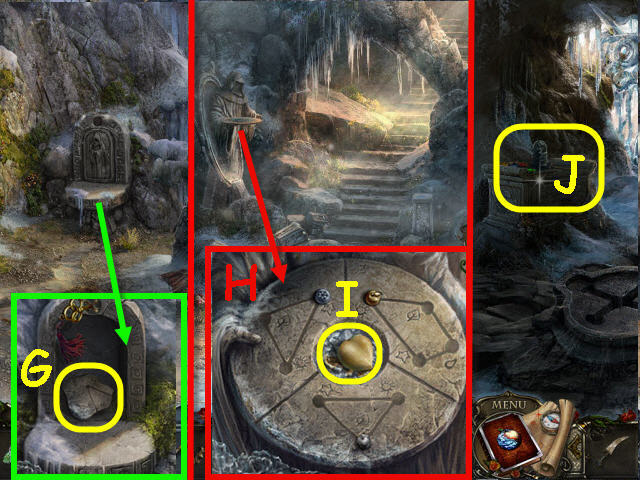
- Examine the altar and place the KEY in the slot; turn the key and take the STONE CHUNK (G).
- Go right.
- Examine the statue; place the STONE CHUNK in the recess. Slide the buttons to their matching symbols using the clues in your diary from the coffin. See screenshot for solution (H).
- Place the FROZEN NUT in the center; take the TASTY NUT (I).
- Go up the stairs.
- Examine the table and place the PAINT, BRUSH, CHISEL and CRYSTAL on it to trigger a puzzle (J).
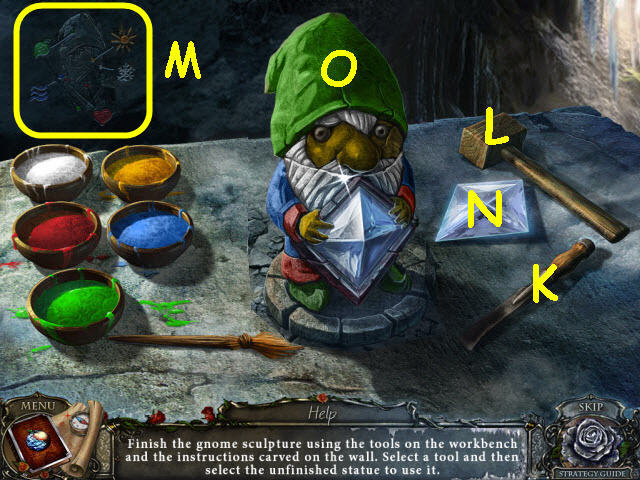
- Create a gnome.
- To solve the puzzle, use the chisel (K) on the stone, and then use the hammer (L) on the chisel 3 times.
- Use the brush on the paints and follow the diagram etched in the wall (M).
- Place the crystal (N) on the gnome; take the GNOME (O).
- Go up the stairs.
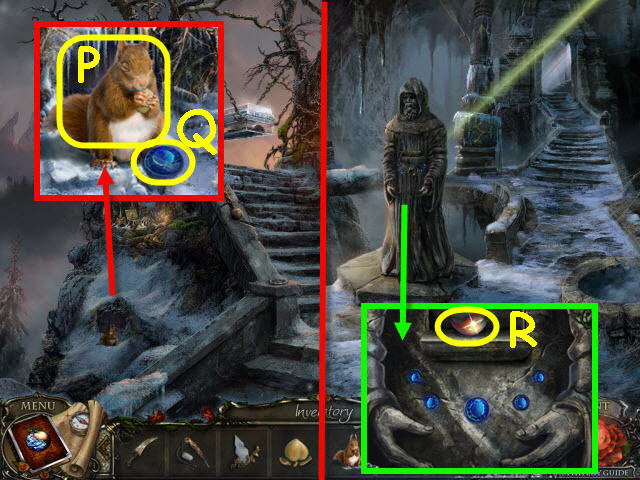
- Examine the squirrel; give the TASTY NUT to him and automatically get a SQUIRREL (P).
- Take the BLUE GEM (Q).
- Back out.
- Examine the statue and place the BLUE GEM on it; take the APPLE PART (R).
- Go up the stairs.
- Examine the tree roots to access a HOP.
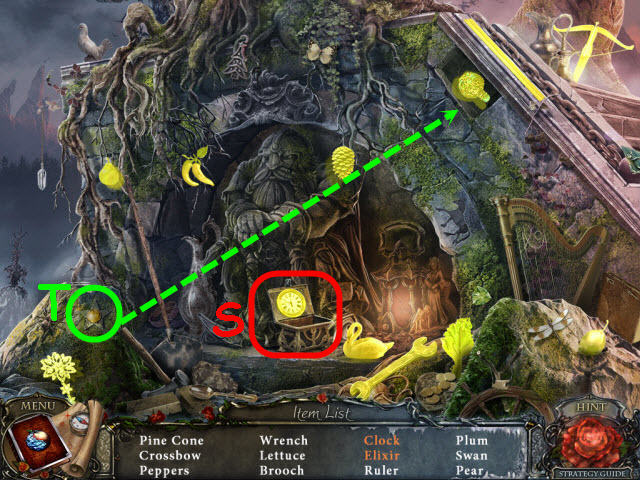
- Find the items listed.
- Open the box to get the clock (S).
- Place the star in the recess to get the elixir (T).
- You will earn an ELIXIR.

- Examine the empty pedestal and place the GNOME on it (U).
- Turn the gnomes to match the code on the landing between the gnomes.
- To solve the puzzle, select the following gnomes: Yellow hat x 2, green hat x 3 and blue hat x 2.
- Examine the landing; take the 2nd APPLE PART (V).
- Examine the coffin and zoom into the lock; place the 2 APPLE PARTS in it. Select the apple (W); you will receive CORSET LACE.
- Examine the doorway; take the DIRT (X).
- Open the doors; take the LEVER (Y).
- Back out and go up the left passage twice to the Cliffside.
Chapter 3: Forest
- Examine the statue base; take the 2nd MIRROR SHARD (Z).
- Examine the papers and move them; read the note and take the FACE PART (A).
- Examine the rope and use the KNIFE on it (B).
- Back out three times.
- Take the ROPE (C).
- Examine the mirror and place the 2 MIRROR SHARDS on it to trigger a puzzle (D).
- Assemble the mirror.
- See screenshot for solution (E).
- Take the MIRROR.
- Go up the stairs.
- Place the LEVER in the mechanism and move it (F).
- Examine the statue and place the MIRROR in its hand (G).
- Go up the left passage twice and then forward to the Narrow Pass.
- Examine the ribbon; take the MOSS (H).
- Back out; go forward to the Cottage.
- Examine the rocking chair; take the recipe and GNOME (I).
- Back out.
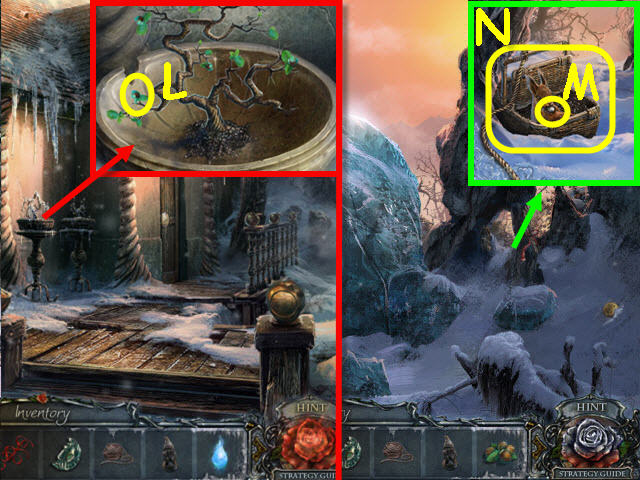
- Examine the platter and place the DIRT, MOSS and ELIXIR on it to trigger a puzzle (J).
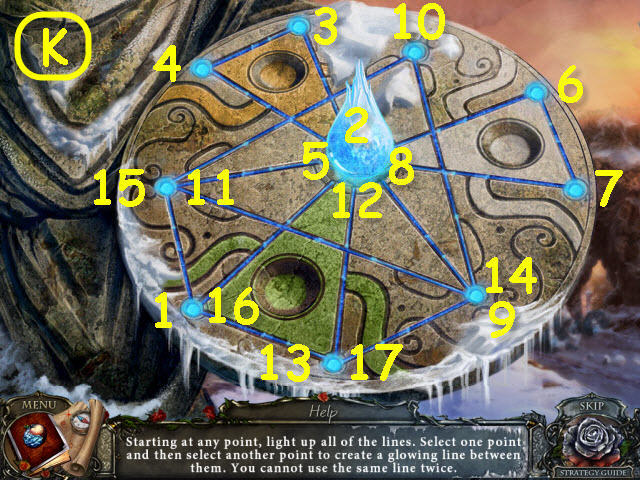
- Light up all the lines.
- To solve the puzzle, select the points in the order noted in the screenshot (K).
- Take the MAGIC SOIL.
- Go forward to the Cottage.
- Examine the planter and place the MAGIC SOIL in it; take the NUTS (L).
- Go to Narrow Pass.
- Examine the ribbon and place the NUTS and then the SQUIRREL in the basket; take the BALL (M).
- Use the ROPE on the basket; take the SQUIRREL IN A BASKET (N).
- Back out three times.
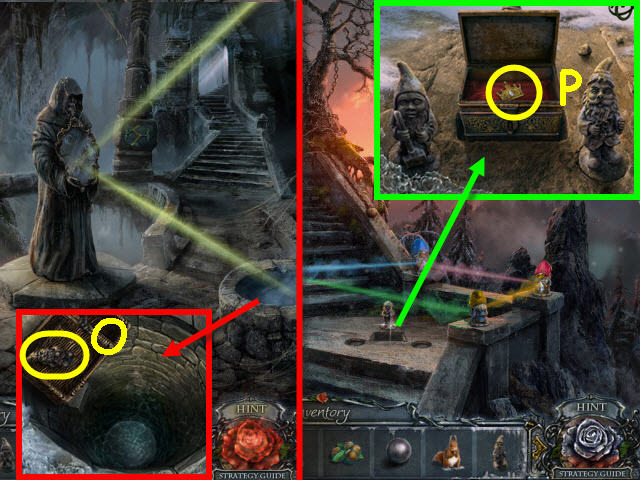
- Examine the well and use the SQUIRREL IN A BASKET on the gnome; take the 2nd GNOME (O).
- You will automatically receive a SQUIRREL.
- Go up the stairs on the right.
- Examine the landing and place the 2 GNOMES in the holes. Open the chest; take the CROWN (P).
- Go to the Cottage in the Forest.
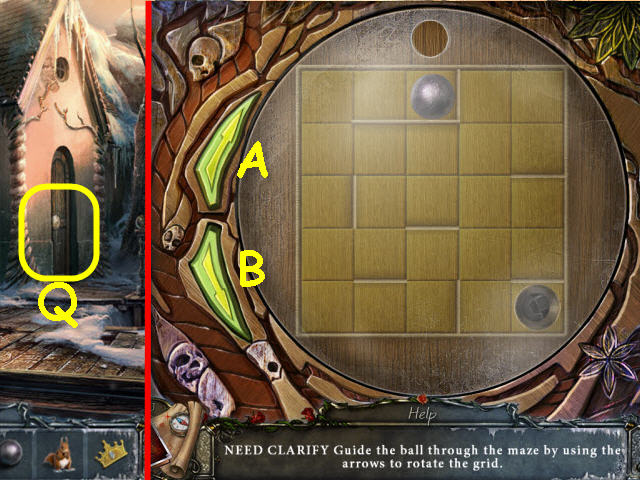
- Examine the door and place the BALL in the hole to trigger a puzzle (Q).
- Guide the ball through the maze.
- To solve the puzzle, select the following arrows: B, Ax3, B, Ax2, Bx2 and Ax4.
- Enter the Inside Cottage.
- Examine the dresser to access a HOP.
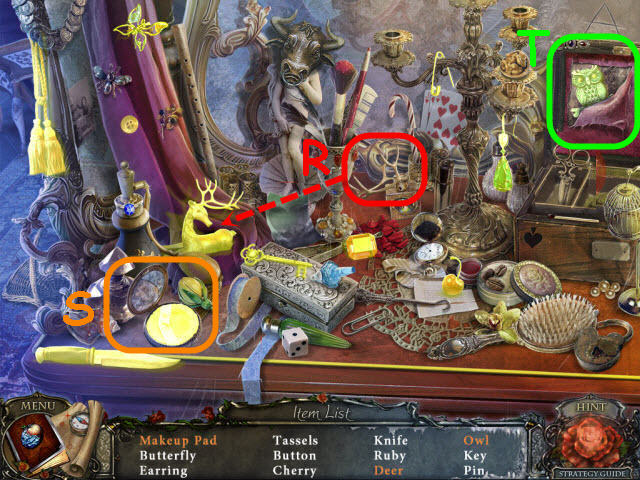
- Find the items listed.
- Place the antlers on the deer to get a deer (R).
- Open the compact to get the makeup pad (S).
- Rip the cloth to get the owl (T).
- You will earn a BUTTERFLY.
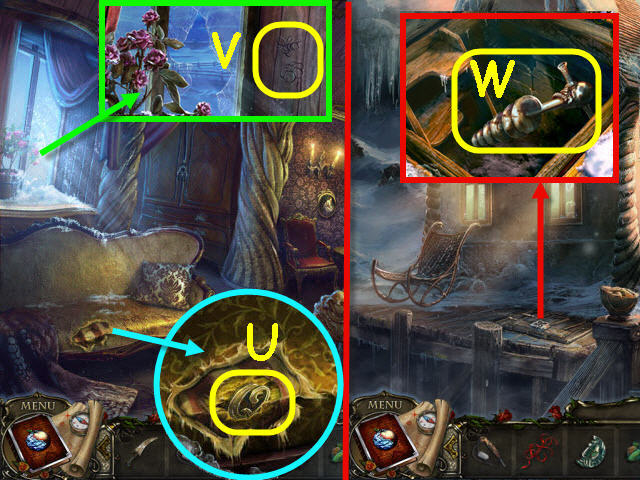
- Examine the sofa and use the KNIFE on the rip; take the Q (U).
- Examine the window; note the code (V).
- Back out to Cottage.
- Examine the hatch and place the BUTTERFLY on the latch; select the latch and take the DRILL (W).
- Go to Narrow Pass.
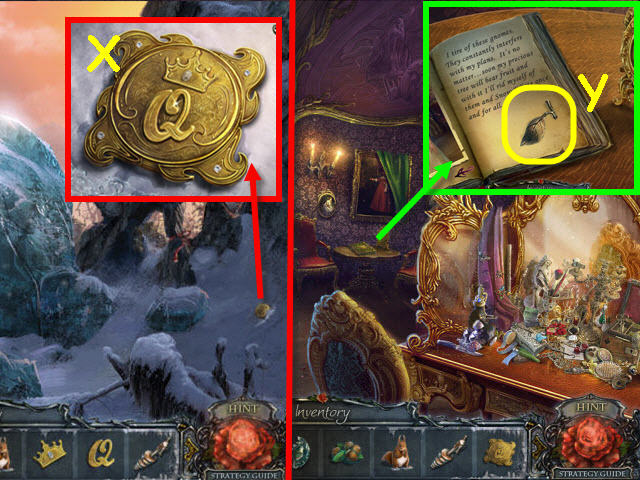
- Examine the locket and place the Q and CROWN on it; take the LOCKET (X).
- Go to the Inside Cottage.
- Examine the table and place the LOCKET on the book; turn the page and take the GOLDEN LEAF (Y).
- Back out to Cottage.
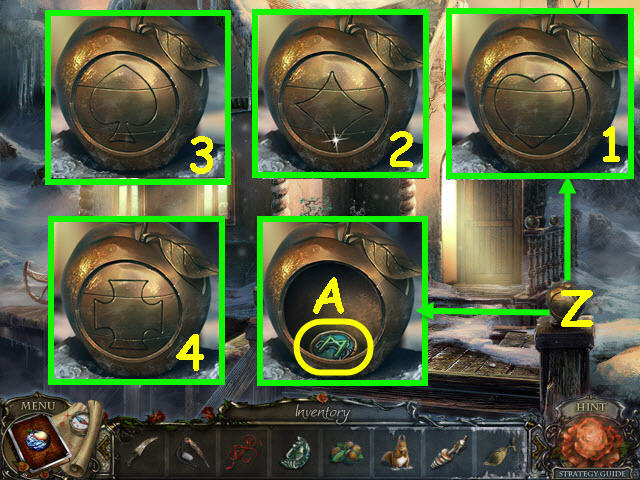
- Examine the right post and place the GOLDEN LEAF in the recess (Z).
- Rotate the apple sections to complete the symbols. Complete any 3 of the four shapes (1-4).
- Take the RUNE (A).
- Back out twice.
- Examine the stone container and place the RUNE and FACE PART on it; take the DYNAMITE (B).
- Go forward twice to the Narrow Pass.
- Examine the ice and use the DRILL on it. Place the DYNAMITE in the hole and use the FLINT AND STEEL on the end of the wick (C).
- Go forward.
Chapter 4: Gnome
- Examine the hole and place the NUTS and SQUIRREL in it; take the PUZZLE PART (D).
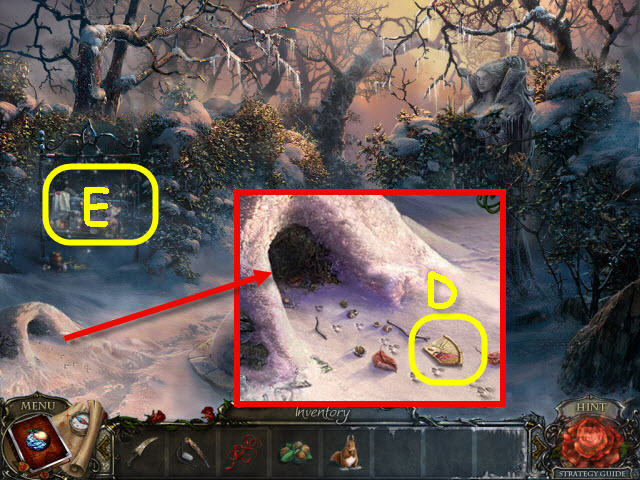
- Examine the swing to access a HOP (E).
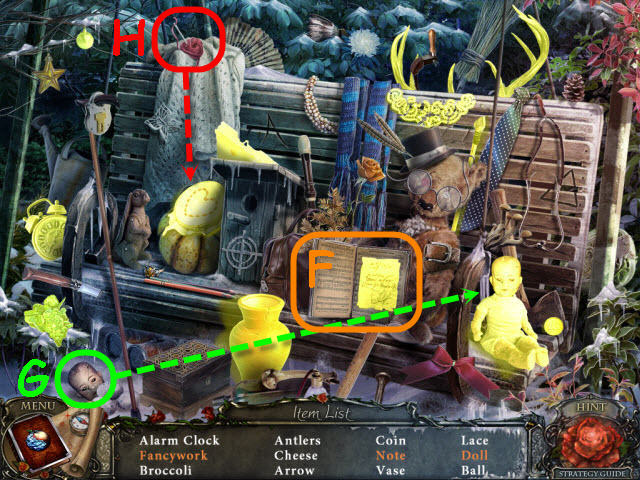
- Find the items listed.
- Open the book to get the note (F).
- Place the head on the body to get the doll (G).
- Use the needle and thread on the needlework hoop to get fancywork (H).
- You will earn a COIN.
- Go forward.
- Examine the sign and get a clue; use the COIN on the screw and take the SCREW (I).
- Examine the branches to access a HOP (J).

- Find all 23 apples.
- You can check the remaining apple count on the lower branch (K).
- Go up the path on the right.
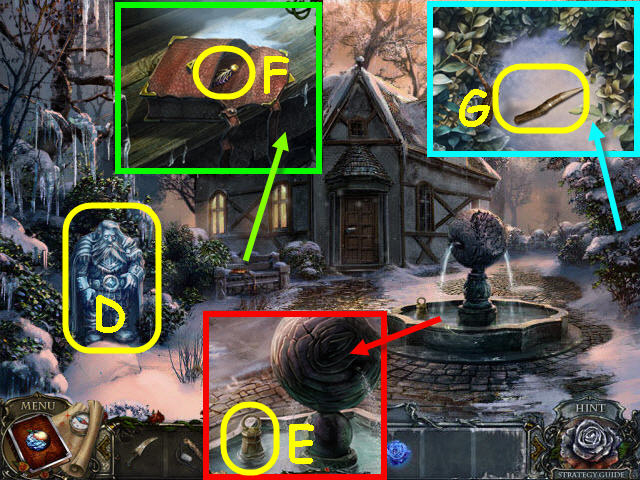
- Examine the bench and move the branch; take the HALF OF PRUNERS (L).
- Examine the fountain to trigger a HOP (M).
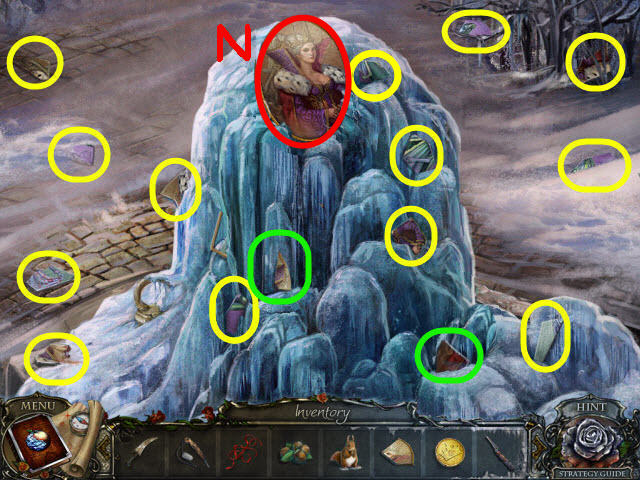
- Find the picture pieces.
- The pieces in green you will not find until the portraits covering them are completed.
- Place the PUZZLE PART on the top portrait; take the QUEENLY PORTRAIT (N).
- Go to Inside Cottage.

- Examine the table and place the QUEENLY PORTRAIT in the frame; take the SNAKE MEDALLION (O).
- Go to the Apple Tree.
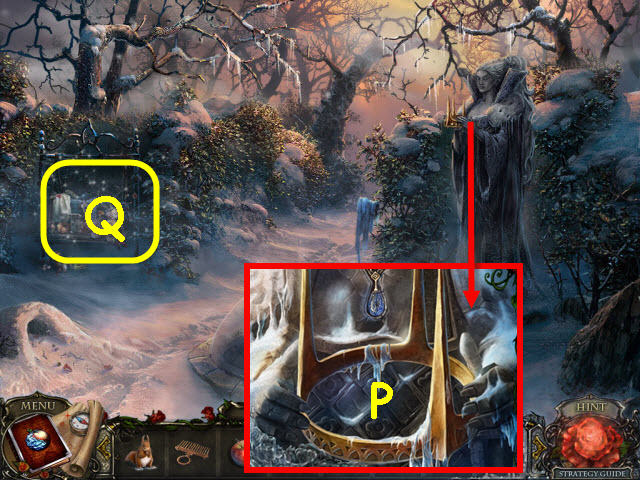
- Examine the gate and place the SNAKE MEDALLION in the lock to trigger a puzzle (P).
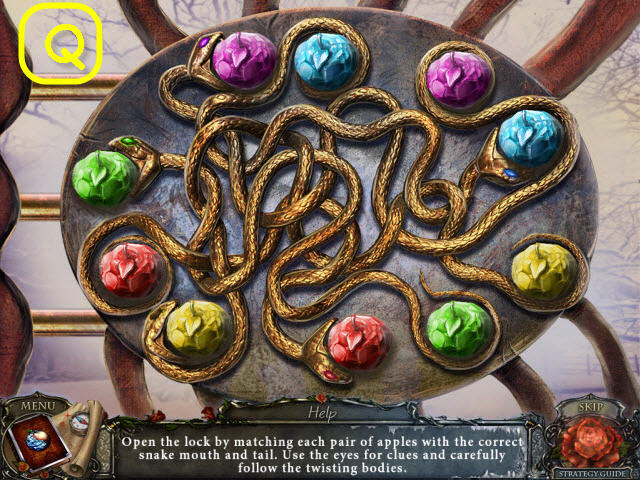
- Place the colored apples on the snakes with the matching eye colors.
- See screenshot for solution (Q).
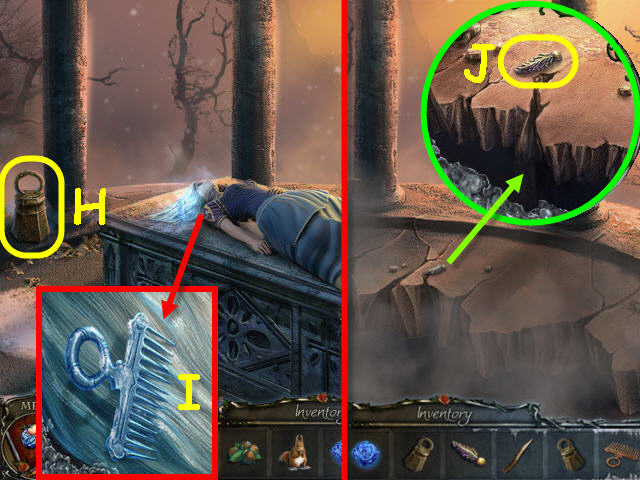
- Go forward.
- Take the TONGS (R).
- Examine the mirror and get a clue. Place the HALF OF PRUNERS and SCREW on the half of pruners; take the PRUNERS (S).
- Back out twice.
- Use the PRUNERS on the brambles; examine the crown and take the RING (T).
- Go to the Inside Cottage.

- Examine the window and use the PRUNERS on the roses; take the ICE ROSE (U).
- Examine the armoire and use the RING on it; turn the ring. Read the note and take the OILCAN (V).
- Examine the dresser to access a HOP (W).
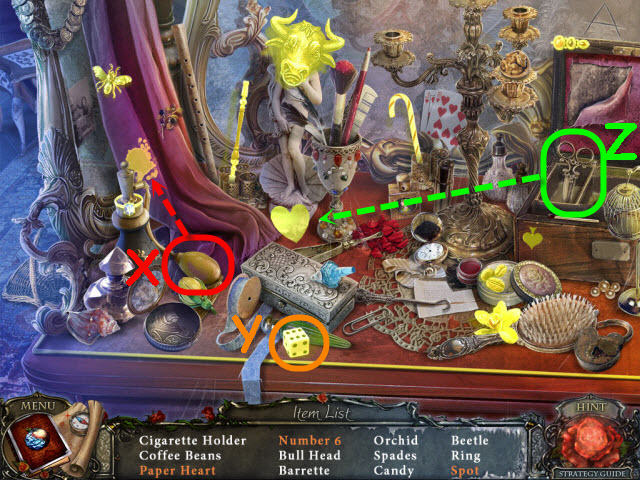
- Find the items listed.
- Squeeze the atomizer to get a spot (X).
- Roll the dice until you get a number 6 (Y).
- Use the scissors on the paper to get a paper heart (Z).
- You will earn a BULL HEAD.
- Go to Near Altar.
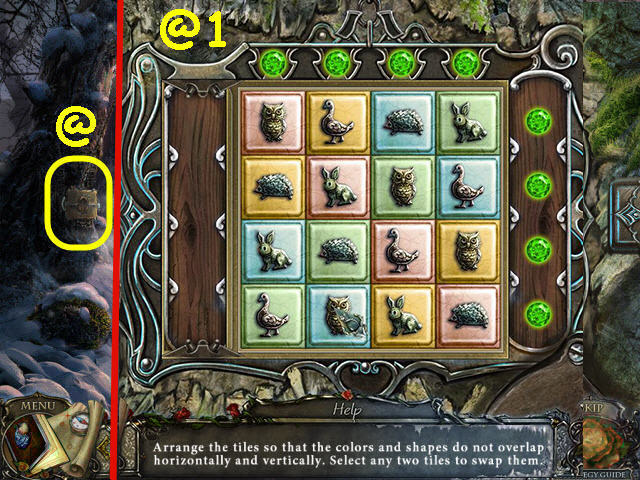
- Examine the tree trunk and place the BULL HEAD on the lock to trigger a puzzle (@).
- Arrange the tiles per the instructions.
- See screenshot for solution (@1).
- Examine the straw animal and use the KNIFE on the two straps; take the HAY (A).
- Back out.
- Place the HAY on the tree base and use the OILCAN on it. Use the FLINT AND STEEL on the oiled hay (B).
- Examine the burnt tree; use the TONGS to get APPLE ASHES (C).
- Go up the path on the right.
- Give the APPLE ASHES to the gnome (D).
- Examine the fountain; take the WEIGHT (E).
- Examine the bench and open the purse; read the note and take the LEAF (F).
- Examine the bush and move the leaves. Use the KNIFE on the branch; take the PEG (G).
- Go to Near Altar; go forward.
- Take the 2nd WEIGHT (H).
- Examine Elizabeth’s hair; take the CURSED COMB (I).
- Speak to Elizabeth.
- Examine the ledge; take the 2nd LEAF (J).
- Go to the Apple Tree.
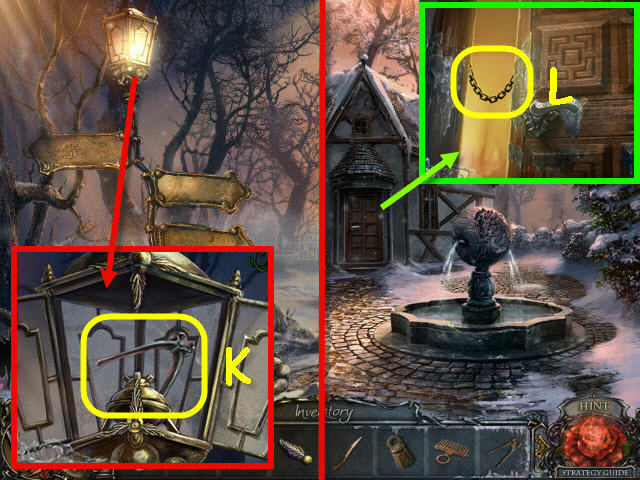
- Examine the lantern and place the 2 LEAVES on the bottom latch; turn the leaves and take the WIRE CUTTERS (K).
- Go to the Gnome Garden.
- Examine the door and pull the handle; use the WIRE CUTTERS on the chain (L).
- Go forward into the Workshop.
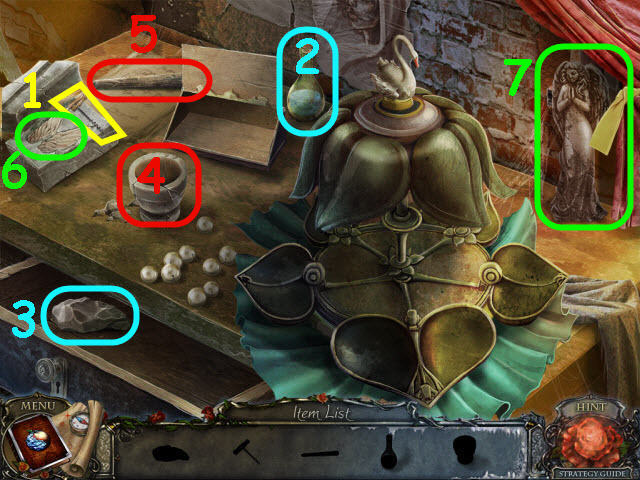
- Examine the table to access a HOP.
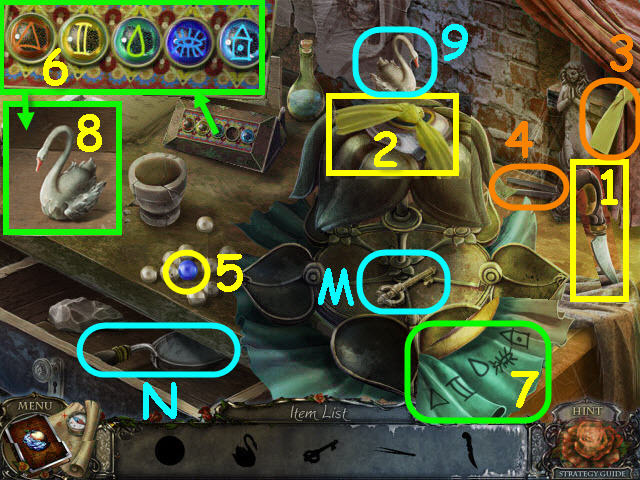
- Take the knife (1) and use it on the ribbon. Take the ribbon (2) and use it to tie back the curtain (3).
- Take the tweezers (4).
- Move the pearls; take the part of lock (5).
- Examine the box and place the part of lock on it. Select the correct symbols (6) per the clues (7); take the swan (8).
- Place the swan on the device (9); take the key (M).
- Examine the drawer lock and use the tweezers on the keyhole. Place the key in the keyhole; take the trowel (N).
- You will earn a TROWEL.
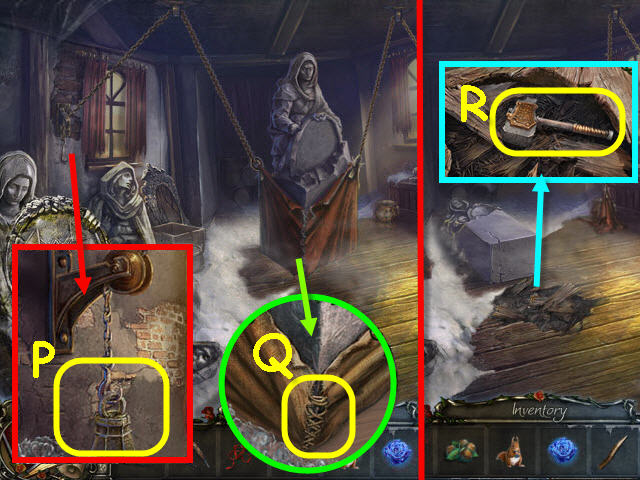
- Examine the hook and place a WEIGHT on it; when it stops going down place the 2nd WEIGHT on it (P).
- Examine the sling and use the KNIFE on the stitching (Q).
- Examine the broken floor and move the boards; take the HAMMER (R).
- Go to Near Altar.
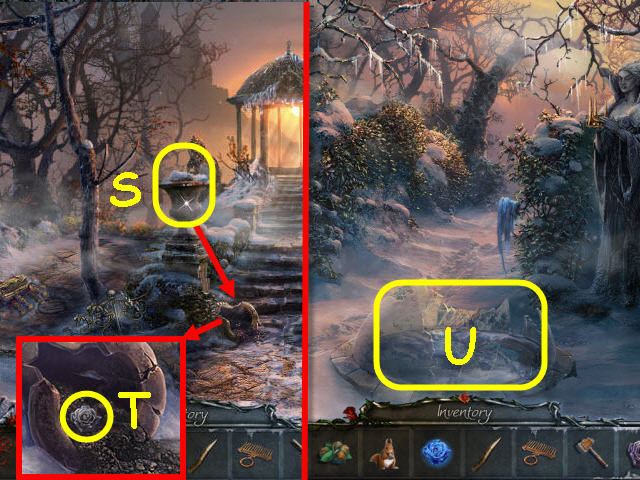
- Knock over the vase (S).
- Examine the broken vase and use the TROWEL on the dirt twice; take the METAL ROSE (T).
- Go to the Forest Entrance.
- Examine the broken dome and place the ICE ROSE and METAL ROSE in the recesses to trigger a puzzle (U).
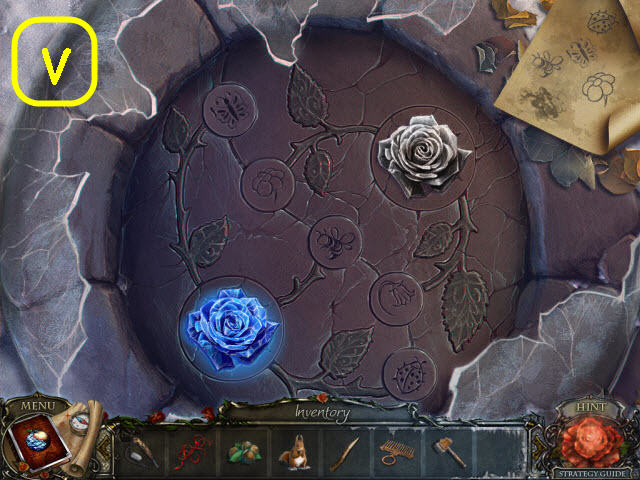
- Select the correct disks per the collected clues.
- See screenshot for solution (V).
- Take the ROPE LADDER.
- Go to the Inside Workshop.
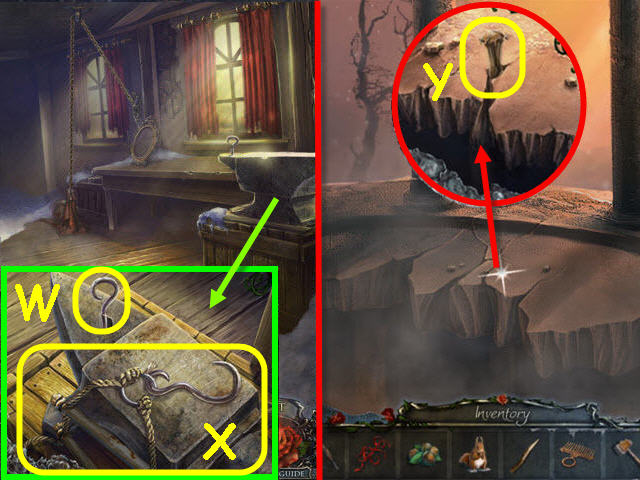
- Examine the anvil and place the ROPE LADDER on it; use the HAMMER on the hook (W).
- Place the hook on the ladder; take the ROPE LADDER WITH HOOK (X).
- Go to the Altar.
- Examine the ledge and place the PEG in the crevice; use the HAMMER and then the ROPE LADDER WITH HOOK on the PEG (Y).
- Go down the ladder.
Chapter 5: The Girls
- Examine the bottle; take the POWER (Z).
- Go right.
- Take the BOOK PAGES (A).
- Examine the base of the stalagmite to access a HOP (B).
- Find the items listed.
- Move the curtain to get some items in orange (C).
- Use the nutcracker on the nut to get a nut kernel (D).
- You will earn a SUN.
- Go forward through the opening.
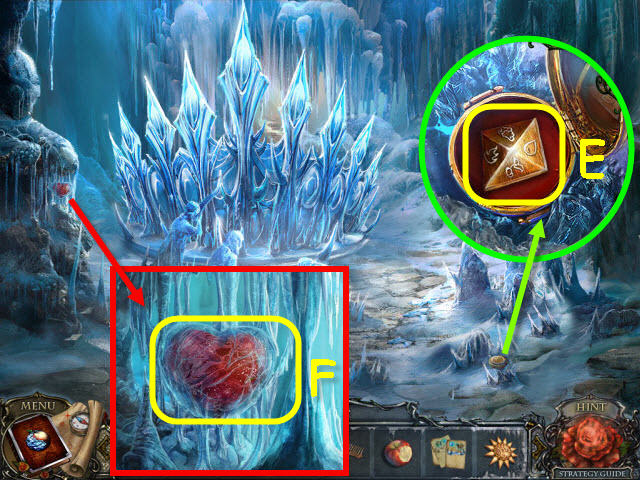
- Examine the locket and open it; take the RUNE STONE (E).
- Examine the heart; take the FROZEN HEART (F).
- Go to the Inside Workshop in the Forest.
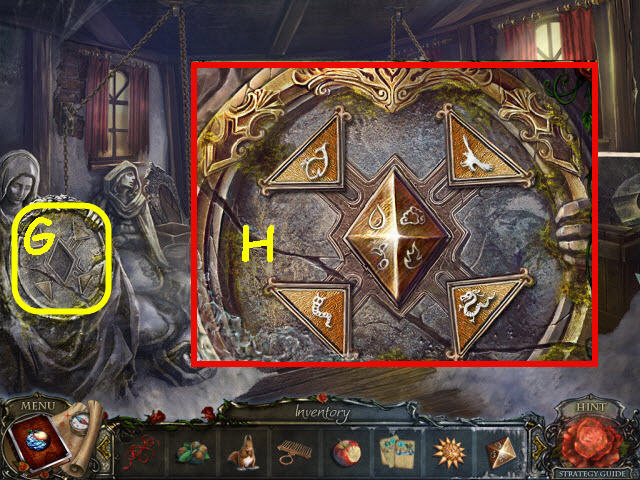
- Examine the statue and place the RUNE STONE in the center to trigger a puzzle (G).
- Select the outer symbols to correspond with the symbols on the center rune.
- See screenshot for solution (H).
- Take the ROUND HANDLE.
- Examine the mirror on the table to access a HOP.
- Open the mold and take the corkscrew (1).
- Use the corkscrew on the bottle cork; take the bottle (2).
- Take the gypsum (3) and place it in the bowl (4).
- Take the pestle (5) and use on the bowl.
- Use the bottle in the bowl; take the gypsum solution (4).
- Use the gypsum solution on the mold; take the wings (6).
- Place the wings on the statue; take the angel (7).
- You will earn an ANGEL.
- Go to the Mirror Chamber at the Lake.
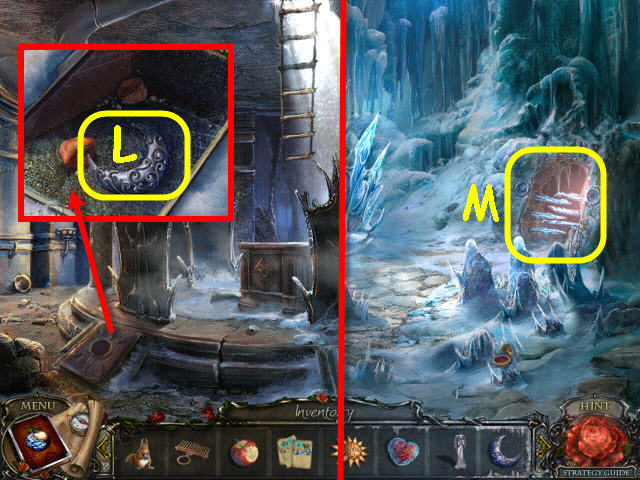
- Examine the compartment and place the ROUND HANDLE in the center. Turn the handle; take the MOON (L).
- Go to the Queen’s Statuary.
- Examine the gate and place the MOON and the SUN in their matching slots to trigger a puzzle (M).

- Open all the spikes.
- To solve the puzzle, select the following spikes: Gx2, Ax2, Bx2, Ex2, Cx2 and Fx2.
- Go right through the newly opened passage.

- Examine the ice; take the LOCKET (N).
- Examine the steps; take the note and CRANE HANDLE (O).
- Go to the Forest Entrance in the Forest.
- Examine the statue and place the LOCKET on it; take the CROWN (P).
- Examine the swing to access a HOP (Q).
- Find the items listed.
- Use the knife on the 1 to get a number 12 (R).
- Open the box to get the coral (S).
- You will earn a HACKSAW PART.
- Go to Near Altar.
- Examine the fence and use the HACKSAW PART on the blade to get a HACKSAW (T).
- Go to the Stone Bridge at the Lake.
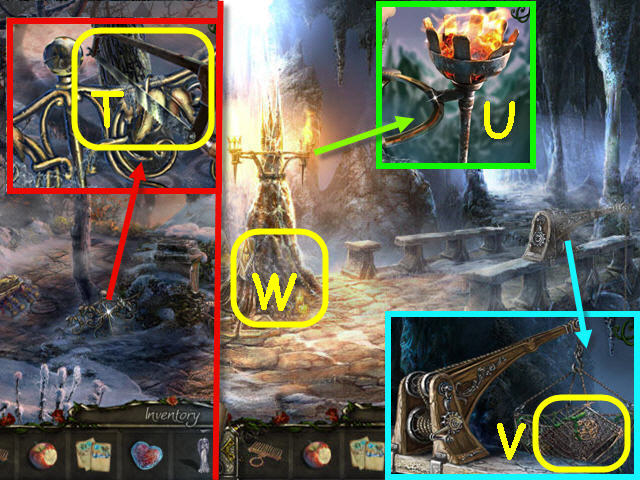
- Examine the torch and use the HACKSAW on the bracket to get a TORCH (U).
- Examine the crane and place the CRANE HANDLE on it; turn the handle and take the BOOK COVER (V).
- Examine the base of the stalagmite to access a HOP (W).
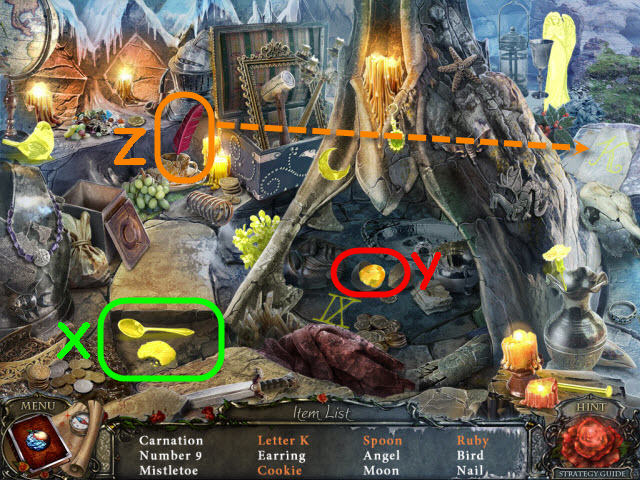
- Find the items listed.
- Move the stone slab to get the spoon and cookie (X).
- Crack the egg to get a ruby (Y).
- Use the quill on the writing to get a letter K (Z).
- You will earn a 2nd ANGEL.
- Back out.

- Examine the brazier and use the TORCH on it. Place the FROZEN HEART on it; take the HEART (A).
- Examine the stone cabinet and place the 2 ANGELS in the recesses; take the CROWN PART (B).
- Go to the Frozen Pyramid.
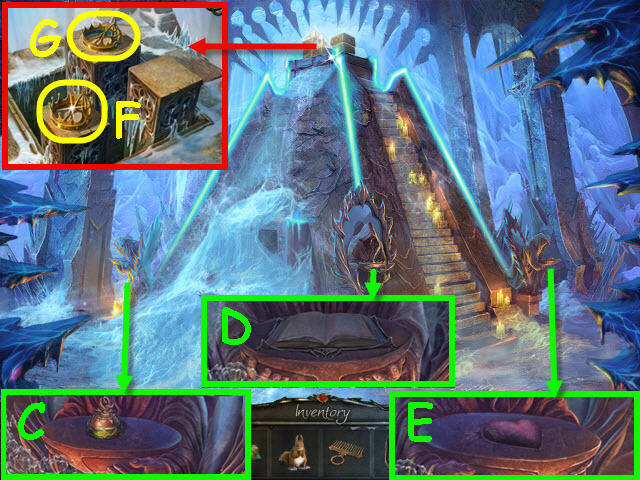
- Examine the left statue and place the POWER on the platter (C).
- Examine the center statue and place the BOOK COVER and then the BOOK PAGES on the platter (D).
- Examine the right statue and place the HEART on the platter (E).
- Examine the top of the pyramid and remove the two glass covers; place the CROWN PART on the left pedestal. Take the 2nd CROWN (F) and the 3rd CROWN (G).
- Back out.
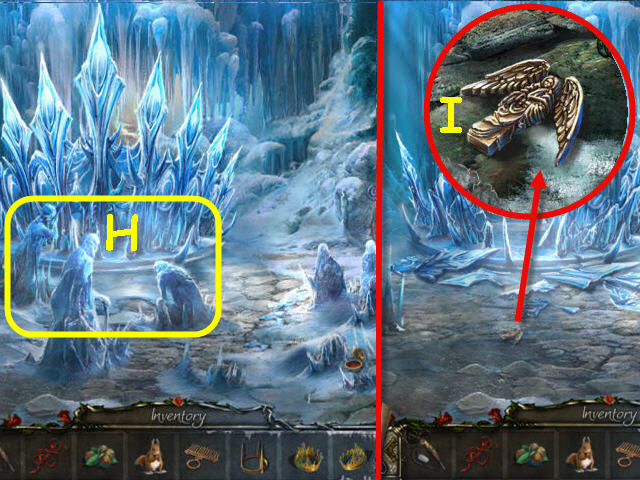
- Place the 3 CROWNS on the girls (H).
- Examine the figure; take the ANGEL FIGURE (I).
- Go forward.
Chapter 6: Lake
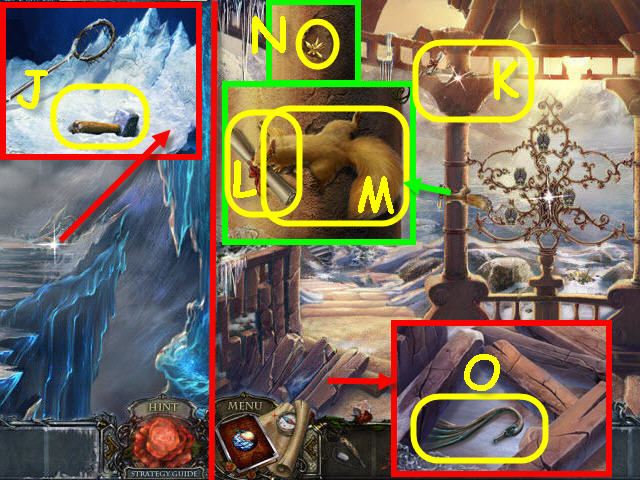
- Examine the hammer; take the HAMMER (J).
- Go forward.
- Place the NUTS and SQUIRREL on the pillar (K).
- Examine the squirrel; take the scheme (L) and the SQUIRREL (M).
- Remove the flake; take the YELLOW CRYSTAL (N).
- Examine the pile of pillars and move them twice; take the SWAN NECK (O).
- Go up the left path.
- Examine the sleigh to access a HOP.
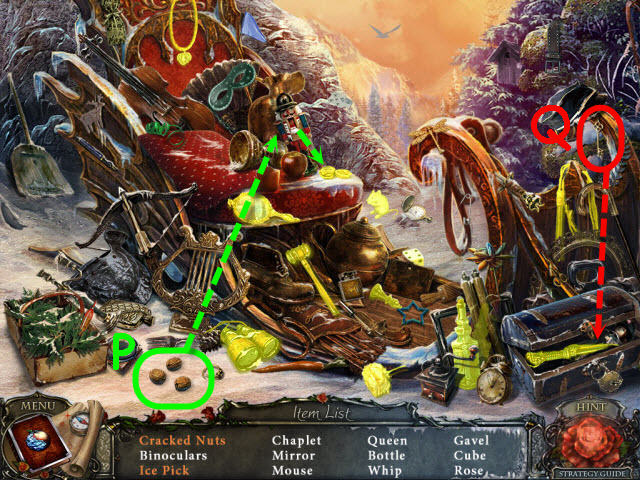
- Find the items listed.
- Place the nuts in the nutcracker to get cracked nuts (P).
- Use the key on the padlock to get an ice pick (Q).
- You will earn an ICE PICK.
- Back out and go forward on the right.

- Examine the tree; take the 2nd ANGEL FIGURE (R).
- Back out twice.
- Examine the handle and use the ICE PICK on the ice to get a TRIANGULAR HANDLE (S).
- Go to the Mirror Chamber.
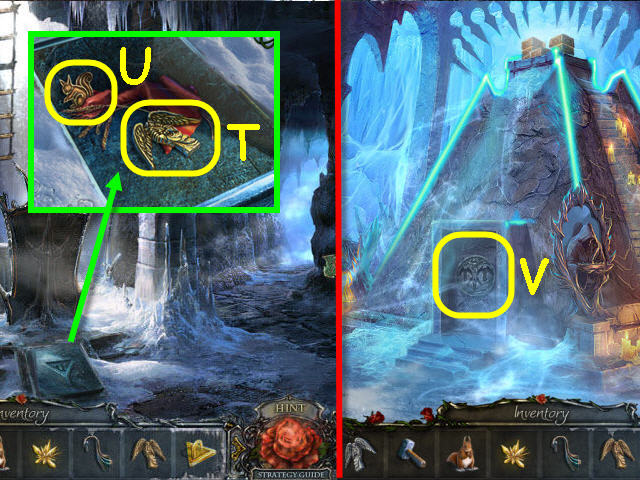
- Examine the right compartment and place the TRIANGULAR HANDLE on it and turn the handle. Take the 3rd ANGEL FIGURE (T) and the SQUIRREL EMBLEM (U).
- Go to the Frozen Pyramid.
- Examine the pyramid door and place the 3 ANGEL FIGURES on it (V).
- Examine the opened pyramid.
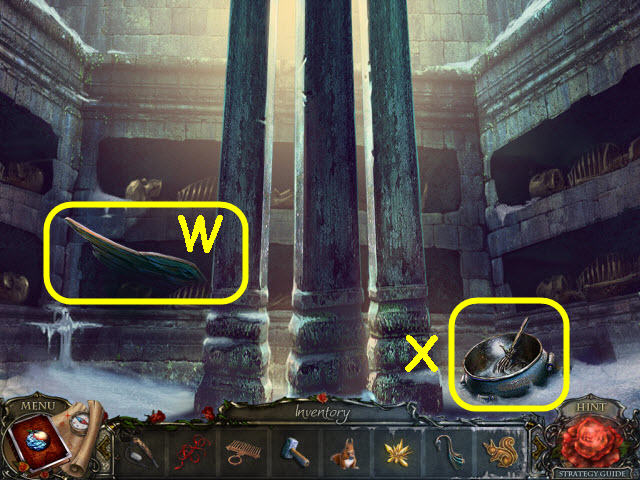
- Take the SWAN WING (W) and VAT (X).
- Go to the Bear Statue.
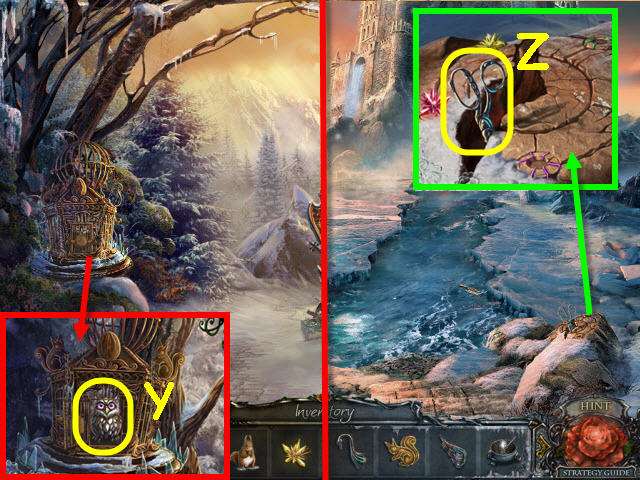
- Examine the cage and place the SQUIRREL EMBLEM in the upper right squirrel outline. Open the cage door; take the OWL (Y).
- Go to the Lake Shore.
- Examine the stone and place the YELLOW CRYSTAL in the yellow recess; take the SCISSORS (Z).
- Go to Stone Bridge.
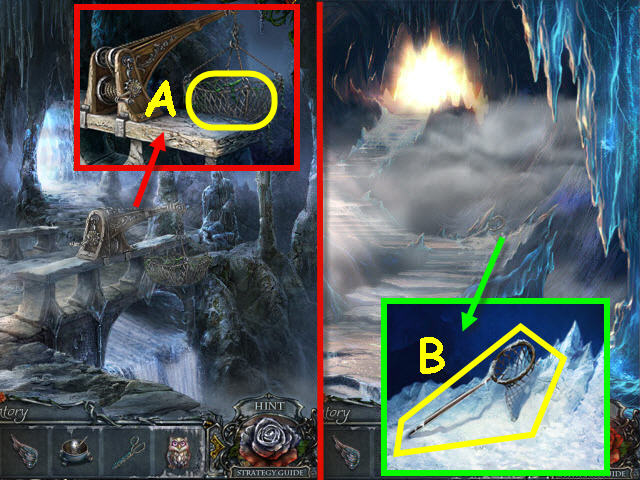
- Examine the crane; use the SCISSORS to get a NET (A).
- Go to the Cave Mouth.
- Examine the broken net and place the NET on it; take the SCOOP NET (B).
- Go to the Lake Shore.
- Examine the water; use the SCOOP NET to get the BRUSH (C).
- Go to the Bear Statue.
- Examine the glass shards and use the BRUSH on them twice; take the SCRAPER (D).
- Go to the Lake Shore.

- Examine the tree; use the SCRAPER to get RESIN (E).
- Go to the Mirror Chamber.
- Examine the brazier and place the VAT and RESIN on it; take the VAT WITH RESIN (F).
- Go to the Lake Shore.
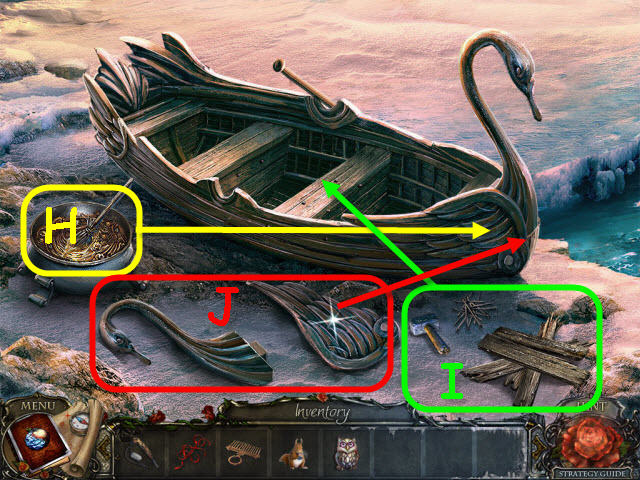
- Examine the boat and place the HAMMER, SWAN NECK, SWAN WING and VAT WITH RESIN on it to trigger a puzzle (G).
- Use the resin on the bow (H).
- In this order; use the boards, nails and hammer (I) on the interior.
- Place the swan neck and then the swan wing (J) on the bow.
- Select the boat and go forward with it.
- Take the SKULL (K).
- Go to Stone Bridge.
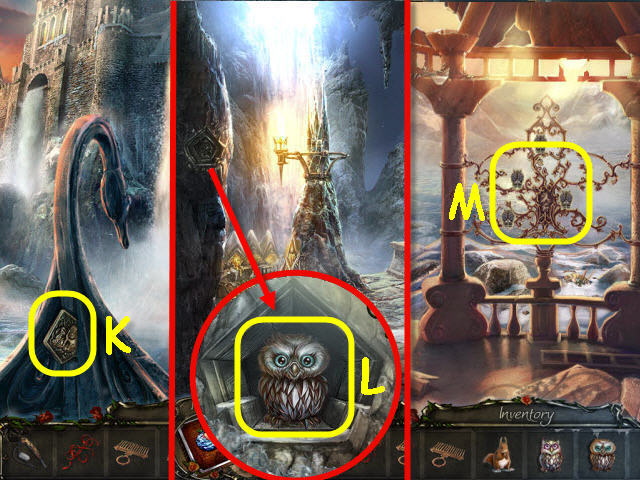
- Examine the recess in the left stone and place the SKULL in it; take the 2nd OWL (L).
- Go to the Summer Gazebo.
- Examine the owls and place the 2 OWLS on it to trigger a puzzle (M).

- Find the matching pairs.
- See screenshot for solution (N).
- Take the GEM.
- Go to the Waterfall Entrance.
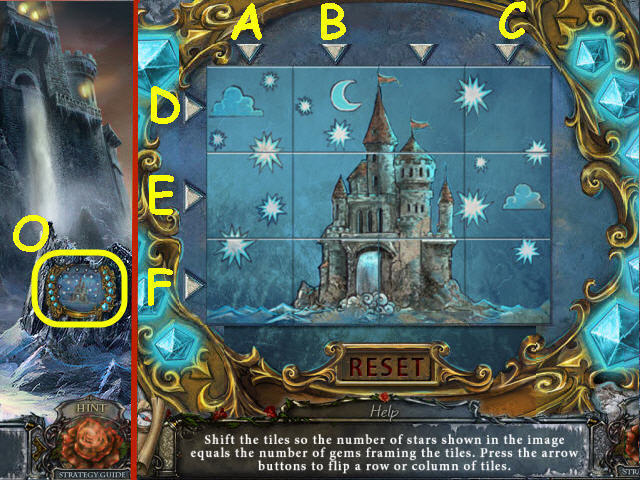
- Examine the stone and place the GEM in the upper left slot to trigger a puzzle (O).
- Flip the tiles to get 12 stars.
- To solve the puzzle, select the following: D, B, C, E, A and F.
- Go forward.
Chapter 7: Mother
- Examine the winch; take the GNOME (P).
- Examine the crates to access a HOP (Q).
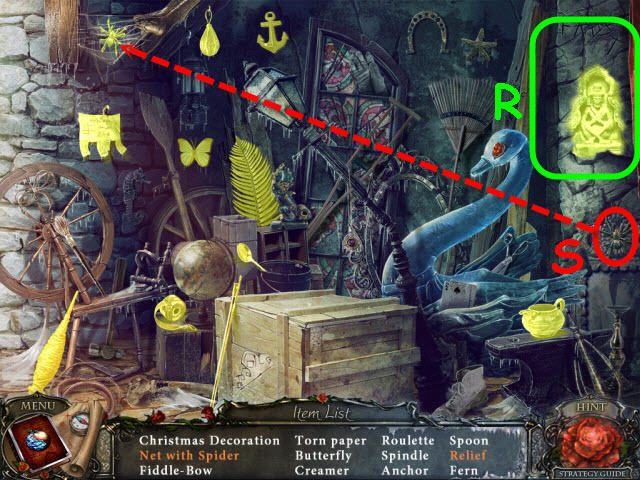
- Find the items listed.
- Move the cloth to get the relief (R).
- Place the spider in the new to get a net with spider (S).
- You will earn a SPINDLE.
- Go forward through the door.
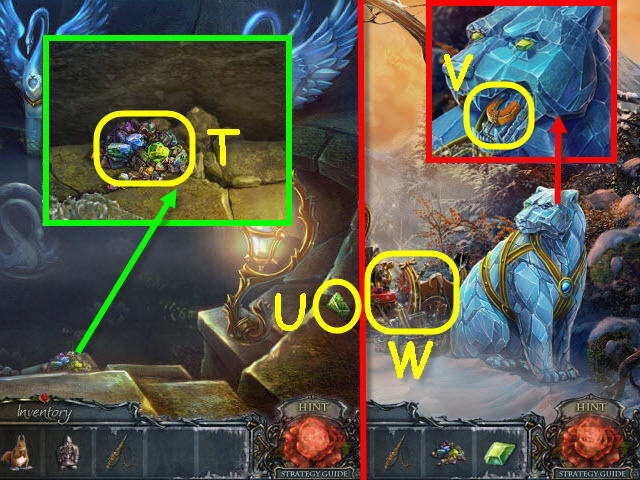
- Examine the ledge; take the GRAVEL (T).
- Take the BEAR EYE (U).
- Go to the Bear Statue at the Lake.
- Examine the bear head and place the BEAR EYE in the socket. Use the SPINDLE on the magnet; take the MAGNET ON A ROPE (V).
- Examine the sleigh to access a HOP (W).
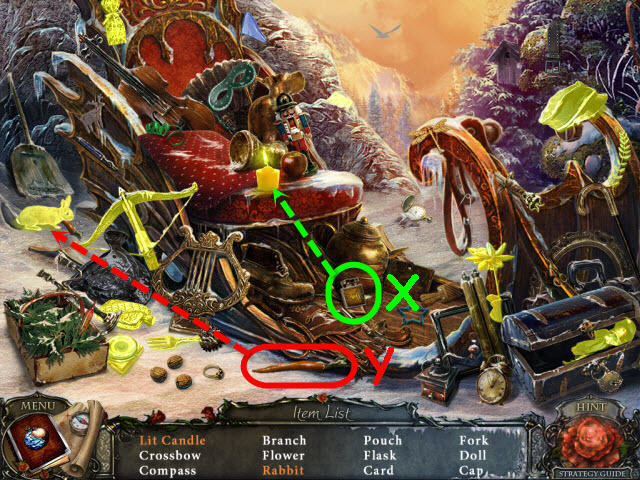
- Find the items listed.
- Use the lighter on the candle to get a lit candle (X).
- Place the carrot by the rabbit hole to get a rabbit (Y).
- You will earn a FLOWER.
- Go to the Swan Pool in the Castle.
- Examine the ledge and use the MAGNET ON A ROPE on the bottle; take the ACID (Z).
- Back out.
- Examine the door and use the ACID on the lock (A).
- Go forward through the newly-opened door.
- Examine the window; take the LENS (B).
- Go forward through the archway.
- Examine the shield on the right; take the TASSELED CORD (C).
- Select the orb and then zoom into the box to access a HOP (D).
- Take the lumberjack (E) and place him in the slot (F).
- Take the miner (G) and place him in the slot (H).
- Take the orb (I) and place it on the door; take the key (J).
- Place the key in the keyhole and turn it (K).
- Take the gem (L).
- Select the miner (M) to expose the chest; take the target (N).
- Use the gem on the chest; take the wind (O).
- Place the target on the hook (Q) and then drag it over the spider (P).
- Turn the key (R).
- Place the wind on the center cloud (S); take the star (T).
- Turn the key.
- Place the star in the lantern; take the light (U).
- Place the light on the left hook (V); take the flower (W).
- Turn the key.
- Place the flower in the case (X); take the GNOMES (Y).
- Go forward up the left stairs.
- Take the EMPTY PENDANTS (Z).
- Examine the rail; take the GOLDEN SWAN (A).
- Go to the Swan Pool.
- Examine the puzzle stone and place the GOLDEN SWAN and FLOWER on it to trigger a puzzle (B).
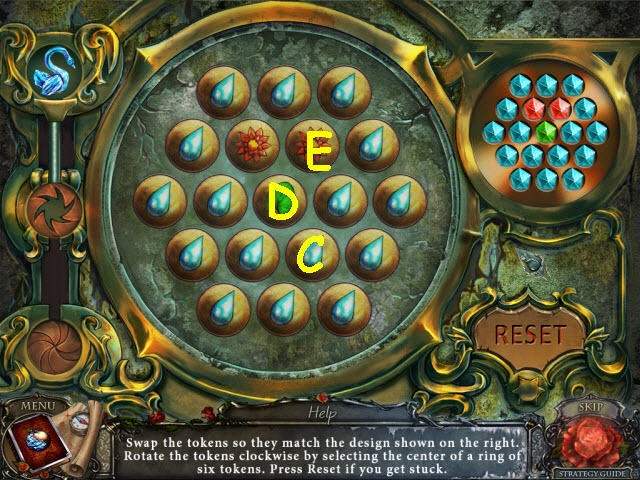

- Arrange the gems per the diagram.
- To solve the puzzle, select the following tokens for Set 1: Cx2, Dx3 and Ex3.
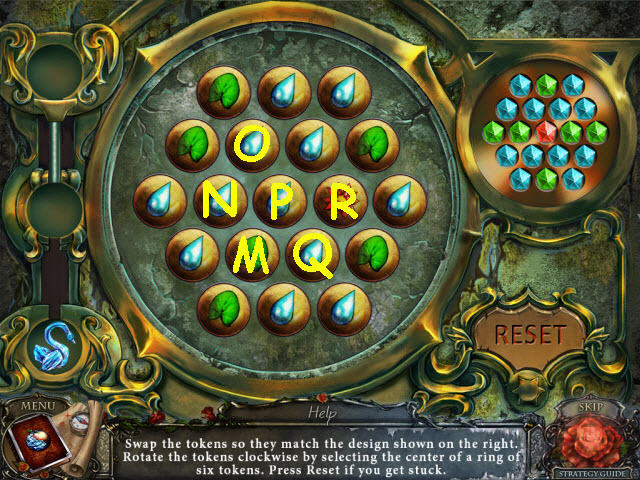
- Set 2 solution: F, Gx2, H, Ix2, H, J, Hx2, F, G, Kx3, Ix2 and L.
- Set 3 solution: M, N, M, Ox2, P x 4, Qx2, Px4, O, Px5 and R.
- Take the 2nd GNOME (S) and HELMET (T).
- Go to the Battlements.
- Examine the door and place the 2 GNOMES and the GNOMES on the lock to trigger a puzzle (U).
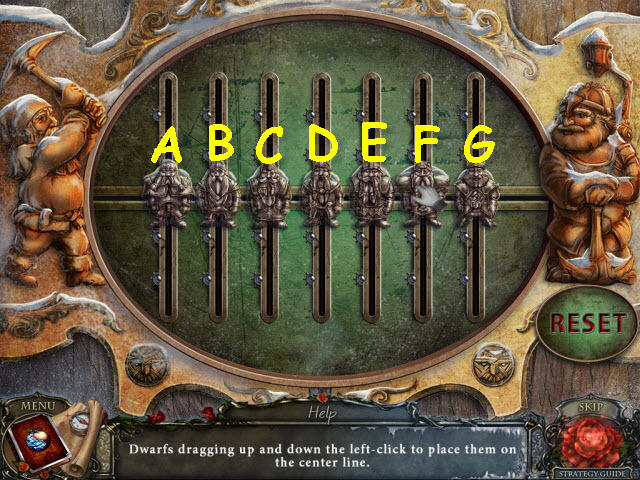
- Line all the gnomes up on the center line.
- To solve the puzzle, select the following gnomes: F all the way up, D all the way up and then to center, C center, E center, F center, A center, B center, C center, A center, B center, G center, F all the way up and then to center.
- Go forward.
Chapter 8: Castle
- Take the SPRAY (V).
- Go up the stairs.
- Take the POKER (W).
- Examine the bed to access a HOP (X).
- Find the items listed.
- Use the paintbrush on the clover to get a purple clover (Y).
- Use the scissors on the snowflakes to get a snowflake (Z).
- You will earn an EMBLEM.
- Go to the Castle Keep.
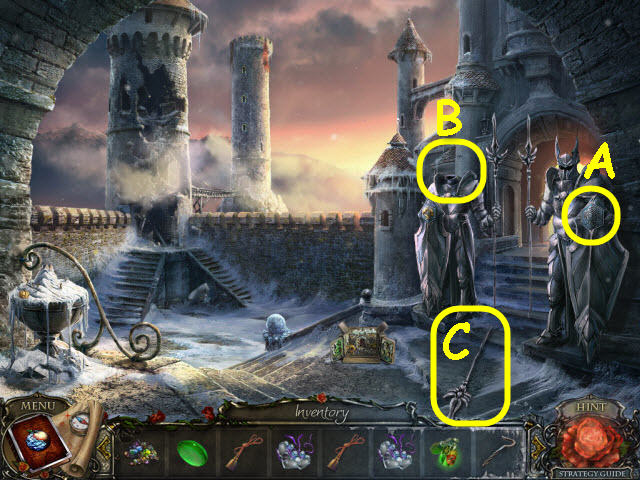
- Examine the shield on the right and place the EMBLEM on it (A).
- Examine the left guard and place the HELMET on it (B).
- Take the HALBERD (C).
- Go up the stairs between the guards.
- Examine the cage and select the acorn; take the PINE CONE SEEDS (D).
- Examine the throne; take the SCEPTER (E) and note the clue.
- Examine the brazier and use the POKER on the crystal; take the GREEN CRYSTAL (F).
- Examine the green globe; use the EMPTY PENDANTS on it (G) to get a GREEN PENDANT.
- Examine the debris to access a HOP (H).
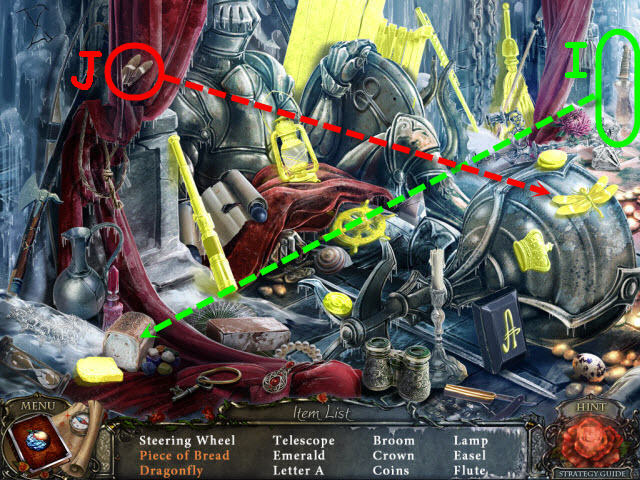
- Find the items listed.
- Use the knife on the bread to get a piece of bread (I).
- Place the wings on the dragonfly to get a dragonfly (J).
- You will earn a STEERING WHEEL.
- Go to the Courtyard.
- Examine the window and use the SCEPTER on the glass twice; take the PURPLE CRYSTAL (K).
- Go to the Dock.

- Examine the left swan and use the HALBERD on the pendant; take the 2nd LENS (L).
- Examine the winch and place the STEERING WHEEL on it; turn the wheel and take the BLUE CRYSTAL (M).
- Examine the crates to access a HOP (N).
- Find the items listed.
- Remove the brick to get the pouch (O).
- Open the crate to get the fishing net (P).
- Open the lantern to get a strawberry (Q).
- You will earn a CANDLE SNUFFER.
- Go to the Lake Shore at the Lake.

- Examine the cracked stone and place the GREEN, PURPLE and BLUE CRYSTAL in the matching colored slots; take the MAGIC STONE (R).
- Go to the Queen’s Room at the Castle.
- Examine the bed to access a HOP (S).
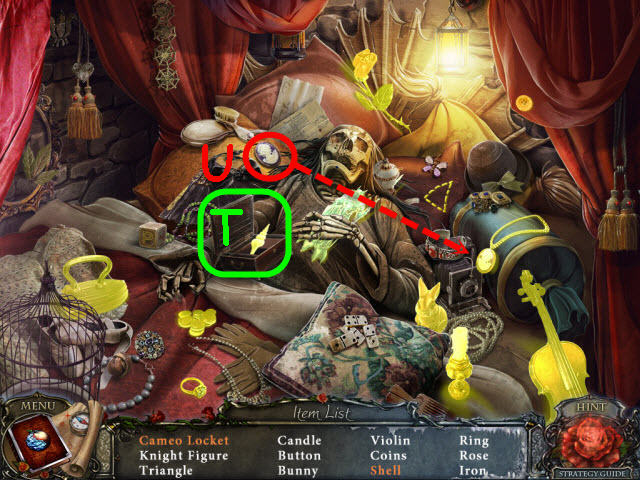
- Find the items listed.
- Open the box to get the shell (T).
- Place the cameo in the necklace to get a cameo locket (U).
- You will earn a KNIGHT FIGURE.
- Go to the Courtyard.
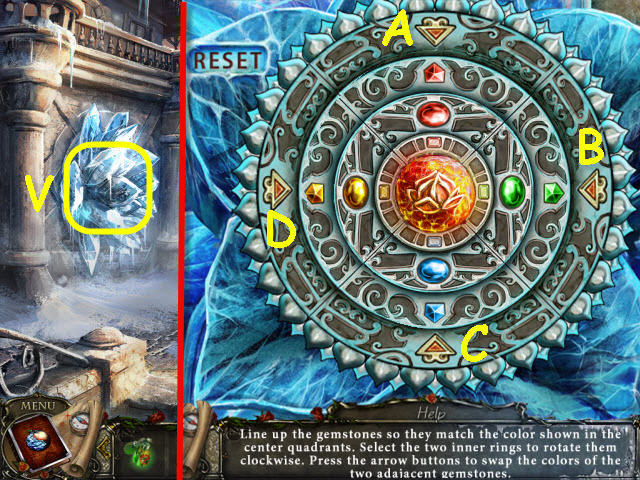
- Examine the ice flower and place the MAGIC STONE in the center to trigger a puzzle (V).
- Place the matching colored gems in a row.
- To solve the puzzle, select the following: D, B, rotate the smaller ring once, D and then rotate the larger ring twice.
- Take the SNOWFLAKES.
- Go to the Queen’s Room.
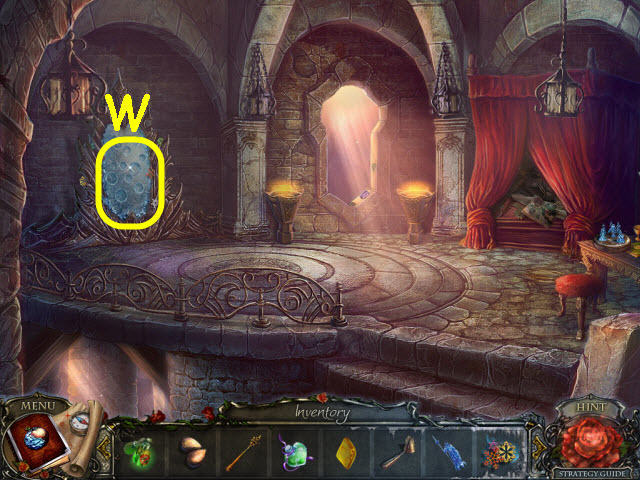
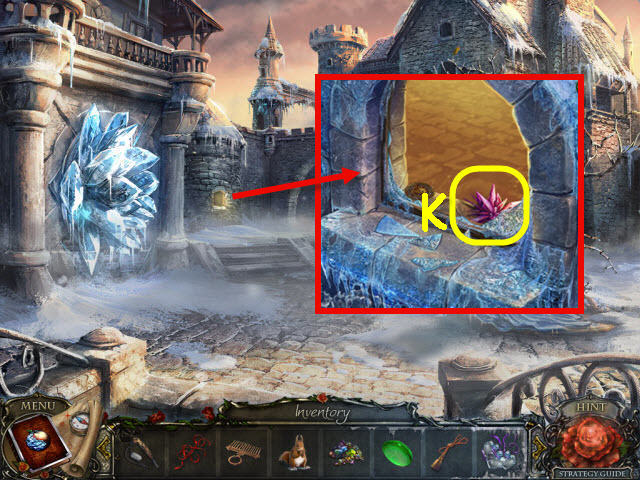
- Examine the icy wall and place the SNOWFLAKES on it (W).
- You will trigger a puzzle.
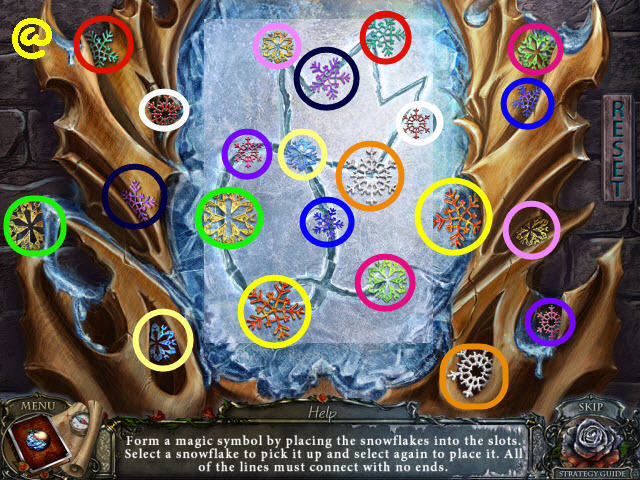
- Place the snowflakes in the center to complete the symbol.
- See screenshot for solution (@).
- Use the SCEPTER on the mirror to get a SHARD.
- Go to the Courtyard.
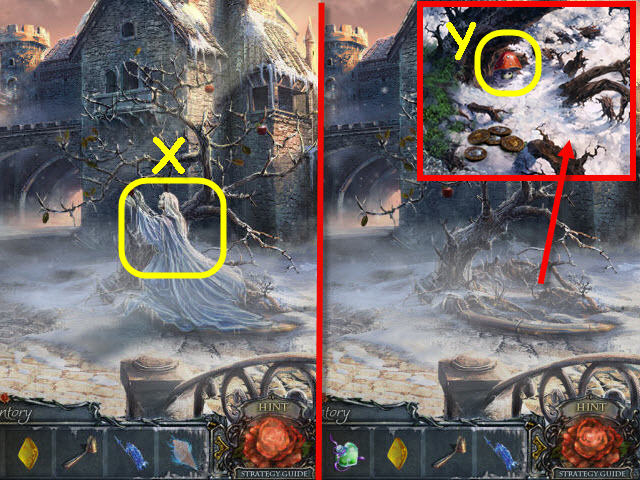
- Use the SHARD on mother (X).
- Examine the roots; take the MUSHROOM (Y).
- Go to the Throne Room.
Chapter 9: Queen
- Examine the cage and place the SQUIRREL in it; take the MURAL PART (Z).
- Examine the debris to access a HOP (A).
- Find the items listed.
- Open the box to get the amber (B).
- Place the portrait piece on the torn portrait to get a portrait (C).
- Remove the breast plate to get a sun (D).
- You will earn an AXE.
- Back out.
- Examine the fountain; take the PUMPKIN (E).
- Place the KNIGHT FIGURE in the center and use the EMPTY PENDANTS on the water (F) to get a PURPLE PENDANT.
- Examine the globe and set the phases of the moon per the clue on the throne; take the 3rd LENS (G).
- Go to the Tower Landing.
- Use the TASSELED CORD on the curtain; examine the mural (H).
- Place the MURAL PART on it to trigger a puzzle.
- Select the correct mural pieces to complete the mural.
- See screenshot for solution (I).
- Go down the newly-opened passage and then go forward.
- Speak to your sister (J) and receive an APPLE.
- Examine the mirror and place the APPLE, CORSET LACE and CURSED COMB on it (K).
- Examine the statue; use the EMPTY PENDANTS on the tears to get a BLUE PENDANT (L).
- Examine the leaves and place the MUSHROOM on them; take the SCARECROW OF SPRING (M).
- Go forward.
- Examine the statue base; take the CASKET KEY (N) and QUEEN FIGURE (O).
- Go to the Queen’s Room.
- Examine the table and place the QUEEN FIGURE on it; take MOTHER’S TOKEN (P).
- Go to the Swan Pool.
- Examine the spider and use the SPRAY on him; take the SKULL (Q).
- Examine the left swan; place the GREEN PENDANT on it (R).
- Examine the center swan; place the PURPLE PENDANT on it (S).
- Examine the right swan; place the BLUE PENDANT on it (T).
- Examine the center swan; take the SCARECROW OF SUMMER (U).
- Go to the Courtyard.
- Examine the tree roots and use the AXE on them; take the SNOWMAN HANDS (V).
- Go to the Battlements.
- Examine the snowball and select it twice; place the PINE CONE SEEDS and the SNOWMAN HANDS on it. Place the SNOWMAN HANDS, PINE CONE SEEDS for the eyes and the icicle (W) for the nose on the snowman; take the SCARECROW OF WINTER (X).
- Go to the Dock.
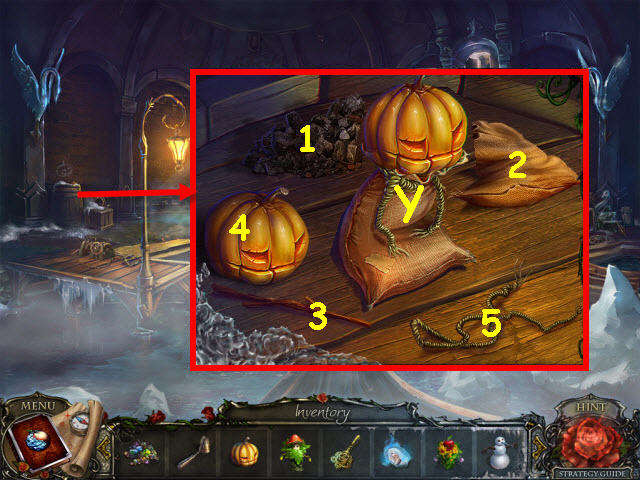
- Examine the barrel and place the PUMPKIN and GRAVEL on it. In this order; place the gravel (1) in the burlap sack (2), place the stick (3) on the gravel and the pumpkin (4) on the stick. Tie with the string (5); take the SCARECROW OF FALL (Y).
- Go to the Secret Passage.
- Examine the center tiles and place the SCARECROW OF WINTER, SCARECROW OF SUMMER, SCARECROW OF SPRING and SCARECROW OF FALL on it (Z).
- Examine the left statue; take the LADY’S TOKEN (A).
- Examine the right statue hand and use the CASKET KEY on the chest. Turn the key; take SNOW WHITE’S TOKEN (B).
- Go to Tower Landing.
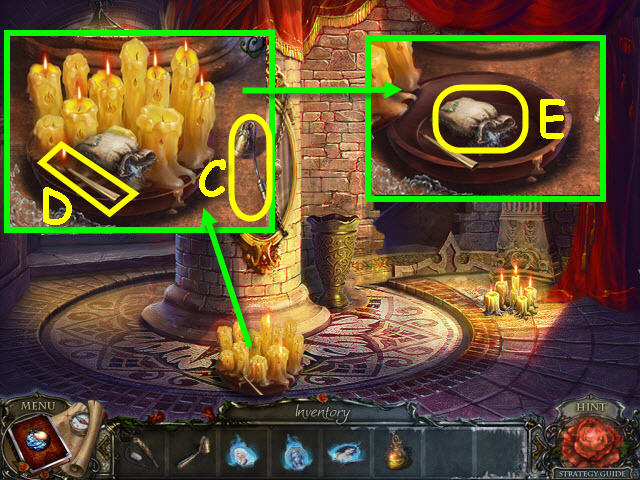
- Examine the candles and place the CANDLE SNUFFER on them; use the candle snuffer (C) on the lit candles.
- Use the lit stick (D) on the candles with flames etched on them. Use the Cursor tip and not the end of the lit stick on the wicks.
- Read the note; take the POWDER BAG (E).
- Go up the stairs.
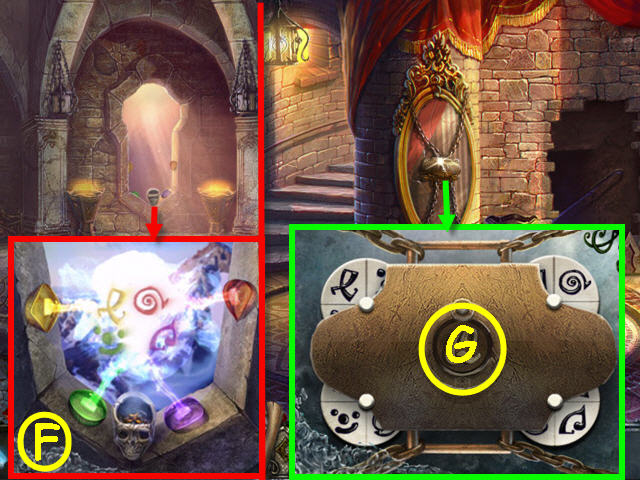
- Examine the window; place the 3 LENSES in their appropriate slot and place the SKULL in the center. Empty the POWDER BAG in the SKULL and use the FLINT AND STEEL on it to get a code (F).
- Back out.
- Examine the mirror and set the outer dials so the symbols match the code from the Queen’s room window (G).
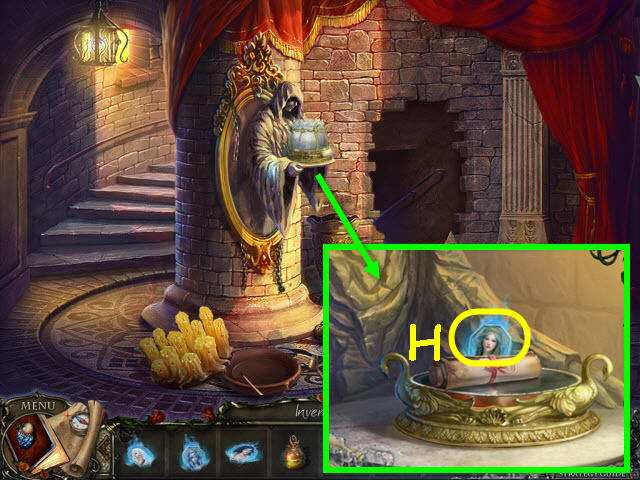
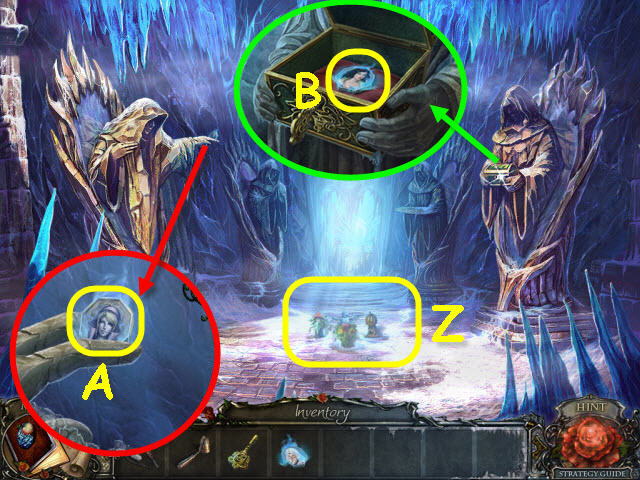
- Examine the platter and remove the cover; read the scroll and take ELIZABETH’S TOKEN (H).
- Go to Altar of the Fairest.
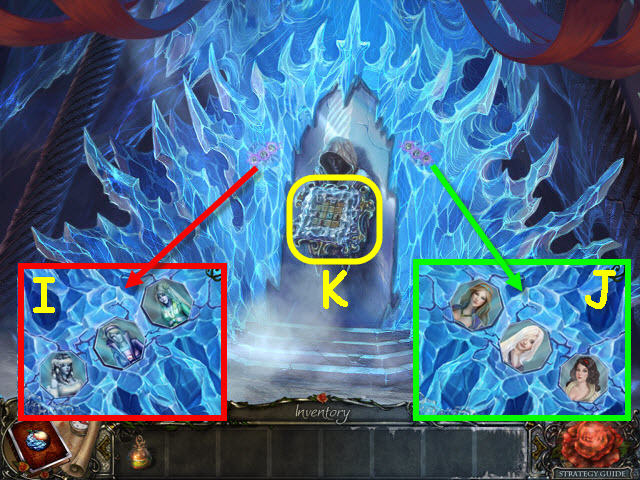
- Examine the slots on the left and place the LADY’S TOKEN in the center (I).
- Examine the slots on the right and place ELIZABETH’S TOKEN, SNOW WHITE’S TOKEN and MOTHER’S TOKEN on them (J).
- Examine the center board to trigger a puzzle (K).
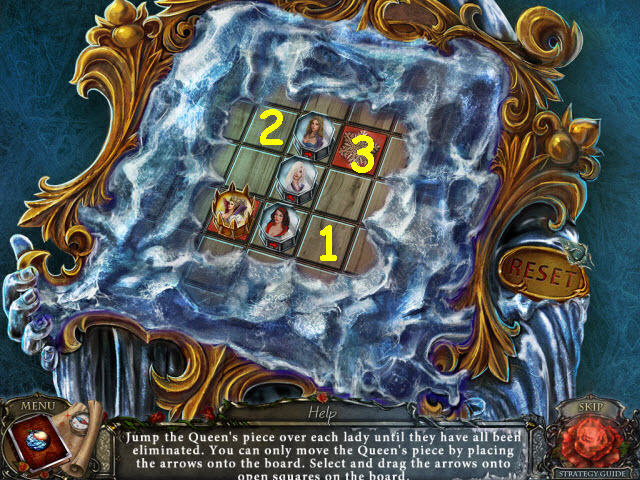
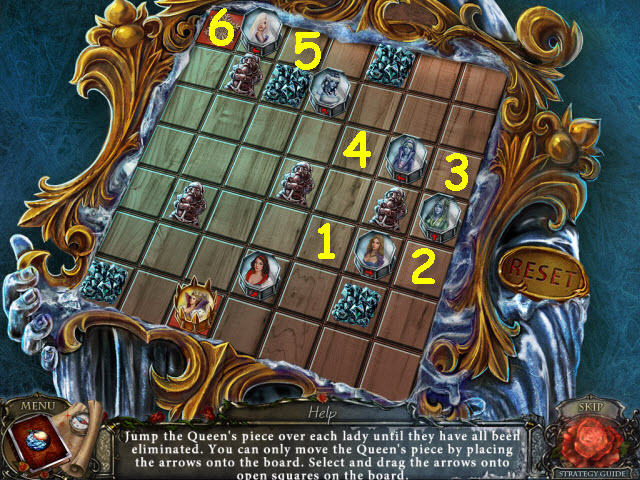
- Arrange the girls so the queen can jump them all and go to the snowflake.
- To solve the first set, place the girls in the squares as shown. Then select the queen and move to her to the squares as numbered (1-3).
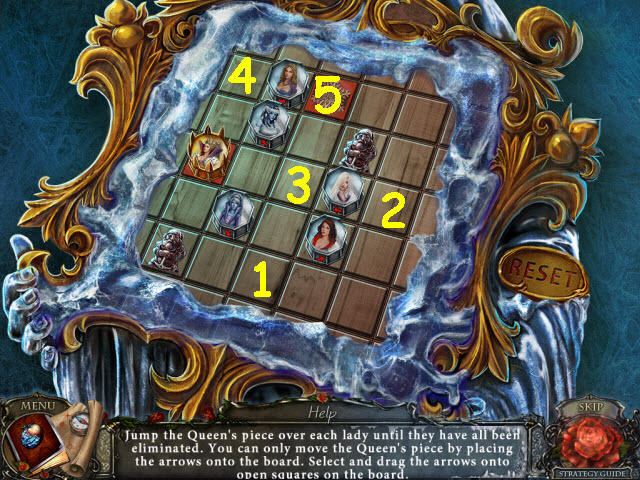
- Second set: Place the girls in the squares as shown and then select the queen and move her to the squares as numbered (1-5).
- Third set: Place the girls in the squares as shown and then select the queen and move her to the squares as numbered (1-6).
- Congratulations, you have completed Living Legends: Frozen Beauty.


 Campgrounds: The Endorus Expedition Walkthrough, Guide, & Tips
 Reality Show: Fatal Shot Walkthrough, Guide, & Tips
 Whispers: Revelation Walkthrough, Guide, & Tips
 Voodoo Chronicles: The First Sign Walkthrough, Guide, & Tips
 Myths of the World: Black Rose Walkthrough, Guide, & Tips