Midnight Calling: Anabel Walkthrough, Guide, & Tips
Midnight Calling: Anabel Walkthrough

Welcome to the Midnight Calling: Anabel Walkthrough
Return to your hometown to save your father and uncover Midnight Castle’s secrets!
Whether you use this document as a reference when things get difficult or as a road map to get you from beginning to end, we’re pretty sure you’ll find what you’re looking for here.
This document contains a complete Midnight Calling: Anabel game walkthrough featuring annotated screenshots from actual gameplay!
We hope you find this information useful as you play your way through the game. Use the walkthrough menu below to quickly jump to whatever stage of the game you need help with.
Remember to visit the Big Fish Games Forums if you find you need more help. Have fun!
This walkthrough was created by prpldva, and is protected under US Copyright laws. Any unauthorized use, including re-publication in whole or in part, without permission, is strictly prohibited.
General Tips
- This is the official guide for Midnight Calling: Anabel.
- This guide will not mention each time you have to zoom into a location; the screenshots will show each zoom scene.
- Hidden-object puzzles are referred to as HOPs. This guide will not show HOP solutions. It will identify the location of the HOP and the inventory item acquired.
- This guide will show solutions for non-random puzzles. Please read the in-game instructions for each puzzle.
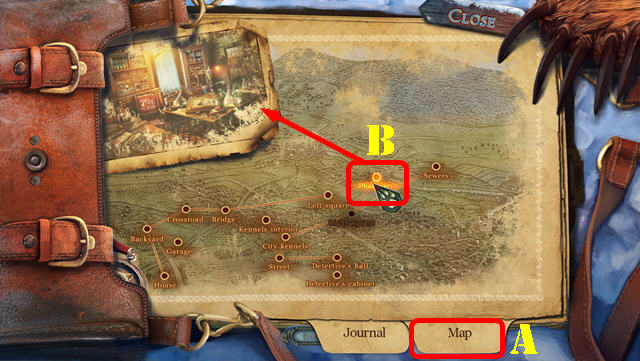
- In this game, you will often have to select the new scene to trigger dialog, cut-scenes, or tasks prior to interacting with the scene.
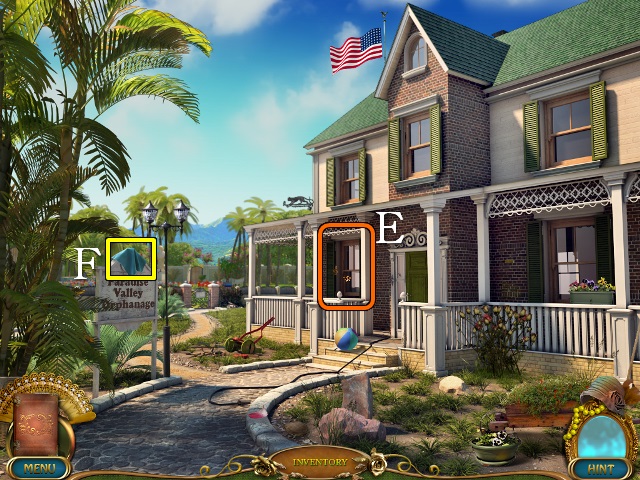
Chapter 1: Return to Rocksville

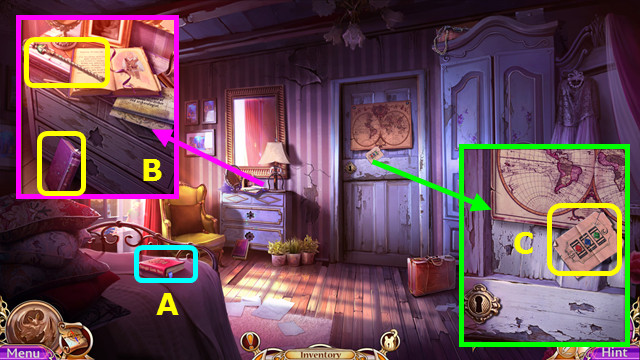
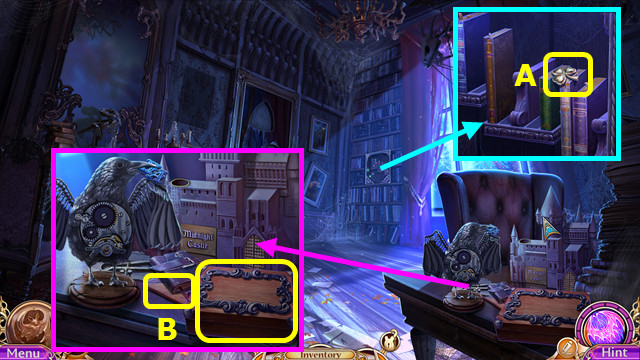
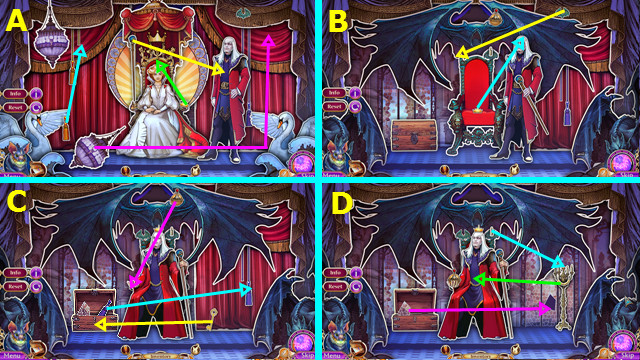
- Open and read the book (A).
- Take the BATON and the 1st BOOK; read the journal and paper (B).
- Take the LOCK CODE (C).
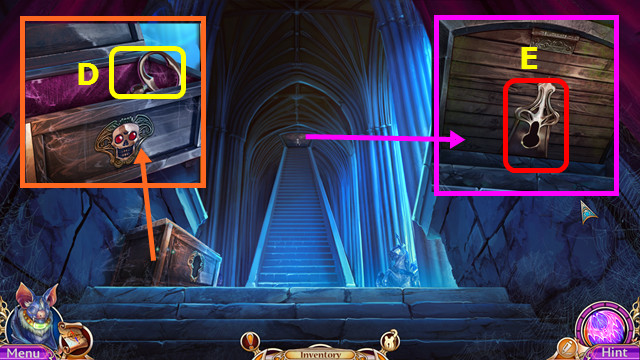
- Use the BATON to take the BAG (D).
- Combine the BAG and LOCK CODE; find the HAIRPIN (inventory).
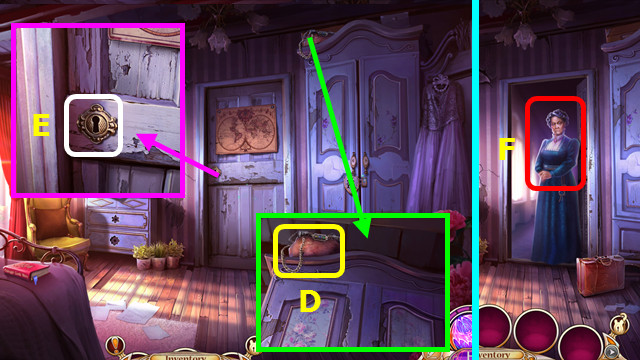
- Use the HAIR PIN (E).
- Talk to the Headmistress (F).
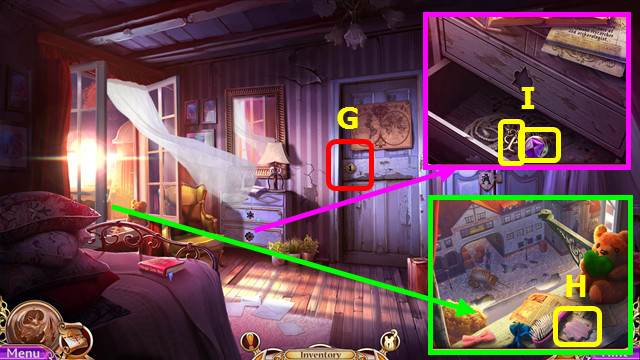
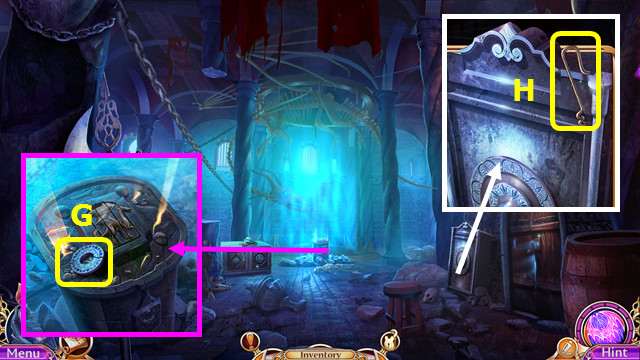
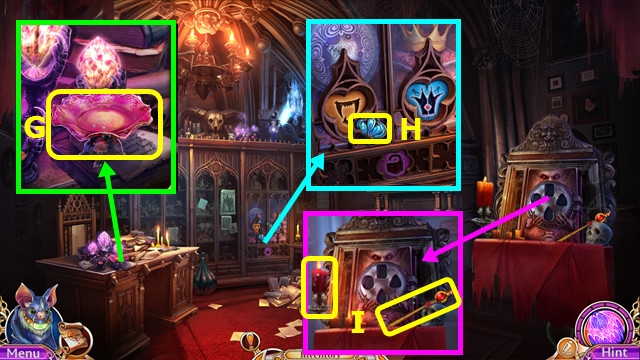
- Try the door (G).
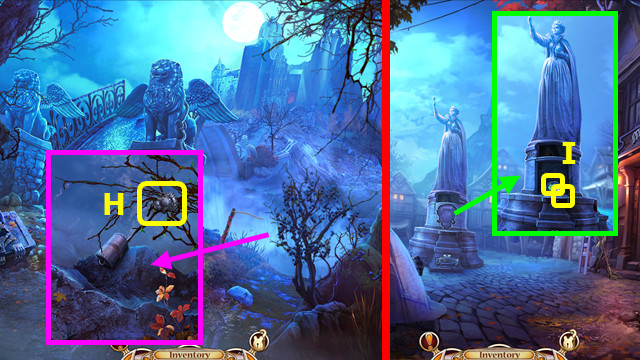
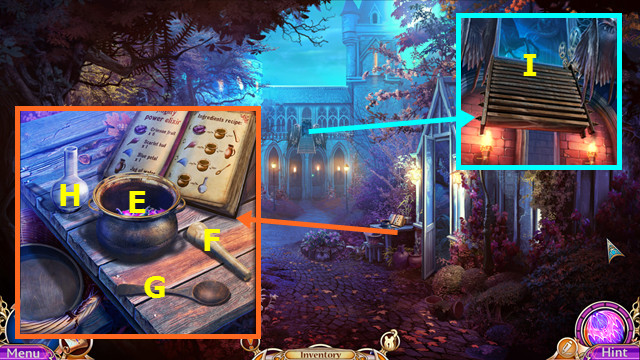
- Take the HANDLE(H).
- Place the HANDLE; take the CUFF LINK and ORNATE MONOGRAM (I).
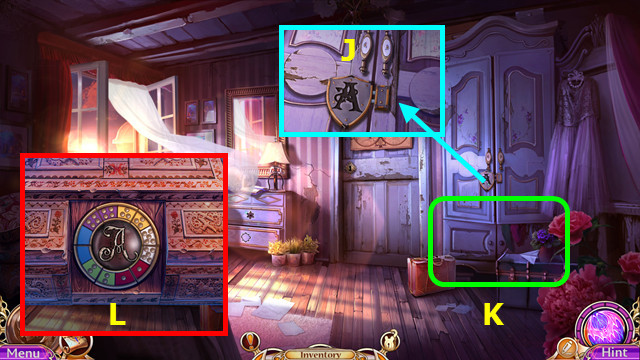
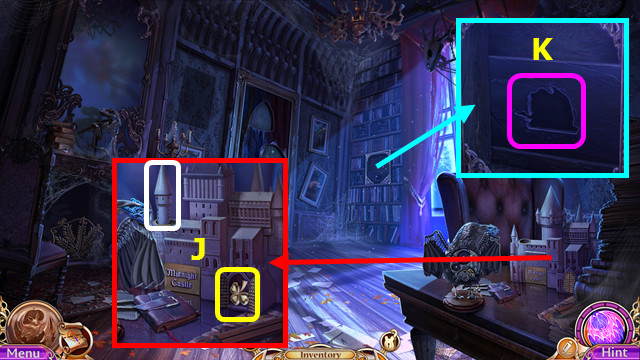
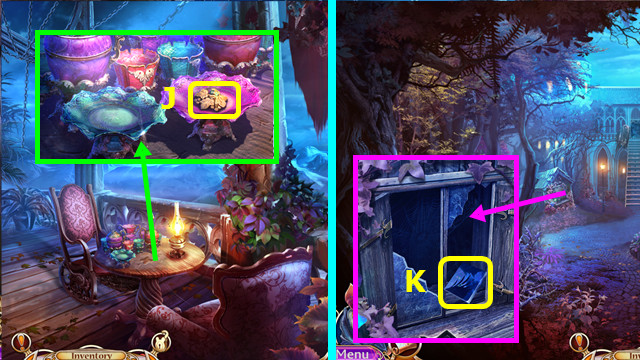
- Place the ORNATE MONOGRAM (J).
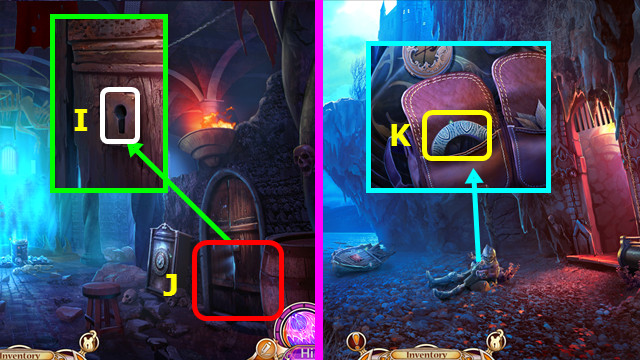
- Play the HOP; earn the DELICATE BOX (K).
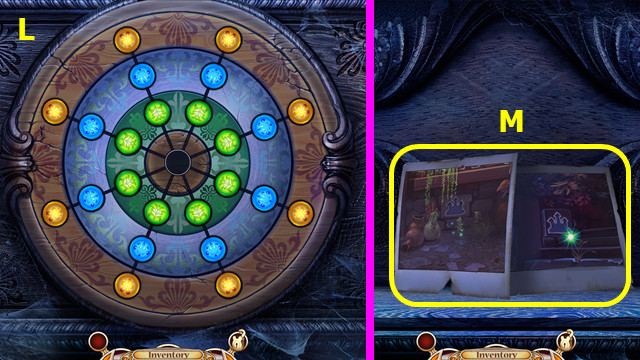
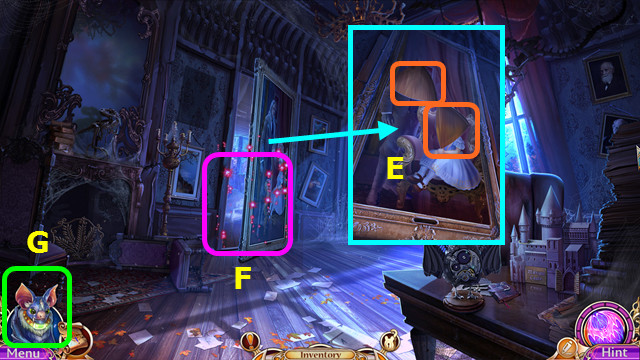
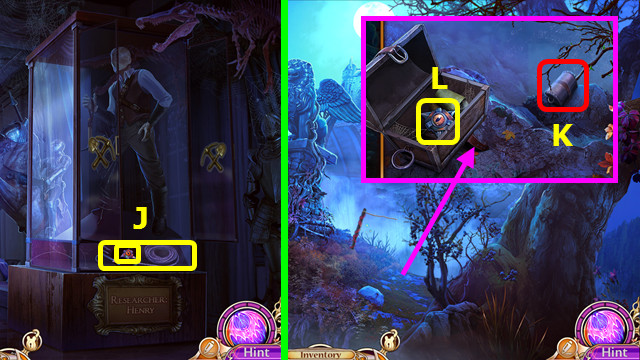
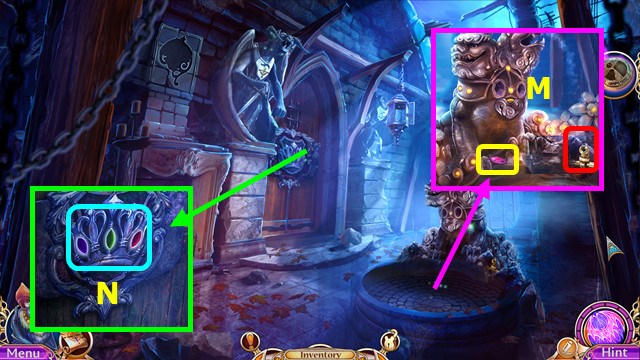
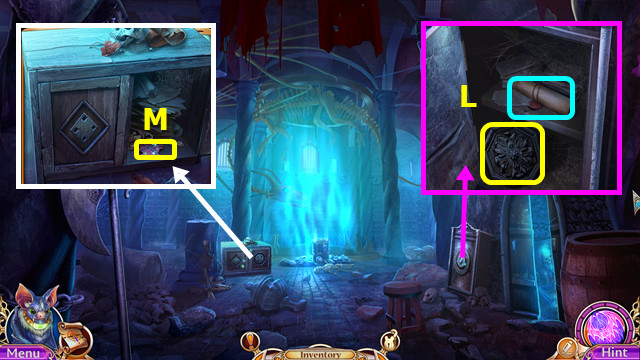
- Look at the DELICATE BOX (inventory) and restore the lock (L). Take the HANDLE and ANABEL’S BOX.
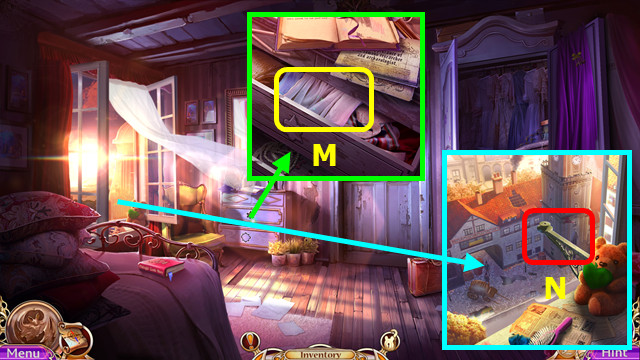
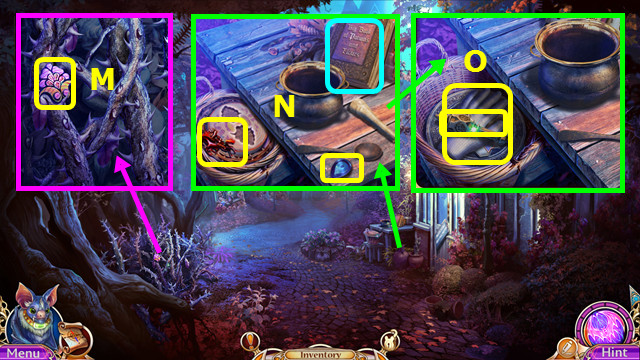
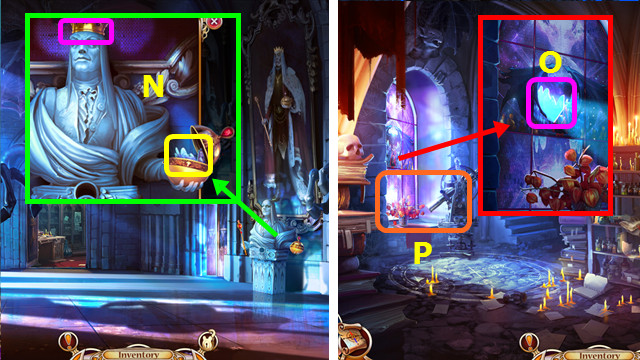
- Place the HANDLE; take the BEDSHEETS (M).
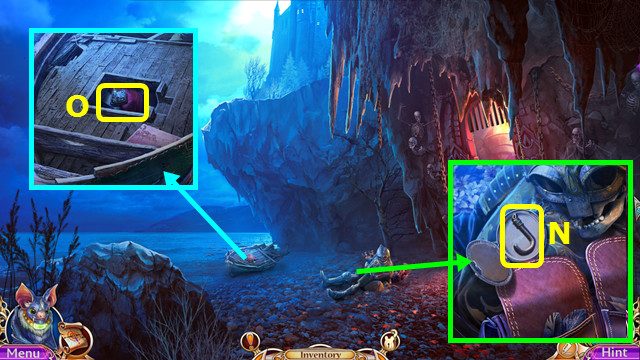
- Tie the BEDSHEETS together to make the TIED BEDSHEETS (inventory).
- Use the TIED BEDSHEETS (N).
- Go left.
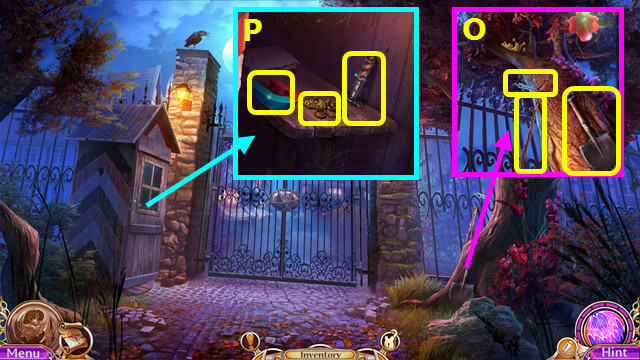
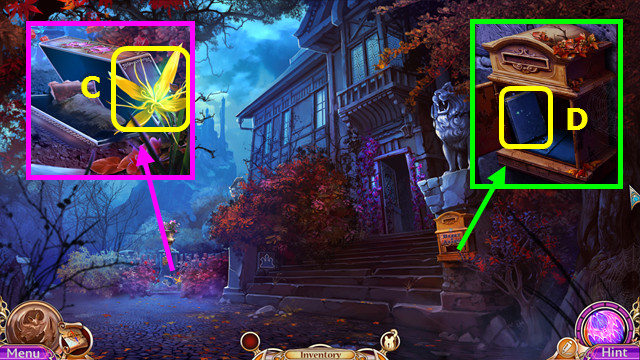
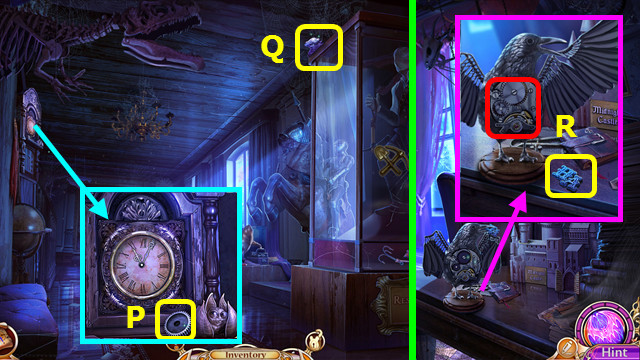
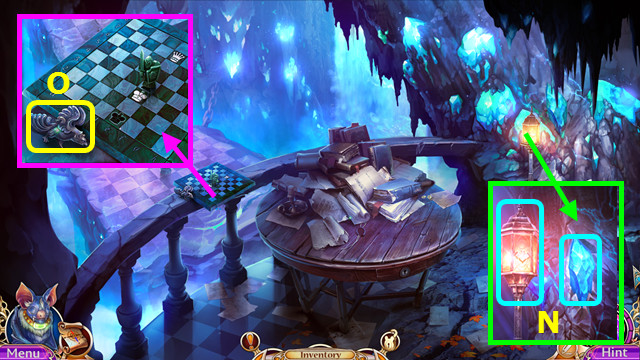
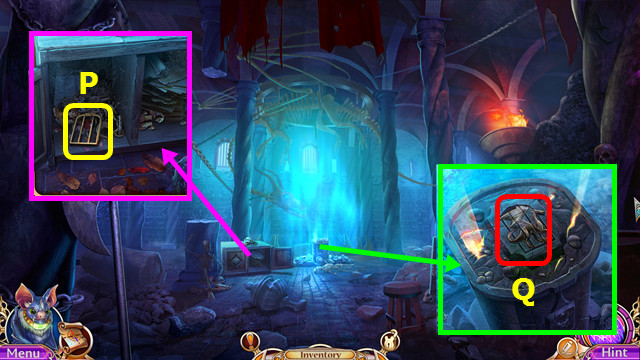
- Take the STICK, DAGGER BLADE, and SHOVEL (O).
- Use the STICK; take the MAGNET, 1st TOWN GATES PIECE, and DAGGER HANDLE (P).
- Combine the DAGGER BLADE and DAGGER HANDLE to make the DAGGER (inventory).
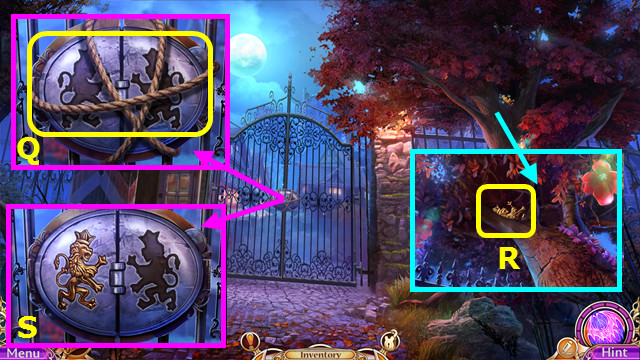
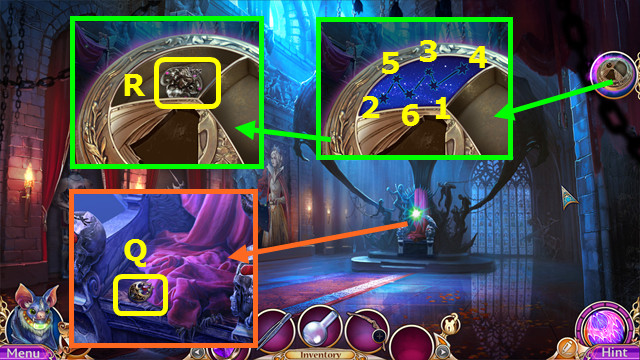
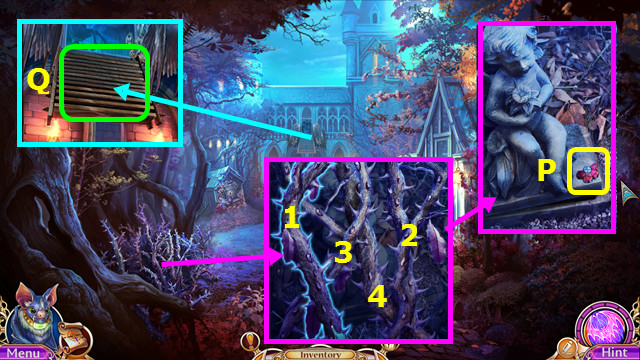
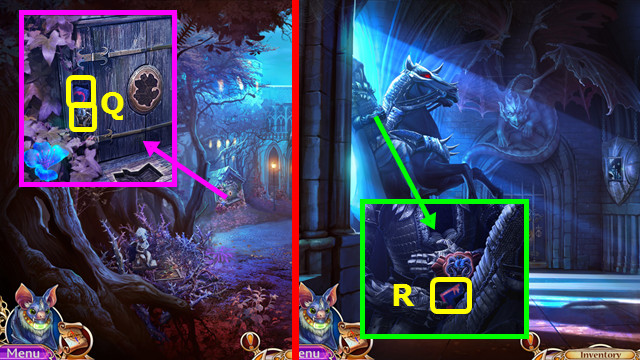
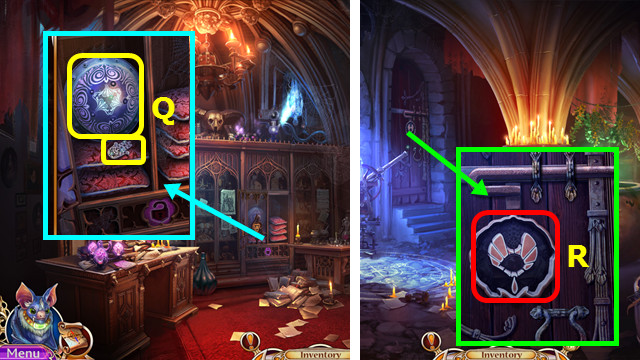
- Use the DAGGER to take the ROPE (Q).
- Combine the MAGNET, STICK, and ROPE to make the MAGNET ON STICK (inventory).
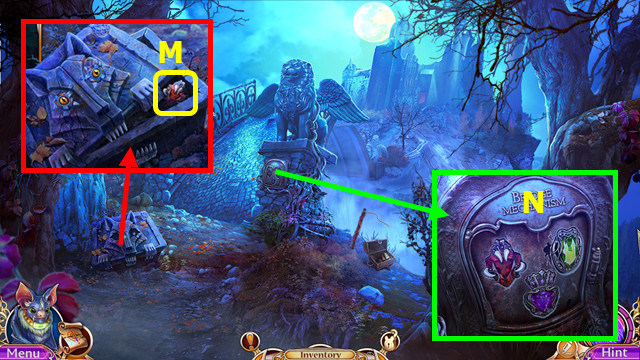
- Use the MAGNET on STICK to take the 2nd TOWN GATES PIECE (R).
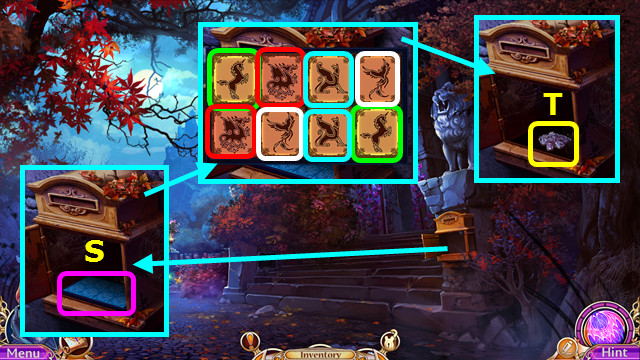
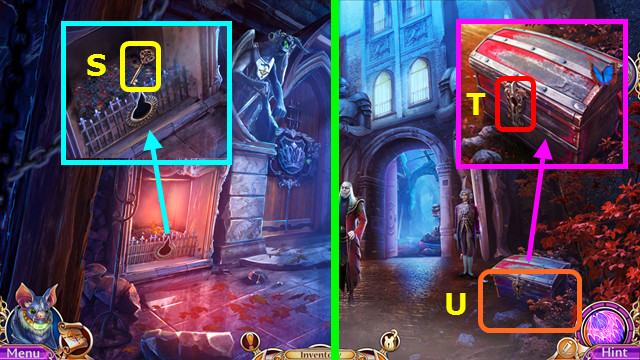
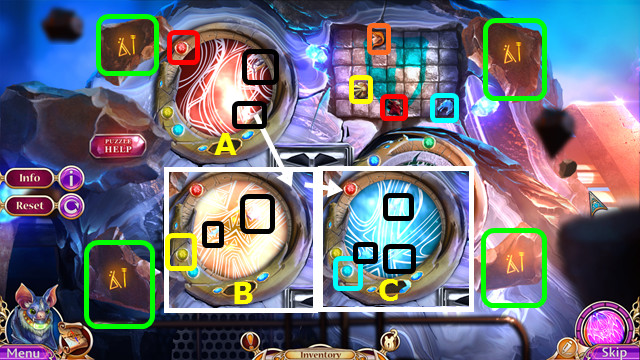
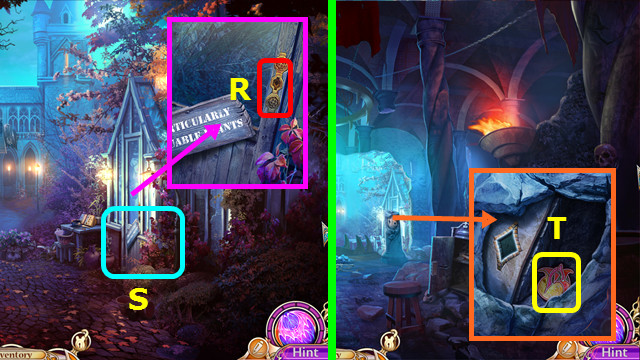
- Place the 2 TOWN GATES PIECES (S).
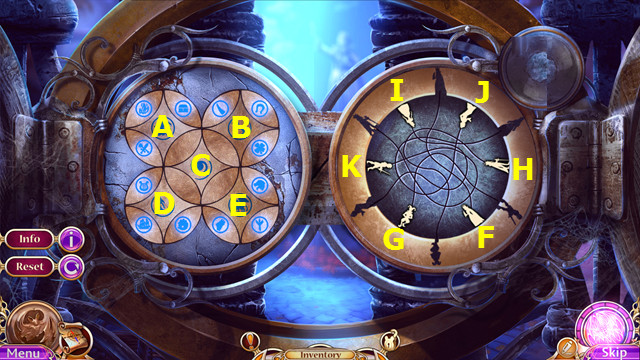
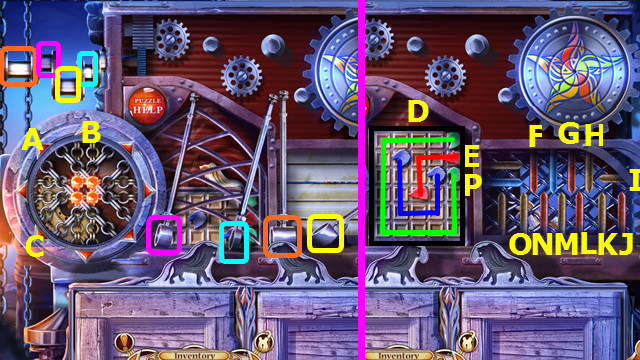
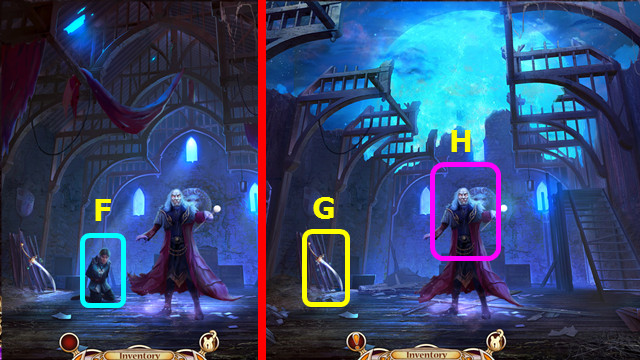
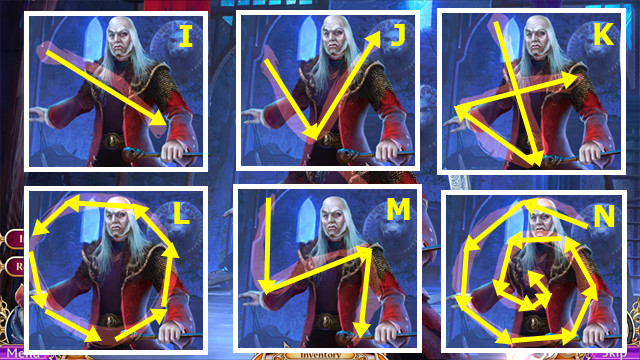
- Select: Ax2-D-Ex2-C-B-C-A-D-E-C-A-D-Bx2-Cx2-Bx2-D.
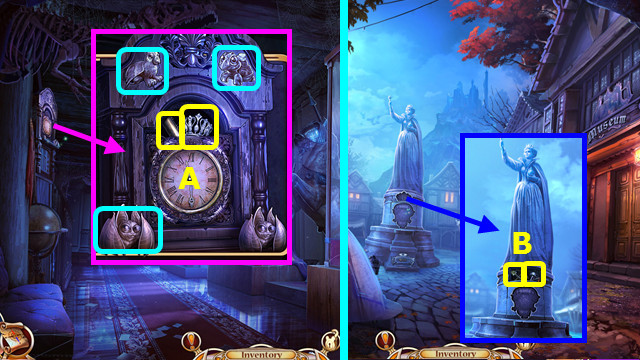
- Rotate counter-clockwise as shown; select the figure (F).
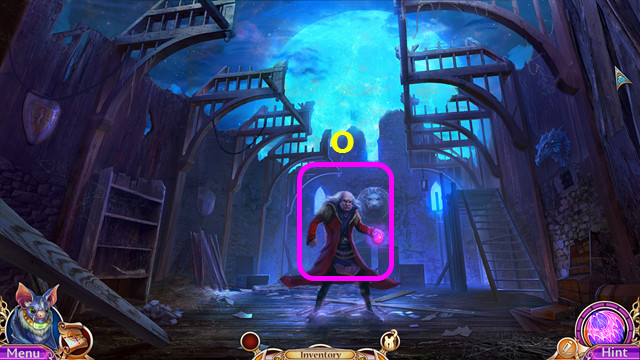
- Continuing this method, rotate-G-rotate-H-rotate-I-J-K.
- Walk forward.
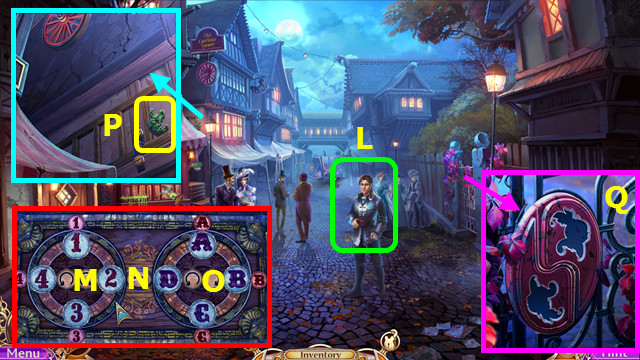
- Talk to Calum (L).
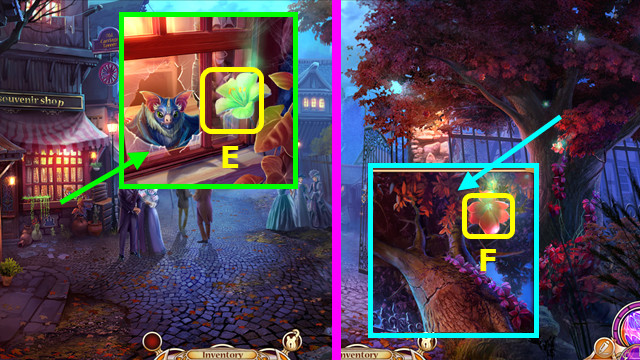
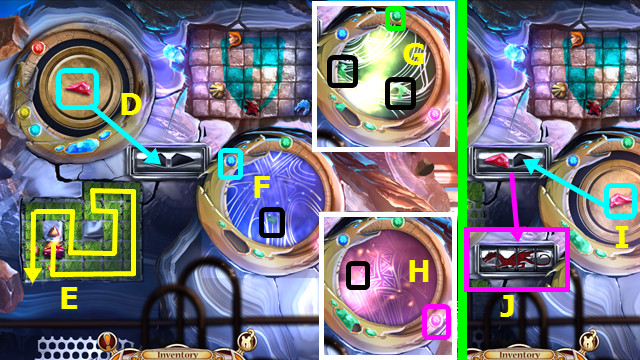
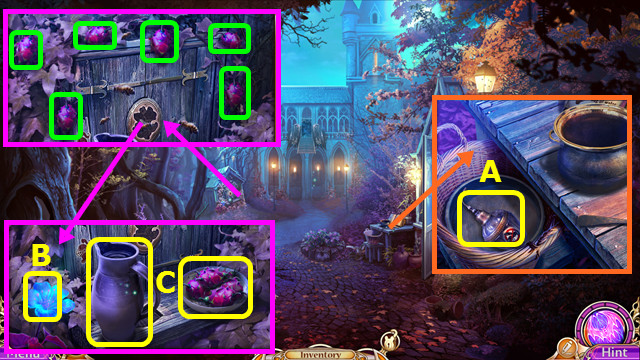
- Select M-O-N-Mx3-O-N-Mx2-Ox3; look at the photo and take the 1/2 LEAF.
- Take the 2/2 LEAF (P).
- Move the vines 2x; place the 2 LEAVES (Q).
- Walk right.
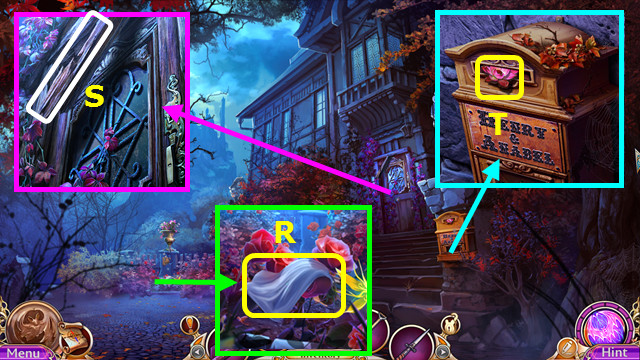
- Take the HANDKERCHIEF (R).
- Move the beam; earn the 1/2 PRECIOUS FLOWER (S).
- Take the 2/2 PRECIOUS FLOWER (T).
- Walk down.
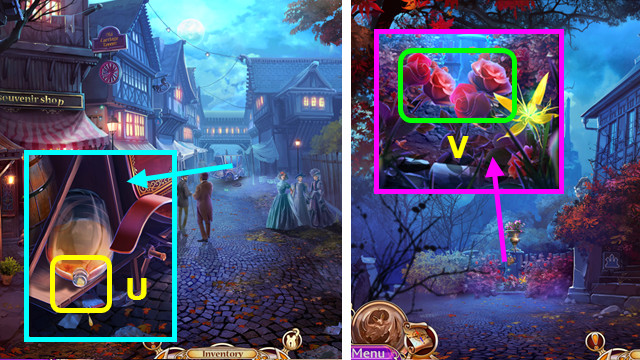
- Use the HANDKERCHIEF to make the OILY HANDKERCHIEF (U).
- Walk right.
- Use the DAGGER and SHOVEL (V).
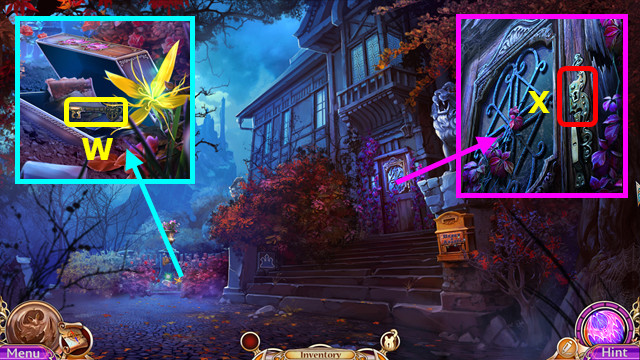
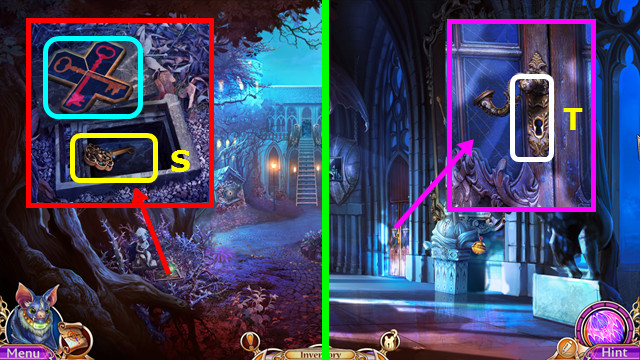
- Use the OILY HANDKERCHIEF and 2 PRECIOUS FLOWERS; take the HOUSE KEY and view the pictures (W).
- Use the HOUSE KEY (X).
- Walk forward.
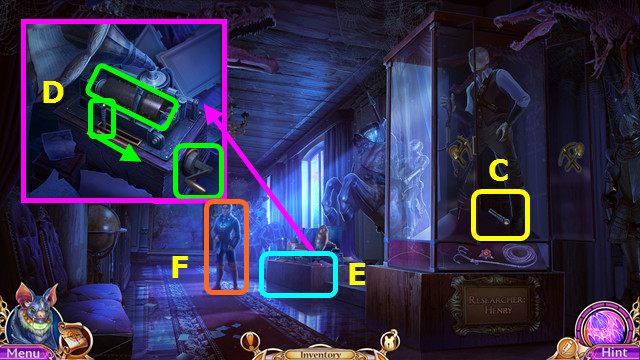
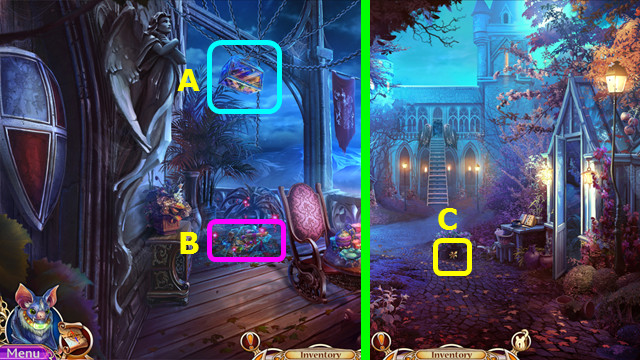
- Take the 1st CLOVER(A).
- Take the ALCHEMIST’S KIT and POSTBOX AMULET (B).
- Open the ALCHEMIST’S KIT and read the notes; take the TWEEZERS and FLASK (inventory).
- Walk down.
- Use the TWEEZERS to take the 1st PETAL (C).
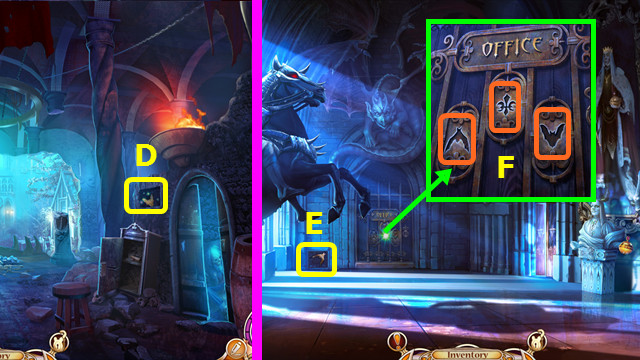
- Place the POSTBOX AMULET; take the 2nd BOOK (D).
- Walk down.
- Use the TWEEZERS to take the 2nd PETAL (E).
- Walk down.
- Use the TWEEZERS to take the 3rd PETAL (F).
- Add the 3 PETALS to the ALCHEMIST’S KIT; take the SLEEPING POTION (inventory).
- Walk forward.
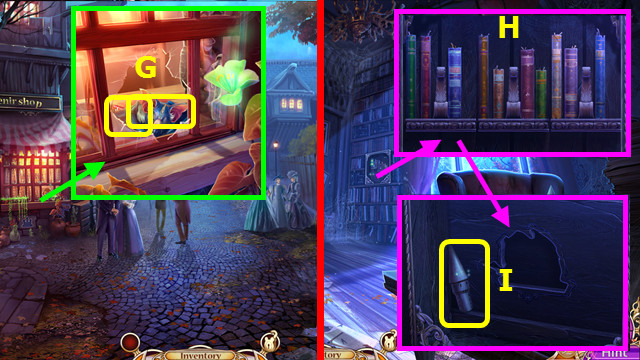
- Use the SLEEPING POTION; take the SLEEPING FAMILIAR and 3rd BOOK (G).
- Walk right and forward.
- Place the 3 BOOKS; arrange as shown (H).
- Take the CASTLE TOWER (I).
- Place the CASTLE TOWER; take the 2nd CLOVER (J).
- Combine ANABEL’S BOX and 2 CLOVERS; take the QUEENLY MEDALLION and SAFE FRAGMENT (inventory).
- Place the SAFE FRAGMENT (K).
- Solution (L); this mini-game is randomly generated.
- Take the 2 HIDING PLACE IMAGES (M).
- Walk down.
Chapter 2: The Hiding Places
- Use the 1st HIDING PLACE IMAGE (A).
- Take the 1st PICTURE FRAGMENT (B).
- Walk down.
- Use the 2nd HIDING PLACE IMAGE (C).
- Take the 2nd PICTURE FRAGMENT (D).
- Walk right and forward.
- Place the 2 PICTURE FRAGMENTS (E).
- Play the HOP; earn the PARCEL (F).
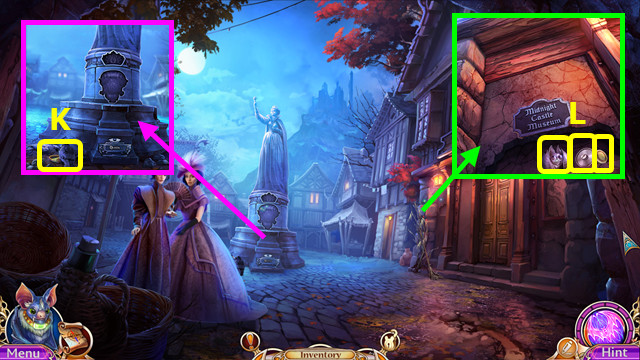
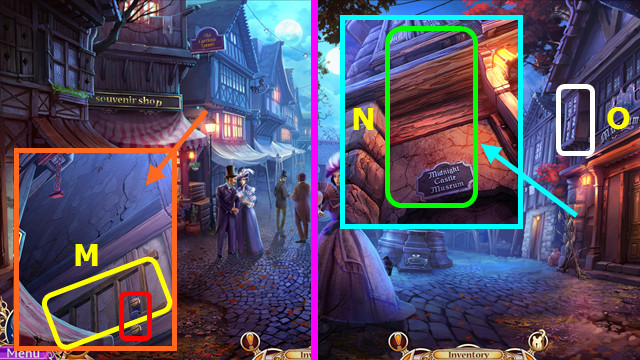
- Open the PARCEL; take the MUSEUM NAMEPLATE, MAGIC COLLAR, and read the journal (inventory).
- Combine the SLEEPING FAMILIAR and MAGIC COLLAR to make the FAMILIAR (inventory).
- The FAMILIAR is now on the menu bar (G).
- Walk down 2x.
- Use the FAMILIAR; take the WHEEL (H).
- Place the WHEEL (I).
- Go forward.
- Take the RING (K).
- Place the MUSEUM NAMEPLATE; take the 1st CLOCK FIGURINE, 1st GEAR, and COIN (L).
- Walk down.
- Use the COIN; take the LADDER (M).
- Walk forward.
- Place the LADDER (N).
- Enter (O).
- Take the 2nd GEAR (P).
- Use the FAMILIAR to take the 2nd CLOCK FIGURINE (Q).
- Return to the House.
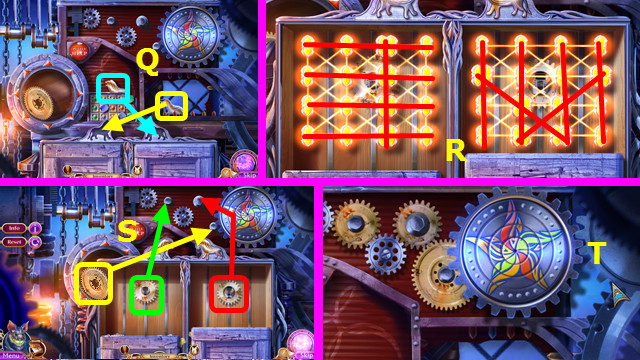
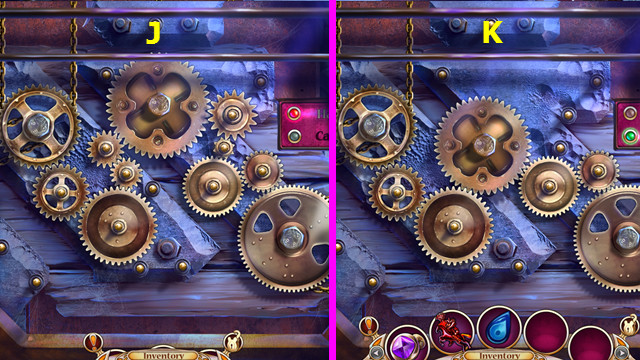
- Place the 2 GEARS; take the POSTBOX MONOGRAM (R).
- Walk down.
- Place the POSTBOX MONOGRAM; select (S).
- Select pairs (color-coded).
- Take the 3rd CLOCK FIGURINE (T).
- Return to the Museum.
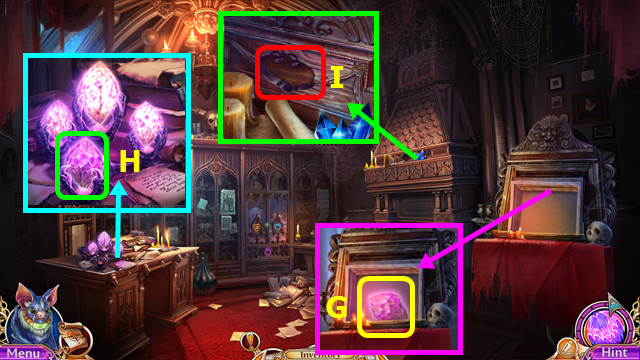
- Place the 3 CLOCK FIGURINES; take the CYLINDER and CREST ELEMENT (A).
- Walk down.
- Place the CREST ELEMENT; take the EXPLORER SYMBOL and HANDLE (B).
- Go right.
- Place the EXPLORER SYMBOL; take the LEVER (C).
- Place the CYLINDER, HANDLE, and LEVER; move the lever and turn the handle (D).
- Play the HOP (E).
- Talk to Calum (F).
- Go forward.
- Use the FAMILIAR; take the CREST ELEMENT (H).
- Walk down 2x.
- Place the CREST ELEMENT; take the DIAMOND and FATHER’S AMULET (I).
- Combine the RING and DIAMOND to make the DIAMOND RING (inventory).
- Go right.
- Use the DIAMOND RING; take the 1/2 WOLF EYE and GRAPPLING HOOK (J).
- Go forward.
- Use the GRAPPLING HOOK (K).
- Open the chest; take the 2/2 WOLF EYE (L).
- Place the 2 WOLF EYES; take the CHAMBERLAIN’S SYMBOL (M).
- Place the QUEENLY MEDALLION, CHAMBERLAIN’S SYMBOL, and FATHER’S AMULET (N).
- Select A-B-A-Cx2.
- Move the crankshafts (color-coded).
- Connect the heads as shown (D).
- Select E-F-G-H-I-J-K-L-M-O-N-P-E-G-H-E-M.
- Move the 2 lions (Q).
- Select the red lines (R).
- Move the 3 gears (S).
- Restore the pinwheel (T).
- Go forward.
- Talk to the Chamberlain; earn the MYSTERIOUS BOX (U).
- Combine the MYSTERIOUS BOX and QUEENLY MEDALLION (inventory).
- The MYSTERIOUS BOX is now on the right (W).
- Use the FAMILIAR (V).
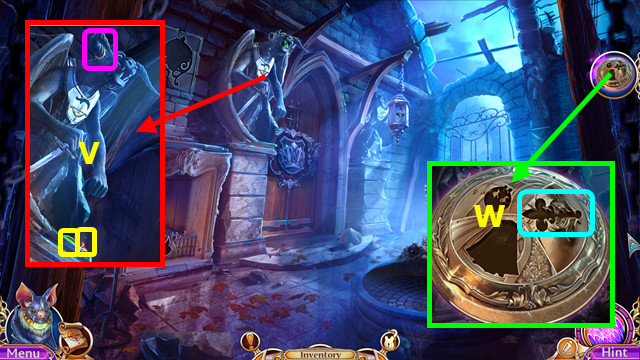
- Take the GARGOYLE FRAGMENT (X).
- Walk forward.
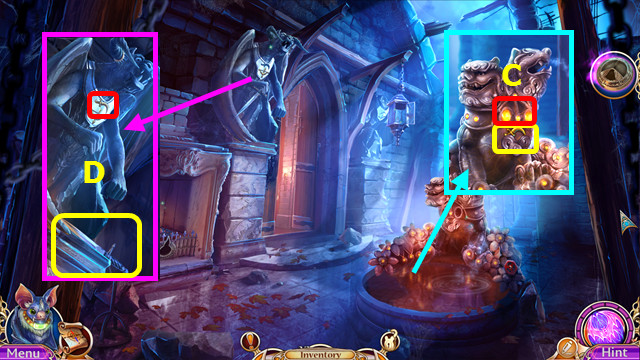
Chapter 3: The Castle
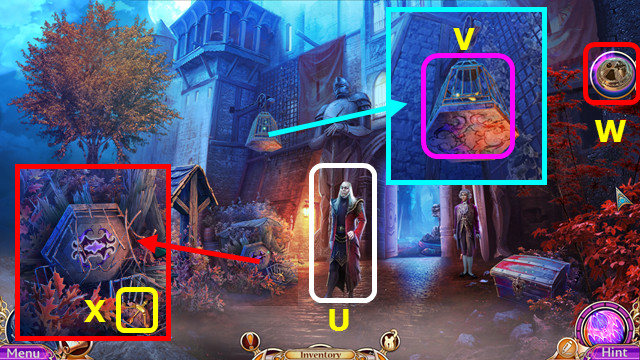
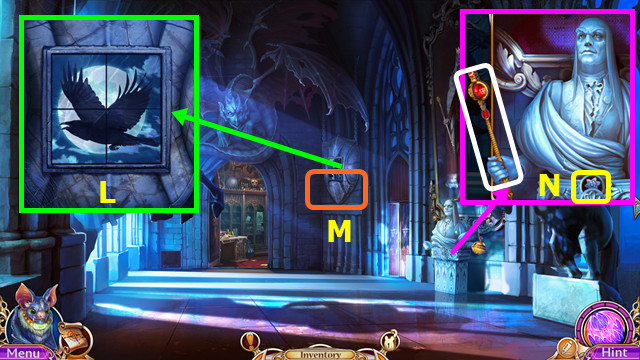
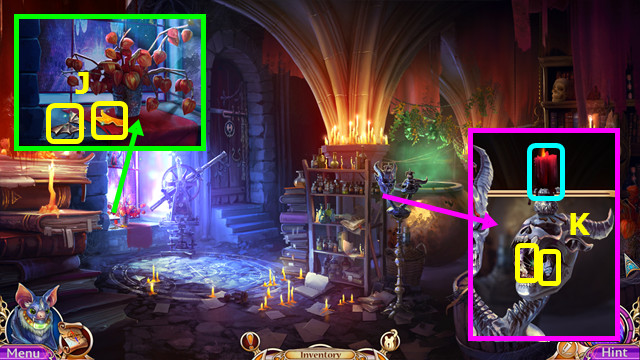
- Take the 1st CAGE’S DECORATION; place the GARGOYLE FRAGMENT and take the BOW (N).
- Take the BROOM (O).
- Take the SCARF and STONE (P).
- Use the SCARF to take the POT (Q).
- Walk down.
- Use the STONE; use the POT to take the WATER (R).
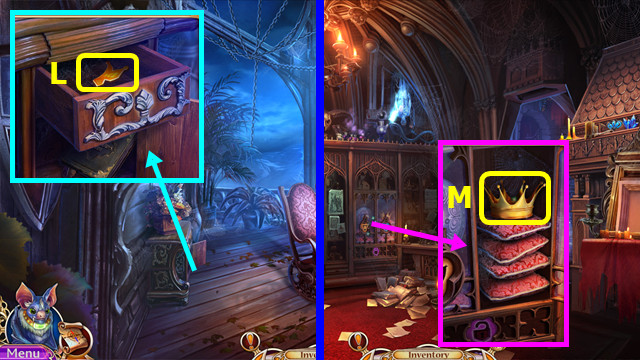
- Go forward.
- Use the WATER and BROOM; take the CHEST KEY (S).
- Walk down.
- Use the CHEST KEY (T).
- Play the HOP; earn the GARGOYLE HORN (U).
- Go forward.
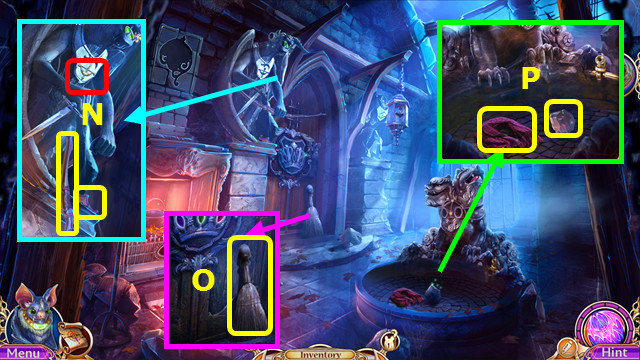
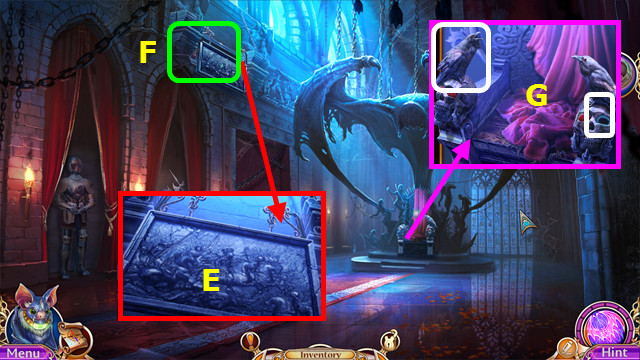
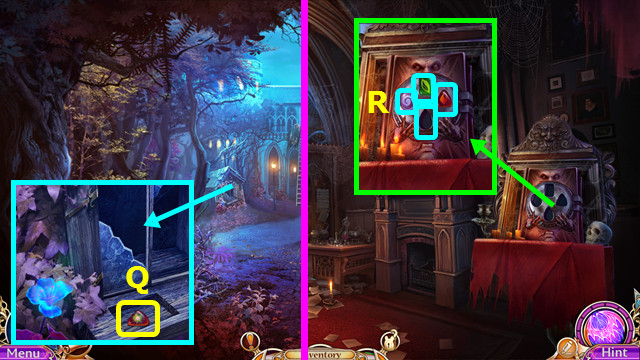
- Place the GARGOYLE HORN; take the 1st OVAL GEM and MYSTERIOUS BOX ELEMENT (V).
- Place the MYSTERIOUS BOX ELEMENT (W).
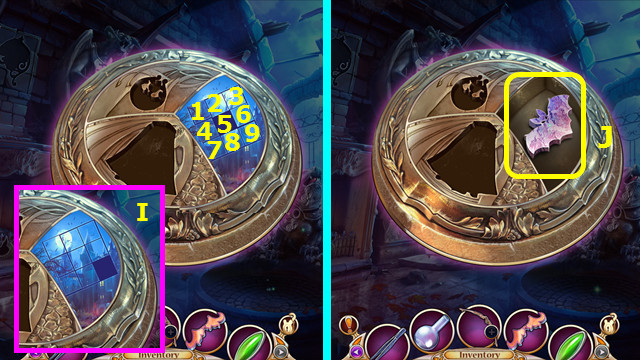
- Select 8-7-4-1-2-3-6-9.
- Final solution (I).
- Take the LANTERN EMBLEM (J).
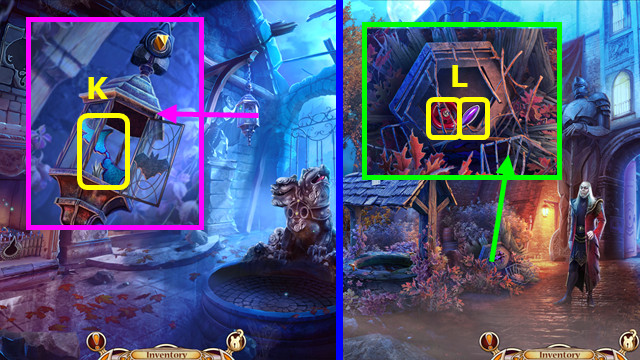
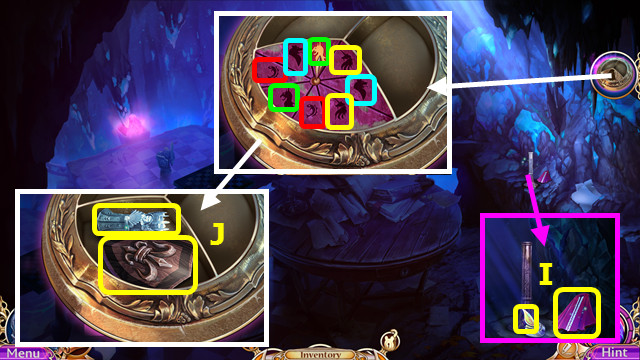
- Place the LANTERN EMBLEM; take the 2nd CAGE’S DECORATION (K).
- Walk down.
- Place the 2 CAGE’S DECORATIONS; take the 2nd OVAL GEM and VALVE (L).
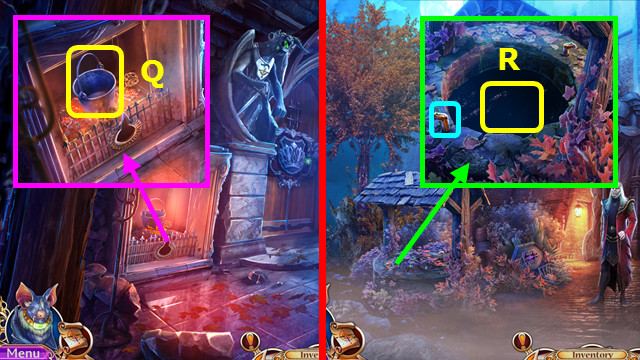
- Go forward.
- Use the VALVE; take the 3rd OVAL GEM (M).
- Place the 3 OVAL GEMS (N).

- Play the match-3 mini-game; move the 3 keys (white) below the line (O).
- Swap gems to make chains of 3 or more (P).
- Walk left.
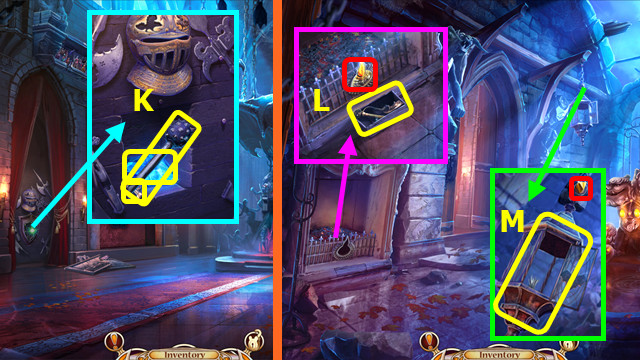
- Take the MYSTERIOUS BOX ELEMENT (Q).
- Place the MYSTERIOUS BOX ELEMENT; select 1-6. The sequence is randomly generated; you solution may vary.
- Take the WALL AMULET (R).
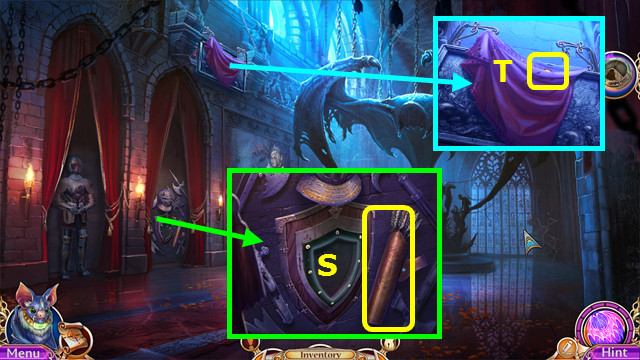
- Take the QUIVER (S).
- Use the FAMILIAR; earn the 1/2 STONE (T).
- Walk down.
- Place the WALL AMULET; take the FRESCO FRAGMENT (A).
- Walk left.
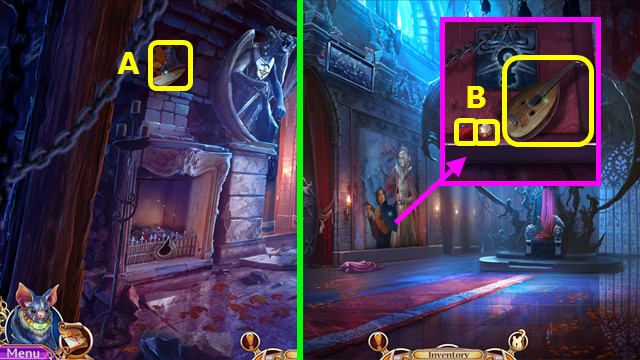
- Place the FRESCO FRAGMENT; take the 2/2 STONE, RED GEM, and LUTE (B).
- Walk down.
- Place the 2 STONES; take the GARGOYLE PART (C).
- Place the GARGOYLE PART; take the DAGGER (D).
- Combine the LUTE and DAGGER to find the STRING (inventory).
- Combine the BOW, STRING, and QUIVER to make the BOW WITH ARROWS (inventory).
- Walk left.
- Use the BOW WITH ARROWS (E).
- Play the HOP; earn the STONE RAVEN (F).
- Place the STONE RAVEN and RED GEM (G).
- Go forward.
- Take the MYSTERIOUS BOX ELEMENT and FIREPLACE AMULET (I).
- Place the MYSTERIOUS BOX ELEMENT; select the matching symbols (color-coded).
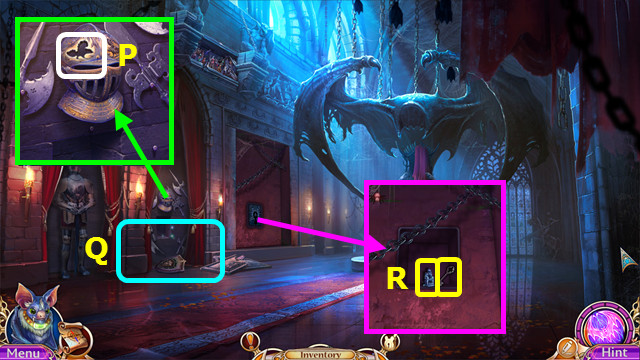
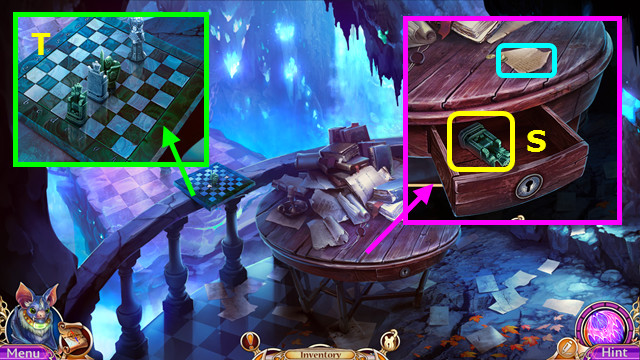
- Take the COAT OF ARMS and the 1st CHESS PIECE (J).
- Walk down.
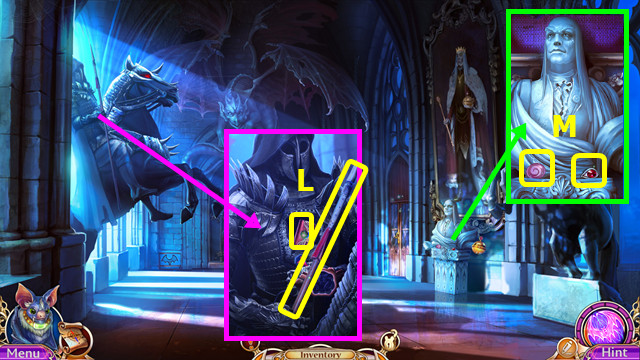
- Place the COAT OF ARMS; take the MACE, CRYSTAL, and TRIHEDRON (K).
- Walk down.
- Place the FIREPLACE AMULET; take the TINDERBOX (L).
- Use the TRIHEDRON to take the LANTERN (M).
- Combine the LANTERN and TINDERBOX to make the LIT LANTERN (inventory).
- Walk left and forward.
- Place the LIT LANTERN and CRYSTAL (N).
- Take the HELMET DECORATION (O).
- Walk down.
- Place the HELMET DECORATION (P).
- Play the HOP; earn the KEY EMBLEM (Q).
- Place the KEY EMBLEM; take the 2nd CHESS PIECE and DESK KEY (R).
- Walk forward.
- Read the note and use the DESK KEY; take the 3rd CHESS PIECE (S).
- Place the 3 CHESS PIECES (T).

- Level 1 solution: 1-2.
- Level 2 solution: 3-4.
Chapter 4: The Shore

- Talk to the Mermaids (A).
- Use the FAMILIAR; take the SMALL CHEST (B).
- Use the MACE; take the DRAGON TOKEN (C).
- Combine the SMALL CHEST and DRAGON TOKEN; press the tokens left-right-center and take the AWL (inventory).
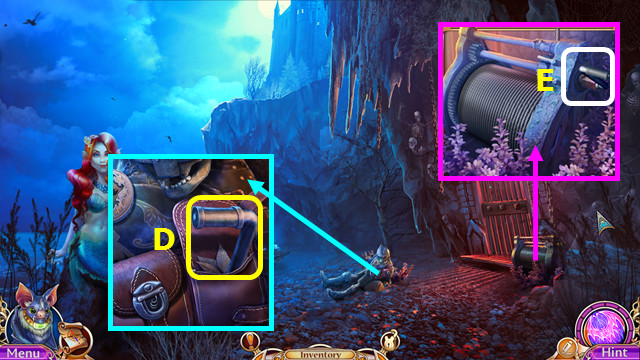
- Use the AWL; take the MECHANISM HANDLE (D).
- Use the MECHANISM HANDLE (E).
- Walk right.
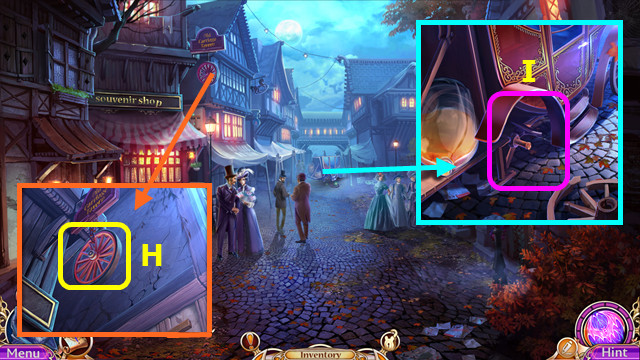
- Take the 1st SAFE ELEMENT (G).
- Take the LOCKPICK (H).
- Use the LOCKPICK (I).
- Play the HOP; earn the BUTTON (J).
- Walk down.
- Place the BUTTON; take the 2nd SAFE ELEMENT (K).
- Walk right.
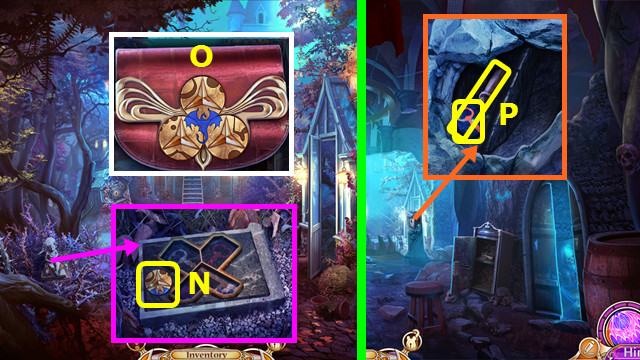
- Place the 2 SAFE ELEMENTS; take the OCTAGON ELEMENT and read the scroll (L).
- Place the OCTAGON ELEMENT; take the GUARDIAN BADGE (M).
- Walk down.
- Place the GUARDIAN BADGE; take the HOOK (N).
- Use the HOOK; take the DIAMOND ELEMENT (O).
- Walk right.
- Place the DIAMOND ELEMENT; take the GRATE (P).
- Place the GRATE (Q).
- Rotate the rocks and change the runes as shown (green).
- Select blue-orange x4-blue x5-yellow x3-red x2-yellow x2-red x2.
- Select the red gem; take the pieces (A).
- Select the yellow gem; take the pieces (B).
- Select the blue gem; take the pieces (C).
- Move the stone (D).
- Slide the piece along the path (E).
- Select the blue gem; take the piece (F).
- Select the green gem; take the pieces (G).
- Select the pink gem; take the piece (H).
- Move the stone (I).
- Restore the dragon (J).
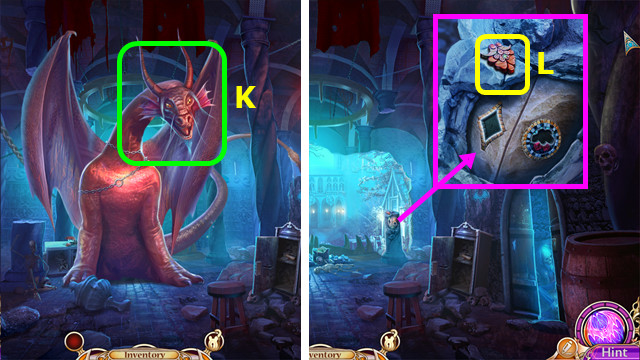
- Talk to the Dragon (K).
- Take the 1st HERBALIST AMULET (L).
- Go forward.
- Take the 2nd HERBALIST AMULET (M).
- Take the KNIGHT SYMBOL and the 1st ELEMENTS SYMBOL; read the book (N).
- Place the 2 HERBALIST AMULETS; take the GREENHOUSE HANDLE and GLOVE (O).
- Use the GLOVE; select 1-4.
- Take the MOSAIC FLOWER FRAGMENT (P).
- Use the FAMILIAR (Q).
- Use the GREENHOUSE HANDLE (R).
- Play the HOP; earn the SCARLET BUD (S).
- Walk down.
- Place the MOSAIC FLOWER FRAGMENT; take the HERBALIST EMBLEM (T).
- Go forward.
- Place the HERBALIST EMBLEM; take the BEE REPELLENT (A).
- Use the BEE REPELLENT; select the 6 crimson fruit (green).
- Use the TWEEZERS to take the 1st PETAL (B).
- Take the JUG and CRIMSON FRUIT (C).
- Place the CRIMSON FRUIT (E); use (F) on (E).
- Use the SCARLET BUD and JUG (E).
- Use the PETAL (E); use (G) on (E).
- Place the VIAL (H); use (E) on (H).
- Take the STRENGTH POTION (H).
- Use the STRENGTH POTION on the FAMILIAR (inventory).
- Use the FAMILIAR (I).
- Hard solution (J).
- Casual solution (K).
- Go forward.
- Place the KNIGHT SYMBOL; take the PURSE and SPEAR (L).
- Take the 2nd ELEMENTS SYMBOL and 1st CHAMBERLAIN’S AMULET FRAGMENT (M).
- Walk down.
- Use the SPEAR; take the PURSE ELEMENT (N).
- Combine the PURSE and PURSE ELEMENT; restore the elements (O), and take the MOSAIC FLOWER FRAGMENT.
- Walk down.
- Place the MOSAIC FLOWER FRAGMENT; take the CHISEL and 1st AMULET KEY (P).
- Go forward.
- Use the CHISEL; take the 2nd AMULET KEY and SCARY AMULET (Q).
- Go forward.
- Place the SCARY AMULET; take the 3rd AMULET KEY (R).
- Walk down.
- Place the 3 AMULET KEYS; take the BALCONY KEY (S).
- Go forward.
- Use the BALCONY KEY (T).
- Walk right.
- Use the FAMILIAR (A).
- Play the HOP; earn the ENVELOPE (B).
- Open the ENVELOPE; take the 3 HIDING PLACE IMAGES (inventory).
- Walk down 2x.
- Use the 1st HIDING PLACE IMAGE; take the 1st CHAMBERLAIN’S SYMBOL (C).
- Walk down.
- Use the 2nd HIDING PLACE IMAGE; take the 2nd CHAMBERLAIN’S SYMBOL (D).
- Go forward 2x.
- Use the 3rd HIDING PLACE IMAGE; take the 3rd CHAMBERLAIN’S SYMBOL (E).
- Place the 3 CHAMBERLAIN’S SYMBOLS (F).
- Go forward.
Chapter 5: The Study
- Take the PLATE and read the note (G).
- Take the CHAMBERLAIN’S TOKEN (H).
- Take the SCEPTER and CANDLE (I).
- Walk down and right.
- Place the PLATE; take the AGRICULTURE SYMBOL (J).
- Walk down 2x.
- Place the AGRICULTURE SYMBOL; take the SHIELD ELEMENT (K).
- Go forward.
- Place the SHIELD ELEMENT; restore the picture (L).
- Play the HOP; earn the BOTTLE TOPPER (M).
- Place the SCEPTER; take the CABINET BUTTON (N).
- Walk right.

- Place the CABINET BUTTON; read the diary and take the BOOK SYMBOL (O).
- Place the BOTTLE TOPPER; take the 3rd ELEMENTS SYMBOL (P).
- Walk down 2x.
- Place the BOOK SYMBOL; take the 4th ELEMENTS SYMBOL (Q).
- Go forward 2x.
- Place the 4 ELEMENTS SYMBOLS (R).
- Restore the images (A-D).
- Drag and drop into place.
- Take the CRYSTAL (G).
- Place the CRYSTAL (H).
- Place the CHAMBERLAIN’S TOKEN (I).
- Walk right.
- Take the 2nd CHAMBERLAIN’S AMULET FRAGMENT and 1st CROWN SYMBOL (J).
- Place the CANDLE; take the CABINET BUTTON and CHAMBERLAIN’S AMULET BASE (K).
- Walk down 2x; go right.
- Place the CABINET BUTTON; take the 2nd CROWN SYMBOL (L).
- Walk down and forward.
- Place the 2 CROWN SYMBOLS; take the CROWN (M).
- Walk down.
- Place the CROWN; take the GLASS SHARD (N).
- Go forward and right.
- Place the GLASS SHARD (O).
- Play the HOP; earn the FANG AMULET (P).
- Walk down.
- Place the FANG AMULET; take the 3rd CHAMBERLAIN’S AMULET FRAGMENT and MIRROR SHIELD (Q).
- Combine the CHAMBERLAIN’S AMULET BASE and the 3 CHAMBERLAIN AMULET FRAGMENTS to make the CHAMBERLAIN’S AMULET (inventory).
- Walk right.
- Use the CHAMBERLAIN AMULET (R).
- Walk left.
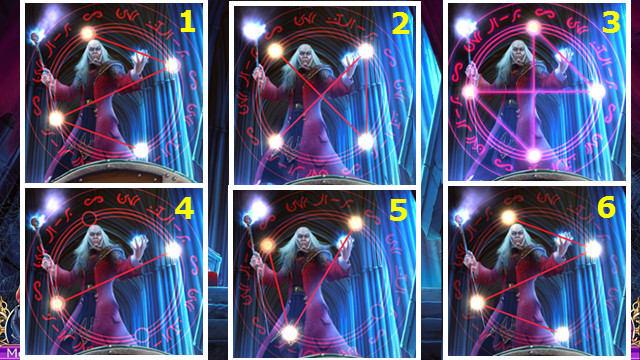
- Use the MIRROR SHIELD.
- Recreate the patterns 1-3 for the hard level.
- Recreate the patterns 4-6 for the casual level.
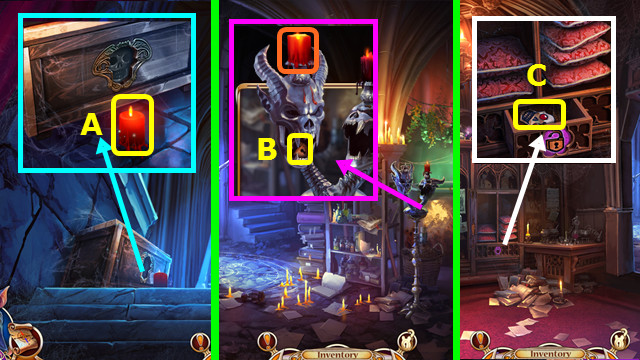
- Take the CANDLE (A).
- Walk down.
- Place the CANDLE; take the LOCK SYMBOL (B).
- Walk down.
- Place the LOCK SYMBOL; take the SKULL SYMBOL (C).
- Go right and left.
- Place the SKULL SYMBOL; take the ATTIC KEY (D).
- Use the ATTIC DOOR KEY (E).
- Go forward.
- Select Calum (F).
- Take the HOLY FLAME SWORD (G).
- Use the HOLY FLAME SWORD (H).
- Trace the images I-J-K for casual level.
- Trace the images K-L-M-N for hard level.
- Use the FAMILIAR (O).
- Congratulations! You have completed Midnight Calling: Anabel!


 Mayan Prophecies: Blood Moon Walkthrough, Guide, & Tips
 Lara Gates: The Lost Talisman Walkthrough, Guide, & Tips
 Secrets of the Dark: Mystery of the Ancestral Estate Walkthrough, Guide, & Tips
 Syberia, Part 3 Walkthrough, Guide, & Tips
 Love Chronicles: The Sword and the Rose Walkthrough, Guide, & Tips