Grim Tales: Threads of Destiny Walkthrough, Guide, & Tips
Grim Tales: Threads of Destiny Walkthrough

Welcome to the Grim Tales: Threads of Destiny Walkthrough
Can you free Jackie’s parents from their deadly fates?
Whether you use this document as a reference when things get difficult or as a road map to get you from beginning to end, we’re pretty sure you’ll find what you’re looking for here.
This document contains a complete Grim Tales: Threads of Destiny game walkthrough featuring annotated screenshots from actual gameplay!
We hope you find this information useful as you play your way through the game. Use the walkthrough menu below to quickly jump to whatever stage of the game you need help with.
Remember to visit the Big Fish Games Forums if you find you need more help. Have fun!
This walkthrough was created by prpldva, and is protected under US Copyright laws. Any unauthorized use, including re-publication in whole or in part, without permission, is strictly prohibited.
General Tips
- This is the official guide for Grim Tales: Threads of Destiny.
- This guide will not mention each time you have to zoom into a location; the screenshots will show each zoom scene.
- Hidden-object puzzles are referred to as HOPs. This guide will not show HOP solutions. It will identify the location of the HOP and the inventory item acquired.
- This guide will show solutions for non-random puzzles. Please read the in-game instructions for each puzzle.
- In this game, you will sometimes have to select the new scene to trigger dialog, cut-scenes, or tasks prior to interacting with the scene.
Chapter 1: Greg Duffy

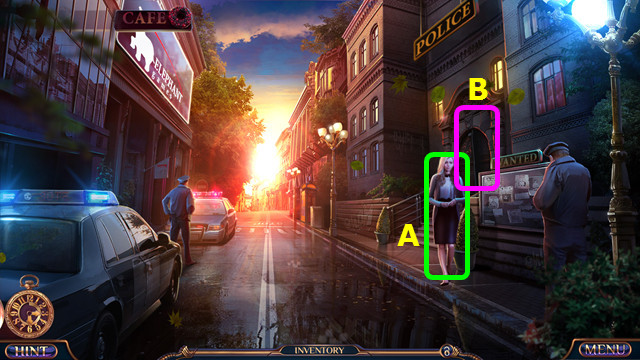
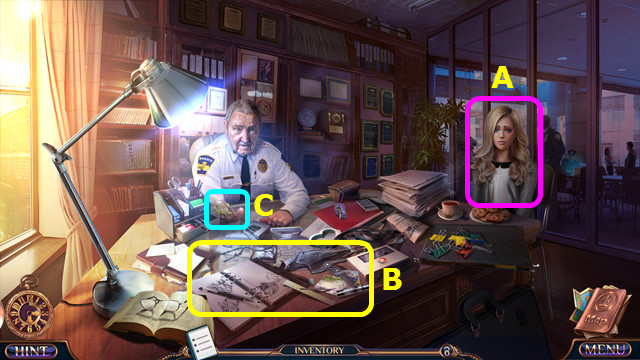
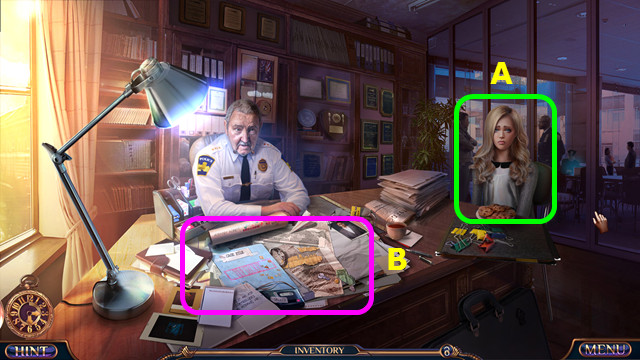
- Talk to Jackie (A).
- Walk right (B).
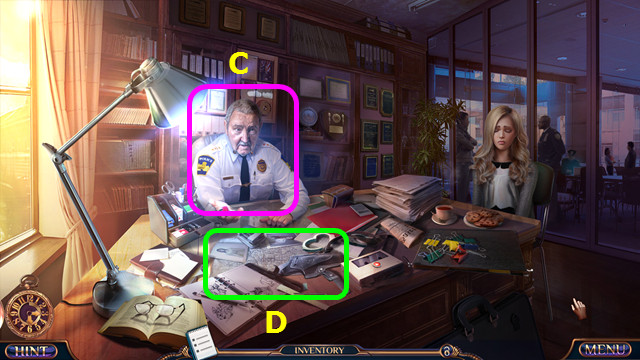
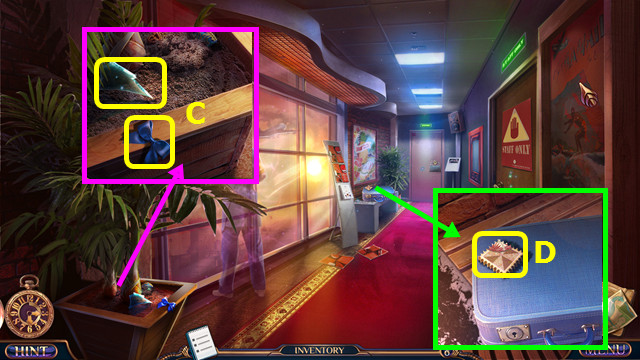
- Talk to the Sheriff (C).
- Play the HOP; earn the CASE NOTES and KILLER’S PHOTO (D).
- Talk to the Sheriff again (C); earn the CAR KEY.
- Select the CASE NOTES to lower them.
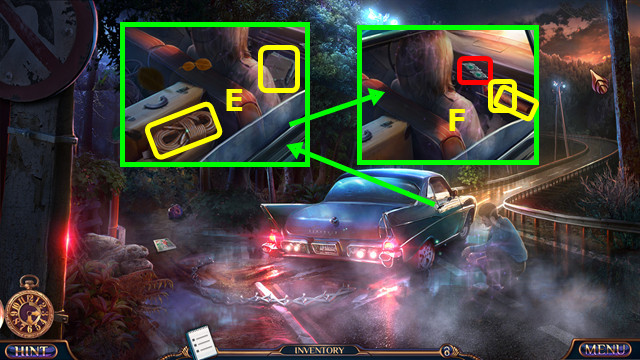
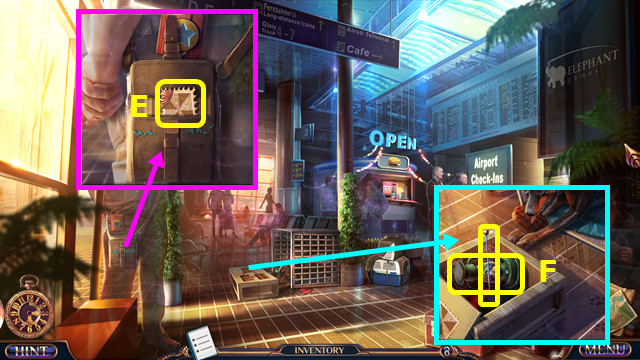
- Take the ROPE and FOLDER (E).
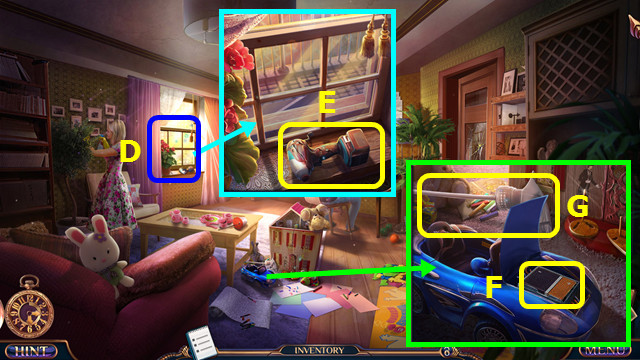
- Read the FOLDER; take the DECORATIVE SLIDER and DOVE EMBLEM (inventory).
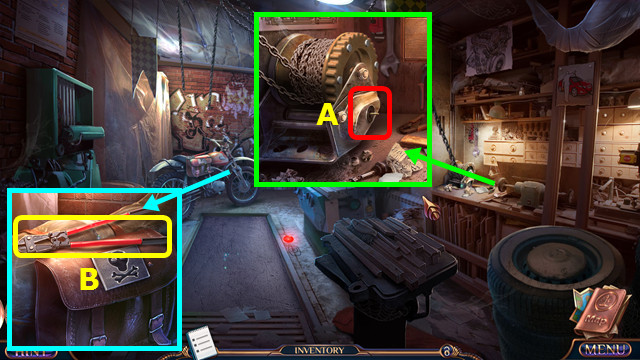
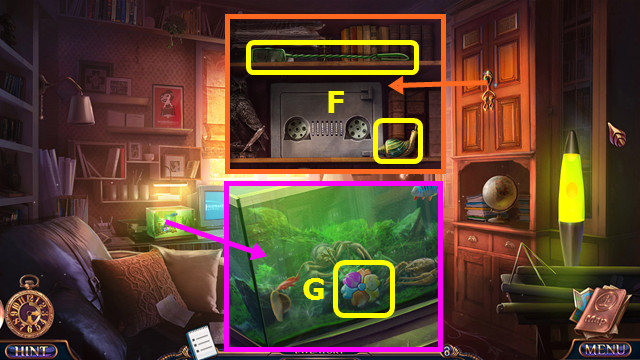
- Place and select the DECORATIVE SLIDER; take the MAP and METAL DISC (F).
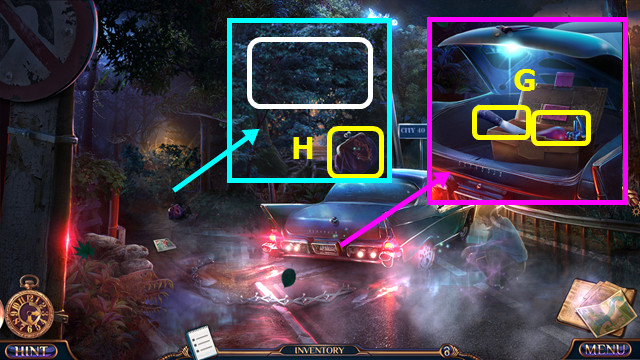
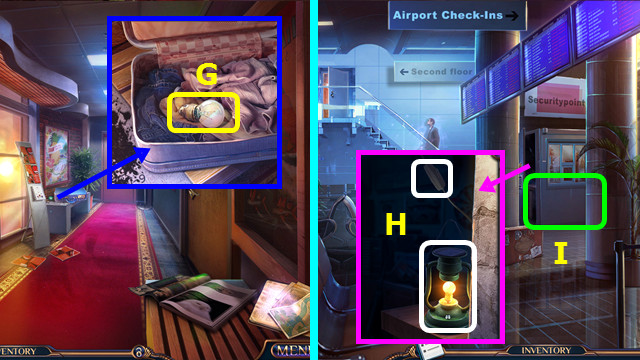
- Use the CAR KEY and place the METAL DISC; take the AXE and EXTINGUISHER (G).
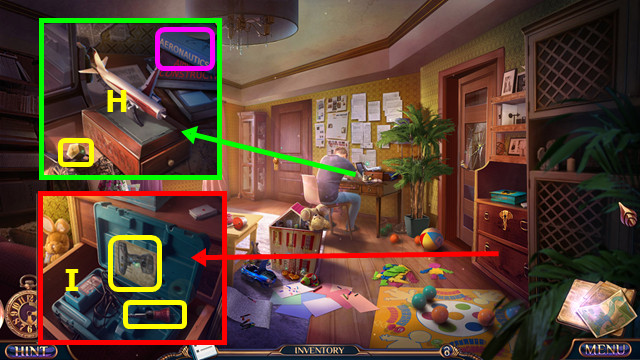
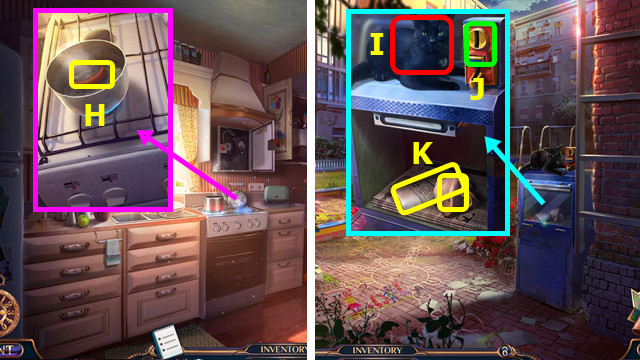
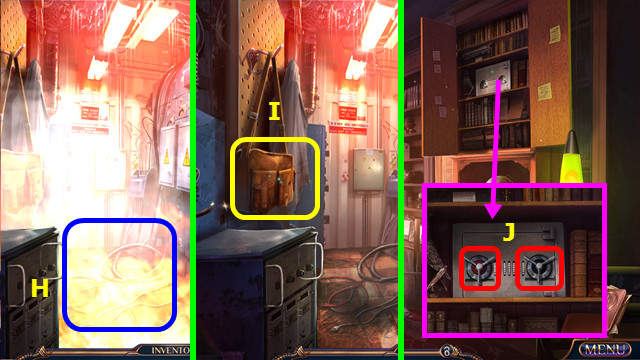
- Take the COIN PURSE; use the AXE 4x (H).
- Walk left.
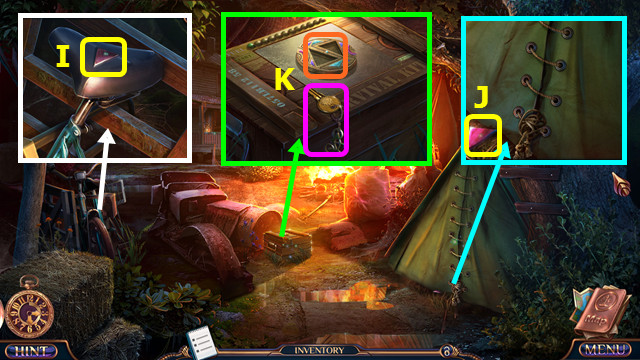
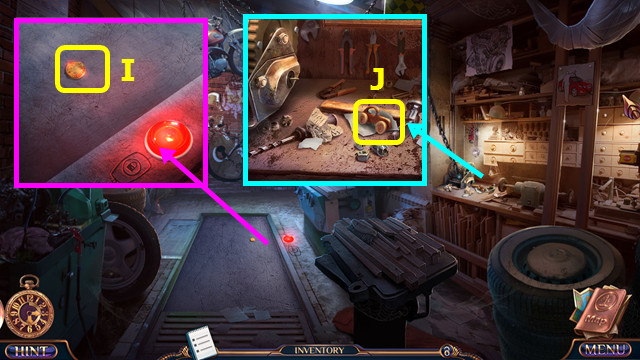
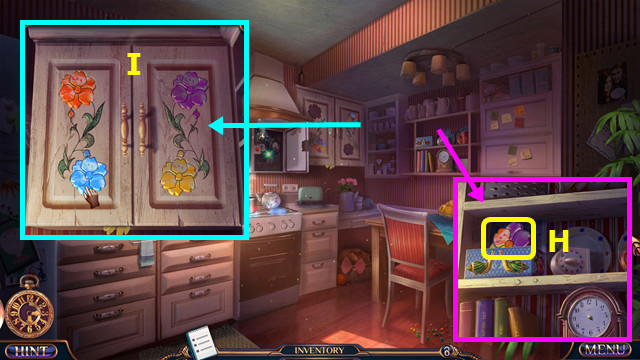
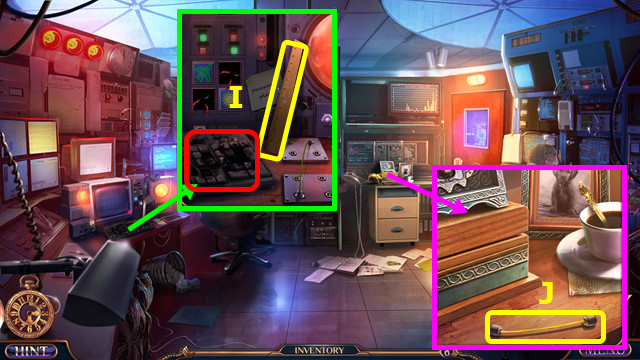
- Take the 1/2 TRIANGLE EMBLEMS (I).
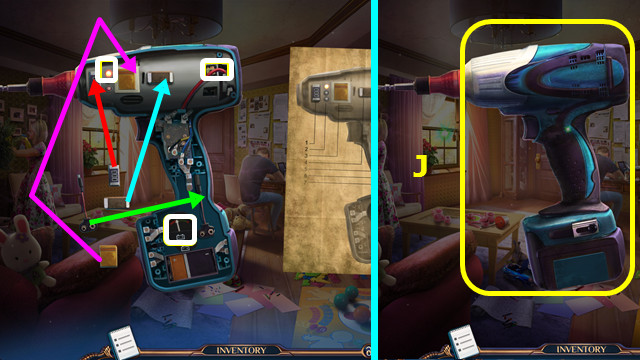
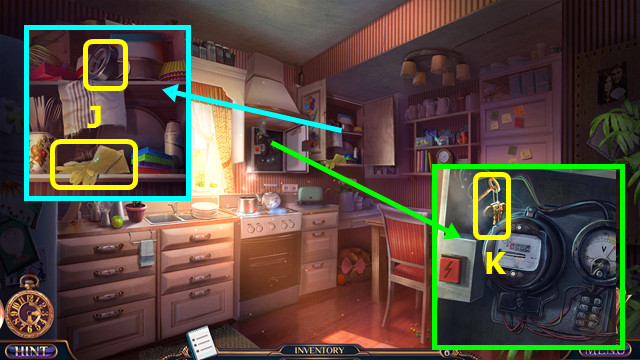
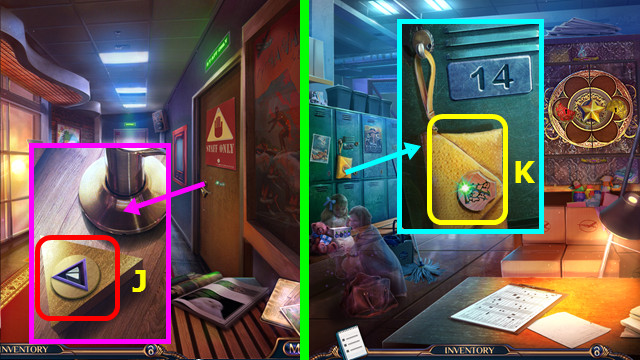
- Take the 2/2 TRIANGLE EMBLEMS (J).
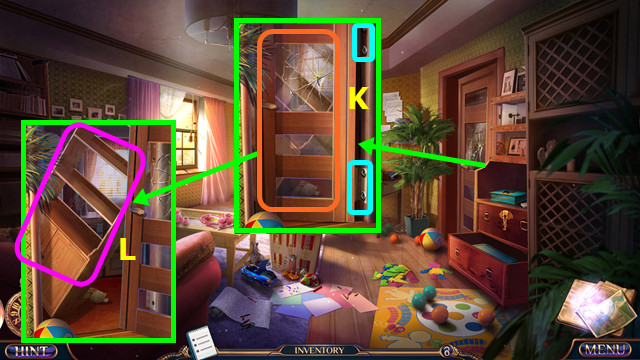
- Touch the key; place the 2 TRIANGLE EMBLEMS (K).

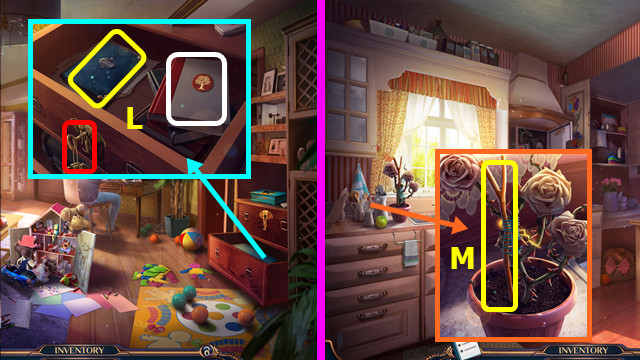
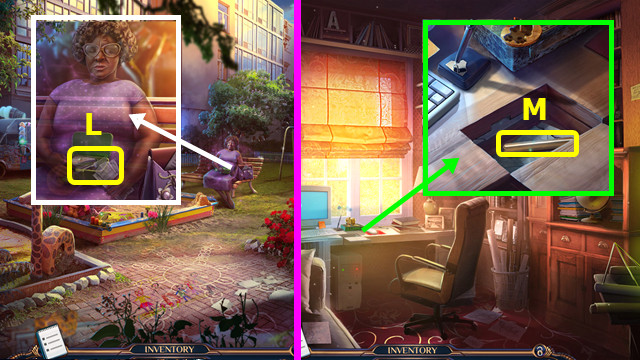
- Solution (L).
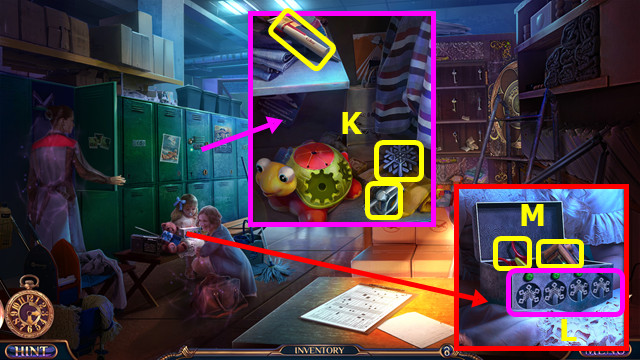
- Take the HAMMER and FLASHLIGHT (M).
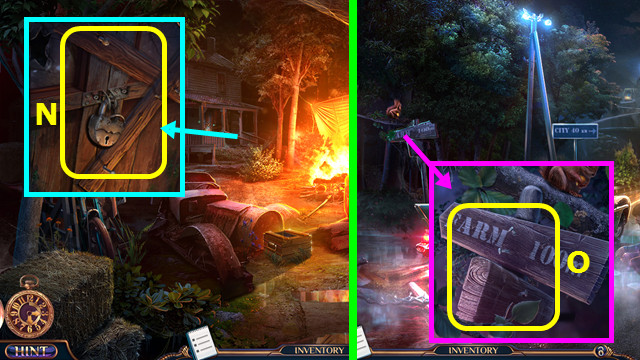
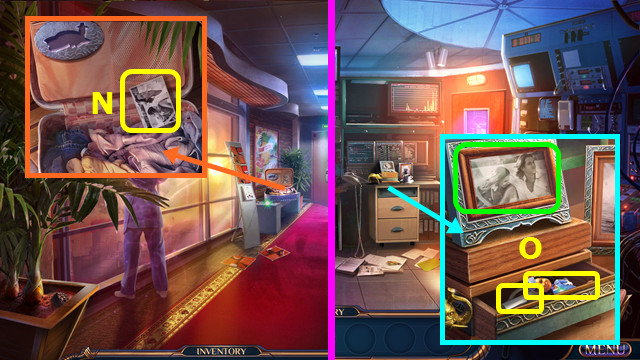
- Use the HAMMER to take 2 PLANKS and 4 NAILS (N).
- Walk down.
- Use the HAMMER to take 2 PLANKS and 4 NAILS (O).
- Walk left.
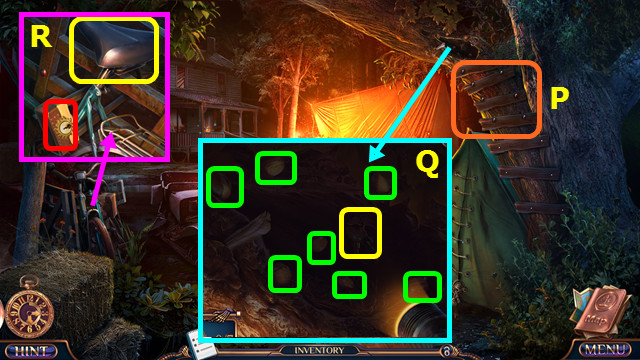
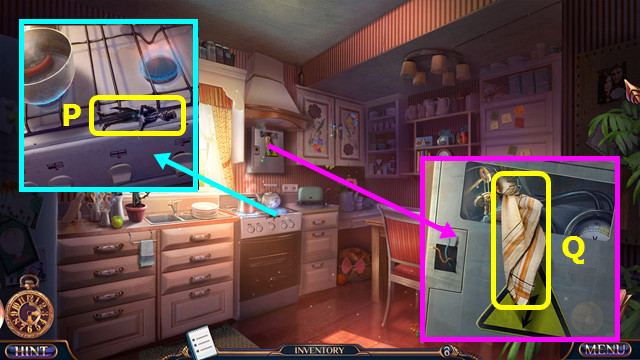
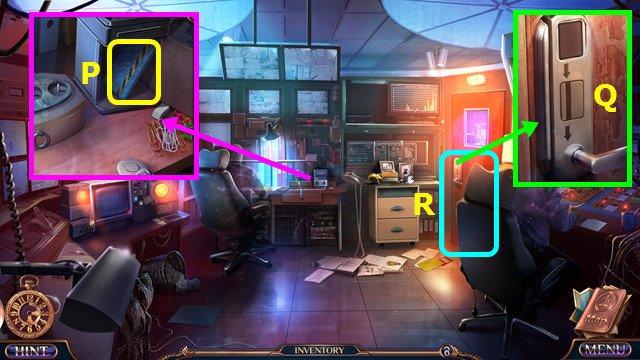
- Use the 4 PLANKS, 8 NAILS, and HAMMER (P).
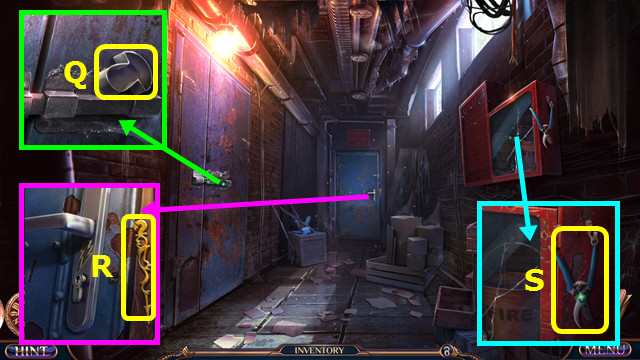
- Use the FLASHLIGHT; collect the 7 NUTS and BICYCLE KEY (Q).
- Use the BICYCLE KEY; take the BICYCLE (R).
- Walk down.
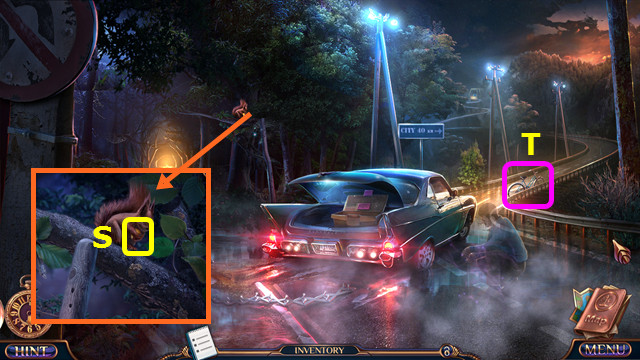
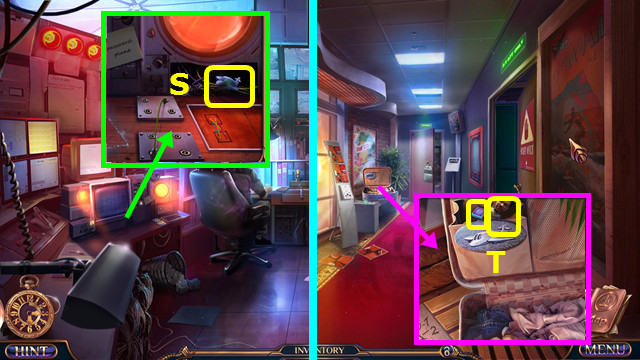
- Use the NUTS to take the GOLDEN NUT (S).
- Combine the COIN PURSE and GOLDEN NUT; take the THREAD and SCRAP PAPER (inventory).
- Use the BICYCLE (T).
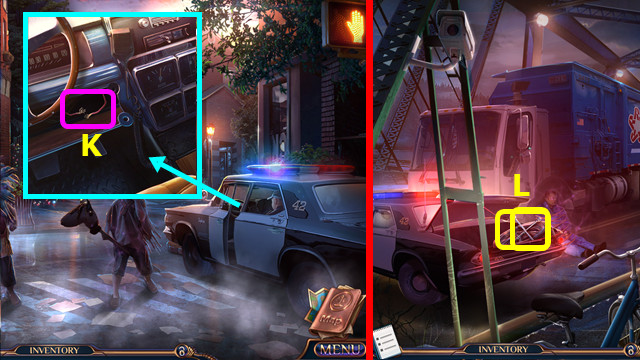
- Select the clip; take the SHARD (A).
- Go forward (B).
- Use the EXTINGUISHER (C).
- Walk down and left.
- Use the SHARD; take the TONGS (D).
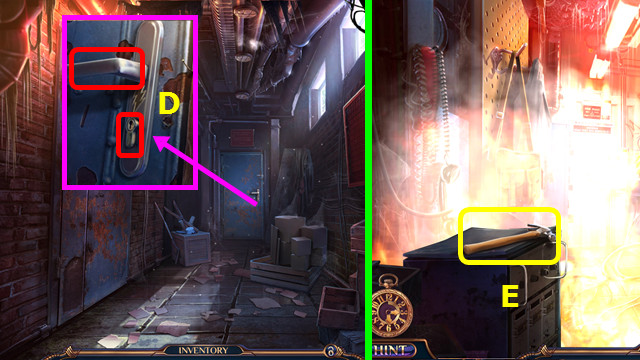
- Walk down and right.
- Use the TONGS to take the BURNING CHARCOAL (E).
- Use the BURNING CHARCOAL; take the LOCKPICK (F).
- Use the LOCKPICK; open the door (G).
- Place the KILLER’S PHOTO (H).
- Select the 4 items (green).
- Use the ROPE; select Greg Duffy (I).
- Take the STOLEN PURSE (J).
- Combine the STOLEN PURSE and DOVE EMBLEM; read the note, take the 1st WOODEN CAR, and GLOVES (inventory).
- Walk down and left.

- Use the LOCKPICK (K).
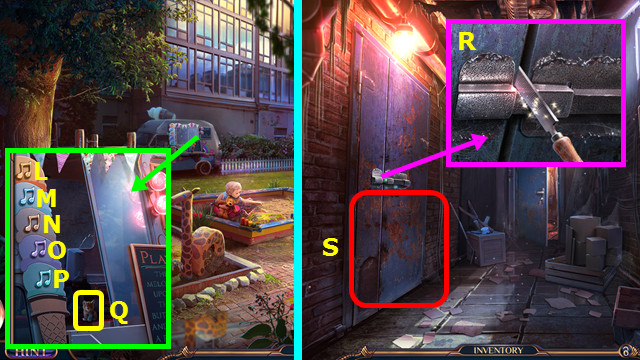
- Play the HOP; earn the CHAINSAW (L).
- Walk down and right.
- Use the CHAINSAW (M).
- Go right.
Chapter 2: Town Outskirts
- Take the BASEBALL BAT (N).
- Use the BASEBALL BAT and GLOVES; take the AWL and PENCIL (O).
- Use the SCRAP PAPER and PENCIL; take the OWL SKETCH (P).
- Take the BOW (Q).
- Walk down 2x; go left.
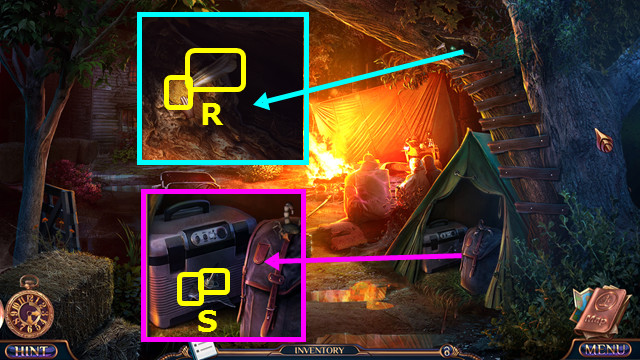
- Use the AWL; take the 1/2 COINS and FEATHERS (R).
- Use the AWL; take the TOGGLE SWITCH and IRON CHUNK (S).
- Combine the IRON CHUNK and OWL SKETCH (inventory).
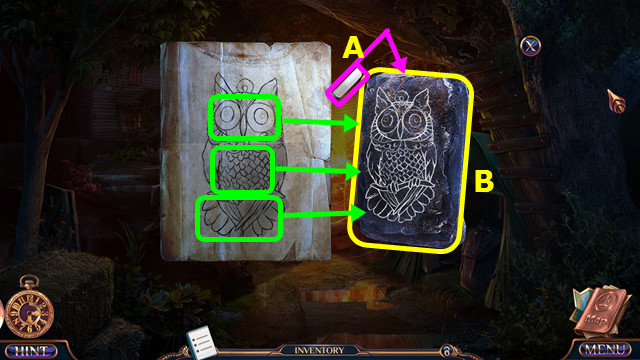
- Use the chalk on the iron chunk (A).
- Change the features to match the sketch (green).
- Use the AWL; take the OWL EMBLEM (B).
- Walk down and right.
- Place and select the TOGGLE SWITCH (C).
- Take the case and look at the photos (D).
- Take the ARROW (E).
- Walk right.
- Place the OWL EMBLEM; take the DUCT TAPE and STICKY CLAY (F).
- Combine the BOW, ARROW, STICKY CLAY, FEATHERS, and THREAD to make the BOW AND ARROW (inventory).
- Use the BOW AND ARROW; click when the ball is in the green areas (G). You earn the GARAGE KEY.
- Use the GARAGE KEY (H).
- Go forward.
- Take the 2/2 COINS (I).
- Take the 2nd WOODEN CAR (J).
- Walk down.
- Place the 2 WOODEN CARS; take the ACETONE (K).
- Go forward.
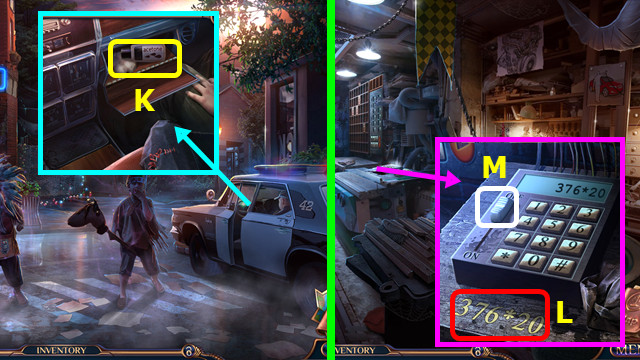
- Use the ACETONE (L).
- Press 3-7-6-*-2-0; slide the switch (M).
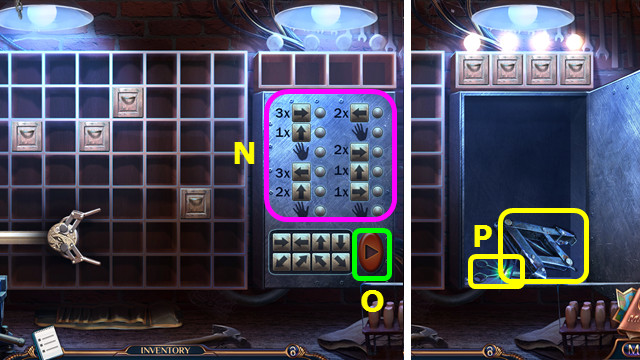
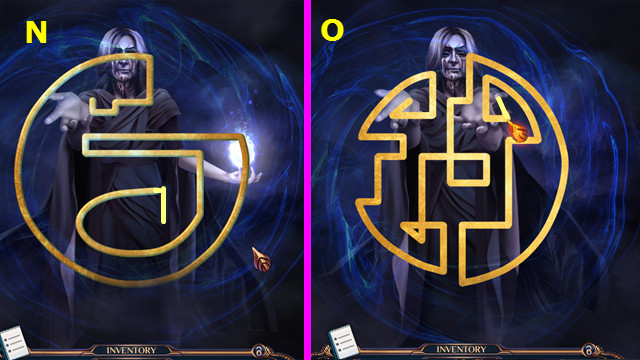
- Solution (N).
- Press (O).
- Take the RUSTY JACK and SCISSORS (P).
- Walk down.
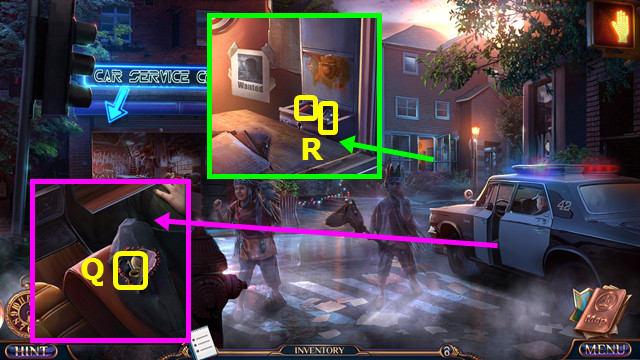
- Use the SCISSORS; take the CABINET KEY (Q).
- Use the CABINET KEY; take the CRANK and BROKEN KEY FOB (R).
- Go forward.
- Use the CRANK (A).
- Take the BOLT CUTTERS (B).
- Walk down.
- Use the BOLT CUTTERS (C).
- Play the HOP; earn the ANTI-RUST SOLUTION (D).
- Combine the RUSTY JACK and ANTI-RUST SOLUTION to find the CAR JACK and CROSSBONES EMBLEM (inventory).
- Use the ANTI-RUST SOLUTION, open the drawer, and take the 1/2 BUTTON BATTERIES and SKULL EMBLEM (E).
- Go forward.
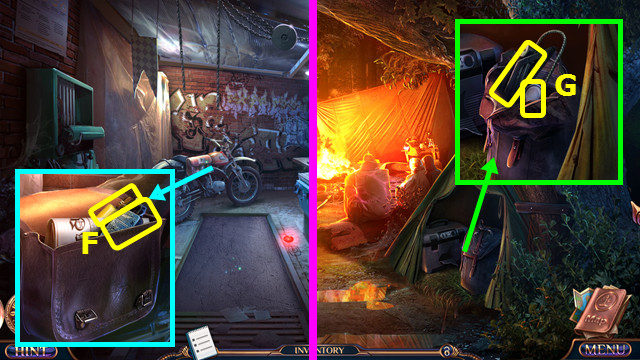
- Place the SKULL EMBLEM and CROSSBONES EMBLEM; take the LIGHTER, move the newspaper, and take the INSECTICIDE (F).
- Walk down 3x; go left.
- Use the INSECTICIDE and open the pack; take the FOOT PUMP and 2/2 BUTTON BATTERY (G).
- Return to the Repair Shop.
- Combine the BROKEN KEY FOB, 2 BUTTON BATTERIES, and DUCT TAPE to make the REMOTE KEY FOB (inventory).
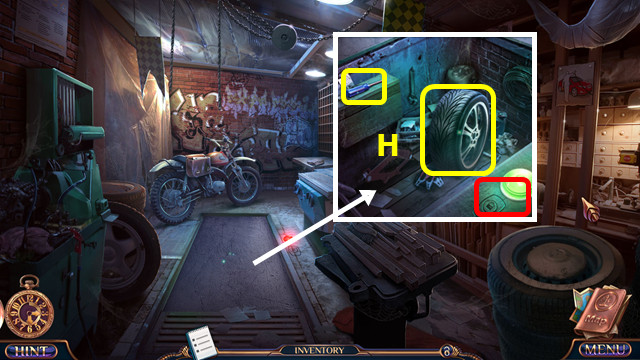
- Use the REMOTE KEY FOB; take the 1/2 TIRE and SCREWDRIVER (H).
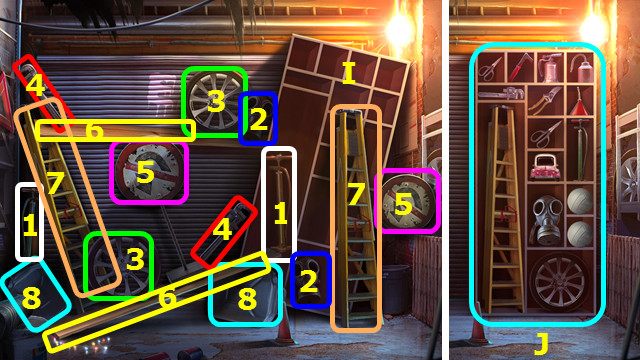
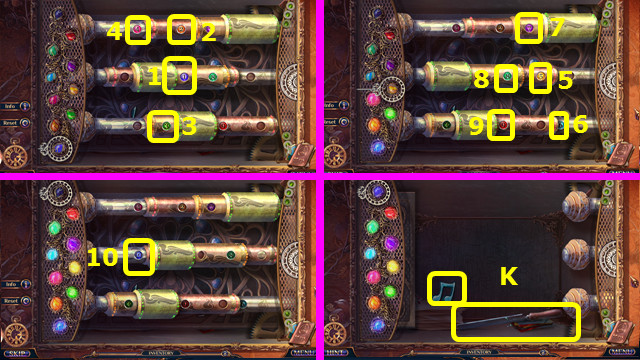
- Select the pairs (1-8); select the shelf (I).
- Restore the items (J).
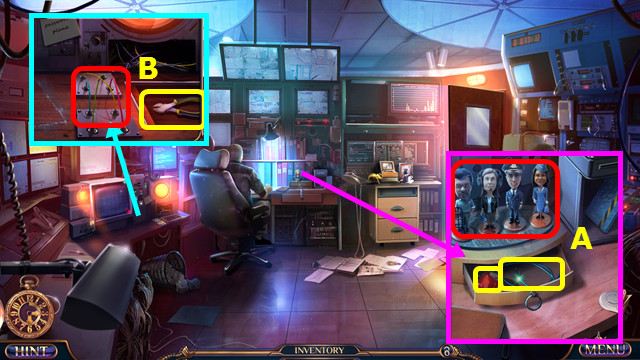
- Use the SCREWDRIVER; touch the wires (K).
- Take the TIRE IRON and 2/2 TIRES (L).
- Walk down.
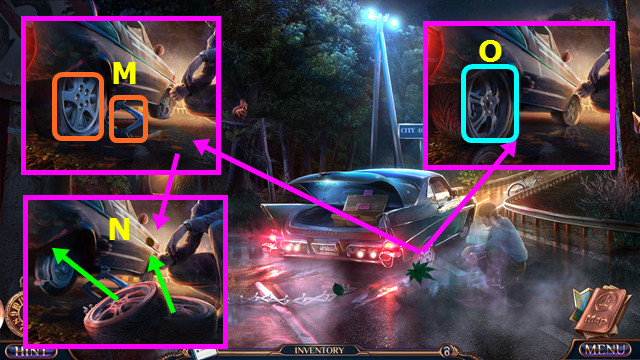
- Use the CAR JACK and TIRE IRON (M).
- Place the 2 TIRES; place the tires on the wheels and use the TIRE IRON (N).
- Remove the car jack and use the FOOT PUMP (O).
Chapter 3: The Fire
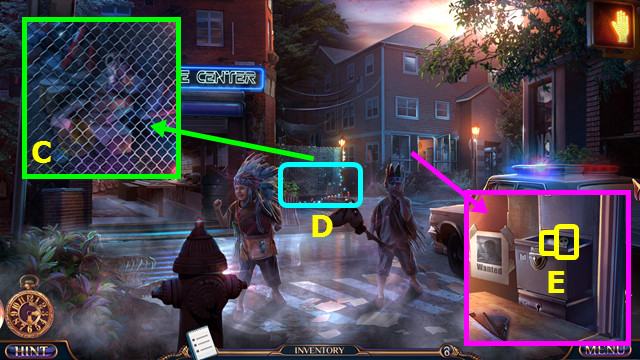
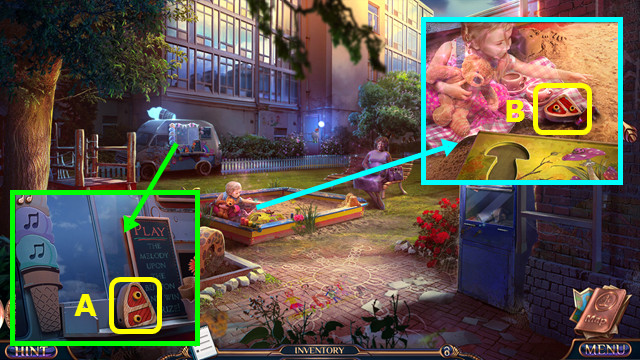
- Talk to Jackie (A).
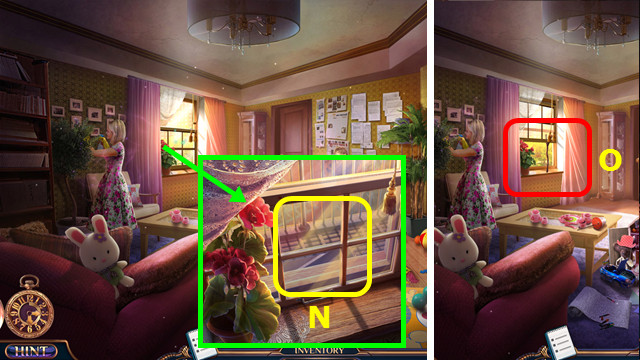
- Play the HOP; earn the CASE NOTES and MAP (B).
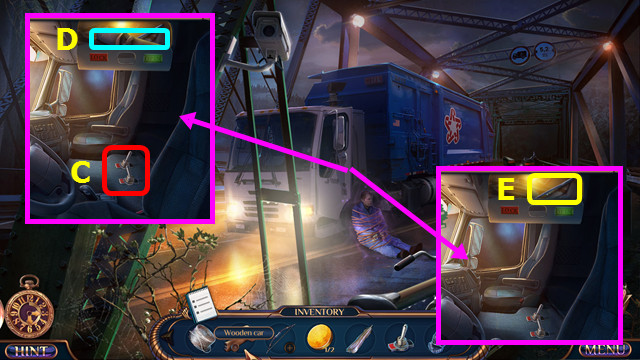
- Touch the paper (C).
- Select (D).
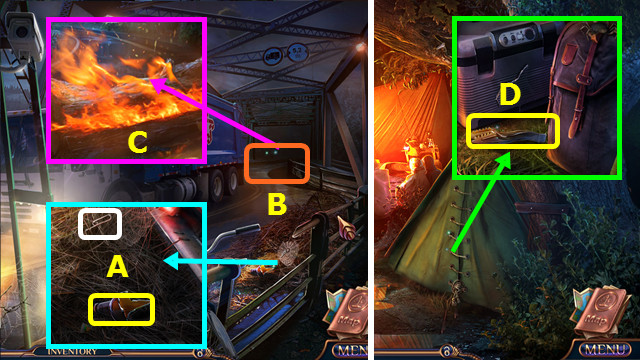
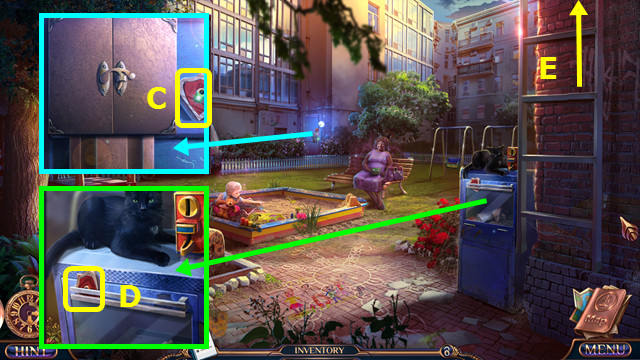
- Take the BROKEN SCREW GUN (E).
- Open the hood; take the BATTERY (F).
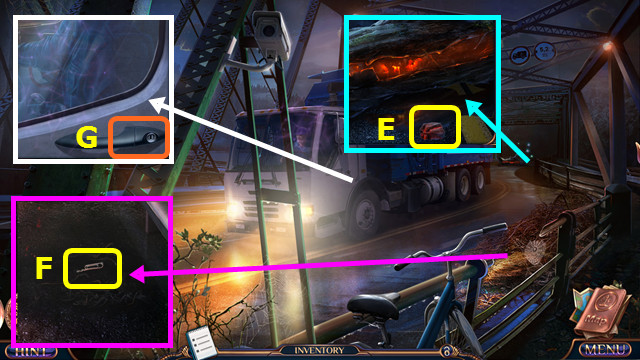
- Take the SPRAY NOZZLE (G).
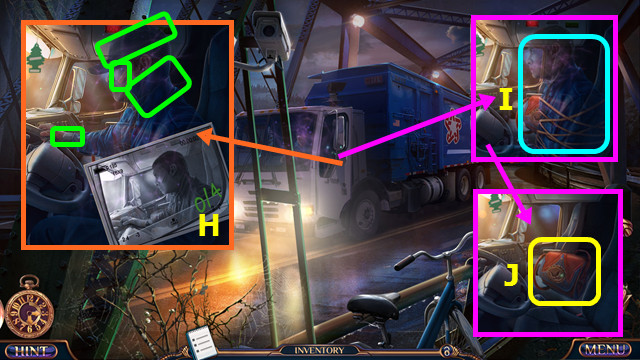
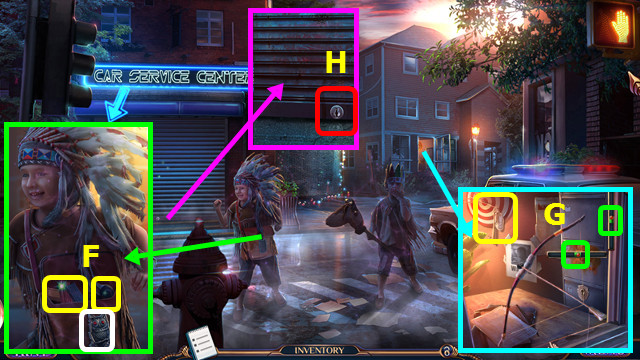
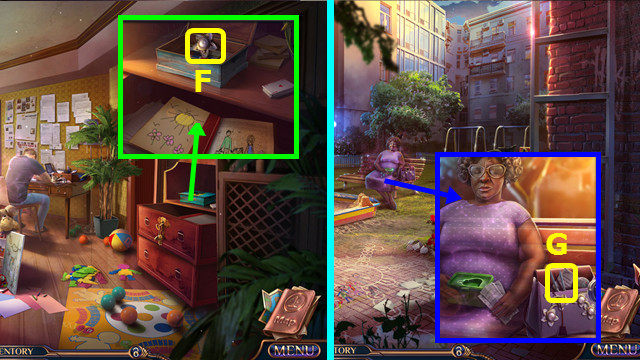
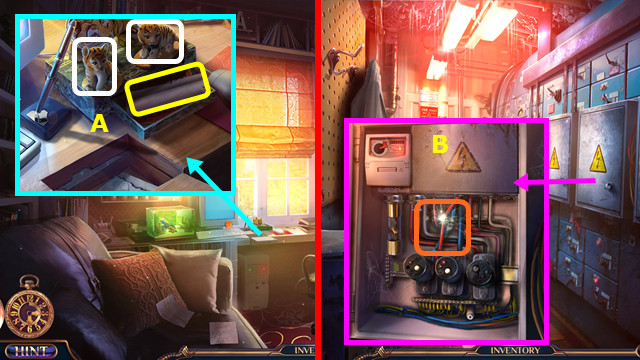
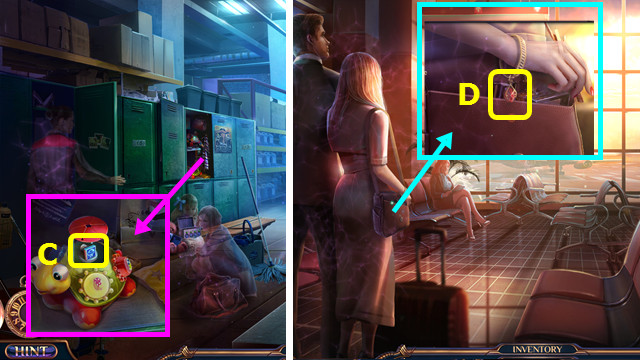
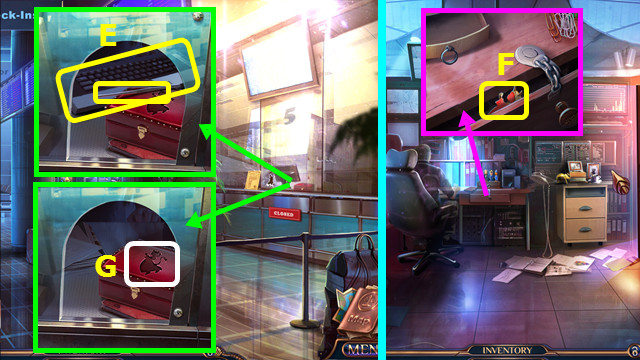
- Take the CASE BUTTON and read the book (H).
- Open the drawer; place and push the CASE BUTTON. Take the SCREW GUN CHUCK and SCREW GUN MANUAL (I).
- Combine the BROKEN SCREW GUN, SCREW GUN MANUAL, SCREW GUN CHUCK, and BATTERY (inventory).
- Restore the 4 items per the arrows; select the 3 locations in white.
- Take the SCREW GUN (J).
- Use the SCREW GUN and remove the door (K).
- Move the bookshelf (L).
- Walk right.
- Take the 1st PENGUIN (M).
- Place the SPRAY NOZZLE; take the CLEANER (N).
- Use the CLEANER; take the 2nd PENGUIN (O).
- Take the BUTLER (P).
- Take the HANKY (Q).
- Walk down.
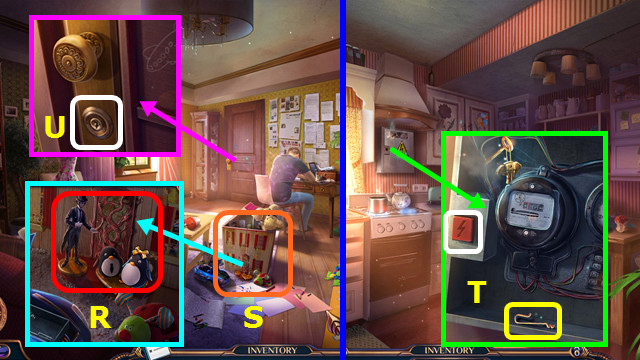
- Place the BUTLER and 2 PENGUINS (R).
- Play the HOP; earn the DOLL (S).
- Take the ELECTRICAL BUTTON and 1st JEWELED SNAIL from the DOLL (inventory).
- Walk right.
- Place and push the ELECTRICAL BUTTON; take the WIRE (T).
- Walk down.
- Use the WIRE (U).
- Walk forward.
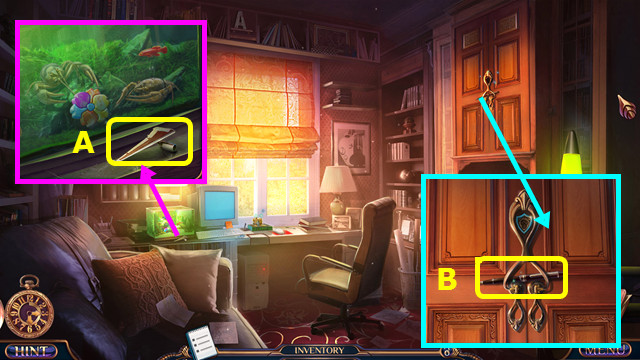
- Take the PLANE WING (A).
- Take the FOUNTAIN PEN (B).
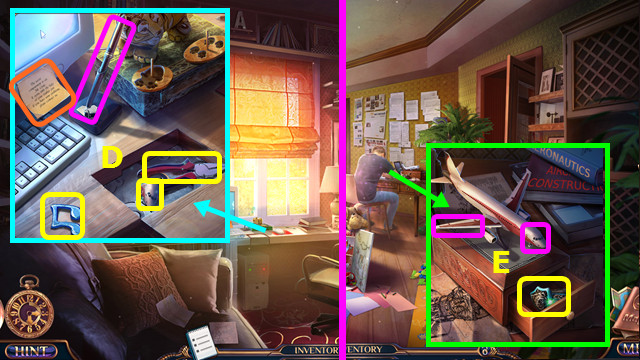
- Place the FOUNTAIN PEN; take the PLANE NOSE, PLIERS, 1st MUSIC NOTE, and read the note (D).
- Walk down.
- Place the PLANE NOSE and PLANE WING; take the FAMILY RING (E).
- Walk forward.
- Place the FAMILY RING; take the SCOOP NET and 2nd JEWELED SNAIL (F).
- Use the SCOOP NET to take the 1st GLASS FLOWER (G).
- Walk down and right.
- Place the 2 JEWELED SNAILS; take the 2nd GLASS FLOWER (H).
- Place the 2 GLASS FLOWERS; restore the petals as shown (I).
- Take the ELECTRICAL TAPE and RUBBER GLOVES (J).
- Use the ELECTRICAL TAPE; take the ELEPHANT KEY (K).
- Walk down.
- Use the ELEPHANT KEY; take the FOLDER and read the book (L).
- Open the FOLDER; take the RAZOR BLADE and 1/2 DOWEL ROD (inventory).
- Walk right.
- Use the RAZOR BLADE; take the FORKED STICK (M).
- Walk down.
- Use the FORKED STICK (N).
- Walk left (O).
Chapter 4: The Yard
- Take the 1st BUTTERFLY PART (A).
- Take the 2nd BUTTERFLY PART (B).
- Take the 3rd BUTTERFLY PART (C).
- Take the 4th BUTTERFLY PART (D).
- Combine the 4 BUTTERFLY PARTS to make the BUTTERFLY EMBLEM (inventory).
- Go up (E).
- Place the BUTTERFLY EMBLEM; take the PEARL BROOCH (F).
- Go left.
- Use the PEARL BROOCH; take the TONGS and read the 2 notes (G).
- Return to the Kitchen.
- Use the TONGS to take the HOT DOG (H).
- Return to the Yard.
- Use the HOT DOG (I).
- Use the 2 COINS (J); take the WRAPPED ITEM and NEWSPAPER (K).
- Open the WRAPPED ITEM; take the PEAR EMBLEM (inventory).
- Place the PEAR EMBLEM; take the FORK (L).
- Combine the FORK and PLIERS to make the TWO-PRONGED FORK (inventory).
- Go up and forward.
- Use the TWO-PRONGED FORK; take the 2nd DOWEL ROD and read the note (M).
- Return to the Yard.
- Use the NEWSPAPER and LIGHTER; trace the symbol (N).
- Trace the 2nd symbol (O).
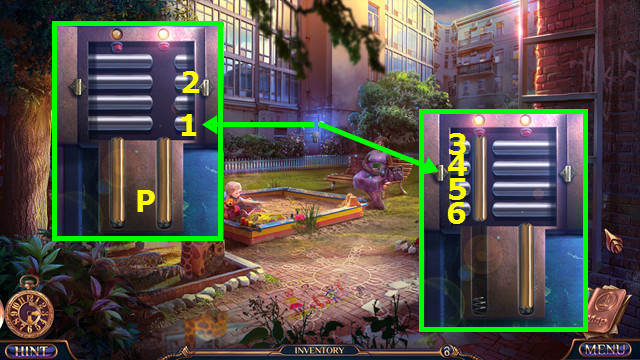
- Open the latch and place the 2 DOWEL RODS (P).
- Set the rods (1-2).
- Set the rods (3-6).
- Walk forward.
- Take the MUSHROOM MOLD (Q).
- Take the 1/2 CLOCK HAND (R).
- Take the PRUNERS (S).
- Return to the Kitchen.
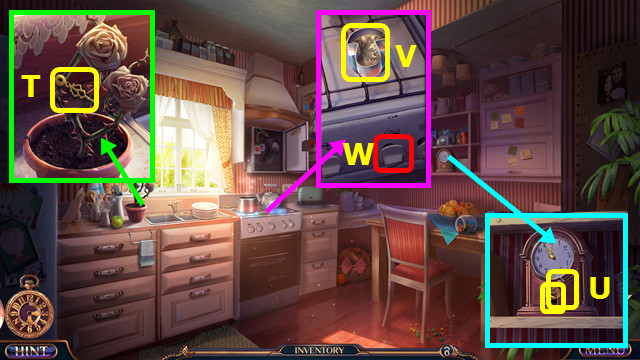
- Use the PRUNERS; take the 2/2 CLOCK HAND (T).
- Place the 2 CLOCK HANDS; take the 1/2 BIRD CHARM and PLASTIC SOLDIER (U).
- Place the MUSHROOM MOLD and PLASTIC SOLDIER (V).
- Select (W).
- Take the TOY MUSHROOM.
- Go to the Yard.
- Place the TOY MUSHROOM (A).
- Arrange the figures as shown (B).
- Take the ELECTRICAL KEY and 2nd MUSIC NOTE (C).
- Go forward.
- Use the ELECTRICAL KEY; turn the handle (D).
- Go forward.
- Take the HAMMER (E).
- Walk down.
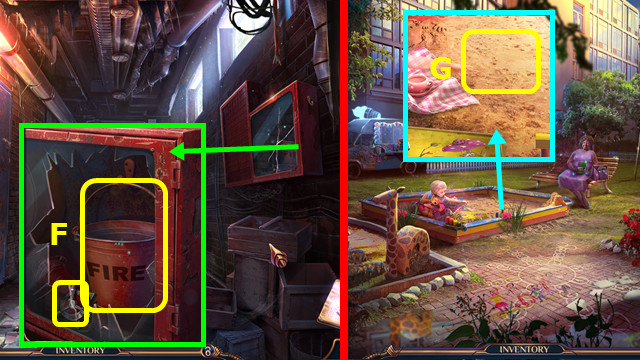
- Use the HAMMER; take the 1st SAFE VALVE and BUCKET (F).
- Walk down.
- Use the BUCKET to take the BUCKET OF SAND (G).
- Go forward 2x.
- Use the BUCKET OF SAND (H).
- Take the BURNT BAG (I).
- Look at the BURNT BAG; take the 2nd SAFE VALVE (inventory).
- Go to Alexander’s Study.
- Place the 2 SAFE VALVES (J).
- Move the bars as shown; select 1-10.
- Open the grill; take the 3rd MUSIC NOTE and the FILE (K).
- Go to the Yard.
- Place the 3 MUSIC NOTES; select; M-N-P, N-O-P-L-M.
- Take the 1st CUB FIGURINE (Q).
- Go forward.
- Use the FILE (R).
- Play the HOP; earn the OLD CHEST (S).
- Open the OLD CHEST; take the 2nd CUB FIGURINE and KNIFE (inventory).
- Use the KNIFE on the BURNT BAG; take the FUSES and ELECTRIC PLUG (inventory).
- Go to Alexander’s Study.
- Place the 2 CUB FIGURINES; take the CONTROL ROOM DIAGRAM (A).
- Open the CONTROL ROOM DIAGRAM to find the PLAN (inventory).
- Go to the Control Room.
- Open the panel; use the RUBBER GLOVES and ELECTRICAL TAPE (B).
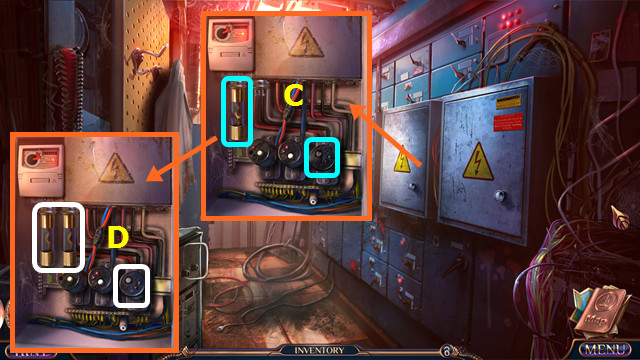
- Remove the broken fuse and plug (C).
- Place the FUSES and ELECTRIC PLUG (D).

- Select E-F-F-G-G.
- Final position (H).
Chapter 5: The Plane Crash
- Talk to Jackie (A).
- Play the HOP; earn the CASE NOTES and MAP (B).
- Talk to Jackie again (A).
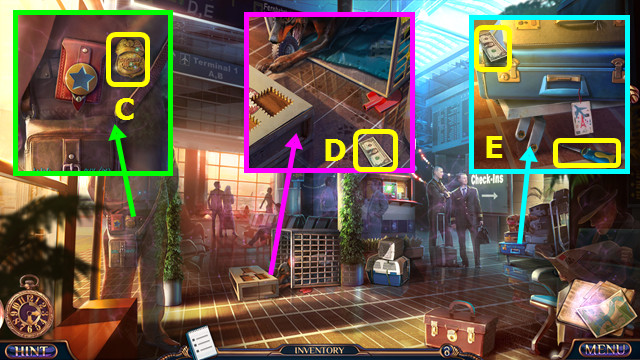
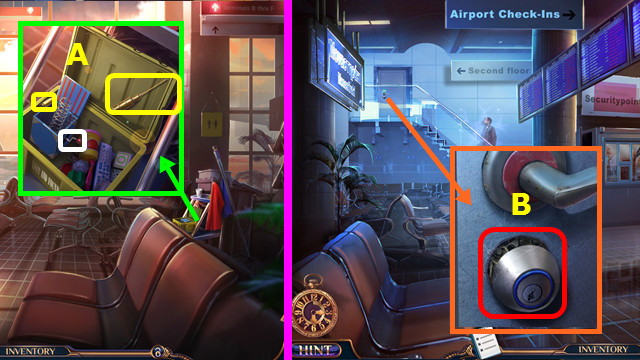
- Take the SECURITY BADGE (C).
- Take the 1/3 DOLLARS (D).
- Take the 2/3 DOLLARS and SCREWDRIVER (E).
- Go forward.
- Take the BOLT (F).
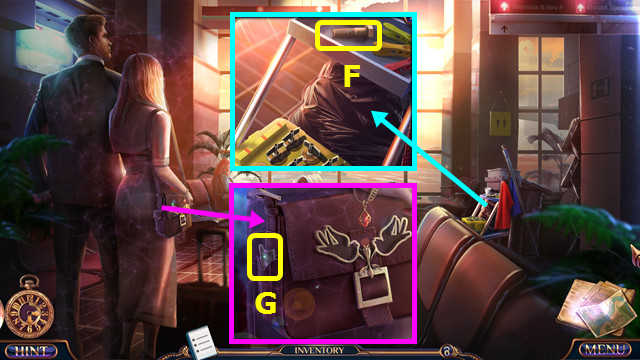
- Open the flap; take the 3/3 DOLLARS (G).
- Walk down.
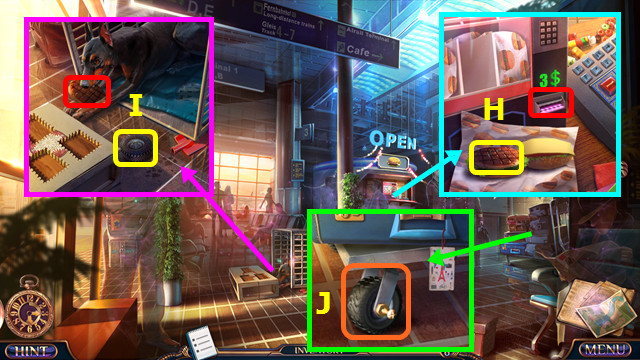
- Use the 3 DOLLARS; open the sandwich and take the BEEF PATTY (H).
- Use the BEEF PATTY; take the TRUCK WHEEL (I).
- Use the TRUCK WHEEL, BOLT, and SCREWDRIVER; move the cart (J).
- Walk right.

- Place the SECURITY BADGE; press 4-2-5-5-lock symbol (K).
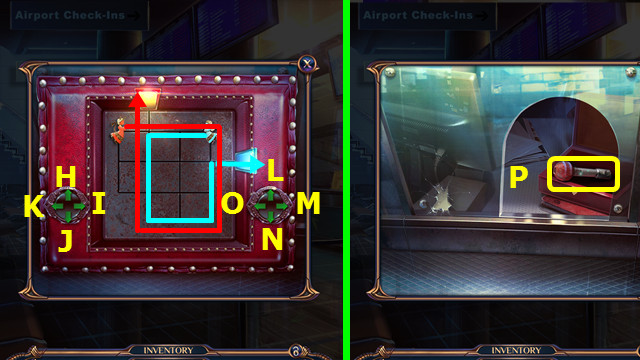
- Take the EMPTY GUN and KNOB (L).
- Walk down and forward.

- Place the KNOB; select M-N.
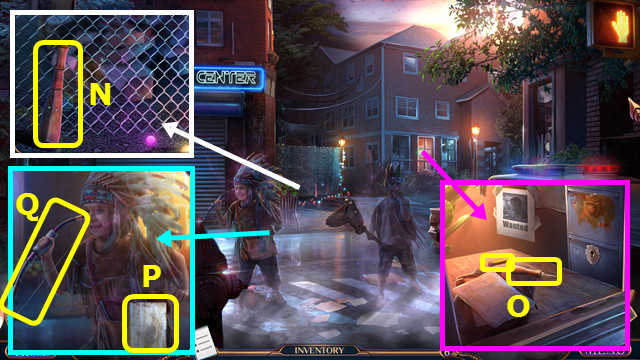
- Take the 2/2 BIRD CHARM, 1/3 STAMP EMBLEM, and the 3 BUTTON (O).
- Place the 2 BIRD CHARMS; take the PENCIL (P).
- Walk down and right.
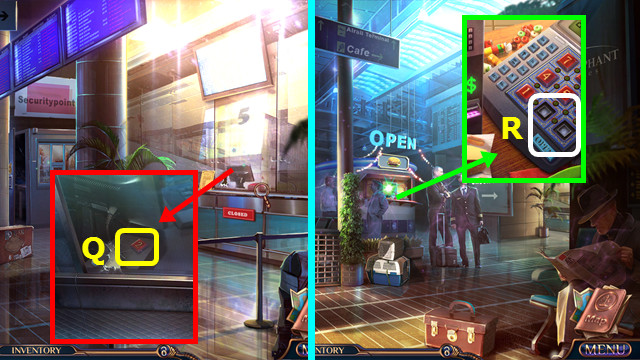
- Use the PENCIL to take the 2 BUTTON (Q).
- Walk down.
- Place the 2 BUTTON and the 3 BUTTON (R).
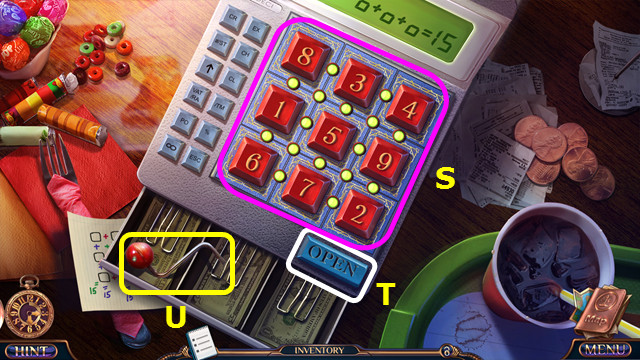
- Solution (S).
- Press (T).
- Take the CRANK (U).
- Go forward.
- Use the CRANK; take the BULLET and OIL (A).
- Combine the EMPTY GUN, OIL, and BULLET to make the LOADED GUN (inventory).
- Walk down and right.
- Use the LOADED GUN (B).
- Walk forward.
- Take the SHARP SHARD and BOW (C).
- Take the 2/3 STAMP EMBLEMS (D).
- Walk down 2x.
- Use the SHARP SHARD; open the bag and take the 3/3 STAMP EMBLEMS (E).
- Place the 3 STAMP EMBLEMS; take the KNITTING NEEDLE and EXTINGUISHED LANTERN (F).
- Walk right and forward.
- Use the KNITTING NEEDLE; take the BULB (G).
- Combine the EXTINGUISHED LANTERN and BULB to make the LANTERN (inventory).
- Walk down.
- Place the LANTERN; select the switch (H).
- Play the HOP; earn the TRIANGULAR KEY (I).
- Walk forward.
- Use the TRIANGULAR KEY (J).
- Walk right.
- Take the HANDBAG (K).
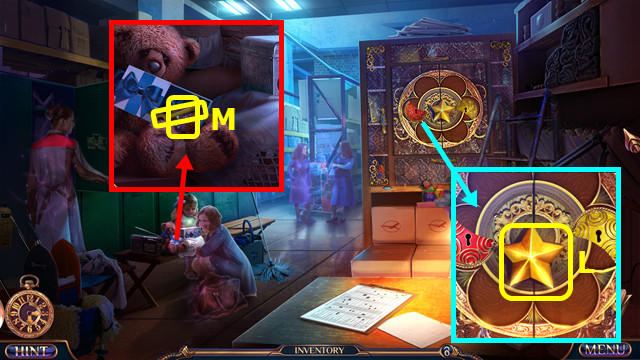
- Take the STAR (L).
- Place the BOW; take the HANDLE and 1/4 LOCK SHIELDS (M).
- Walk down 3x.
- Place the STAR; take the 2/4 LOCK SHIELDS (N).
- Use the HANDLE to take the SHOVEL (O).
- Walk right and forward.
- Use the SHOVEL; take the 3/4 LOCK SHIELDS and 7 EMBLEM (P).
- Combine the HANDBAG and 7 EMBLEM; take the 1/2 TOY GEARS and 4/4 LOCK SHIELDS (inventory).
- Walk right.
- Place the 4 LOCK SHIELDS (Q).
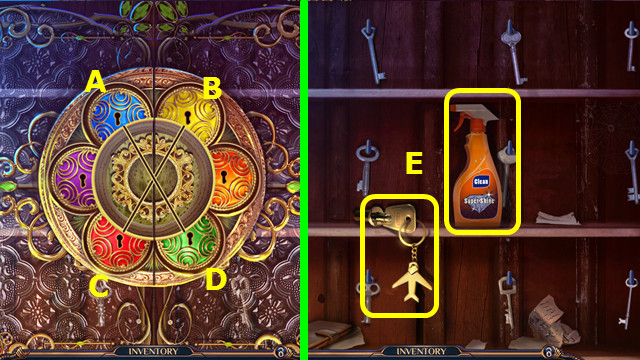
- Solution: DA-DA-AD-DA-DA-CB-AD-BC-BC
- Take the PLANE KEY and CLEANER (E).
- Walk down.
Chapter 6: The Control Tower

- Use the CLEANER and HANKY (F).
- Use the PLANE KEY (G).
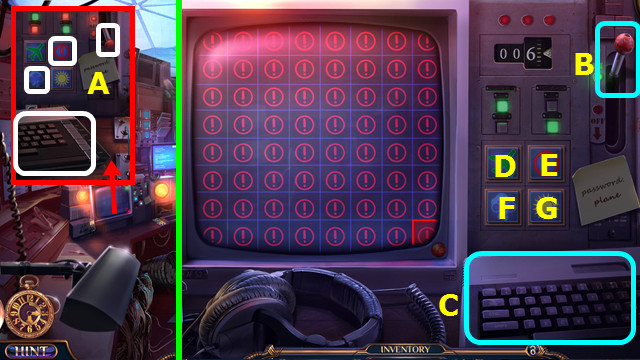
- Set the code (H).
- Go forward.
- Remove the old keyboard; take the RULER (I).
- Take the 1/3 WIRE (J).
- Walk down and right.
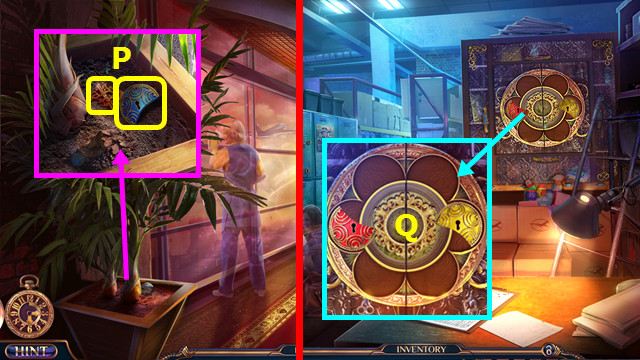
- Use the RULER; take the GLUE, SNOWFLAKE, and 1/2 PROPELLER EMBLEM (K).
- Place the SNOWFLAKE; change the snowflakes as shown (L).
- Take the CHILD’S SCISSORS and BROKEN FRAME (M).
- Walk down.
- Use the CHILD’S SCISSORS; take the PHOTO (N).
- Combine the BROKEN FRAME, GLUE, and PHOTO to make the FRAMED PHOTO (inventory).
- Go forward.
- Place the FRAMED PHOTO; take the STEWARDESS FIGURINE and 2/2 PROPELLER EMBLEM (O).
- Place the 2 PROPELLER EMBLEMS; take the ACCESS CARD (P).
- Use the ACCESS CARD (Q).
- Play the HOP; earn the POUCH (R).
- Open the POUCH; take the PILOT FIGURINE, WRENCH, and 2/3 WIRE (inventory).
- Use the WRENCH and take the PLANE EMBLEM (S).
- Walk down.
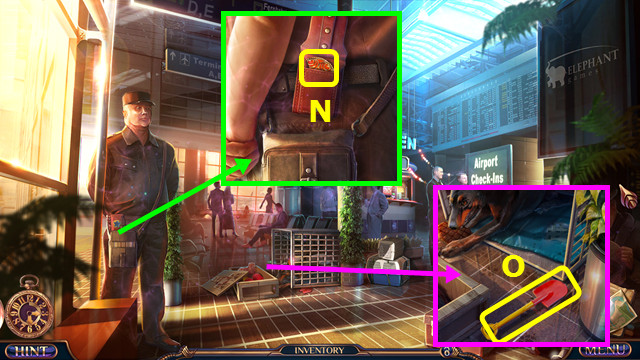
- Place the PLANE EMBLEM; take the MECHANIC FIGURINE and the WARNING BUTTON (T).
- Go forward.
- Place the STEWARDESS FIGURINE, PILOT FIGURINE, and MECHANIC FIGURINE; take the 2/2 TOY GEARS and 3/3 WIRE (A).
- Place the 3 WIRES; take the NIPPERS (B).
- Walk down and right.
- Place the 2 TOY GEARS; take the WEATHER BUTTON (C).
- Go to the Waiting Area.
- Use the NIPPERS; take the RED DIAMOND (D).
- Walk down and right.
- Use the RED DIAMOND; take the TWEEZERS and KEYBOARD (E).
- Go to the Control Tower.
- Use the TWEEZERS to take the IMP EMBLEM (F).
- Walk down 2x.
- Place the IMP EMBLEM (G).
- Select O-N-M-I-L-M-J-K-H.
- Take the LEVER (P).
- Go forward 2x.
- Place the WARNING BUTTON, WEATHER BUTTON, KEYBOARD, and LEVER (A).
- Select (B); select (C).
- Select D-G-E-D-F-D-G-F-E.
- Congratulations! You have completed Grim Tales: Threads of Destiny!


 Hamlet Walkthrough, Guide, & Tips
 Tales from the Dragon Mountain: The Strix Walkthrough, Guide, & Tips
 Lost Souls: Timeless Fables Walkthrough, Guide, & Tips
 PuppetShow: The Price of Immortality Walkthrough, Guide, & Tips
 Secrets of the Dragon Wheel Walkthrough, Guide, & Tips