SWTOR 3.0 Fury Marauder DPS guide written by Artorias of Ebon Hawk. Updated for patch 3.2.1.
Contents
Introduction: Fury is currently one of the few AOE specs in game, how ever with changes to the spec in update 3.0, the spec is now capable of doing a pure single target rotation to allow for added damage by sacrifcing AOE in the rotation. This allows you to swap between a single target burst and an AOE burst depending on the situation.
Note: This guide was translated from Rage Juggernaut. Rage and Fury have near identical rotations due to Vicious Slash merely replacing Retliation for single target. The rotation for Fury is actually easier than Rage, as such there is a higher insentive to run it.
Skillful
Cloak of Carnage: Increases the damage dealt by Cloak of Pain by 15% and increases its duration by 4 seconds.
Defensive Forms: Shii-Cho Form: Further increases Damage Reduction by 2%
Cloak of Rage: While Cloak of Pain is active, it generats 1 rage when ever you’re attacked. This effect cannot Occur more than once every 3 seconds.
OR
Path Carver: Sweeping Slash deals 25% more damage. (For AOE Fights)
Masterful
Defensive Roll: Reduces damage taken from area effects by 30% and increases Internal and Elemental damage reduction by 5%.
and Select one or more of the following depending on fight.
Cloak of Annihilation: Each use of Assault, Battering Assault and Crippling Slash reduces the cooldown of Cloak of Pain by 3 seconds.
Phantom: Increases the duration of Force Camouflage by 2 seconds and further increases the movement speed bonus of Force Camouflage by 20%
Relentless: Predation no longer requires or consumes Fury, but will go on cooldown for 30 seconds when activated.
Heroic
Brooding: Reduces the cooldown of Intimidating Roar by 15 seconds. In addition, you build up to 30 Fury over the course of using Channel Hatred. This effect cannot occur more than once every 30 seconds.
(select one of the three depending on preference or fight requiring cleanses often)
Undying: Increases the duration of Undying Rage by 2 seconds and reduces the cooldown by 30 seconds
Unbound: When Predation is applied or refreshed, it purges movement-impairing effects. Additionally, the movement speed bonus of Predation is increased by 30%
Expunging Camouflage: Force Camouflage removes all cleansable effects when activated.
The above utilities are outlined to make the most of your Raid Utility and PVE environments.
Fury revolves around buffing yourself passively in rotation to allow for a massive hit at the end of each ‘cycle’. These cycles remain the same but if you have no idea of your passives then you won’t know how or why the cycles are there in the first place.
Berserk: While in Shii-Cho, converts 30 stacks of Fury to generate 8 Rage over the next few seconds.
Destruction: While Shii-Cho Form is Active, activating Berserk/damage dealt by Force Crush grants Destruction, increasing the damage dealt by your next Raging Burst and Force Smash by 15% and reducing their cost by 100%.
Dominate: Force Charge and Obliterate make your next Smash or Raging Burst automatically Crit.
Rout: Assault, Battering Assault, Vicious Slash, Sweeping Slash, Force Scream, Vicious Throw and Furious Strike reduce the active cooldowns of Smash, Raging Burst, and Obliterate by 1.
Cascading Power: Increases all damage dealt by 5% for 6 seconds after dealing damage with Smash or Raging Burst. Cannot occur more than once every 8 seconds.
Dark Resonance: Increases the Critical strike damage of all abilities by 15%.
Gravity Manipulation: Force Crush grants Gravity Manipulation, providing immunity to interrupts and controlling effects 6 seconds. Cannot occur more than once every 30 seconds.
Battle Cry: Reduces the Cooldown of Obliterate by 3 seconds. When Force Charge or Obliterate is used, your next Force Scream deals 5% more damage and generates 1 rage.
Furious Defense: While Shii-Cho Form is active, Furious Strike grants Furious Defense, increasing your defense chance by 10% for 6 seconds.
Raging Burst: Deals a massive amount of single target Kinetic damage when buffed fully (this should always be the case.) Procs Cascading Power and consumes Shockwave and Dominate.
Costs: 0 Rage
Force Crush: Deals Kinetic damage over time before hitting with a final blow which deals a higher amount of damage. Grants Shockwave and Gravity Vortex.
Costs: 3 Rage
Smash: Deals a massive amount of Kinetic damage when fully buffed, though less than Raging Burst, compensates for this by being AOE. Should never be used on Single Target.
Costs: 0 Rage
Furious Strike: New ability added in 3.0. Deals high amount of weapon damage and autocrits when utilizing the 6-piece Weaponmaster Set Bonus making it one of the hardest hitting abilities in game.
Costs: 5 Rage
Force Scream: Deals moderate Kinetic damage. Has a Range of 10m, this ability isn’t used as much as previous Fury to make use of the 6 piece set bonus.
Generates: 1 Rage
Obliterate: 10m gap closer and one of the most used abilities due to granting Decimate.
Costs: 2 Rage
Dual Saber Throw: Deals less damage than all your single target abilities but is decent in AOE situations. Procs Weaponmaster Critical Set Bonus
Vicious Throw: Used in place of Vicious Slash in every Ravage Cycle. Your second highest critical ability (when crits does more damage on average than Raging Burst)
Costs: 3 Rage
Vicious Slash: Used in conjunction with Furious Strike to deal moderate weapon damage and reduce active cooldowns.
Costs: 3 Rage
Assault: Never used as it does terrible damage and has zero benefit to you entirely.
Generates: 2 Rage
Force Choke: Never used. Minimal damage and will unsettle your rotation.
Generates: 4 Rage
Force Charge: Simple gap closer that allows you to transition to your target in opener or if you need to swap and get to your new target ASAP.
Generates: 3 Rage
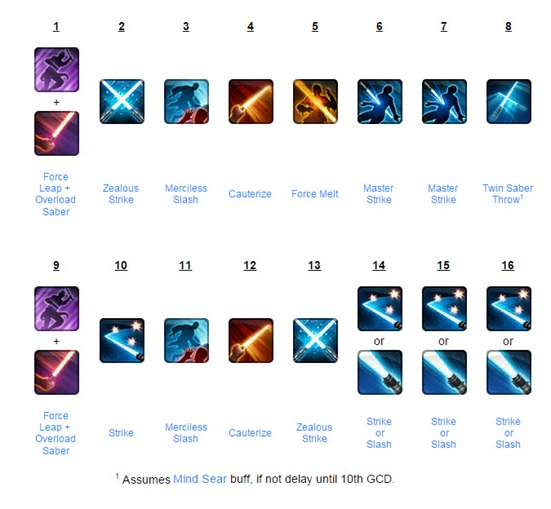
The opener for Fury is rather simple and never deviates regardless of scenario. Berserk frontloads your Destruction and Force Charge grants Dominate, allowing the following Raging Burst to crit. Your Ravage will proc your Weaponmaster Set Bonus allowing the first Furious Strike to Crit.

As I mentioned above, Fury follows ‘Cycles’. One cycle ends and another begins, each cycle ends with a Raging Burst (or Force Smash depending on if you want AOE). Each Cycle subsequently bleeds Rage or lack there of into the next cycle.
There are 2 types of cycles. I like to call them the "Berserk Cycle" and "Ravage Cycle." These cycles follow one another, when an Berserk Cycle ends, the Ravage Cycle begins, so you can keep track of which cycle you’re supposed to be doing on the CD of Force Crush as it’s the first ability used in the Ravage Cycle.

Each Cycle follows another, even into the execute.
You may be asking where you can fit Dual Saber Throw into rotation for AOE? The best place I’d personally put it is in your Berserk Window’s Cascading power following your Smash, this will give near back to back AOE and will buff it with Cascading Power.
The location where Bloodthirst is placed mid-rotation is dependant on two things: Do you have Frenzy? And how much Fury do you have? If you prematurely use Frenzy, you’ll push to 30 stacks and will only have enough Fury to use one activation. So when Frenzy is up and Satiated has fallen off, it should look like this:
This Obliterate is the one at the end of your Berserk Cycle. You’ll consume your 30 stacks of Fury with Berserk, then gain another 30 stacks with Frenzy, then consume those with Bloodthirst, this priority will mean you don’t throw your rotation off and needlessly throw away stacks by popping Frenzy as soon as it comes up.
The execute changes the rotation slightly in favor of damage. The rotation itself doesn’t alter and neither does resource management, the only thing that changes is an ability shift in your Ravage Cycle to gain more damage. By substituting your Vicious Slash for Vicious Throw, you gain the 2nd most powerful critting ability in rotation without any draw back. Pretty good right? Your rotation will look like this:

What was the minimum hit of your Raging Burst/Force Smash? You’ll see a rough deviation of roughly 2000 due to Relic and Adrenal windows. If you land a 10000 Raging burst, your minimum should be the low 8000’s. If you have hit far lower than this 4k deviation, you’ve messed up a Shockwave window at some point or another.
The Number of Obliterates+Force Charge activations = Number of Raging Bursts+Force Smashes.
APM (Actions Per Minute) of at least 39.4
Are you clipping Ravage effectively at the 0.3 second mark? Clipping Ravage with Furious Strike secures it inside the Cascading Power window.
Is your Raging Burst/Force Smash average output higher than 10secs? If so, you’re delaying it or your rotation is too slow.
Parse Analysis

Video of the Fury/Concentration Rotation

 SWTOR 3.0 Vanguard Tactics and Plasmatech DPS Guide by Kwerty
 SWTOR 3.0 Corruption Sorcerer Healing Guide by Orderken
 SWTOR 3.0 Shield Specialist Vanguard Tanking Guide by Milas
 SWTOR 3.0 Dirty Fighting Gunslinger DPS Guide by Cloake
 SWTOR 3.0 Sharpshooter Gunslinger Guide by Shulk