Widepark is only available for tiers 4 through 6 so it is often overlooked since you do not always play it depending which tiers you are working on. Since Widepark is a small map it works well for the tier tanks that can play on it since their view range fits perfectly with Widepark’s size. Looking at Widepark you will notice that the map is clearly split into a northern and southern side by a railroad cutting across the center of the map. This railroad is raised across most of the map with the western side having an underpass and the eastern side of the railroad having less of a incline making it easier to cross. Both teams are given their own side of the map and each has its own advantage since each side has a different layout. The northern side has more wide open areas and is more difficult to defend the western side of the map. The southern side has more buildings and cover, but at the same time it is harder to defend the eastern side of the map.
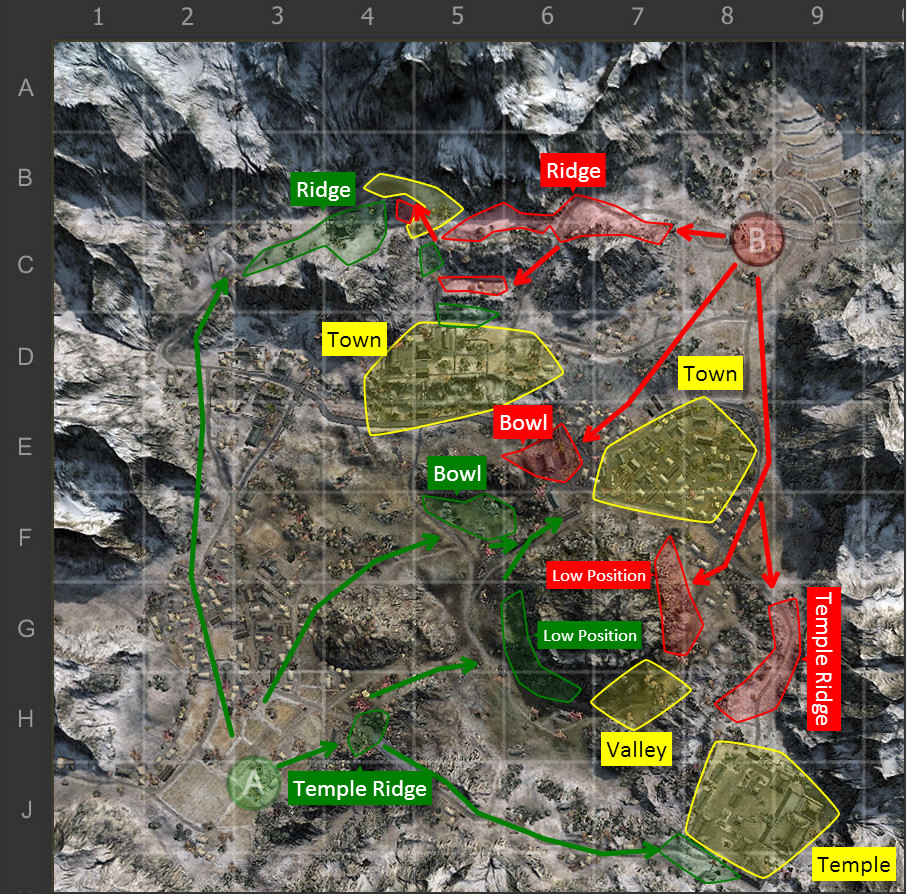
The images below were created using MapTactic which is a great World of Tanks tool for creating strategies for clan wars, tournaments, and eSports.
http:///
To understand the strategies below better there are a few features you should know prior to digesting the strategy. Rectangles/squares that are outlined in red/green and that are not filled in with color are indented for artillery/SPG placements. Setting up as a SPG to begin the game you will want to choose one of the two “1” areas and then as the match progresses move to “2” and then “3” to guarantee you have great shots on the enemy. Colored lines with arrows at the end of them indicate routes to take at the start of the match to reach key positions that are outlined in red/green and have their corresponding color as a filler. Finally, the yellow areas are places where most of the fighting will take place and if you enter these areas expect to have shells coming your way very quickly.
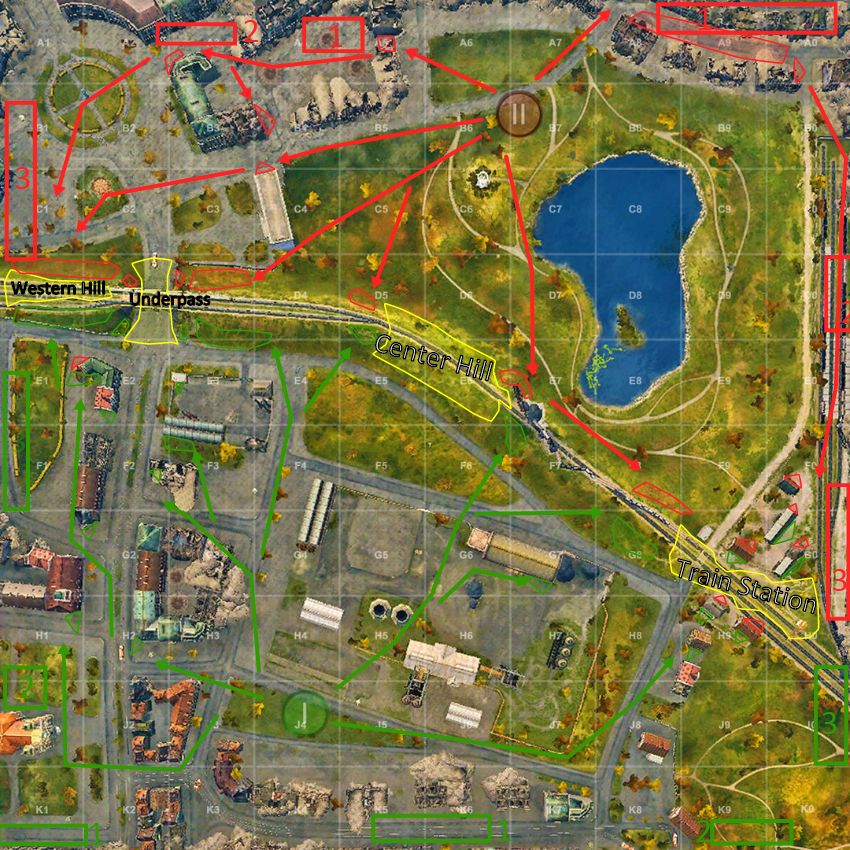
Starting out you will want to decide whether you head straight ahead, west, or east. The center of the map rewards tanks with at least 10 degrees of gun depression, 8 will suffice though with good frontal armor, and for medium/light tanks. The east side of the map/train station also works well for medium tanks and for heavier tanks. This area has less hilly terrain than the other areas on the map since the railroad is not elevated and is easy to cross. Tanks with less armor can also set up in the northeast corner to support the center hill and train station. Finally, the western side of the map near the underpass performs well for tank with a lot of armor, big guns, and good gun depression doesn’t hurt either.

Behind the front lines there is a few areas where tanks with below average armor can setup to get a few shots off without taking to much damage. In A3 you can peek out from the corner quickly to hit any enemies down the 2/3 line road easily. Keep in mind that you run the risk of being spotted after you fire your gun or if enemies have very good view range. The locations in B4 and A5 are fallback positions if the train station falls or if enemies spill across the center hill. Typically your team will only want 1-2 tanks sitting back here since otherwise you do not have enough tanks to hold the center of the map.
In D1 the “Western Hill” is a raised section of the railroad and it is possible for tanks with good gun depression to peek over and get shots off without exposing their hulls. Enemy artillery can hit you here if you are not careful when you cross, but if you have a quick tank you can easily setup here and get a shot off into G1 or E4 as the enemy advances. For those more daring or if you are in a platoon you can even push across into E1 and be safe from enemy SPG fire and surprise the enemy team.
If you run into a lot of enemies here then it is best to allow them to push across the railroad and when they do this you hit them before their gun can depress enough to hit you. Keep in mind that letting the enemy get on top of the railroad tracks allows them to hit your allies in A3, C3/C4, and D3 easier so you will need to “control” their position carefully.
For tanks with a lot of frontal armor and/or big guns then the underpass is the perfect spot for you to make you move. Setting up on the edges of it to begin with you can side-scrape or peek-a-boom to weaken enemies. Pushing through the underpass is easy for tanks with a lot of armor and keeps enemies in their cover if you have support. It is best to push through the path closer to the edge of the map since it leaves openings for the A3 location to nail enemies that are ahead of you. Exiting on the other side you will most likely want to turn towards the 1/2 line since it prevents the enemies from having more flanking routes to kill you if you have the edge of the map on one side.
The “Center Hill” location is straightforward if you know how to use your gun depression to your advantage. For tanks with 10 degrees of gun depression it is very easy to position on either side of the opening in the center and have shots towards the underpass or train station. For tanks with less gun depression you will need to judge whether any enemies are aiming at you so you do not pop over into a swarm of shells heading you way. This area is also great for mediums and light tanks at the start of the game to advance to so that you can potentially spot enemy SPGs and tanks at their starting area.
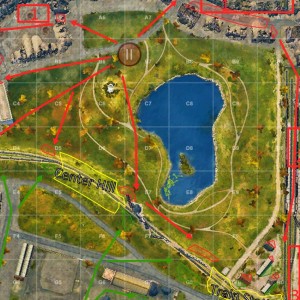
The northeast corner from A8-A0 has a few buildings that provide decent cover from incoming enemy fire and also give decent firing lanes at enemy tanks. It is best if only 1-2 tanks are back here(non-spgs) since otherwise your team will not have enough tanks holding the front lines. Your best bet is to set up in A9 and attempt to hit enemies in the train station and if any enemies are peeking over the center hill you can have a shot at them.
The train station is a pivotal area for team 2 since this side has a slight advantage with attacking this area. This is because it is difficult for the enemy SPGs to hit this area depending on where they position themselves and also because the enemy team usually gravitates towards the 1-3 lines since it is closer. Be cautious crossing the G line and then after that it is clear sailing to flank the enemy until the turn and realize you are coming.
Since Widepark is a very small map it can be difficult to find good spots to position artillery on this map. Starting out you have two options marked with a outlined red rectangle with “1” in it on the map. As the match unfolds you should move to “2” and then “3” if your flank is pushing the enemy back so that you get better firing angles on your enemies. Setting up on the west side of the map you will gain better shots in the train station, eastern edge of the “center hill” area, and into the 2 line. If you position yourself on the east side of the map you will have better shots into the 1 line/western hill, and the western edge of the center hill. Personally I find it easier to stick to setting up in A4/A5 and then moving over to the 1 line since it tends to be the safer bet.
Team 1 plays very similar to team 2 as far as where to go depending on what kind of tank you are in. The center of the map rewards tanks with at least 10 degrees of gun depression, 8 will suffice though with good frontal armor, and for medium/light tanks. The east side of the map/train station also works well for medium tanks and for heavier tanks. This area has less hilly terrain than the other areas on the map since the railroad is not elevated and is easy to cross. Tanks with less armor can also set up in the southeast corner to support the center hill and train station. Finally, the western side of the map near the underpass performs well for tank with a lot of armor, big guns, and good gun depression doesn’t hurt either.
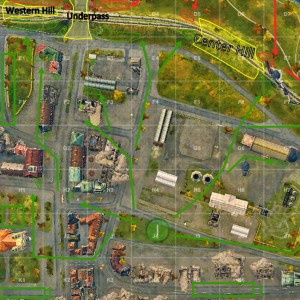
Like team 1 this side also have secondary positions further back from the fighting at allows tanks with less armor to get off shots a little safer. You can setup in J1/H1/H2 and peek out from around the corner to get shots off. Closer up there are more locations in G1/F2/E2 and provide many corners to defend this side of the map. Since this side has a lot more defensible locations it is why it can be very difficult for the enemy team to attack head on and win against this side without a thought out plan.
The western hill plays almost identical compared to the other team except for the slope on this side is a little less pronounced which makes it capable for tanks with only 6 degrees of gun depression to fight on it well. Unfortunately this also means that it is easier for enemy artillery to hit you here and you should adjust according to how many enemy SPGs there are in the match.
The underpass also plays virtually identical to the northern team and you should even try to attack through the path through the underpass closest the the edge of the map. This leaves better views for your tanks positioned behind you to hit the enemy in A3 and D3.
Surprise! The center hill area also plays similar to the northern team and there are not many changes as far as going about fighting here. Just keep in mind that the northern team has more tanks hanging back in A8-A0 than your team does in the center so peeking over from this side is a little more dangerous than from the other side.
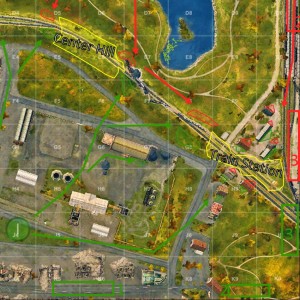
The southeast corner has very limited secondary positions that are actually useful and beneficial to you and your team. There is a location in G7 that has good shots into the train station but it can only be used if you break down the walls in G8. There are also some hills you can use in K9/K0 to fire into any enemies pushing into the train station but it can be difficult to stay alive for very long here since there is little cover. If your tank has very good camouflage it is possible to stay hidden but only if the enemy is in the G line and above.
The train station can be difficult to defend for the southern team and it can be difficult to attack across the railroad as well. This is because there is very limited cover in the G/H lines for the southern team to use without allowing the enemy team to simply push across. However, it is easier to push across into G9/G0 and use their own cover against them where the angled buildings are since it blocks shots from enemy SPGs and tanks sitting further back. The downside is that since the northern team typically has a lot of tanks sitting in A8-A0 and also in the 4 line it makes pushing any further north very difficult. There is cover up the 0 line but you will need to push quick to get into the A line to be truly safe.
Like the northern team(team 2) there are few places to position SPGs on Widepark due to its size. Initially you will want to run for your life to somewhere on the K line since enemy scouts can spot you from the center hill if you are not careful. Positioning south of the base/east of the base will allow you to hit from the 1 line to the 5 line better than if you position yourself on the western edge of the map. If you choose to go to the 1 line you will want to try to take out enemies in A3/C3/D3 first to allow you to move up further and to get into E1 where you have better shots. Typically it is only useful to head over to the 1 line with an SPG if your team does not protect the train station side of the map well and it is your only hope for survival.

 Map Strategy: Hidden Village - World of Tanks Guru
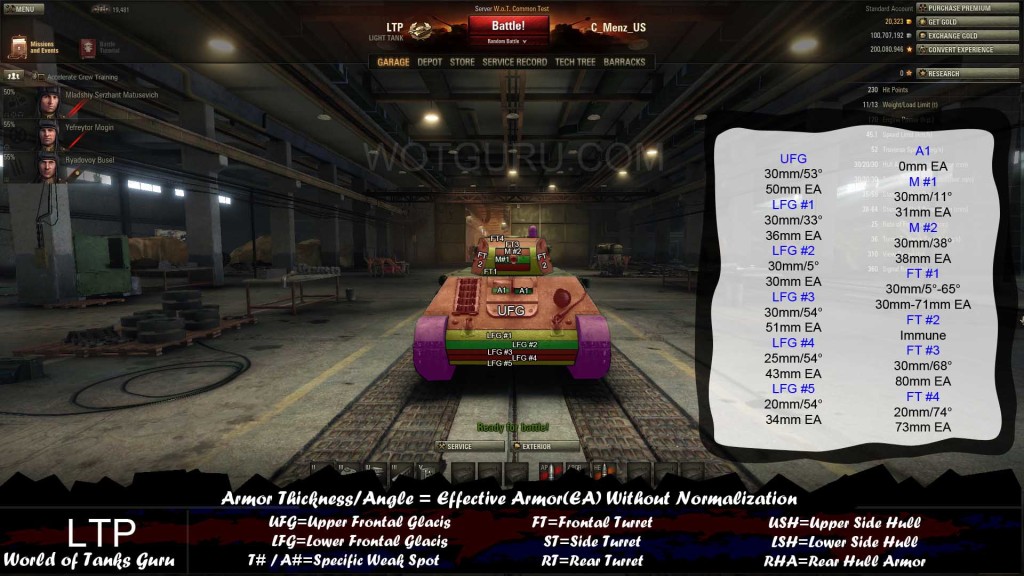 Weak Spot Guide: LTP - World of Tanks Guru
 Weak Spots Guide: Type 59 - World of Tanks Guru
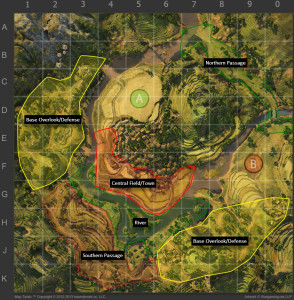 Map Strategy: Pearl River - World of Tanks Guru
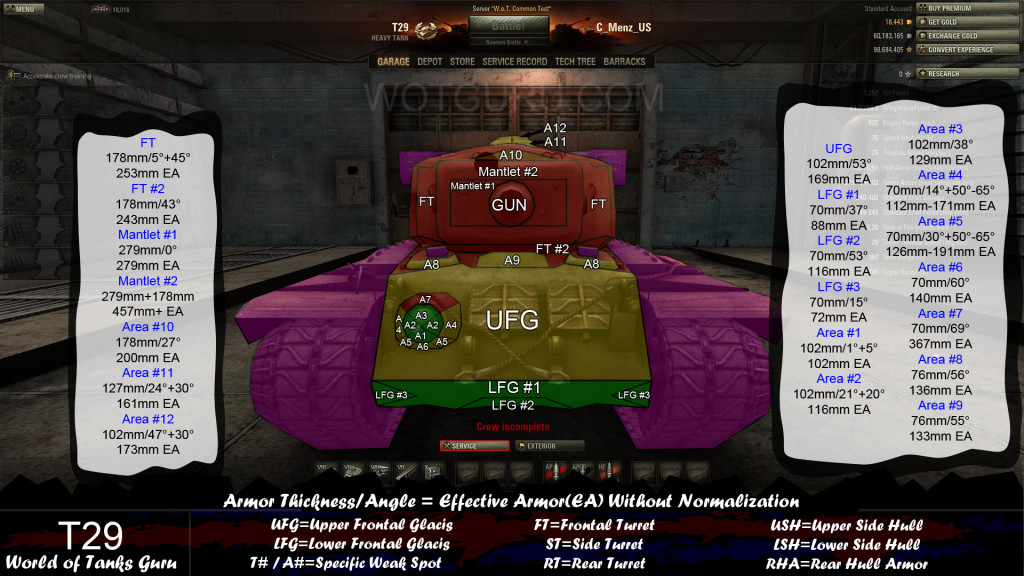 Weak Spot Guide: T29 - World of Tanks Guru