Swamp has underwent numerous changes over its stint in World of Tanks and its current iteration is vastly different than the initial version of Swamp released years ago. Swamp has seen its initial spawning locations rotated and 90%+ of the map has received significant changes since its initial release. With all these changes it can be difficult to stay up to date with Swamp as the map is continually fine tuned. As its name suggests Swamp features a large swamp in the center of the map with two estuaries that extend north/south out of the centralized swamp to divide the map into two. With roughly 35% of the playable terrain falling into the “poor” category it makes maneuvering quickly very difficult in these areas. Outside of the swamp/water areas you have the elevated north/south areas that see the highest elevations in the corner that slope down as you head towards each team’s base/flag. Swamp provides unique challenges with its different terrain types and most importantly it has the most “poor” terrain(difficult to move through) of any map currently in World of Tanks.
This World of Tanks Swamp map strategy will outline key areas and routes to use depending on what team you are on in random public matches. Team 1(green) starts in the north and the pivotal areas to push to initially are highlighted in green with routes to follow roughly. Team 2(red) starts in the south and like team 1 its pivotal areas are outlined in red and routes to follow roughly are also highlighted. Yellow areas are places that will be contested in almost every match but they do not have specific spots favoring either team. In yellow areas it comes down to your best judgement based on the specific match and also the tank you are in.
was used to create this World of Tanks Swamp map strategy and Map Tactic is an excellent resource to create strategies for World of Tanks and numerous other competitive online games.
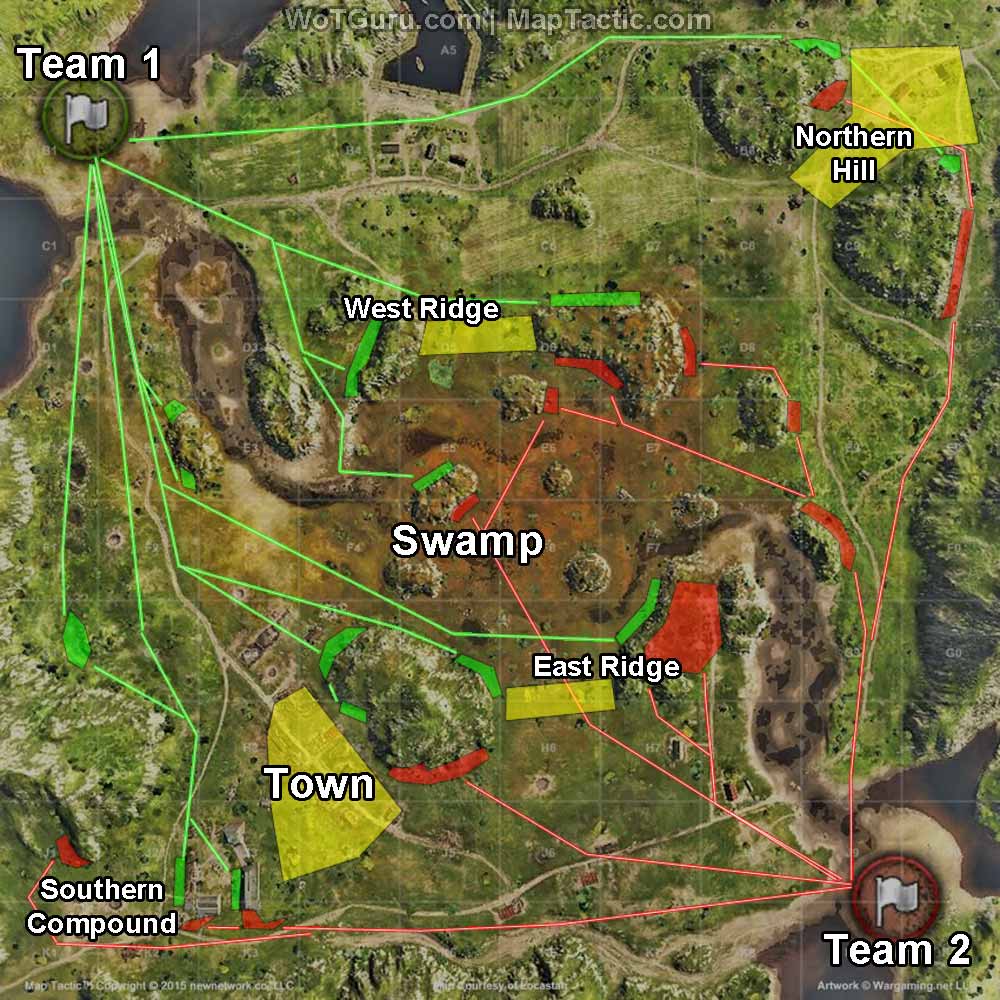
Swamp is essentially broken down into 6 general areas on the map which are tactically important and will see regular use in random public matches. Starting in the south the “Southern Compound” is elevated due to it being in the corner and has some cover from artillery fire making it a decent location for heavy/medium tanks. The “Town” area a little further north has many buildings to provide hard cover but since you have limited cover if advancing it is only viable for heavy tanks and tank destroyers with great frontal armor. Both the “East Ridge” and “West Ridge” provide each team with an elevated platform to support a large area of the map but both areas provide minimal cover if the enemy team has spotters in the center of the map.
Giving the map its name the center “Swamp” area has very poor terrain and should only be tackled by light and medium tanks. This area is key to spotting and the only true cover comes by pushing across and taking gamble closer to the enemy. Finally the northern section of the map features a large field north of the swamp and then the “Northern Hill” in the northeast corner. This area is the highest of the map and is cutoff due to the large terrain obstacles.
Starting out on team 1 you find yourself in the northern section of the map. Where you head largely depends on your tank type and also where the majority of your team decides to go. Since Swamp is a very large map it is difficult to reinforce a failing flank so you do not want to find yourself in a very slow tank without support. Knowing that if you are in a heavy tank or slow tank destroyer your best bet is to stick to the Southern Compound or Town areas since getting there is quicker due to the incline and there is adequate protection from artillery. For faster heavy tanks you also can choose to head to the Northern Hill if you choose to do so and for frail tank destroyers the West Ridge is a good support location.
In a medium tank your options are not limited much by the map but rather by where your team focuses its primary force. If the majority of your team heads to the southern part of the map it doesn’t make sense to go “lone wolf” to the Northern Hill only to be stomped by a heavy tank. In this situation you are better off sticking around the West Ridge or push into/around the swamp. However, if you can find 2-3 other medium/light tanks to push far north then take it and run with it.
As a light tank your job is to spot for your team for the majority of the match and only worry about flanking/doing damage at the very end. If you are able to safely push into and navigate the swamp you will prevent the enemy from advancing easily and open up shots for a lot of your friendly tanks. If the swamp isn’t your thing then helping out in the north can prove to be crucial if you can swing the fight up there in your team’s favor. Finally, as a SPG your sole duty is to use your engine/tracks to keep up with your strong flank. It is almost inevitable that one side(north or south) will fail and you do not want to be left behind. Move between each shot behind your stronger flank so you don’t get left behind.
One important thing to remember is that compared to team 2, team 1 has a slight advantage in the south. It is easier for team 1(green) to push aggressively into the Southern Compound to prevent the enemy from entering the 1/2 line and also in H4 your forces can push to cut off any enemies trying to push into the Southern Compound. On the flip side it is slightly harder for your team to do well in the northern edge of the Swamp around D7 and also in the Northern Hill area if the enemy makes it into the yellow contested area.
Starting on team 2(red) you find yourself initially starting in the southern side of the map. Tactically this side follows the same mindset as team 1 as far as where to focus on depending on your tank type. As mentioned earlier on this team you have a slight advantage in the northern edge of the Swamp compared to team 1 and you also have an easier time pushing the Northern Hill aggressively. The downside is that it is harder to fight in the vital southern areas of the map if your team doesn’t prevent the enemy from locking you out of the Southern Compound.
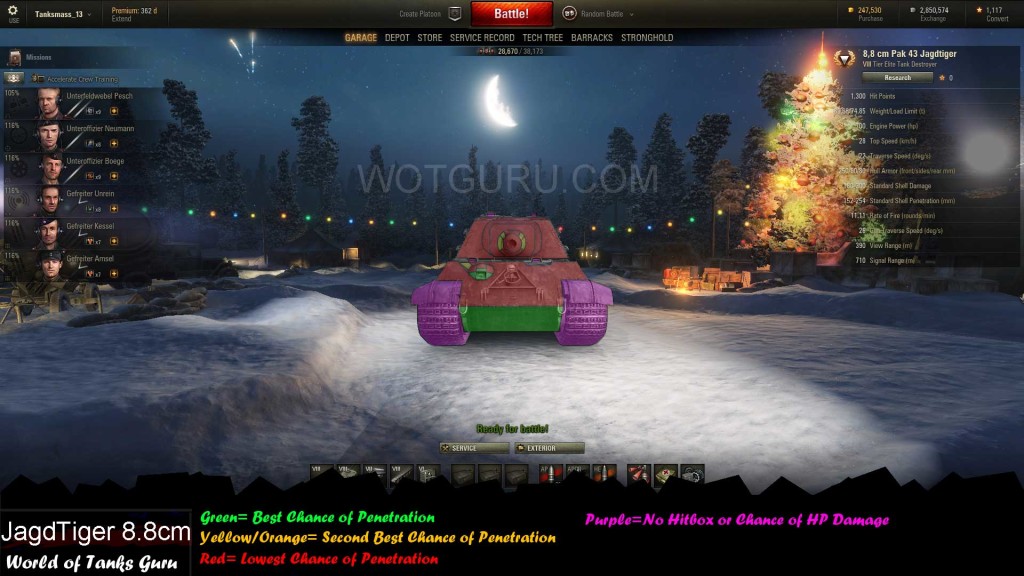 Weak Spot Guide: Jagdtiger 8.8 cm Pak 43 - World of Tanks Guru
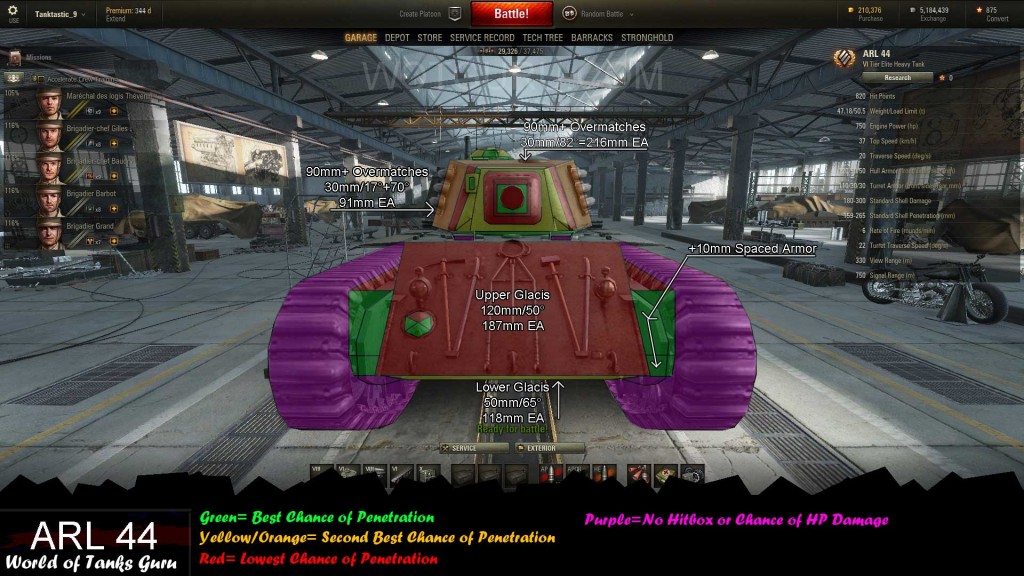 Weak Spot Guide: ARL 44 - World of Tanks Guru
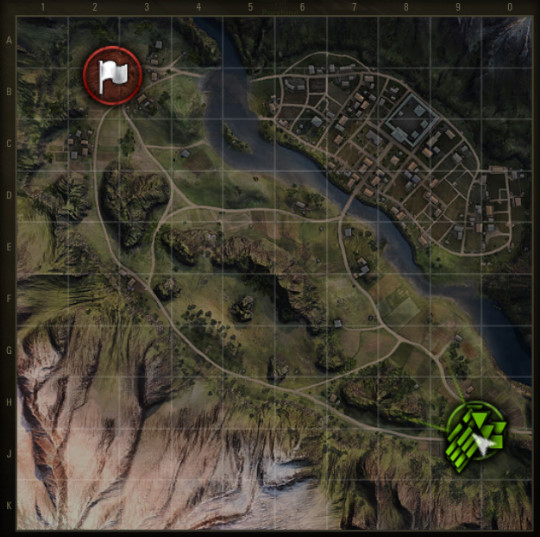 Map Strategy: Hidden Village - World of Tanks Guru
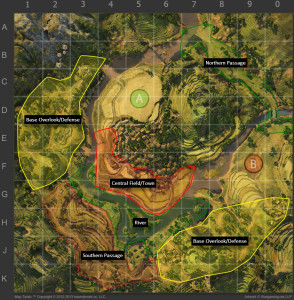 Map Strategy: Pearl River - World of Tanks Guru
 Weak Spot Guide: Waffenträger Auf E100 - World of Tanks Guru