Sacred Valley is a very complex map at first glance since it has many obstacles, terrain differences, and lack of cover for advancing tanks. However, after you break the map down into key areas and routes it becomes easier to manage and understand how the map unfolds in most fights. Although very different from Redshire I like the compare Sacred Valley to it since in a sense it is an “open” map however it is extremely difficult for either team to push across the map without being spotted/torn to shreds.
I used MapTactic to create this map strategy. It is a valuable resource for World of Tanks and other games to create strategies and discuss tactics with clan mates and others. Tendresse also did most of the grunt work and tactics for this map strategy since I have been gone from the game for quite some time!
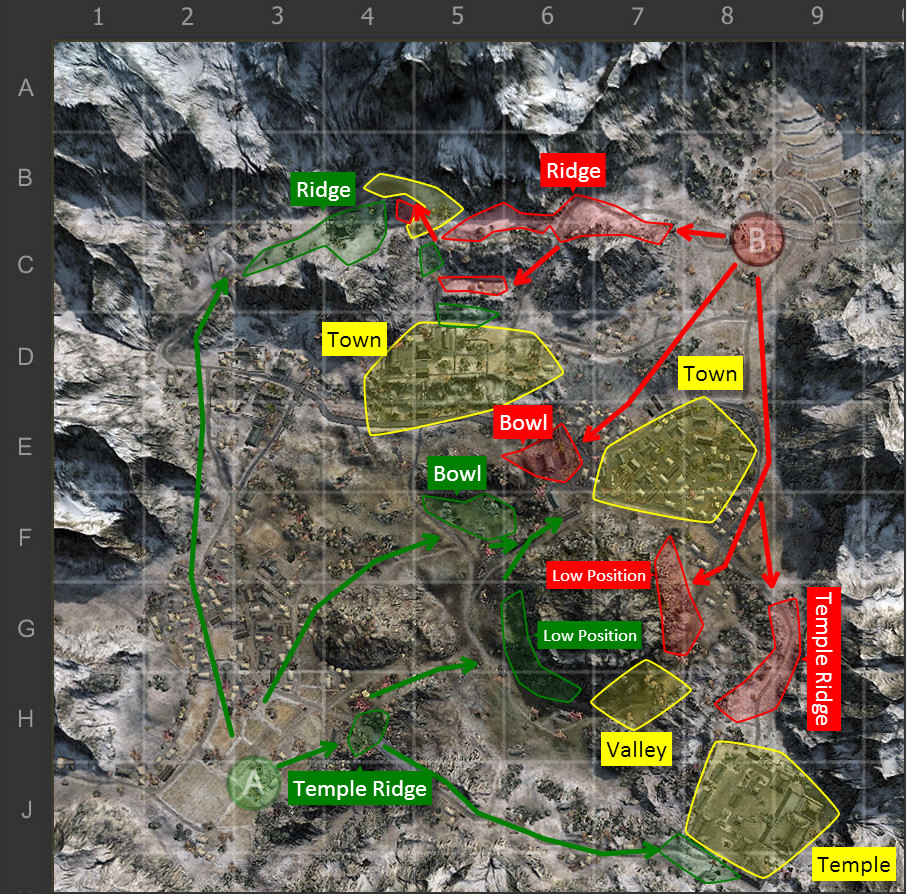
Most of the brawling occurs in the yellow area in B4/B5 if the red team does not advance into B4 to hold the corner. The elevated ridge offers cover from the rest of the map, so the only external factor to consider is SPG fire. Whichever team wins this contested area gains a decisive advantage : vantage points offer excellent shots on the bowls’ key areas for both teams (E5/E6), the D4 town, the E7/E8 town and down lines 2/3. Be careful of returning fire, since tanks from all these areas can easily shoot back due to the lack of brushes on said vantage points. Winning this area also provides the opportunity to push either base, which can in turn easily break the common stalemates of the south flank.
Green Team
Most heavies from the green team should be heading up to contest the north ridge, moving up through the town on the 2 line. Slower tanks using this path should be mindful of scouting from the bowl – once up in the D2 area, the slope is pretty rough and tanks will be exposing their sides and back for a short time to anyone sniping from the D4 town area.
Red Team
The north ridge path is a lot safer for the red team since it’s entirely protected by a high ridge. The only tanks that are at risk are those peeking out for shots on the bowl – they can easily be spotted and shot down by camouflaged light tanks below.
This flank is asymmetrical seeing as only the green team can push initially, using elevation as cover in the J7 area. The rest of the action generally occurs at long range between the green team holed up in the J3/H4 bushes and the red team controlling the monastery plateau. This flank is a lot more static than the rest of the map due to the large open area and the certainty that TDs will be looking for shots on either side of the bowl. Vision is key, so one good scout can easily turn the tide in one team’s favor. Keep in mind the monastery’s buildings are mostly destructible.
Green Team
Pushing to J7 puts you at risk of getting shot off your sides from the valley at G7, but allows you to get good spots on tanks holding the monastery, potentially ending the inevitable stalemate before it even begins. Only fast tanks should consider pushing up because it won’t take long before the red team is in position to take shots at anyone crossing the bridge or venturing into the climbing road – it’s J7 or nothing. From J7, you can either spill into the monastery if you believe the other team isn’t there yet, or you can simply act as a spotter for your TDs and whoever else is camping J3/H4. This is also a great area to hull down with tanks like the T-54/Type 59, allowing you to contest the monastery even if the red team is already in position.
Red Team
This area is a lot less intuitive for the red team, since pushing the J line is not an option and thus your scouting options are severely limited. It’s possible for a tank with good camouflage and vision to choose a bush to passive scout from, either from the top of the monastery or down in the bushes in the H7/H8 ridge area. Aggressive scouting to the G7 ravine can also lead to early vision on green tanks pushing the J line – snipers aware of this can easily rack up a couple of hits early on. Stalemates can be broken with a scout quickly going from cover to cover down in the bowl, hopefully lighting up the TDs for the supporting snipers.
The G8/H8 locations on the temple ridge also provide excellent firing lanes north which can reach up the “C” line easily for most tanks with decent accuracy. If the northern ridge is lost it is best to stay here instead of rushing back to help since by the time you get there you will be no use. Simply stay put and allow your teammates hold up near the base spot enemies and you can pick them off from safety.
This area is completely off limits to most TDs and Heavy tanks due to the high speed and mobility required in order to survive. Most buildings are cover down here is easily destructible, the entire area is vulnerable to artillery fire, and visual cover is scarce at best. However, it’s surprisingly easy to venture into the bowl and survive, as long as you know which spots are safe and which aren’t. Some are especially deceptive, but others offer some efficient cover while even allowing shots to tanks on the periphery. Most spots, good or bad, depend on your team holding certain areas of the map in order to be safe, so map awareness is a highly important trait to have if you’re going to venture here.
Green Team
There’s a small ridge, recognizable by a destructible wall running along its length, down in F6. It creates a small depression in the ground below which provides cover from both the 8 line and the vantage points on the B line. This is a terrific spot for light tanks with a gun decent enough to snipe, and 6th sense even allows you to be aggressive and take shots on tanks running up the main routes. From there, you have two main weaknesses : the C4 area and light/medium red tanks swarming you. The latter should not be happening since your entire north flank can easily support you, as for the former it’s conditional on your team losing the north flank so that’s something you should always keep an eye on.
Red Team
Scouts from the red team can use the destructible buildings and bushes in E7 to light up tanks moving up the 2 line. From there you can safely and easily flex to the ravine at G7 and help your southern flank, then scoot back to E7, rinse and repeat. You are extremely vulnerable to shots from the 2 line, so make sure you’re behind cover at all times, even when 6th sense is not triggered.
Located at D4/D5, the town is a tricky area which provides cover in the form of mostly destructible buildings, walls and elevation. It has some excellent shots on both the 2 and the 8 line, but is wide open to tanks peeking from the cliff above. It’s also vulnerable to shots from the main flanks’ routes, which can easily leave you stranded or dead if you don’t use cover wisely. Pushing through town is a high-risk high-reward maneuver that can potentially cut off a team’s flank, which is generally a back-breaker for any pub game.
The valley is protected very well from outside fire(especially from artillery) but can be tricky to push through if the enemy is set up on either temple ridge. For both teams having a small amount of tanks(1-2 usually works) stationed here is beneficial and is excellent for slower/large tanks. Both low positions provide firing lanes north into the town/ridge areas and on the southern side provide shots into the valley/temple ridge.

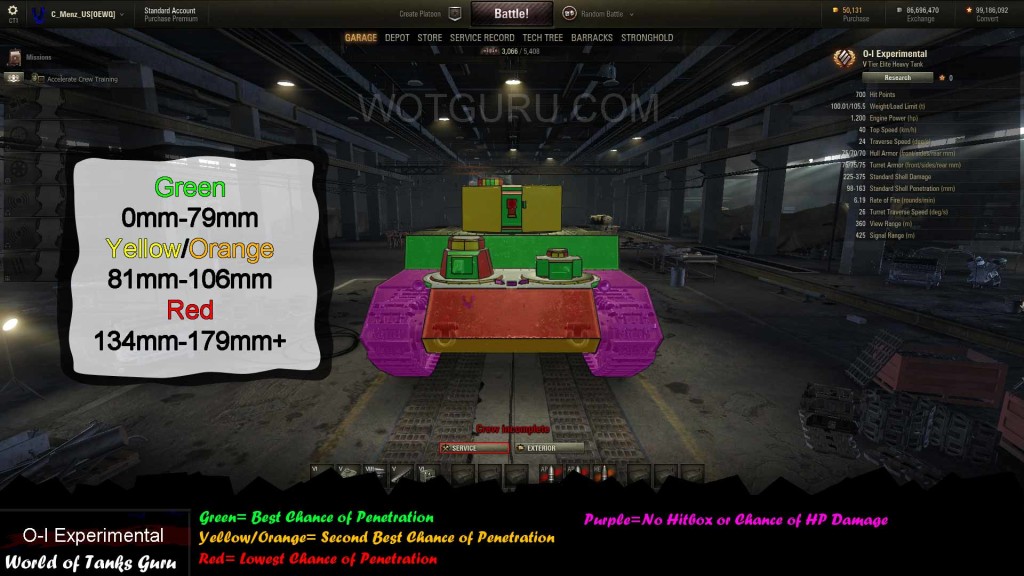 Weak Spot Guide: O-I Experimental - World of Tanks Guru
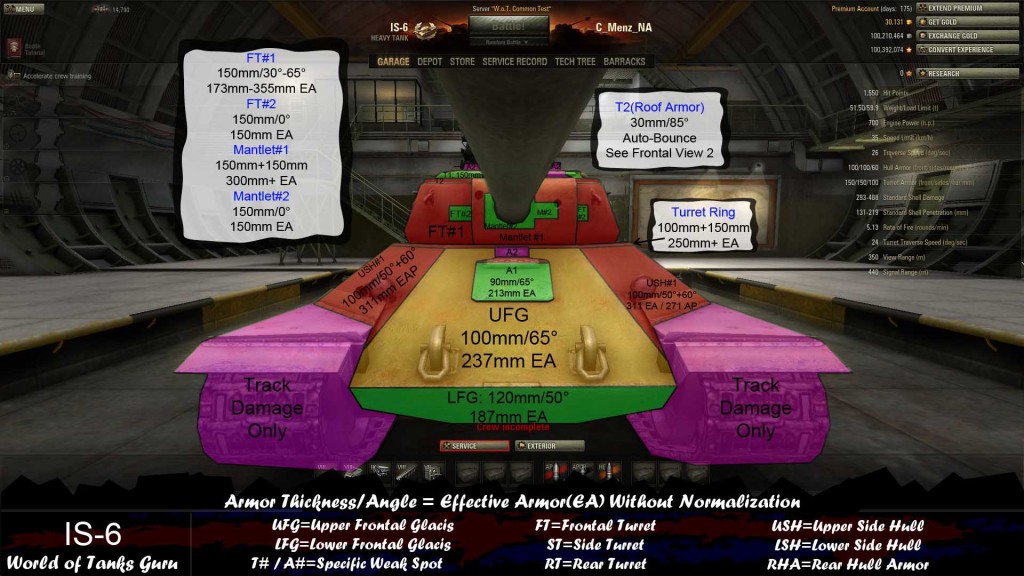 Weak Spot Guide: IS-6 - World of Tanks
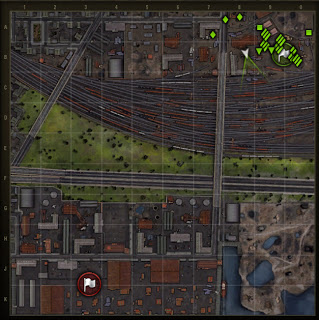 Map Strategy: Port - World of Tanks Guru
 Tank Guide: M26 Pershing - World of Tanks Guru
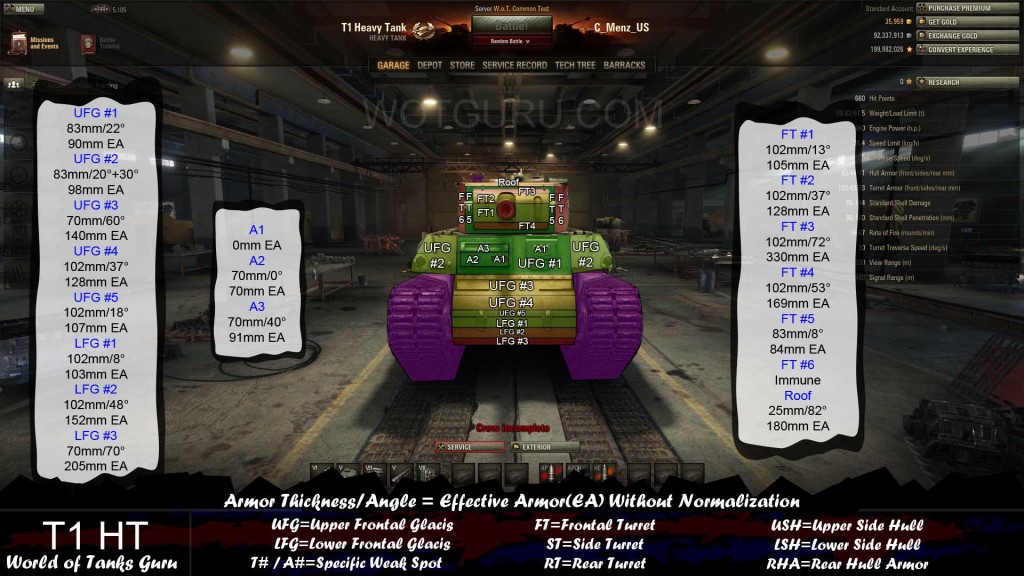 Weak Spot Guide: T1 Heavy Tank - World of Tanks Guru