Prokhorovka has gone several changes unlike other maps. The first version was very flat with very little cover, the second version became much more hilly/bumpy with adequate cover, and the present iteration has been smoothed out closer to the original version. This leads to a map that many think is dominated by arty, which in a way it is, but more importantly it rewards teamwork. Scouts and mobile tanks are very important on this map since it allows heavy tanks/tank destroyers/artillery to sit back in safety to dish damage out. If a team has 2 good spotters on Prokhorovka it will greatly shift the match in their favor.
The red routes are initial routes/locations used for side two on the map while the green routes/locations are for side one. Yellow refers to “shared” locations that are typically engagement areas which are fought over by both teams. Solid routes are initial routes taken from the spawn to the front lines.
This map you see below was drawn up using MapTactic which is a very easy to use tool for making strategies for World of Tank maps. It works directly in your browser and has no cost to use it.
http://maptactic.com/

This section of the map lacks a lot of hardcover aside from the depressed area in the C2/3 and D2/3 areas that prevent enemies from shooting you but not artillery. Side 1 does get many trees and bushes which are both helpful and harmful. If the bulk of your team sits from C2 up you will not be able to spot enemy tanks advancing north until they are right on top of you.
The counter this a light tank/medium should be out ahead in the E2/E3 or central ridge area to light up enemy tanks further south. The other tanks should advance south 1-2 grids behind the scout and provide fire on anything that is spotted. Above all, never drive directly in the road or you will be seen very easily.
The center ridge if for fast tanks as well as tanks with good gun depression. Always keep moving and don’t let to much of your tank get exposed to the enemies to the south. The best place to spot is generally in the E3/E4 area since it has a decent amount of cover due to the steeper slope.
Even tanks like the T32, T34, etc. with good gun depression can set up here if there are only 1-2 arty. Just pop out, take a shot, and back away. Works very well to provide a threat in the center of the map and can deter the enemy from pushing.
The western side of the tracks(center of map) isn’t the most useful spot for 2+ tanks to go down since you get to a point where you can shoot east or west without being torn to shreds. It is best if a team has 1 person here to stop any scouts from slipping through.
The town can be what you make of it… It can be a death trap with no cover from artillery and outside fire(all buildings destructible) or a very well covered area of the map you can move around in while attacking. The trick to the town is to first see if the enemy pushes stupidly through it to your side, sitting in E6/E7 at the edge of town is good for this.
After that shift over to the 7 line(never go into the 6 line since it can be hit easily) and sometimes the 8 line. Pick your buildings to protect against artillery fire and move after they are destroyed. By applying pressure you will be able to kill enemies in the town, spot tanks on the hill for your team, and also negate most artillery fire.
The reworked versions of this map added accessibility to the small “island” up in the northwest corner. It’s uses are somewhat limited since once you are up there you are somewhat useless. Sure you have shots on the hill and if the enemy breaks through into C6/north. At the same time you allow your teammates to die easier on this side of the map by hiding up here.
The only times I would head here is if you are the only tank on the east side of the railroad tracks or if you are artillery.
Pushing the hill can be very difficult depending on how you do it. The enemy team almost always beats you to the top if they have tanks with similar speeds and you can also be shot from the side if you are not careful. Stick to the edge of the map and do not stray to far west. It is better to be aggressive and push to the top at the start than to wait for their slower tanks to get up there as well. At worse you run into more tanks than you can handle and you’ll loose a bit of HP as you back down.
Scouts have many options for this map and also play styles. Doing quick spotting runs in the center of the map will spot a lot of their team if you have 440m+ view range while moving(optics people!) and gives your team good intelligence. Alternatively you can passive spot in E1/E2 behind one of the many bushes as well as over in the eastern side of the map.
Typically as a scout you want to spot somewhere first but safely on this map, then move to where you see a flank not taking advantage of the spotting locations. If your team is huddled up in B2 then scouting the 1/2 line is good or if your team is to afraid to going near the hill then doing a quick run there helps out a lot.
Setting up as arty on this map you will want to put as much distance between you and the enemy base meaning that you want to be near the edge of the map. A1/A2/A3 provides good cover and the longest route typically. A6/A7 is good if you do not have many in the 1/2 line, and A9/A0 is if you want to shake it up.
Side 2 unlike side 1 has a bit less cover on this side of the map. Venturing past J1/J2/J3 will most likely get you spotted and obliterated. Spotters with good camouflage can set up in J1 behind the bush line while the main force is in K2/K3. K1 has a small depression behind a hill which can be a good defensive spot if you do not have many people on this side of the map.
Like side 1 the center ridge is good for spotting as well as tanks with good gun depression. F3/F4 along with F5 provide the best spots to dip in and out of cover to get shots off.
The western side of the tracks(center area) is good for 1 tank to be in to poke into the middle and also to stop scouts. Other than that you will find if there are many tanks here that you cannot push north due to incoming firing from all sides.
The eastern side of the tracks provide good cover via bushes to reach the town. It is also a decent spot to get shots off on people climbing the hill once you get to G7.
The town plays the same way as side 1 in most cases in that you should avoid the 6 line and also wait initially for anyone rushing through. After that pick your spots and slowly advance through. This side has the added option of heading further east into the 8/9 lines since you can “pinch” the people sitting in E0/F0 trying to go up the hill.
The hill is very important for side 2 and 2-3 tanks should head up here to prevent the enemy from securing it. Heavy tanks should almost never go up here since it is better to simply bypass it and attack through the town. Once up here pin the enemy on the hill climb and stay alive. Wait for your team to create the situation for pushing over into them to be viable.
Scouting the center area at first like side 1 will provide your team with valuable intelligence as to where the enemy team is going. Unlike side 1 the passive spotting positions are a bit limited in the 1/2 lines but you can still set up on the left side of the road. For the eastern side of the map the hill provides a very good vantage point to spot from.
K1 is a good spot if you have a very large force in the 1/2 lines. K7/K8 are decent if your team chooses to focus on the east side of the map.

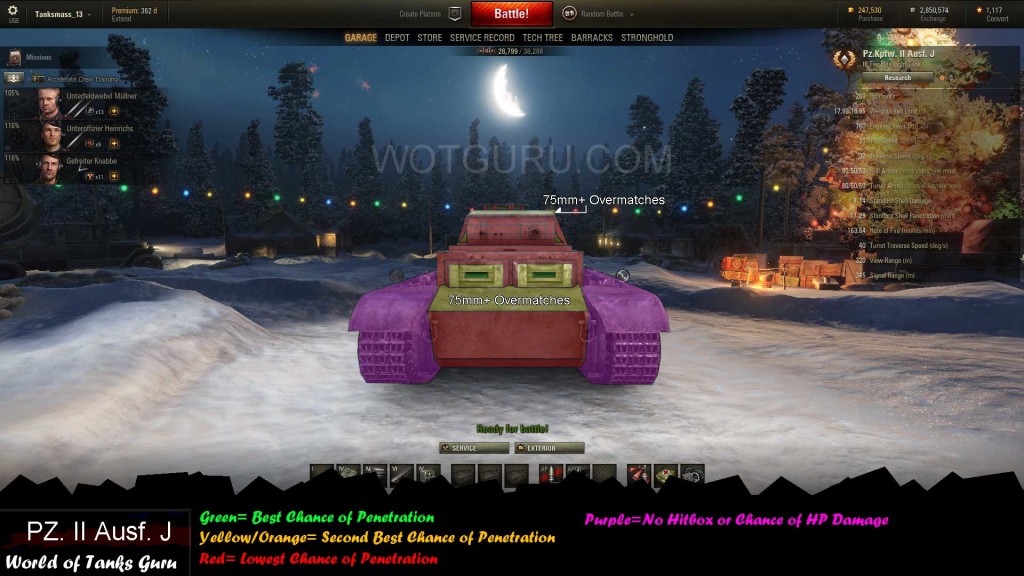 Weak Spot Guide: Pz.Kpfw. II Ausf. J - World of Tanks Guru
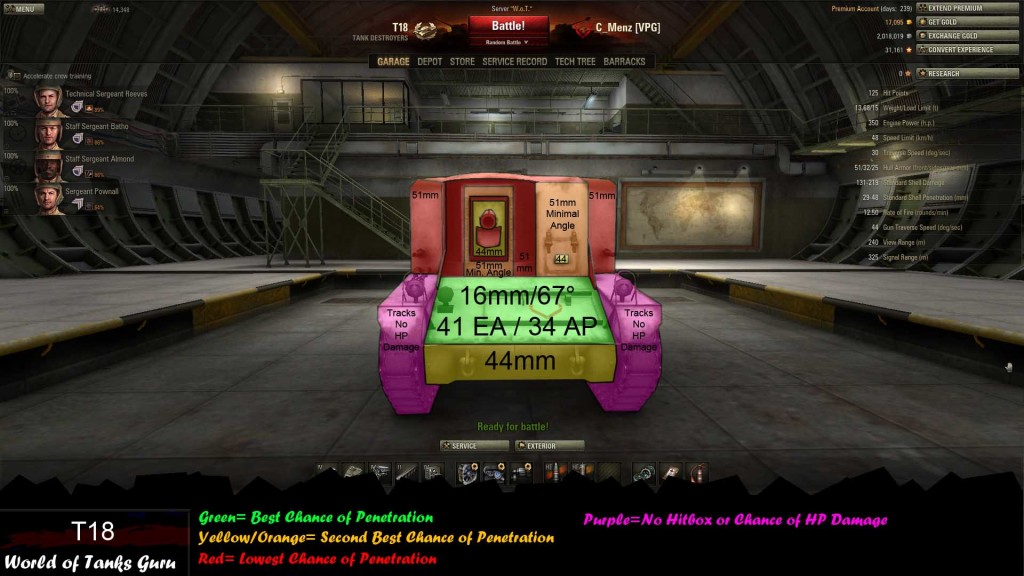 Weak Spot Guide: T18
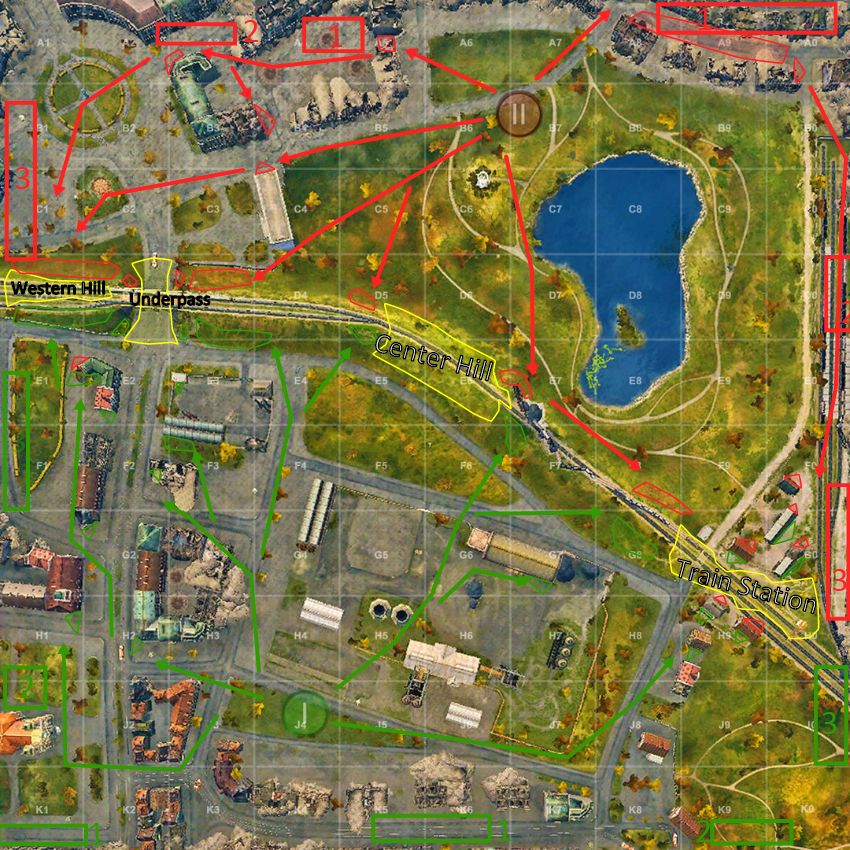 Map Strategy: Widepark - World of Tanks Guru
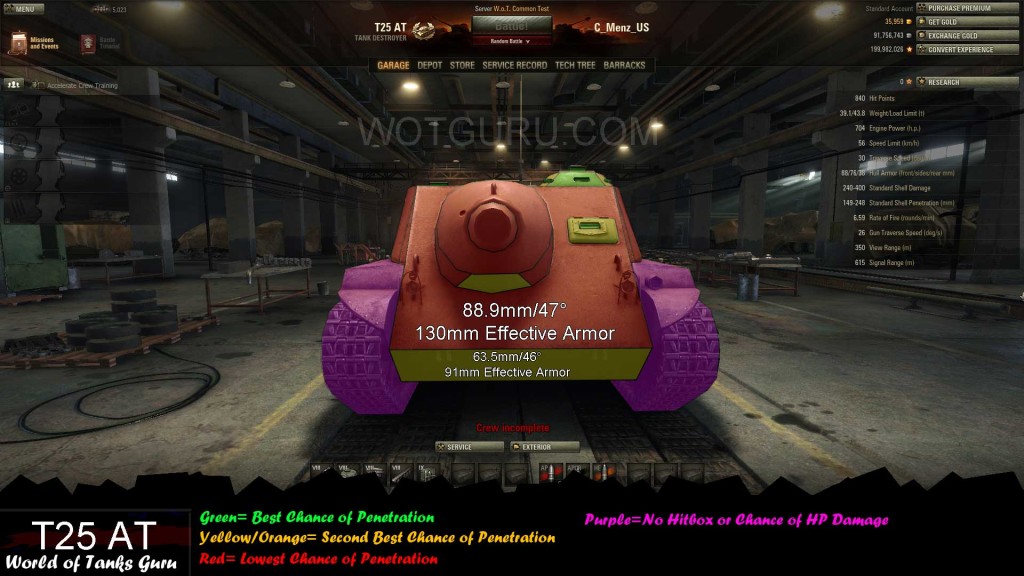 Weak Spot Guide: T25 AT - World of Tanks Guru
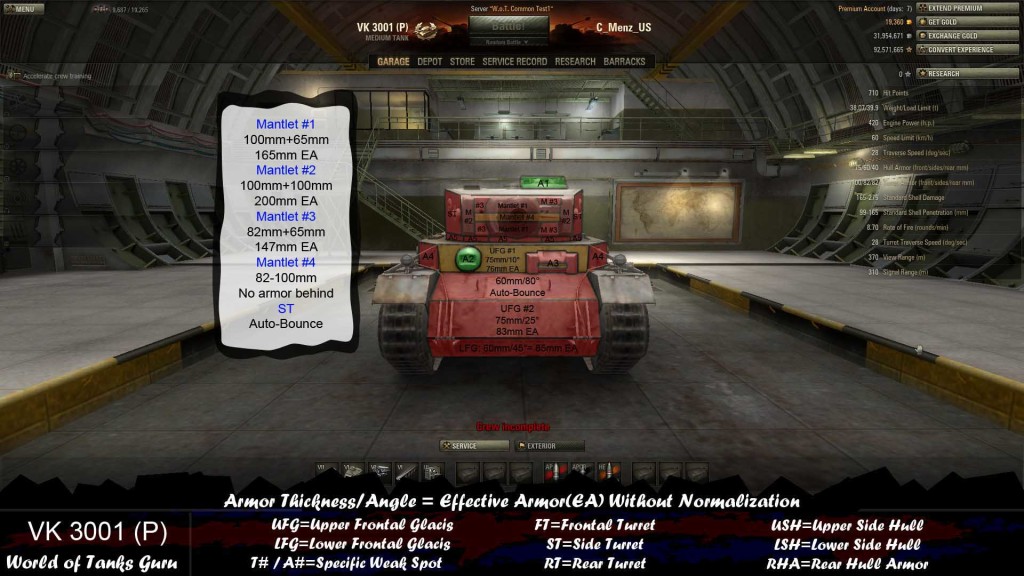 Weak Spot Guide: VK 3001 (P) - World of Tanks Guru