1. Walk through the gates.
2. Walk into the small building. Read the journal on the table.
3. Go back to the gate and examine the right lion head. Take the key from its mouth.
4. Go back to the small building and use the key to open the box on the table. Take the key from inside.
5. Leave and tap on the house/manor up the path. Use the key to open the door.
6. Enter the left door. Take the key from the bowl and read the journal entry.
7. Enter through the door ahead and take the magnifying glass.
8. Arrange the pictures above the fireplace like so to open a secret door behind the bookshelves:
9. Go back to the main room and go up the spiral staircase.
10. Open the left door in the back and enter the room. Look at the picture above the bed:
11. Arrange the puzzle on the night table so it looks like this:
12. Leave and open the door to right. Enter the the room. Use the clover key to open the closet. Take the blue book and read the journal entry. Leave the room.
13. Enter the room to the right, towards the front. Read the journal entry and take the figure from the night stand.
14. Enter the bathroom and take the light bulb.
15. Go back downstairs and take the left door again. Place the figure in the empty space between the other figure and take the red book.
16. Go through the door ahead and into the secret chamber behind the bookshelves. Place the missing books in the right spots and another door will open, revealing a computer. Look at the “help” screen:
17. Go back two rooms and zoom in on the telephone. Dial the number from the computer screen and a latch will open up. Take the microchip from inside.
18. Go back to the computer and put in the microchip. Tap on the “door” file and unlock the door. Also look at the “chrono” screen.
19. Go upstairs and open the door that’s now unlocked. Go inside and read the journal entry. Then look at the book on the desk. Use the magnifying glass to see coordinates:
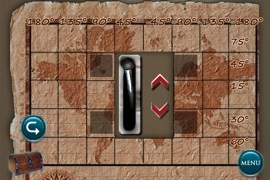
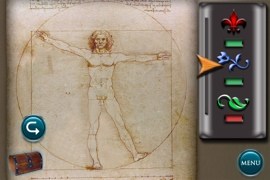
20. Tap on the map and select the four coordinates to reveal a lever:
21. Pull the lever and a staircase will lower from the ceiling.
If you like this game, try “Alice Trapped in Wonderland” by MediaCity Games, the same developer as Crimson Manor.
22. Go up the staircase. Read the journal on the table and take the roll of film.
23. Open the door to the right and walk through. Place the light bulb and film in the projector and turn it on. Watch the film. Note the numbers you see before the video.
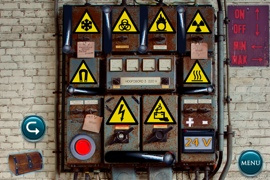
24. Go down to the dining room and press both urns next to the stone figure. You must touch them at the same time. Then the painting will slide down, revealing a keypad for a safe.
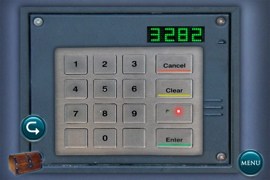
25. Punch the correct numbers into the keypad (from the film) to unlock it:
26. Take the stone emblem and key from inside.
27. Go to the kitchen and use the key to unlock the door. Go through to enter the gardens.
Act 2: The Gardens
1. Tap the birdhouse and take the crystal heart.
2. Tap the stairs to the right and then take the battery from the window sill.
3. Go back and tap left near the bird house to see the door to the wine cellar. Open it and enter.
4. Go to the back of the room and take the corkscrew. Also read the journal.
5. Go back to the kitchen. Use the corkscrew to open the bottle and look at the message.
6. Go back out and tap the right stairs again. Enter the numbers from the message into the lock on the door and enter.
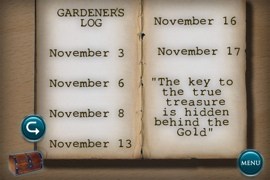
7. Take the light bulb and shovel. Read through the journal and the note on the table:
8. Go back to the dining room. Place the heart crystal in the statue on the mantelpiece and take the clock hands.
9. Put the clock hands on the clock and set the time according to the puzzle from the bedroom:

10. Take the sword from the clock.
11. Go back to the wine cellar. Put the bulb in the lamp. It shines a light on the barrels. Tap on them and match the symbols like so to get a shield:

12. Go back inside and up to the room above the study. Remember the cheerleaders picture?

13. Tap on the poster on the wall and arrange the legs and arms like each cheerleader, selecting the appropriate color on the right side before each one. If you get one right, the bar below the symbol will change from red to green.
14. Look at the treasure map that’s revealed:
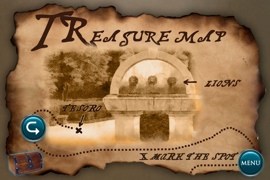
15. Go back outside and zoom in on the three lion heads. Dig where the X was on the map to get a bag of gold!
***Like this game? Try “In Fear I Trust.”***
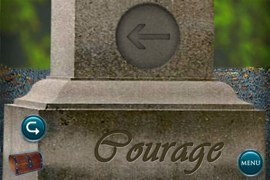
16. Tap on the opening behind the lions to see a statue. There are three more openings, with a statue behind each one. Place the sword on the first one (courage) and take the medallion. Note the arrow:
17. Place the shield on the second one (bravery) and note the arrow:

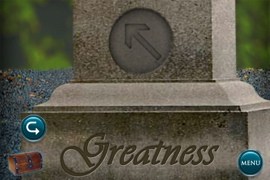
18. Place the bag of gold on the third one (greatness) and note the arrow:
19. Place the three medallions above the lion heads and some dials will appear below the lion heads. Arrange them according to the three arrows and turn the handle to get a wine bottle and another emblem.
20. Go to the wine cellar and place the win bottle in the missing slot to open a secret door. Climb down the ladder to enter the secret complex.
Act 3: Secret Complex
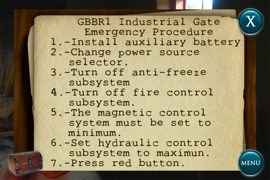
1. Replace the battery and pull the levers so they look like this, then press the red button to open the door:
2. Walk through the door and then enter the Foreman’s Office. Take the key and read the journal:
3. Exit the office and tap the right side of the screen. Pick up the crowbar.
4. Tap on the machine to the right and take the key with a lightning bolt on it.
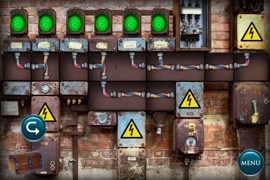
5. Leave that room and go back to the Foreman’s Office. Use the light int key to unlock the doors to the right. Tap the metal plates to remove them, then arrange the wires like so to get the power back on:
6. Leave that room and go up the stairs. Pick up the valve.
7. Go back downstairs and to the room on the right. Place the valve in the machine on the right and press the button to repair the valve.
8. Go back upstairs and place the valve where it’s missing to shut off the steam.
9. Go through the door towards the back of the room. Then use the crowbar to remove the wooden plank on the dressing room door.
10. Take the clothing that’s hanging and the elevator card. Read the journal entry.
11. Leave the room and tap the area that the caution sign is pointing to.
12. Zoom in on the pressure control valves. Turn them until the arrow points to “100” and the temperature is safe.
13. There’s a locked box inside the boiler. Use the orange key to open it and take the high security key.
14. Go back to the Foreman’s Office and open the locked door. Take the last stone emblem and gasoline from inside.
15. Go back upstairs to the area with the dressing room. Put the gasoline in the forklift to move it and go through the doors that say “EXIT.”
16. Use the elevator card on the lift and you’ll be back inside the house/manor. Place the three emblems on the wall to reveal a secret door.
17. Use the key card in the slot next to the doors to gain access to the secret laboratory.
Final Act: Secret Laboratory
1. Read the journal entry on the ground.
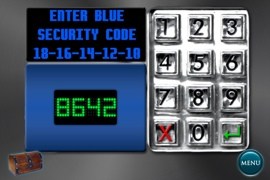
2. Tap ahead and enter the code into the blue keypad:
4. Tap ahead and enter the code into the green keypad:

5. Read the journal entry.
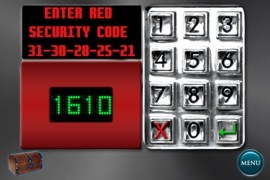
6. Tap ahead and enter the code into the red keypad:
7. Read the journal entry.
8. Go up to the machine. Read the journal entry and choose a button. I chose green out of curiosity 😉
Congratulations! You discovered the mystery of the Crimson Manor!
If you liked this game, try “Alice Trapped in Wonderland” by MediaCity Games, the same developer as Crimson Manor.
Make sure to check out the new game by 3D Methods, Cryptic Caverns!
Also, check out these other escape games.


 How to move up the grid in GT Racing 2 - hints and tips
 How to dig deep in Towers & Dungeons: hints, tips, and tricks
 Real Steel Champions Cheats, Tips & Hack for Gold & Coins - AppGameCheats.com
 100 Pics Classic Toys Answers Levels 1-100
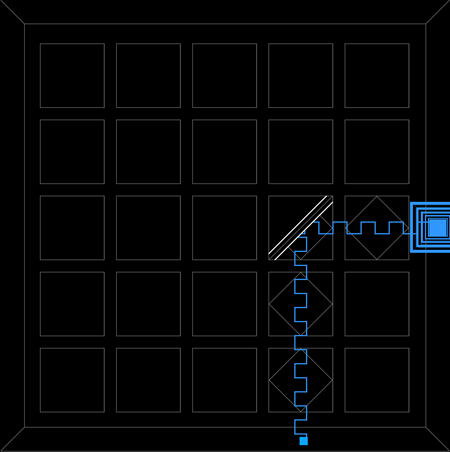 How to eavesdrop - TouchTone puzzle walkthrough and solutions for Tutorial 1, 2, and 3