
In this guide to the Elite: Dangerous you will find plenty of tips and pieces of information which will help you with taking your first steps in your galactic career. From tips concerning the basic flight system up to the choice of a controller, earning money and acquiring the Elite rank. This guide is based on the 1.0 version of the game but it will be expanded and updated every time a new add-on or a major patch will appear. You will find here the description of every ship, piece of equipment, a detailed info on the market aspect and so on.
Topics which will be described consist of:
Piotr "Maxim" Kulka ()
Welcome in the future! The action of Elite: Dangerous begins in the year 3300. After discovering the methods of flying in the hyperspace, humanity began an expansion and colonization of the most distant spots of our galaxy. The cold war between the Federation and the Empire continues whilst the Alliance of the independent fractions grows stronger, creating a powerful coalition.

Speaking of which, it is worth describing these fractions as the game does not provide too much information on what is happening.
Federation is a part of humanity with the law structure, similar to today's democratic society. With all its advantages and flaws. It is an autocratic system in which corruption fills the every day life. Domination of the corporations and misusing the laws is a part of every day's life. Federation is being controlled by the president of congressmen. Both the government as the citizens are obliged to abide the law of the constitution. Some things are tolerated (i.e. the variety of religions) while the others are not - such as the drugs, cloning, political activism or slavery. Media creates a celebrity cult on which they're focusing for the most of the time, distracting the population from the wars and destabilization by doing so. Sounds familiar isn't it?
Another part of the galactic force is created by the Empire. A society of a totalitarian caste system where the power and status can be reached only if you are rich and influential. Empire values the honor. It is acceptable to be actively proud of the origins, but it is the treating of others (including the slaves) which matters more. Having some unpaid debts is considered to be a disgrace and the only way to pay them, for the people form lower classes, is to become a slave. The law is forced by the senators who are above it which means that they can do whatever they want, this includes starting the wars in the name of the Empire. Senators report only in front of the Imperator. Some of them loudly oppose the slavery to show their honor, but they do not suggesting any imposing it. A few things are banned in the Empire, but people using the drugs are unwelcomed.
The third fraction is The Independent Alliance of Systems. Alliance has started from the need of a cooperation between many independent galactic collectives whilst the war between the Federation and the Empire, which left an imprint on the peaceful alliances. Alliance is a mix of many different cultures bonded by one goal - protection of their resources and independency from more powerful forces. Political system of the Alliance can be troublesome - each year the presidency is given to the hands of a different culture, which in practice makes it harder to create an actual agreement. The military cooperation is much better organized. Each member of the Alliance gives a part of his fleet for the Defense Forces which are commanded by six admirals - one for each cultural fraction. They can respond quickly and without any linkup with the government which in practice works very well.
In addition to that, the game includes lots of freelancing groups which are not the part of the Alliance. They are usually in the state of anarchy and it is hard to tell whether they will play any major role anytime soon.
After dealing with the historical context, we can move to describing the game itself. In Elite: Dangerous we won't find a standard single player campaign as it is a big sandbox, in which anyone can travel along the path of any career, doing anything what he wants. A player can be a pirate, salesman, smuggler, assassin or whatever he can think of. Although, the player will always be the pilot of his own ship, which is the thin that counts the most. More about the roles and ways of earning money can be found in the chapter Career and Missions.
A lack of campaign doesn't mean that there aren't many plot based quests which would give the player additional motivation to complete them.
In the day of release, a big story-machine has been started which would then begin the war between the worlds. The main plot is based around the sickness of Imperator Hengist Duval. Now, the deeds of his successors are the main reason of everything that happens in the world. These results are not the only one to be bothered with, but to be up to date it is recommended to check the GalNet news: http://www.elitedangerous.com/news/galnet/
The players have a big influence on what happens in the galaxy. They are in charge of what the "game masters" will do next - they can change the regulations of the Federation, the outcomes of the rebellion oreven wars. Of course one player by himself won't be much of an influence, but organized groups can do a lot by economic machinations and armed combats. How does it work? Each mission, each murder and transaction done by the player influences the political and economic situation of the fraction that is actually ruling in the interstellar universe. In consequence it will change the balance between the main three fractions. So if the fraction for which we work for takes part in some kind of an argument or conflict, and then we, will help this fraction THEN this situation may be acknowledged by the authors who, after that, will be creating another events.

Galaxy in the Elite: Dangerous is enormous, or even monstrous. There can be found 400 billion star constellations to explore. It is more than a one player can explore throughout his lifetime. The most fascinating feature of the galaxy is its congruity for what we know about the galaxy today. Player can find there practically every star that you can now see in the night sky - as well as their planetary systems, moons, nebulas and so on. It adds a lot to the game in the matter of the exploration's depth. All it takes now is to take a particular star, find its name and you can actually get there via the game. More than that, each star in the Elite: Dangerous is a dynamically rendered picture you can explore. Same goes for every 'painted' stars and the vast sky which surrounds the player. It all can be investigated. Even though, the parts of the galaxy that we have already discovered are rather small. That's when the system of procedural generation comes to the game.
Each unknown constellation is generated by the game which makes them so different from each other. Some of them will be blocked and unavailable on the day of release. This is because of the new insectoid race called Thargoid which will be introduced in future. This combative race (supposedly composed of female members only), may be causing some war in this world. It will be the only race, except for humans which will be intelligent, and it is the Thargoids who will be in possession of these blocked constellations. More on that can be read in the Galaxy Map and travelling chapter.
From the mechanic point of view, Elite: Dangerous is one of the most complex cosmic simulator ever made (the only competitor could be Star Citizen). Game is using the Newton's flying system, which is connected to all of the Newton's Dynamics Laws. If you'd played any other flying simulators such as Independence War II - Edge of Chaos (2001) or Evochron Mercenary (2010), you will feel at home. For those who are just starting with this kind of physics will have to spend some time learning it and getting used to it (with which our guide of course helps). In the old times there was a system implemented which bared the resemblance of the one that applies to the real life flying with the real life planes... but in cosmos. The Elite uses the six degrees of freedom system, which may be familiar for those who played the Kerbal Space Project. Of course it is a simplified version for it would be much harder to play this game whilst enjoying doing so. More on the flying system can be found in the Introduction to flying system chapter.
Another interesting fact is that independently to the game mode, the world is always connected with other players' actions which helps to create a kind of internal economic political and story ecosystem. Each player can interact and change it, so that the game can be more unpredictable.
You could say that there is only one game mode in the Elite: Dangerous - it is a sandboxish free roaming. It can be somewhat compared to the Minecraft or DayZ: You start the game and right away you are on your own. Everything is dependent from you and the enemies or friends you will encounter on your way.
Elite: Dangerous went with the way of the Evochron MerPricery, where the progress is being transmitted between the single and online multiplayer. There are three modes to play: Solo Play, Private Group and Open Play.
In the Solo Play you are playing by yourself, but the economic and political system are common and shared between other players, thus making the game similar to other MMOs. This is why you cannot play the game without an internet connection. In practice it would look like this:<br>Imagine that you are interested in a particular resource that you've just seen on the other station. You're coming back there and it turns out there is no more of this resource as probably the other player earlier came up with the same idea of buying it.
Private Group is the mode is for everyone who wants to play online but in the hermetic group of their own friends in their private group. These friends can leave or join the group at any time (so be careful who you invite). There are no more differences between this mode and the solo mode.
Open Play is simply a MMO where everyone minds their own business. It may result with meeting new friends and acquaintances in the common operations. It is also a bit risky as there are no limitations concerning attacking other players. The only limitation is the law which applies in the particular areas and its representatives. Each misdemeanor is noted down and the head is being exposed for the hunting of bounty hunters. Such wrong doers are marked and the player and the AI law enforcers can attack them without any consequences. The Open Play mode is definitely for those who are not afraid of the risk.
Controlling the ships in the Elite has to be explained beyond the basic keyboard controls. Many players can find this complex system as too big obstacle to overcome. Even the ones that are used to flying simulators may find this system surprising.
The main difference between the Elite: Dangerous and the popular genre classics is the number of axes on which the ship can move. Instead of usual three, the Elite has six of them. You have to acquire the ability of flying on them in order to fly effectively and without any accidents. This six axis implementation comes from using the Newton's system (more on that in the Introduction to six axis flying system chapter) and it requires both hands to use it.
Players which are used to always playing on the keyboard and mouse will have the least problem with it. Same goes for those using the HOTAS (Hands on Throttle and Stick) controllers.
Finally, we have reached the point in which we will be telling which controller is the best for Elite. Keyboard and mouse will, of course, do absolutely fine but they're rather tough, especially in the context of controlling the machine put in the zero gravity.
What are the alternatives then?
Joystick is the simplest and the most obvious choice when speaking of flight simulators. Average joystick has four axes (X, Y, Z and the throttle) and the mini-joystick (POV Hat) placed on the stick isn't quite expensive and it should satisfy anyone who is not an advanced pilot. The second hand will have to be placed on the keyboard all time which is one of the disadvantages of this solution. This combination enables you to control three basic axes strafing and the power of the engines with the keyboard.
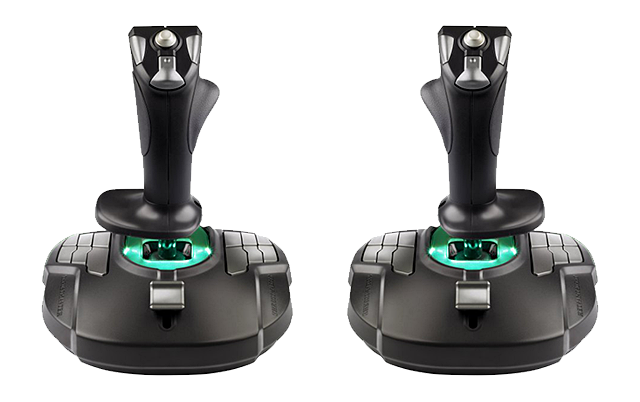
Using two joysticks may sound exotic, but the 'new era' of flying simulators using the Newton's dynamics makes this way of controlling more popular. The biggest problem is equipping yourself with the left-hand or universal joystick (best for them would be using the same model). Fortunately such can be found on the market in the sensible prices. The second problem may be the amount of the buttons which can be used without getting the hand of the controller. This combination enables you to control three basic axes with the first joystick and the strafing and power of the engines with either of them.
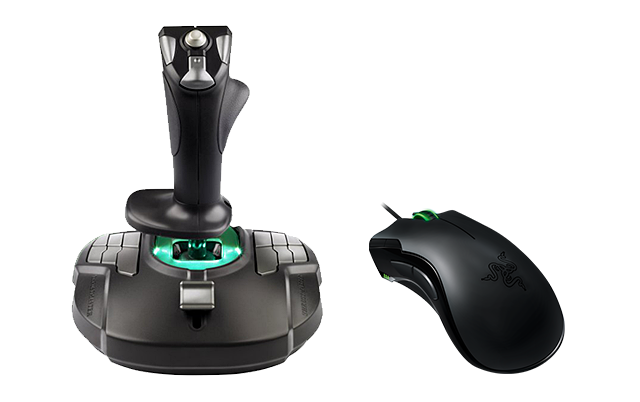
Even more exotic may be using both the joystick and he mouse at the same time. It requires a bit of agility but it is doable. The ambidextrous people will have less problem with this setting. This combination enables you to control three basic axes with the mouse and the strafing and the power of the engines (can be connected to the mouse wheel) and turning the ship with the joystick.
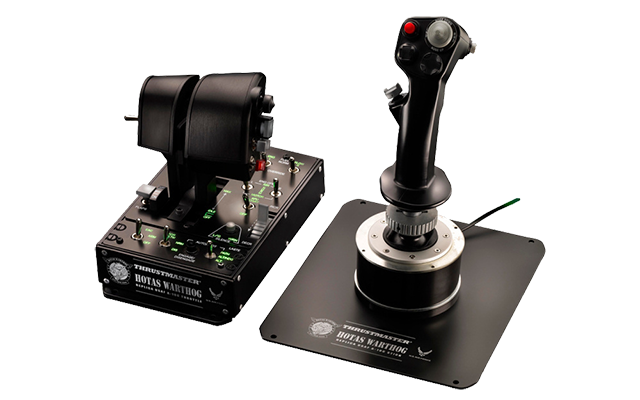
System HOTAS enables the player the control over every aspect of the flight without getting the hands of the controllers. Through the analogs on the throttle you can control the additional three axes. It is probably the most common system within the veterans of this genre but it has its flaws. The first would be the price - the complete HOTAS cost more than the average player would be willing to spend on a controller which can be used for the very limited amount of games. The second disadvantage is the fact that the most of such controllers don't have the analogs on the throttle. Buttons put on them are no better than the keyboard. In this setting the joysticks operates the three basic axes and the throttle controls the engine power and strafing.
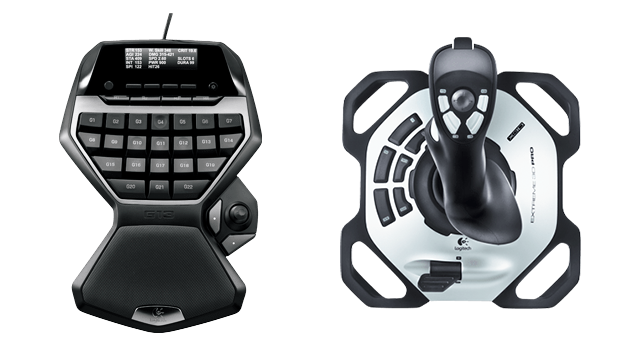
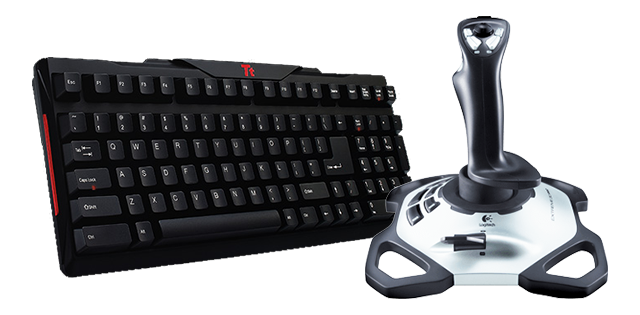
One of the most universal and probably the most easy-to-adapt setting would be using the gameboard/keypad along with the joystick. Such combination resolves the need for using the keyboard and getting your hands of the controllers. This system is getting very popular because of its simplicity, price and intuitivism. Gameboard is a small keyboard for the players often equipped with the mini-joystick which can be operated with a thumb. The simplicity of the gameboard comes from its keyboard based button setting. It is a hybrid of a keyboard and a gamepad. Its little analog may be the biggest advantage. Some of the gameboards offer only the digital version of it (four or eight ways) or a simple d-pad. This setting implies the three axes being connected to the joystick and the gameboard for the strafing.
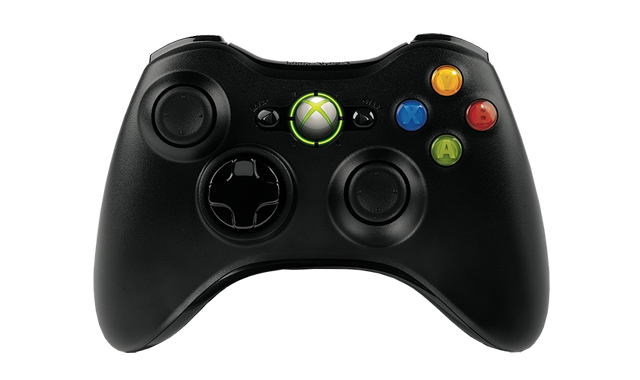
Gamepads, in the games such as the Elite, are consider as a rather poor choice of a controller. Two analogs and the analog buttons are surely an advantage in the matter of axis but their little spectrum of movement makes them really sensitive and makes it difficult to be precise. A small amount of the buttons also forces the player to reach his keyboard whilst holding the gamepad with one hand. It may be a good alternative for those who hate flying on keyboard and mouse and don't have any other equipment mentioned above.

Turn (axis Z)

Pitch (nose up or down)

Turn left

Turn right

Thrust left (strafe)

Thrust right

Thrust up

Thrust down

Throttle forward (acceleration)

Throttle backward (reverse)

Speed 0%

Flight control On/Off

Afterburner

Frame Shift Drive

Target the object in front of you

Next target

Choose the most threatening target

Choose another sub-system of the targeted object
Weaponry

Basic gunfire

Additional gunfire
Change the group of Weaponry

Release/Retrieve the hardpoints
Cooling

Silent flight

Release the radiator

Lights On/Off

Increase the range of the sensors

Decrease the range of the sensors

Power on the engines

Power on the Weaponry

Power on the systems (shields etc.)

Equal power distribution

Rest the Occulus Rift

Release/Retrieve the cargo rack

Eject the cargo

Slide out/hide the undercarriage

Focus the interface

Pause

Target Panel

System Panel

Sensors Panel

Quick communication
Communication Panel
Interface Mode

Interface Panel Up

Interface Panel down

Interface Panel left

Interface Panel right

Choose the highlighted button object

Next bookmark in the panel

Previous bookmark in the panel

Turning the looking around on/off

Turning the head
Galaxy map

Turn the map up

Turn the map down

Turn the map left

Turn the map right

Map forward

Map backward

Map left

Map right

Map up

Map down

Zoom in

Zoom out

Turn

Pitch

Turn right/left

Throttle (acceleration/reverse)

Button 4 - Afterburner

Thrust left (strafe)

Thrust right

Thrust up

Thrust down

Speed 0%

Flight control On/Off

Frame Shift Drive
Targeting

Button 3 - Target the object in front of you

Chose another target

Choose the most threatening target

Choose another sub-system of the target

Button 1 - Basic Gunfire

Button 2 - Additional Gunfire

Button 5 - Change the group of Weaponry

Button 8 - Release/Retrieve Hardpoint

Silent flight

Release the radiator

Lights On/Off

Increase the sensors range

Decrease the sensors range

POV1 Up - Move the power on the engines

POV1 Right - Move the power on the Weaponry
POV1 Left - Move the power on the systems (shields etc.)

POV1 Down - Equal power distribution

Reset orientation Occulus Rift

Release/Retrieve the cargo rack
Drop Cargo

Slide out/hide the undercarriage

Button 6 - Focus the interface panel

Pause

Target Panel

System Panel

Sensor Panel

Quick Communication

Communication Panel

POV1 Up - Interface Panel up

POV1 Down - interface Panel down

POV1 Left - Interface Panel left

POV1 Right - Interface Panel right

Button 1 - Select highlighted position

Button 2 - Next bookmark in the panel

Button 3 - Previous bookmark in the panel

Looking around on

Head turning

Turn the map up

Turn the map down

Turn the map left

Turn the map right

Map forward

Map backward

Map left

Map right

Map up

Map down

Zoom in

Zoom out

Turn/Pitch

Thrust horizontal and vertical

Throttle forward (acceleration)

Throttle back (reverse)

Afterburner

Speed 0%

Flight control On/Off

Frame Shift Drive

Target the object in front of you

Choose another target

Choose the most threatening target

Choose another sub-system of the targeted object

Basic Gunfire

Additional Gunfire

Change the group of Weaponry

Release/Retrieve the Hardpoint

Silent flight

Release the radiator

Lights On/Off

Increase the sensors range

Decrease the sensors range
Power on the engines

Power on the Weaponry

Power on the systems (shields etc.)

Equal power distribution

Reset Occulus Rift

Release/Retrieve cargo rack

Drop Cargo

Slide out/hide the undercarriage

Focus on the interface panel

Pause
Target Panel

System Panel

Sensor Panel

Quick Communication

Communication Panel

Interface Panel up

Interface Panel down

Interface Panel left

Interface Panel right

Choose the highlighted position

Next bookmark in the panel

Previous bookmark in the panel

Looking Around

Head turn

Turn map

Move map

Map up/down (along with the analog)

Zoom In

Zoom Out

Screenshot (BMP)

Screenshot in 4k resolution (or 16k if played on the 4k)

PipeLine Shot (graphic files HDR and BMP - for the graphic designers)

Show the FPS counter

Show the Network Traffic

Hide the interface (screenshot mode)
Screens are saved in: C:\Users\XXX\Pictures\Frontier Developments\Elite Dangerous.
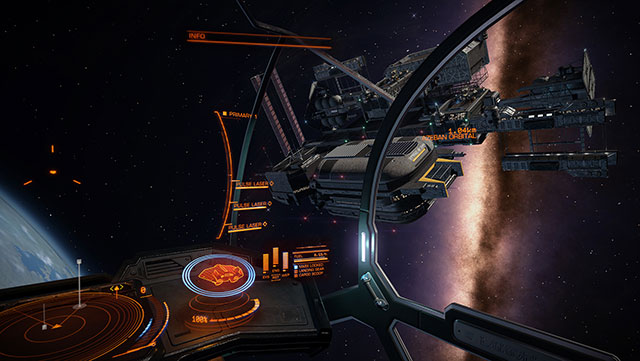
In Elite: Dangerous all of the interface elements are rendered in 3D as a holograms. They do not bear much resemblance to the windows which are used to be pinned to the screen. This does not take so much space and looks clearer. This effect looks the best on devices such as Oculus Rift or TrackIR (or any other fee accessories). Having one of these enables the players more control on some panels, all it takes is to look directly at them to expand them, thus giving us quick access to the crucial pieces of information without even touching the keyboard. Most of the functions are described in the tables above, but some of them require a further analysis, these can be found below.
 This description is an expansion of the point nr. 14 in the key of the main interface.
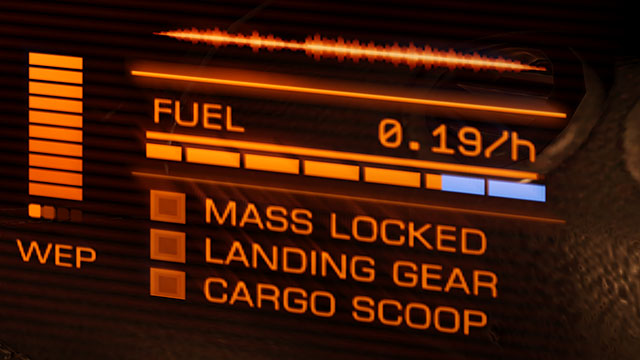
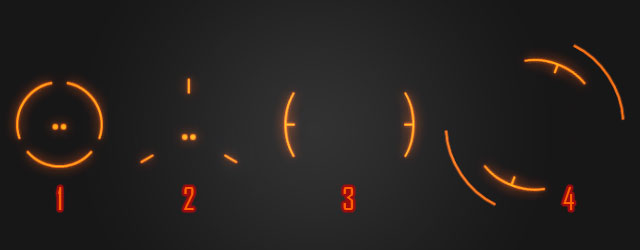
1. Termic signature
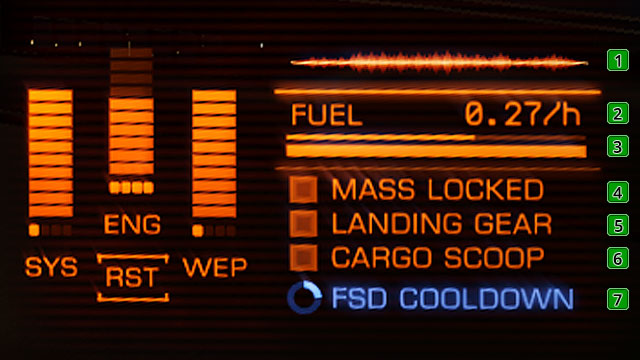
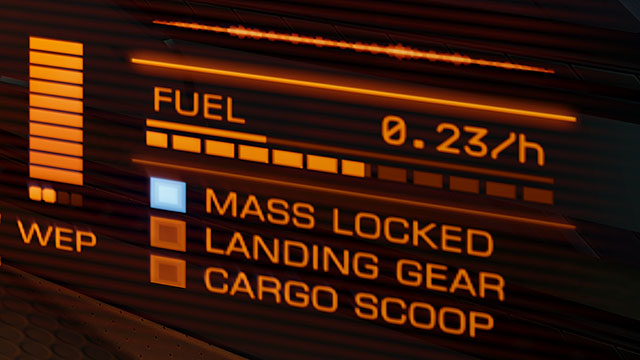
This wave-o-meter represents the visibility of your ship on the other ships' and cosmic stations' radars. The thinner it is, the harder it is to spot you via usage of the scanners. The thermic signature can be masked by using the silent flight mode. The ways of lowering the signature are described in the Fight and Weaponry chapter
2. Fuel use for an actual speed
This digital indicator, shows the amount of the fuel you are using in the context of actual speed your ship is moving. The presentation is in the value of tones per hour.
3. Fuel gage and its reserves
Here you can see two pointers. The thin line is the status of your reserves. The thicker dashed one shows the whole supply. Moving around the inner constellation whilst on free-flight and Super Cruise, you are using the reserves which refills itself automatically through the supply. It uses a 'dot' of the dashed line.
4. Mass Lock
This gage lights itself when we are in the close area of an object which has bigger mass than our ship. It can be a planet, cosmic station or even other ship. The gravity of such objects blocks us from turning on the FTL drive, thus disables us from going into the hyperspace.
5. Undercarriage
This indicator lights blue when the undercarriage is down. It turns off after you hide it.
6. Cargo rack
Works the same way as the Undercarriage indicator.
7. Cooling FSD
After leaving the Super Cruise mode, this indicator tells you how long you should wait before using it again.
Scanner is simply a radar, which shows every object in its range. Using the scanner properly is a key to success and to survive in the crowded areas. Everything matters and it is described in the attached key. Quality of the scanner is dependable of the quality of its component on the ship. Usual scanners that you will be getting with your ships have the range of about 4 kilometers and in order to increase it you will have to spend some money. The scanner also shows the temperature of the ship and the indicator of its speed. Its appearance changes drastically while docking, but this matter is further expanded in the Docking and start chapter.
![Left panel (button [1]) can be used for the analysis the target as well as for the navigation and checking the mission details - (Left) Target Panel - Ship Interface - Elite: Dangerous - Game Guide and Walkthrough](https://game.lhg100.com/Article/UploadFiles/201512/2015121518380768.jpg)
Left panel (button [1]) can be used for the analysis the target as well as for the navigation and checking the mission details. It consists of five bookmarks and for you it will probably the most viewed part of the interface. Below you can find the key for understanding each of the key piece of information.
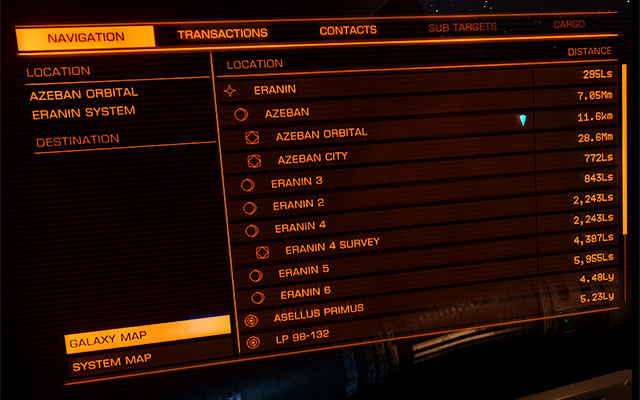
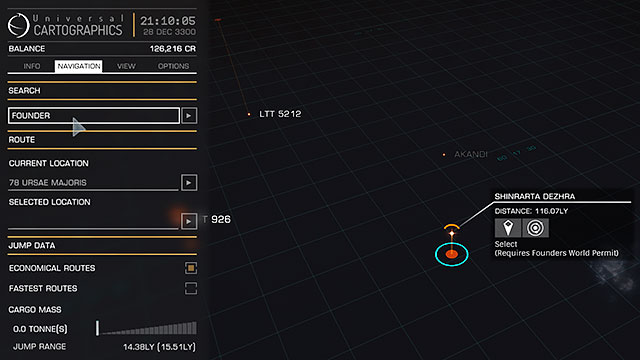
In the navigation bookmark you can find the detailed list of locations to which you can travel via the Super Cruise mode or the hyperspace jump. Here you can also open the galaxy/constellation map in which you are at the time.
On the list to the right all of the celestial bodies in your reach are written. Also your current localization is marked with the diamond on the list. Below are the icons:

Star

Planet

Cosmic Station

Unidentified source of the signal

Hyperspace Jump enabled in this spot

The window of transactions shows the mission which you picked up as well as their remaining time. There are also all yours not collected rewards and the lists of bounties on your head.
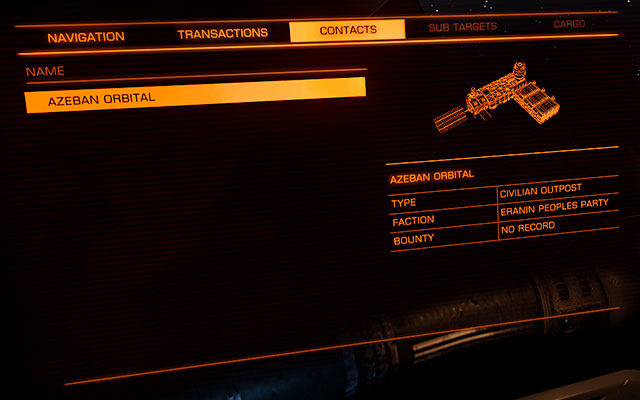
The list of contacts shows all the objects shown by the sensors. Here you can communicate with the stations (asking for permission for landing) and other ships.

This bookmark has the written out list of each components mounted on the selected ship. It may enable you the estimation of the danger. Choosing an element on this list enables you targeting and destroying it. More on that in the Fight and Weaponry chapter
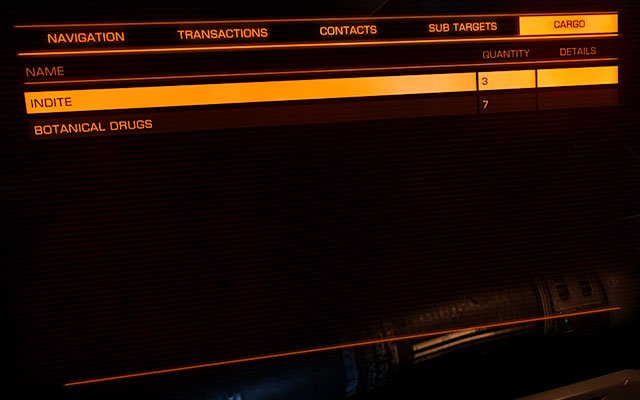
To see the contents of this bookmark you will have to target a ship first, and then use the Cargo Scanner. By doing so you will be able to see here the list of the cargo of the targeted ship. It is the basic smugglers' and pirates' tool.
![Right panel (button [4]) can be used mostly for checking your statistics and configuration of the subsystems - (Right) System Panel - Ship Interface - Elite: Dangerous - Game Guide and Walkthrough](https://game.lhg100.com/Article/UploadFiles/201512/2015121518380867.jpg)
Right panel (button [4]) can be used mostly for checking your statistics and configuration of the subsystems. The left panel also consists of five bookmarks. Here are the descriptions.
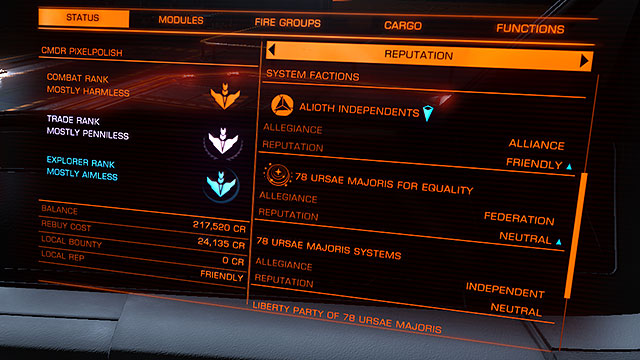
The first bookmark shows the details on the pilot. The most prominent are Your Pilots Federation Rankings in the left column. In the Elite: Dangerous there are no levels nor experience points. The ranks are given to you on the basis of your fights, trading and exploration achievements.
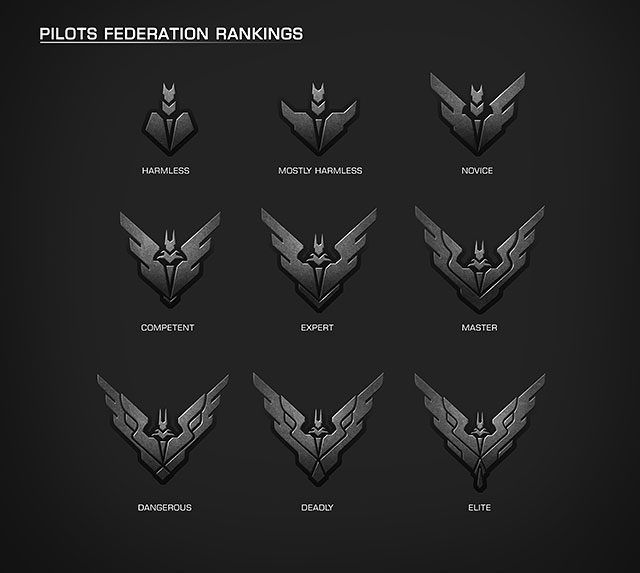
Ranks are given to you after reaching the particular, hidden thresholds for each branch. There are no precise requirements written down in order to move up, but soon enough they will be discovered. In order to achieve the Elite rank in any of the branches, you will have to work for months. Each rank is a global statistic bounded to your account. Even deleting our progress from the server won't influence your progress.
Ranks, beside the point of glory have the special functions. Elite rank automatically joins us into the Elite Pilots' Federation which comes with many, unknown for the moment, benefits. One of the confirmed privileges is the free pass to the Solar System. Without it would be much harder to get there. Pilots may enter the EPF before achieving the Elite rank, but they will have to prove their skills. Free pass to the Solar System also belongs to those who had bought the beta version of the game.
The same bookmarks in the right column you will find other details concerning your pilot. Moving through these position requires using the left/right buttons.
REPUTATION - detailed data on your reputation in the constellation and the reputation between the fractions. The blue arrow indicates the growing tendency and the red indicates declining one.
CONSTELLATION STATUS- detailed info on the influences of the each fraction in the particular constellation. The blue arrow indicates the growing tendency and the red indicates declining one.
FINANCE - info on the bank account, the insurance and the cost of buying a new ship (in case of an accident).
STATISTICS - all the history of the pilot's achievements throughout the entire play through. Finance, Battle, Exploration e.t.c.
PERMITTIONS - list of all the 'passes' into the closed constellations or systems (i.e. Solar system)

This bookmark shows all the sub-systems of your ship - from Weaponry to the life support. Each component has its own etiquette; SYS (systems) ENG (engines) or WEP (weaponry) which connotes with the power settings on the cockpit panel. Near to the etiquette you can find the information (which is also a setting) on which priority does the component have. You won't have to be dealing with this too often - the exception are the extreme situations such as equipping a generator which has the base power lower than the power which is taken by all of the components. In such cases you can transfer the priority of the less important components (such as power supply in cargo). The higher the number is, the lower is the priority of the component. Sometimes you could even go as far as turning off the module completely. The last piece of information here is the percentage of health for each module.
Below the table there is an indicators for the generated and used power. The pointer of the used power divides onto two parts which represent the components 1 and 2. If the level of the used power is coming up to the 100% you will have to think about changing the generator.
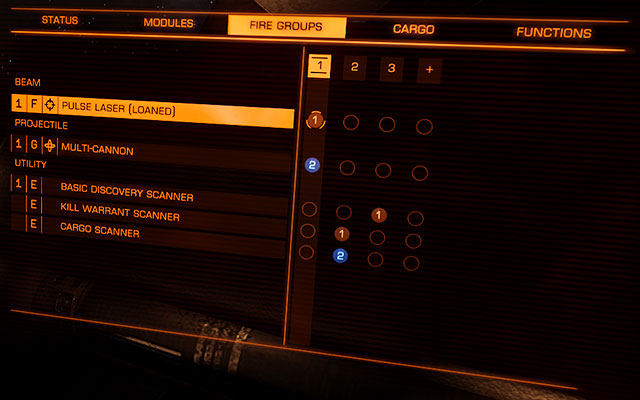
Here you can connect each element of the weaponry to the button and fire group of your choice. Select (1) to connect the weapon to your main trigger or (2) in order to connect it to the additional trigger. To do it, move the cursor on the group and bind the key. You can reconfigure many independent groups of weaponry. By default only two groups are visible - to add another, simply move the cursor on the group marked with plus and bind a key.
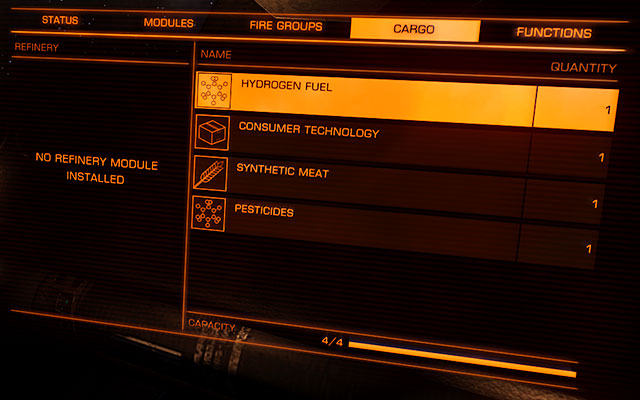
This screen shows the list of the cargo which you currently got on your ship. Here you can drop any of the cargo if you need more space or if the cargo is illegal and you want to keep the low profile. If you have got the refinery, it's contains are also listed here.
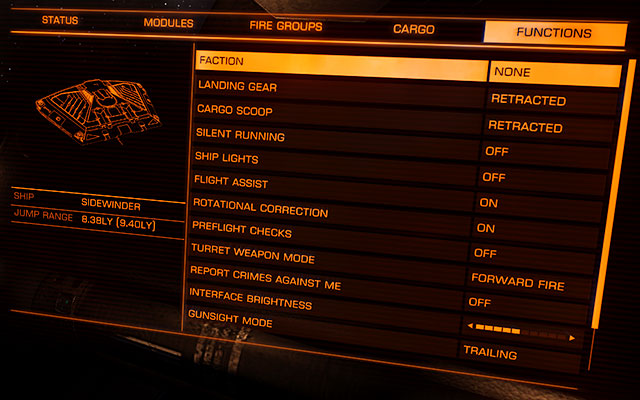
The last bookmark in the right panel are the functions. You can turn on/off many functions from here and even reconfigure some of them. Most of them has bound hotkeys to themselves (check the Controls chapter) so you won't have to do much in here. The exception are the functions such as the mode of the turrets or the intensity of the highlight, way of targeting etc. Each options are described in their own chapters.
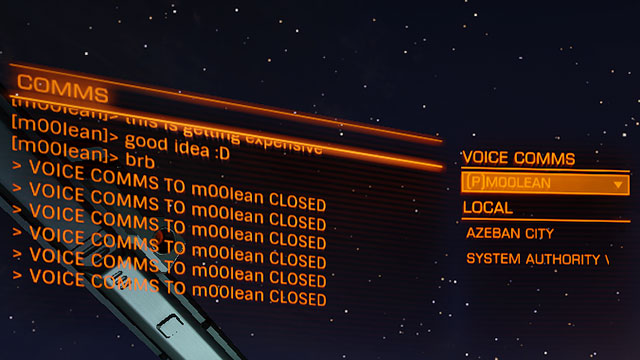
Communication Panel is used to receiving or sending the text messages between the ships. It is simply a chat window. To send the message select the particular ship from the list by the chat, type your message and send it by pressing the Enter button. This panel can also be used as the voice chat, choose the "voice comms" and select the receiver from the list. There is also your friends list here with whom you may communicate no matter how far they are or in which mode they are playing. You can even communicate with the players who are yet in the main menu.

After docking on the station in the place of the radar you will see the menu with three items: Starport Services (main interface window available without coming off the ship), Enter hangar (I you need to buy or swap the components of the ship or the entire ship) and Launch (choose if you want to leave the station. All of the further options are described below.
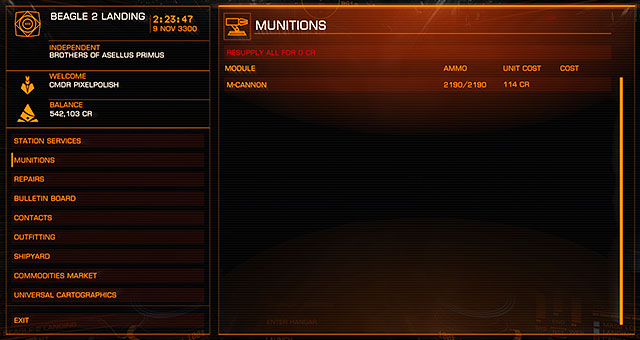
This window enables you the refill of the ammunition for each weapon and hardware (cannons, missiles, afterburners, radiators etc.).
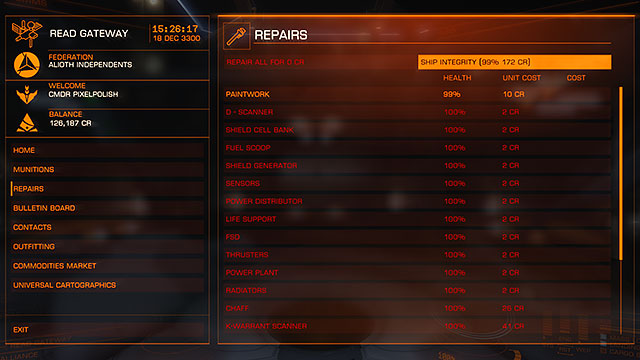
In the Repairs window you can repair each of the ship's component separately or all at once. Repairing single components may come handy if you want to save some money.
Other function is the repair of the ship's integrity. Integrity differs from the technical state as the latter is making the component work or not when our ship's health is down to 0% whilst the first makes the ship infallible. If the integrity is down to 0% it lowers the health of the ship by 30 % independently from the earlier made repairs. Low integrity may also cause the fallibility of the components.
Another function is the renovation of the paintwork for our ship. Which with time outwears because of time and collisions.
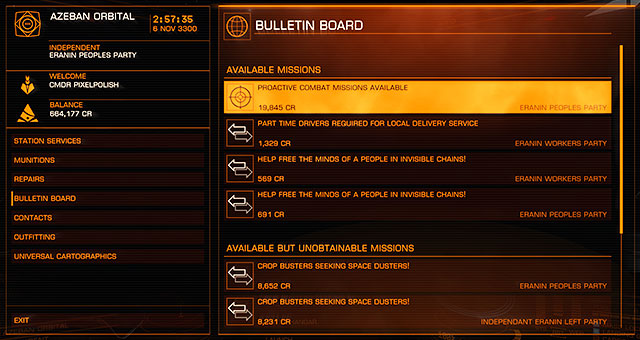
Bulletin Board shows the new missions when the old ones disappear (due to time). The missions are divided into two parts, those who are available right away and those for which particular requirements have to be met. More on that in the Earning your first money chapter.
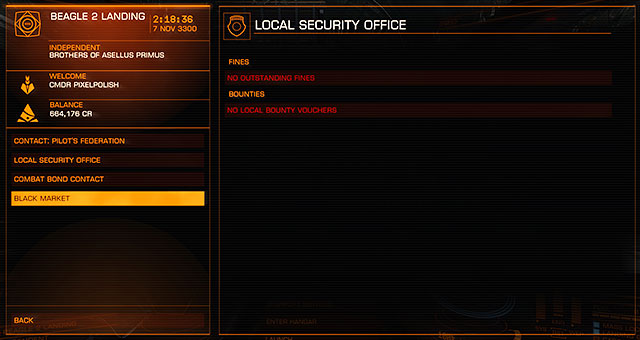
Here you can manage your financial actions with the Pilot's Federation and the local government. In order to pay your fees you will have to contact the PF. Each unpaid fee after 24 hours changes into the bounty on your head and gives you the wanted status. In this situation you will have to go to another constellation where you are not wanted and pay your own bounty using this window.
If you want to withdraw all your money given to you for a successful hunt on other player, you will have to contact the Local Security Office. In most cases the rewards are given to you only in the constellations in which you had capture the wanted. More on that in the Earning your first money chapter
Another contact on the list is connected to the military missions. Taking such mission requires from you going to the spot of the conflict, choose the side of it and profit from each enemy ship you will kill from that point. This window will give you your credits.
A black market shows only in some stations. You can sell there the illegal cargo or the stuff which you wasn't able to transfer on time (the deadline will pass and the cargo will be marked illegal).

This window enables you buying the weaponry and other ships components. Prices of each component are lowered by the value of the component which is already mounted in a particular slot. The first bookmark shows the hardpoints on which you can mount the new acquisitions. The second bookmark enables you the change of the color of your ship if you had purchased any earlier on the game's page (for the real money). For now you can't buy new skins for the in-game currency but this may change through time.
This screen also gives you the information on your ship such as power use, cargo capacity or fuel capacity. Watch out: Not every station sells the equipment - more on that in the Fight and Weaponry chapter.
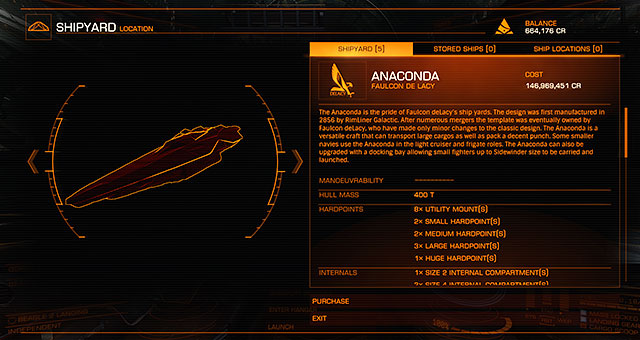
Shipyard plays the role of the ship store. Besides the available models you will be able to find here the holographic pictures of the offered ships and their details. You will be able to sell your ship while buying new one, thus lowering the price of the model you want to buy. Last two bookmarks show you the ships which you have docked and the locations of them. More on that in the Ships chapter.
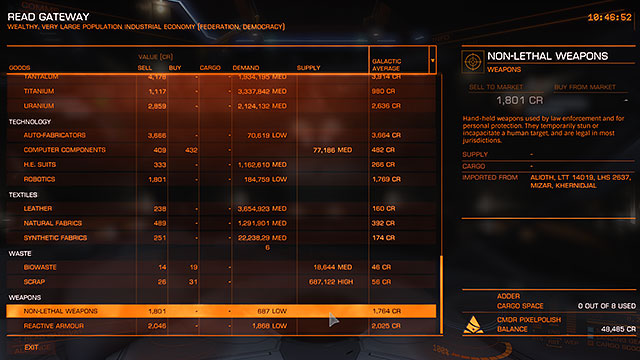
Market is a very simple interface which can be used to buy or sell a particular goods of daily use (medicaments, food, computer parts etc.) It can be used only for further trade. Sometimes you will find here something which is vital for completing your mission. There are also demand and supply indicators, list of the constellations and the supply of a particular good on the station. Based on that, you can plan your trading route. Not every station has its own market more on that on the Earning first money chapter.
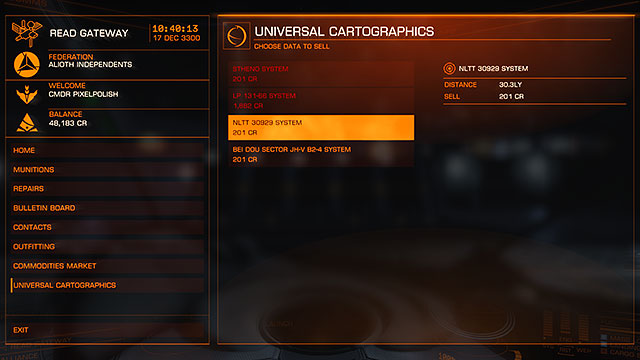
The last position on the list of the station's services is the interface used for the galaxy maps selling. It is very useful for those who are not interested in exploration and do not have any component for scanning on their ships. For the searchers and the cosmic tourists the pieces of information on this maps may appear as a very lucrative business model. Prices of these maps are of about thousands of credits. The rules are simple: Maps with details about the star systems around the station are the cheapest, the ones connected to the constellations far away are the most expensive. Minimum distance of these maps is the 20 light years.
The basic difference between the Elite: Dangerous and other popular classics among the cosmic simulators is the so called Newton's Flying system. The first crucial difference is the number of axes on which the ship can maneuver. Apart from the three basic axes: RX (rising/declining), RY (veering) and RZ (turning via the axis going along the hull) offers also the axes; X, Y, Z.
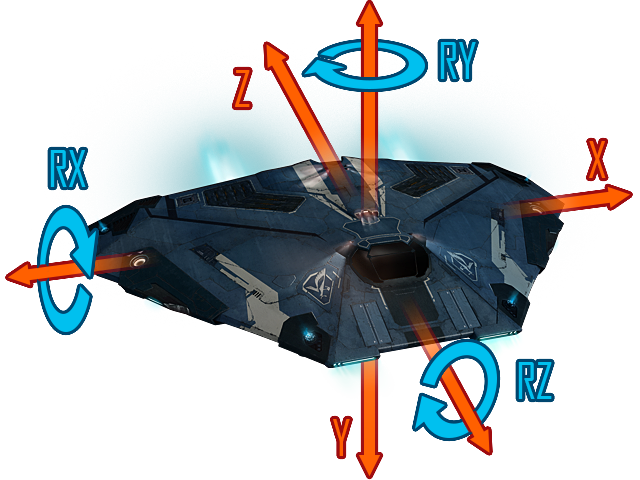 These three additional implements are used for moving the ship by vectors - which is called the strafing. You can strafe horizontally (left-right), vertically (up -down) and 'in depth' (forward backwards). These six degrees of freedom or 6DOF enables you flying in true three dimensions. The closest comparison to such system is steering a submarine or a helicopter (up to some degree).
Thus we had come to another aspect of the flight model in the Elite: Dangerous. The most crucial here is the First rule of the Newton's law of motion:
When viewed in an inertial reference frame, an object either remains at rest or continues to move at a constant velocity, unless acted upon by an external force.
This rules applies to our ship in the matters of playability. If you will accelerate with your ship (without any flight support) it will be drifting in the space with the same velocity as long as there won't be anything to stop it. The same goes when it doesn't move.
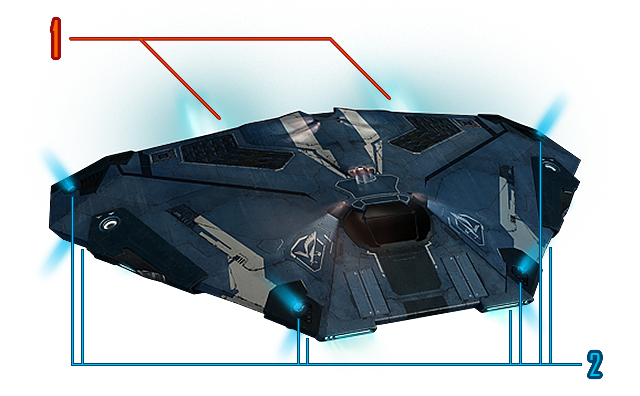
1. Main Engine, 2. Bow Thrusters
Such flight model would be enormously hard to tackle if not for the cockpit's computer with its power steering. Every ship is equipped with the main engine (1), which drives the ship in the direction the nose is pointing. For the change of the direction or strafing the ship uses the Bow Thrusters (2) placed on both sides of the hull (both the top as the bottom).
Through this system the computer can read the signals send by the rod and change it into the trajectory of the flying in the space. Pilot doesn't have to process any complicated calculations to fly or keep the speed up, it comes naturally.
This looks a bit different without using power steering though, when the pilot has to correct every change of direction. It requires reflex and dexterity but it gives the player the possibility of performing extraordinary maneuvers (Advanced flight techniques chapter). Turning off the power steering doesn't turn it off 100% as the computer will be always helping more or less. It doesn't influence the speed or the direction though.
No matter whether the Power steering is on or off, you have to remember that the ships is influenced by the space and inertia. This is the reason not to change its direction in the matter of seconds as the Bow thrusters need some time to adjust.
It would appear that because of using the advanced physics rules, it would be possible to endlessly accelerate the ship, but the game's physics won't let that happen and thus the ships has their maximum speed predetermined.

Let's imagine the situation when the player approaches the station going with the speed of 100.000 KM/s - not to fast considering the galaxy's scale, but it would be a massive speed for the pilot who's the littlest mistake would highly affect the ship. It could simply end with a big 'boom' both of the ships as the stations which would then be turned into the stardust.
Another reason for limiting the maximum speed is also for the playability, this time concerning the difficulty of targeting and shooting other ships. It would be nearly impossible to counter the other ship's attack and it would simply look like a jousting, binary.
As you can see these limitations seem to be fair because of the reasons of safety and playability. We can surely assume that once the space flights will be commercialized the way the game shows them, everyone will be under such limitations. Also, in order to travel in the speed of light, you can also turn on the Frame Shift Drive, further exploited in the Travelling and navigation chapter.
Speaking of which, the maximum speed is different for each ship, dependently for its weight. How to justify that? The bigger weight, the bigger threat for the pilot and his surroundings, thus the maximum speed is lower for the heavier ships.
Another vital aspect concerning the ships' speed is the optimum speed which makes the maneuvering easier. It is also different for each vehicle model. The in-game interface provides you with the crucial information on what to do to find, and later keep the perfect speed. If the speed is too high, the ship will have problems with turning, when the speed is too low on the other hand, the steering is not provided with enough power to turn the ship.
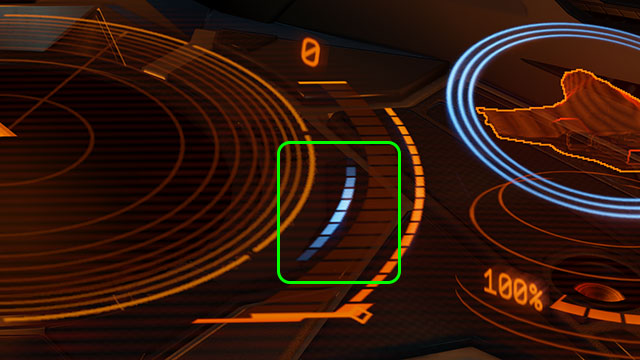 "Blue sweet spot" moves, dependently from the amount of power given to the engines and the quality of Bow thrusters."
The speed gages is distinguished with a blue speed range which has to be kept in order to keep the ship's full potential in maneuvering. It is commonly referred to as a "blue sweet spot". Keeping the right amount of speed is crucial when dealing with a difficult terrain (asteroids' field). There are very few exceptions in which going higher than the BSC would be sensible (fleeing or chasing).
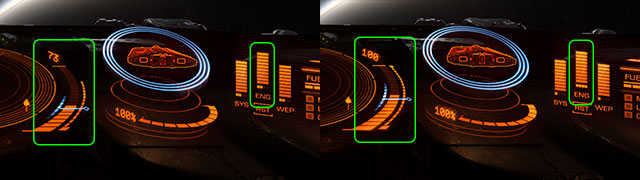 Notice that the higher the speed and the 'bsc' moved when giving the full power on the engines whilst keeping the same amount of power on throttles.
Of course, there is a method to increase the performance of the engines and bow thrusters. In the Elite: Dangerous you can manually distribute the power between the engines, weapons and systems. The only unchangeable unit here is the amount of the whole power and giving more power on some components lowers the amount of the power on the others. More on that in the Interface chapter.
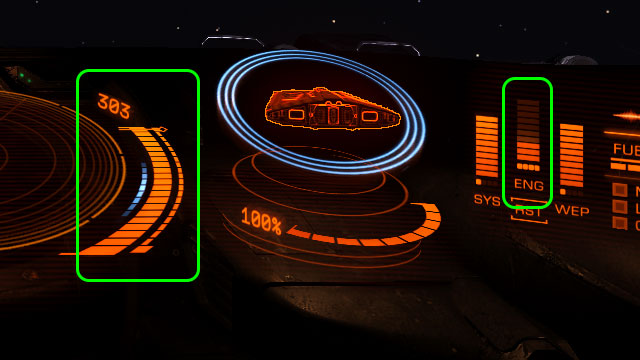 As long as the ENG won't be fully restored, you won't be able to use afterburner.
In case of a sudden need to escape, chase or any other sudden and extreme situation, you can always use the afterburner. It increases the maximum speed of the ship for a while but the engines need to cool down afterwards. The most effective way is giving the maximum power on the engines and then using afterburner. It gives the highest speed possible for your ship. The speed of cooling down the engines depends on the power given to the engines. Pressing the button for an after burner longer than a taping is ineffective as this component works binary as a short speed injection.
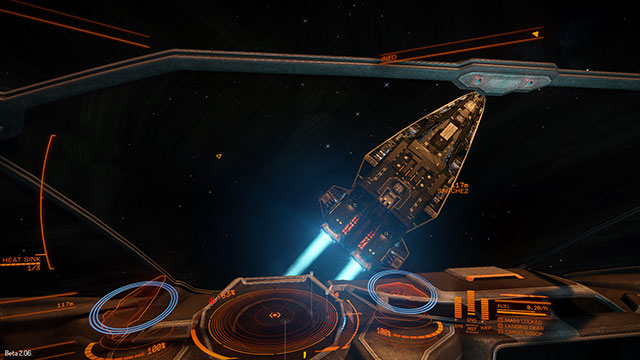 If you see an enemy in front of you in this position, it means that you're doing your job well.
One of the specific element of the Elite is the limited range of turning on the RY axis. Such characteristic may be well known for the veterans of the old space simulators. If the pilot wants to turn around, he has to turn the machine on the RZ axis (semi barrel roll), and them pick the nose up. It is justified by the planes' construction and the aerodynamics in the real life, but not in Elite. The authors made it to make the game make the game more fun and easy to play. Whether you like it or not, such limitations also takes their part in balancing the differences between the ships. It almost eliminates the "turreting" (hovering in one spot and just turning the ship to make the targeting easier in the way a turret would move). A proper fight requires from the player keeping a sufficient speed and thus somewhat uncovering him/herself on some of the opponents' attacks. Realism may have suffered because of that, bat the dynamics surely gain at the same time.
One of the interesting topics mentioned in the forum of the Elite: Dangerous is the docking, its sense and its level of difficulty. Why this maneuver does even exists? The first reason is the immersion which enables the player to go more inside the game. There is nothing in the game that would be simplified into the cut-scene so why would this be? Another reason is more simple and banal and it is for the games mechanics. Smuggling the illegal cargo, chasing or fleeing influences our docking. It makes some of these activities more stressful and thus it makes the game more exciting. Quite some players complained that the manual docking is tiring and too difficult, which it actually make some sense when playing on keyboard and mouse, but using other controller or two makes it a walk in the park. And as in everything it requires practice, but as for theory you can read what is stated below.
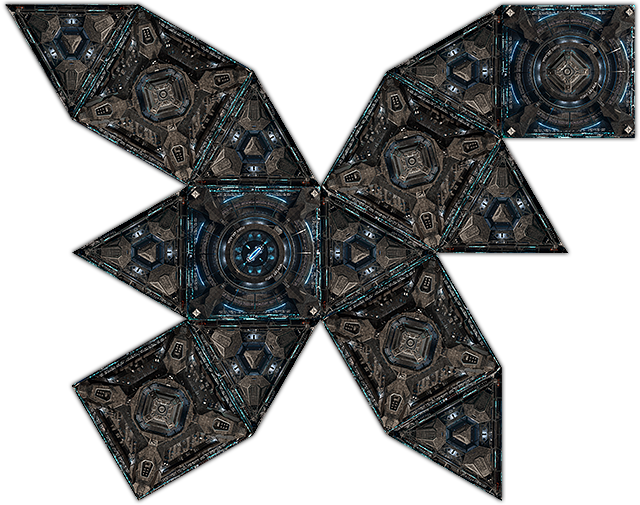
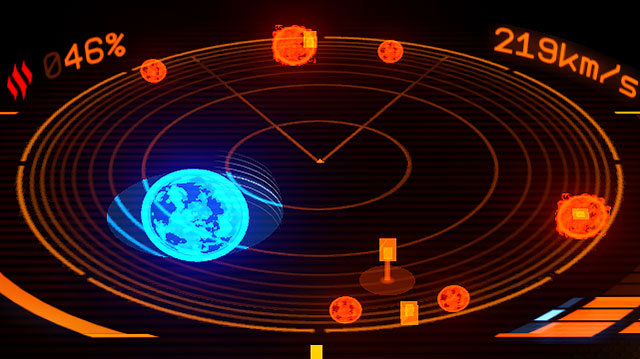
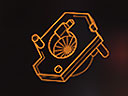
One of the questions is on "How to find the entrance to the Coriolis type stations?" (The ones similar to the D&D dices). And it is actually pretty simple; every station move counterclockwise. It takes a while to look at the station to find its turning axis and thus finding its bevel which goes around it. The stations are always orbiting around some celestial body and the entering tunnel is always facing this body. The illustrations shows the 2d model of the Coriolis station.
You can also mark the station and on its holographic picture you will find the arrows showing the way to the tunnel.
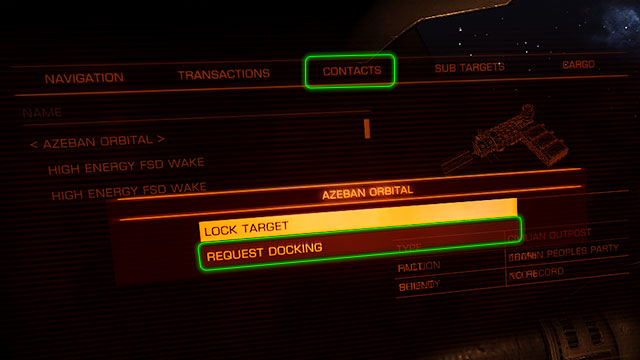
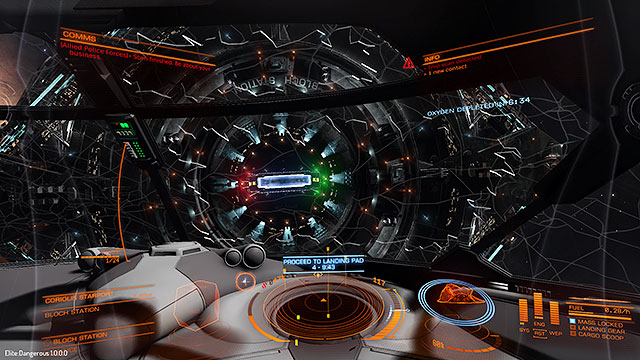
In order to land on the station you will first have to request the docking. Open the left interface panel, from the contacts menu choose the station and select the 'request' option. It is best to do it no more than 8 km from the station and it is crucial to never enter the station without getting a permission as it may end up badly for the ship. You will have 10 minutes to land from the moment of getting the permission. This limit is given to eliminate the traffic caused by the people who are not landing and also to create a queue for those who want to do so, but had found the station occupied.
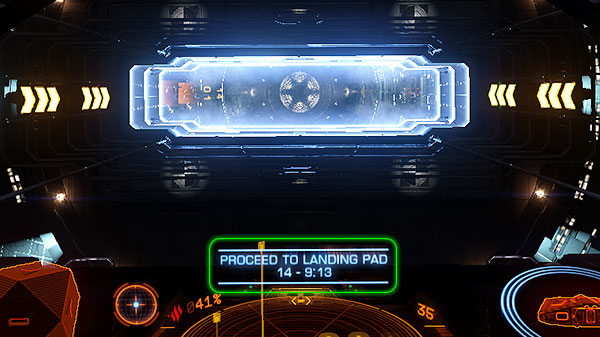
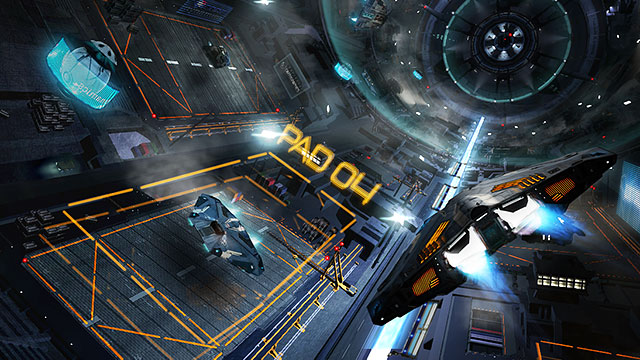
Given the permission you will see the information on which landing field you may land. With the hidden hardpoints and lights turned on, approach the station steadily and gently.
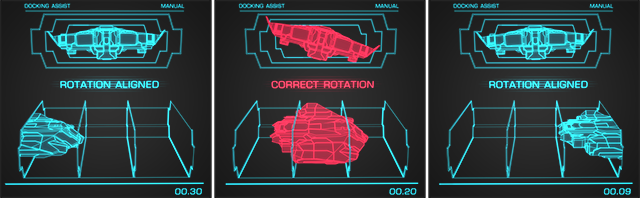
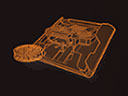
The illustration shows the way of moving the ship through the tunnel. The most important is turning the ship slightly to adjust it to the stations' turning to protect it from the damages. It is important mainly for the bigger ships, as the small ones will be able to go through the docking without it.
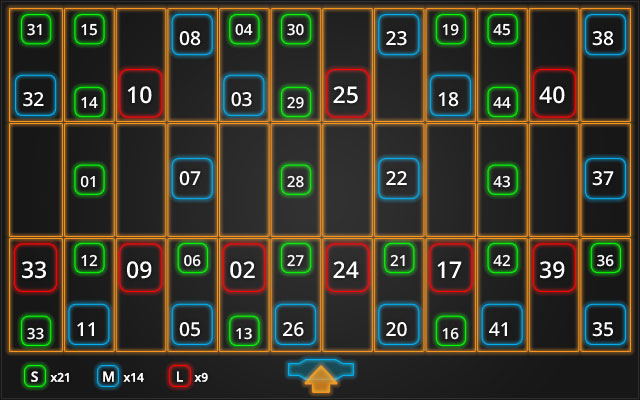
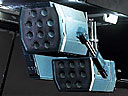
To find your landing field you will need to know its number which is showed as a hologram above it. Above you can see the net of the tube which shows numbers and locations for each landing spot. It doesn't seem to be put in any particular order whatsoever. The only fact is that only the active landing sites show the orange hologram. Locate your number and approach it steadily.
WATCH OUT: Don't try to land or fly near to the other landing sides as you may be 'awarded' with a fee.
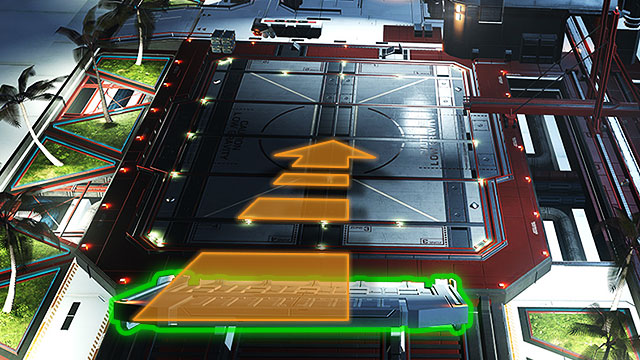
Landing field has to be approached in a special way. Each of the plates has its own collision bands on its rear sides which is supposed to be blocking the exhaust fumes of you ship or your ship itself. This also indicates the proper side from which you should be landing. Slide out the undercarriage before touching the ground.
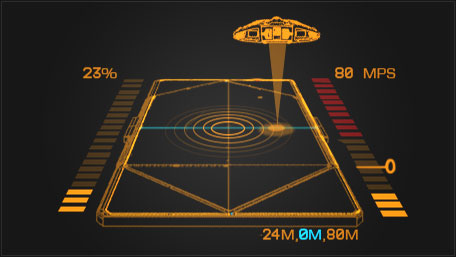
When you will eventually find yourself exactly over the plate another hologram will appear on your radar. It will help you to land perfectly. It shows the center of the landing spot depicted as a big disk, there is also a miniature version of your ship with a vertical line leading directly below the ship. There are also speed and distance indicators.
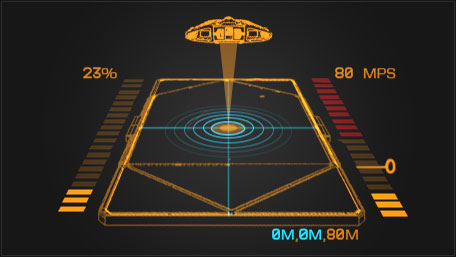
The left indicator shows the speed on the axes X and Y (vertical and horizontal). The right one, shows the speed in the Z axis (forward - backwards). Try not to accelerate more than the maximum and everything should be alright. There is also a distance gage underneath depicted in meters. The numbers are showing your distance serially in axes X, Z and Y. Here, the ship is 24m too much to the right and 80 meters too high. The proper situation is marked in blue color. Also, the closer to the plate you are, the 'peeping' is more intense.
Your ship should be on the center of the plate, no more than 80 meters high.
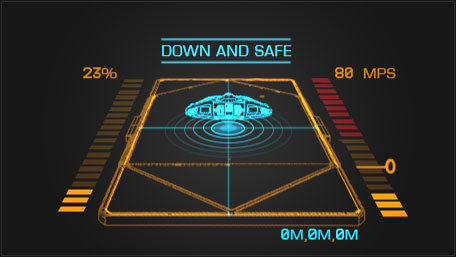
When your coordinates are about to be the perfect center, start lowering yourself slowly by strafing. When your undercarriage touches the ground, the control over your ship is taken by the computer. From now on you won't be able to move your ship and the station menu will show up.
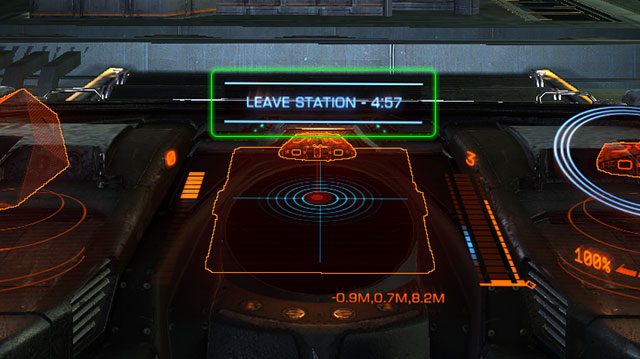
When done with everything on the station, choose the launch option from the menu and wait for your ship to be turned towards the exit. It will be unlock and you will be free to leave. You will have 5 minutes before the security start shooting for blocking the way.

If for some reason you would like to automatize the docking process you may be helped by the Standard Docking Computer. It is very expensive and by buying it you will lose one of your hardpoints. The choice is yours.

Automatic landing is a piece of cake. Given the permission, approach the entrance to see a communicate to slow down. Do that and leave the rest for the AI.

Frame Shift Drive (FSD) is the most important component of the ship. It is a drive which enables the movement in the FTL speed inside the star systems and enables the hyperspace jumps. It is impossible to imagine travelling through space with a different system. Using it requires partaking few steps, but all in all it is very easy. More on the FSD you can find later on in this chapter.
To jump, you will have to hide the undercarriage, cargo rack and the hardpoints. Another step would be taking at least 5 km of space from the objects that has bigger mass than the ship - or the mass will be locked. Eventually when everything is done, the FSD may start warming up.
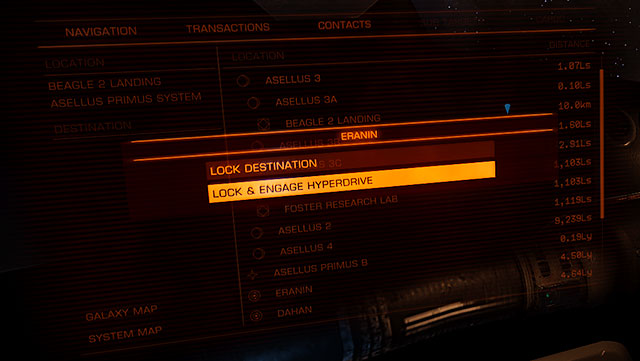
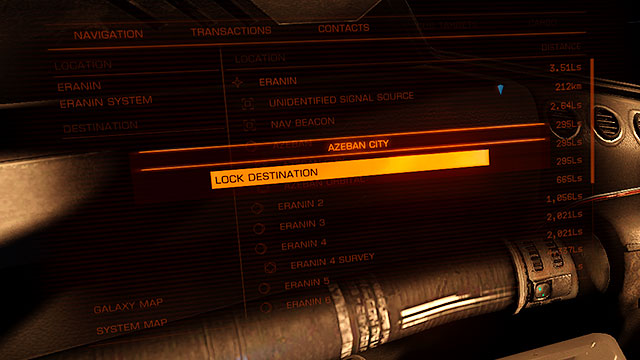
Next, you will have to choose the constellation in the reach of your FSD (can be checked in the left interface panel). Use the navigation bookmark or the galaxy map. If the constellation is too far, you will be informed. From the left panel choose the "lock & engage hyper drive" option which will automatically start the ignition. If only the "lock destination" option is chosen, you will have to press the 'J' button to start the jump procedure.
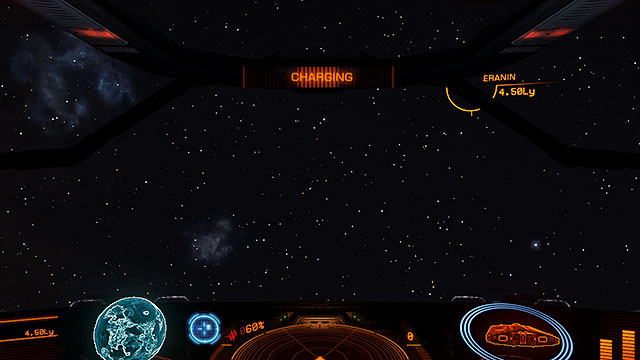
When the ship is warming up, set your ship the way from which the destination point is visible in the center of the screen. You can help yourself by using a compass by the radar. The blue point marked on it has to be placed in the compass' center.
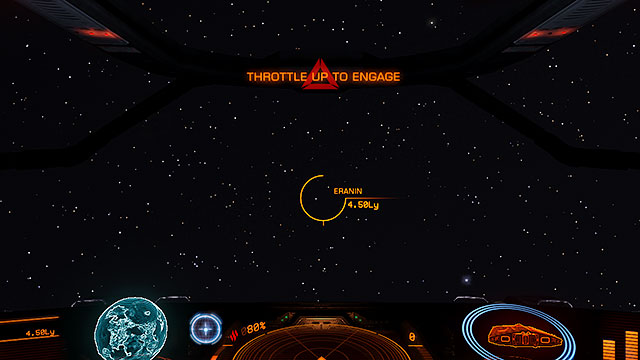
When the ship's position will be alright, the screen will show the notice "throttle up to engage". Set the throttle on the 75% of the engines power and wait for the countdown.
When the countdown is over, the ship will get to the hyperspace. You won't be able to stop it or control it on that time. The animation serves the purpose of a loading screen.
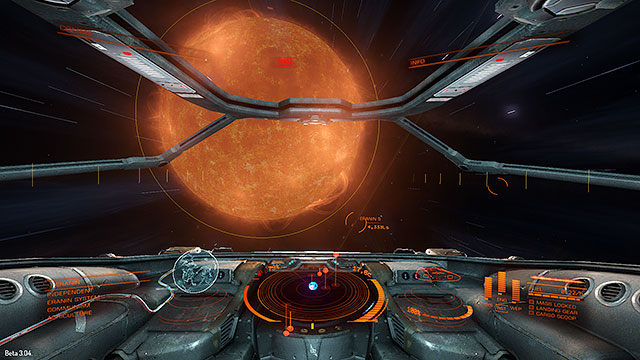
Right after exiting the hyperspace, the ship will be placed in a close distance to the main star of the constellation. Immediately slow down to prevent the FSD from turning off as some of the ships may burst in flames when getting to close to the stars.
Next step is the selection of the destination in the constellation. If you were not using the FSD before that, but you simply want to go into the FTL speed, repeat all of the steps of turning on the FSD. FTL Mode is called the Super Cruise mode and it can only be used to move inside a star system.
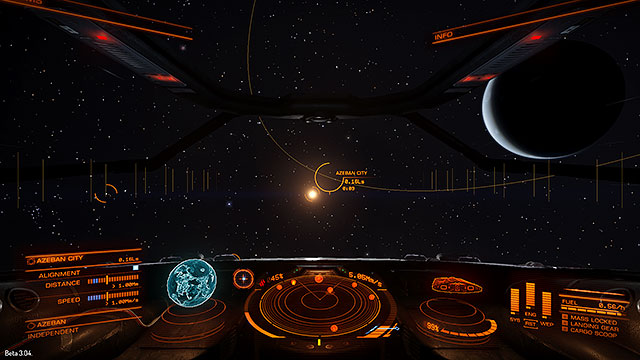
Use the compass to select the direction. Target if with the sight and accelerate up to the maximum speed. When the point of your destination will be no more than 8-10 seconds from you, slow down to make the speed indicator positioned in the middle of the blue area. Don't accelerate and the computer will do the rest of job connected to slowing down. You can set the optimum speed right after setting into the FSD, but it will prolong the time of the flight. It is very comfortable and secure if you want to check something else in the meanwhile.

It is the best to approach the station from the internal side of the orbit as every station are directed frontally to the celestial body around which they're circulating. When you get to be in the distance of no more than 1M from the target, the scanner will show the "safe disengage ready" communicate. If you would turn on the Super Cruise mode in this moment, you would be asked to slow down as you would definitely miss the target.
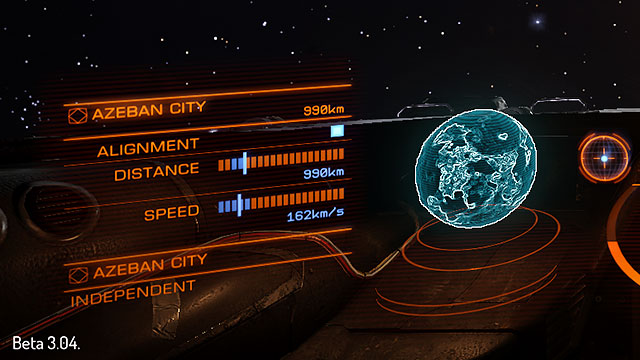
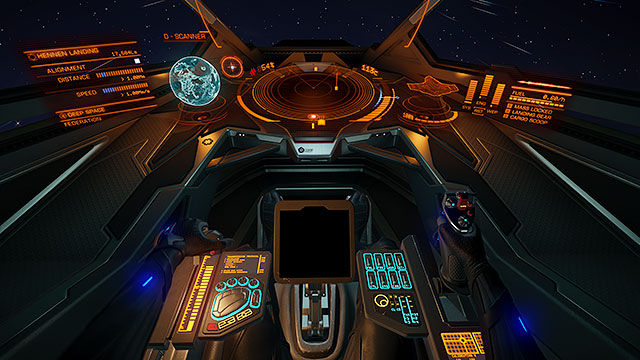
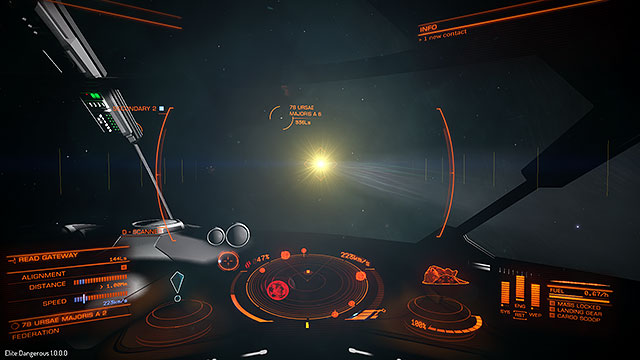
Very helpful tool to get yourself out of the Super Cruise mode is the data panel shown to the left of the compass. In the SC mode the details about the target will be changed with the information concerning the navigation. Let's look at the first three positions: "alignment", "distance" and "speed". Firstly, be careful and don't let the Alignment control to turn off. It means that your ship stays on the right angle. Further on, there are two indicators. When they're both on the blue fields it will mean that you can safely exit the SC mode. Now you can turn off the FSD (J button) and safely exit about 8kms from your destination.
When travelling in the SC mode you have to control the ships movement when approaching the celestial bodies and stations being closer or farer from you. The gravity of the big objects causes the acceleration of the ship, thus the same force may slow you down when you're moving away from these objects. The scanner will help you conclude whether you are in the gravity force or not. The red objects on the scanner will be the one which are keeping you within their gravity field, exiting this area will change the color of the indicators to blue.
Whilst travelling in the SC mode you will sometimes notice a gleaming light sources. These are the other ships moving in the FTL speed. It won't hurt to check the scanner once in a while, in order to check if the ship doesn't try to locate itself behind yours. This may indicate that someone wants to capture your ship with an interdiction.

If by any means you will press the button which turns on/off the FSD, the computer will prevent your ship from getting out from the FTL ride in the unpleasant circumstances. The warning communicate will appear saying that you are moving with too high speed for the safe exit. If you want to leave the SC mode anyway, press the button by tapping it twice. Such exiting the SC mode may result with the overheated systems and thus, their further damage (usually about couple of percentage points).
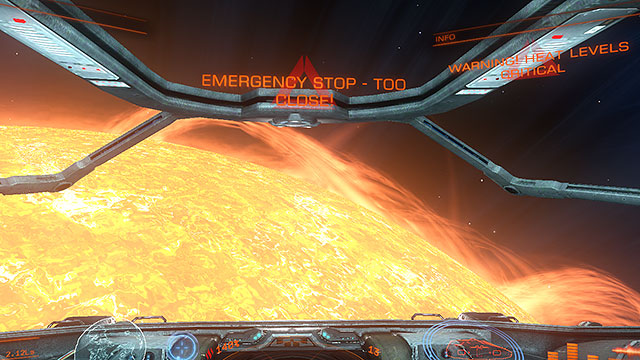
One of the situation which causes the emergency stop of the SC mode, may be a short distance from e.g. a star. This protection prevents the deadly collisions. When the ship is thrown out from the SC mode, you should still get out from the reach of high temperatures, otherwise your ship may start burning. The most dangerous are the white dwarves with a huge gravity and temperatures and yet small of the size itself.
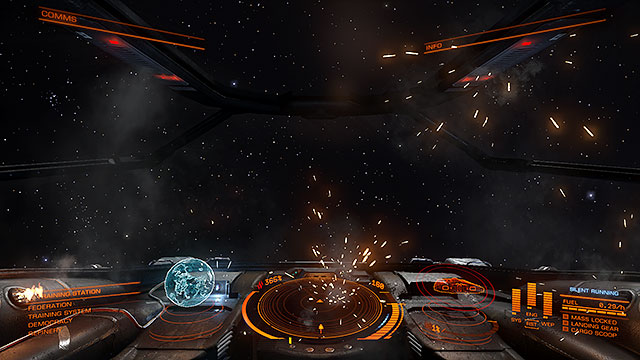
If the ship will overheat to the point where in the cockpit you will see a fire, you have got a problem. Even if you will manage to deal with the overheating, the ship will still receive damages. There are two ways around it. First is to go as fast as you can into the SC mode as it stops the fire for the duration of the flight for some reason. It would be the best to jump to the next station and to dock the ship and immediately starting repairing it. Second resolution is less risky and safer which is about the turning off the life support systems. In the cockpit. No oxygen equals no fire. To do it, go to the 'modules' bookmark and turn of the 'life support'. Don't worry about your health because you should have the extra oxygen supply for at least couple of minutes and putting out fire takes couple of seconds. If you have the system of throwing out the radiators, you should expect lowering the temperature in the ship to zero.
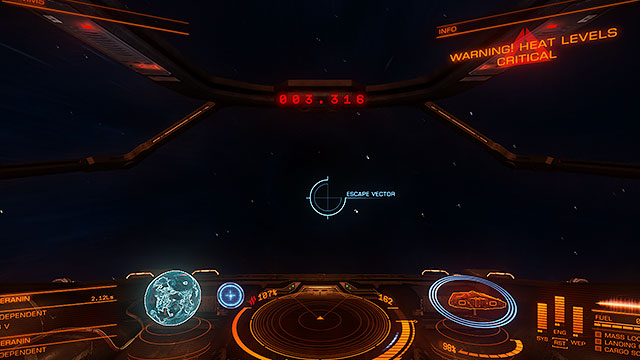
To safely abandon the area where you had been thrown out from the SC mode, warm up the SFD and find the "escape vector" on the compass. It is the only proper direction to move into the FTL speed.
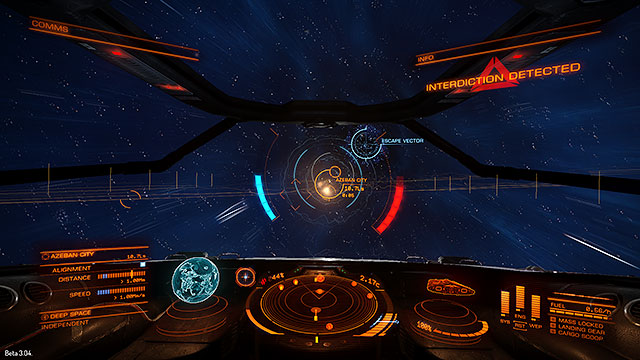
Other reason for the sudden and unplanned exit from SC may be the interdiction. It is a mechanics which enables the players and other NPCs to capture other ships - usually illegal, but the law captures happen too. The moment your ship is captured you will have only couple of seconds to decide whether you want to face the challenge or to continue moving. If you want to give up, just stop your ship and wait to confront the other ship. If not, there is a method to continue the flight without any stops.
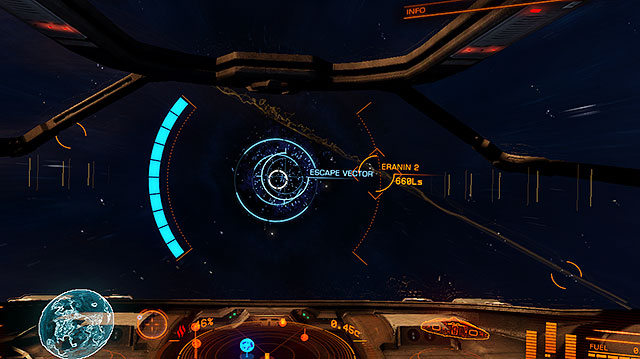
In the short period between use of an interdiction and the forced exit from the SC mode, you can try using the "escape vector" mentioned in the Emergency Situations. The same option appears here. Keep it in your sight and wait for the blue bar to fill itself. It may be dodgy because of the turbulences, but it is definitely doable with some practice. The tougher your opponent will be, the harder will it be for you to keep the EV in sight. If because of some reason you have lost the vision of the EV, you can help yourself with the 3D indicators which will move towards the target.
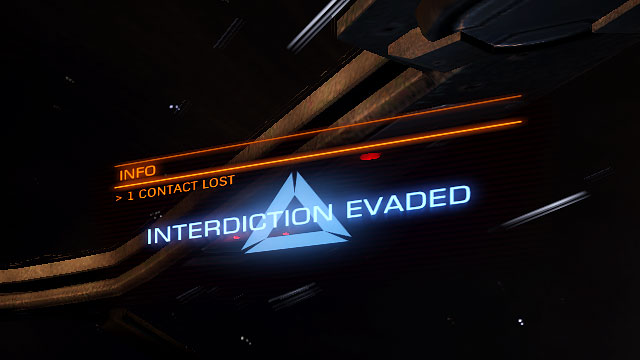
If you will manage to keep the right direction for enough time, you may go back to the space surfing and you will se the info bar with the 'interdiction evaded' communicate.
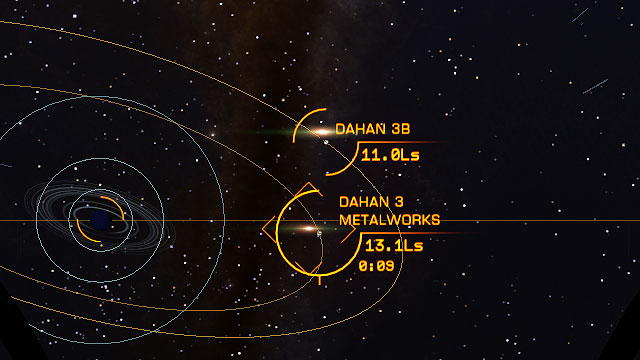
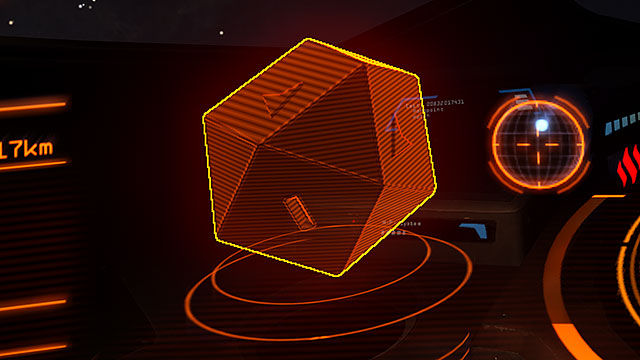
Interdiction can be also used on other ships by you. It is a great tool for a hunter or a pirate. Moving in the SC mode you will often meet other ships pictured on the radar in a form of the green-reddish glimpses. If any of them is within your reach you can select it and check its status in the bottom-left corner.
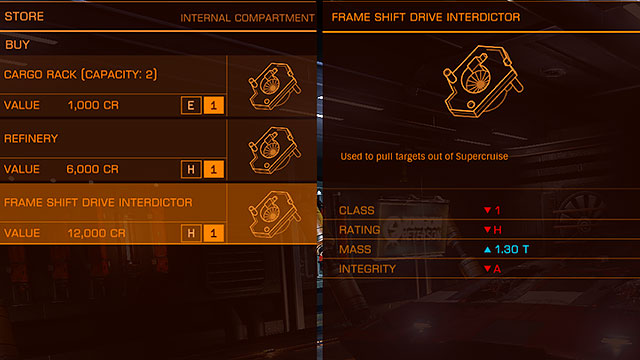
To get the other ship out of the SC you will need the FSD Interdictors (Frame Shift Drive Interdictor), available on most of the cosmic stations. Prices may vary dependable of the class of the component.
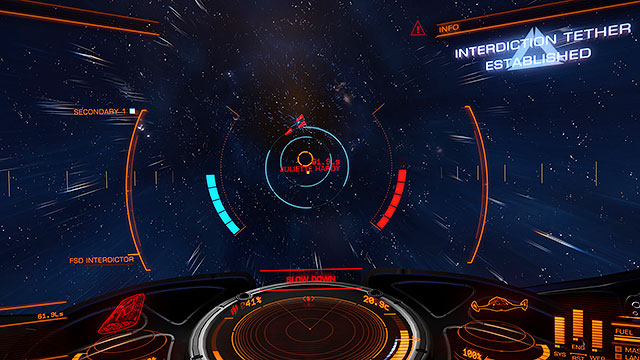
If your target is within the reach of your interdictor, just use it on the selected ship through the same way you would use a scanner. The ship may try to lose you by using the EV. In that case you will have to keep it on sight for the duration of time indicated by the same blue bar which would appear when fleeing.
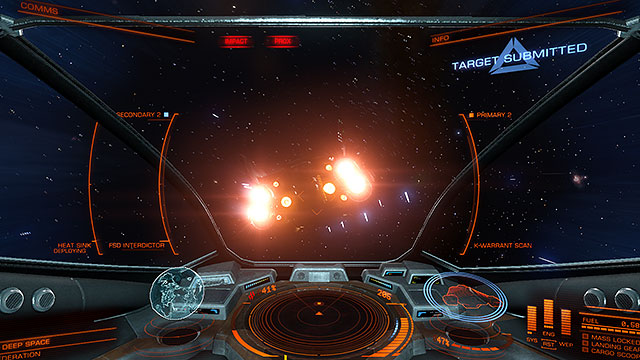
If your skill to hold the ship in target area are better than your opponents' skills to escape, both of your ships will leave Super Cruise mode in a small distance from each other. It's best to slow down immediately to avoid the collision or at least to lower the damage received from hitting each other. All you have to do right now is to locate the target where you've performed the interdiction and to return to Super Cruise mode.
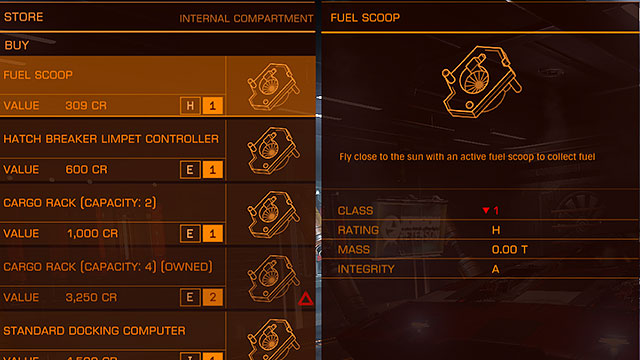
Frequent jumping to the hyperspace may dry your fuel tank very quickly which is very important in your game. It can be helped with buying a Fuel Scoop. It is very cheap, available on the most stations and it will save you a lot of money as with this device you will be able to collect the fuel from the hydrogen from the stars, thus changing it into the fuel.
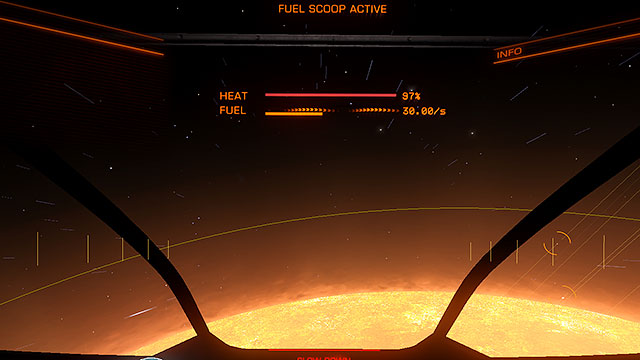
To start the fuel scooping, approach the star via the SC mode but not too close. The optimum distance would be the 1.50Ls. Fuel scooping will start automatically if you are in the right distance. The screen will show you the heat and fuel indicators. The speed of scooping is shown in the units per second and the maximum speed is 30.00/s. Getting closer to the star is pointless in this situation. Keep the heat lower than the 100% and move away from the star if necessary to collect the fuel slower, but safer.

Apart from the middle screen bar, the amount of the fuel is shown also on the bottom-right panel of the pulpit. It flashes whilst collecting more fuel. When full, you will be able to go further on your journey. Using the natural fuel resources is a great option for the discoverers, merchants and for anyone who rarely uses the cosmic stations and doesn't want to stop the flight. It is also money-saving.

The scooping speed is dependable of the class of the component and varies between the 30/s (1st class C indicator) and 120/s (4th class D indicator) but more important thing is the fact that not every star can be exploited (e.g. white dwarves). It is vital to plan your route the star classification is given on the map, and here is the division between good and bad stars:
Stars capable for scooping the fuel
Stars incapable for scooping the fuel
A
DA
B
DC
F
Y
G
T
K
L
M
TTS
O
Neutron Star
S
The galaxy map is one of the crucial parts in the game, and it is vital to learn how to use it. It will help you find your way in the galaxy which consists of 400 billion of the star systems. It also helps with creating the special routes which will make the smaller jumps much more comfortable. There are also basic details concerning the export/import and the trade overall.
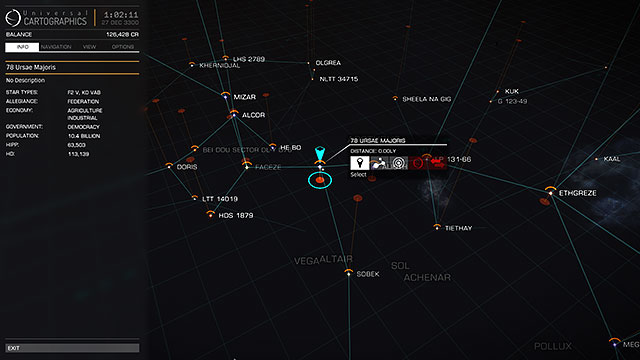
The first thing you will see after turning on the map (Connecting the 'M' button is suggested as by default the map can be open only by using the left panel's 'navigation' bookmark) is a rather small area of the system that surrounds you and the key with the description. The 'info' bookmark will give you the information about the selected star system:
For each player the other piece of information may be important, dependable for the player's in-game occupation, but everyone will find something interesting in here.

In the window that shows by the selected star system, you will see the system's name, your distance from it and five buttons. Their function is, from the left: selecting the system, route planning, detailed map of the system, permanent acquisition of the cartographic data and 24 hours acquisition of the trade data.
The last two buttons are important for the non-discoverers and merchants. The acquisition of the cartographic details enables the player to see the detailed map with all of the objects in the area. The trading acquisition on the other hand, gives the information on the imported/exported goods. It is available only for 24 hours for the economic doesn't stand still and throughout the 24 hours it may drastically change. If some button is highlighted in red, then it indicates that the station does not provide this certain information.
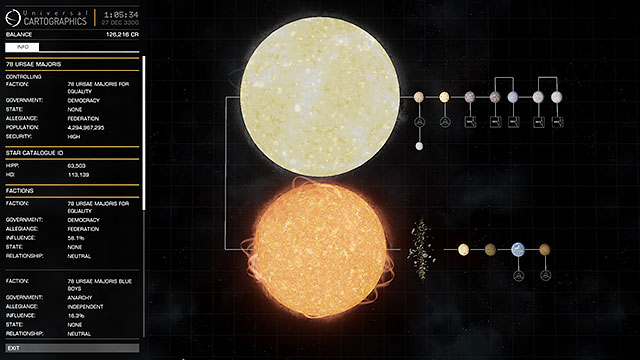
If you are interested in the complex details concerning the particular system, just press 'System view" button which shows up after you hover your cursor over the star. It will display the scheme for the system as well as its moons, planets, stations and asteroid fields. The key includes the information for the astronomy hobbyists and potential merchants. Clicking any element in this window will result with loads of data showing up concerning plenty of branches.
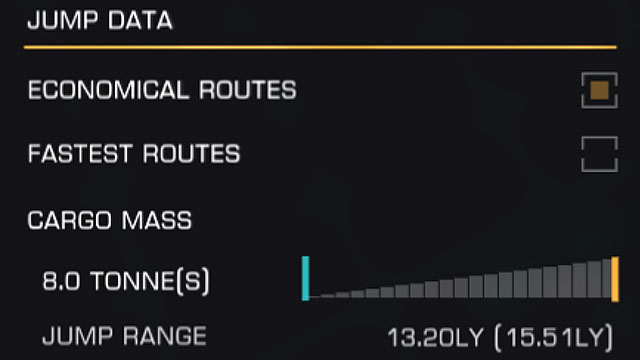
Let's go back to the main window of the map and go to the 'navigation' bookmark. One of the most important functions here is the route planning. Depending on your needs you can choose either the economical or the fastest route. Obviously, the first one will be using less fuel than the latter.
Another matter here is the area of your FSD for the different amount of cargo. Use the bar to indicate the amount of cargo you are taking and you will be able to see the distance you will cover with it via the FSD (number in brackets is the distance without any cargo). The heavier the ship is, the smaller the distances are.
Another limitation (indicated in the maximum distance) is the capacity of the fuel tank as well as the power of the drive. Only little amount of the fuel will be enough to get to the area shown in the screen above. So why is it impossible to buy a lot of fuel and go into the opposite edge of the galaxy at once? It is because of the drives' limitations, none of them will be able to use that amount of fuel at once. It helps the economy of the FSD compartments. If not for that, even the worst drive would be the same as the best if only there was enough of fuel. The amount of the fuel needed for the jump is indicated in the blue color in the bottom-right corner of the cockpit.
Another useful function which can be found in the 'navigation' bookmark is the 'search'. If you know the name of the star system, or at least the part of the name, you will only have to type it there and the computer will find it and center it on the map.
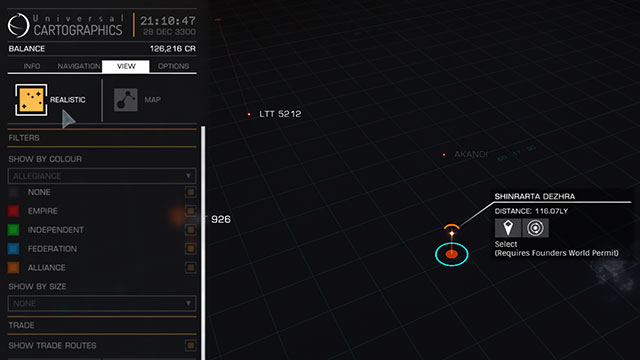
"View" is another helpful bookmark in the map's key. By default, the view is realistic, which reflects the look of the stars (their color and size) the same way as they are. It also shows the connections between them, but only if the ship is able to reach them via one jump. Remember that when planning your routes.
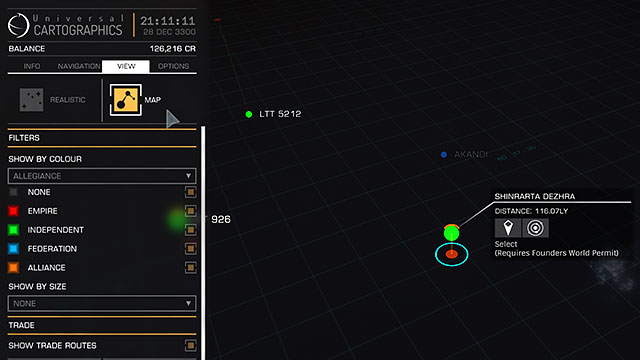
Other view that can be displayed is the "map". Stars here, are shown schematically, the connections are shown too but here, you can choose which pieces of information you want to see. You can select the division on; fractions (as shown above) in order to know which systems you should avoid if you have any bad relations.
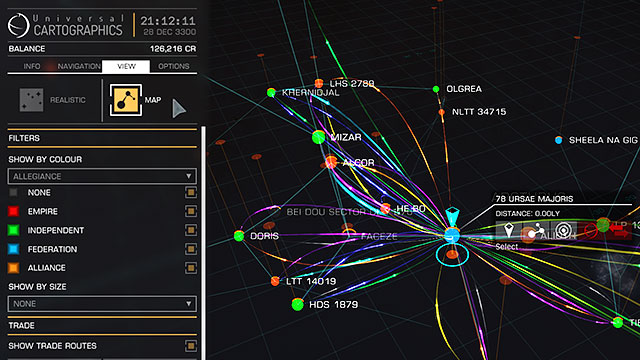
You can also show the division concerning the trading lines. By default the routes will show every kind of traded goods, but you can select the particular ones, to make it look clearer. Each line differs through its thickness, direction and color. The thicker it is, the more intense is the trade on that route. The flashy points indicate the direction from the import to the export center.
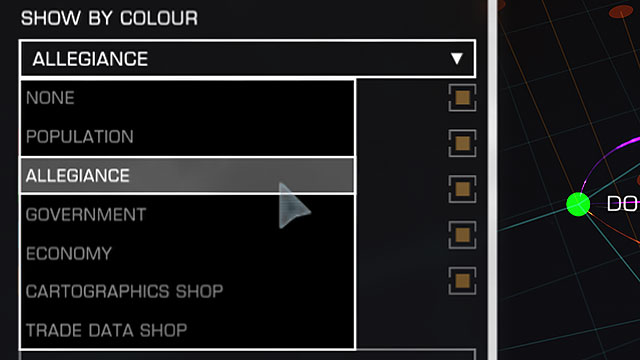
Apart from the mentioned earlier filters, there are some more. They are:
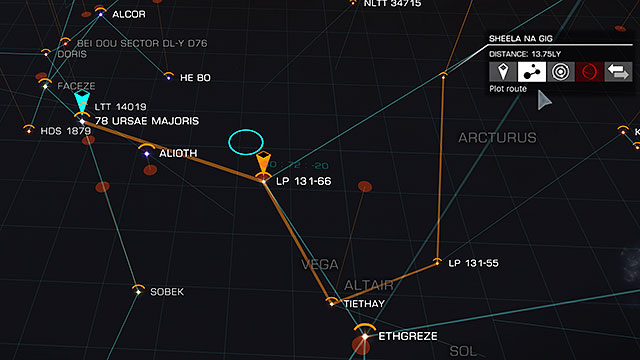
After selecting your destiny ('plot route' button) your way will be shown with an orange color. If the target is placed couple of system away, the route will use every system on the way. Unfortunately there isn't any way to save your routes in the computer which means that you will have to plot it every single time. Even when you want to reach a distant star, the computer will automatically connect you with the nearest star in the map. It happens because of the computer which plans the jump every time when reaching a 'sub-destination'. There can only be one route at a time planned on the map. The starting point of your way is marked with a blue arrow, and every other point is marked with an orange one.
The trade, exploration, mining may be interesting activities, but sooner or later you will feel the urge to draw your weapons and shoot some rebels (or the righteous ones). It is good to be prepared and even though nothing equals the practice, you may get to know something from this chapter about the combat and weaponry.
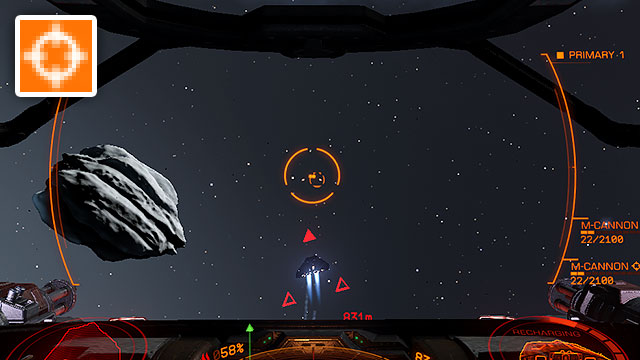
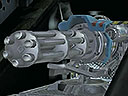
Let's start with the basics. There are many gun sights in the Elite and they differ dependently of the hardpoints used on the ship. They differ with their behavior
This is it for the still pointers, but there are also dynamic ones which will are covered in the next chapter.
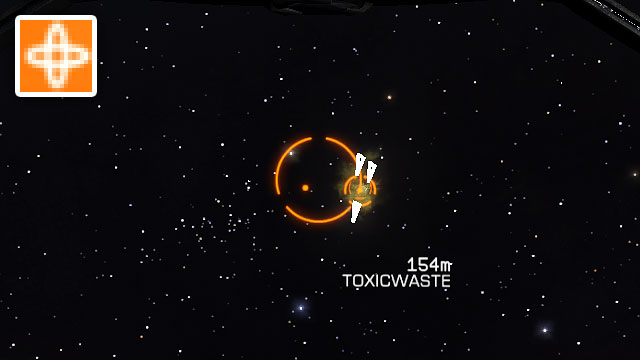
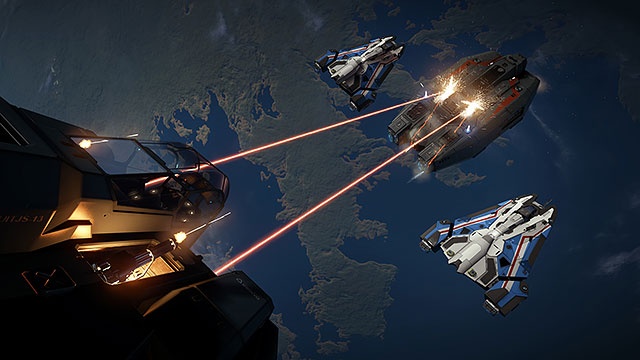
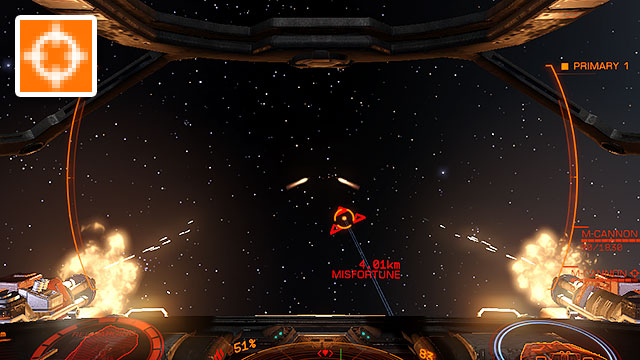
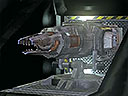
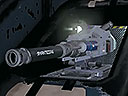
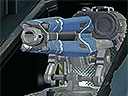
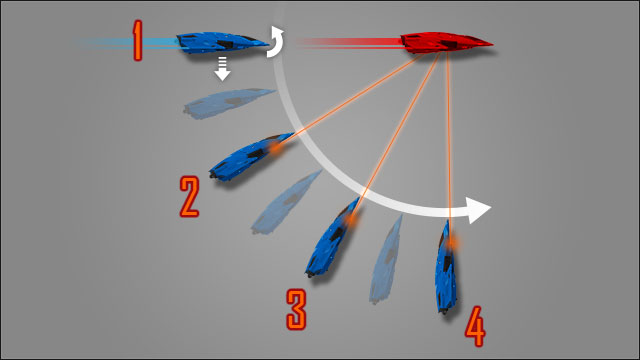
A weapon based on a gimbaled hardpoint moves along with the target within some specific range. Each weapon work independently as shown on the picture above, where the right turret sticks to the target. Some things you will have to do on your own obviously. It is vital to remember that such dynamic weapons use more power, thus the generator overheats faster, also the weapon deals less amount of damage. The range of the weapon is dependable on its placement on the hull. In that matter, the best hardpoints are located on the upper front of the ship. The weapon mounted on the bottom and on the rare parts, will have much worse range than the first one.
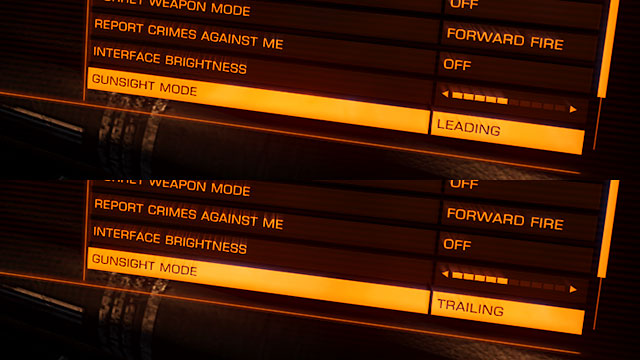
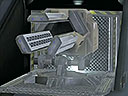
The second more classic way are the fixed hardpoints. With them, the pilot has to correct they're targeting as they do not trail the target. The way of the targeting can be changed in the interface with its 'functions' bookmark. There a leading or trailing option can be chosen.
In the case of leading method, the computer will point the gun point a bit ahead of the target. In the case of energetic weapons which hit the target immediately. In this case, all it takes is to simply point at the hull to attack e.g. a ship with the laser. The forestalling method has a flaw which may be of more disadvantage when the target is far away. It may happen that the pulpit will even block the enemy out of view completely.
Method of the trailing pointer may be an easier one to use and it is favored by many players. In this case you don't have to deal with a fixed to center pointer and you don't have to follow the target on your own. Here, the gun sight is dynamic and it is displayed so that the player can place it on the enemy. Gun forestalls the target the same way as the last pointer, the only difference are the visuals.
The same method is used by the real pilots and it helps to focus on target rather than on the surroundings. It increases the orientation of the shooter. Looking at the target makes it easier for you to predict its next move. Again, the energetic weapons hit the target immediately.
In the end there is one more piece of information concerning the fixed hardpoints itself. Their name isn't 100% accurate as, even though the weapon doesn't track the enemies' moves, it helps in targeting by concentrating two weapons in a one spot (which is your target). Hence, there are no problems with targeting the thinner ships with two guns at once. These may occur only at the very short distances.
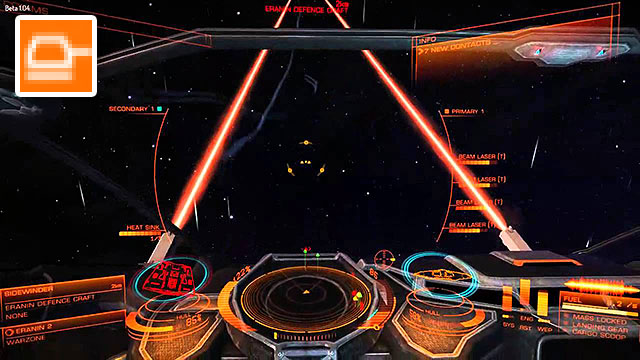
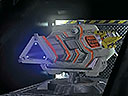
The last class of the hardpoints are the turrets. They work alike the gimbaled hardpoints, but they are fully automatic and they are covering wider areas. They can work independently from the pilot or be set on one of the other two ways.
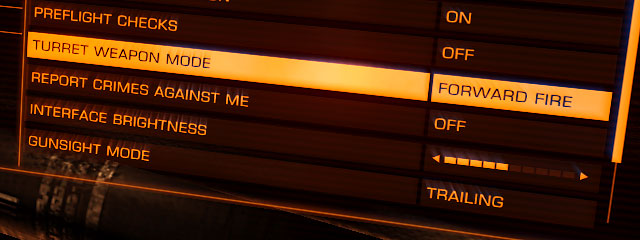
Forward fire: Turrets work like a fixed weapon fully controlled by the pilot
Target only: Turrets will attack automatically only the selected target
Fire at will: Turrets will automatically attack every target within its reach.
This model is used on the massive ships like Anaconda or Cobra because they recompense for the lack of maneuverability. They take a lot of power as they are working constantly.
Now when you know how to aim, you have to answer the question: 'with what?' There is a wide range of choice between different lasers, futuristic kinetic weapons or even the missiles and mines. Hybrids are also present on the list. Each of the weapon is deadly on its own way but each of them has some flaws too.
Energetic weapons are simply the lasers. In the Elite: Dangerous there are three main types of them pulse lasers (with pulsating beams), burst lasers which shoot the short beams and the continual beam lasers. The lasers also deal the thermic damage.
Pulse laser they are the most power and thermal saving. They are also very quick-fired. They also inflict less damage but their rapid fire may be a good solution for those with a less steady hand.

Burst laser attacks with the three impulses, thus inflicting much more damage than the pulse laser. On the other hand it overheats easily and takes a lot of power. The shooting comes with a large intervals too.

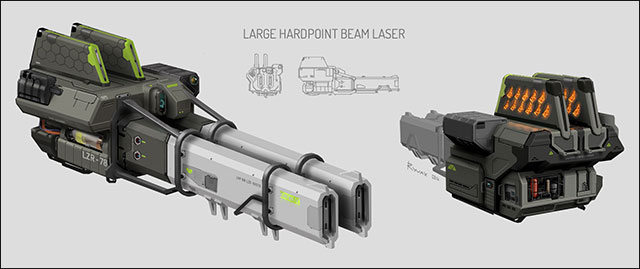
Beam laser emits a constant beam of energy. It deals a massive damage within a longer period and it may damage many components inside the ship at once. It takes a hefty amount of power and generates as much of the heat in a short time. These lasers are the best on short distances.
Energetic weapon is the best for destroying the enemies shields, and worse for destroying the hull. All of the mentioned weapons come with each type of a hardpoint.
It is a bit more conventional type of arms. It uses the big caliber ammunition which makes the player supplying himself with an ammo. On the other hand, they do not require much power and they aren't overheating the ship as much as the energetic weapon would. Here, there are also three types to choose from.
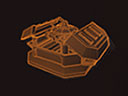
Cannon: Shoots big bullets and work similar to the today's howitzer. For now it appears only in the fixed mode. The fire is far from rapid but it inflicts a huge damage.
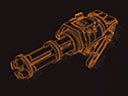
Multi-cannon: One of the favorites among the players of Elite. Its fire is very rapid and the recoil is small. Damage isn't too big, but the rapidity recompenses that in a big way. The magazines for it come in different capacities. The reload takes a while and may leave a player defenseless.
Fragment Cannon: Similar to a shotgun. Shots slow and it is effective only on short distances, or against massive ships. The shrapnel may damage many enemies' components, but their scattering increases along with the distance.
Energetic weapon is the best for destroying the enemies' hull, and worse for destroying the shields.
For now, only one hybrid is available. The Railgun. It shoots the bullets with a huge velocity attacking the target almost without any delay, inflicting a massive damage by doing so. Railgun is hard to control though. It comes only as a fixed weapon and after each fire the weapon needs to recharge for quite a time. As for another disadvantages, the overheating and a big power consumption could be mentioned.
These weapons are the best for finishing the enemy after destroying its shields as the shooting with a high frequency is impossible. The thermo-kinetic weapons work well against both the hull as the shields.
Plasma Accelerator: one of the rarest weapons in the Elite. Besides, it can be mounted only on the big ships. The accelerator work similar to the railgun, thus it has to reload after every shot. It can destroy the ship with about 3-4 projectiles. As for another disadvantages, the overheating and a big power consumption could be mentioned. It is best against the big and slow ships.
Plasma Accelerator works well against both the hull as the shields.
As for now, three types of explosive weapons are available; missiles, torpedoes and mines. Every of them uses the same kind of expensive ammunition. A small choice and expensive ammunition make this type a rather uncommon one.

Missile Rack: its advantage is the high speed and maneuverability and the tracing ability (the 'dumbfire' rockets don't have this ability). A single missile may not inflict a lot of damage but these can be shot with a large frequency as long as the target is in front of you.
Torpedo pylon: alike the missiles these also have the ability of tracing, but they are less agile and they're slower. This is recompensed with the amount of damage they deal when meeting the target. A single shot may destroy a small ship completely. You can only have one, single, very expensive projectile on your ship which makes them more of a curiosity than a real weapon.

Mine launcher: this can be used as a defence rather than an offensive weapon. It is helpful during the pursuits when you can throw the mines right in front of the enemy. They can, however, be used as a trap e.g. in the asteroid fields, although it is rather expensive and hard to execute.
The missile weapons work best against the hull and less against the shields.
Good weapons may not be enough against the enemy, the defence systems are non-less crucial in the fight. Here are their components described:

Bulkheads (internal): dependable for the role to which you will be adjusting your ship, armor may be its only shield. It is vital to invest some more money into a better kind of the bulkheads. The harder the armor is, the more resistant it is. Some may even reflect the lasers, thus giving you the better protection from the thermic weapon but dealing worse with the kinetic one. There are also the opposite kinds.
Generator Shields: right after the armor, shields are the most important source of defense from the damages. The bigger and heavier the generator is, the more damages it will be able to consume. It will also regenerate the shields faster. The power distributor may help with the energy flow.

Shield cell bank - internal: Using it, regenerates the shields immediately by using lots of power. It uses its own ammunition and its capacity differ between the components' classes
Heatsink launcher - utility: by using it the heated radiator is thrown out of your and is being replaced by a new model. It is a great solution for a quick temperature reducing. It uses its own ammunition.
Chaff Launcher - utility: shoots the thick metal stripes which stands for a decoy to confuse the enemies' weapons (doesn't apply to the fixed hardpoints weapons). Uses its own ammunition.
Electronic countermeasure - utility: jams the attackers' missiles an torpedoes. Holding the button connected to this device, increases its range up to 5km - releasing the button detonates all incoming ballistic projectiles.
Point defence - utility: a small independent turret which trails the incoming mines, missiles or torpedoes and shoots them. It is vital to remember the side on which the turret is mounted to maneuver the ship the right way. Uses its own ammunition.

Auto field maintenance unit: component enables you to repair most of the things on the ship without the necessity of landing. There are some limitations to the bigger damages such as the power generator damages. Uses its own ammunition.
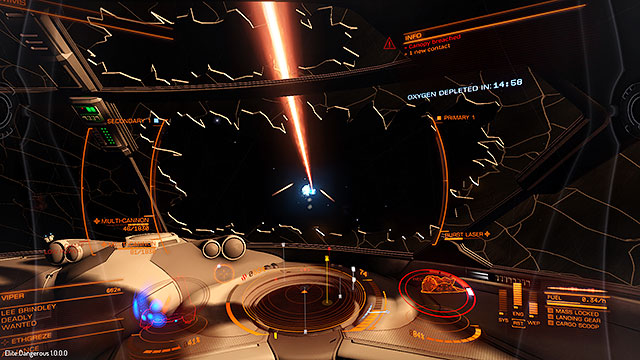
This, ignored by many pilots component, may often save life. There come the situations when the enemy will shatter our front glass pane. In the situations like this the entire oxygen is being sucked out of the ship and only the Life Support System may be of any help.
Dependable of the class of the mounted module, the system may give us 7, 15 or 25 minutes of oxygen in the space suit. The moment of starting up the system is easy to recognize as it shows the outlines of the oxygen mask, the sounds are muffled and our pilot will start panting. Now you will have to decide whether to finish the fight or head to the station right away. Most of the big stations with a force field have its atmosphere, thus right away after entering the tunnel you will be alright. In the case of the small stations, you will have to enter the hangar. Replacing the old pane with a new one is fortunately a rather cheap thing to do.
After the description of the weaponry, it's time to cover the three basic maneuvers, helpful with the Newton's flight model. Having the six axis on which you can move makes a lot of possibility to do the things unthinkable for the airplane pilots.
This kind of strafing should be known to everybody who ever played some shooters. Here you will be strafing vertically rather than horizontally. It can be used whilst chasing the enemy and works much better than the usual 'tailing'.
Keeping our sight point on the target start strafing down whilst picking up the nose to track the opponent. Stay in the blue range of the optimum speed to keep the ship's maneuverability. Strafing down gives you better view on the enemy than you would get whilst strafing up (the pulpit would block your visual) it is also easier to chase the enemies as they usually behave in the same way.
180 Turn (with the power steering)
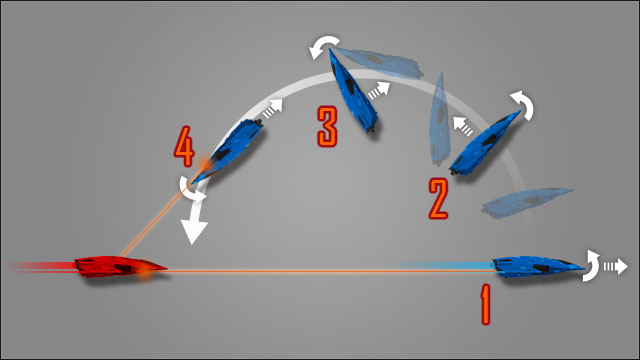
This works the best when someone is tailing you and some quick decisions have to be made.
In the case of seeing this maneuver being performed by the enemy, start circle strafing whilst flying backwards. This should save you from being tailed.
180 Turn (no flight correction)
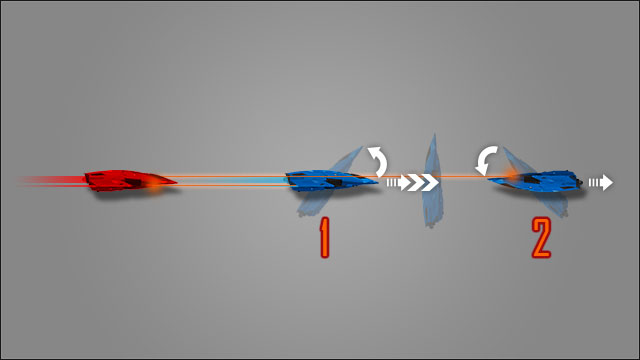
The 180 turn may be more complex when not using any flying support. But it is faster if done properly.
The described maneuver gives the possibility of shooting the enemy; first face two face, and later on, by tailing him. Controlling the ship without using any power steering may be tricky but it is worth it.
The key to success is of course, the practice. The intuition is important too, but the experience will enable you to use different tactics whilst on combat. These short description should be used as no more than an inspiration and an introduction to the very basics. Try not to be predictable and don't be ashamed of fleeing when necessary.
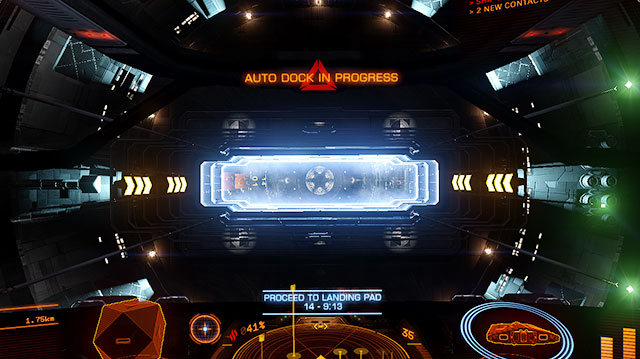
When the computer will take control over the ship, a new 'auto dock in progress' communicate will appear. You can leave it for a while as this is a long and automatic process. After the docking, the game will play the Johann Strauss's The Blue Danube Waltz which is a reference both to the old Elite games as to the 2001: Space Odyssey, the movie by Stanley Kubrick.
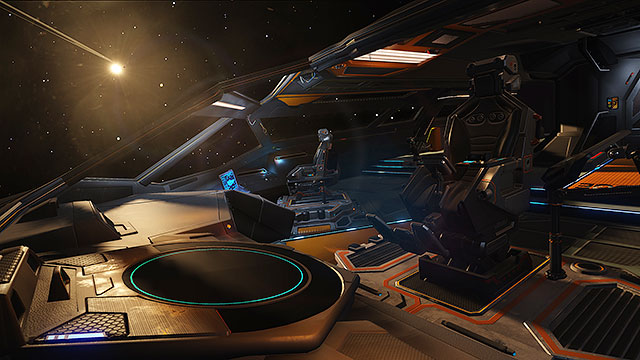
When you will eventually learn how to fly and fight properly, you should find yourself some profitable profession. Here, you may read the description of different jobs of different difficulties. The description contain both the legal as the illegal tasks. It is recommendable to try everything at least for a while. Nothing bounds you to any profession so you can also combine different mission, thus getting more experience in different fields.
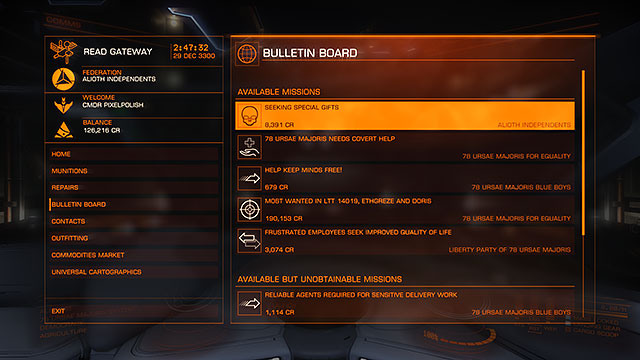
An important source of income in the Elite: Dangerous is a bulletin board which can be found almost in every space station. Missions which are offered here, are different from each other and the list is being refreshed every 5 minutes. The missions that show up in a location differs dependable from the location and its character. The stations placed in the star systems which takes place in the war between fractions may offer some jobs for the mercenaries, the fractions which are of anarchic structure may offer the mission for the pirates and smugglers. The list of the mission changes constantly, so be sure you've checked the bulletin each time you dock in the station.
The current version of the Elite, has got a bulletin with a 9 different types of missions, whereas the last one is more of a reward than a task itself.

Courier Missions
The least challenging type, it is a simple task in which you have to transfer the information from one point to another. It doesn't require any space in your ship and it is a good start for the beginners.

Transport Missions
This task requires from you to move a particular cargo from one point to another. It nicely fits into the legal professions. Requires a space for cargo, but they are also paid better.

Delivering Missions
A peculiar type, directed mainly to the traders. The station orders a specific commodity which has to be delivered in the specified time period. It is up for the player how he gets the commodity, it just has to be legal.

Humanitarian Missions
Pro bono delivering missions. The only reward for completing these missions are a high reputation increase in the specific fraction's eyes.

Smuggler Missions
A perfect mission for any pirate. Available only in the 'underground' stations. It requires getting a cargo and delivering to the station. The cargo has to be acquired illegally (a cargo which had been found by accident also counts).

Recycling Missions
This type requires from a player to loot a specific star system in order to find a specific goods. They are always appear in the "Unidentified Signal Source" area. This activity is considered illegal, thus the goods have to be smuggled.

Mercenary missions
Requires from a player to annihilate specific amount of ships of some kind: pirate, hunter police etc. Its legality depends of the kind of the pointed target.

"Seek and destroy" Missions
A mission for a well-armed and well equipped ships. Usually it requires from a player to destroy a unique, powerful NPC ships.

Permission Acquisitions
This type of "missions" is a reward for increase of the reputation in the eyes of a specific fraction. It grants you a permission which will enable you to enter the previously locked locations, thus giving you more opportunities to acquire better missions.
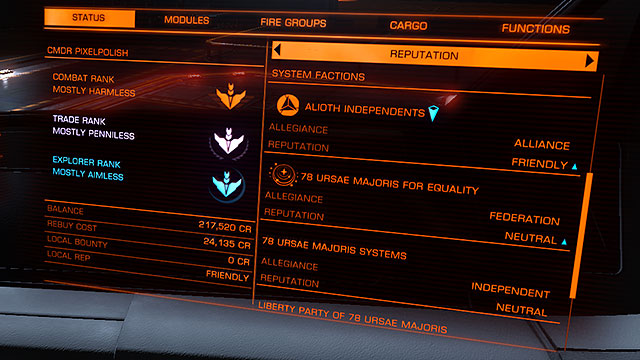
Doing missions, except for the money, gives you the long-time period rewards from a fraction which had given you the mission. It is vital to choose your employer from the very beginning. Each of the three main fractions (Federation, Empire, Alliance) has got something to offer to their allies. It can be a new ship, an access to the locked star system etc. Working for the smaller groups gives you a quicker progress. Reputation increase comes with a trust increase, thus better missions. The reputation can be checked any time in the right panel.
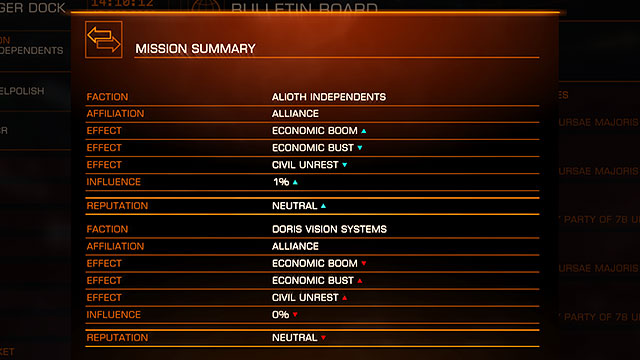
Remember though, increased reputation in eyes of one fraction usually comes with a reputation decrease in the eyes of others. It happens when the mission works against other fractions directly.
Working for the small local fractions you indirectly work for their superiors, but the progress is not measured independently. To increase the reputation in the 'lower' fractions takes less time that it would whilst working for the 'higher' ones.
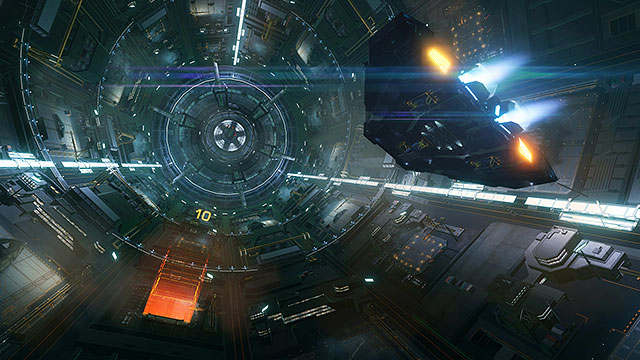
The courier missions are the best source of income in the beginning of the game. They may not be of the best payment, but their requirements are very low. They're giving the opportunity to enhance your abilities in the matter of flying. You will be also exploring the galaxy, all of this whilst earning some money.
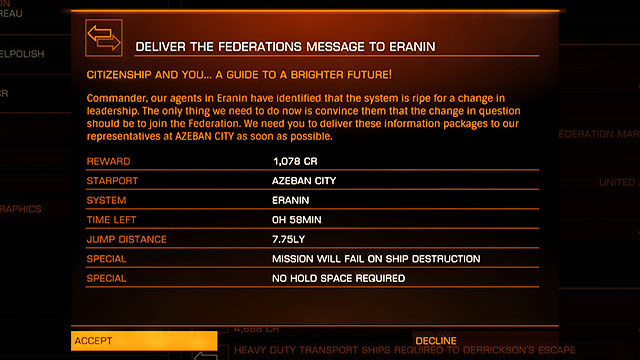
The most recommendable courier missions is the data delivery. All of their requirements can be summed up to the ability of navigating through t galaxy map and docking on the stations. How to squeeze the most from this mission? Accept every courier missions available on every station in a particular star system and jump into the closer system to which you are supposed to deliver the data. There, again, accept every courier data missions available go to another system and repeat it over and over again. The first mission may not be of high profits but when they sum up to a nice digit. There are also no consequences if the information is not delivered on time. What you really need to avoid is getting caught red-handed.
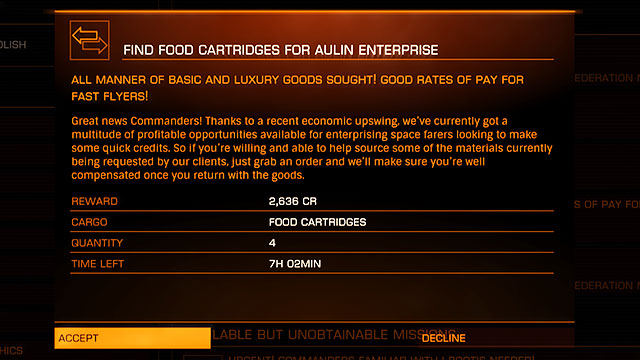
Other type of the delivery missions are the buying offers. In them you will have to acquire a particular amount of a specific good and deliver it to the station from which you took the mission. It requires having the space in the ship and having enough money. If you won't be able to reach the destination on time the cargo won't be marked as stolen as it was you who bought it. It works well with the merchant profession.

Every ship consist of a scanner, so that working in this 'profession' you can start right off. A very pacifistic career which doesn't require much form a pilot except for the basics of flying. All you here is scanning every celestial body you will be encountering.
This job can be matched with a job of a courier as both require a similar thing. The mix of these two will also increase the amount of money you will be earning.

What you are going to need is a proper scanner. The basic scanner you are getting with the ship is enough for a start but sooner or later you will have to equip yourself with something better. Is a big cost and it should concern only really devoted explorers.
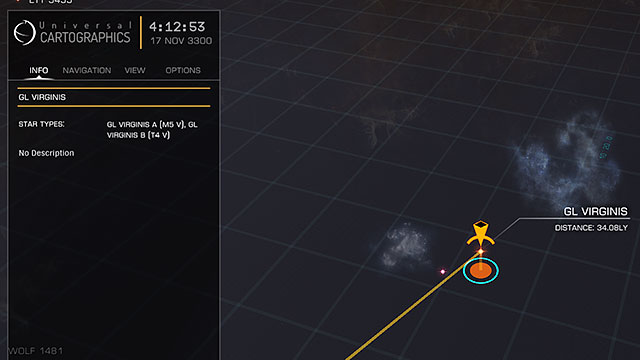
To use the scanner, look at the galaxy map and find the closer area without any description. It is available for scanning.
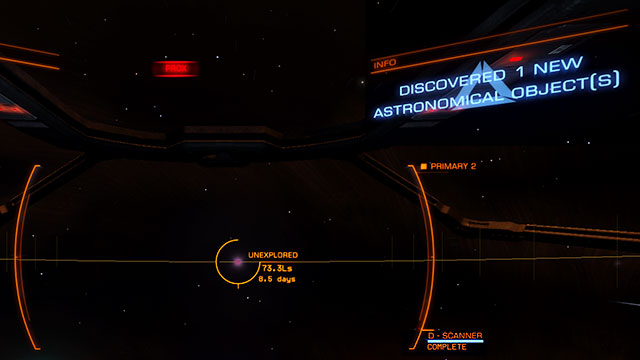
After choosing the "unknown" system, jump there. Be careful as after the jump you will find yourself in the near distance of the biggest star. The information panel will inform you about finding a new system, but additionally to that you will have to scan the area manually. Set up the scanner and hold the right button until the scanning is over.
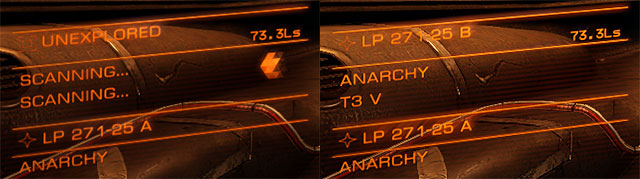
After finding the new astronomic object, marked as 'unexplored', approach them and select them. The scanner in the bottom-left corner of the pulpit will start gathering the information. A while later you will get the detailed information on the celestial body you have just scanned. After scanning everything in the system you are free to go on further exploration.
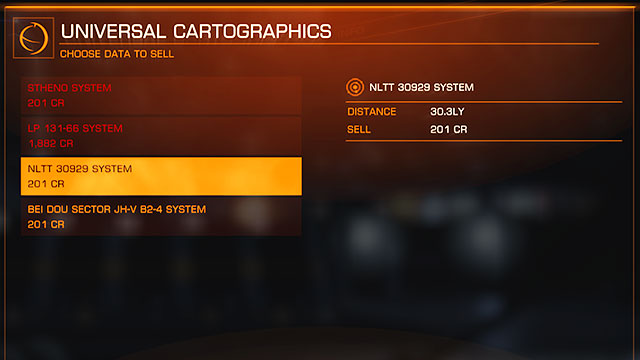
The obtained information can be sold in any station in the "universal cartographics" bookmark. The best price are being paid by the stations which are of the longest distance to a scanned area and the distance between this area and the station has to be at least 20 light years.
If you like to trade, then this profession should be of your interest. It is simply a buy cheap and sell expensive kind of work, completed with a lorry driving like exercise. The first steps to partake should be finding some extra space in your hold. Knowing the basics of the trade and economy is of an advantage. The devoted merchants should be using their first money on buying a new, transport ship. The first would be then the Hauler, and the last Lakon, Type-9. Apart from that every ship can be adjusted for transportation by changing the internal compartments for a holds which come with different capacities.
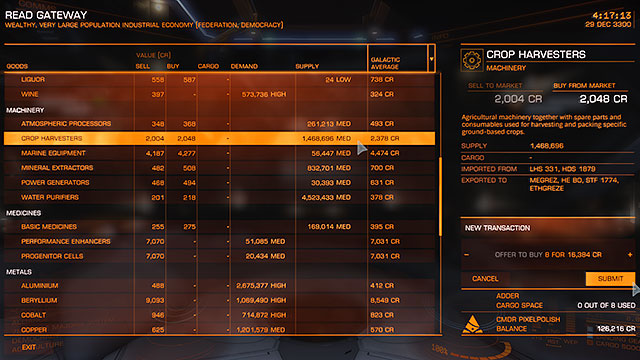
A buy cheap and sell expensive is the basic rule of every trader. Looking for your cargo check the 'supply' column and pick the ones which has a MED or HIGH indicators by them as it will cost you less. Buy all you can and you will be able to move to the next step, the selling.
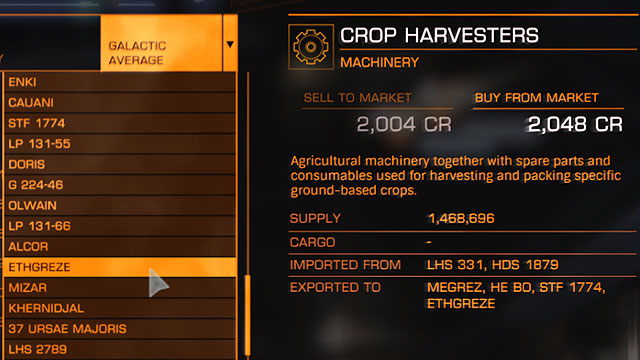
Now, you will have to find the station which needs the goods that you have just obtained. The market window will show you all of the stations (which import this commodity) right after you will choose which goods have been bought by you.
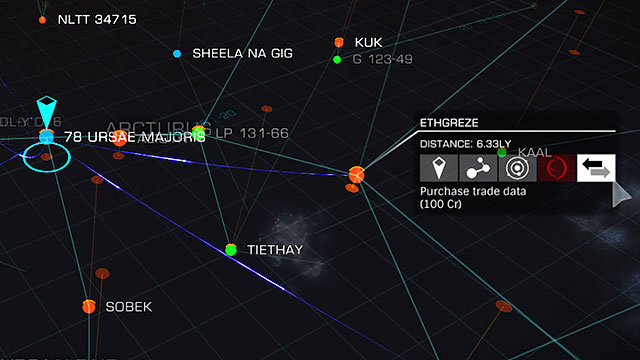
Another essential device for plotting you route will be the galaxy map. Go to the view bookmark and change the view to realistic. Then, choose the category to which our cargo belongs and look at the direction to which the route is pointing and go to the one which has the biggest demand.
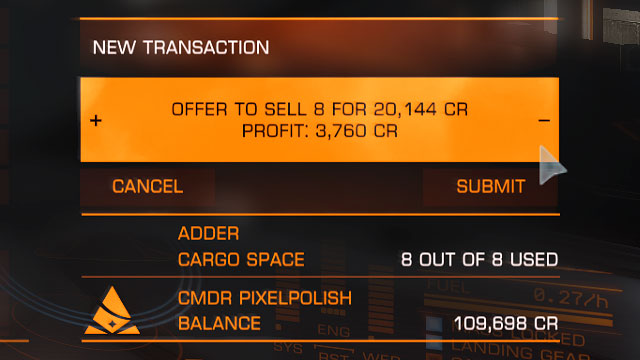
After docking check if the demand is high enough to be profitable. If so, sell everything and count the profits and if not, you can always check other stations or even a different star system.
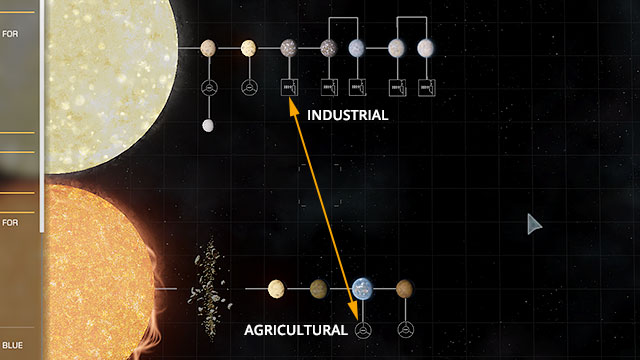
Another golden rule of every trader is optimizing the time in comparison to the profits. Sometimes, great routes may be found in the very same star system. All it takes is to take a while and think. If the same system consists of an industrial station (which produces the farming equipment) and a farming station, then it is pretty obvious that there may be some nice money to be made. There are many combinations like that in the galaxy, all it takes is to look around.
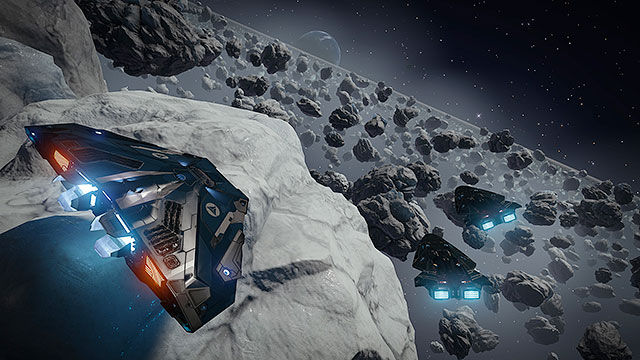
Bounty hunter job is a perfect job for the hunters who are not afraid of getting paid with the blood but legal money. The right selection of the targets make it a great job even for the most basic ships such as Sidewinder. Even the advanced equipment is not required - two basic lasers will do fine for a start. It is vital to properly estimate the danger and the success chance. For a start it is good to hunt only for the ship of the same class as yours.
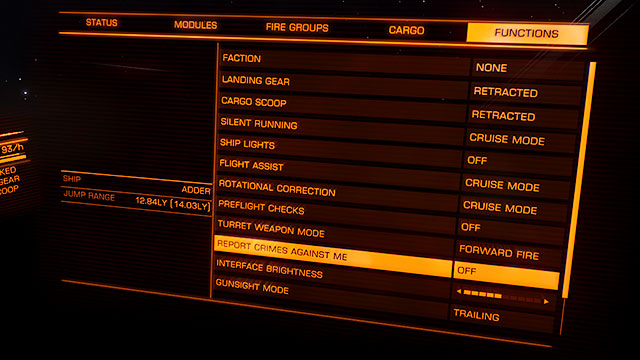
Before getting to hunting do one more thing. Turn off the "Report crimes against me" so that the police won't intervene in your fight. It will prevent the situations when the police will finish the enemy, thus taking the credit for your job and not giving you money.
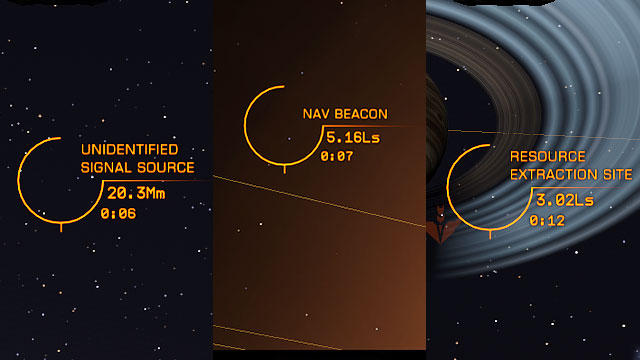
How to find the bandits? Move around the crowded locations (except for the stations). Check the unidentified signal sources, nav beacons and the resource extraction sites (a picture above). USS appear in the random places and it is the easiest to encounter them whilst on the SC mode. Beacons are placed usually near to the main stars of the system. The RES can be found around the asteroid fields. There won't be any assurance of finding the target there, but these locations are the most possible.
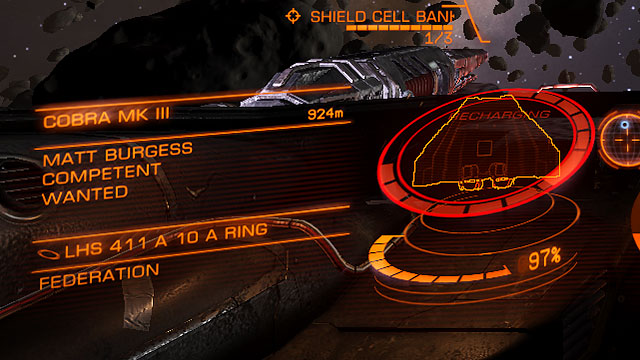
How to tell apart a criminal from a law abiding citizen? Select the ship and wait for the scanner to do their job. The first one will be marked as clean, the latter as wanted. Easy.

Another (optional) step is setting up the bounty for the head of the late criminal. Go to the left panel and select the contacts bookmark. There you will find the amount of credits assigned to the head.
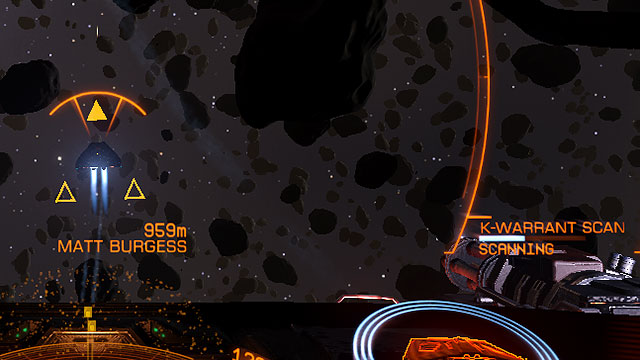
If you want to increase your income, you should invest a bit in order to buy a kill warrant scanner. Usually, you are getting paid only from one station which has been looking for the target. If the target is wanted in many of them, this scanner will sum um every bounty placed on his head. Using it works the same way as using the exploring scanner - select the enemy and hold the specific button until it's over, all of this whilst keeping right distance to the target.

After all of that, finish the enemy to receive a communicate showing the full sum you've earned yourself.
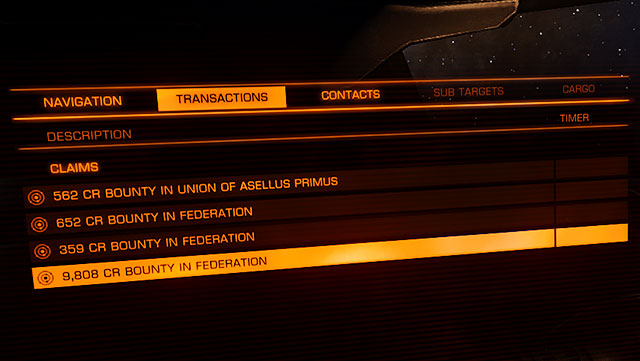
Information about the awaiting bounties can be found in the left panel, in the transactions bookmark. Given pieces of information are the price and the place of collection. Sometimes the bounty can be collected only in the system from which you took the mission and sometimes in any station which belongs to the fraction, responsible for giving you the task.
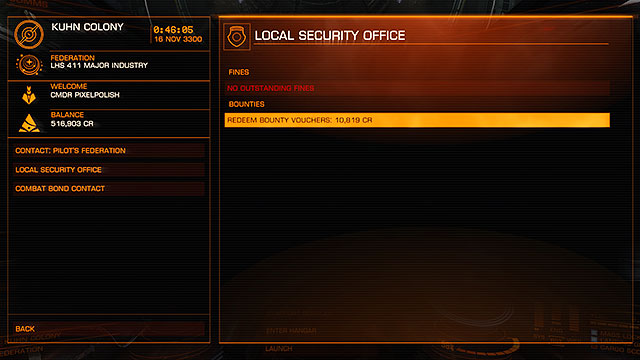
Now go to the specific station, then Contacts > Local security Office to collect the credits.
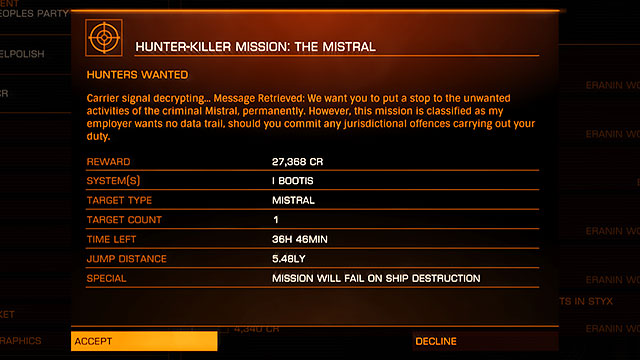
Apart from the usual bounty hunting there are some other possibilities. Some stations offer the special tasks in which you have to destroy a specific, unique NPC ship. These are usually very well equipped ships such as Cobra or Anaconda and they can be compared to the boss fights. Finding them is also rather difficult and requires from you to check every unidentified signal source in a particular star system as they spawn randomly. Because of the low chance of encountering the enemy, their time is usually prolonged up to couple of days of a real time.
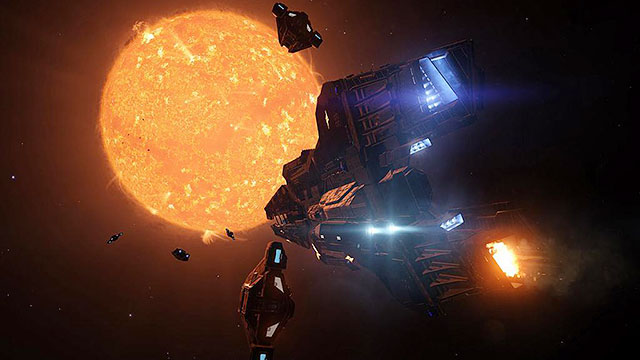
A mercenary is also a profession devoted to fighting. It is very similar to being a bounty hunter, but the mercenaries also take part in the in between fractions conflicts rather than hunting single units. Usually playing as a mercenary is similar to the Team Deathmatch known from many online games. You being neutral is of an advantage but also a bit of mystery as you will never know which side of the conflict will ask for your service. Of course, you can be faithful to one fraction but it will limit your income.
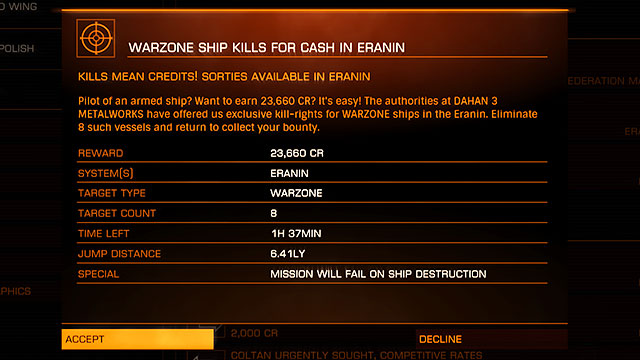
The best method of earning the money as a mercenary is hiring up for the missions which are connected to one fraction or another. These can be found in the systems which are positioned in the neighborhood of two fractions areas. These missions are all about defeating a specific number of the enemy ships. The best locations to begin the mercenary job are Dahan and Eranin.
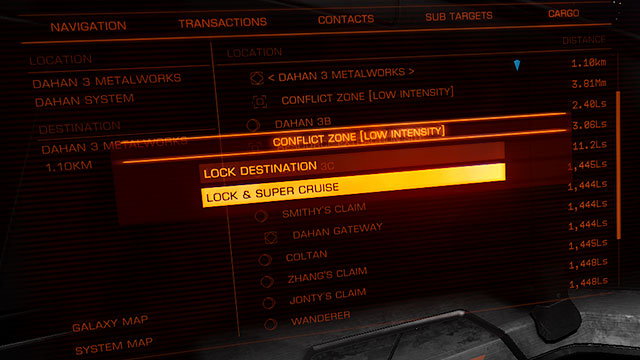
After you accept the mission, in the navigation panel search for the conflict zones and head to the battlefield. They may be of low or high intensity (which differs dependently of the number of ships taking part in the fight).
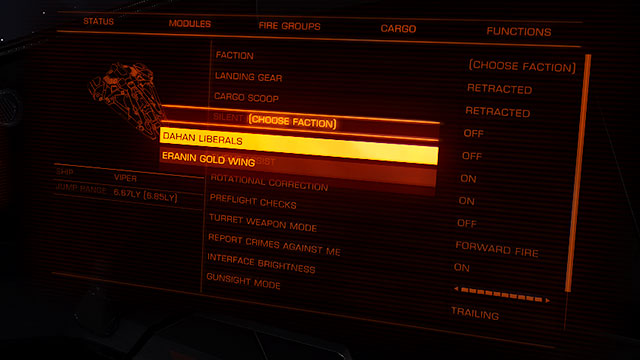
After you reach your destination, your scanner will mark all the ships neutral and it is left for you to decide which side of conflict you want to opt for. Obviously, it should be the one pointed in the briefing. Actually you don't even have to take the mission to take part in the conflict, but in this chapter the matter of earning money is being covered, thus we are suggesting you to take the mission first.
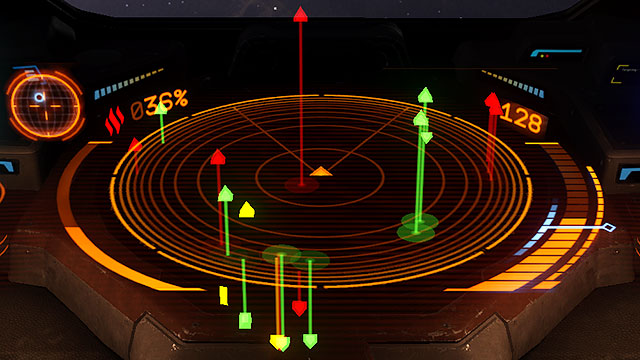
After choosing the side, the markers on the radar will change showing your allies in green and the enemies in red. Now you can star fighting and helping your employers.
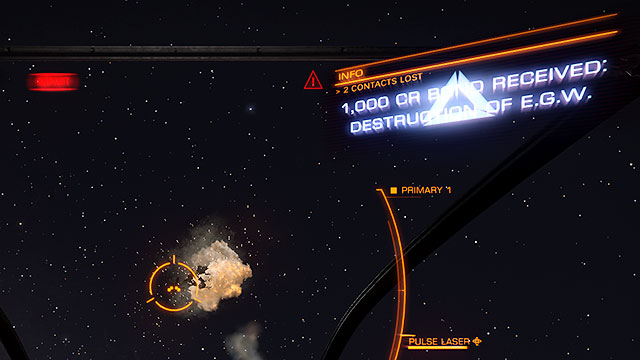
Now it is the time for a little bonus. Eliminating the enemies' ships count not only as the part of the mission but also additionally independently which means that you will be getting additional money for each kill. No matter who you will kill, one side or another will pay you, thus the optionality of taking the mission. Even working spontaneously may give you some profits.

A number of eliminated ships, the sum of credits for doing so and the actual status of the mission can be tracked in the left panel in the transactions bookmark.
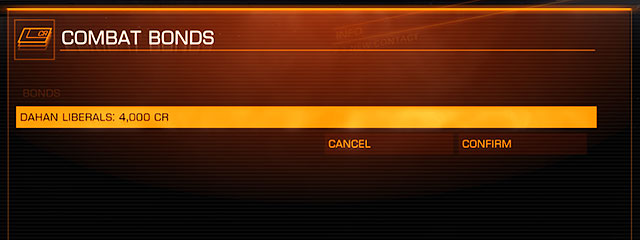
When the mission is done, go back to the station from which you took the mission to withdraw your money. For the additional money go to the contacts bookmark and select the combat bounds to get your money. It will be your only payment if you hadn't took up the mission earlier.
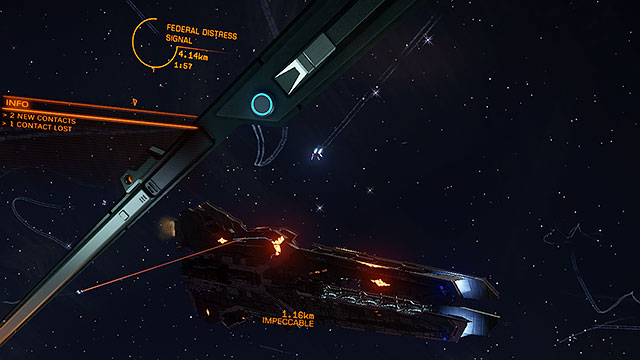
Other way of earning many as a mercenary may be responding for the Federal Distress Signal. In some systems consumed by war, the war ships may call for help. It will also appear as a unidentified signal source. The rest goes the same as taking part in the conflicts. You reach the place, opt for the side and you start to fight whilst earning the money.
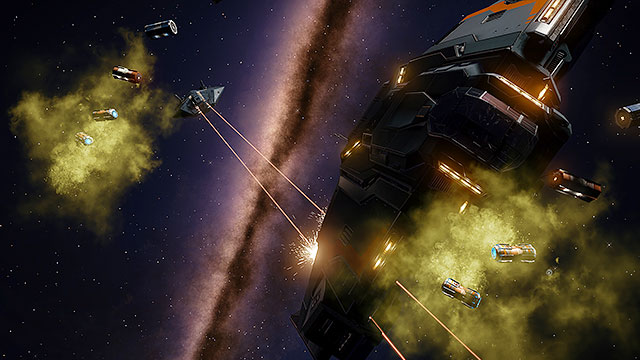
Piracy is one of the most challenging and complicated jobs in the Elite. You shouldn't mistake the pirate for a murderer as your main job will be stealing from other ships rather than destroying them. This profession can be approached in a similar way as you would to the job of a bounty hunter with some differences of course. Apart from a proper ship you will also need some holds inside of it, as you will have to have some space for the cargo you are going to steal. This job requires a lot of precision and ability of controlling the ship and the ship's sub systems. It is also very dangerous and illegal, your head will be constantly marked as wanted and you won't be welcomed in the non-anarchist stations.
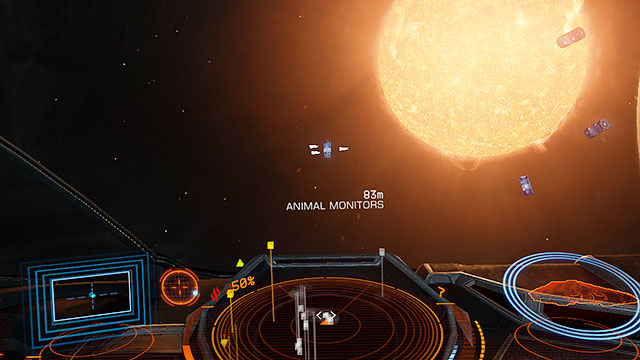
The most essential device you will have to obtain is the cargo scanner. You should know whether the shooting is profitable before doing so. This scanner works in the same way as does the bounty hunter scanner.
After scanning your victim's cargo, look at the left panel in the cargo bookmark. If you think the cargo is worth the risk, you may proceed with the 'cleaning'.
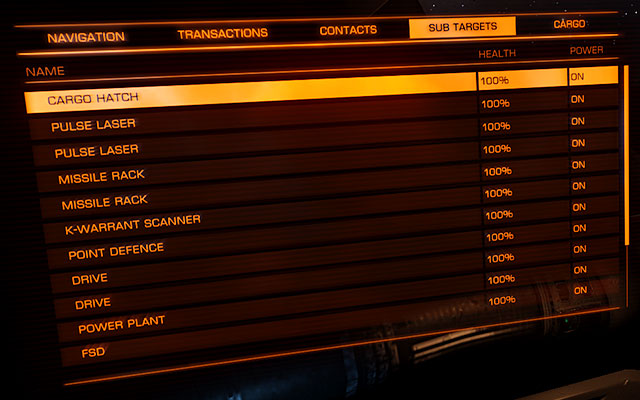
Go to the "sub targets" bookmark in the left panel and select the cargo hatch. This component will be marked on the victim's ship with a red square. Shoot this particular spot until the lock brakes. The lock is placed on the rare of the ship so you will have to tail the ship constantly. The weapons mounted on the gimbaled hardpoints will do best.
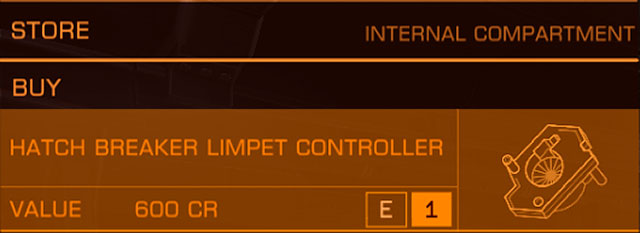
The more sophisticated method of cleaning someone's cargo is using of the hatch breaker limpet, which after shooting, automatically brakes into the cargo, throwing some of the cargo into space by doing so. The amount of obtained cargo is dependable from the class of the drone. The cheapest ones will get you no more than 20% of it.
When everything fails, the most desperate method would be to force the enemy to drop his cargo into space. You will have to damage the ship (5-10% of the hull's integrity). Usually the victims will focus on fleeing and they will drop their cargo to buy themselves some time. This isn't very profitable, and if you accidentally destroy the ship, you will lose all of the cargo.
If you will manage to force the target to drop its cargo, start the reaping. Use the cargo scoop to collect the goods. Releasing the cargo scoop will be indicated by showing its system on the bottom left part of the pulpit (animated, rectangular tunnel with a target in the middle).
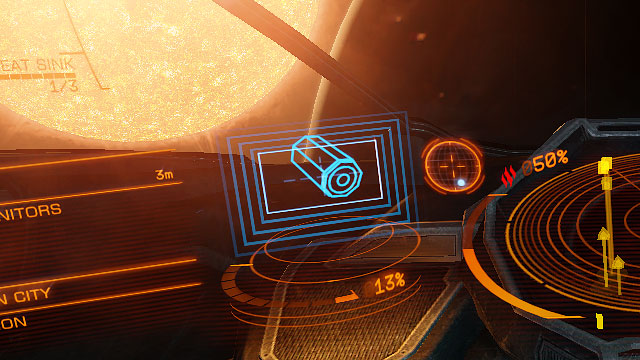
Now, choose the container and position the ship in the way in which the rack will be right above the cargo. Then, slowly (max. 40m/s) approach the target. When you will be close enough, the rack will collect the container and it will bring it up into your holds. All you have to do now is to sell it on the black market. More about that you can find in another sub-chapter.
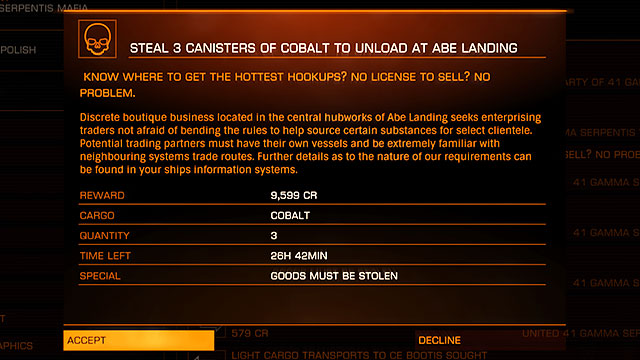
Some stations of a rather dodgy reputation offer the work for the pirates directly. It is a great opportunity for a pirate. It is a delivery mission but its difficulty comes from a type of the good you will have to acquire and deliver. This may make the job very time consuming. In this case look for the trading routes and filter the particular good to see where these goods are being exported to. Fortunately the task's time is usually prolonged up to couple of days of a real time.
Smuggler is a unique profession. You may become one because of your choice or simply because of the coincidence. Smuggler is basically a trader which sells illegal goods (drugs, tobacco or even sugar). Even the righteous citizen may become a smuggler - usually though it is a deliberate choice. Illegal commodities are valuable on the black market, thus the game is worth the risk. Even though the most of the smugglers do know what they're doing, some of them could be called that even though they didn't want to become one. Everyone could be left with a cargo which got marked as illegal just because they hadn't managed to get to the station on time. Of course the cargo can be thrown away, but this is not the case.
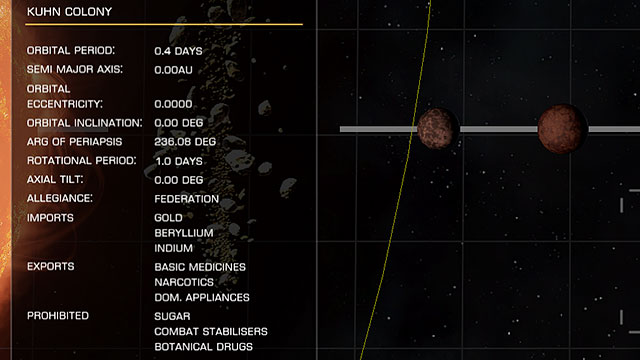
To check the goods illegal in a particular system, just open the map and select the station. On the very bottom you will see the table with information on the prohibited goods. The map obviously won't tell us whether the black market exists on the station, you will have to do it personally. Another step would be the acquisition of the cargo. Do it in the station where it is legal.
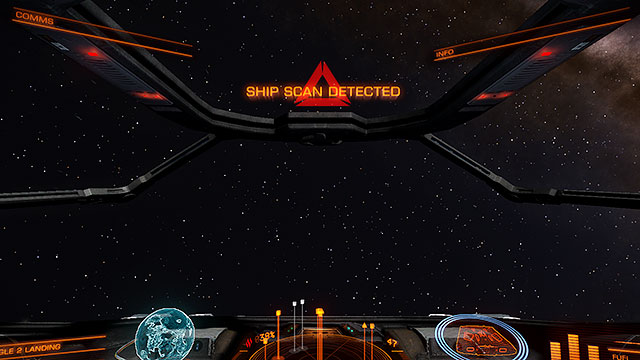
Real difficulty come, of course, whilst transporting the cargo n the station where it is illegal. Firstly, don't let the local authorities scan you. Keep away from them right after exiting the SC mode.
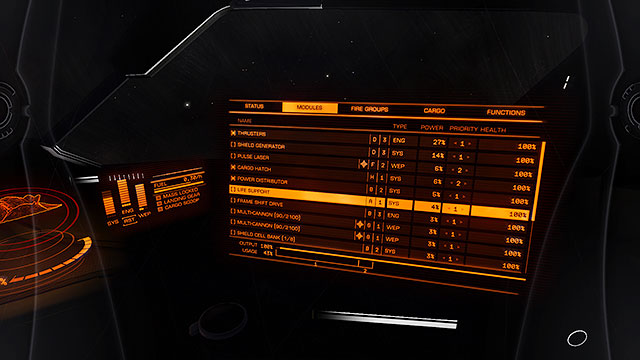
Another step would be positioning yourself directly in front of the entrance, all of this whilst keeping the right distance of about 10km and reducing the thermal signature of the ship. To do it, go to the right panel, get yourself into modules and turn off everything except for the engines and power. Go to the station and turn on the silent running. If you can turn of the power drive to be able to drift into the station.
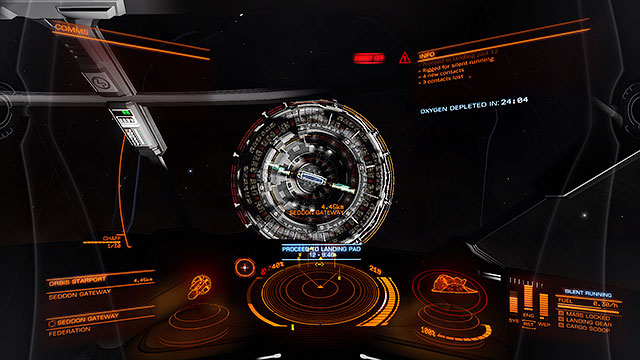
Flying this way will make your ship overheated, thus throwing out the radiator may be of some help (As long as you have the device connected to this task). Ask for the landing permission when you will be of about 7.5 km from the station. Get the permit and slither in to the station, dock and go to the hangar right away. Turn off the silent running and turn on all of the sub-systems.
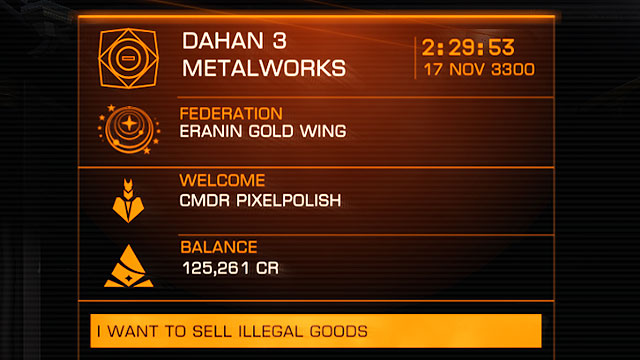
After the safe landing, open the contacts panel and sell your illegal cargo. It is a peculiar move so be sure to practice it before you will do it for real. After all this may be your main source of income sooner or later.
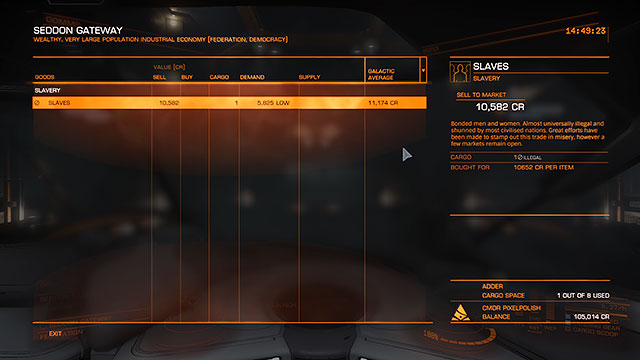
The number one rule of every smuggler is; the more illegal is the cargo, the bigger the profits are. So be careful to plan your trading routes before executing the trade itself.
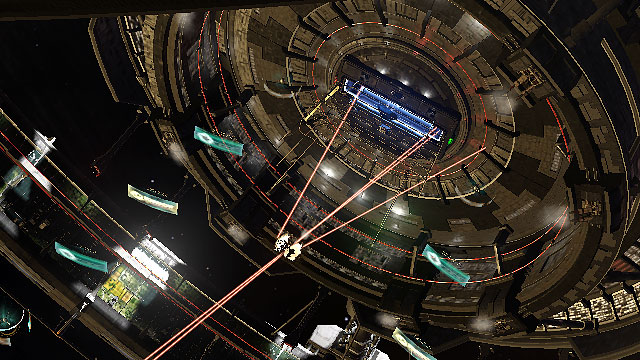
I wanted to say again; train the maneuvers properly before giving yourself up to the smuggling. It is easy to miss some vital step which may cause a deadly and costly result.
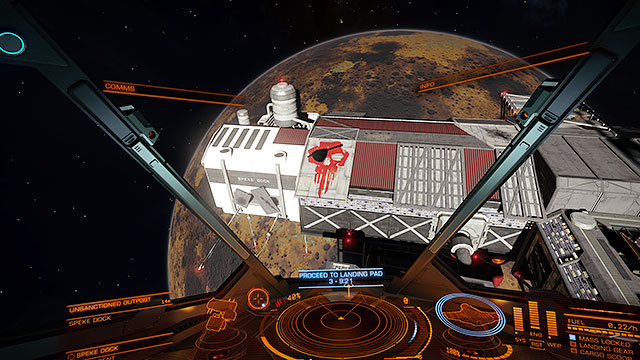
For those who don't like the risk, there are some small outposts which don't have any security nor patrols around them. Some of the stations are even openly the pirate ones. Many of them has the black market. Even though the pirate station differ somewhat from the usual ones - it should be the first drop point for every pirate who doesn't really care for the money.
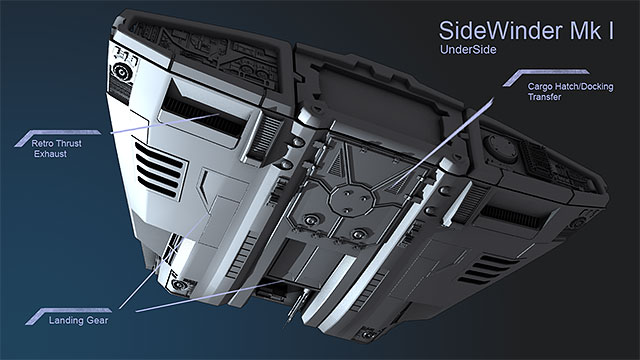
Here you will find the specifications of every ship in Elite: Dangerous and their basic data. Before doing so I would like to mention one important aspect concerning the buying/improving the machines - remember to gather enough money to cover both the ship/ship's improvements and the insurance as well. Which cost about the 5% of the machine's price (with all of the components). Other way you will be left with the situation in which you won't be able to pay for your destroyed ship. In the beginning it may be resolved with a bank loan (maximum of 200000 credits) which is getting paid automatically from your account. But, when you will cross the limit, you will be left with returning to the very first ship. This can be dealt with by clearing all the saved data and starting all over again. I do not recommend it to anyone, thus I insist on buying the ship only after thinking it through. Even though the new, sparkling ship may be tempting, the vision of bankrupting because of its damage is not.
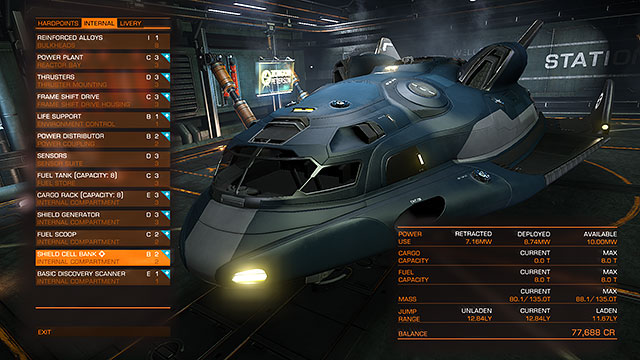
There are lots of sub-systems in the Elite, each of them comes with a load of statistics which can be hard to understand at the first glance. The authors didn't work too hard to make it easy to comprehend, but you can find the description of each of them below:
Let's start with the outfitting. To the left there are three bookmarks concerning the shopping:
Hardpoint: these are the slots on which you can mount your weapons.
Internals: These are the compartments where the integral parts of the ship are being mounted; from the engines to the armor.
Livery: This bookmark enables you to change the hull's color and it also enables you to add some stickers to it.

How to read the data shown in each slot? The most important is the type of a hardpoint and its class (orange font). It tells us what can be mounted to it and what maximum size of a component it uses. The text written in the white font tells us which component is already mounted. The blue plus in the upper-right corner indicates the availability of the additional sub-systems which can be mounted to that slot. The availability of the component is dependable from the station's economy. To improve the ship it is the best to look for the high tech stations or the industrial ones, as they offer a bigger range of improvements.
The description of the statistics is based on the ship's generator but nevertheless, the same rules apply for every other sub-system. Different statistics may appear but these will be very easy to understand. Here are the least understandable ones:

Class: it is simply the size of the component. The slot to which you can mount the component is compatible with its class or with the lower one. This is the reason for you not seeing the components of a higher class than your slot. The smaller components can be mounted on the higher class slots but it isn't recommendable. Try to match the component's class to the slot if possible. There are classes from 1 to the 8 in the Elite (whereas the 8 is the highest one and it gives you the best opportunity to enhance).
Rating: characteristic which indicates the quality of the sub-system.
Integrity: indicates the durability of the sub-system. Many other statistics are also described with the letters.
Letter indicators:
I, H, G, F, E - Very low quality. Will do its job and costs nothing, but can't be considered to be good. Cheap and easily destroyable with a low performance ratings. Usually the equipment you get with the ship.
D - A little better piece of equipment, usually lighter and more power saving, but still of rather poor quality and high fragility.
C - A class to which you should be aiming when doing your first improvements. A bit heavier but efficient and of a good price. You could call it a 'branded' equipment.
B - Heavier than C, more solid and very efficient. Also, more expensive. It is good to skip this class and aim directly for the class A.
A - The very best quality. It is the most efficient class for those who want to squeeze everything from their ships. The prices are breath taking though.
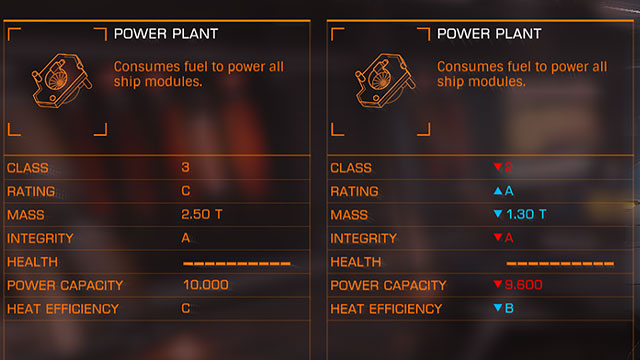
Before buying the sub-system you can easily compare it to the one you already own. The red statistics indicate that something is worse, and the blue one indicate the exact opposite. To correlate both components, select the compare option. Sometimes you may see a better component of the same class but usually these differences are nearly unnoticeable in practice.
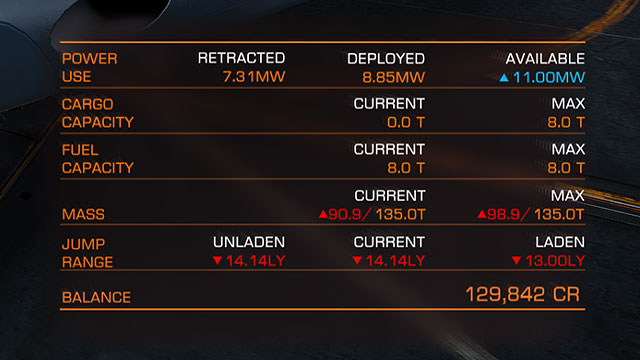
The overall influence of mounting a particular component in your ship can be seen in the bottom right corner of the trade screen. Here similarly, the red indicates the change for the worse and the blue for the better. The better component equals a higher power intake and the weight's increase. It is best to start improving the ship from a generator, the engines or the FSD drive.
Remember: When you are buying a new component, its price is lowered by the price of your actual device.
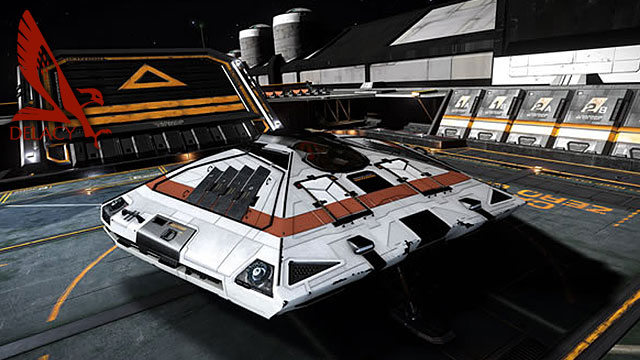
Name
Sidewinder
Producer
Faulcon deLacy
Price
32.000 CR
Maximum Speed
220m/s
Afterburner Speed
320m/s
Manouverability
8/10
Shields
40
Armour
60
Weight
25T
Hardpoints
2x utility mount
2x small hardpoint
Internal Compartments
1x size 2 internal compartment
2x size 2 internal compartment
Special Modules
Fuel tank (capacity: 2)
Cargo rack (capacity: 4)
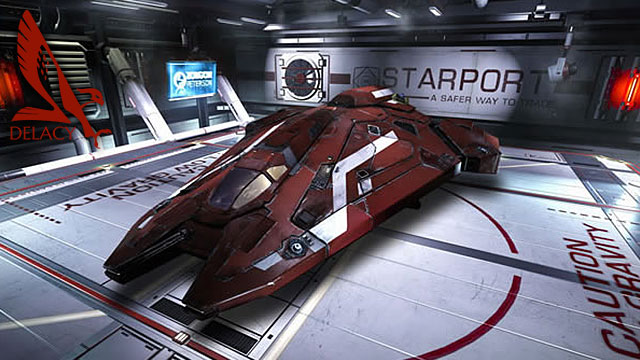
Name
Viper
Producer
Faulcon deLacy
Price
142.931 CR
Maximum Speed
320m/s
Afterburner Speed
400m/s
Manouverability
6/10
Shields
105
Armour
70
Weight
60T
Hardpoints
2x utility mount
2x small hardpoint
2x medium hardpoint
Internal Compartments
1x size 1 internal compartment
1x size 2 internal compartment
3x size 3 internal compartment
Special Modules
Fuel tank (capacity: 4)
Cargo rack (capacity: 4)
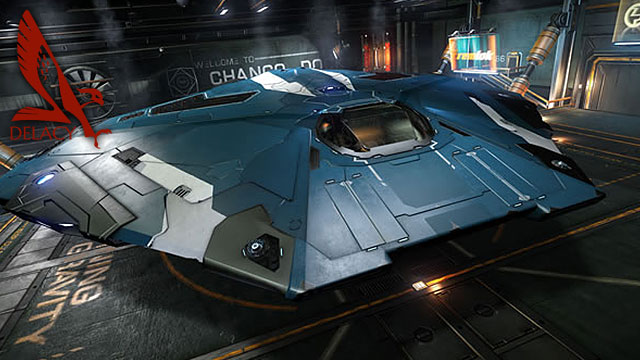
Name
Cobra Mk III
Producer
Faulcon deLacy
Price
379.718 CR
Maximum Speed
280m/s
Afterburner Speed
400m/s
Manouverability
6/10
Shields
80
Armour
120
Weight
180T
Hardpoints
2x utility mount
2x small hardpoint
2x medium hardpoint
Internal Compartments
3x size 2 internal compartment
3x size 4 internal compartment
Special Modules
Fuel tank (capacity: 16)
Cargo rack (capacity: 8)
Cargo rack (capacity: 8)
Cargo rack (capacity: 2)
Cargo rack (capacity: 2)
Frame Shift Wake Scanner
Intermediate Discovery Scanner
Name
Python
Producer
Faulcon deLacy
Price
56.978.179 CR
Maximum Speed
250m/s
Afterburner Speed
2800m/s
Manouverability
6/10
Shields
390
Armour
260
Weight
350T
Hardpoints
4x utility mount
2x medium hardpoint
3x large hardpoint
Internal Compartments
1x size 2 internal compartment
2x size 3 internal compartment
1x size 4 internal compartments
2x size 5 internal compartment
3x size 6 internal compartment
Special Modules
Fuel tank (capacity: 32)
Cargo rack (capacity: 32)
Cargo rack (capacity: 32)
Cargo rack (capacity: 16)
Cargo rack (capacity: 2)
Name
Anaconda
Producer
Faulcon deLacy
Price
146.696.451 CR
Maximum Speed
180m/s
Afterburner Speed
240m/s
Manouverability
2/10
Shields
350
Armour
525
Weight
400T
Hardpoints
8x utility mount
2x small hardpoint
2x medium hardpoint
3x large hardpoint
1x huge hardpoint
Internal Compartments
1x size 2 internal compartment
3x size 4 internal compartment
3x size 5 internal compartment
3x size 6 internal compartment
1x size 7 internal compartment
Special Modules
Fuel tank (capacity: 32)
Cargo rack (capacity: 64)
Cargo rack (capacity: 32)
Cargo rack (capacity: 16)
Cargo rack (capacity: 2)
Name
Eagle
Producer
Core Dynamics
Price
44.800 CR
Maximum Speed
240m/s
Afterburner Speed
350m/s
Manouverability
10/10
Shields
60
Armour
40
Weight
50T
Hardpoints
1x utility mount
3x small hardpoint
Internal Compartments
1x size 1 internal compartment
1x size 2 internal compartment
1x size 3 internal compartment
Special Modules
Fuel tank (capacity: 4)
Cargo rack (capacity: 2)
Name
Federal Dropship
Producer
Core Dynamics
Price
37.814205 CR
Maximum Speed
180m/s
Afterburner Speed
300m/s
Manouverability
0/10
Shields
200
Armour
300
Weight
580T
Hardpoints
4x utility mount
4x medium hardpoint
1x large hardpoint
Internal Compartments
1x size 2 internal compartment
2x size 3 internal compartment
1x size 4 internal compartment
2x size 5 internal compartment
1x size 6 internal compartment
Special Modules
Fuel tank (capacity: 16)
Cargo rack (capacity: 32)
Cargo rack (capacity: 16)
Cargo rack (capacity: 8)
Name
Adder
Producer
Zorgon Peterson
Price
87.808 CR
Maximum Speed
220m/s
Afterburner Speed
320m/s
Manouverability
8/10
Shields
60
Armour
90
Weight
35T
Hardpoints
2x utility mount
2x small hardpoint
1x medium hardpoint
Internal Compartments
1x size 1 internal compartment
2x size 2 internal compartment
2x size 3 internal compartment
Special Modules
Fuel tank (capacity: 8)
Cargo rack (capacity: 4)
Cargo rack (capacity: 2)
Name
Hauler
Producer
Zorgon Peterson
Price
52.720 CR
Maximum Speed
200m/s
Afterburner Speed
300m/s
Manouverability
6/10
Shields
50
Armour
50
Weight
15T
Hardpoints
2x utility mount
1x small hardpoint
Internal Compartments
1x size 1 internal compartment
1x size 2 internal compartment
2x size 3 internal compartment
Special Modules
Fuel tank (capacity: 4)
Cargo rack (capacity: 4)
Cargo rack (capacity: 4)

Name
Type 6
Producer
Lakon Spaceways
Price
1.045.945 CR
Maximum Speed
220m/s
Afterburner Speed
350m/s
Manouverability
3/10
Shields
90
Armour
90
Weight
155T
Hardpoints
3x utility mount
2x small hardpoint
Internal Compartments
2x size 2 internal compartment
1x size 3 internal compartment
2x size 4 internal compartment
2x size 5 internal compartment
Special Modules
Fuel tank (capacity: 16)
Cargo rack (capacity: 16)
Cargo rack (capacity: 16)
Cargo rack (capacity: 8)
Cargo rack (capacity: 8)
Cargo rack (capacity: 2)
Name
Asp Explorer
Producer
Lakon Spaceways
Price
6.661.153 CR
Maximum Speed
250m/s
Afterburner Speed
340m/s
Manouverability
6/10
Shields
140
Armour
210
Weight
280T
Hardpoints
5x utility mount
4x small hardpoint
2x medium hardpoint
Internal Compartments
2x size 2 internal compartment
3x size 3 internal compartment
1x size 5 internal compartment
1x size 6 internal compartment
Special Modules
Fuel tank (capacity: 32)
Cargo rack (capacity: 4)
Cargo rack (capacity: 2)
Name
Type 7
Producer
Lakon Spaceways
Price
17.472.252 CR
Maximum Speed
180m/s
Afterburner Speed
300m/s
Manouverability
2/10
Shields
120
Armour
120
Weight
420T
Hardpoints
4x utility mount
4x small hardpoint
Internal Compartments
2x size 2 internal compartment
2x size 4 internal compartment
2x size 5 internal compartment
2x size 6 internal compartment
Special Modules
Fuel tank (capacity: 32)
Cargo rack (capacity: 32)
Cargo rack (capacity: 32)
Cargo rack (capacity: 16)
Cargo rack (capacity: 16)
Cargo rack (capacity: 8)
Name
Type 9 Heavy
Producer
Lakon Spaceways
Price
76.555.842 CR
Max Speed
130m/s
Afterburner Speed
200m/s
Manouverability
0/10
Shields
240
Armour
240
Weight
1.000T
Hardpoints
4x utility mount
2x small hardpoint
3x medium hardpoint
Internal comopartments
1x size 2 internal compartment
2x size 3 internal compartment
2x size 4 internal compartment
1x size 5 internal compartment
1x size 6 internal compartment
1x size 7 internal compartment
1x size 8 internal compartment
Special modules
Fuel tank (capacity: 64)
Cargo rack (capacity: 128)
Cargo rack (capacity: 64)
Cargo rack (capacity: 16)
Cargo rack (capacity: 8)
Cargo rack (capacity: 4)

Name
Orca
Producer
Saud Kruger
Price
48.539.887 CR
Maximum Speed
300m/s
Afterburner Speed
380m/s
Manouverability
2/10
Shields
220
Armour
220
Weight
580T
Hardpoints
4x utility mount
2x medium hardpoint
1x large hardpoint
Internal Compartments
2x size 2 internal compartment
1x size 3 internal compartment
1x size 4 internal compartment
2x size 5 internal compartment
Special modules
Fuel tank (capacity: 16)
Cargo rack (capacity: 32)
Cargo rack (capacity: 16)
Cargo rack (capacity: 16)
Cargo rack (capacity: 8)
Name
Imperial Clipper
Producer
Gutamaya
Price
22.295.860 CR
Maximum Speed
300m/s
Afterburner Speed
380m/s
Manouverability
2/10
Shields
180
Armour
270
Weight
400T
Hardpoints
4x utility mount
2x medium hardpoint
2x large hardpoint
Internal Compartments
2x size 2 internal compartment
2x size 3 internal compartment
2x size 4 internal compartments
1x size 6 internal compartment
1x size 7 internal compartment
Special modules
Fuel tank (capacity: 16)
Cargo rack (capacity: 64)
Cargo rack (capacity: 8)
Cargo rack (capacity: 2)
Elite: Dangerous is already properly optimized and its requirements are rather low in comparison to what the game offers. The game will also be released on the MACs
Single player: Yes
Cooperation offline (split screen/hot seat): None
Cooperation Online: Yes
Multiplayer: Yes, limited number of players.
Guide for the PC version, based on following configuration:
On this configuration, the game worked perfect in the 1920x1080 resolution with nearly unnoticable frame drops. Press Ctrl+F in order to see the frame counter. If you want to check your internet connection, press Ctrl+B. Following requirements are based on the beta version of the game. They may change throughout the engine improvement.

 EVE Online Game Guide & Walkthrough
 Euro Truck Simulator 2: Scandinavian Expansion Game Guide & Walkthrough
 Endless Legend Game Guide & WalkthroughEuro Truck Simulator 2 Game Guide & Walkthrough
 Eragon Game Guide & Walkthrough