Need a quick and easy way to backup and restore Windows without relying on backup tools or the cloud for your personal data? While plenty of third party Windows backup and restore tools are available, it’s time to learn how to make an ISO image of your Windows PC.
We all know that backing up our data is important, especially when upgrading to a new version of Windows. But rather than fiddle around with partitions purely for personal data, or cloud storage, which might be slow to restore your vital files and folders, wouldn’t it be great to be able to simply take a backup of your entire Windows installation?

Such a backup might be configured to include your personal folders, but omit apps and games, or you could opt to create an image of your entire system drive. Naturally, you would need a suitable volume of storage for such a backup.
Thanks to the ISO image format, it is possible to back up your data – essentially create an exact copy of your entire drive or selected directories – and restore it relatively quickly should disaster strike. ISO files can also be used to back up existing CDs and DVDs, a useful means of reducing reliance on physical media.
One popular use for disk images is creating a clone of your hard storage (hard disk drive or solid state drive), which might be on its last legs.
DataNumen Disk Image is one such solution, runs on all versions of Windows and is available as freeware. Known as DDKI, this solution is straightforward. After downloading and installing the utility, use the Clone tab to select the drive you wish to make an image of; to clone multiple drives, use the Batch Clone tab.
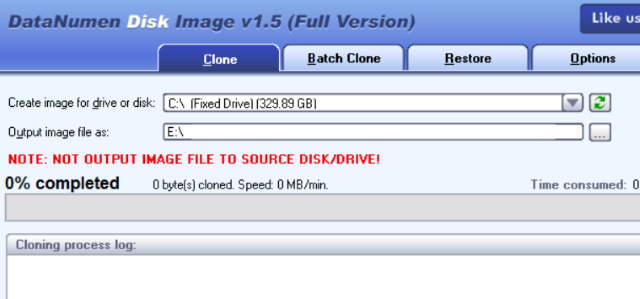
Select the destination location and assign a filename in the Output image file as box, where you should select the target disk drive – the device purchased to replace the old HDD.
Begin by clicking Start Cloning. When complete, your disc will be copied to its destination device, ready to use. Our look at HDD cloning covers the topic in greater depth.
Creating an ISO image of your Windows installation is a great solution to any concerns you might have about upgrading to Windows 10.
Worried your PC may not boot after the upgrade? Heard horror stories from your friends at work? While issues with a Windows 10 upgrade are unusual, they can be utterly frustrating, and often when upgrading from Windows 7 and 8, it isn’t possible to automatically roll back the installation.
This is where an ISO image comes in.
You might alternatively have already upgraded to Windows 10, and want to create an ISO image before you downgrade to Windows 7 or Windows 8.1.
While Microsoft may recommend you backup your files rather than rely on complete system images, there’s no reason not to have an ISO disk image ready for a disaster recovery scenario. This might be an image of the system in its current state, or of a freshly installed Windows 7, complete with all of the apps you regularly need (such as Microsoft Office, perhaps). Backing up to an ISO disk image is part of the Windows 7 backup and restore feature.
To create a system image in Windows 7, open Start > Getting Started and then Back up your files. On the left-hand pane, click Create a system image, and select the destination.
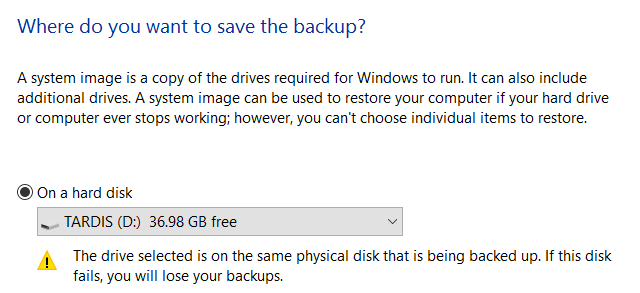
This might be an external hard disk drive or some other large volume. Multiple DVDs can be written to, if necessary, or if you have a Blu-ray writer, this should also be an option.
Do you have a home server, or some large storage on your network, perhaps in the shape of a purchased NAS (or a DIY device, perhaps using a Raspberry Pi)? If so, you can use the On a network location option. If you want to use a USB flash device, connect this to your computer in advance and select it as the destination – or use one of these bootable USB tools.

With your selection made, it is time to select the drives to include in the backup. It is unusual for multiple drives to be required, but in most cases you will need to ensure that the System drive (by default the C: drive) is selected. The device you selected for the backup will not be listed here.
The confirmation screen will detail how much space will be taken up by the backup. Check this to ensure the figure matches the remaining space on the target device. Proceed with the backup, and wait while it completes; the duration will differ, based on the size of the backup and the speed of the drive.
Once complete, Windows will suggest you create a system restore disc. This is a good idea, so find a blank disc and follow the instructions. You can then use this to boot your PC and select the System Image Recovery option to restore the ISO Disk Image of your Windows installation following a disaster scenario.
Note that other system restore discs are available, although conversely these may not have the disk image restore functionality.
The same tool for creating a disk image is available in later versions of Windows. You ideally need to have upgraded Windows 8 to Windows 8.1 before proceeding here.
To find the system image creation tool, press Start and type “file history“. The automatic search will display the File History entry first, so click this to open the File History tool, then System Image Backup in the lower left corner.

You can then proceed as detailed above. With the ISO backup created, use the steps for Windows 8.1, below, to restore the image in Windows 10. In a disaster recovery scenario, you will need to boot into the Windows 10 equivalent of Safe Mode to restore the image.
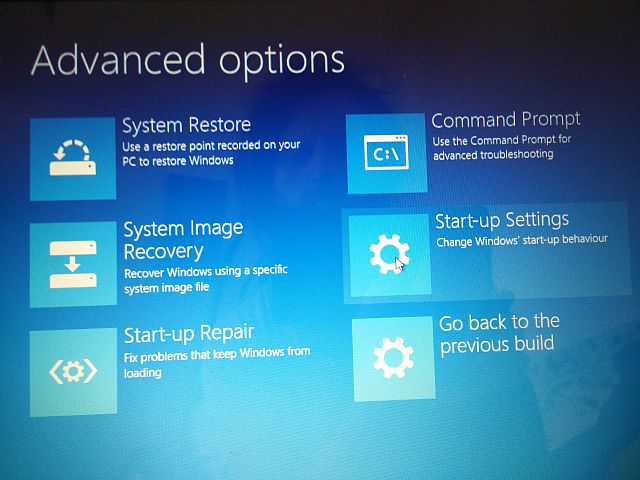
If a Windows 10 upgrade doesn’t work out for you (perhaps you’ll experience a reboot loop), having an ISO image to fall back on is a massive advantage. You can restore the Windows 8.1 disk image in Window’s Advanced options screen, which you will find by pressing F8 repeatedly when your PC boots up (or holding SHIFT as you click Restart).
In Advanced Startup Options, select Repair your Computer > System Image Recovery and follow the instructions, ensuring that Windows can find the ISO file.
Note that even if you have the Windows 8.1 installation media you can still restore the disk image. At the Install now screen, use the Repair your computer link and then Repair.
From here you’ll be redirected to the Advanced Startup menu, so select Troubleshoot > Advanced options > System Image Recovery, following instructions to restore your Windows ISO system image.
As you can see, creating an ISO image backup of your entire Windows system is perfect for backing up in advance of a major system upgrade. Additionally, the speed with which the ISO can be created and subsequently restored should make it a far more attractive option than just backing up your data and hoping for the best.
Have you used ISO system images to backup and restore Windows? Did it help you avert a Windows 10 upgrade disaster scenario? Tell us all about it in the comments.


 Squad: (video game) System Specs (PC)
 Trine 3: The Artifacts of Power (PC) overview
 Destiny Guide: Exotic Shards and Exotic Weapon Upgrade Detailed
 Tom Clancy’s Rainbow Six: Siege Wiki – Everything you need to know about the game .
 Love Exploring? These RPGs Are Made For You