It doesn’t matter whether you’re shooting with the latest and greatest DSLR or a three year old smartphone, what results is still a photograph. Good photos and bad photos aren’t determined by cameras but by photographers.
The difference between a bad photo and a good photo — or a good photo and a great photo — can be very slim. Subtle changes may be all that’s required to close the gap. With that in mind, here are 13 tips that will quickly improve your photos.
The single biggest thing you can do to improve the quality of your images is post-process them. You can use Photoshop, Lightroom, or any other app you like. There’s no need to make dramatic changes; simply adjusting the exposure, contrast, and color tone is enough to take an okay image and make it special.
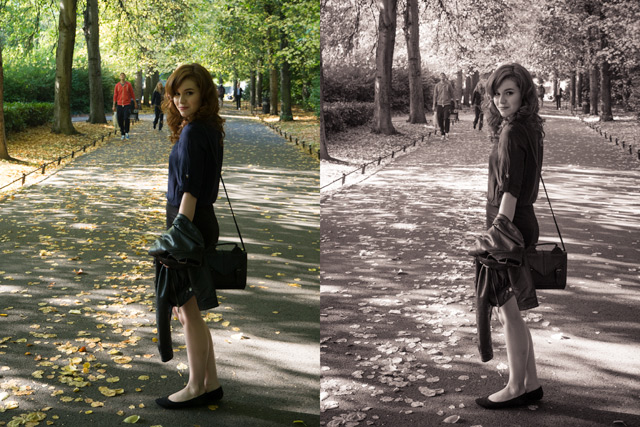
The problem is that film photography had a look. Each individual film stock had certain characteristics and no two were the same. This is what Instagram filters try to replicate. Some films were contrasty while others emphasised green tones. Straight out of camera, film images have basically been edited.
Digital images, however, are designed to be neutral representations of the scene. Straight out of camera they are flat and lifeless; they have no character. Post processing them brings them to the same point that a film image is at.
You should always shoot RAW image files if you can — no matter what Bryan says. RAW files save a lot more data than JPGs so you have a lot more flexibility to edit your images after you shoot. This means that you’ve more chance of nailing the shot and creating a great image.
The only time you shouldn’t is when your camera doesn’t support it.
Most of Instagram’s filters are great but they’ve become much too recognizable. Slapping an Instagram filter on top of your image might make it look kind of cool but it won’t make it a better photo. If you want to edit using a mobile app, try VSCO Cam instead.
It doesn’t matter whether “X” is contrast, HDR, a vignette, or color toning, go easy with it.

Plenty of great images are ruined by photographers being too heavy handed while they edit. Unless there is a strong artistic reason to push an image hard in one direction it’s best to be subtle. As a rule of thumb, dial every effect you add to an image back from 100% to 70%.
Selective color images—where one thing is a bright color and the rest of the picture is in black and white—aren’t cool, kids. They’re just one of many kinds of clichéd photos. This video from DigitalRevTV provides a great overview of 25 photo clichés. I don’t agree with all of them but for the most part they’re spot on. Avoid clichés like the plague.
Nothing ruins a good image faster than an obnoxious watermark.
A small subtle logo in one corner is fine but your name in bold across the centre of the image not only stops people from stealing it, it stops people from looking at it. If you’re going to put your images online, you need to accept the risk that some people may share them or pass them off as their own.
The rule of thirds is a simple compositional rule that leads to stronger photos.
According to the rule of thirds, you should divide your image into both horizontal and vertical thirds. The intersection points of the thirds is where you should place your subject for the strongest image.
While it’s not true in all situations, for most things it’s a quick and easy way to guarantee a strong composition.
Real life doesn’t have borders but photos do. It’s easy to forget this when you’re photographing.
The border of an image is a compositional element. If something is placed too close to the edge it creates tension in the image. This can be a good thing or a bad thing.
In general, if someone is looking or moving in one direction, they should be placed on the opposite edge of the frame so they appear to have some photo to move into.
Similar to the point above, watch where the edges intersect with your subject.

You should avoid cropping a portrait so that it chops half way through a persons limbs; it looks strange. The best places to crop a portrait are at the subject’s neck, arm pits, waist, just above the knee, or not at all. Be careful that things like hands aren’t accidentally cut off even if you crop at one of those points.
While humans have depth perception, cameras don’t. What we see as a 3D scene they render as a 2D image. This means that some things that appear to have no relation in real life have a relationship created by the compression to two dimensions. The classic example is a subject standing in front of a tree or lamppost. While you see the scene normally when you’re shooting, in the final image the tree appears to grow out of the model’s head!
To create stronger images look at what your subject is standing in front of and think how it will be translated to two dimensions. If you thing it might not look good, change up the shot.
There’s no such thing as bad light, but certain kinds of light suits some subjects better.
Harsh midday light is one of the hardest to use effectively. If you plan on shooting a glamorous portrait in it you’re going to have a very difficult time. It’s far easier to shoot portraits when the sun is lower in the sky.
On the other hand, if you want to shoot some high contrast cityscapes, the midday sun may be exactly what you want. Don’t try and force photographs in less than ideal circumstances, instead use the strengths of what you have to work with.
If you’re shooting portraits without artificial lights, the two most flattering places to do it are in the shade outdoors on an overcast day or inside by the light of a window. Both situations create wonderfully flat light that is easy to work with.

When you’re shooting in low light it can be tempting to use the pop up flash on your camera. Don’t do it!
Unless you have something like a bounce card to make it a softer light source, it won’t lead to good photos. It’s far better to increase your ISO or tighten your aperture.
That’s 13 tips that I’ve found are quick ways to improve your photos. Learning each and every one of these has made every image I’ve taken since better.
This, however, is hardly a complete list! If you’ve any great tips to quickly improve the quality of your photos, please let me know in the comments.


 How to fix PS3 DNS Error 80710102
 Batman: Arkham Knight (PC) overview
 Planetbase Beginner's Guide: Crew, Needs And Resources, Base's Basics and more
 14px: The Surprisingly Simple Yet Addictive Platformer
 Star Wars Battlefront’s Recommended System Specs revealed