

Google Drive is a fantastic resource for those who need free (or cheap) online storage space. It synchronizes beautifully with Google’s own suite of products, as well as several third-party services such as desktop email client Mailbird, productivity and organization software Evernote, and online communication tool Slack.
Here we take a complete look at how to use of the service, as well as offering some hints and tips along the way.
The Only Google Drive Guide You’ll Ever Need to Read
Navigation: Supported File Types | Accessing Google Drive | Storage Space | Working with Google Drive | Desktop Clients | Uploading Files & Folders | Downloading Files & Folders | File Size Restrictions | Creating a New Document | Sharing Files & Folders | Collaborating | Accessing Files Offline | Organizing Your Drive | Tweaking Your Layout | Third Party Apps | Troubleshooting | Drawbacks of Google Drive
Formerly known as Google Docs, the service was launched to the public in April 2012 and has since gained an estimated 300 million active monthly users.
The premise behind the service is to allow its users to store files in the cloud, thus enabling them to access them from any Internet-connected computer or mobile device in the world. Since late 2012 it has also encompassed Google’s free office productivity suite – Google Docs (word processing), Google Sheets (spreadsheets), and Google Slides (presentations).
Two of its most important and standout features are the ability to share documents with non-Google Drive users, and the ability to collaborate on documents in real-time. Shared files can be either shared publicly (to anyone with the link), or privately (to specific email addresses and/or users), though it’s important to note that files can only be shared privately with Google account holders. Collaborated documents are updated live – thus enabling the other users to see what changes are being made as they work.
A wide range of file types are supported, and they can all be viewed via the Google Drive viewer in the web client or the mobile apps. These include the full range of Microsoft Office file extensions, PDFs, most typical image files (JPEG, PNG, GIF, TIFF, BMP, and WEBP), video files (MPEG4, 3GPP, MOV, AVI, MPEGPS, WMV, FLV, OGG, and WebM), audio files (MP3, MPEG, WAV), Adobe Photoshop files, Apple Pages, Autodesk AutoCAD extensions, PostScript, and fonts.
Unsupported file types can still be uploaded to the service, but they cannot be viewed from within the web client. There is a 5 TB limit on upload size.
The service has a web-based client, a Chrome app, downloadable synchronization folders for Windows and Apple’s OS X, and smartphone/tablet apps for Android and iOS. Linux and Windows Phone users have to resort to third-party replacements because no official versions are available.
The service supports a number of third-party applications that add extra features or benefits to the existing offering. These have been available via the Chrome Web Store since the 2012 launch, but since early 2013 they have also been available through the web client itself.
Currently, the first 15 GB of storage is free, with various paid options available thereafter. The cheapest paid plan is $1.99 per month for 100 GB of storage, while the most expensive plan will set you back $299.99 per month for 30 TB of space. Google will often run various promotions that allow users to pick up extra storage for free, and people who buy a new Chromebook currently get a mammoth 1 TB free for two years.
Let’s take a look at some of Google Drive’s main features and how to use them.
Most users will access Google Drive through the web client or by using a folder on their Windows PC or Mac.
The web client can be accessed by heading to https://drive.google.com/drive/ and following the onscreen login instructions. If you already have an always-logged-in Google account, the link should take you directly to your Google Drive’s main page. If you don’t already have a Google account, you will be prompted to make one.
If you prefer to use a desktop folder to sync your files with your account, you’ll need to download the relevant software from within Google Drive.
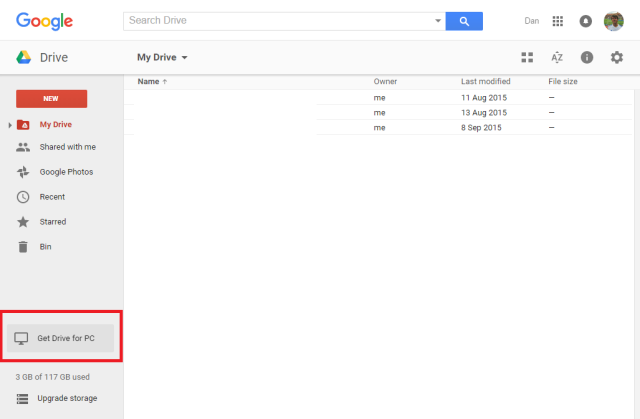
To do so, log-in via the web client using the instructions above. Once you’re presented with your Drive’s homepage, locate the button titled Get Drive for PC in the lower left-hand corner. Alternatively, head to https://www.google.com/drive/download/ and select Mac and PC from the dropdown menu.
You will be prompted to accept the various terms and conditions, and the file will download. When it’s completed, run the download and a folder will be added to your user file and your taskbar (Windows) or your Applications folder (Mac).
Enter the downloaded program’s settings to tweak which folders should sync, whether the service should launch at start-up, and more. Once the download has been installed, simply drag any files you want to upload to your newly-created Google Drive folder, and they will automatically sync to the service.
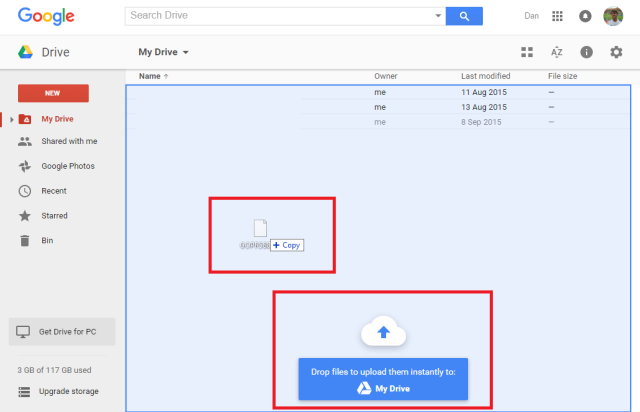
If you’re using the web client, you can upload documents in two different ways.
Firstly, you can simply drag the file or folder you want over the top of the Google Drive window. You will be prompted to drop the file to begin the upload.
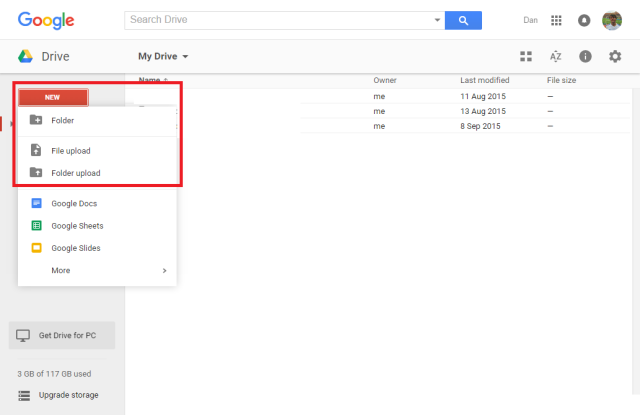
The alternative method is to use the menus within Drive. Click on New in the top left-hand corner, and then select either File Upload or Folder Upload, depending on your desired action.
The progress of the upload can be monitored via the status bar in the bottom right-hand corner. This is also where you can cancel an upload once it has started.
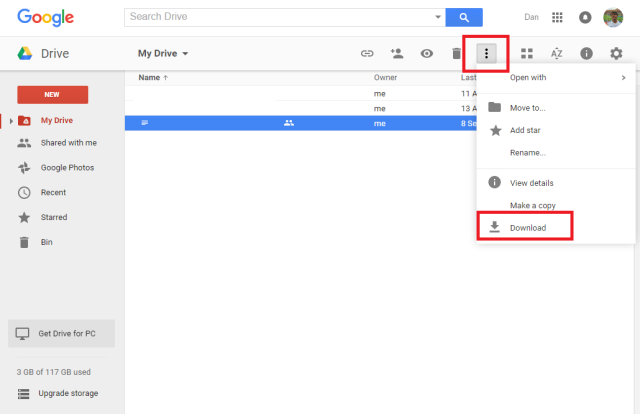
In the same way that you can upload individual files or entire folders, you can also download files and folders.
Simply select the item you wish to download and either right click on it and choose Download, or click on the three vertical dots for More Actions and choose Download. If you want to download more than one file/folder at once, hold either Ctrl (Windows) or Cmd (Mac) and click all the items you require.

If the selected files are above a certain size, Google Drive will automatically put them into a ZIP format before downloading. Make sure you have a tool to unzip them installed on your computer.
As previously mentioned, the file sizes for uploading are restricted.
For example, Google Drive cannot support any file that is larger than 5 TB. At the same time, files that have been converted to a Google format are further limited in size:
Creating a new Google document from within Google Drive is a straight-forward process.
Simply click on New in the top right-hand corner and select the type of document you wish to create. A blank file will immediately be launched, and you are ready to start working.
You can rename the document by clicking on “Untitled Document” and entering the file name of your choice.
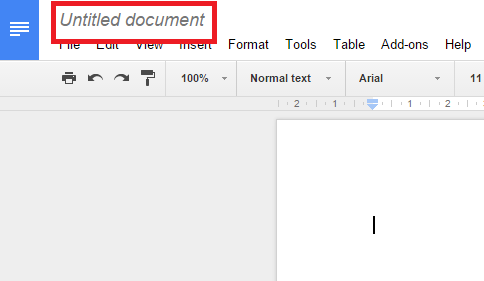
Any changes will be immediately saved, and the document will automatically synchronized to your Google Drive account.
You can also create non-Google documents by clicking More and launching a third-party app that you have installed. As with Google documents, any changes you make to the third-party program will be automatically saved and reflected within your account.
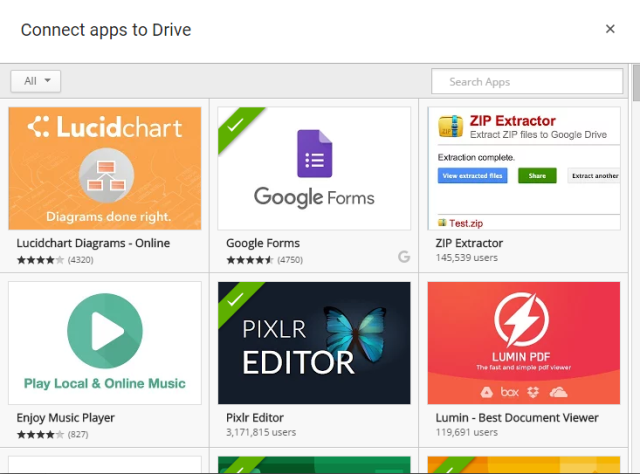
You can add third-party apps through the Google Web Store or by following New > More > Connect more apps from within Google Drive. To remove third-party apps from your account, enter the Settings menu in the top right-hand corner, then choose the Managing Apps tab. Scroll down to the app you want to remove, click Options, and select Disconnect from Drive from the dropdown menu.
Google Drive makes it incredibly easy to share files and folders in your account with other users. Sharing a file will let others read, edit, and comment on it, depending on which privileges you grant.
To begin sharing a file or folder, highlight the item in your file list within Drive and either click on the sharing icon, or right click on it, and select Share.
You will then be presented with a pop-up window that allows you to customize your sharing settings.
You can either get a “sharable link” by clicking Get sharable link in the top right-hand corner, or you can select individual people by entering their email addresses in the box below.
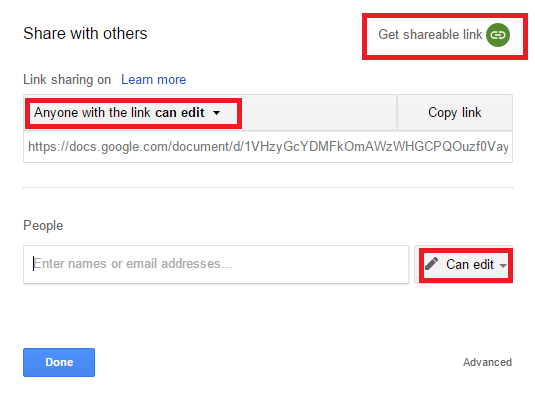
Set the necessary privileges by using the relevant dropdown menus.
If you chose to get a link, you will need to share it with anyone you want to access the file/folder. If you entered email addresses, the person will receive a notification in their inbox that will give them access.
Anyone with editing rights will have complete control over the file. The only things they will not be able to do is delete the item or transfer its ownership. You can change the ownership of the document to someone who you are already sharing the file with by clicking the dropdown menu next to their name and selecting Is owner.
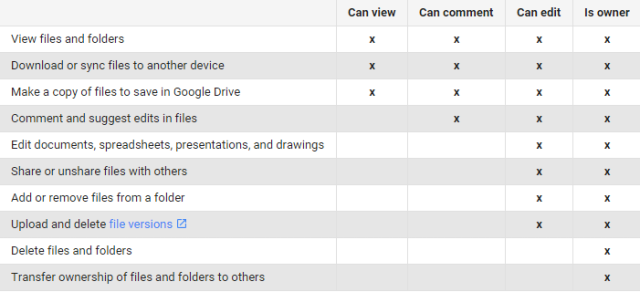
Clicking on Advanced in the bottom right-hand corner of the pop-up window will offer you some additional “Owner Settings”. These include the ability to prevent users who only have view and comment privileges from downloading, printing, and copying the file, and the ability to prevent editors from changing other people’s privileges and adding new people to the share list.
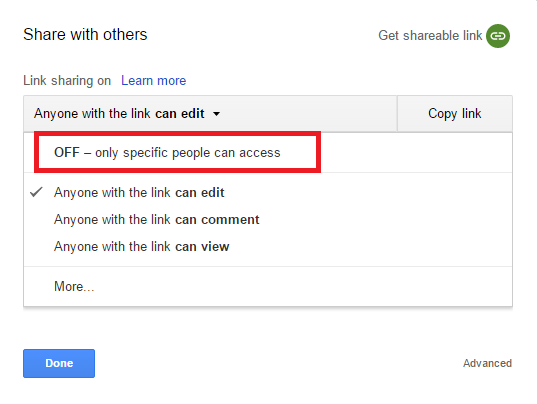
To stop sharing a file either click on the “X” by the person’s name that you want to remove (if you shared with individuals), or select OFF – only specific people can access from the dropdown menu (if you set up a shareable link).
Finally, if someone has shared a file with you, you will find it under Shared with me in the main menu on the left-hand side of the screen.
Giving someone editing privileges over your file will automatically allow you to collaborate on the document in real-time.
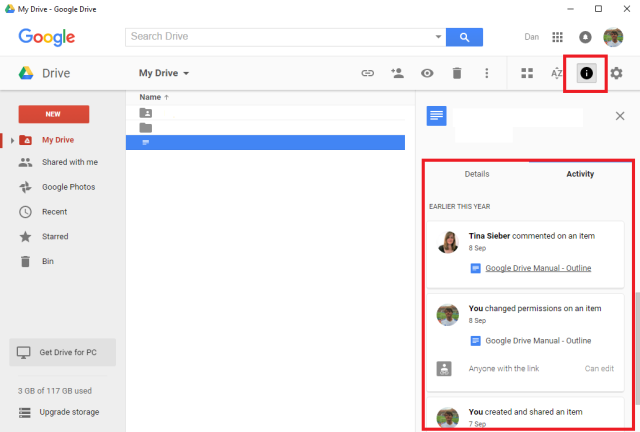
You can keep track of the changes being made through the Google Drive interface. To see a complete history of all changes made to all files in your drive, click on the Information icon next to the settings gear. To just see the changes for a single file, make sure the file is highlighted before you click on information.
The activity history will show you changes surrounding moving, renaming, uploading, sharing and un-sharing, and most significantly, editing and commenting.
It is important to note that only 50 people can edit a document at the same time, and you can only share a document with a maximum of 200 people. To allow more people to look or work at a file, you must choose to give access to Anyone with the link or make it Public on the web. You can find these link sharing options under Share > Advanced > Change…
Google Drive enables you to view and edit your documents when offline – perfect for when you need to work while travelling or in a café without an Internet connection.
Offline access is individually controlled for each device. To turn on offline access for the computer you are currently on, you need to access the settings menu by clicking on the gear icon in the top right-hand corner and then selecting Settings.
Once there, make sure the checkbox next to Sync Google Docs, Sheets, Slides and Drawings files to this computer so that you can edit offline is ticked.
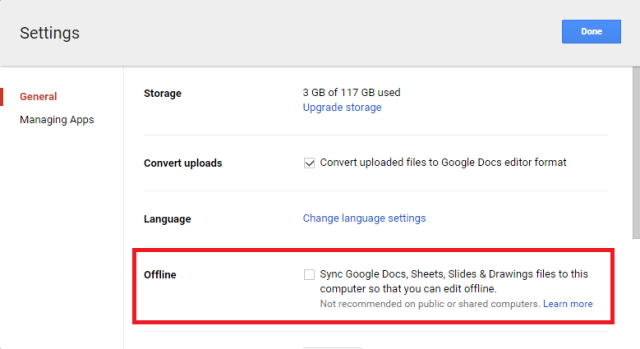
As per the warning under the option, you should not enable this feature on public or shared computers.
After the feature is enabled, you need to either use a Chrome browser or a Chromebook to access your Google Drive as you normally would. It will not work if you try to use a non-Google browser. The page and its associated documents will be displayed in the same way as they would be if you were online, and usage guidelines remain identical.
Any changes or edits you make will be uploaded and synchronized automatically as soon as an Internet connection becomes available again.
Only Google Docs, Google Sheets, Google Slides, and Google Drawings can be accessed offline. Google Sites, Google Forms, Fusion Tables, uploaded images, folders, Microsoft Office file extensions, and PDFs will be unavailable.
You can organize your Google Drive in much the same way as you can organize file and folders on your regular desktop.
Make a new folder by either clicking on New > Folder, or by right-clicking anywhere in the main panel and selecting New Folder. Once you’ve made the folder, simply drag and drop any desired files into it.
You can also “star” items that are particularly important. Either right click on the item you want to star, or highlight it and choose Add star off the More actions menu.
Any starred items will be listed under Starred in the menu on the left-hand side of the screen.
You can choose from two visual layouts – either a grid format or a list format. You can change between the two by clicking the relevant button near the top of the screen.

You can also alter the sort option by clicking the “AZ” button. The options are “Name”, “Last modified”, “Last modified by me”, and “Last opened by me”.
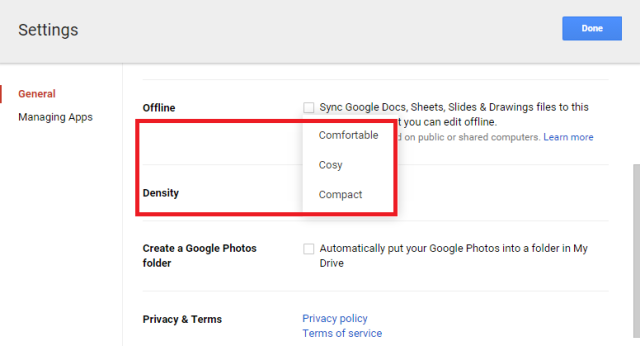
Drive also includes a Gmail-esque option to allow you to alter how densely packed the on-screen information is. Navigate to Gear > Settings, then scroll down to Density and select your preferred option.
Third-party apps can add a significant capability boost to your Google Drive account. We recommend the following.
ZIP Extractor lets you extract ZIP files from within your Google Drive. This is particularly useful if you need to upload a large file. Zip it up on your PC, upload it in a shorter time, and unzip it again once it’s safely in the cloud.
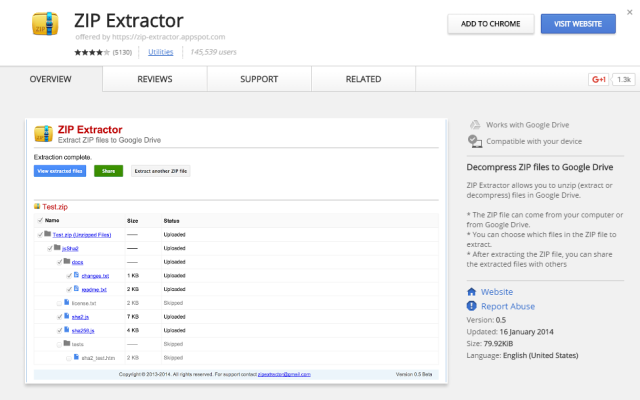
It’ll even let you choose which files within the ZIP file to unpack.
Fed up of receiving documents from people who don’t know how to add multiple pages to a scanned PDF?
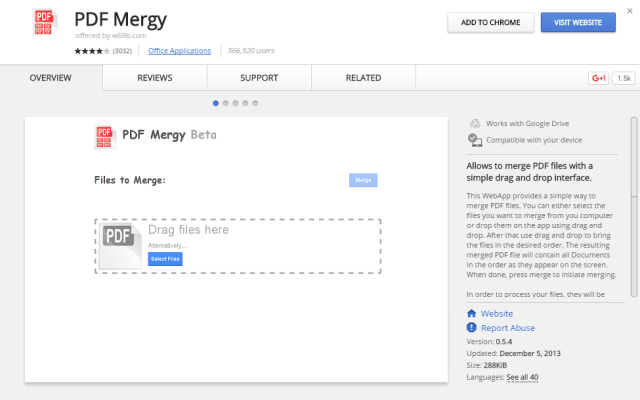
PDF Mergy lets you combine multiple PDF pages into one neat file using a simple drag and drop interface.
No matter how much we might love Google and their online range of services, realistically it’s still going to be a long time until we can all wean ourselves off the ubiquitous Microsoft Office forever.

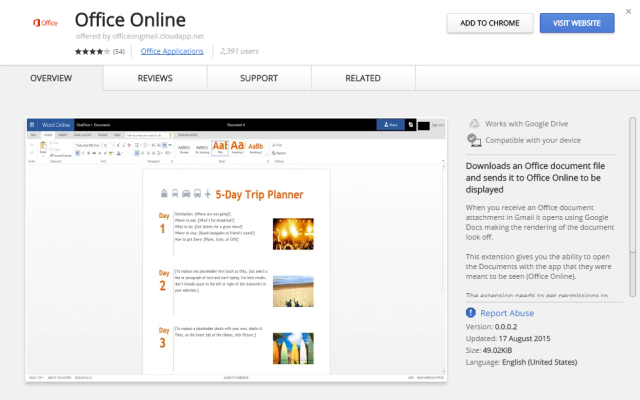
Office Online will force email attachments with an Office extension to open in Microsoft’s online suite, rather than opening an often poor rendering in Google Docs.
Murphy’s Law — everything that can go wrong, will go wrong — applies anything, even Google. Here we take a look at five common issues that people come across when using Google Drive.
We’ve all done it – accidentally deleting an important file or folder is incredibly frustrating, especially if you don’t realize until long after the event and you’ve already emptied your Recycle Bin several times over (if this happens to you, try using a special recovery tool).
Thankfully, Google Drive offers its own version of the Recycle Bin; it’s simply called “Bin” or “Trash“, depending on your region. The feature is accessible via the main menu in the left-hand panel (it’s the last item on the list).
Click on it, and you will see a complete list of all the files that you’ve ever deleted.
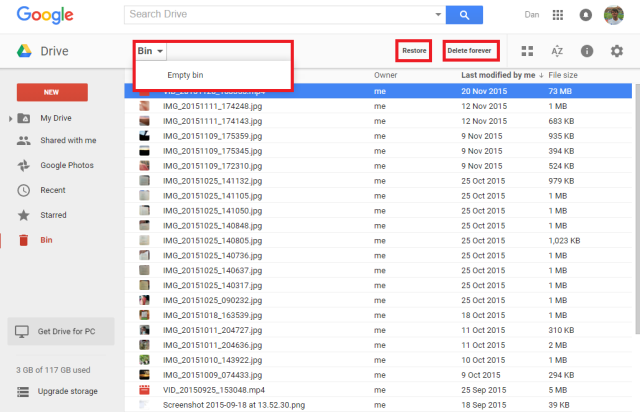
To restore an item, highlight it and click on Restore in the top right-hand corner. Similarly, if you want to permanently delete an item, select that option instead.
To empty the entire bin, activate the dropdown menu under Bin and click on Empty bin.
If you don’t find the available file, consider that it might have been a shared file and the owner either deleted it or stopped sharing it with you. In those cases, you need to contact the owner and ask them to re-grant you access.
If you cannot find the file in the bin, and you are certain you created it, Google claim they may be able to help you recover it for a limited time. You can contact them via their special web-form.
Windows and Mac users who use the Google Drive folder on their systems may occasionally get the following message: “An unknown issue occurred and Google Drive needs to quit“.
To resolve the problem, make sure that all background processes associated to Google Drive have been terminated and attempt to restart the program. If you get the message repeatedly, you might need to disconnect your computer from Google Drive, then reauthorize it.
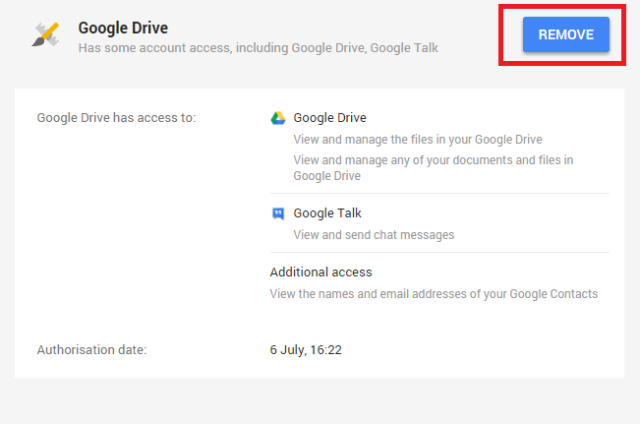
To do so, head to https://security.google.com and sign in with the same account that you use for Google Drive. Scroll down the list of apps until you find the Google Drive entry, then click on Remove. Once removed, sign back into Drive on your computer to re-establish authorization.
The problem could also be caused by an out-of-date Google Drive folder. Refer to the previous instructions for downloading Google Drive on a Windows or Mac, but ensure that you click Yes when you’re asked if you want to replace your current version.
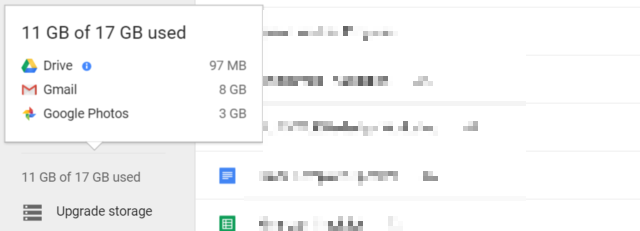
You may be presented with a message that reads “More Google storage is needed“, while you’re performing an upload.
To purchase more storage, log in to your Drive account and click on Upgrade storage in the bottom left.

You will be presented with a number of options. Select the one most appropriate for your needs and follow the on-screen instructions. Prices vary from $1.99 per month to $299.99 per month.
Alternatively, you can try to free up storage, for example by deleting emails with large attachments in Gmail.
When looking at the list of people that a file is shared with, you might encounter unrecognized or anonymous users. This may have various reasons.
The issue of not being able to share a document with a specific domain only arises when you’re using Google Drive through a Google Apps account. The problem occurs because your domain administrator has restricted documents from being sent or shared from outside a specific list of external domains – normally for security reasons. You will need to speak to your administrator or share the file by using Google Drive alternatives.
Google’s official Google Drive help channels are surprisingly robust, in-depth, and responsive.
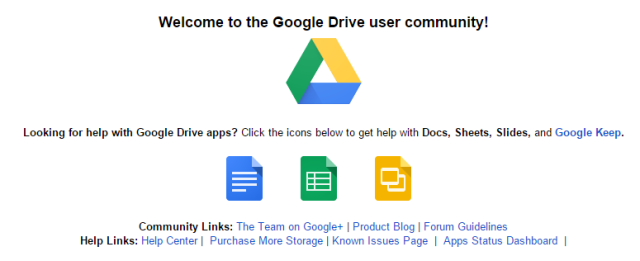
Your first port of call should be their online help guide. It covers all aspects of the Google Drive web client, the downloadable folders for Windows and Mac, and the accompanying smartphone/tablet applications.
If you cannot find the information you need, your next option is the help forum. It’s packed with Google Drive employees, non-Google product experts, and other users who may have experienced similar issues.
If you still can’t find a solution, try reporting the issue that you’re experiencing via the user feedback form. You can access it by clicking on the gear, then following Help > Send feedback.
Lastly, if all else fails, you can contact Google directly. They offer both telephone and live chat support (English only).
Google Drive is not for everyone – despite its obvious advantages, some concerns could put potential users off.
Perhaps the biggest disadvantage is the necessity for users to sign up for a fully-fledged Google account; it is impossible to create an account solely for using with the Drive service. That means you’re going to automatically get a Gmail email address, potentially start recording your search history without realizing, and have a whole new raft of security settings that you need to set up and manage.
If you’re a person who is concerned about Google’s privacy commitments, the NSA’s back-door entry schemes, or you are heavily invested in another provider’s suite of products (such as Apple or Microsoft), all that is going to set alarm bells ringing.
Despite the length of this guide, we know it’s barely scratched the surface in terms of Google Drive’s power and capabilities. The beauty is, once you get started, you will automatically discover the finer details. With this guide, you should be well on your way to Google Drive mastery.
What are the most important features that you think we missed out? Perhaps you’ve discovered some little-known secret or trick that will make your fellow readers’ lives easier? Maybe you don’t even use Google Drive; if not, why not? What do you use instead?
As always, we’d love to hear from you. You can leave us your thoughts, feedback, and suggestions in the comments box below.


 Redshirt Preview: An Alpha in Which You Play as an Omega
 What Are The Chances That A Machine Takes Your Job?
 Learn to Love Flying Again with These Secret Travel Tips
 Toy Soldiers: Cold War – Evil Empire / Napalm DLC Guide
 Dark Souls: A Time To Grind