The advent of superfast Internet brought with it masses of files to download. We encountered a similar splurge in files when photography became increasingly digitized. Suddenly, it was necessary to have a 1TB hard drive to store the swathes of beloved memories, with another one to store their accompanying soundtracks.
Every now and then, you’ll want to rename all of the image files. At other times, you’ll want to delete all of the music files. We’ll show you how to do that, plus a few other handy file-related things.
There are a few ways we can batch rename files using Windows. It can be done using File Explorer, the Command Prompt, or the PowerShell, and each are useful for different tasks.
File Explorer (formerly known as Windows Explorer) offers one of the easiest renaming options, but also offers the least flexibility in what we can rename to. To get started, grab all the files you wish to rename and place them in the same folder. You can press CTRL + A to select all files. Order them how you would like them following the rename. Select all the files you want to rename, right-click and select Rename. Once you enter the new file name, pressing Enter will take the base name (“pirateday” in the first image) and add a number to each following file.
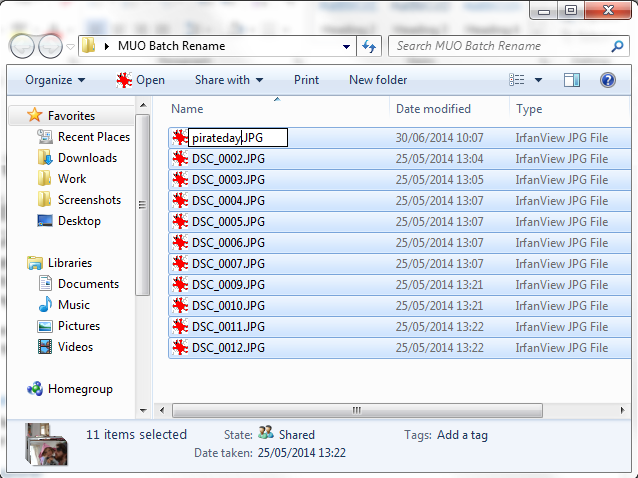
As you can see, it does the job, but doesn’t offer much flexibility.

For a bit more flexibility, we can use the Command Prompt’s rename command. The ren command allows us to rename multiple files at once, accepts the wildcard characters “*” and “?” and allows us to change file extensions as we go. The Command Line offers vastly more options for renaming than File Explorer.
Gather the files you wish to rename. In the same folder, Shift+Right Click and select Open command window here. This opens a Command Prompt with Administrator system rights, focused on your folder. To rename a single file, we use this command:
ren filename.jpg newfilename.jpg
To rename multiple files, we need to add to the command using the wildcard characters. For instance, if you have a number of files named in order, such as document01.txt, document02.txt, document03.txt, we can use this command to change the number:
ren document??.txt document3?.txt
The command will alter the digits in each filename in the folder. We can also remove small parts of the filename using another slightly different command. If you have a series of documents named “jan-budget.xlsx,” “feb-budget.xlsx,” “mar-budget.xlsx,” and so on, we can remove the –budget portion.
ren ???-budget.xlsx ???.xlsx
Finally for this section, we can rename the file type itself using the batch rename command. For example, if you have a number of .txt files and wish to rename them all to .rtf, you can use this command:
ren *.txt *.rtf
The * wildcard character stands in for the file names, allowing you to convert each file type as needed.
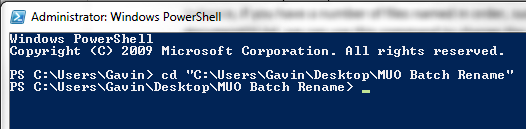
The Windows PowerShell offers the most flexibility for batch renaming files, and is the most powerful renaming tool built into Windows. Open the Start menu and search for windows powershell. Select the first option. Once open, you’ll need to use the cd command to navigate to the directory containing the files you wish to rename, like so:
We can now rename parts of the filenames. For instance, if we want to change the underscore of each file to a hyphen, we can use this command:
Dir | Rename-Item –NewName { $_.name –replace "_","-" }
This works particularly well with image files pulled from a digital camera. You can try this command to change the name:
Dir | Rename-Item –NewName { $_.name –replace "DSC","pirateday" }
Where DSC is part of the original filename.
As PowerShell is one of the most powerful tools available to us, we can use it to rename files throughout an entire directory. If you have a folder containing multiple files with a certain string – for instance “workbook-current” – a PowerShell command can alter each filename in the directory. You’ll have to navigate to the folder containing your files using the cd command, then you can run this command:
Get-ChildItem -Filter "*current*" -Recurse | Rename-Item -NewName {$_.name -replace 'current','old' }
This will change each filename containing “current” to “old,” and the command will apply to each applicable file.
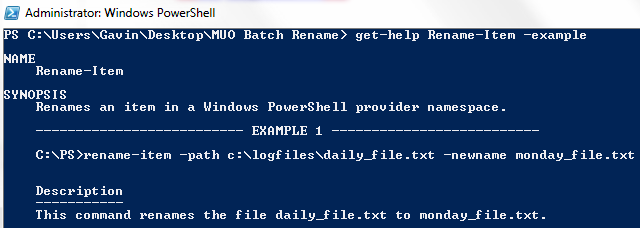
If you need more help, you can always examine the inbuilt PowerShell examples using this command:
get-help Rename-Item –examples
Finally, another handy PowerShell parameter is –WhatIf. The –WhatIf parameter specifies the command to be run in Report Only mode, meaning you can gauge the changes the command will make before hitting OK. For example, one of our previous commands would now look like this:
Get-ChildItem -Filter "*current*" -Recurse | Rename-Item -NewName {$_.name -replace 'current','old' } –WhatIf
If the File Explorer option isn’t powerful enough, but you don’t want to play around with the at times complicated commands, there are a few handy renaming tools available to you.
The Bulk Rename Utility is one of these. The slightly hectic UI is a visual display of the huge array of options available to command-line users. But if you take your time, you’ll quickly work out which options to toggle. You can use the Bulk Renaming Tool to alter filenames, add or remove numbers and lettering, swap extensions, and rename files based upon EXIF or ID3 data.
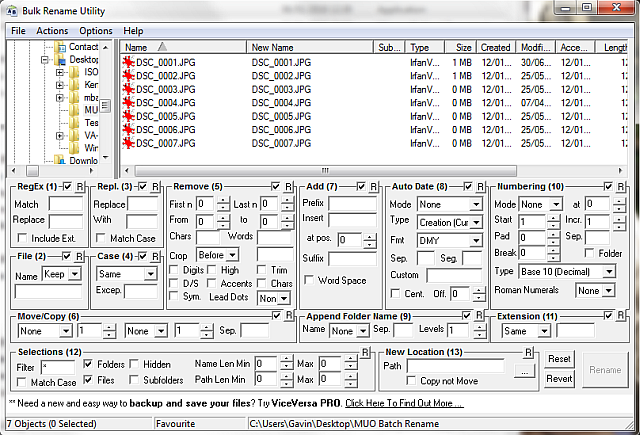
It comes with pretty comprehensive help documentation, and you can also seek out a number of tutorials.
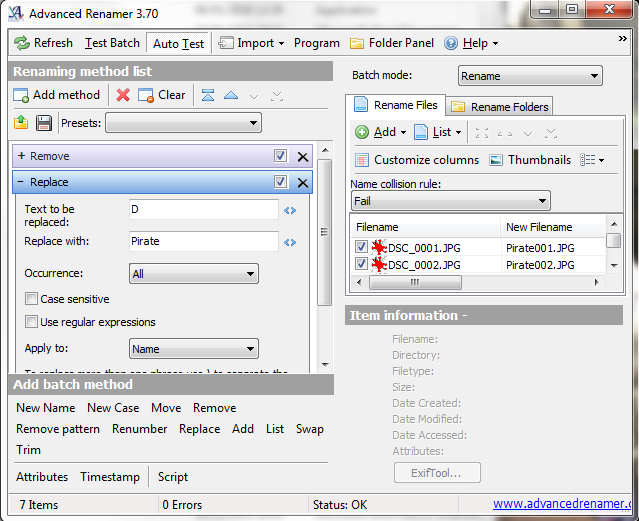
Another excellent tool is AdvancedRenamer, and it has much cleaner UI to navigate through. You can select from a number of “methods” and watch the potential result before committing to a change. The methods can be extensively configured, so the tool can be as simple or as comprehensive as required, plus your files can be copied or moved to a new location, following their batch rename.
Now, most people don’t have to regularly delete 500,000 files spread over 45,000 folders, but I’m sure we have all had the moment where your music collection is just no longer up to scratch. Deleting anything more than a few files using File Explorer can become a lengthy process as Windows opts to enumerate each file before sending it packing.
We can draw on a couple of tools for batch deletion of files. For some tasks, using the Command Prompt is a simple and effective method. For others, we will use a .bat batch file. There are also a number of third-party applications available.
We can use two powerful commands: DEL and rmdir. DEL is hopefully self-explanatory, while rmdir is the syntax for removing a directory. We can add additional parameters to the command for greater control over the files in a given directory.
Press Win+R, type cmd, and press Enter. To delete a single folder, we can use this command:
del C:\enter\your\path\here /f /s
The basic command locates the specified folder, while the /s parameter will delete all files contained in the directory subfolders, and the /f parameter ignores any read-only setting However, this command leaves behind the file structures, which can be a little irritating. In this case, we can pair del command with rmdir, like so:
del /f /s /q C:\enter\your\path\here > nul
rmdir /s /q C:\enter\your\path\here
We’ve added a couple more parameters, too. /q selects “quiet mode,” meaning you won’t be prompted Yes/No before your files combust. Nul is a special file that discards all data written to it, meaning Windows somewhat time-consuming enumeration process isn’t written to a file. Note that this will permanently delete your files.
Batch Files are essentially scripts you can run to perform certain tasks on your system. If you know how to build a series of commands, you can build lengthy scripts automating tasks and processes to save time. In this case, we will use some basic commands to script a batch delete.
For this example, I’m going to delete the MUO Batch Rename folder created for the earlier examples. Right click your desktop and create a new Text Document. Name it BatchDelete, and open it.
We will need to select the correct folder using the cd command. If you are unsure of the correct path for the folder, you can always right click, select Properties, and view the location there. Or, you can browse to the folder, and single click the address box to reveal the direct folder path. Either way, make sure you have the correct folder, because it is shortly to be wiped clean from your system.
Now that we know the path, we can create the batch file. Use these commands:
cd C:\enter\your\path\here
del * /S /Q
rmdir /S /Q "C:\enter\your\path\here"
You can now Save, and Exit. Locate your BatchDelete.txt file, and press F2. This time, we are going to change the file extension. Change .txt to .bat, and press Enter when you encounter a warning. Congratulations, you’ve just made your first batch file!
N.B: You’ll have to update the path of the batch file each time you have a bulk delete session. Or, you could have a single delete folder, and dump all your files in there, and rerun the batch file. However, depending on the number and size of the files you’re deleting, transferring them could be (is likely to be!) more time consuming.
Windows can run into some issues with filenames, resulting in undeletable files. In some cases, the original file may have become corrupted, and ends up with a ridiculous string of characters instead of something you’d already chosen. You may have run into this error message, too:
Cannot delete [file name]: The file name you specified is not valid or too long.
Specify a different file name
A Destination Path error can be quickly fixed using almost any archiving tool, such as WinZip or 7-Zip. Open the folder containing the offending file. Create a new archive in the same folder, then move a level up the directory tree using the small arrow. For example, this is the arrow in 7-Zip:

Once you’ve done that, you should be able to rename the file as normal from within the archive software, then delete when you’re finished. Check out this video if you’re a little lost:
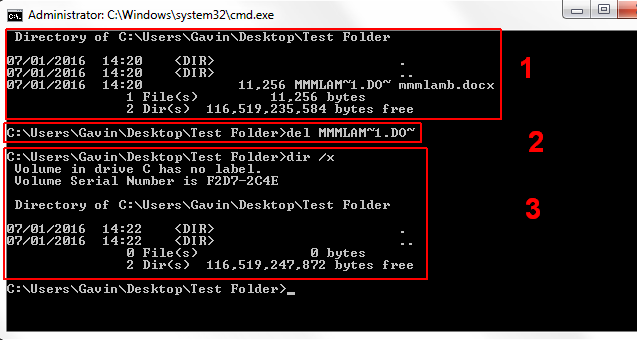
We can also use the Command Prompt to delete files encountering this error, though it is dependent on the containing folder having the right path length. If not, you end up in a whole new issue. Browse to the directory, Shift+Right Click and select Open command window here. Now use dir /X to see a list of the shortened filenames for that folder. You should then, using the same command window, be able to delete the files using their shortened filename, like so:
Whether you were renaming, deleting, or renaming to delete, I hope we’ve shed some light on how to tackle your issues. Rest assured, as with most things computers, chances are, if you’re pulling your hair out, someone else is already bald, and they might just have made a forum post about it somewhere (their file issues, that is, not their baldness!).
Have we helped? What are your favorite batch delete methods? Any extra tips on file renaming? Let us know below!


 The Minimap Plague
 Destiny: The Taken King: How To Farm Exotics With Three of Coins Exploit
 NBA 2K16 Wiki – Everything you need to know about the game .
 The Witcher 3: Wild Hunt Gwent Cheats, Tips and Tricks To Improve Your Skills
 How to get Forza Horizon M. Rossi Easter Egg, Pitch Black Matte and more for Xbox, Tips and Tricks