Michael: Go to the bank.
After the introductory scene ends, you control Michael. Get in the car and follow the yellow route to the destination marker at the front entrance of the Union Depository . There, Michael meets his gunman crew choice. You automatically switch to Franklin in the HW Cutter directly below Michael in the Metro tunnel excavation.
Franklin: Drill through the wall into the bank vault.
Steer the cutter forward, then veer rightward to the wall section marked by the yellow blip on your radar. Use the controls shown onscreen to activate the cutter blades and start chewing through the earth. This triggers a cutscene: the drill tears through the wall into the bank vault.
Park the cutter by the wall. Now you need vault access, so back the cutter out of the hole you just drilled and park it out of the way, in the spot marked by the new yellow blip.
As you do so, Lester reports that the vault’s seismic activity detectors have locked down the main door, cutting off vault access from inside the bank. This is good, but Lester adds that security teams may show up in the tunnels behind Franklin
Use explosive charges to blast open the vault doors.
When the vehicle is in the right spot, you get a new objective. Hop out of the cutter and hurry through the drilled hole to the first two vault doors, each marked as a yellow blip on radar. Gold bars are stacked on carts behind each one. Open your weapon wheel and select Sticky Bombs, then place one on each door. Stand back and detonate the charges.
Fight off the NOOSE teams.
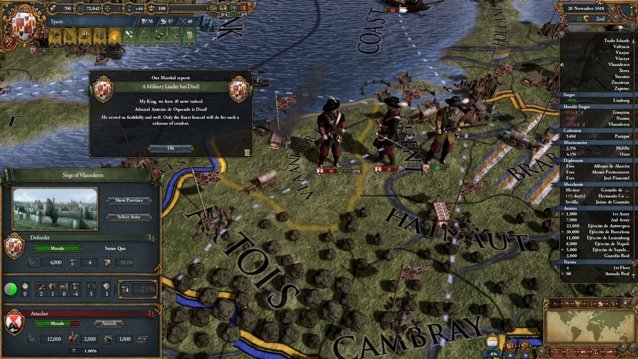
Now Franklin’s crew member begins his job rolling both of the heavy, gold-laden cads out of the vault and underneath the excavated hole for helicopter pickup. Unfortunately, NOOSE tactical teams start closing on your position from the tunnels. Franklin must now fight off these hostile teams.
Take cover and check your radar for red blips. The first team emerges from a tunnel to the right. Take them out, then rush past the cutter to meet a NOOSE team emerging from the tunnel on the opposite side. As you fight, note that the take amount shown in the lower-right corner is rising steadily! lf you can hang on, this truly will be a big, big score.
Shortly after you eliminate the second NOOSE team, a cutscene shows the two helicopters arrive: Franklin hooks a winch from one chopper to the first gold-filled crate. But another NOOSE team attacks from inside the vault and the battle is on again. Trevor then reports NOOSE units rappelling into the tunnel, and he has to pull his chopper out. Turn to face this new threat as gunmen drop down and deploy near the drill. When you take out the last of these attackers, you’re prompted to switch to Trevor.
Trevor: Fly out of the city.
Trevor is hauling a crate of gold with his helicopter; your crew,s driver pilots the other chopper, carrying the other crate. Lift upward, then simply head for the hills in the distance. The heavy load makes the controls a bit balky; try not to overcorrect when you drift. you,re then prompted to switch to Michael.
Michael: Escape with your gunman.
Michael is now fighting his way across the plaza in front of the Union Depository with the other gunman crew member. Note that you have a brutal five-star Wanted Level now. It doesn’t get any hairier than this, but remember-Michael’s special time-slowing ability is a great equalizer in such a battle. As always, go for headshots when time slows to keep your ability bar filled. When you reach the plaza’s far end, a police chopper suddenly glides across your path. Try to nail the pilot to take it down quickly.
Follow your crew downstairs and meet up with Franklin. Then fight your way across the long walkway connecting the bank to the Arcadius Business Center, across the street. Switch back and forth between Michael and Franklin to get better shots at enemies on the way. Use your high vantage point to pick off cops on the streets below. Stick with your crew as they advance along the walkways then back upstairs to the Arcadius plaza with the big sculpture.
Here, another police helicopter banks hard around the building and makes a pass overhead. This chopper’s shooters are particularly deadly, so stay behind cover until you get a good shot angle, then activate Michael’s special ability and nail the gunmen and pilot. Fight across the Arcadius plaza and descend the stairs on its opposite side. Follow the walkway all the way around to a staircase that descends to the street. Then turn left and run down the ramp into the parking garage where you stashed your getaway car earlier.
Your ground team is almost free now. But several NOOSE units roar into the garage in their armored SUVs so take cover behind pillars and take them out. When you finally eliminate this last threat, hop into your getaway car and drive out of the garage.
Lose the cops!
This is a brutal five-star Wanted Level, but if you souped up your ride at the mod shop earlier, you have a chance to outmaneuver and outrun your pursuit. When you finally get clear of the cops, Michael checks in with Trevor, who is running into some Merryweather entanglements.
Follow your pilot and target the Merryweather choppers.
Switch to Trevor now! Stay on the tail of your team’s other chopper as you climb over the iconic Vinewood sign. Lester reports that three Merryweather choppers are just over the hill, blocking your way to the hijacked train where you’ll drop the gold crates. Lester grabs an RPG and you get instructions: help Lester target the enemy choppers by flying close to them at the same height level. If you do this, Lester picks off the Merryweather birds one by one.
The flight path gets tricky as you veer through the Ron Alternates Wind Farm t and its spinning windmills atop the hills. As Lester explains, you must destroy all three enemy choppers before you reach the train or else your gold transport is revealed and the job is blown.
Drop the gold into the train car.
Once you get past the windmills, bank to the right and follow the train (the blue radar blip) down the tracks an engine pulling a single flatcar. Maneuver the crate directly over the flatcar and press the button indicated onscreen to drop the crate onto the car.
Land at the airfield.
Follow the yellow map blip to McKenzie Field up in Grapeseed. Land the chopper on the destination marker to trigger the jubilant mission-ending cutscene: the big one is done, at last. Trevor and Michael join Lester in the chopper to help him get the gold in storage. When the mission ends, you control Franklin.
Gameplay:
Be Sociable, Share!
 How to fix The Expendabros Resolution issues, Update Error, Multiplayer mode issues, Lag and FPS issues, Crash issues etc
 Citizens of Earth Wiki – Everything you need to know about the game .
 The Outside Perspective
 Check out Fabolous She Wildin ft. Chris Brown
 Madonna releases her new album Rebel Heart