Nym’s Nightmare is another creative and good-looking Escape Games by Selfdefiant. I love all of his Escape games, as they are Logical, Creative and the Design is unique. His latest release, Nym’s Nightmare, is really easy, but there’s one tricky puzzle. Read on to find out ;)
NOTE: You see the Table on the right-side (Top-Right corner of the floor)? Take the MAP (white piece of paper), from the Table (near Bottom-Right corner) if you so desire. However, it’s NOT necessary. Especially not if you’re going to follow this Walkthrough :D
NOTE 2: The navigation Arrows are located on each side of the game. Down Arrow is located on the Bottom of the Game Screen, meaning, right above the Menu Bar, at the bottom of screen. The Left and Right Arrows are located on the Left and Right-side of the screen. The arrows are only Visible when they’re available!
1. Click on the Object with all those Shapes on it, on the Table (Right-side), to Zoom in. Note the order they’re placed. Also, notice that the first Shape, the Triangle, has 3 Edges, the Square has 4 Edges, the next Shape has 6 Edges, and the last one, the Square, 4 Edges! By doing this, we’ve actually discovered a code: 3464
2. Zoom out (click on Arrow, bottom of game screen), and then click on the Rectangle-Shaped Grey Code Box, left to the Door in the middle. Input the code we exposed previously, 3 4 6 4, and press the E button, in order to open the door – enter!
3. Move Left, and take the BROOM, near Trash Can on Left-side. Move Right, 3 Times. Look at the Middle-Top of the screen. Do you see the Key stuck up there? Well, use the Broom to push the key down. Once it’s fallen, and is idle on the ground, take the KEY. Move Left!
4. Notice the Stars’ Edges on the Wall, and their colors. BLUE = 5 Edges, GREEN = 6 Edges, RED = 8 Edges. Now don’t get your hopes up, because we haven’t generated a code by doing this, because this Code has another pattern. Move Left Twice :)
5. Look at the Top-Right Corner. Do you see the Rectangle-shaped, colorful objects up there? Notice the order they’re placed in, from Top to Bottom (Descending order), and also remember the Colored Stars with different edges from before. Well, the Colors of the stars, correspond to those Colorful Objects up there. Remember this order: RED – BLUE – GREEN – BLUE, and if you recall the number of edges of each of those colors, you can generate this code: 8 5 6 8 – Move Left (lol, watch out for the Trash Can)!
6. Click on the Code Box, which the Yellow Star on the wall is pointing at, to Zoom in. Do you see that the Digits in the Code Box are also placed from Top to Bottom, just like the object from previous step? Well, what are you waiting for, type, or rather click the digits to match this:
8
5
6
8
Once done, click on the Button, right below the last Digit, the most bottom one, in order to open the Box. Take SMALL COG, Zoom out (Arrow on Bottom), and Move Right 2 Times!
7. Click on the Panel, on the right-side of the Door in middle (looks just like the Code Box in its Top-most part), to zoom it in. Forget about the Code and Numbers on the Left-side for now, let’s just focus on the Circles and Arrows on the right.
You see the Circles and the Arrows, pointing in different directions? Let’s forget about the Line that’s connecting them together, cause that’ll just confuse you.
From LEFT to RIGHT:
Circle #1: It’s obvious that this one is DOWN
Circle #2: This is where everything gets confusing. Since the Arrow is on the RIGHT-side of the Circle, while the 3rd Circle is on the LEFT-side of its Circle, it means that the Arrow on this Circle, is not the 2nd in line, but the 3rd. It’s confusing, yeah, but think of the Dark-Grey Line that is connecting all of the Circles together, as a guide that shows that the correct order of a circle is from LEFT to RIGHT, and this can then be thought: the Left-side of a Circle is before the Right-side – and the Circles in the middle are pretty close to each other, if you remove the Connecting Line in your head.
Another Theory: Remove the Line connecting the Circles in your head (the Dark Grey one), and if you look closely, you can see that the Top-Middle Arrow pointing Right (Circle #3), is actually closer to the Left, than the Bottom-Middle one. So, if you can also remove the Circles in your head, and then look at the location of the Arrows from Left to Right, you can discover the code ;)
This Arrow is pointing LEFT!
Circle #3: This Arrow pointing RIGHT, is actually before the one on Circle #2. Look at the theoretical explanation above!
Circle #4: This is also obvious. It’s the last one, and pointing RIGHT
You can finally generate this code: DOWN, RIGHT, LEFT, RIGHT – Circle 1, Circle 3, Circle 2, Circle 4! Zoom out, by clicking Arrow on Bottom.
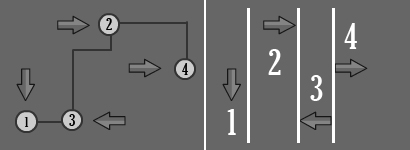
Possible Solution. The Circles and Lines may be an Illusion to distract the mind from seeing the Top Arrow before the Bottom one!
8. Move Left. Use the Silver Key in your inventory, on the Door in middle, to unlock it. Enter! Click on the Red Toolbox (Near Top-Left corner of the Floor), to zoom it in. Remember the Code we generated earlier, well, use it here. From LEFT to RIGHT: DOWN, RIGHT, LEFT, RIGHT, or click from LEFT to RIGHT, without touching the Arrows (all pointing UP), click them in this order: 2 Times, 1 Time, 3 Times, 1 Time!
Click on the Button, right below the Arrows, to open the Toolbox. Pick up the BOLT CUTTERS / HAMMER, Zoom out (Bottom-Arrow), and leave the room, by clicking on Down-Arrow!
9. Move Right, 3 Times! Use Bolt Cutters / Hammer, on the Lever, near Middle of the Wall ahead of you (the Lever with Red Handle). Take the BIG COG (The Black Circle-shaped object, which was spinning a few seconds ago, on the wall), and Move Left 3 Times!
10. Enter Door. You see the Machine right in front of you. Look at its most Top-Left part (the one that looks like the letter Y, with a big Cirlce). Place the Big Cog on the small Black Circle, in the middle of the Big Cirlce (which again is in the midle of the Y-shaped part of the Machine), and the Small Cog on the small Black Circle, which is located right below where you placed the Big Cog. Take the KEY, which just appeared, and leave the room by clicking on the Bottom-Arrow!
11. Move Right 2 Times. Use Black Key on the Door, to unlock it, and enter! You see all the Red Rectangle-shaped “Buttons” on the Machine. Well, click on them, to Active Power. Also, notice the 4 Lines and the Lines inside them, on the Monitor:
— = Long Line
– = Short Line
x = Nothing
Each Line has 3 Parts. In the First Part (Most left one), there can be a Long Line, a Short Line, or nothing. On the Second Part (Middle one), there can either be a Short Line, or nothing. In the Third Part (Most right one), there can either be a Short Line or nothing, just like the Second Part!
1. — x x
2. — – –
3. – x x
4. x – –
or
1. First Part: Long Line, Second Part: Nothing, Third Part: Nothing
2. First Part: Long Line, Second Part: Short Line, Third Part: Short Line
3. First Part: Short Line, Second Part: Nothing, Third Part: Nothing
4. First Part: Nothing, Second Part: Short Line, Third Part: Short Line
Remember this, and Leave the Room (Bottom-Arrow)!
12. Click on the Panel, Right-side of the Door (Looks similar to the Code Box, Left to the Door), to Zoom it in. For this Code, Focus on the Numbers on the Left-Side (forget about the Circle and Arrows). Find the Lines, that look just like the ones we saw in that Room on the Monitor, and remember, the Lines we found earlier, were placed in an Descending Order (Top to Bottom), so the code you find, the Top Line must be the first Digit:
1. — x x = 6
2. — – – = 3
3. – x x = 1
4. x – – = 5
or
1. First Part: Long Line, Second Part: Nothing, Third Part: Nothing
Number: 6
2. First Part: Long Line, Second Part: Short Line, Third Part: Short Line
Number: 3
3. First Part: Short Line, Second Part: Nothing, Third Part: Nothing
Number: 1
4. First Part: Nothing, Second Part: Short Line, Third Part: Short Line
Number: 5
Code: 6 3 1 5
————
Zoom Out (Bottom Arrow). Click on the Code Box, Left-side of the Door, to zoom it in. Type the code just found: 6315, and press E. Enter Door!
13. Enter the Door in the Middle. Move Right 2 Times. Move your Mouse/Cursor over the Dragons, and you’ll find out that each one has their own color in the Eyes. This time, it’s also a Descending Order, meaning that the Colors are in the order from Biggest/Largest to Smallest/Tiniest:
Biggest (Most Right-side): BLUE
Big (Most Left-Side): YELLOW
Small (Middle): GREEN
Smallest (Left to Middle): PURPLE
Code: BLUE – YELLOW – GREEN – PURPLE
Move Left 3 Times!
14. Open the Bottom-Drawer on the Small Table, next to the Sofa. Drag the Pieces of Paper, anywhere else on the screen, and take the LIGHTER. Zoom out (Bottom-Arrow)! You see the Painting/Picture, above the Sofa? Hold and Drag to the Right (Only Drag it as much as when you see 4 Colored Bars. Any further than its limit, may cause the Painting to follow the Cursor after releasing Mouse Button)! Change the Colored Bars, from LEFT to RIGHT, according to the Code we discovered: BLUE, YELLOW, GREEN, PURPLE
If you DON’T touch the Bars right after unveiling them, follow this, from LEFT to RIGHT:
Bar #1: Click 2 Times (BLUE)
Bar #2: Click 4 Times(YELLOW)
Bar #3: Click 7 Times(GREEN)
Bar #4: Click 0 Times(PURPLE)
Once Done, click on the Grey Button, near Bottom-Left corner of the 1st Bar, the most Left one. Take the DART, and Move Right!
15. Move Back (Bottom-Arrow). Enter Left-side Door (or Click on Left Arrow). Use Dart on the Balloon, in the Middle of Top-Left corner, and Top-Middle of screen, in order to pop it. Take the KEY that fell down. Also, notice the Level of the Position of the Bars on those Pipes:
From LEFT to RIGHT (There are only 3 Levels of Heights):
Bar #1: Top
Bar #2: Bottom
Bar #3: Middle
Bar #4: Top
Bar #5: Middle
Position: TOP, BOTTOM, MIDDLE, TOP, MIDDLE
Move Right, in order to leave the Room!
16. Enter the Door in Middle. Move Right! Click on the Code Box, next to the Door in middle, to Zoom in. Remember the Bars from the previous step, set the position of these Bars, as the position of the Bars in the other room, from LEFT to RIGHT: TOP, BOTTOM, MIDDLE, TOP, MIDDLE, or click them as following, without touching them from the beginning (all set on TOP), from LEFT to RIGHT:
Bar #1: Click 0 Times (TOP)
Bar #2: Click 2 Times(BOTTOM)
Bar #3: Click 1 Time(MIDDLE)
Bar #4: Click 0 Times(TOP)
Bar #5: Click 1 Time(MIDDLE)
Once done, press E, in order to open the Door. Enter!
17. Use the Lighter on the Candle (Middle Left-side of screen), and take the DIAMOND from where the Spider was. Move Back (Bottom-Arrow). Move Right, and insert Diamond on the small Diamond-shaped Spot, just below the Sword, on the stone. Once that is done, take the SWORD, and Move Left 2 Times!
18. Use White Key on Door, to unlock it, and Enter. Place the Sword on the Stone, at the Left-Corner of the Edge of the Cliff. Move Forward by clicking on the Opening in front of you (at the other end of the bridge). Move Left, and click on the 2nd Pumpkin from Left to Right, and quickly take the SCREWDRIVER from underneath it. Move Right!
19. Move Back 2 Times (Bottom-Arrow), and then Move Left. Use the Screwdriver on the Top Drawer of the Small Table, Left to the Sofa. Take the BEAKER (Glass used in Science/Lab), and zoom out (Bottom-Arrow)! Move Right, Enter Door, and Move Forward by enter the Opening on other side of Bridge. Now, Move Right!
20. Use the Beaker (Glass used in Science/Lab) in your inventory, on the standalone Pot. Click on the Plant’s Mouth, to make it open it. Take the KEY, and Move Left. Use the Plastic Key on the Door in front of you, and ESCAPE!
————-
WOW, this took me almost 2 Hours to finish o_O
Anyways, enjoy. Was it helpful?
Prid

 Mario & Luigi Paper Jam unlock Secret Boss, Dry Bowser
 Interview With James. C. Burns Of Call Of Duty: Black Ops
 How to level up and gain XP in Destiny beta
 What To Get For the Wii U Owner In Your Life
 How To Fix Fallout 4 Stuck On Terminals Bug