As we revisit the Tomb Raider world after Tomb Raider: The Definitive Edition was released 31st January on PS4 and Xbox One, we’re now on the hunt to attain all of the collectibles throughout the gameplay.
What are Treasure Maps for? There are a total of 14 Treasure Maps located across the map and their purpose is to reveal the locations of all hidden Relics, GPS Caches and Documents within a given area. Once you’ve collected all of these Tomb Raider 2013 items, you’ll receive either 125 achievement points or 6 bronze trophies and 1 gold trophy.
How to use Treasure Maps in Tomb Raider? As you pick up a treasure map, it will update your map with icons pointing to the hidden collectibles in that specific area. We’re here to assist you with the locations and co-ordinates for all of these maps to help you attain all Collectibles Achievements and Trophies. Follow on to discover more…
#1. Coastal Forest Treasure Map
Co-ordinates: 712382, 3416112 
Head over to the second campsite within the coastal area and locate the bridge in the center of this area with beams arched above. Walk to the right of this bridge to find a low hill next to the cliff wall. Walk over this and hop from the close platform to the beam that spans the bridge. Continue across the beam and leap across to the boarded platform and take the zip line down towards a table. This first treasure map can be found on the table reveals all hidden items within this area.
#2. Mountain Temple Treasure Map
Co-ordinates: 712430, 3416148 
Head over to the cave located near to the waterfall and the base campfire at the Mountain Temple. Move through the waters towards the waterfall and the cave will be visible on the left hand side. The treasure map will be found in the cave on top of a crate, revealing all of the hidden items within this area.
#3. Mountain Village Relic Treasure Map
Co-ordinates: 712453, 3416210
Complete Tomb: Tomb of the Unworthy 
Locate the tomb at the southern point of the Mountain Village, by leaping across the room via the central cage hanging from the ceiling, reach and light the torch and return to the cage. Now, use the torch to burn the bags that are hanging upon it and leap back to the upper ledge and push the metal cage off the edge. Hop on to the metal platform that rises and jump off to your left. Using your ax to climb up the wall, follow the corridor around to grab this Relic treasure map, revealing all of the hidden relics within this area.
#4. Mountain Village GPS Cache Treasure Map
Co-ordinates: 712522, 3416230
Complete Tomb: Hall of Ascension 
Locate the tomb entrance at the northern point of the Mountain Village and raise the platform up in front of you to the side of the bridge and use it to reach the right wall. Just before you operate the lift, head to the left and crank the shutters closed to stop the wind. Now, wait a few seconds after closing the shutters, turn the crank, scramble up on to the box to the side of it and jump over to the lift as the shutter opens. This will now carry you to the far side of the room and high enough for you to jump against the wall. Grab and shimmy across the ledge towards the left until you are able to climb up above. Follow the corridor and you will reach a chest and a GPS Cache map revealing all of the hidden GPS Cache’s within this area.
#5. Base Exterior Treasure Map
Co-ordinates: 712390, 3416289 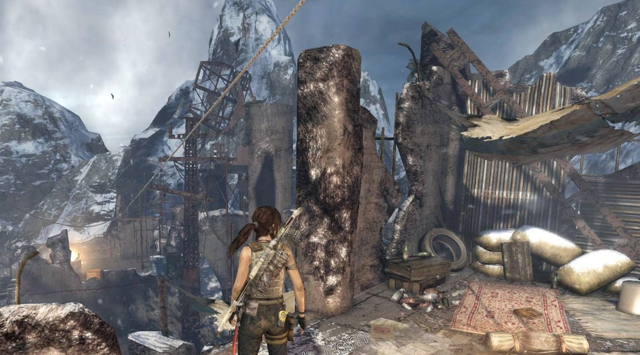
Use the zip line located at the Radio Tower Base Camp and head towards the barrel on fire to the left of your landing position. The treasure map can be found on a crate next to this barrel.
#6. Shanty Town Relic Treasure Map
Complete Tomb: Well of Tears 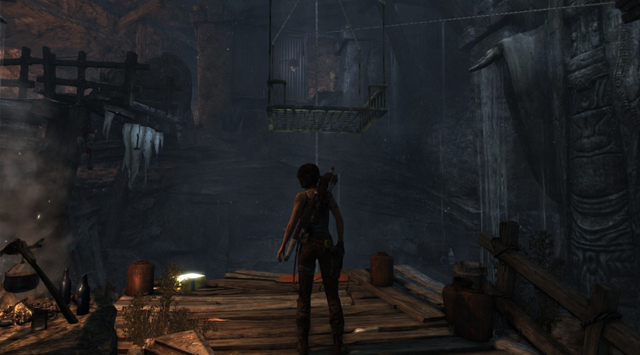
As you arrive at this tomb, you will find a lift surrounded in several gas canisters. Pick up three of these canisters and throw them onto the lift, forcing it to drop lower, enter this lift and jump on it forcing it to drop to the ground. Once you reach this lower level, throw the canisters off the lift and sprint up to the ledge where you originally entered. Jump back on to the rising lift and then hop on to the ledge on the left hand side. A chest containing the Relic Map will be found as soon as you pull yourself up. Use this map to detect all of the hidden Relics within this area.
#7. Shanty Town GPS Cache Treasure Map
Co-ordinates: 712390, 3416289
Complete Tomb: Chamber of Judgement 
Locate the tomb inside the cave behind the windmill, as you enter collect the gas cans dotted around the room and place onto the end of the platform close to the entrance. You will now need to break three platforms where the cans are situated. The first platform is to the right, use your rope arrow to swing the tire to destroy the platform behind. The second platform is found in the centre of the room above the fires, knock it down by throwing the other gas cans on to it. The weight will drop the platform down as well as the gas cans. Grab another can close to the large statue to the left side of the room using the ramp to reach it. Place all of these cans on the end of the ramp and jump to climbable wall ahead. Scale up and left to discover the chest containing the GPS cache map.
#8. Geothermal Caverns Treasure Map
Co-ordinates: 712708, 3416013 
Starting at the Catacombs base camp, head north down the hill to discover some wooden scaffolding. Climb up the beams until you reach the top where the treasure map can be located.
#9. Summit Forest Relic Treasure Map
Complete Tomb: Stormguard Sanctum 
Locate the tomb just past a bridge in the northeast area of the forest. As you enter, ignite the hanging torches ahead and above and then fire an arrow through the green gas cloud above and left. The explosion that is caused in response to this action will drop debris from the ledge above, allowing you to climb the wall blocking your path, Climb and jump forward, using your axe to make your way through the opening containing a chest offering the Relic treasure map.
#10. Shipwreck Beach GPS Cache Treasure Map
Coordinates: 712491, 3416001
Complete Tomb: Temple of Handmaidens 
Locate the tomb on the beach and use the crank to raise up a cage submerged in the water, allowing the buoy to pass. Jump up to the left ledge, swing across the pole and fire a rope arrow at the rope below, causing a bar to pull out of the way allowing the buoy to pass. As it hits the next bar it turns another pole ahead of you, jump across this and over to the climbable wall. At the top you can find a chest containing the GPS Cache map.
#11. Shipwreck Beach Relic Treasure Map
Co-ordinates: 712533, 3415966
Complete Tomb: The Flooded Vault 
Locate this tomb to the south point of the Shipwreck Beach head up the stairs and switch the power on using the green button. Return to the ground floor and open a large door using another green button. Head through this door, burn the cloth to the left, enter the room to the right and shotgun the wooden barricade. Using your rope arrow, pull the boat in close towards you; jump onto it and then up to the right platform. Lara can now de-electrify the water for a brief moment, allowing passage by shooting her rope arrow at the bundle of rope above. Now, sprint towards the stairs located on the far side an guide the boat beneath the electrical wire. Once the wire is on the boat, jump into the water and head towards the stairs and a chest containing the Relic treasure map.
#12. Cliffside Bunker Treasure Map
Co-ordinates: 712561, 3415929
Reach the bunker, enter the gun battery and head through a hole in the wall to the left. The treasure map can be found on a pile of sandbags near to the wall in this outdoor area you will arrive in.
#13. Research Station Treasure Map
Co-ordinates: 712433, 3416048 
Reaching the bottom of the elevator shaft, a large door will become visible, head through it and along a corridor until you reach a stack of boxes. This treasure map can be found behind this stack of boxes.
#14. Chasm Shrine Treasure Map
Co-ordinates: 712594, 3416259 
Pass the camp and enter into the next room containing a large pit. Use the ramp to the left side of the room to reach the second floor and follow the catwalk. Hope over the gap and discover this final treasure map on a crate.
If any of the above instructions were unclear then check this video below for a more visual description:
Have you got any Hints and Tips for Tomb Raider? Let us know in the comments below.
If you enjoyed this, here’s a few more you’ll definitely enjoy:


 Location of all Dark Souls II: Scholar of the First Sin DLC Keys
 Chivalry: Medieval Warfare (PC) Classes tips
 MGS 5: The Phantom Pain how to become a Hero or Demon
 Mr. Philips Mission Guide In Grand Theft Auto V
 MechWarrior Online Heralds the Return of Mech Simulators