Unofficial Hidden Chronicles
Guide by Mongoose General for
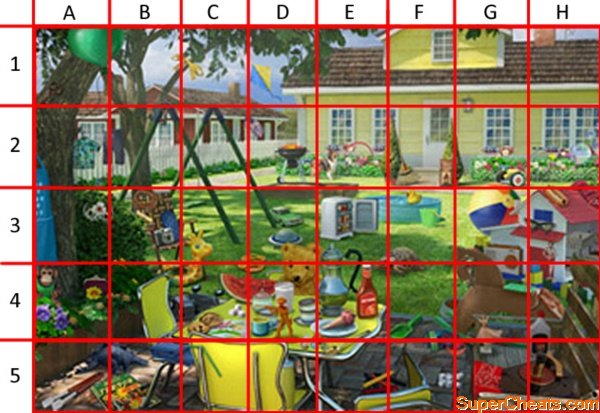
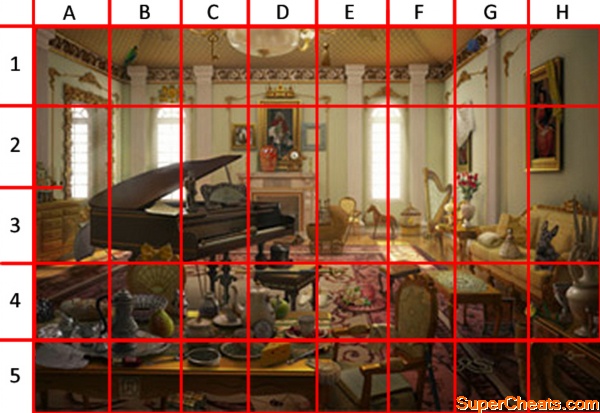
Hidden Chronicles marks a departure from many of the other popular Facebook games, especially those by Zynga, the social gaming behemoth. It is a 'hidden object' game, which essentially means you spend a lot of your time examining painstakingly-crafted pictures for particular objects. Each object that you find earns you points. You get more points depending on how quickly you find the objects that are listed at the bottom of the screen. These points can be shown on a leaderboard, which is where the first social element to the game comes into play. You can obviously compare your statistics with your friends and this encourages you to replay scenes that you have already cleared. If you get stuck on a particular item, you can request a hint. Don't forget... Don't spoil the fun of this game by looking at our solutions first, we recommend you try your best to find the solutions yourself, and only when you've had a good go, then refer to our solutions. Have fun! And remember, it's the journey that counts not the destination! Coins are the main currency in Hidden Chronicles. They are used to purchase most things in the game, and while it is not as transaction-heavy as other Zynga games, you will still want to build up as many Coins as possible. You can see how many Coins you currently have at the top of the screen. Cash is the premium currency in Hidden Chronicles. This means that it is incredibly hard to acquire, with the game very rarely giving it out for free. You do get some Cash every time you level up, but otherwise you are largely expected to purchase it using real money. You can see how much Cash you have at the top of the screen. As with most social games on Facebook, there are no cheats for Hidden Chronicles. The whole premise behind the game is to test your memory, if you've played a scene multiple times, and your reflexes if you haven't. If you could skip this or somehow make it easier, the fun would be taken out of the game. If you find anyone offering to give your free Cash or for you to download something to make the game easier, they are probably just trying to gain access to your computer or your Facebook account. The only way to remotely 'cheat' at Hidden Chronicles is to buy Cash using real money or complete surveys to get it for free - that way you are essentially getting ahead of everyone else. Energy is required to perform most tasks in Hidden Chronicles. Most importantly, it is needed to search during the hidden object scenes that make up the bulk of the game. Each scene requires 8 Energy to play. After this, you will need to wait for your Energy to recharge before trying again. You can see how much Energy you have at the top of the screen. Reputation is the social currency in Hidden Chronicles. You can acquire Reputation Points through interacting with your friends in the game. This includes tasks such as visiting neighbors, hiding things on their land for them to find, and playing Fast Find games with them. Reputation Points are used not only to show off about your social prowess, but to unlock new items for your estate. Estate Points: Buildings: The bulk of Hidden Chronicles is made up of hidden object scenes. These are images that you are shown where you must locate a list of items in a crowded scene. To access them, you can click on Ramsey Manor itself, or on the play button in the bottom right-hand corner of the screen. You will then be shown a total list of all of the scenes that you are able to play at this point. You unlock scenes as you go along, and you can actually see any scenes available to unlock, as well as the requirements for doing so, beneath them. Below you will find a guide to the majority of the scenes in Hidden Chronicles. These will inform you of the majority of item locations in every scene - although be warned, some items have a random placement and you will just have to find those ones for yourself! Feel free to add in the comments if you have found an item that we have not included. You can include the grid reference to help other players out. This Fast Find map must be unlocked by asking Friends and Neighbors for materials. It is a Wild West themed scene. Ace: A1 Spring Egg Hunt - Fast Find Another Fast Find map, this shows a country house and lavish garden, with lots of natural items to find. To unlock this scene you need two crewmembers. Antenna: F1 This Fast Find map features a living room which, clearly, no one has been living in for some time! To unlock this scene you have to ask friends and neighbors for the required amount of minerals. 8 ball: C5 This Fast Find map looks like paradise, but there's a hellish amount of potential items for you to discover. Arm Floaties: D4 Use the guide below to find all the items in this scene. You will need friends and neighbors to send you the required amount of materials to unlock it. Accordion: E5-F5 Another exotic location with loads of animals and items to find. Andean Cock: A1 A cursed place with tons of loot for budding explorers to unearth. You will unlock it by requesting the required amount of materials from friends and neighbors. Alligator: G2-H2 Snuggle up in the warm away from the cold weather outside while you search for the items listed below. Again, unlock this scene by requesting the specified amount of materials from friends and neighbors. Axe: G2-H2 Geisha Tea House: Ball: A5 This scene is set in a theater - people seem to have left plenty of objects behind for you to locate! Abacus: B5 Explore this picturesque Japanese scene. Abacus: B5-C5 This stuffy, stifling room brings back memories of an ancient ritual. Alligator Skull: G3-G4 This must have been where the archaeologists rested and examined their items after inspecting the Mummification Chamber. Alabaster Cup: D3-E3 When a group of Flappers get together for a party, this is the end result. Lots of lavish items strewn about the place. Ankh: E2 From the dig site to the museum, there are hundreds of archaeological trinkets littered around this scene. Ashtray: A3-A4-B3-B4 The title needs no further explanation on this one! Apple: C4 Goldie's Kennel is like heaven for a dog. Hardly a kennel really. Ballerina: G2 This scene is basically an i-Spy with Dogs! Tons of dog breeds make up the majority of the items to spot on this level. Afghan Hound: B3-C3 Positively sedate is how this scene feels after the madness of the dog-infested last one. Baby Shoe: B4-B5 A picture in pink would sum up this scene nicely. Airplane: G1 Time for a rare trip outdoors at nighttime. As well as a beautiful view, you have a picnic to rummage through and the stars to admire. Acorn: C4 A glimpse into the room of a young baby, complete with toys and even some pets. Alphabet Blocks: D5-E5 There are not so many items in this scene, many of them are writing/work related. Ammo Belt: C4-C5-D4-D5 Books, books and more books. Apple: B2 An eclectic selection of items have been collected in this shop. Alarm Clock: G3 A shop stuffed full of delicious candy. See if you can resist the urge to eat the items you are supposed to be spotting! Almonds: F4 This flowery porch could do with a bit of a clean-up, but it's a haven for item spotting! Airplane: C2 The scene for this level involves a thatched cottage and bustling garden. Airplane: C1-D1 This old castle even has a suit of armor to be discovered. Armor: A2-A3 A creaking boat is the setting for this scene. Use the list below to match up the items you need to find with their grid location. Apple: G5-H5 A St. Patrick's Day theme resonates throughout this particular scene.
Accordion: D3 Another suburban garden makes up the bulk of this scene. Antenna: H1 This historic ship marks the setting for this scene. Ace: B3 From the Queen's ship to her palace. Apple: D4 It may be a stereotypical setting for 'love', but there's no denying its effectiveness. Battery: E1 Here's another level to celebrate all-things Valentine's Day. This time the setting is a romantic restaurant. Baguette: B4-C3-C4 After a romantic dinner, the next logical step is...a wedding ceremony. Ace: H5 The rich Asian decor shows just how illustrious the owner of this particular room is. Arrow: D5-E5-F5 Celebrate Chinese New Year with the Colonial Hong Kong scene. Abacus: A1 Perhaps the clearest symbol of China in all these scenes is this bold dragon. Ace: D5 This secluded and ramshackle building is home to Bessie. Banjo: E4 This scene takes place around a bank vault. Alarm Clock: H4-H5 What exactly was fateful about this picnic? Maybe the eggs were off. Airplane: E1 This is what happens when you break into bank vaults! Ashtray: B5-C5 It's not possible to be on the run without stopping at a Diner like this. Bananas: A3-B3 Most treehouses are secluded, mainly because they're in trees... Bandage: H2-H3 Another secluded level, nestled amongst the trees. Bicycle: E5-F5 An ornate fountain with lots of flora and fauna to spot. Animal Tracks: C4-D4 What could be inside the Pavilion? Axe: G4 This retreat seems to have been untouched, almost for centuries. Arrow: G3-H3 The Paris Bistro level features one interactive item, which is the match, seen below in D5, and drag it to the candle in C3. For a full list of static items in this level, and where to find them, see the list below. Bicycle: B2-B3 This famous train houses another large set of items: Baby Bunny: E3 The last of the 'free' maps and also the last in the Scarlet Stones trilogy, the Thief's Lair is a dingy attic stuffed full of interesting items for you to find. The 'super clue' for this puzzle is that you need to 'level the scales'. You need to drag the additional weights onto the right-hand side of the scales to level them off. The theme of this set of scenes is music, and this one takes place in a workshop making instruments. Apron: H2-H3 The last scene was largely focused on violins. This one has intruments of all types. Ashtray: H4-H5 Central Park There are heaps of items to find in this scene. Angel Wings: E2 From natural and serene to artificial and dingy. Beanbag: D3-D4-D5 Time to explore the world some more with the Journey in Jade scenes. Armadillo: A3-A4-B3-B4 Who would just leave that treasure lying around? Agave Cactus: E2-F2 Time to mix things up a bit with an underwater scene. Bell: G2-G3 This scene takes place in a creepy shop. Ball of Yarn: G1 The final scene from this set. To do spot the difference, simply match the grid reference next to an item below with exactly the same position on the opposite side. Basket of Fruit: D2-D3
Another element to Hidden Chronicles is that you have a space which you can decorate and manage, which integrates elements from some of Zynga's other games, such as CityVille. You can visit your friends' areas and they can come to see yours.
The story behind Hidden Chronicles is that your uncle Geoffrey has passed away but requested your presence at Ramsey Manor, his illustrious country house. The idea is to explore Ramsey Manor and unlock all of the rooms and areas, some of which are windows into the past, facilitated by a special genetic trait that your character possesses.
Coins
How to earn Coins:
The best way to earn Coins in Hidden Chronicles is to complete scenes. You get more money from completing scenes if you get higher score. Second to this is completing quests. These will often earn you a good bundle of Coins, as well as XP and items. Remember that you can also sell items should you not need them for your progression. A third way to get Coins is to interact with the game's social feeds. These will frequently list items and gold, while visiting neighbors and actually being social will reward you with Coins and Energy. The game features a gifting system where you can leave gifts for your neighbors and vice versa, earning 50 Coins each time. As with all these games, you can also buy coins using your real money!
Cash
How to get free Cash:
Note that you are also able to earn Cash by completing certain offers or filling in surveys. Keep an eye out for links informing you of extra ways to earn Cash, as these are the way to find such offers and surveys.
Cheats
Energy
If you run out of energy, you must either wait for it to recharge, which occurs at a rate of 1 Energy every 5 minutes, or you can use an Energy Boost. These can be purchased with Cash or gifted from friends. Bear in mind that once you level up, your Energy will be totally refilled. This means you should try to use up as much Energy as possible in the moments immediately preceding levelling up. This way you won't be wasting the refill.
Reputation, Friends and Neighbors
Your Neighbors in Hidden Chronicles are incredibly important. You will need them to help you by joining your 'Crew' which is required to build certain new structures on your estate, as well as to gift you items - a huge part of the game if you want to succeed. There is also a mini hide-and-seek game where someone comes onto your estate and hides a package for you to locate. Once you do find it, you will receive bonuses. You can obviously return the favor and hide something on their estate too. Like many Zynga games, there is a daily bonus available - you will receive it for every day you visit your neighbors' estates.
As explained above, you are also able to play Fast Find games with your friends. You can do this once a day, earning Reputation Points which unlock new items in the game's marketplace.
Other Currencies and Resources
Estate Points allow you to unlock additional hidden object scenes which in turn allow you to complete quests. You are able to earn them by decorating your own estate as much as possible, and building new structures.
Experience:
As with the vast majority of social games, you can earn experience in Hidden Chronicles, the more you do. To elaborate, you will earn Experience by finishing quests and performing hidden object scenes as well as possible. Experience is required to advance and move up through the levels. Every time you level up you receive 1 Cash as well as more Energy. It also unlocks all-new items for you to use via the marketplace.
Clues:
In order to be able to expand your estate and unlock new areas, you require Clues. These are not hints that inform you of object locations, rather they are a type of currency in Hidden Chronicles. You can earn Clues by completing quests or through gifts from your neighbors.
Trophies:
Trophies are earned by completing hidden object scenes within Ramsey Manor. You can earn five trophies for each scene. Unlocking trophies will help unlock new scenes and areas of land.
Your Estate
Hidden Chronicles isn't just about those hidden object scenes. In fact, there is a robust building and estate management section to the game which evokes memories of other Zynga titles. You can buy all the items you need by interacting with the marketplace at the bottom of the screen. Decorations will make your estate look nicer and make it more individual if your friends and neighbors come to visit. Decorations also earn you Estate Points, as mentioned above. If you need an instant injection of these, simply purchase and place them.
In addition to decorations, of course, there are standard buildings. These normally have certain requirements that must have been fulfilled before you can purchase them, and take a set amount of time to complete construction. Often you will need to request assistance from your neighbors, which can involve them sending you items, or staffing them up into your crew to help in the building. If you are the unsociable type, or simply don't want people interfering in your business, you can use Cash to advance through the stages without of this inconvenience.
Should you want to sell a building, you can do this by clicking the Tool icon at the bottom of the screen. Inside this menu you will see the option to sell. Obviously, selling generates you some of the resources that were exerted when building the structure, but you will not keep the Estate Points earned from it.
Expanding:
When you inevitably run out of space in your estate you will have to unlock new areas to build on. You can see areas that you can unlock by clicking on one of the darkened areas of your map. You will then be taken to a new menu which tells you the exact requirements for unlocking the desired expansion. It is worth clicking around all of the areas on offer as they will have varying requirements based on their contents. Unlocking new areas will always require Trophies, Clues and Coins - you can see details on how to earn all of these resources above.
One of the biggest advantages to unlocking new areas is that you may find certain treasure or objects on them that you can only access by gaining these particular sections of land.
Hidden Object Scenes
Click the picture of a scene to enter it, then click the scene to start the timer and start searching. You will see a list of items appear at the bottom of the screen. You can take as long as you want to find these items, but bear in mind that your score will receive bonuses based on the speed at which you can find all the items and complete the scene. Note that the speed at which you find consecutive items is also important - this acts as a sort of multiplier, so if you find two items in succession within a few seconds, that will earn you more points. If you can chain items together quickly, like this, you will be sure to enjoy large points hauls while playing Hidden Chronicles.
Every scene has a certain number of items hidden within it. You will not receive the same items each time, and they are randomized. Nonetheless, the more you play a scene, the more chance you will have of being tasked with finding a particular item more than once. As a result, your speed at a particular scene should improve dramatically with time. You can also use our Hidden Chronicles scene guides to assist you with locating items as fast as possible.
Should you really not be able to find a particular item, you are able to use a 'Hints' system to reveal where the item is. The game prevents you from using the Hint button too many times within a short period, so it has to recharge after each use before you can employ it again. Having found all of the required items in a scene, you will visit the leaderboard. Here you can compare your score with all of your friends. This is also where Trophies are dished out. Trophies are attained when you reach particular points milestones - and you can see these by mousing over a scene at the selection stage.
Remember, you are also awarded points depending on how accurate you are. Blindly clicking the screen in the hope that you will find items will not work! When you play a scene your points will be collated and recorded. The more points and Trophies that you earn in a scene, the harder it will be the next time you play. Each scene has a maximum total of 2 million points, while you can get up to 5 Trophies in each.
Fast Find:
Fast Find is a game mode which you can play against your friends. The idea behind it is that you have a time limit of 60 seconds and then must locate as many items in a particular scene as possible. Your friend must try to beat your number of objects within the same time limit. As you are playing socially, taking part in a Fast Find object scene does not use Energy.
Scene Guides
To use these guides, look for the item name that you are searching for, then use the grid to find it on the picture. For example, if it says the candle is in C3, that means you search along the image from left to right until you get to the C column, then look down the numbers on the left, until you get to row 3. Where C and 3 meet you can find the item. Some items span multiple squares.
Stage Coach - Fast Find
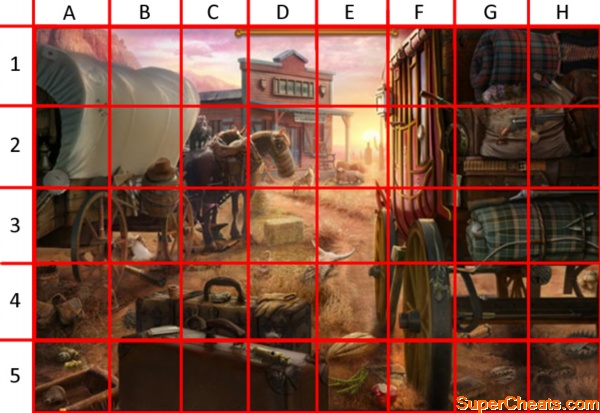
Yes, there's a tumbleweed
Ammo: G2
Arrow: G4
Bag of Flour: B3
Bandana: C3
Banjo: A2-A3
Book: G5
Boot: B3-B4
Bottle: E2
Bow: G3-H3
Bucket: A4
Bullet Holes: A2-B2
Buzzard: C2
Cane: F2
Canteen: A4-B4
Cat: D3-D4
Chair: E2
Coffee Beans: B4
Compass: G3
Corset: H1
Coyote: D2-D3
Doll: H1
Dynamite: G4-G5
Eggs: A5
Feed Bag: D2
Fork: G4
Fruit: E5-F5
Gloves: D4
Gold Nugget: A5
Hammer: F3-F4
Harmonica: B4
Hat: B2
Hay Bale: D3
Horn: B3
Horseshoe: F2-G2
Jacket: A2
Joker: E1-E2-F1-F2
Knife: F1-F2-G2
Ladder: D1
Lizard: F4
Loaf: E5
Lock: G4-H4
Mesquite Pods: E5
Mouse: A5
Mule: E2
Newspaper: F3-F4-G3-G4
Patch: A1-B1
Pipe: B4-C4
Potato: H4
Razor: H3
Revolver: G2-H2
Rifle: G3-H3
Saddle: C2
Saddle Bags: A4
Sage: G1
Skull: D3-D4-E3-E4
Snake: G5-H5
Spider: D5-E5
Spoon: F2
Spur: C3-C4
Spyglass: B4
Star: D4-D5
Tea Pot: A2
Tomahawk: B2-B3
Tortoise: C1
Trap: H4-H5
Trough: A5-B5
Tumbleweed: D3
Wanted Poster: F5
Whip: C3
Whistle: D5
Wooden Button: G2
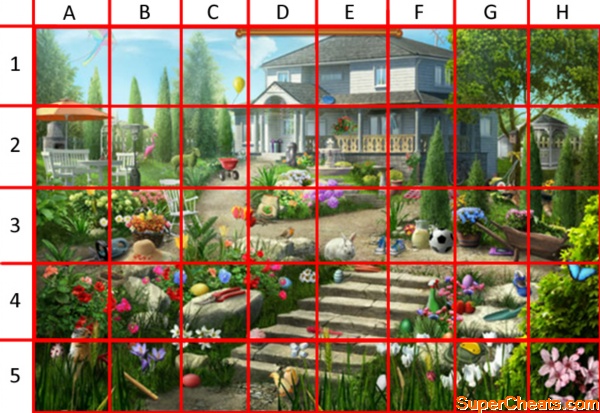
Someone needs to clean up this garden!
Archway: A2-B2
Balloon: C1
Barrel Planter: F3
Birdhouse: G2
Blue Egg: D4
Bicycle: F2-G2
Birdbath: E2-F2
Bird's Nest: A4-B4
Bunny: E3
Butterfly: H4
Carrots: E4
Cherry Blossoms: H5
Chicks: D5
Clay Pots: E2-E3-F2-F3
Crocuses: B5
Cupcake: D4
Daisies: D4
Dog: G3
Fertilizer: D3
Fireplace: A2
Flamingo: B2
Fountain: E2
Gazebo: G2-H2
Gift: D2
Gopher: A4-A5
Green Egg: F4
Hanging Plant: E2
Hand Rake: A5-B5
Heart: C1-D1
Heater: B2
Hedge Trimmer: A3-B3
Hydrangea: D3-E3
Kite: A1
Knee Pads: F5-G5
Ladybug: F5
Lawn Mower: G3-H3
Lemonade: F3
Marshmallows:D4-E4
Moat Statue: D2
Orange Egg: F4-F5-G4-G5
Patio Furniture: A2
Polka Dot Egg: A4-B4
Pruning Shears: C4
Purple Egg: G4
Rabin: D3
Red Egg: C5
Rock Candy: D5
Rocking Chair: B3-C3
Sandal: G4
Seed Spreader: C2
Sheep: C2
Sneakers: E3-F3
Soccer Ball: F3
Spade: G4
Spotted Egg: A5
Spray Bottle: F4
Strawberries: F4-G4
Striped Egg: E4
Sundress: E2-F2
Table Cloth: F3-G3
Throwing Disc: E1
Tool Shed: G2-G3
Tulips: C3-D3
Umbrella: A2
Video Game: G3
Wheelbarrow: G3-H3
White Egg: E4
Wicker Basket: B3
Yellow Bow: G2
Yellow Egg: C4
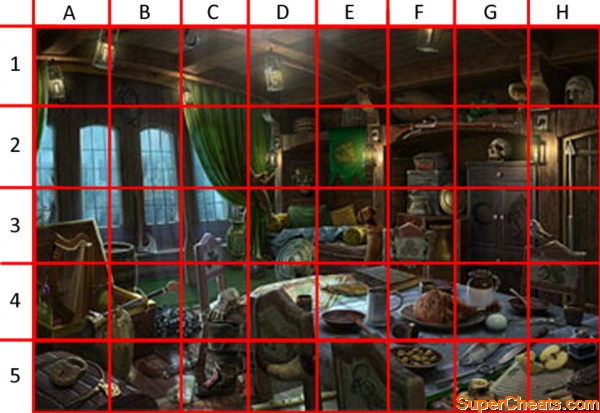
Living Room - Fast Find
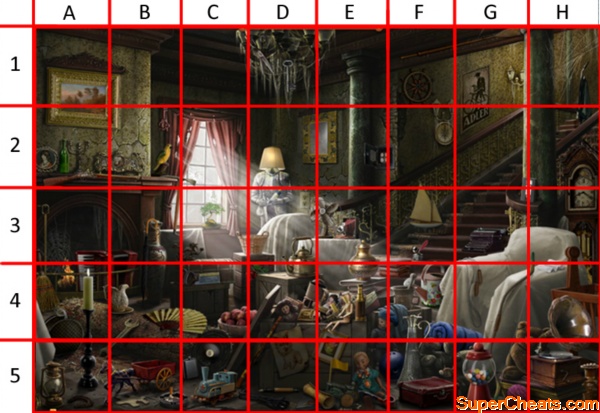
It's been many years since anyone sat down in this living room
Accordion A3-A4-B3-B4
Archer's bow: G4
Ashtray: B5
Bandages: H4
Basket of Apples: C4-D4
Beret: F4
Bicycle: G1-G2
Bird: B2
Bonsai: C3
Bottle: D3
Bowling ball: F5
Camera: E3
Candle stick: A4
Clock: H2-H3
Compass: F2-G2
Cradle: A4
Dragon: C3
Electric fan: E3
Extension cord: D5
Fire: A4
Flag: E5
Flask: C5
Flute: D4-D5
Folded cloth: F4
Fountain pen: D5
Framed leaf: E4-E5
Fuses: E3-F2
Golden urn: E3-E4
Green bottle: A2
Gumball machine: G5
Hand fan: B4-C4
Hand saw: C3
Hat box: A4-A5
Horse wagon: B5
Horseshoe: A5
Jump rope: G4
Kettle: D3-D4-E3-E4
Lampshade: D2
Landscape painting: A1-A2-B1-B2
Lantern: A5
Lighter: D4
Mirror: D2-E2
Mug: D4-E4
Necklace: E5
Oar: G1
Ornate jug: H5
Outlet: D3
Phonograph: H4-H5
Pick: B2-B3-C2
Pipe: E5-F5
Pitcher & basin: B4
Portrait: A2
Puzzle piece: B5
Quill: F3
Rifle: A2-B2
Rolled map: D5-E5
Rose: D4
Scissors: D1
Ship's Wheel: F1
Sleeping bag: F4-G4
Spyglass: E4
Steering Wheel
Suitcase: F5
Terrier: D5
Train: C5
Typewriter: G3
Umbrella: B3
Vacuum: H1-H2
VHS: G3-H3
Watering can: F4
Wicker basket: D3
Wooden doll: E4
Wrench: B4-B5
Yacht: F3
Yarn: G5
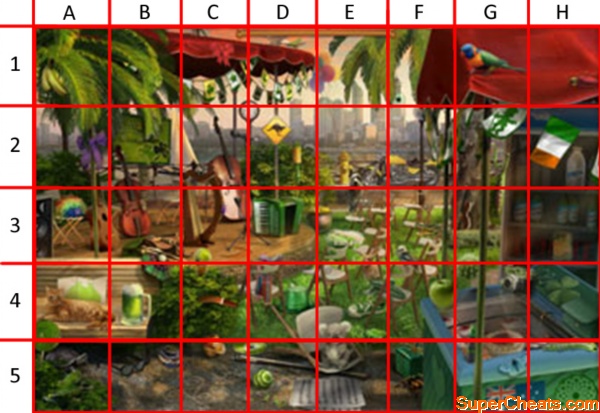
Tropical Beach - Fast Find
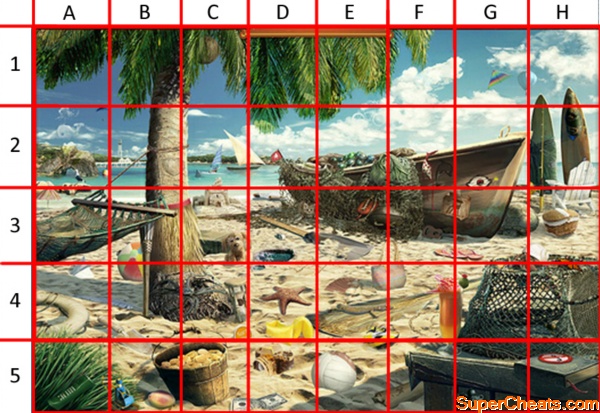
Watch out for sharks!
Bag: E4-F4
Balloon: G1-H1
Beach ball: B3-B4
Beach cruiser: E1 (in the clouds)
Bikini: F2
Book: H5
Bumble bee: H4
Buoy: A2-B2
Camera: D5
Castle: C2-C3
Cave: A2
Cell phone: A5
Chair: H2-H3
Champagne bottle: H1-H2
Coconut: C1
Dollar bill: C5-D5
Dolphin: F2
Eye: G2
Fan: E4
Feather: A4-B4
Fish: D2
Flag: D2
Flip flops: F3-G3
Flipper: D3-E3
Gecko: E4
Grass skirt: B3
Hat: A3
Heart: B2 (engraved on the tree)
Helicopter: B5
Hermit crab: G3-G4-H3-H4
Hour glass: C4-D4
Jet ski: E4-E5-F4-F5
Kayak: G1 (in the clouds)
Kite: G1
Kitten: D3-E3
Lifeguard stand: F3-G3
Life preserver: A4
Lighthouse: B2
Mango: B5
Message in a bottle: D3
Monarch: H3-H4
Moon: F4
Necklace: H4
No fishing: H5
Octopus: G5
Parachute: A2
Picnic basket: H3
Pier: B2
Plane: A3-A4
Puppy: C3
Ring: G4
Rod: H2
Sailboat: C2-D2
Sarong: H1-H2-H3
Scarf: E2-F2
Sea slug: F4
Seagull: A2
Shark: C2
Shovel: B4-B5
Soccer ball
Spider crab: B4-B5
Starfish: D4
Suitcase: C3
Sunglasses: A3-B3
Surf wax: C4-D4
Tic tac toe: D3-D4-E3-E4
Tide Pool: D3
Torch: B3-B4
Turtle: G3-H3
Treasure: B5-C5
Treasure map: E5-F5
Tropical drink: F4-G4
Ukulele: F3
Umbrella: A3
Volleyball: E5
Whale: A2 (in the clouds)
Windsurfer: C2
St. Peter's
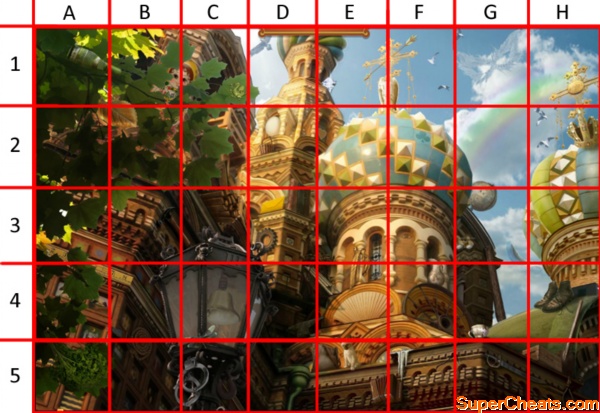
Some of the items in this scene are really hard to spot
Angel: E1-F1
Anvil: D4
Arrow: E1-F1
Axe: A4-B4
Basket: D2
Bear: D3-E3
Bell: C4
Binoculars: G3
Book: D2-D3
Boots: H4
Burlap bag: E5
Cat: E5
Club: F2 (as in the suit of cards)
Coin: H1
Crack: F5-G5
Crate: H5
Crown: H2
Diamond: E1
Dragon: C1
Dragonfly: C4-C5
Eagle: D1
Egg: D2
Envelope: D3
Eye: F3
Fan: E4
Feather: G1
Firewood: C2-C3
Gear: D3
Globe: G2-G3
Gold leaf: A2-B2
Grate: E3-E4
Hammer: B3-C3
Handcuffs: B5-C5
Heart: E2
Hook: C5
Icicle: F5
Log: G4
Mask: G1 (in the clouds)
Nesting Doll: B1-C1
Noose: H5
Parsley: A5
Pitcher: F3-F4
Rainbow: G1-G2-H1
Roman Numerals: C3-C4
Rope: B4-B5
Ruler: A3-A4-B4
Saber: G5-H5
Silk Scarf: E3-E4
Sled: D4-E4
Spade: H4-H5
Teacup: G4
Vodka: A1
Wheel: F4-G4
Machu Picchu
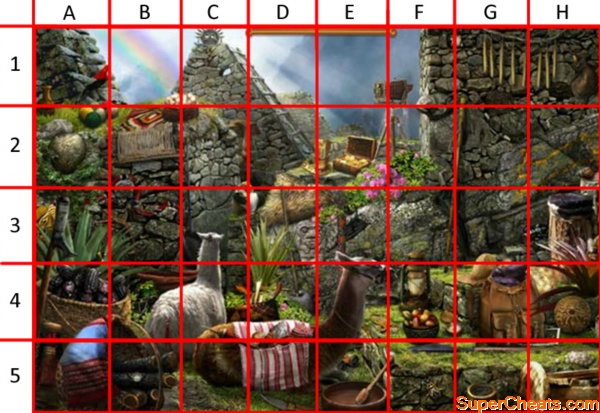
One of the wonders of the world, with lots going on
Antler: A3-B3
Axe: G3
Basket of wool: B1-B2-C1-C2
Bee hive: A2
Bell: E4-E5
Belt: E3
Binoculars: E5
Blanket: A4-A5
Bottle: G4
Bowl: E5
Camera: E1-E2-F1-F2
Candles: G1-G2
Clay jug: A1-A2
Coal shard: E3
Cocoa beans: F4
Colorful basket: B4-C4
Compass: F4
Cooking Pan: B3-C3
Corn: A4-B4
Cup: G5
Diamond ring: B5
Doll: A4-A5
Drop Spindle: C4-C5
Drum: H3
Firewood: B5
Five: C2-C3
Footprint: B5-C5
Gemstones: G3-H3
Goldfinch: A3-A4
Golden jewelry: D2-E2
Gold statue: H3
Guinea pigs: C3-D3
Hat: G3-G4
Hay: D2-D3
Inca Weapon: A3-A4
Knife: D5
Ladder: C1-D1-D2
Lantern: F3-F4
Leaf footed bug: F5
Llama harness: E3-E4
Map: G4
Mask: A3
Medallion: H4
Missing rock: C1
Mortar & pestle: D4
Orchids: E2-E3-F2-F3
Pearls: H5
Peruvian loom: B2
Poison Dart Frog: C4
Postcard: H4
Rabbit: G2-G3-H2
Rainbow: A1-B1
Red ribbon: B4-C3-C4
Rope: C2
Sandal: E4-F4
Shells: D4-D5
Snail: H2
Snake: A3-B2-B3
Spear: F5-G5
Spoon: E5
Stone face: D3
Stone frog: F1-F2
Stool: H5
Sun: C1
Treasure: E2
Umbrella: F3-G3
Violet potatoes: G4
Walking stick: F2-F3-G1-G2
Water pouch: H1
Woven pillow: C4-D4
Yarn balls: A2
Tut's Tomb
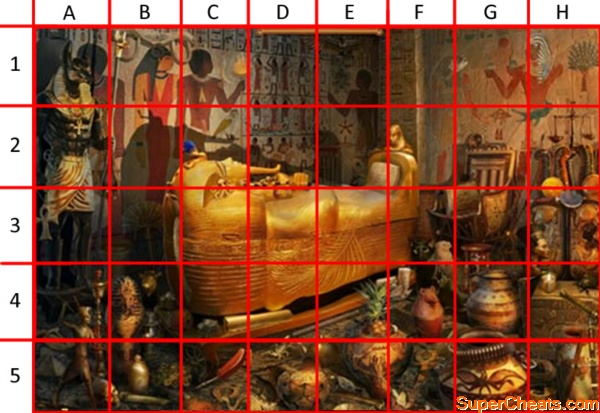
What will you discover in this lavishly decorated tomb?
Ammo Belt: G4-G5
Basket: F3
Bat: A2-A3-B2-B3
Beads: B2
Blue Orb: C2
Boat: D2
Bone: E5
Bow & arrows: G3-H2-H3
Box: C5
Bracelet: H5
Butterfly: H4
Candle: H4
Canteen: B5
Cat: F3-F4
Cigar: H2-H3
Coconut: B4-C4
Coin: H2-H3
Column: E1-E2-F1-F2
Comb: E2
Drum: A3-B3-B4
Fan: B3
Fish: F1-G1
Flower: E2 (the star-like image on the wall painting)
Flute: D4-E4
Frog: E1
Hat: F4
Hookah: A4-A5
Hourglass: G3-G4
Knife: B5
Lamp: B4-B5
Magnifying Glass: H3
Map: G3
Mirror: G2
Moon: C1
Mouse: G4-G5
Nefertiti: G3-H3-H4
Octopus: C2-C3
Owl:C2
Ox: B4
Palm: D3-D4-E3-E4 (markings on the sarcophagus)
Peacock feather: E2
Pick: A3-A4
Pillow: F3-G3
Pineapple: E4
Pouch: E5
Pyramid: A5
Quill: C5
Red Urn: F4
Revolver: A2
Ring: D2-D3
Rope: H5
Sandal: A4-A5
Scales: H2
Scarab: H4
Scorpion: D4-D5
Scroll: C4-D4
Skull: A5-B5
Snake: C5-D5
Sphinx: F2
Spider: C5
Striped Cloth: H1
Sun: G1
Sword: B2-B3-B4-C4
Tablet: E2-E3-F2-F3
Tea Pot: D5-E5
Telescope: H4
Torch: C1
Treasure: B5-C5
Tree: H1
Triangle: C1 (around his neck)
UFO: G2
Waves: E1
Wings: G2
Yoke: B1-C1
Ski Lodge
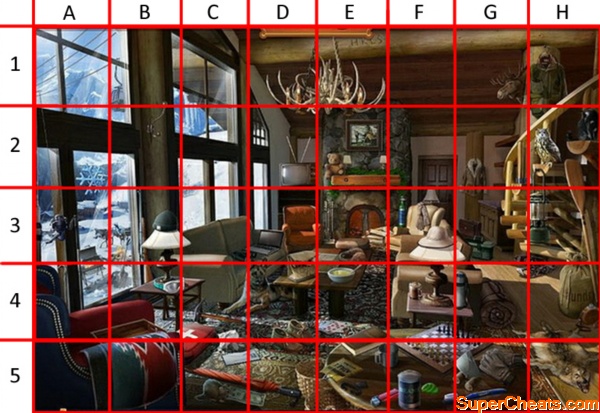
Try to be as quick as you can in this Fast Find scene
Barbeque: A3-A4
Beanie: B3
Binoculars: C3-D3
Book: E4-E5
Canteen: H4
Cards: E4
Cat: H2
Chessboard: F4-F5-G4-G5
Cork Boat: G5
Crowbar: A4
Dollar: C5-D5
Earmuffs: E3
Envelope: C5-D5
Fire: B3
First Aid: C4-C5
Fishing Rod: A3-A4
Flask: G4
Fur Coat: G2
Gloves: G5
Guitar Pick: F5
Hat: F3
Hot Cocoa: F4
Ice Pick: C4
Initials: E1
Jacket: H1
Laptop: D3
Lantern: H3
Laundry Bag: H4
Lift Ticket: E5
Lighter: E5-F5
Lunch Sack: D3-D4-E3-E4
Map: D3
Moose: G1
Mouse: C5
Moccasin: D4-D5
Oar: H2-H3-H4
Oxygen Tank: F3
Owl: H2
Painting: E2
Paper: C4-C5
Pelt: H5
Rifle: B3-B4
Rope: E1
Scarf: F3
Shepherd: C4-D4
Shovel: B3-B4
Ski Goggles: B4-C4
Ski Shoe: G4-H4
Sled Dogs: A3-B3
Sleeping Bag
Snowflake: A2
Stew: E4
Suitcase: G3
Tackle Box: G3
Teddy Bear: E2
Tin Cup:E5-F5
Tooth Brush: F5-G5
TV: D2
Umbrella: C5-D5
Okuni's Fan
This serene scene has plenty of items for you to try to locate.
Time for some tea
Bamboo Bucket: E3-F3
Bamboo Spout: F2-F3
Bells: C2
Blanket: C5-D5
Brush: E3
Butterfly: H1
Caligraphy Paper: F3
Candles: D4
Cat: E2-E3
Cattails: E2-F2
Cherries: B3-C3
Cherry Blossoms: H3
Chopsticks: B3-C3
Coins: B5-C5
Crane: F1
Dagger: E4-F4
Dragon: F4
Embroidered Sash: B5
Exotic Flower Vase: B2-C2
Fox Statue: G2
Golden Cricket: G5
Gosho Doll: B3
Green Bamboo: G1-G2
Hand Mirror: A4-B4
Hanging Flute: B1-C1
Incense Burner: B2-B3
Inkstone: E3
Kimono: A1-A2
Koto Harp: G4-H4
Lute: H2-H3
Mandarin Duck: F3
Mask: B1
Omamori Bag: F2-H2
Peach: B3-C3
Pearl Hairpin: A5-B5
Photograph: B2
Pickles: E3
Porcelain Geisha: C2-C3
Red Makeup: A5-B5
Rice Balls: D3
Robin: F1-F2
Sake Barrel: G3-G4-H3-H4
Sandals: G3
Ship: G5-H5
Spider: G1
Stone Lantern: G2
Sun: E1
Tea Cup: D3
Teapot: F3-F4
Tea Powder: C3
Tea Shisk: D4-E4
Toe Socks: F3-G3
Tray: D4-E4
Wall Scroll: B1-B2
Water Scoop: C3-D3
White Makeup: A4
Wind Bell: D1
Woodblock Print: A3
Wooden Idol: E2
Wrapped Container: E5
Trophy Boundaries:
1) 500,000
2) 1,000,000
3) 1,750,000
4) 3,125,000
5) 6,125,000
East Meets West
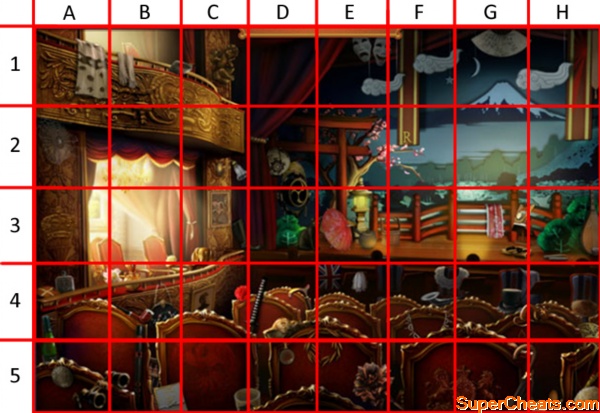
This hastily abandoned theater is the setting for this hunt
Ascot: E4
Bell Pull: H1
Boot: C3-D3
Bucket: E3-F3
Cane: D4
Cape: A1
Carnation: C4
Cat: D3
Cherry Blossom: E2-F2
Cherub: C1
Chopsticks: H5
Coat: G4-H4
Coat of Arms: F5-G5
Coin: A5
Crown: A3
Dog: C3-C4
Fan: G1
Feather Duster: E5
Flag: E3
Flask: A4
Fleur-de-lis: G4-G5-H4-H5
Flute: B4-B5
Gas Light: C2
Gloves: B1
Gold Vase: B4
Hair Brush: B3-B4
Hairpin: H4
Hand Lantern: D2
Hearing Horn: F4-G4
Helmet: G3
Hot Cross Bun: A4
Invitation: B5-C5
Lace Collar: F4-G4
Laurel Wreath: D4-D5-E4-E5
Lute: H2
Mask: E1
Monocle: D5
Moon: G1
Muff: H4
Necklace: F4
Newspaper: B1-C1
Opera Glasses: A5
Parasol: E3
Pipe: B4
Phoenix: C5
Photograph: C4
Poster: C3
Purse: B4
R: F2
Rat: G4-H4
Rice: H5
Sandals: G3
Shell: D4
Spider Web: A2
Standing Drum: D2-D3
Star: F1
Stone Lantern: E3
Sun: H1
Sword: D4
Teacup: C5-D5
Teapot: E3
Top Hat: G4
Torri Gate: E2
Umbrella: G5
Watch: H5
Wine Bottle: A4-A5
Wooden Clappers: H3
Trophy Boundaries:
1) 500,000
2) 1,000,000
3) 1,750,000
4) 3,125,000
5) 6,125,000
Sands of Chigasaki's
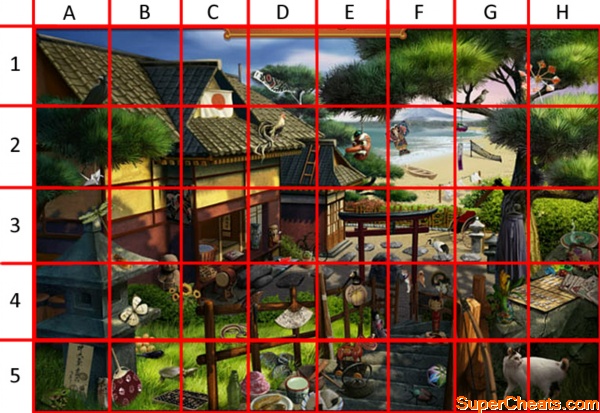
Looks like a great place for a holiday!
Axe: G2-G3
Bamboo Sword: E4
Bicycle: D3-E3
Boat: F2
Bobtail Cat: G5-H5
Bottle: C5
Bow and Arrow: F5-G5
Bucket: D3-D4
Buddha: B3-B4
Butterfly: B4
Caligraphy Brush: D5
Cards: H4
Carp: D1
Cart: F3-G3
Cicada: B3-B4
Clams: D5
Cloth Doll: E4
Coin Purse: H3
Crow: A1
Dragonfly: A3
Eggplant: B5
Eggs: B4-B5
Envelope: A5
Firewood: C4
Fishing Net: G2
Floor Cushion: C3
Flower Arrangement: G4
Frog: A5
Green Beetle: F5
Hairpin: D4
Hakama Pants: G3-G4
Hand Lantern: E4
Incense Burner: H3
Japanese Flag: C1-C2
Kite: F2
Ladder: D2
Laundry: F2-F3-G2-G3
Marbles: H4
Mask: E2
Mortar and Pestle: D5-E5
Paper Crane: A2
Phone: D3
Pinwheel: H1
Pickles: D5
Poster: B3-C3
Red Hand Fan: B5
Rice Balls: D5-E5
Rooster: D2
Sea Urchin: H2
Shaved Ice: D5
Shogi Board: G4-H4
Snake: C4
Soaking Tub: C3
Sparrow: G1
Spinning Top: E4-E5
Sunflowers: B4-C4
Taiko Drum: C4
Teacup: D5
Teapot: E5
Temari Ball: F5
Torli Gate: E3-E4-F3-F4
Turtle: B5-C5
Vase: D3
Watermelon: D3
Wind Chime: G2
Trophy Boundaries:
1) 500,000
2) 1,000,000
3) 1,750,000
4) 3,125,000
5) 6,125,000
Gazing Across Centuries - Mummification Room
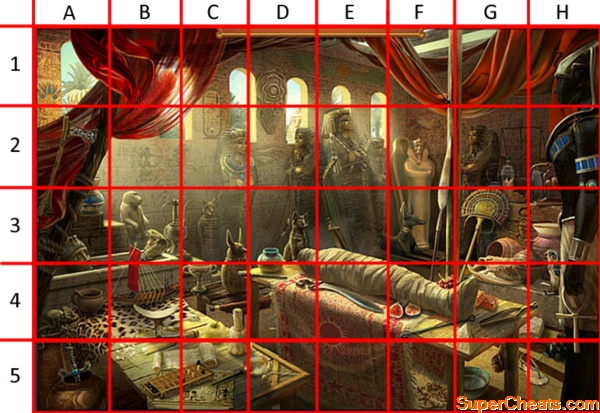
I wonder if you'll find a brain in a jar...
Ankh: H4-H5
Anubis Statue: E3-F3
Apple: C4-C5
Arrow: F1
Axe: G3
Baboon: B1
Bastet Statue:D3
Blue Vase: A3
Canopic Jar: C3-C4
Cartouch: C1-C2
Cat Mummy: C3
Chameleon: A4
Chisel: B4-B5-C4
Clay Mug: A4
Cobra: B3
Egyptian Mask: A3
Faloon: H3-H4
Fan: G3
Golden Sarcophagus: E2-E3
Grapes: F4-G4
Hand Mirror: C5-D5
Harp: E2-E3
Ibis: H2-H3
Leopard Skin: A4-A5-B4
Ostrich Plume: B1
Plumbline: D5
Pyramid: F4-F5-G4-G5
Sandal: G5-H5
Senet Game: B5-C5
Shield: D1-D2
Ship: B3-B4
Sliced Figs: F4
Snail: G5
Star: E5
Sun: E4-E5
Sword: D4-D5
Turquoise Bracelet: H3-H4
Tweezers: G4-H4
Unused Bandages: B5-C5
Trophy Boundaries:
1) 750,000
2) 1,500,000
3) 2,625,000
4) 4,687,500
5) 9,187,500
Excavator's Tent
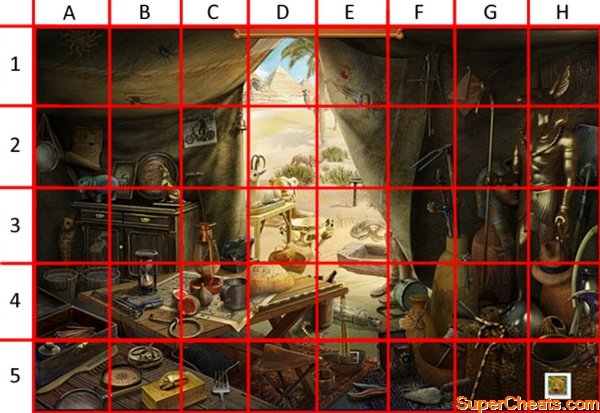
Someone needs to clean up in here
Bell: C1-C2
Belt: E5
Boots: E3-E4-F3-F4
Brass Dish: B2-B3
Bread: C4-D4
Brush: A5
Camel: D1-D2-C1-C2
Camera: E4-E5-F4-F5
Canteen: F4
Cat Mummy: A3
Cat Statue: B2-B3
Compass: A5-B5
Dagger: F3
Egyptian Mask: G2-G3
Figs: B4-C4
Flail: E4
Fork: C5
Gas Canister: E4
Gold Box: B5-C5
Hat: H3-H4
Hoe: F2
Hourglass: B3-B4
Ibex: C2-D2
Magnifying Glass: A5-B5
Matches: A4-A5
Oil Lamp: C3-C4
Palm: D1
Pen Knife: E5
Pillow: C5
Pipe: H5
Pistol: A4-B4
Roof Patch: C1-D1
Shovel: H2
Snake: E3
Sphinx: C1-D1
Spider: B1
Sun: A1
Tin Cup: C4
Tripod Seat: D5
Trowel: F5
Trophy Boundaries:
1) 750,000
2) 1,500,000
3) 2,625,000
4) 4,687,500
5) 9,187,500
Flapper Party
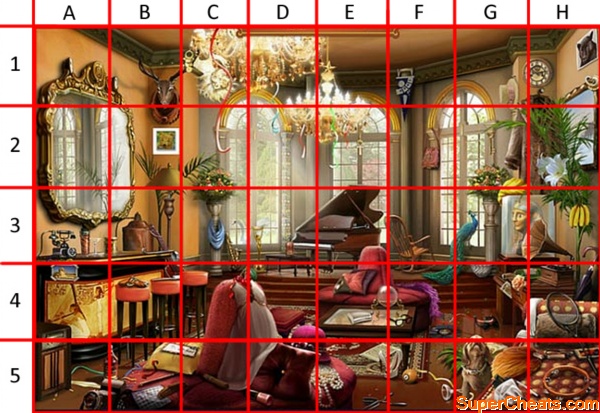
Try not to break anything
Ashtray: D3-D4
Bananas: H3
Billiard Ball: F5
Boater: G1
Bootleg Liquor: A5-B5
Bowl: G3-G4
Bow Tie: G4
Broken Record: F4-G4
Brooch: H1
Candybar: F5-G5
Card: G4
Carnation: G4
Cherries: C4-C5
Cigar: C5
Clock: G1-H1
Couche: D4-D5-E4-E5
Crystal Ball: E4-F4
Deer: B1-B2
Dog: G5
Dress: C4-C5-D4-D5
Feather Boa: F4
Feather Duster: G5-H5
Flask: E4
Floor Lamp: B2-B3
Footstool: D4
Golden Earring: C1
Guitar: B3-B4-C4
Gun: B4
Hankerchief:M B5
Jaguar: H1
Large Mirror: A1-A2-A3-B1-B2-B3
Letter: B5-C5
Lillies: H2
Marble Column: D2-D3
Muff: H4
Music: E5-F5
Peacock: F3-F4-G3
Pennant: F1
Purse: F2
Raccoon Coat: G1-G2-H1-H2
Radio: A4-A5
Record Player: G3-G4-H3-H4
Saxophone: C3-C4
Sphinx: A4
Star: E1
Swan: C3-C4
Tambourine: H5
Telephone: A3
Toothbrush: B4
Turban: G2-G3
Umbrella: H3-H4
White Glove: G4-H4
White Heels: E5-F5
White Mask: C3
Trophy Boundaries:
1) 750,000
2) 1,500,000
3) 2,625,000
4) 4,687,500
5) 9,187,500
Curator's Office
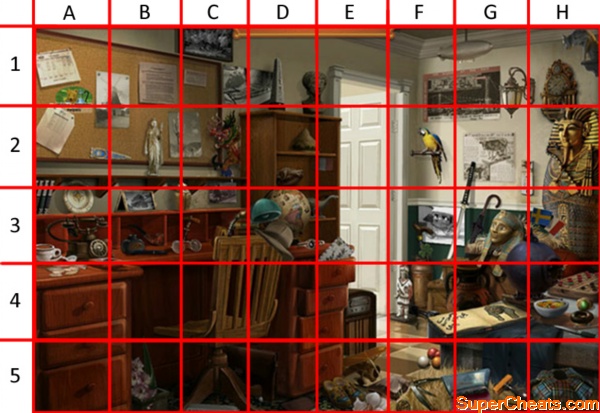
Items from around the world can be found in the curator's office
Balls: F5
Bathysphere: G3-G4-H3-H4
Biplane: E5
Bookmark: A2-B2
Books: C3-D3
Brass Button: F5
Bridge: F1-F2-G1-G2
Briefcase: C5-D5
Bus: C5
Cactus: B2-C2
Cane: F3
Checkered Board: H4
Coffee: A3
Corkscrew: C3
Desk Lamp: D3
Donut: H4
Dragon: C2
Dumbell: F4
Egyptian Mask: G3
Eye Glasses: B3-C3
French Flag: H3
Fruit Bowl: H4
Gargoyle: H1
Gladiolus: B5
Globe: D3
Handkerchief: E5-F5
Hat: D3
Indian: F4
Inkwell: B3
Isis: B2
Italian Flag: D2-E2
Katana: G2-G3
Large Ring: H4
Large Vase: F4-G4
Letter Opener: G5-H5
Macaw: F2
Materborn: D2-E2
Morrocan Platter: A2-A3
Obelisk: D1
Pocket Knife: F5
Radio: E4
Shamrock: F3
Spoon: A3-A4
Stage Coach: F3
Steam Train: C2-C3
Swedish Clock: H1-H2
Swedish Flag: H3
Tamoshater: H5
Telephone: A3-B3
Thermometer: G2-G3-H2-H3
Tibetan Temple: B2-B3
Tie Clip: D3-E3
Umbrella: G3
Vest: G4-G5-H4-H5
Wallet: D5
Wall Lamp: G1-G2
Windmill: A1-A2-B1-B2
Wooden Shoes: E5
Zeppelin: F1-G1
Trophy Boundaries:
1) 750,000
2) 1,500,000
3) 2,625,000
4) 4,687,500
5) 9,187,500
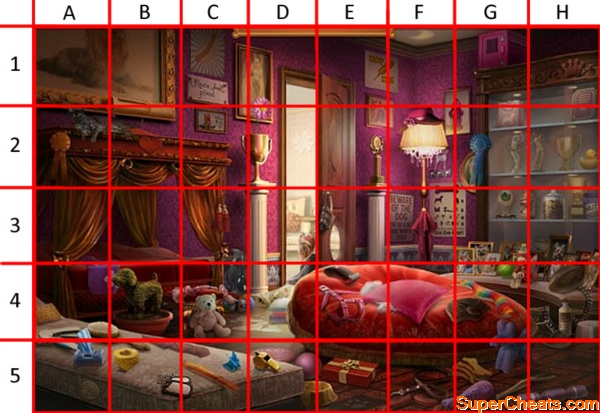
Lovers' Boudoir
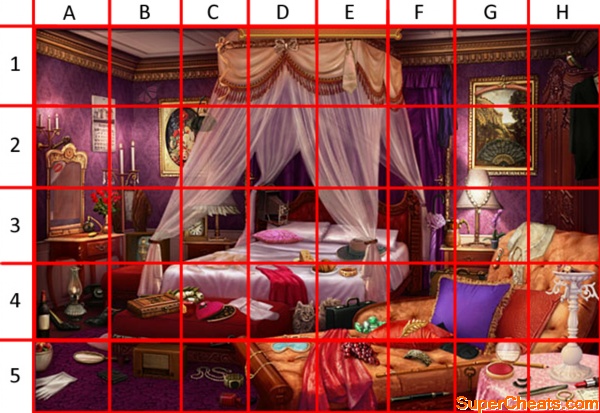
Do you really want to go rooting around in a lovers' boudoir?
Black Book: A5-B5
Bow: D1
Briefcase: E4
Butterfly: B1
Calendar: A1-A2-B1-B2
Camera: D3
Carafe: F3-G3
Cat: D4-E4
Chocolates: C4
Clock: C2
Croissant: D4-E3-E4
Diamond Ring: H5
Emeralds: E4
Eyebrow Pencil: H5
Eyelashes: G5
Folding Fan: G2 (in the picture)
Furcoat: B3
Garter Belt: G3-G4-H3-H4
Gold Bracelet: E4
Gold Leaf: F4
Grapes: E5
Hand Mirror: A5-B5
Hanger: G1
Hat: E3
Hummingbird: H1
Kiss: A2
Knife: B4
Lamp: A4
Lost Sock: F4-F5-G4-G5
Man's Coat: H2
Nail Polish: C5-D5
Nightgown: D4
Orchid: G3
Pen: F5
Perfume: A3
Pink Pillow: D3
Potpouri: A5
Purse: C1-C2
Radio: A5
Red Roses: A3-B3
Rouge: G4-G5
Shoe: A4-B4
Silk Glove: A5
Silk Scarf: F1-F2
Sleeping Mask: D4-D5
Slipper: A4-B4
Stationery: H5
Suitcase: F4-G4
Swiss Cheese: D3
Telephone: A4
Tie: E1
Tweezers: H5
Umbrella: F2-F3
White Blouse: C3-C4
White Roses: B4-C4
Wine Bottle: A4
Trophy Boundaries:
1) 750,000
2) 1,500,000
3) 2,625,000
4) 4,687,500
5) 9,187,500
Doggone Dog - Goldie's Kennel
Lots of dog-themed items available to find in this scene
Beef Jerky: A4-A5-B5
Beware Sign: F3
Biscuit: A4
Blue Ribbon: G2
Butterfly Clip: C5
Cat: A2-B2
Clover Leaf: D2
Choke Chain: H4
Cookie Jar: G2-G3-H3-H4
Corn Dog: E1-F1
Crescent Moon: F1
Crown: H1
Dog Balloon: G4-G5
Dog Bones: G5
Dog Carrier: G1
Dog Chart: F2-F3-G2-G3
Doggie Door: E3
Doggy Shampoo: H4
Doggie Sweater: A3-A4-B3-B4
Dog Tags: B5-C5
Dog Topiary: B4
Drumstick: G5
Fire Hydrant: F1-F2-G1-G2
Flea Medicine: G2-G3-H2-H3
Flying Disc
Football: H4
Friendship Sign: C1
Golden Dogbowl: D5-E5
Golf Trophy: H2
Hair Brush: A4-B4
Hair Trimmer: E3
Harness: E4
Heart: B2
Hot Dog: C1
Knit Cap: F4-F5
Leash: F5
Measuring Tape: B5
Muzzle: E3
Nail Trimmer:A4-A5
Newspaper: D4
Old Shoe: H4
Orange Ribbon: A2
Paper Bag: G1-G2
Paw Print: E5
Peanut Butter: H3
Pillow: E4-F4
Pink Flower: D1-D2
Plaque: H1-H2
Popper: H5
Raquet Ball: D5-E5
Rawhide Chew: C5
Rope Toy: B4-C4
Rubber Clown: C4
Rubber Duckie: H2
Sausages: F5
Scroll: B2
Silver Dogbowl: H4
Snake Toy: G4
Sock Monkey: G3-G4-H3-H4
Sponges: D4
Spot Remover: C3-C4
Stick: G5-H5
Summer Hat: F2
Tassel: C3
Teddy Bear: C4
Tennis Ball: G3-G4
Towel: F3
Whistle: D5
Wrapped Gift: E5
Dog Park
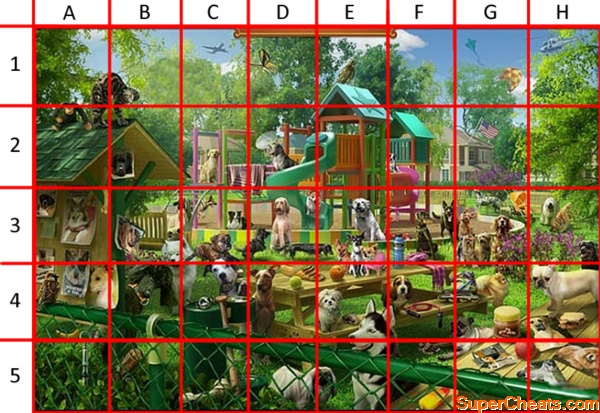
See if your favourite breed is in the Dog Park
Banana: A4
Balloon: G1
Baseball Bat: C5
Basset Hound: F4
Beagle: G5
Black Lab: B2
Black Poodle: B4
Black Shepherd: F3
Blanket: C3-D3
Bloodhound: B3
Blue Cattle Dog: A3-A4
Border Collie: C3-D3
Boxer: C3
Brown Bulldog: E2-F2
Butterfly: D1
Candy Bar: B5
Cat: A1-A1-B1-B2
Chihuahuas: E3-E4
Chow: H5
Cocker Spaniel: G3
Dachshund: D3
Doberman: F3
Dog Whistle: A5
Fig Cookies: E4
Flag: G2
Flying Disc: D2-E2
French Bulldog: H4
Frozen Treat: F5-G5
German Shepherd: C3
Golden Lab: C2
Golden Retriever: H3
Gorilla: A1-A2
Great Dane: H4
Greyhound: A4-B4
Hawk: E1
Helicopter: H1
Husky: E4-E5-F4-F5
Irish Setter: G3
Jet-Liner: C1
Kite: G1
Labradoodle: D3
Mastiff: D2
Orange: E4
Peanut Butter: G4
Pekingese: D5
Peruvian Hairless: D4
Pomeranian: G4
Pug: F4-F5-G4-G5
Rawhide Bone: C5
Red Ball: G4-G5-H4-H5
Rollerskate: G4
Rottweiler: H3-H4
Saint Bernard: A3
Samoyed: B3-B4-C3-C4
Sandwich: H4
Satellite Dish: D2
Scarf: F3-F4
Schnauzer: G5-H5
Scooter: E3-F3
Scottish Terrier: D3
Shar Pei: A3
Sheepdog: H3
Shetland Collie: A3
Shih Tzu: E4
Sliced Bread: D4
Soccer Ball: B3
Sparrow: A4
Sports Drink: F3-F4
Sports Shoe: F5
Star: E1-E2
Stroller: G3-H3
Sunglasses: C4
Tennis Ball: D4
White Bulldog: E3
Wishbone: A2-A3
Kahuna's Den

Use this image to help you locate all the items in Kahuna's Den
Banana: E4
Blue Fish: D1
Boardgame: D4
Bubbles: G2
Butterfly: H2-H3
Button: F5
Cereal Box: E3-E4
Cherry: G1-G2
Chew Toy: B4-B5-C4-C5
Cookie: G5
Cradle: C5-D5
Crayons: G5-H5
Crown: B4
Daisy: C2
Diapers: F1-F2
Egg Timer: E4-F4
Fairy Wand: E3-E4-F3-F4
Flower Pot: D2-D3
Frog: F3
Hand Print: C3
Hedgehog Toy: D5
Hippo: A5
Juice Box: F4
Kid's Shirt: A1-A2
Knight: D4
Lamb: E1
Laundry: H3
Letter Blocks: F2
Lunch Box: C3-D3
Mermaid: H1-H2
Milk: F4-F5-G4-G5
Mitten: H4
Music Player: C5
Pacifier: A4
Panda Backpack: B2
Pandas: G4-H4
Paper Airplane: E4-F4
Paw Print: F4-G4
Peanut Butter: H5
Pinata: D2-E2
Plastic Bat: C3-C4
Pony: F3-F4-G3-G4
Princess: E2
Puzzle Piece: E5-F5
Rabbit Clock: H1
Rubber Duckie: D2-D3-E2-E3
Safety Pins: C5-D5
Shorts: A3-A4-B3-B4
Snake: H4
Soccer Ball: F3
Sock Monkey: E1-F1
Sponge: D4-D5
Spring: F4
Star: F1-F2
Sun: B5
Sunglasses: D3-E3
Tennis Ball: E2-E3
The Letter M: E4-E5
Toaster Oven: A3
Toy: C4-C5
Toy Basket: B3
T-Rex: F2-F3-G2-G3
Tutu: B4-C4
Watercolors: H4-H5
Xylophone: D5
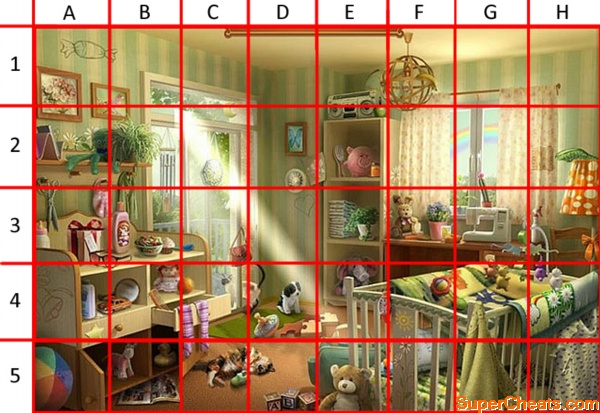
Mother's Memories - Fairytale Nap Time
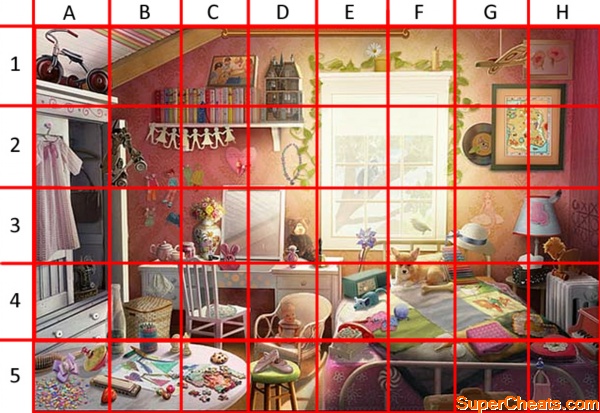
This would seem to be a little girl's bedroom
Apron: H5
Ballet Slippers: D5
Bell: E3
Board Game: C1-D1
Bone: F4
Bookmark: C1-C2
Bottle: A4-B4
Box of Chocolates: H4-H5
Candy Jar: C3
Candle: F1
Cat: H3
Chess Pieces: B4-B5-C4-C5
Confetti: A5
Cookie: C5
Crochet: E4-F4
Daisy: E1
Doll House: D1-D2
Drawing: B5
Feather: H3
Hair Bow: A5
Hairbrush: A5
Handkerchief: B4
Hand Puppet: C3-C4
Hanger: A2
Harmonica: A5-B5
Jigsaw Puzzle: C5
Laundry Hamper: B4
Lipstick: C3
Lunchbox: G4-G5
Map: G1-G2-H1-H2
Marbles: B5
Mermaid: G3 (painted on the wall)
Mouse: E4
Necklace: D2
Nightgown: A2-A3
Peppermint: E5-F5
Perfume: D3-D4
Pinwheel: E3-E4
Polka Dots: C4-D4
Pressed Flowers: G1-H1
Puppy: F3-F4
Purse: A2-A3
Roller Skate: A2-B2
Raccoon: E2
Radio: E4
Ruler: C2-C3-D2-D3
Sewing Machine: A2-A3
Shells: F5-G5
Songbird: F3
Spinning Top: A5
Spring Hat: F3-G3
Strawberry: A5-B5
String of Paper Dolls: B2-C2
Suitcase: F5-G5
Tea Set: B3
Teddy Bear: D3-E3
Telephone: E4-E5
Tiara: C4
Tic-Tac-Toe: H3
Tissues: G4-H4
Tricycle: A1
Vinyl Record: G2
Xylophone: F3-F4-G3-G4
Valentine: C2-D2
Vase: C3
Star-Gazing
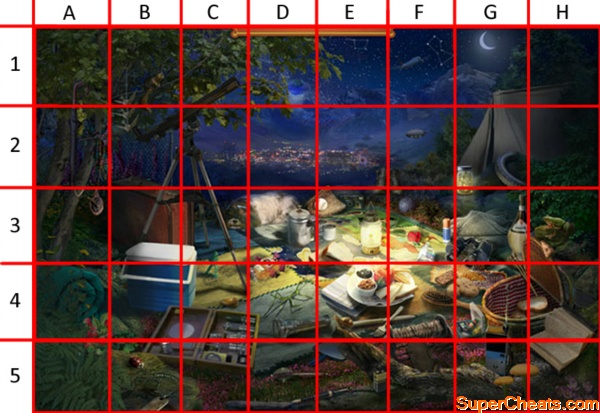
See what constellations you can spot
Airplane: F1
Ants: F5-G5
Baseball Glove: D2-E2
Battery: E5
Bicycle Tire: G3-G4-H3-H4
Big Dipper: E1
Binoculars: F3-G3-G4
Blanket: G3
Bug Spray: F3
Camera: E3
Cheese Plate: E4-F4
Chip Log: F4-F5
Coffee Set: D3
Cooler: B3-B4-C3-C4
Cookies: F4-G4
Dog: C3-D3
Dog Tag: B5
Electric Tower: C2
Fence: B2
Fireflies: G2-G3
Flashlight: D4
Fountain Pen: D5-E5
Frog: H3
Hair Brush: F4-G4
Heart Etching: A2-A3
Granola Bar: F4-G4
Grapes: A1-A2
Journal: H4-H5
Knitting Needles: G3-G4-H4
Ladybug: B5
Magnifying Glass: D5-E5
Mirror: D5-E5
Moon: G1
Moth: H3
Mushrooms: G5-H5
Napkins: E4
Orion: F1-G1
Paper Cranes: B1-B2
Raspberries: A4-A5-B4-B5
Robot: D3-D4
Rose: F3
Sandwiches: E3-E4
Scarf: A2
Sewing Kit: G4
Silverware: E4-F4
Sleeping Bag: A4
Snail: E4
Sourdough Bread: G3-G4-H3-H4
Squirrel: B1
Star Dial: A3
Stick Bug: D4
Suitcase: B2-B3-C3
Telescope: B2-C2-C3
Telescope Lenses: B4-B5-C4-C5-D4-D5
Tent: G1-G2-H1-H2
Toy Soldier: C3-C4
UFO: D1
Umbrella: A1-A2
Walkie Talkie: G4-G5
Wine Bottle: G3-H3
Yarn: F3
Nursery Rainbow
Pretty much everything except the baby itself
Apple: E2
Baby Bottle: A3
Baby Food Jar: E2
Baby Powder: A4
Bagel: F3-G3
Ball: A5
Banana: F1
Bells: A4
Bib: A2-A3-B2-B3
Bow: H3
Butterfly: D2
Cactus: G2-G3
Calico Cat: C5-D5
Candy: A1-B1
Car: A4-B4
Comb: B4
Cupcake: B3
Doll: B4
Ducky: B5
Elephant: E3-E4
Fairy: D2-E2
Finch: A1-A2-B1-B2
Folder Diapers: E3
Gift: A3
Globe: E1-F1
Hair Brush: E2
Heart: D3
Ivy: E3
Jelly Slipper: H2
Jigsaw Puzzle: D4-E4
Lemonade: F3
Magazine: B5
Mirror: B4
Mobile: G3-G3-H3-H4
Moon: C1-C2
Octopus: B2-C2
Orange: B4-C4
Pacifier: E5-F5
Pig: E2
Pony: A5-B5
Purse: C3-C4-D3
Puppy: D4
Rabbit: F3
Radio: E1-E2
Rattle: F4-G4
Roses: A1-A2
Safety Pin: H5
Salad: B3
Scarf: B2-B3
Scissors: A2-A3
Seashell: D2-D3
Sewing Machine: G3
Sewn Patch: H2
Shampoo: B3
Shoe: C5-D5
Siamese Cat: C4-D4
Spider Plant: B2
Spinning Top: D4
Spoon: B3-C3
Star: A4-A5
Stockings: C4-C5
Sun Catcher: C2
Sunglasses: A3-A4-B3-B4
Tabby Cat: G5-H5
Teddy Bear: E5
Towel: G4-G5
Violets: F3
Wind Chimes: B2-B3
Kipling's Tiger - Kipling's Study
An exotic office setting awaits
Backgammon Board: B4-B5
Banana: D2
Basket: E4
Big Ben: F2-F3
Briefcase: D3-D4-E3-E4
Butterfly: A2
Cobra: G3-G4
Cricket Ball: E3-E4
Cricket Bat: E3-E4
Dictionary: C4
Elephant: C3-C4-D3-D4
Fig Leaf: B2-B3
Figs: E5-F5
Flask: B4-B5
Hand Fan: D4
Hanging Light: F2
Incense Container: F4-G4
Ink Bottle: F5
Jacket: B4
Jasmine: C5
Monkey: H2-H3
Papaya: C3
Parasol: E2-E3
Peacock Feather: C4-D4
Pith Helmet: F3
Polished Teapot: C3-C4
Queen Portrait: G2
Rice: E5
Rifle: G3-G4
Shoe Brush: D4-D5
Slippers: D5
Spiral: C1-D1
Stamp: F5
Star Sapphire: G1
Tea Cup: F4-F5
Tiger Head: E2
Turtle: G5
White Pitcher: D4
Whip: B4
Wolf: D3
Vermont Library
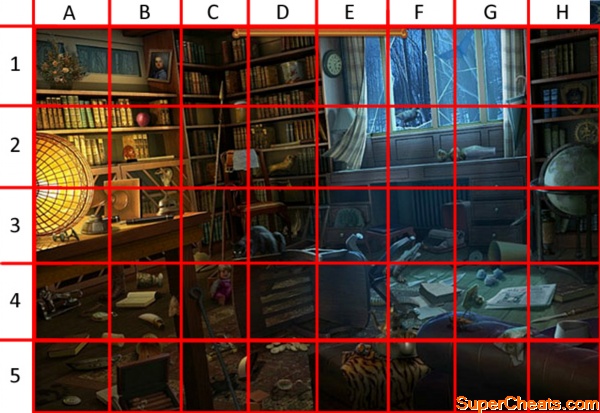
A cosy library awaits for this scene
Bat: F1-G1
Biscuit Tin: D1
Boot: A4-B4
Broken Glass: F4-G4
Candle: A4-A5-B4-B5
Cat: C3-D3
Cigar Box: B5
Clock: E1
Cricket: F4-G4
Cricket Ball: D1-D2
Crocodile: E4-F3-F4
Crumpled Paper: G3
Doll: C3
Dried Flowers: A1
Feather: G3-H3
Fire Poker: C4-C5
Footstool: E3-F3
Fossil: D2-D3
Fountain Pen: B3
Globe: H2-H3
Gold Coins: D4-D5
Handkerchief: G4-G5
Inkwell: A3
Letter Opener: H4
Lion: D2
Moth: B4
Newspaper: G4-H4
Oil Lamp: F2-G2
Overturned Cup: B4
Pencils: B5
Pentray: B4-B5
Plaque: H1-H2
Pocket Watch: A4-B4
Portrait: B1
Raven: F2
Rug: D5
Silver Teapot: F4
Silver Tray: E4-E5-F4-F5
Small Wooden Box: C5-D5
Spear: C1
Tiger Skin: E5-F5
Tipped Chair: C3-C4-C5-D3-D4-D5-E3-E4-E5
Typewriter: F3-G3
Umbrella: G1-G2
Waste Basket: G3-G4-H3-H4
White Shade: E2
Pawn Shop
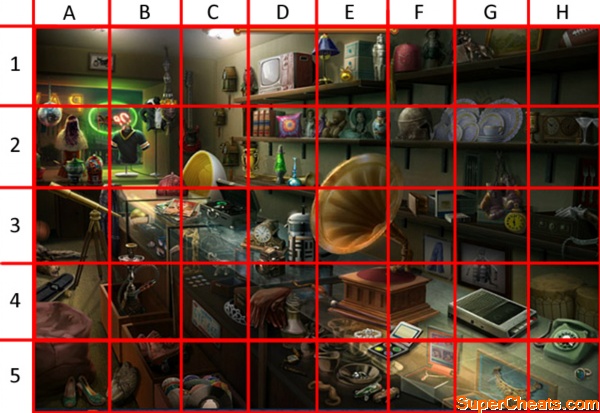
Everything you can imagine can be found in most pawn shops
Apple: E1
Baseball Cards: F4-F5-G4-G5
Bean Bag: A4-A5
Boxing Gloves: G2-G3
Camera: D3-D4
Cocktail Shaker: E1
Coffee Maker: D3
Cup and Saucer: F2-G1-G2
Disc: C5
Discoball: A2
Drumset: G4-H4
Electric Guitar: C1-C2
Fez: F1
Football: H1
Gloves: D4
Gold Necklace: G5-H5
Grab Handle: D4-E4
Gramophone: D3-E2-E3-E4-F2-F3-F4
Gumball Machine: A2
Helmet: F2
ID Bracelet: H3
Jet Pack: B3-B4
Lava Lamp: D2
Leather Jacket: A2-A3-B2-B3
License Plate: C4-C5
Macrame Planter: B2-B3-C2-C3
Magazine: B3-C3
Owl: C1-D1
Revolver: H3
Silver Teapot: D4-D5
Skateboard: A1
Slot Cars: E5-F5
Sports Jersey: B2
Telephone: H4-H5
Telescope: A2-A3-A4-B3
Tie Dye: D1
Trophy: C2-D2
TV: D1
A Basket Case - Candy Shop
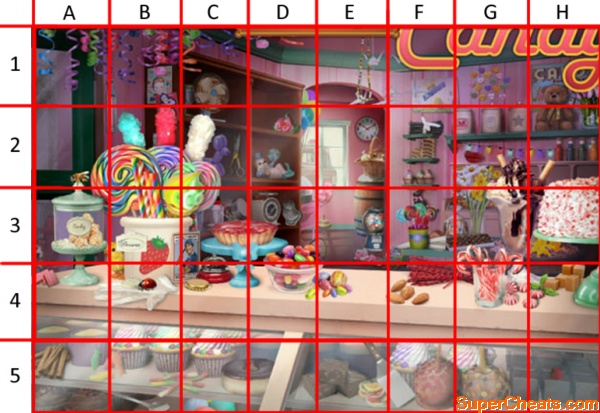
Time for a sugar rush
Balloon Dog: C2
Balloons: D1-D2-E1-E2
Baseball Card: B3-B4-C3-C4
Bell: C3-C4
Bottlecap: C4
Bubblegum: A4
Butterscotch: H3
Candy Eggs: D4-E4
Candy Fruit: E5
Candy Mould: D3-E3
Candy Necklace: E1
Caramels: H4
Chocolates: F3-G3
Cinnamon Sticks: A5
Clock: E2
Cotton Candy: E2-E3
Daffodils: G2-G3
Daisies: G2
Dog: A3
Doughnut: C5-D5
Dyed Eggs: C5
Empty Jar: C3
Fig Cookies: F2
Fire Hydrant: A3
Fluffy Chick: B3
Food Coloring: H2
Fruit Tart: C3-D3
Fudge: E5
Glove: B4
Gumball Machine: E3
Gummy Fish: A5-B5
Gummy Worms: B5-C5
Hearts: G1
Honeybee: A2-A3-A4
Ice Cream Cone: B2-B3-C2-C3
Jelly Beans: D3-D4-E3-E4
Ladybug: B4
Licorice: F4
Mint Leaves: G4-H4
Peppermint Cake: H3
Peppermints: G4-H4
Popcorn Balls: A3
Raspberry: H5
Rock Candy: B2
Rose: D2
Rubber Band Ball: F3
Sandal: E3
Scale: D3
Scissors: B2
Spatula: E5-F5
Spoon: B5-C5
Star: G2-H2
Strawberry: B3-B4
Streamers: A1-B1-C1
Sundae: G2-G3-H2-H3
Swirl Sticks: A2-A3-B2-B3-C2-C3
Thermometer: B1-B2
Tulips: H1
Vanilla Beans: F2
Wax Lips: G2
Gingerbread Porch
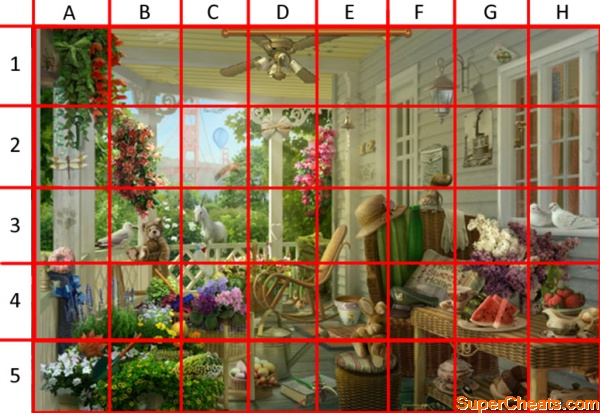
Too many seagulls and not enough gingerbread!
Bell: E2
Blue Bow: A4
Book: D5-E5
Butter Dish: B2
Butterfly: A2-B2
Caterpillar: B5
Cookies: G5
Cruly Ribbon: A2
Balloon: C2
Diamond: C2 (on the bridge)
Door Mat: D4-E4-E5
Doughnut: A3-A4
Doves: H3
Dragonfly: A2
Duffle Bag: D3-D4-E3-E4
Dyed: C5-D5
Electric Fan: C1-D1-E1
Embroidery: F3-F4-G3-G4
Garden Gloves: F3-G3
Garden Shears: D5
Green Bow: A1
Hand Print: B1
Horse: C3
Lamp: F1-F2
Lemon: B4-B5-C4-C5
Lilacs:G3
Mailbox: F2
Orange Leaf: A4-A5
Pink: E2
Playing Card: G1
Rocking Chair: D4-E3-E4
Rose Bush: C3
Seagull: A3-A4
Shovel: A5-B5
Sock: C3-C4
Spoon: G5
Spring Hat: E3-F3
Squirrel: F2-F3
Teacup: F4-G4
Teddy Bear: A3
Toad: B5-C5
Violets: C4
Frost Cottage
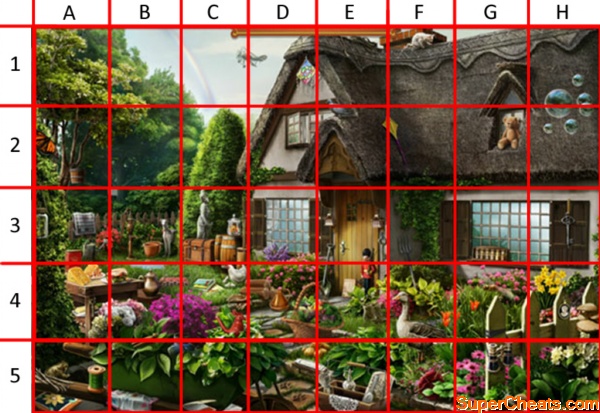
There's plenty going on in this garden
Ball of Yan: F5
Bird Whistle: C4
Bird's Nest: G1-H1
Blanket: A3
Boots: E4
Bubbles: H1-H2
Butter churn: C3-C4
Butterfly: A2
Cameo: H4
Candy Jar: C3
Cat: F1
Cheese: A4
Chessboard: B4
Chickens: C4
Children’s Book: C4
Cigarette Case: C5
Clay Pots: B3
Clothes Pin: B4-B5
Coiled Rope: E1
Daffodils: H4
Dog: B3
Doily: E5
Fireflies: A3
Fleur-de-Lis: E2
Flower Cushion: A5
Gloves: C4-D4
Goose: F4-F5
Hair Brush: E5
Handkerchief: B5
Harmonica: D5-E5
Honeycomb: B4
Ink Bottle: B4-B5-C4-C5
Jug: C4-D4
Kite: E2-F2
Lace Curtains: D2-E2
Laundry Line: A3-B3
Lavender: D3
Logs: C4-D4
Lucky Clover: H5
Marble Statue: C3
Mushrooms: H4
Opera Glasses: G5
Pail: A2
Paw Prints: D5
Perfume Bottle: E10
Pigeon: E1-E2
Pitchfork: F3-F4
Poem: E5-F5
Postcard: E4-F4
Potatoes: D5-E5
Puddle: B4
Rainbow: B1-C1
Raw Wool: B4
Sandwich: B4
Shaving Brush: D5-E5
Shovel: E3-E4
Snail: G5
Spice Rack: G3
Spool of Thread: A5
Stained Glass: D1
Stick of Butter: A4
Storage Trunk: C3
Tea Tin: A3-A4
Teapot: C4
Teddy Bear: G2
Tin Soldier: E3-E4
Toad: A5
Vanilla Beans: A5
Water Pump: B3
Watering Can: A3
The Lost Harp - Ancestral Castle
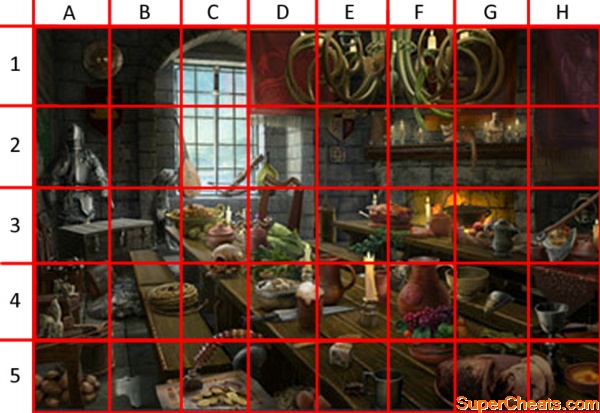
Blow away the cobwebs as you search for your items
Beans: F1-F2
Book: E2
Bucket: A4-A5-B4-B5
Bucklee: E1
Butter Churn: E2-E3
Cannonball: C5-D5
Carrot: E3-F3
Cat: F2-G2
Cauldron: F3-G3
Celtic Cross: E2
Coins: C5
Cookfire: F3-G3
Dagger: D4-E4
Die: E5
Eagle: H1-H2
Eggs: D5-E5
Fiddle: H4-H5
Fire Hook: F2
Flute: B4-B5
Goblet: H4-H5
Grapes: F4-G4
Knocker: H3
Leg of Lamb: F5-G4
Lock: E1
Musical Bow: A4-A5
Pelt Rug: A4-B4
Pewter Cup: E5-F5
Porridge: D4
Quill: C4-C5
Round Shield: A1-B1
Satchel: A4-B4
Sea Serpent: D1-D2
Shamrock: F4-F5
Sheep: F4
Skull: C3-C4
Spill: B5
Spool of Rope: B4-C4
Spoon: D4-E4
Storage Trunk: A3-B3
Immigrant Ship
Let's hope the boat is still sea-worthy!
Armor Breastplate: B4-B5
Bird: G3-H3
Bird Cage: E1-E2
Boots: C4-C5
Drinking Horn: D5
Flag: E2
Gold Coins: F5-G5
Golden Necklace: A5-B5
Gold Vase: F3-F4
Inkpot: H4-H5
Lighthouse: A2-A3-B2-B3
Oar: C2-C3-C4
Powder Flask: E4
Red Chest: F2
Shield: D3-D4
Silver Tankard: E4-F4
Skeleton Key: F5-G5
Skull: G2
Musical Quinn's
There's nothing more Irish than...a Kangaroo?!
Aircraft: D1
Australian Flag: G5-H5
Balloons: D1-E1
Bananas: A1
Boomerang: B5-C5
Bug: H1
Butterfly: G5-H5
Cactus: G3-G4
Cat: A4
Cattle Dog: E2-E3
Crushed Can: B5
Cucumbers: E4-F4
Drum: E3
Fire Hydrant: E2
Gift: F5
Gold: D3-E3
Heart: F5
Ice Cream Cone: C2-C3
Irish Flag: H2
Juice Box: H3
Kangaroo: D2
Koala: E4-E5
Kookaburra: F3-F4
Leprechaun: G1
Lollipop: A4-A5
Map: A4
Meat Pie: G4-G5
Microphone: C2-D2
Milk Jug: H2
Motorcycle: F2
Muffin: C5
Musical Bow: C5-D5-E5
Patch: H1
Paw Print: C5
Poster: B2
Purple Bow: A2
Rabbit: E3
Rainbow Lorikeet: G1
Rainbow Wig: A3
Sheet Music: D5-E5
Sneaker: E4
Speaker: A3
Spider: F5-
Spyglass: G4-H4
Sunglasses: B5
Tam Shanter: B3-C3
Turtle: A5
Uilleann Pipes: C2-C3
Violin: G3
Wallet: H4
Yacht: B2-C2
Oliver's Teapot - Kids' Tea Party
I for one didn't have tea parties as a kid...
Apron: A2-A3-A4
Balllerina Shoe: H3
Bandana: G5
Beach Ball: G3
Broom: F2
Bucket: F3
Butterfly: E5
Camera: B3-C3
Car: D3
Coal: F2-F3-G2-G3
Collins: E3-E4
Comic Book: B5
Cookie: C4
Cowboy: D4
Crayons: E5-F5
Dog Tray: F4-G4
Doodles: C4-D4
Flag: D2
Frog: A5
Giraffe: C3-C4
Glasses: H3
Glass of Milk: D4
Heart: A1-B1
Hot Dog: H3
Hula Loop: E2
Ice Cream Cone: E4
Ketchup: E4
Kite: C1-D1
Lady Bug: G1
Lavender: A4
Lawn Mower: G2
Lighter Fluid: H4-H5
Mitten: B3-C3
Monkey: A4
Purse: A4-B4
Record Player: G5-H5
Refrigerator: E3
Ribbon: C1
Rubber Duck: F3
Shirt: A2-B2
Shovel: F4
Slipper: D3-D4
Spoon: E4-E5
Stegosaurus: A5-B5
Straw: C5
Sugar Cube: C4-D4
Tiara: A3-B3
Tong: A5
Towel: B5-C5
Turtle: F3-F4
UFO: D3
Watermelon: C4-D4
Whistle: H5
Ocean Liner

Things aren't looking particularly ship-shape in here
Anchor: F2
Arrow: E2-E3
Ash Tray: E3-E4-F3-F4
Backgammon: D4
Binoculars: H4
Blanket: F5
Bolt: F3-G3
Bowtie: A4
Cameo: D2
Cane: H3-H4
Captain's Log: G4-H4
Chain: F5-G5
Chalk: F4-G4
Champagne: E3
Cheese: B4-C4
Cork: B5
Crack: B2
Doily: G4-G5-H4-H5
Doll: H2-H3
Emerald: F5
Eye: D4-D5-E4-E5
Fern: B2
Fish: D1-D2
Flag: H1-H2
Flask: B5
Flower: F4-G4
Gold Leaf: H1
Golf Club: B2-B3
Grape: A1
Handkercheif: H5
Hat: E4-E5-F4-F5
Heart: G3
Hoop: B5
Horse: G2-G3
Ink Spot: C4
Jacks: A5
Knife: A4-B4
Ladder: D1
Lemons: F3
Life Preserver: H3
Lighter: G4-G5
Map: D3-D4-E3-E4
Medal: H3-H4
Model Ocean Liner: C3-D3
Mouse: E3-F3
Newspaper: C3-D3
Parasol: C4-C5-D4-D5
Perfume: H3
Pillow: G3
Pineapple: B4
Pipe: B4-C4
Pitcher: C3
Pocket Watch: A4-B4
Puck: B4-C4
Puff Box: G4
Queen: G4
Ribbon: H1
Rope: H2
Rug: C5-D5-E5
Sandwich: B3-C3
Scones: B4-C4
Shawl: D3-D4
Shoe: D4-E4
Spy Glass: G4
String of Lights: B2-C1-C2
Sugar Bowl: C3
Tassels: D2
Teacup: F3
Toy Boat: E4
Trunk: E3-F3
Tureen: A4-A5-B4-B5
Vase: D3
Whisk Brush: B5
Whistle: D5
Wine Glass: F4
Buckingham Palace
There are a lot of items to find in this scene
Baby Buggy: D3-E3
Binoculars: C5
Blue Flower: G1
Book: E5-F5
Boots: G5-H5
Bread Loaf: A4
Cat: G3
Cheese: D5
Clock: D2
Crown: D1-D2
Crystal Dish: C4
Dog: H3-H4
Dollhouse: A2-A3
Epaulet: D5
Fan: C3
Faun: C2-C3
Feathers: H3
Grapes: A4
Harp: F2-F3
Heart: B2
Horse: E3-F3
Hourglass: H4
Lace Doily: C4
Lady's Hat: E4
Muff: G3
Music Box: G4
Oil Lamp: F3-G3
Parrot: B1
Pear: B4
Red Roses: G2-G3
Red Vase: D2
Salt and Pepper: C4-C5
Sash: H1-H2
Shawl: G2
Slippers: D4-E4
Sliver Frame: D2-E2
Star: F4
Sword: D4-E4
Tassel: E1
Tea Leaves: C5-D5
Top Hat: D3-D4
Wreath: C2-D2
Wedding Brooch: A4-A5
Lasting Love - Drive-in Theater
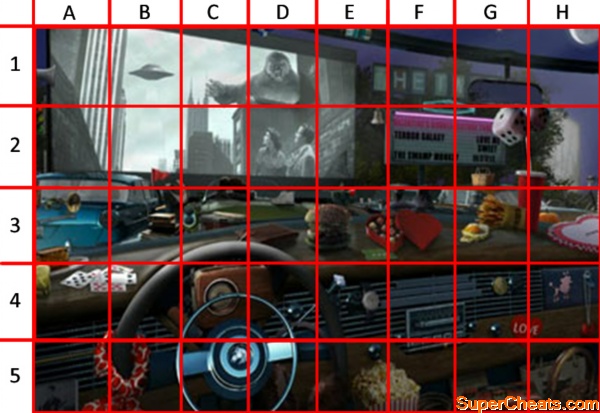
What a classic film!
Bell: E2
Bicycle: H3
Burger: D3-D4
Cards: A4-B4
Chocolates: E3-F3
Coin: G4
Diamond: E4
Dice: G2-H2
Dog: H4
Drum: C3
Ear Muffs: D5-E5
Flag: B2
French Fries: G3
Fried Egg: G3
Horse: C5
License Plate: A3
Lunchbox: G5
Monster: D1
Moon: H1
North Star: G1
Notebook: G5
Pen: F5-G5
Popcorn: E5-F5
Portable Radio: C4
Purse: H5
Red Cup: G2-G3-H2-H3
Rope: F5
Scarf: A4-A5-B4-B5
Skyscraper: C1-C2
Tennis Shoe: D3
Tractor Beam: B1-B2
UFO: B1
Wallet: C3-D3
Watch: E4
White Bookbag: H5
White Bread: G3
Yellow Rose: A4
Skyview Room
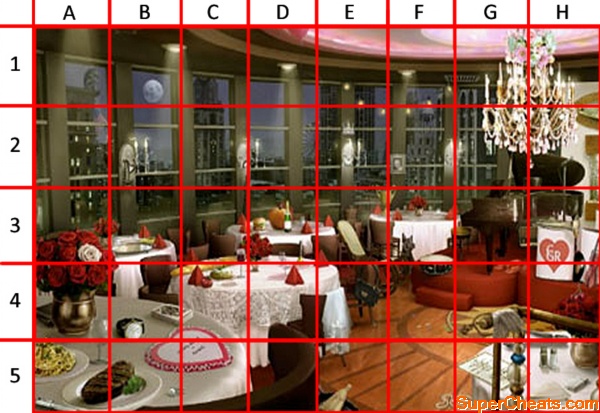
There's even live music to woo your date with!
Balloon: D1
Bell: D3-D4
Blue Bulb: G5
Burger: D3
Cards: B4-C4
Confetti: F4
Constellation: D1-D2
Dog: F3-F4
Dust Pan: E5
Gargoyle: A1
Drum: F3-F4
Ferris Wheel: D2-E2
Fish: H1-H2
Handprint: F1
Hanging Bouquet: G1-H1
Lacy Cloth: C4-D4
Lobster: G3-G4
Menu: G5
Moon: B1
Painted Star: B1
Parquet Stripes: E5-F5
Pearls: F5-G5
Potato: C4
Pumpkin: D3
Rocking Chair: E3-E4-F3-F4
Spaghetti: A5
Steak: A5-B5
Tomato: C4
Tongs: H4-H5
Top Hat: G2-H2
Trophy: E3-F3
Violin: H3-H4
Wallet: A4
Watch: B4
White Rose: A3
Wedding Chapel
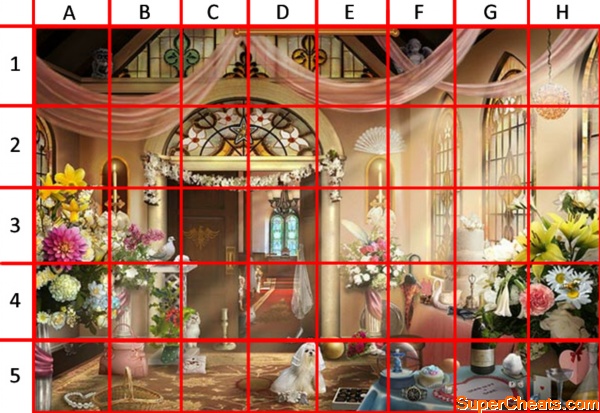
It looks like it's going to be a beautiful day
Angel: F1
Bee: H4
Bell: G4
Candlestick: C4-C5
Carnation: G4-H4
Cat: C4-C5
Champagne: G4-G5
Chandelier: D3
Chocolates: E5
Coins: F4
Cotton: B3-B4-C3-C4
Couple: F4
Cup Cakes: F5
Daffodils: A2-A3
Dahlia: A3-A4
Daisies: H4
Decanter: H5
Diamond: G5-H5
Dog: D5-E5
Dove: B3
Eagle: C3
Egg: F5-G5
Empty Glass: H5
Fan: E2-F2
Feather: E3
Gargoyle: A1-B1
Garland: C2-D2
Green Glass: B1-C1
Holly: B4-B5
Light Ball: H1-H2
Lilacs: B3
Lillies: G3-G4-H3-H4
Mouse: A5
Pearls: A5
Pine Tree: D4
Pink Roses: E3-F3
Purse: B4-B5
Rabbit: C4-D4
Red Roses: E4-E5
Ring Pillow: B5-C5
Shoe: D4-D5
Silver Glasses: F4-G4
Silver Tray: E4-F4
Snowball: G5
Snowglobe: E5-F5
Spoon: G5
Star: C2-D2
Stool: F4-F5
Sun: C5-D5
Swan: F4-G4
Top Hat: C4-D4
Trumpet: G4
Umbrella: F4
Veil: D4
Watch: F5
Wedding Cake: G3-G4
Year of the Dragon - Emperor's Chambers
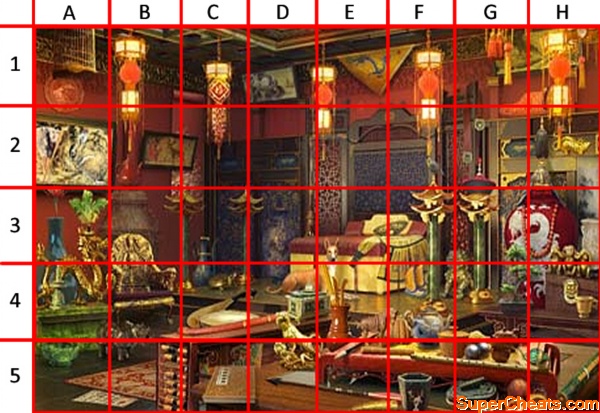
Are there any scenes without dogs in them?!
Birdcage: A1
Bonsai Tree: G3-G4-H3-H4
Book: C5-D5
Boots: F4
Chair: B3-B4
Chinese Squirrel: C1-D1
Cloisonne Pitcher: C3-C4
Cloisonne Vase: D3-D4
Drum: C4-D4
Emperor's Helmet: H1-H2
Emperor's Robes: E3-E4-F3-F4
Firecrackers: C1-C2
Flute: F5-G5-H5
Fu Lion: F3-F4-G4-G5
Green Feathers: A3
Hunting Dog: D4-E3-E4
Imperial Flag: E1-F1
Ivory Vase: H3
Jade Basin: A5
Lotus: H1
Lute: C4
Misty Trees Scroll: H2-H3
Monkeys: G3-G4-H4
Painted Teapot: F4-F5
Pair of Tassels: G1
Peaches: G5-H5
Rat: H2
Rhinoceros: A4-A5-B4-B5
Ring: G5
Rug: A5-B5
Snail: G5-H5
Therapy Balls: G5
Tiger: D4-D5
Yin Yang: D4
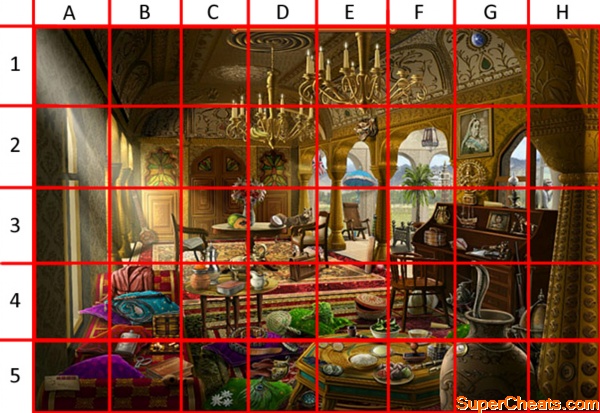
Colonial Hong Kong
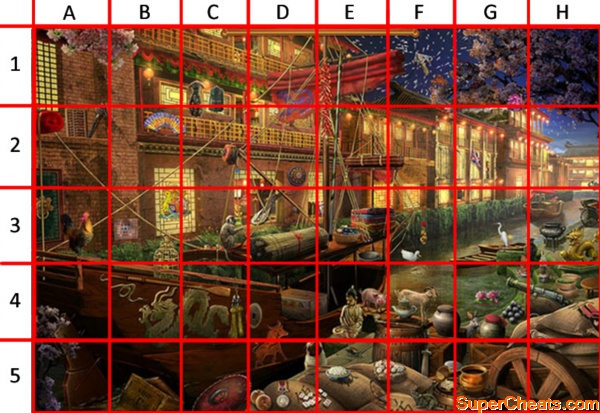
There is a really great atmosphere to this scene, and tons of items to find
Bamboo Bundle: D3-E3
Basket: E3
Boat Oar: B4-C4
Box of Teat: D4
Broadsword: F5
Buddha: E4
Cannon: G4-H4
Cannonballs: G4
Cherry Blossoms: A1-B1
Chinese Dress: B1-B2
Coat of Arms: B3-C3
Copper Pot: F5-G5
Crane: G3
Cricket: E5
Dog: D5-E5
Door Knocker: A3
Duck: F3-F4
Fan: B2
Goat: F4
Gold Coin: C4-D4
Gold Tassles: C4
Good Luck Charm: F3
Great Wall Mural: F1-F2-G1-G2
Horse: H2-H3
Kerosene Lantern: G4-H4
Kite: F1
Lotus: G4
Lute: D3
Mahjong Tiles: D5-E5
Medal: D5
Mongol Boots: G3-G4-H3-H4
Monkey: C3-D3
Ox: D4-D5
Parasol: C5
Peaches: D5
Pearls: E5-F5
Peony: G1-G2
Pig: E4
Pipe: E4-F4
Pocket Watch: F5-G5
Rabbit: G4
Rat: F5
Rickshaw: H3
Rooster: A3
Rudder: A5
Scorpion: E5-F5
Shield: D2-D3
Shipping Stamp: B5
Silk: E3
Slippers: H4
Snake: B4
Sparrow: G4-G5-H4-H5
Stool: H4
Tea Pot: E4-F4
Tiger: D1-D2
Uniform: C1
Unlit Firecrackers: D1-E1
Vase: G3-H3
Dragon Dance

Who knew dragons ate cookies!
Apple: H4
Baguette: A5-B5
Bamboo: G4-H4
Basket: H4-H5
Bell: A2
Bonsai: A3
Buddha: A4
Bull: B2
Candy Cane: F1-G1
Champagne Bottle: H4-H5
Cigar: F3
Coin: E2
Cookie: E3-F4
Cupcake: F3-F4
Diamond: F2
Dog: D4
Doll: F4-G4
Dollar Bill: B5
Dragon Symbol: C3
Drum: G4
Ducks: G1-H1
Egg: H2
English Ivy: G2-G3
Fan: C3
Fire Crackers: F4-F5
Fire Extinguisher: C2-C3
Fire Hydrant: A4
Fish: G2
Flag: A1
Gift Box: F2-F3
Glass of Bubbly: H4-H5
Gold Bars: C5-D5
Heart: D5
Hopscotch: A5
Horn: D2
Horse: B4-C4
Incense Burner: A5-B5
Matches: E5
Mirror: G4-G5-H4-H5
Monkey: B3
Moon: C1
Necktie: E4
Oxen: B3-C3
Peonies: A2
Phone Booth: C3
Pig: D4
Pumpkin: H4
Rabbit: D3-E3
Ram: B3
Rat: C4
Red Tassel: E3
Rooster: C3-D3
Sandwich: H4
Santa: C1-D1
Shoes: C5
Snake: A4
Sparklers: A5-B5
Steamed Buns: G4-H4
Stone Lantern: H3
Sun: E2
Tiger: C4-D4
Tooth: F3
Watch: B4
Wheel: A2-B2
Wreath: H3
A Secret Past - Bessie's Shack
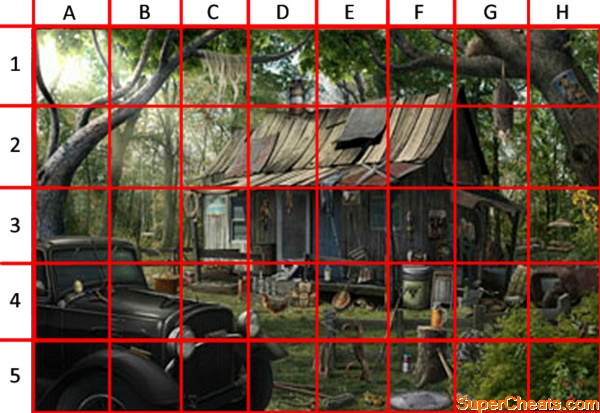
Bessie could do with a helping hand I think
Beach Painting: C3
Bicycle: G4
Bird's Nest: G1
Border Collie: D3-D4
Broken Fence: B3-C3
Bullfrog: E5-F5
Chicken: D4
Chimeny: D1
Clothes Line: F3
Flower Planter: C4
Gas Can: C3-C4-D3-D4
Ghosts: G3
Glass Bottle: D4
Hand Hoe: F5-G5
Hay Bale: G4-H4
Ice Hook: B4-C4
Lasso: C3
Manhole Cover: F5
Milk Carton: E3-E4
Old Sofa: H3
Overalls: E2-E3
Painting of Birds: E3
Possum: G1-G2
Propeller: E2-F2
Recruiting Poster: H1-H2
Rusted Chassis: H4
Rusted Radiator: F2-G2
Soda Bottle: A3
Spring: B4-B5
Sun Tea: F4
Telephone Pole: B2
Tractor Wheel: G3
Trough: C4
Washboard: F4-G4
Wind Chimes: D3
Wooden Bucket: C4
Wringer Washer: F3-F4
Yoke: E4-E5
A Daring Heist
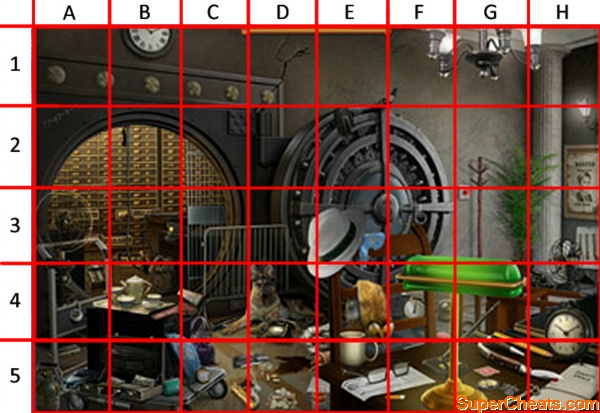
Everyone seems to have enjoyed themselves in here, including the German Shepherd!
Barricade: C3-C4-D3-D4
Briefcase: B5
Cash Register: A4
Chandelier: G1
Clock: B1
Coat Stand: G2
Coffee Mug: E4-E5
Coffee Service: B4
Coin Purse: B5
Deed: H5
Deposit Slip: E5-F5
Desk Fan: H3-H4
Desk Lamp: F3-F4-G3-G4
Dollar Sign: E3-F3
Fedora: D3-D4-E3-E4
Flask: A5
Fountain Pen: G4-G5
Fox: E4
Gas Lamp: H2
German Shepherd: C4-D4
Glasses: E5-F5
Gun Holder: B4-C4
Handcuffs: F3
Leather Glove: E2
Lollipop: F4
Loose Change: D5
Metal Bars: C2-C3-C4
Pencil: G4-G5-H5
Piano Pedals: H3
Rope: B2
Scale: F4
Security Button: G3
Shotgun: C4
Standing Fan: A3
Streaks: D1
Telephone D4
Toppled Chair: F3
Torn Cloth: E3-E4
Tote Purse: C4
Typewriter: H4
Watch: C5
Fateful Picnic
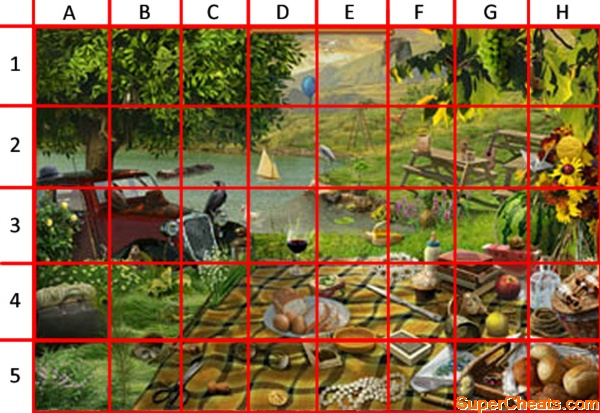
I hope they clean up after their mess!
Apple: G4
Ashtray: E4-E5
Baby Bottle: F3
Balloon: D1-E1
Banana: E3-F3
Bell: B1
Binoculars: H4
Bluebells: F5-G5
Bow: B1-C1
Bug: H2
Bullfrog: B4-C4
Butterfly: F1-G1
Cat: D4-D5-E4-E5
Coin: D5
Cupcake: F4
Daisy Chain: E3-E4-F3-F4
Deck of Cards: F4-F5
Deer: F2
Die: H3-H4
Dragonfly: H5
Duck: C3-D3
Eggs: D4-E4
Fishing Pole: A2-A3
Fork: F5-G5
Glasses: C5-D5
Grapes: G1
Guitar: G2
Hat: A1
Hawk: F1
Heart: A2-B2
Heron: E2
Knife: E4-F4
Ladder: E2
Lamp: C3-D3
Lizard: A2-B2
Log: B2-C2
Man's Hat: B3
May Lilies: C3-C4
Nest: B4-B5
Paper Bug: F2
Paper Crane: G2-H2
Peacock Feather: A4-B4
Pearl Necklace: E5-F5
Pineapple: F2-F3
Rabbit: G2
Raven: C2-C3
Ring: G5
Rope: H4
Rubber Boot: E2-E3
Sandwich: D4-E4
Sapling: E2
Satchel of Money: A4
Scissors: B5-C5
Shovel: G2-G3
Snail: G3-H3
Snake: B4-C4
Star: E1
Tennis Ball: G4
Toy Boat: D2
Turtle: E3-F3
Watch: G4
Wine Glass: D3-D4
Yarn: H2
On The Run
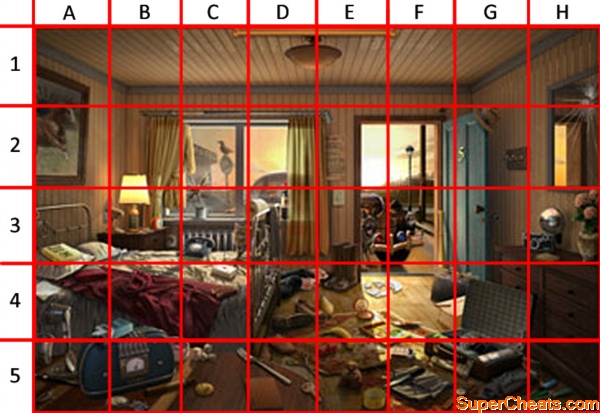
What a mess in this room: bananas, dirty socks...
Banana: E4-E5
Baseball Bat: F3-F4
Blue Lamp: F3
Boots: E3-E4
Bouillon: C5
Briefcase: F4-G4
Calendar: E2
Camera: H3
Cards: C4
Cat: C3-D3
Cigar: B5-C5
Cigarettes: A4-A5-B4-B5
Coin: C5
Cubes: C5
Dice: E5
Dirty Sock: G5-H5
Dog: E3-E4
Fan: A3-B3
Five: G2
Flashlight: F5-G5
Fork: C5-D5
Golf Club: C2-D2
Hand Print: A1-A2
Hat: G2
Hooks: G2-H2
Light Switch: E3
Motel Sign: C2
Mouse: G4-G5
Newspaper: G5
Pear: E4
Pen: A5
Purse: B4
Raven: C2
Rope: D3
Scissors: D5-E5
Screwdrivers: G5-H5
Socket: B3
Spoon: A4-A5
Street Lamp: F2
Take-out Box: F4-G4
Telephone: C3
Towel: A4
Vase: H3
Wallet: C4
Whiskey Bottle: B3
Wine Bottle: D3
Yo-yo: B3
Regina's Diner
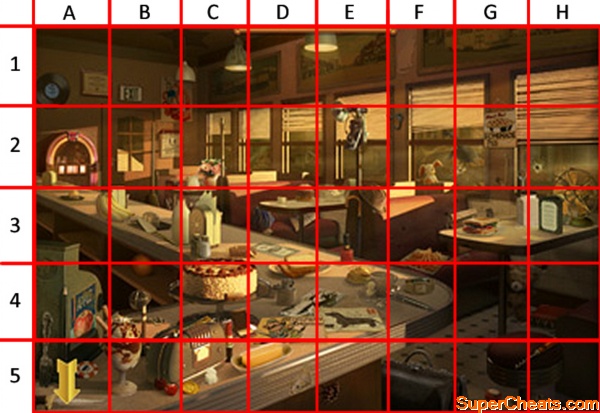
Regina is nowhere to be seen
Butter: C5-D5
Camera: E2
Certificate: A1-B1
Cherries: B5-C5
Coat Hook: F2
Corckscrew: G5-H4-H5
Decorative Key: G2
Dog: E4
Exit Sign: B1
Flower Vase: C2
Fork: A4-A5
Fries: F3-F4
Hamburger: D3
Hat: E2
Lighter: D4
Lipstick: C4-C5
Lost Key: H5
Milk: B3-C3
Orange: B3-B4
Poker Chip: A5
Rabbit: F2
Raven: G2
Record: A1-A2
Rotary Fan: H2-H3
Salt and Pepper: C3
Sandwich: G3
Satchel: F5-G5
Spoon: B4-C4
Sundae: B4
Teddy Bear: G4-H4
Toast: D3-D4-E3-E4
Watch: F4
Secluded - Secluded Treehouse

OK, this treehouse is more secluded than most
Bandana: H4
Bear: C4-D4
Beehive: A2-B2
Bottle: D1-D2
Bread Crumbs: C5
Brick: F2
Broken Glass: E1
Burlap Sack: B4
Butterfly: G5-H5
Cage: B2-B3
Can: B5-C5
Candy Cane: A5-B5
Cat: B1
Caterpillar: H5
Chain: B2
Compass: G5
Deck of Cards: F5
Electrical Cord: D1-D2
Firecracker: C4
Flying Disc: D5
Glove: C2
Hand Print: G2
Hat: E3
Helmet: D2
Hook: H3
Jacket: F2-F3
Knot: C2
Leather Strap: E3
License Plate: E2
Lighter: C5
Lion: G4
Magnet: D3-D4
Magnifying Glass: C5
Mahjong Tiles: D5
Matches: G5-H5
Mint: C4-C5-D4-D5
Pan: A5
Peach: E5-F5
Picnic Blanket: B5-C5
Pillow: F5
Ring: E5
Roadsign: A3-A4
Sandwich: B5
Shield: F2
Smoking Pipe: F5
Spade: D4
Suitcase: D5-E5
Sunflower: G1
Tank: C4-C5
Triangle: E1
Turtle: A5
Violets: G5
Walking Stick: E1-E2
Watering Can: G5-H5
Secluded Windmill
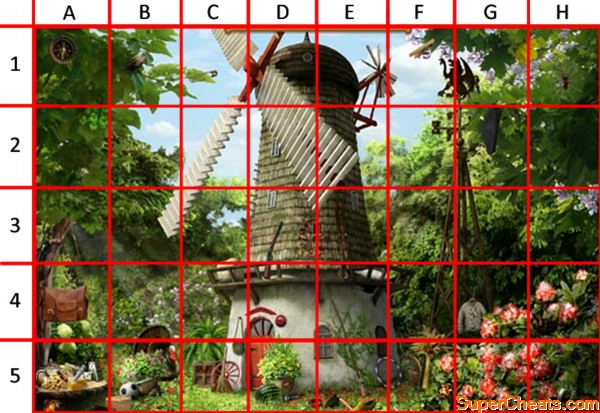
A peacefull setting for this scene
Broken Board: D3-D4-E3-E4
Broom: C5
Buckle: G5
Canteen: C4-C5
Cheese: A5
Chipmunk: A5
Cinder Block: B5
Clog: E5
Clothes Pin: F1
Compass: A1
Dog Collar: D5-E5
Dominos: A5
Dried Wheat: F4-F5
Fall Leaf: G1-H1
Fern: C4-C5
Fire Alarm: D4
Fishing Rod: E4-E5
Fountain Pen: G5
Four Leaf Clovers: A2
Hat: G2
Hinges: D5
Hoe: E5
Hole: E4
Hoop: E5-F5
ID Bracelet: H5
Infinity Symbol: C5 (on the crate)
Ivy: E4-E5
Kiss: D5
Knife: A5
Ladybug: F5
Large Stone: C3-C4
Nails: D2-D3
Peanuts: A5
Pinecone: H4
Red Stripe: D4
Revolver: A3
Rifle: D3-D4
Round Window: D1
Safety Pin: C1
Satchel: A4
Ship: D3-E3
Skis: E3
Snail: A5
Soccer Ball: B5
Songbird: B1
Spider: H1
Spool of Twine: A5-B5
Swan: E3-E4-F3-F4
Sweater: G4
Tree Carving: A3-A4
Turkey: B5
Watermelon: D5
Wheel: D5
Secluded Lion Pond
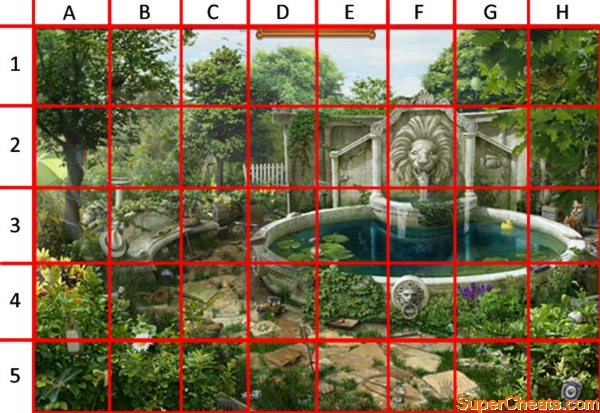
The lion is the most fearsome thing in this scene
Apple: B3
Badge: H5
Basket: B3-C3
Birdbath: B2-B3
Bird's Nest: A1-B1
Broken Tooth: F2
Cat: D1-D2
Charm Bracelet: F5-G5
Coin: D5-E5
Croquet Ball: B4
Daisy: B4-B5
Drain: C5
Folding Fan: B3
Fountain Pen: E4-E5-F4-F5
Fox: H3
Frog: D4-E4
Grasshopper: B5-C5
Lavender: F4-G4
Lightning: E3
Lilypads: D3-E3
Locket: E5
Mouse Trap: E4
Net: D2-D3
Newspaper: H4
Notepad: B4-C4
Radio: G3-H3
Receiver: G4-H4
Rope: B4
Snake: A3
Tadpoles: F3-F4-G3-G4
Tulips: D2-D3
Waders: H3
Wallet: D5
Waterlily: D3
Whistle: H2
Secluded Pavilion
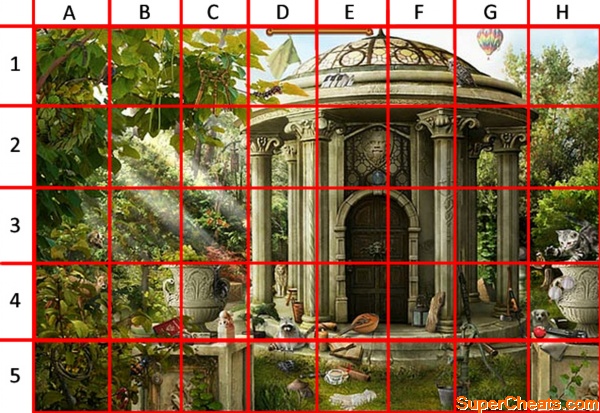
Some careless individual has left their mandolin out in the open
Balloon: G1
Basket: D4
Beetle: B5
Bonsai: C4-D4
Bowl: B4
Bracelet: A5-B5
Bucket: F5
Bullwhip: A5
Butterfly: G3-H3
Candle: E4
Cannonball: G3-H3
Carved Face: E2-F2
Caterpillar: D1
Change Purse: B5-C5
Crack: F2
Crate: C4
Crystal Ball: E2
Cue Ball: H4
Field Mouse: A3-B3
Flag: D1
Flashlight: H4
Football: H4
Frame: C5
Frog: G5
Glass: D5-E5
Glasses: H4
Grapes: B3-C3
Handkerchief: H4-H5
Horn: E4
Horseshoe: A1
Ivy: H5
Lace Gloves: E5
Lantern: F4
Lead Pipe: D5-E5
Lion: D4
Mallet: G5
Mandolin: E4
Mushrooms: D5
Keys: C1-C2
Kitten: H3
Knocker: E3
Owl: F1-G1
Padlock: B5
Passport: B4-C4
Piano Keys: E1
Pump: F5-G5
Puppy: H4
Pyramid: G4
Quill: H4-H5
Raccoon: D4-D5
Rake: G4
Ramsey: E1-F1
Robin: A1-B1
Scallop: D2-E2
Scroll: E5
Snail: C4
Snakes: F2-F3
Split Log: E4
Stamp: C4
Stool: D4
Stump: H4
Taurus: E1
Tea Cup: E5
Umbrella: G3-G4
Watch: F5
Wind Chimes: C2-C3
Wreath: A2
Secluded Retreat
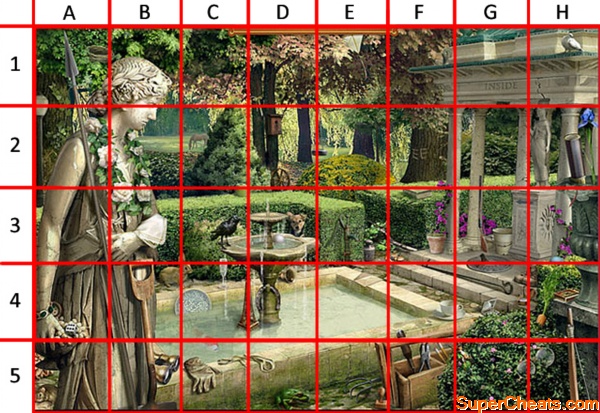
Water features heavily in this environment
Bell: D4
Binoculars: A5-B5
Bird Droppings: A2
Birdhouse: D2
Blue Flower: H2
Book: F3
Box of Matches: H4
Bow: H5
Broken Branch: E3-F3
Bucket: G3
Carrots: H4
Caterpillar: G4-G5-H4-H5
Coffee Cup: F4-G4
Compass: H4
Crack: H1
Dog: D3
Dove: H1
Dragonfly: H3
Envelope: E4
Egg: H3
Eiffel Tower: C4-D4
Eye Glasses: G5-H5
Faucet: E3
Fireplace Poker: F4-G4
Fish: C4-C5
Flower Pot: F3
Footprint: F4
Frog: D5
Garland: A2-B2
Glove: C5
Golf Ball: D3
Handkerchief: B3
Hand Rake: E5
Hiking Boots: G4-H4
Horse: C2
Horseshoe: D4
Kite: E1
Laurel: B1
Mirror: G4
Mushrooms: E3-F3
Nest: A1-B1
Pencils: F5-G5
Plate: C4
Rabbit: B4-C4
Raven: C3
Ribbon: D1-D2
Rifle: G2-G3
Screwdriver: F5
Shoelaces: C5-D5
Shovel: A3-A4-A5
Spear: A1
Spiderweb: G2
Spyglass: H2
Squirrel: F1
Stamp: E5-H5
Sun: H3
Sundial: G3-G4
Tire Swing: D2-F2
Tree Carving: F2
Vine: A2
Weight: E3
Wheel: D2
Wire Clippers: F5-G5
Written Message: G1
The Scarlet Stones - Paris Bistro
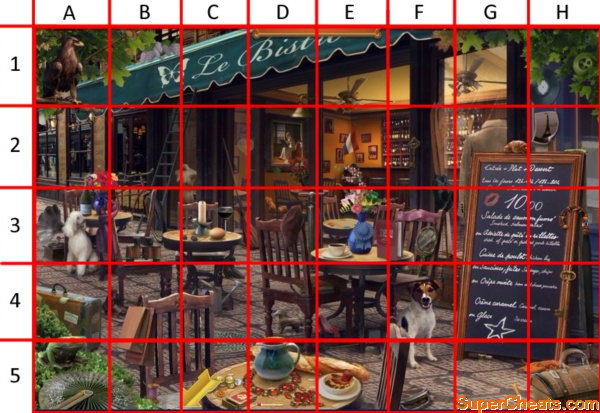
This bustling Paris Bistro is one of the first scenes you visit
Blue Ribbon: E3
Boot: C3-C4
Broom: C2-C3-D3
Butterfly: B1
Caterpillar: H2 (hard to spot, it is on the top right corner of the chalkboard).
Champagne: A3 (on the table)
Cigarette: G5
Chest: F4 (behind the dog)
Coffee Cup: E3
Coins: C5
Crayfish: H5
Creme Brulee: E5
Croissant: G2 (on the top of the chalkboard)
Egg: C3
Frog: A5
Gramophone: A3
Hawk: A1
Ice Skate: B4
Jade Button: H1
Kiss: G3 (on the chalkboard next to the price)
Ladder: B2
Manhole: C4-C5
Measuring Tape: E4-E5
Menu: E3-E4
Picnic Basket: H5
Pitcher: D5
Poodle: A3
Record: H1 (attached to the wall)
Roses: D2
Russel Terrier: F4
Scarf: A3-B3
Shopping Bags: B4-B5
Skis: F2
Stiletto Shoe: E4
Suitcase: A4
Thread: B5 (on the chair)
Umbrella: H3-H4
Watering Can: C4
Wineglass: C3
Woman: D2 (in the picture)
Orient Express
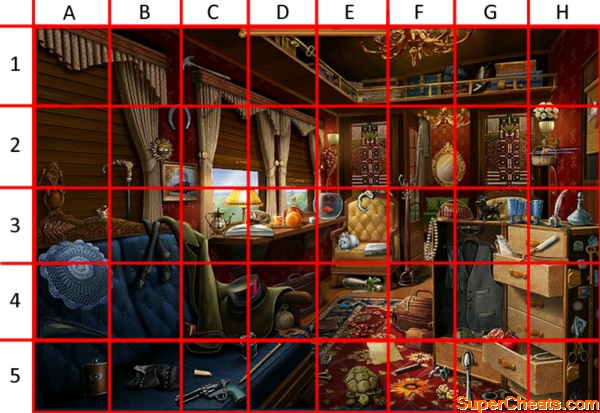
There's no time to take in the scenery...get searching for the items!
Black Gloves: F3-F4-G3-G4
Black Stockings: B3
Briefcase: D4
Bullet: C5
Cane: B2-B3
Coatrack: F2-F3-F4
Crystal Glassware: G3-H3
Dog: G3
Electric Fan: F1-F2
Fallen Vase: E4
Flask: A5
Goldfish: E3
Grapes: E2
Hammer: C1
Handcuffs: E3
Hat: C4-D4
Horseshoe: B2-C2
Inkwell: H3
Kitten: D3
Knitting Basket: H2
Lace Doily: A3-A4
Lighter: C4-C5-D4-D5
Newspaper: E3
Open Book: C3-D3
Orange: D3
Orange Juice: D3
Pearl Necklace: F3
Pocket Watch: D4
Purse: F3-G3
Razor: H3
Revolver: C5
Scissors: H4-H5
Spoon: G5
Steam Engine: B2-B3-C2-C3 (in the picture)
Sun: B2
Sunflower: F5
Sunglasses: G5
Teapot: C3
Tear: A4 (tear as in a rip in the seat)
Tortoise: E5
Trench Coat: F2
Wallet: E4
White Roses: H2
Writing Paper: E5-F5
Thief's Lair
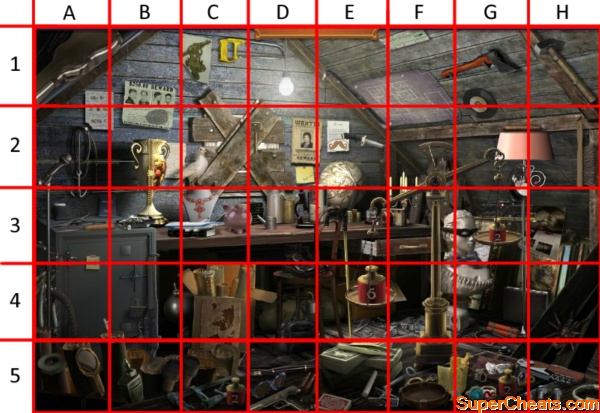
Blow off the dust and locate these items
Ashtray: F5
Axe: G1
Bandit Mask: G3
Binoculars: B5
Bomb: B4-C4
Bow Tie: G3-G4
Bullets: D5-E5
Camera: F3
Cane: E3-E4
Chalk: E5
Chisel: A3
Crumb Brush: H2
Drill: B5
Drill Bit: C2-D2
Duffel Bag: D4
Hacksaw: C1-D1
Knife: E2
Leather Jacket: F2-F3-G2-G3
Magazine: E4-F4
Military Boots: D3-D4
Mustache: E2
Pen: D5
Pigeon: C2
Piggy Bank: C3-D3
Pistol: D5
Record: G1-G2
Roll of Tape: A5
Tape Recorder: D3-E3
Tweezers: E5
Wanted Poster: D2-E2
A Haunting Melody - Cremona Workshop
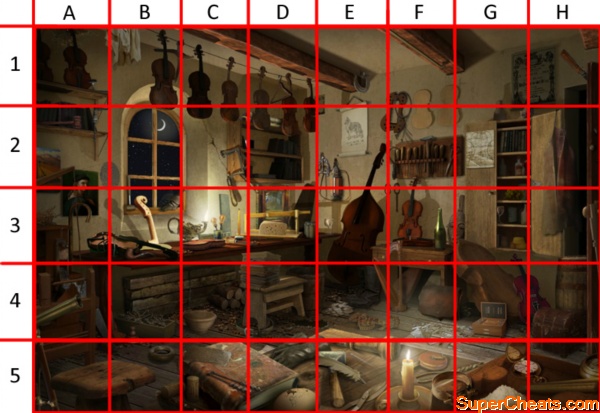
All the tools of the trade can be spotted here
Barrel: H3-H4
Belt:C4-D4
Broken Glass: F4-F5-G4-G5
Brown Mold: A1
Boots: E4
Bowl: C4
Buckets: D4-E4
Cane: A3
Chalk: G5
Cheese: D3
Chest: H4-H5
Clamp: F5-G5
Corks: B5-C5
Cracked Egg: D5
Dish: B5
Dog: E2
Grapes: G2-G3
Harp: E3-E4-F3-F4
Hinge: H2
Incense: H5
Jewelry Box: F5
Measuring Tape: E4-F4
Pigeon: B3-C3
Pocketwatch: G5-H5
Rag: B1
Satchel: F4
Scissors: F2-G2
Scrub Brush: B4-B5
Smoking Pipe: B3
Stack of Beams: B4-C4
Stack of Papers: C3-C4-D3-D4
Telescope: A5
Tweezers: F5
Wine Glass: E3
Vionlin Strings: E2-F1-F2
Vionlin Blueprint: G2
Wine Glass: G3
Wax: G3
Wooden Dowels: H5
Orchestra Room
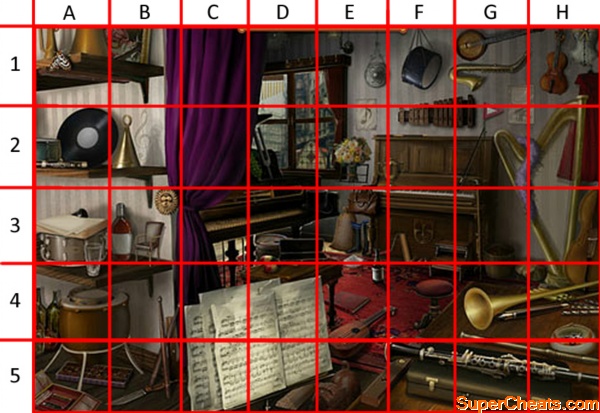
Can you spot any that you play?
Banjo: G1
Barrel: D3
Blank Paper: A3
Blue Drum: F1
Box of Chocolates: A5-B5
Bucket: G3-G4
Cane: G2-G3-G4
Cape: H1-H2
Clarinet: E5-F5-G5-H5
Conductor's Wand: E2-F2
Corset: H1
Cowbell: B2
Cymbals: G4-H4
Dog: E5
Drinking Glass: B3
Drum Sticks: B4-B5
Feather Boa: G2-G3-H2-H3
Flag: G1-G2
Gaslamp: E1
Grapes: D2
Makeup Kit: A5
Maracas: D3-D4
Moth: A1
Pen: G4-H4
Piano Poster: G1-G2-H1-H2
Record: A2-B2
Red Book: E4
Sandbag: E3
Saxophone: F1-G1
Sheet Music: C4-C5-D4-D5-E4-E5
Smiling Mask: F3
Spiderweb: D1
Stained glass: D2-E2
Stepping Stool: F3-F4-G3-G4
Sun: B3
Tambourine: A4
Top Hat: D3-E3
Toy Chair: A3-A4
Trophy: E2-F2
Trumpet: G4-H4
Quarter Note: D2
Waxed Bottles: A4
Wind Chimes: D1
Wine Bottle: E3-E4
Xylophone: F1-F2-G1-G2
Xylophone Piece: E5-F5
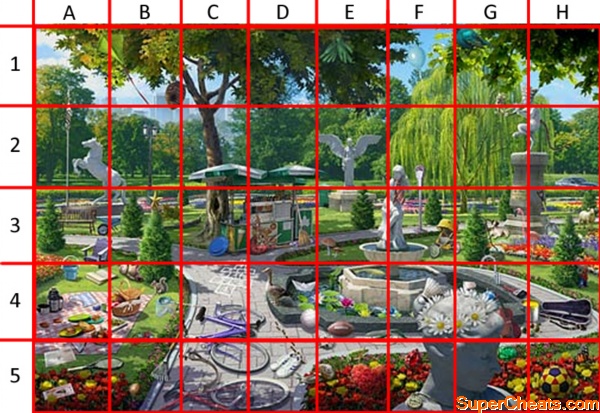
Central Park was much tidier than this last time I was there
Ants: D4-D5
Bagpipe: D3
Ball: D4
Baloon: F1
Baseball: B5
Beehive: B1-B2-C1
Bench: A3
Bluebird: G1
Blue Lily: E4-F4
Brass Plaque: G2-G3
Broken Branch: B3-C3
Broom: D3
Bucket: A3-A4
Butterfly: H5
Car: H2-H3
Crown: G1-H1
Crumpled: E4-E5
Daisies: F4-G4
Dog: G3
Dog Leash: C5
Emerald: G5
Faucet: G3-G4
Flagpole: A1-A2-A3
Flamingo: G3-H3
Flying Disc: C3
Football: E4
Frog: E5
Gnome: H3-H4
Goose: D4
Green Gloves: E1
Heart: E5-F5
Hopscotch: C3-C4-D4
Horn: G1-G2
Ice Cream: C3
Jump Rope: E4-E5-F4-F5
Lawn Chair: A3
Kite: A1-B1
Knot Hole: C3
Koi: E4
Lamp: B2
Lawn Dart: B4-B5
Lawnmower: G3
Letter: A5
Marbles: G4-H4
Mushrooms: E3
Net: B4
Open Book: A4-B4
Paint: G4-H4
Paint Brush: B5-C5
Paper Boat: D4
Parking Meter: F2-F3
Paper Cup: G4
Patch: A4
Picnic Basket: B4
Rake: B4-B5-C4
Rubbish Bin: E2-E3
Ruby: F5
Sheep: H3
Shovel: H3
Shuttlecock: F4
Snail: D5-E5
Soccer Ball: H5
Squirrel: B4
Star: B3
Stroller: F3-G3
Tail: H2
Tennis Racquet: A5-B5
Tennis Shoes: D5
Thermos: A4
Ticket: A5
Tie: F2-F3
Violin: G4
Violin Case: H4
Wheelbarrow: A3-B3
Watch: F5
Manhattan Alley
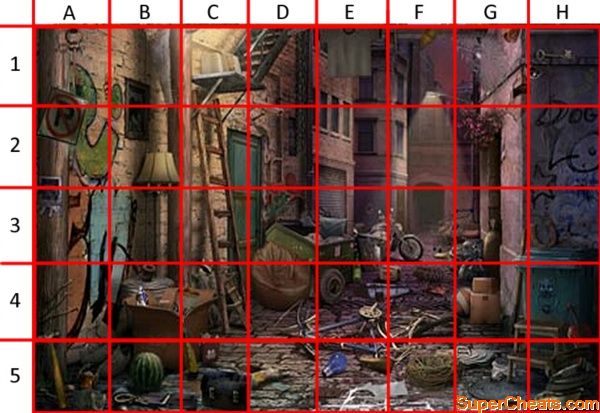
There must be some rats here somewhere
Blue Bulb: E5
Book: C1
Chinese Take-out: C4-C5
Clothing Iron: H5
Floor Lamp: B2-B3
Footprint: H1
Gear: E4
Hammer: A4-A5
Hanging Flowers: G2
Heart: D2-D3
Horseshoe: H4
Lion: H4
Lunchbox: C1
Moth: F1
Motorcycle: E3-F3
Mouse: A5
No Parking: A1-A2
Oil Spill: E4-F4
Pipe Wrench: C4-D4
Raccoon: C3-C4
Security Camera: D1-D2
Shopping Cart: F3-G3
Shovel: G3-G4
Smoking Pipe: B3-B4
Spiderweb: G1
Stepping Stool: G4-G5
Tennis Shoes: A5-B5
Trash Bag: G3-G4
T-Shirt: E1
Twine: F5
Volleyball: G4
Watermelon: B5
Journey in Jade - Mayan Temple
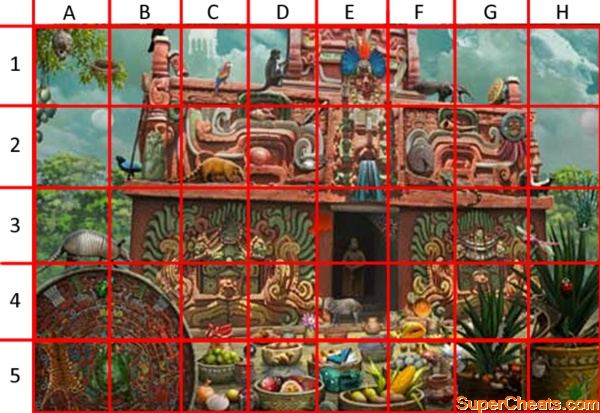
This colorful scene is stuffed with fruit
Caterpillar: G4-G5
Chilies: C4
Conch Shell: D2
Corn: F5
Corn Grinder: E4-E5-F4-F5
Crystal Skull: F1-G1
Dragonfly: G3-H3
Empty Bowl: E4-E5
Figurine: E3-E4
Gold Necklace: E1-E2
Grasshopper: B4
Headdress: E1
Hornets' Nest: A1
King Snake: F5
Jaguar Pelt: A5
Jug: E4
Ladybug: H4
Lobster: B4-B5
Mayan Breastplate: G3
Mayan Drum: G1
Moon: A2-B2
Papaya: F4
Rat: C5-D5
Red Drips: D3-E4
Scarab Beetle: A4-B4
Skunk: G2-G3-H2-H3
Sliced Onion: C5
Spider Monkey: D1
Sundial: F2
Tarantula: E3-F3
Toucan: B1
Waterfall: E2-E3
White Splatter: C1
Yucatan Blue Jay: B1
Conquistador Camp
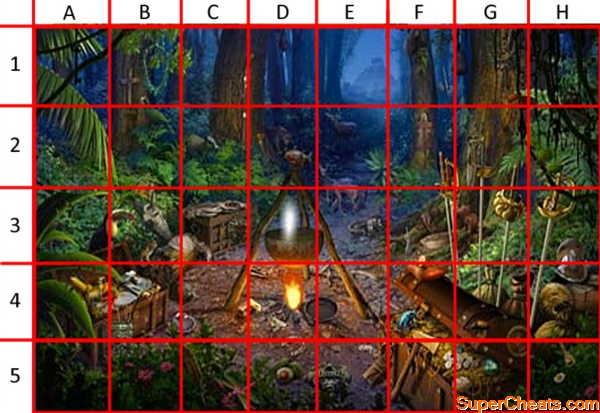
This is a very richly decorated scene
Avocados: D5
Black Beans: C4
Boa Constrictor: A1-A2
Bound Journal: E5-F5
Buckler Shield: F5
Cannonballs: D4
Conquistador Helmet: H3-H4
Crab: A5
Deer: E2
Emerald Necklace: B1
Gold Disc: H4
Golden Axe: F4-F5
Hairless Dogs: E2-E3
Horseshoe: D4-D5
Jade Mask: D5-E5
Jaguar: D2
Jaguar Pelt: F2
Ladle: D3
Matchlock Rifle: C1-C2-D1-D2
Monarch Butterfly: G1
Monkey: F1
Mouse: C1
Parrot: B1-B2
Poisonous Frog: F4
Powder Flask: E4
Scallop Shell Bowl: B4-C4
Tortillas: B3-C3
Toucan: A3-B3
Quill: C5
Wooden Cross: B1
Woven Basket: F3-G3
Underwater Wreckage

Clearly one of the few places you can still find colorful coral reefs
Broken Mirror: C4
Cannonball: F2
Chest Plate: G1-G2
Clown Fish: F4-F5
Crab: H3
Cracked Vase: E4-F4
Crown: C1-C2
Electric Eel: E2
Fishing Rod: G1-H1
Fork: G4-G5
Giant Clam: H2-H3
Helmet: C2-C3
Hook: A1
Horseshoe: H3
Jellyfish: F1-G1
Knife: A4-A5
Lantern: B3-B4
Lionfish: B3
Lobster: D2
Locket: D5
Pirate Hat: C2
Scallop: F5-G5
Seal: D1
Sea Urchin: D4-D5
Shark: H1
Ship Wheel: H2
Shovel: D3
Spanish Eagle: D1-D2
Squid: B1
Starfish: D3
Stingray: B1
Tankard: G3
Treasure Chest: E3
Whistle: E4-F4
Voodoo Shop
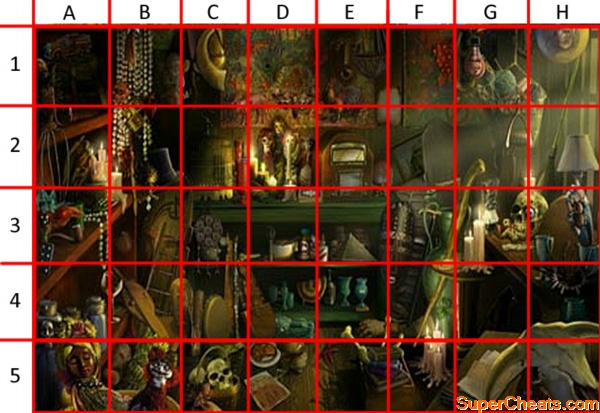
Touch these items at your own risk!
Berries: F1
Books: E5-F5
Burned Paper: E1-E2-F1-F2
Cage: C2-C3
Cajun Food: D5
Cajun Spice: D3
Cat: G4
Cherub: B1-C1
Chili Peppers: E5
Clarinet: C3-C4
Clock: B1-C1
Creole Doll: A5
Crystal Globe: E2-F3-F2-F3
Grave Tracing: D5
Handprint: E5
Hanging Flower Pot: E1
Hat: B2
Horsehoe: E1-F1
Ladder: B3-B4
Lamp Shade: H2
Lightning: D1
Lock of Hair: B1
Love Potion: G1
Moth: D1-D2
Mushrooms: D5
Old Bottle: E4
Painting: F2
Peacock Feather: D1
Pipe: A3
Plain Skull: C5
Porcelain Doll: D2
Snake Eyes: B1-B2
Stationery: G5
Tarantula: H3
Toad: C4-C5
Midwest Kitchen
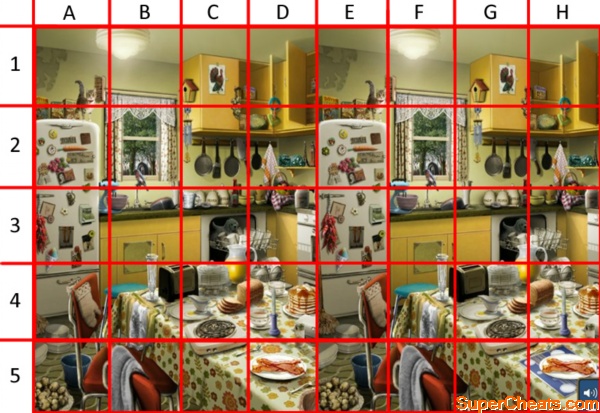
Lots of food on offer now
Bird: B2-B3
Birdhouse: C1
Bread: C4-C5
Bucket: A5
Cabbage/Lettuce: D2
Cake Dish: C3-C4
Carrot Magnet: A2
Cat: A1-A2
Cookie Jar: D2-D3
Dish Towel: D2
Fridge Magnet: A2-A3
Gravy Dish: C4
Hot Plate: C4-C5
Knife: C2-D2
Lace: B1-B2
Measuring Cup: C3
Oven Mitt: A4
Pan: B3
Peppers: A3
Placemat: D5
Plaque: B3-B4
Plates: A4-A5
Raddish Magnet: A2
Rattle: D1-D2
Rooster: C1
Snow Cone Magnet: A3-A4
Stand Mixer: A2-A3-B2-B3
Stool: B4
Towel: B5
Wind Chime: C2


 Destiny PS4/PS3 Trophies Revealed
 How The Walking Dead Used Artificiality To Heighten Emotion
 Castlevania: Lords of Shadow Producer Admits DLC was a Mistake
 Fallout 4: End of the Line walkthrough
 Xenoblade Chronicles X: Combat Guide with Tips and Tricks for Beginners