Leaving previous hero Nathan Hale behind, jump into the future with a new protagonist and a new mission. With the Chimera Fleet destroyed at the end of Resistance 2, it’s time to stop their plans to bring reinforcements from New York. The weapon wheel of Resistance 1 makes a triumphant return with more of the series’ creative weapons, now upgradable. Explore the more open-ended environment, and watch your health — regeneration has been cut, making the newest Resistance a furious combination of new and old FPS styles.
Resistance is futile, check out Game Front’s many lists — we have trophies, and cheats.
Check back after release for updates.
Journal Locations
Resistance 3 Walkthrough
Video Walkthrough
Resistance 3 Walkthrough
Chapter 1 – Home
JOURNAL:After waking up, Joe Capelli, the man who killed Nathan Hale in the last game, looks fondly at his son in the underground shelter. Take a moment to check out your surroundings and grab the first journal, Feral vs. Military, that sits right next to Capelli’s wife Susan.
Capelli has to make his way to the training grounds and meet up with Dale, the community’s armory expert. Make your way through the underground structure, following the waypoint beacon, en route to the shooting range.
JOURNAL:As you make your way through the shelter, pick up the Postcard from Bogota journal in a bedroom near a lady on a rocking chair. Probably The journal is lying on the bed.
Once you make it to the shooting range, familiarize yourself with the classic Chimeran weapon the Bullseye. Fire the primary weapon with R1. In order to survive the Chimeran onslaught, it is necessary to utilize each weapon’s alternative fire. Practice “tagging” a target with R2.
To make up for its weaker firepower, the Magnum now automatically tags its target with a small explosive. After laying down a couple of shots, press R2 to detonate the explosive and send your target and any nearby units flying away.
After shooting a couple of practice rounds, Capelli is alerted that a Chimeran death squad is on its way into the area. Follow Susan to a conference room where they discuss their plans.
The group plans to scout out the forces and hope they pass by without any fighting. Follow Lester through the tunnels to meet up with Nate in the bowling alley. The “scouting mission” turns ugly when the Chimera are alerted to the resistance’s presence and a battle breaks out.
Head out onto Main Street and engage the Chimeran force, who are storming in from the church ahead. There are plenty of cars and other rubble to use as cover (press Circle), so stay behind them and tag as many Chimera with Bullseye and Magnum utilizing each weapon’s alternative fire (especially the Magnum’s detonations) to eliminate the enemy waves.
Return to the Resistance 3 Walkthrough Main Page
Resistance 3 Walkthrough
Boss: Stalker
After cleansing the front of the church of Chimera, turn around and make your way down the street to encounter the Stalker, a heavily armed, mechanical quadruped, chewing up the rest of the resistance’s numbers.
Don’t directly engage the Stalker head on, the four-legged beast rips apart Capelli’s health fast with machine gun fire and rockets that carpet him from above. Instead stay behind cover and attack it when its attention is focused elsewhere.
The Stalker is protected with shields that repel all gunfire and that field needs to be taken down before you can hope to put a dent in it. If you have some, switch to EMP grenades (d-pad right or left) and toss one at the shields to temporarily bring them down. Once down, you have only a few moments before the shields go back up, so pelt the Stalker with as much fire until the shields go back up.
The most effective place to hide out and attack is the “Icy Cream” stand that is in the center of the area. While strafing the Stalker, keep the stand in between it and Capelli for cover, peeking out and firing at it when you have the chance.
When your health is exhausted, head back toward the bowling alley and search around the nearby car and on the ramp entrance to find some health canisters.
As the battle heats up, climb the ladder up onto the roof of the stand and fire at it from there. While the billboards don’t last too long as cover, there is enough ammo (including more EMP grenades) and some health stashed up there to keep you in the battle for awhile.
The Stalker may seem invincible, but continue pummeling it when its shields are down and eventually the blasted thing will go down.
Return to the Resistance 3 Walkthrough Main Page
Resistance 3 Walkthrough
Chapter 2 – Wanted Man
The death squad is defeated, and Capelli returns to the shelter to his wife and son. Susan informs him that Tommy Dean hasn’t checked in and tells him he needs to check it out.
JOURNAL: As Capelli makes his way through the medical ward of the shelter, don’t miss the two journals that can be found in the area. The “Bite Protocol” journal sits on a desk at the foot of one of the patient’s beds. The other journal, a “Note to John Harper” rests near the chalkboard further into the ward.
Continue up to the house to return to the surface and equip yourself with the magnum bullets and shrapnel grenades found along the way.
Once Capelli is out of the house, he sees a dropship swoop down and unload a squad of Chimera onto the street ahead. You can remain on the second floor of the house and pick off the enemies from afar, or you can take the Chimera head on using the cars as cover.
With those troops down, head across the street to the house there and go up to the left garage door. Press and hold Square to open the garage.
JOURNAL: You find Tommy Dean hiding out in the house. This area is filled with health packs and ammo, including the “Leaper Bite” journal up the stairs. Take this opportunity to stock up on supplies—there are plenty more Chimeran death squads ahead.
Tommy has something he wants you to see, so follow him out into a cornfield. Several Chimera are patrolling the area, but don’t seem to know your position. Get there attention with some quick fire, or crouch down (Circle button) and stealthily move in for some melee action.
After clearing out the Chimera, move across the cornfield to Tommy’s position to see what the fuss is all about. A large terraformer is carving its way into the ground while more dropships fly overhead back to the shelter.
Return to the Resistance 3 Walkthrough Main Page
Resistance 3 Walkthrough
Chapter 3 – Paradise Lost
Capelli and Tommy must quickly return to the shelter before the Chimera overtake the base. There is no way Capelli can take on a force this large, so press down L3 to dash down the hills to the field below. Keep running, avoiding the Stalkers and that giant Goliath moving into the area, until you reach a house on the other side. Go through the collapsed roof to enter the house.
Stock up on supplies while passing through the house and get ready to fight off some Steelheads in the back of the farmhouse. The Steelheads carry one of the Chimera’s more creative weaponry, the Auger. For the uninformed, Augers can shoot through walls, have an X-ray scope and its secondary supplies the user with a temporary shield.
Barreling straight into a Steelhead with its shields up is suicide, so do everything you can to eliminate the Steelheads before it puts up it shields. If they do go up run around them to flank their positions or use an EMP grenade if you got any. Once you find an opening, tag the Steelhead with either magnum or the bullseye’s secondary fire to take them out. Don’t forget to equip Capelli with an Auger before moving on.
As you get inside the barn, use that newly acquired Auger’s X-Ray scope to spot a Hybrid and take out the unsuspecting Chimera through the wall. After Tommy opens up the barn, move out to the bridge and pick off any enemies moving in under the bridge. The firefight heats up when a dropship unloads a couple of bombs onto the bridge, opening up a path through the creek.
Follow Tommy as he runs through the dried up creek avoiding all the explosions to reach the abandoned saw mill on the other end.
Go up the stairs into the saw mill ahead and load up on supplies before traveling through the complex.
Of course, there are tons of Chimera stationed around the mill. The enemies are simply patrolling the area, so use the Auger to scout out the enemy groupings and move in for the kill.
There are a couple of Hybrids making the rounds near the storage crates to the right and some are positioned on the stairway of the large mill on the right.
You can choose to attack the Chimeran groups head on, using whatever cover you can find in the mill, or you can climb the ladder in the building on the left to take out the Hybrids from above. As you take out the first wave be prepared for the next wave to come in from another dropship.
With the mill grounds clear, follow Tommy up the stairs leading to the main building. A lone Steelhead blocks your path into the building, flank his position or toss an EMP grenade to get him out of the way.
Run through the main mill, taking out any Hybrids along the way, until Tommy leads Capelli to a metal sheet at the edge of the building.
Pull free the metal sheet to reach the open field on the other side. There, the Haven forces are doing their best to defend the shelter. Move in from behind and take out the remaining Hybrids and and Steelheads and meet up with the rest of the survivors at the covered bridge.
Return to the Resistance 3 Walkthrough Main Page
Resistance 3 Walkthrough
Chapter 4 – Women and Children First
Follow Lester and the rest of the company southeast, into a shop that leads to the junkyard. There are Haven troops getting hammered on the other side of that door.
Take the Marksman from Lester and take position on the building to the right. Go up the stairs to the second floor for a birds-eye-view of the junkyard. Place a turret at the top of the stairs to cover your back and start to pick off the enemies from afar.
The Chimera notice your position and may hole themselves in the garage on the north end of the junkyard. Drop down and throw a grenade down there to flush them out.
Move in and out of the high ground, going down to pick up health or ammo.
After a couple of hybrid waves, another Chimeran creature, the Longlegs, leaps into the battle. Switch to the Bullseye and return to the second story of the house. From the high ground, tag the jumping beasts and send a stream of bullets at them.
After pulling the legs out from under some Chimera, group up with the troops in the alleyways to return to town square. While Lester works on the door ahead, shoot down the Longlegs that drop in to say hello.
Once back in the town square, defend the area from the Hybrids and Longlegs swarming into the area. Stay back near the shop and pick off the Longlegs first before moving into the center of the square to engage the Hybrids.
A couple more dropships appear and unload more waves of Hybrids, Longlegs and Steelheads into the square. Switch to the Auger here to locate them and engage each Chimera one at a time.
Resistance 3 Walkthrough
BOSS: Brawler
After you’ve taken out all the invaders, a large heavily armored Brawler comes charging into the square. The savage giant attacks Capelli and crew with several attacks.
At first, the Brawler charges and swipes at everything it lays it eyes on. Let your teammates distract the beast and attack it when its not focused on Capelli. When the beasts focus does return to you, remember that the thing charges full speed ahead, so wait for it to start its run then move away.
When the Brawler slams the ground in anger, it unleashes a shockwave that pushes back anything nearby.
The “icy cream” roof is not a safe haven either. During the encounter, the Chimeran brute jumps onto the roof and fires shots from the cannons attached to its wrists.
Evade all the Brawler’s attacks and counter all your fire on the Brawler’s weak spots. You can find them by looking for any glowing areas on the Brawler and by looking through the Auger’s x-ray sights. Take out the weak spots in this order: the shoulders, fists, and finally the chest.
With the Brawler down, head to the church and get the hell out of Haven before the terraformer arrives.
Return to the Resistance 3 Walkthrough Main Page
Resistance 3 Walkthrough
Chapter 5 – Wrightsburg
Capelli reluctantly agrees to escort Professor Malikov to New York in hopes to stop the Chimeran menace once and for all. They begin their journey aboard a small motorboat.
The boat is enough to make anyone claustrophobic, but you have to bear with this vessel for a awhile. Know the layout and you’ll make it to your destination unscathed. Open the box on the boat’s bow (front) for unlimited ammo and the small space in between the cabin of the boat has an unlimited health compartment. Return to any of those positions when you run low on supplies.
JOURNAL: Two more journals are here on the boat. Pick up the “Ice Blocks” journal near the cabin on a box and grab the other “Change of Strategy” journal on the floor near the ship’s bow.
Once Malikov steers the boat past a large thankfully deceased Kraken, the good doctor hands Capelli some new arsenal, the Rossmore shotgun. After practicing firing the bad boy on some highly explosive plant bulbs, the boat continues along its route.
Clear out the ice that stops the boat and the small ship starts to travel along a submerged main street. Alerted by the boats presence, Grims start to pour out of the buildings and attack Capelli and crew.
Constantly move from bow to stern, taking out any Grims that try to board the vessel. Keep the shotgun and the bulleye handy—the rossmore is perfect for boarders and the bullseye is great for the midrange foes. Continue to circle the boat and replenish supplies when near one of the boxes.
Several Grims camp out on the roofs and cast stones down upon Capelli and crew. You can take them out, but don’t forget about the Grims near and on the boat.
There are plenty of explosive bulbs attached to some of the buildings. Aim for the yellow hue and clear out more Grims with the explosions.
Several large blocks of ice halt the boat’s route. Also several Grims take advantage of the unmoving boat and simultaneously jump in. Switch to the Marksman and drop off some turrets near the stern to hold them off while you work on the ice.
The open water “safety” is short lived, as a group of Shock Drones fly at the boat to attack its occupants. The first wave of drones come flying in from the bow, so take cover near stern and keep the cabin in between you and the enemy. After you pick off the first wave, another group of drones swoops in from the rear.
Malikov stops the boat and Capelli stands in awe of the mechanical juggernaut. Once the thing is right next to the boat, watch out for more drones to come in to make you forcibly close that dropped jaw.
TROPHY: After you pass the Goliath, scan the roofs of the buildings ahead for a Santa and reindeer decoration. Shoot Old St. Nick down by shooting the yellow exploding bulbs and earn one of the only level specific trohpies: Slaybells.
That Goliath must have noticed your little boat earlier. The four-legged behemoth returns chasing down the boat and raining down missile fire. Even worse, more drones and those annoying high flying Longlegs join the party too.
Lay down some turrets to help you take out the drones, and tag some Longlegs with the bullseye. Maintain your health and ammo during the brunt of the battle to survive.
Destroy the ice that stops the boat again and hold off the drones and Longlegs while the boat picks up more speed.
Capelli and company think they escaped the Goliath and are surprised to run into three of them. The terrible trio brings down the boat, leaving the professor and “movie star” Capelli in St. Loius.
Resistance 3 Walkthrough
Chapter 6 – City of the Past
Capelli and Malikov seem to have survived the attack on the boat. They awakened in a train yard in the middle of St. Louis.
Follow the hobbled Malikov between a couple of train cars to a locked gate. While he waits here, you need to find something to open the gate.
Some of the cars behind Capelli have yellow spray paint on them. Follow the arrows and they will guide you to the switch to unlock the gate.
Head straight behind the locked gate, hang a small right and go through the open car. Make a left from the car, continue forward and turn left after the car labeled “danger/warning/infested.”
JOURNAL: After the infested car continue forward and go up the ramp. Go through an opening in the fence and the “Staying Warm” journal sits here.
Along the way, pay close attention to the small number of leapers crawling about. They are annoying little critters on their own, but in groups they can be dangerous.
JOURNAL: Climb the ladder onto the train car and move down the cars until you see a wood bridge connecting to a car on the left. The ” A Tragic Paradox” journal stands there right next to the rossmore ammo.
Continue to the multiple yellow bulbs at the far end of the yard and jump off the train over the fence. Dispatch the leapers that rush you and pull the lever next to the gate.
Take the elevator with Malikov and witness first hand a large creature, aptly named the Widowmaker, stomping into and out of view.
JOURNAL: Malikov finds a place to rest and Capelli finds a place to gather ammo and health. On the bed next to the Professor is a “VTOL Manual” journal.
After stocking up, go to the open window and zipline to the building across the street.
JOURNAL: Drop down to the collapsed floor after the zipline ride. Pick up the “Gotta Get Out” journal on a shelf next to another spray painted message.
Open the garage door to enter the basement of this factory. Move through the dark factory basement, through the strange pulsating walls, to a new weapon: the Atomizer. There are a couple of Grims waiting for Cappelli in the basement. Greet them with an electric shock from your new toy.
Go up the stairs to the next floor where a crowd of Grims gang up on Cappleli. Fire the Atomizer’s secondary weapon to unleash drop a small device that shocks all nearby enemies, and then sucks them up into a vortex.
Continue forward past the manufacturing drums, grab some ammo and health inside the fenced area to the left, and continue up to the next floor.
Switch to the shotgun and blast your way through the Grims popping all around the second floor. Continue to explore the floor and destroy any pods along the way. There may be some ammo or health inside.
JOURNAL: Cross the metal bridge to the other side and drop down into an office below. There are loads of ammo and health as well as a “Quarantine” journal here.
Find and flip the switch in the control room next to the office to lower the catwalk outside. Return to the second floor and cross the newly lowered bridge.
Go up the stairs across the bridge up to the third floor of the factory. Make your way across the bridge and go down to the corner of the building. Yet another deluge of Grims await Capelli on this floor too. Evade the Grims to bunch them together and finish them off with some buckshots, atomizer blasts or anything else that will clear them out.
JOURNAL: Turn left on the opposite side of the fallen smoke stack to a broken walkway. Leap across the gap to find some ammo and the “Safety Violation” journal.
After you cleanse the Grim factory, enter the fallen smokestack on the corner of this floor. Run down the makeshift tunnel into a storage room. When you’re ready, bend open the metal grate to continue your search.
JOURNAL: Stroll through the rest of the storehouse, picking off the leapers inside, and look left to spot the “It’s Just Me Now” journal. Continue down the hall and climb the ladder in the small room at the end.
To reach the next floor, look up and find the target on the level above you. Shoot it and a ladder slides down, giving Capelli access to the next floor. Equip the sniper favorite, the Deadeye, scout out the window in the corner and take out the Chimera on the rooftops across the street.
JOURNAL: After Capelli readies his sniper scope, collect the “Girl’s Best Friend” journal next to the window.
With the adjacent building clear, drop down the hole, to the left of the window. Go down the hallway and aim at the target place on the building across the street and shoot it, extending a bridge.
Go across the bridge and into the building. Grab the EMP grenade in the kitchen and head up the stairs. At the top of the stairway, Capelli discovers small pods growing everywhere. If you have Atomizer ammo (especially the secondary fire), fry the swarm of leapers that come from the pods.
JOURNAL: Go down the hall of this floor and enter the first room on the left and file the “Letter to Santa” journal on the couch next to the wilted Christmas tree. There are also presents under the tree, so stock up on ammo and health.
Now that all the leapers are gone, get to the end of the hall and bend open the metal grate there.


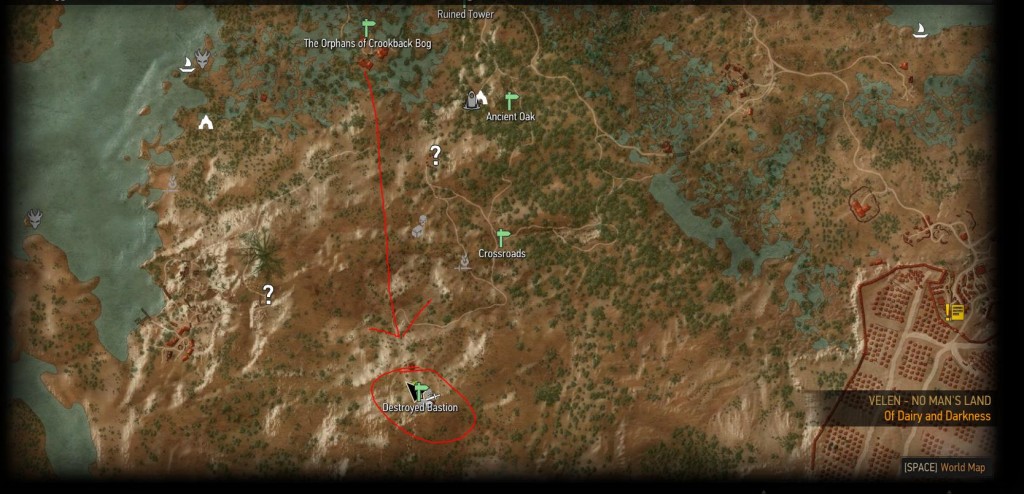 The Witcher 3 : How To Get Ursine Armor Set And Ursine Swords, Location, Diagram And Stats
 FIFA 15 Hidden Gems in Career Mode - Top 5
 Wolfenstein: The New Order Trophies
 The Last of Us Remastered Artifacts Guide
 Tomb Raider Guide (Part 6)