Feelings of revulsion towards insects are a nearly universal human trait. If those insects are gigantic, those feelings are understandably even stronger. Thank god, then, for Earth Defense Force: Insect Armageddon, a game that allows players to enact bloody revenge against oversized creepy-crawlies.
Featuring around 300 weapons, online and local co-op, and a wealth of customization options and modes, EDF aims to offer a shooter experience with a wealth of replayability. If replayability doesn’t float your boat, how about the promise of jetpacks? There’s likely to be a fair amount of challenge involved, too, so stay tuned for a full walkthrough. We’ll also have pages with achievements, trophies, and cheats.
This page is a work in progress. Content will be added as soon as possible. Please bear with us.
Chapter 1: Neighborhood Watch
Mission 1: Invasion Alert
Welcome to New Detroit. After the loading screen and introduction, you’ll have your choice of four armor classes. During each of the first four missions, you’ll have the option to unlock these armor classes one at a time for future use.This is the first mission, so pick whoever you want. Load-outs and weapon choice will become more important later, but for now, just bring an assault rifle and a rocket launcher. The Trooper armor class will do well here.
The mission itself begins with a rail-shooting section. Giant ants are below running rampant through the streets, so squish a few to improve your score. Keep blasting until you land, they can’t hurt you – yet.
As you land, exterminate the giant ants in the park ahead. Red blips will appear on your mini-map, for now, it’s just giant ants. Ants march in large packs, they’re fast and will move in close to launch blasts of acid, or simply bite.
Fight your way though the ant hordes to the crashed lander on your waypoint. Stick close to the AI for support, if you die they’ll revive you.
At the crashed lander, look for a green transponder on the left side of the lander. Hold [Y] or [Triangle] to interact and activate the objective.
After activating the transponder, ants will burrow out of the ground all around the crash. Take them out and you’ll be ordered to set an explosive on the lander.
Setting explosives will draw even more bugs towards the crash site. Clear out and let the bomb take care of a good chunk of them before clearing out the rest.
Move to your next objective, it’s on the minimap signified by a yellow triangle. At the green smoke you’ll reach a mission to destroy any remaining enemies. You’ll see a red circle and skull appear on the map, ants will converge on this position. Just keep shooting and retreating, you’ve got the entire map to play with if you need to run.
Next, you’ll return to the park where an anthill has appeared. Anthills will continuously spawn swarms of ants or other bugs while they’re open. To permanently close an anthill, you’ll need to run onto it and set a bomb. Setting a bomb is hard while ants are pouring it – to help stem the tide of enemies, shoot the anthill itself with explosives to temporarily shut it.
One less anthill. Clean up the mess of ants still rushing to your position. Remember to collect extra health packs, they’ll stack and double your health bar.
Another waypoint will lead you back into the neighborhood. Fight the ant ambush, this is a small group and shouldn’t be a problem. As always, you’ll be surrounded and outnumbered.
An anthill opens up near a park not so far away, inside of a crater. You know what to do, clear the ants and use explosives to blast the ants as they crawl out of the anthill. When the anthill is temporarily closed, move in to set explosives.
The waypoint afterwards will lead you to a re-supply station. Collect one of the large health packs to double your armor, but don’t grab them all unless you need them. A dangerous enemy is ahead, so don’t go wasting those health packs.
Just beyond the supply station, stand near the green smoke. A new enemy called a Hector will dramatically show up and attack. These giant robots are nasty, they attack with a stream of missiles, energy blasts, and energy bombs. They’re fast, able to run circle around you, and if you’re too close they’ll pound the ground and send you flying.
The Hector’s weakness is fairly obvious – shoot the chest and just keep running. You’ll learn to run a lot in Earth Defense Force, there’s never a reason to stop.
When the Hector is dead, move to the last waypoint to complete your first big mission.
Mission 2: Firebase Clyde
One of the EDF fire bases is under attack just ahead of your starting position. Run forward, and shoot down the ants swarming the base up the road.
As you approach the base, you’ll see the ants are spawning from an anthill. Shut it permanently and kill any ants remaining to secure the base.
Now that you have the base, you’ll have to hold it. Lucky for you, there’s some helpful supplies and a turret around the center. Jump into the Autocannon Turret to drill the incoming swarms of ants. Just be careful not to let the turret overheat.
More ants will attack from a different direction, so keep an eye on your map. If your turret is surrounded, jump out and draw the ants away on foot before returning. When you’ve killed enough ants, a lander will stop by for a special delivery.
The lander drops an Anti-Tank Turret, its slower but packs a more power punch. Hectors are incoming, aim for their red chests and take them out as they approach. Ants are accompanying them, making the battle just that much more difficult.
After the Hectors and ants have fallen, you’ll be pointed towards a new rally point. Swarms of ants will try to stop you on your way there, and another swarm of ants will attack at the waypoint itself.
A question mark will appear on your map. Question marks show the general location of Ravager anthills. Fight towards the waypoint, where swarms of attacks will attack you every step of the way. Don’t bother fighting every ant, they aren’t so fast, and eventually they’ll give up chasing you.
Nearing the question mark, you’ll see several anthills. Close them up one at a time. It’s tricky, but you’ll manage with some good explosive weapons and a fast trigger. After knocking out the first anthill, you’ll encounter some new enemies.
Tickers are the fat little ticks that will swarm around you. Their single attack is to jump onto your character and explode. They’re weak, and if you keep moving they’ll have a hard time latching on.
The second new enemy is the gunship. Gunships are flying Ravager craft that will constantly strafe your position with laser beams and energy blasts. They can be tricky to shoot down, a good assault rifle or missile launcher will do the trick. The best time to shoot is when they stop and prepare their laser.
Gunships are very weak, they’ll drop with just a little grazing fire. The gunships are dangerous, but the anthills should be your priority. Knock out the second and third anthills, then clear the enemies in or around the area.
After that exciting action, run to the waypoint and wait to complete the mission.
Mission 3: On The Run
Unlock another armor class, and don’t forget to bring some weapons – an assault rifle and a missile launcher will be useful.
As the mission starts, you’ll get a glimpse of your newest threat. The Carrier will spawn Ravagers indefinitely until it is destroyed. It doesn’t fight back, but they take plenty of damage before crashing, making a fight with them a tough prospect.
Move to the center of the park and start taking down enemies. Ants and gunships will swarm from both carriers above, while bombs lay waste to the city. Stay in the park, and do not move towards the carriers.
Fight the ants and gunships long enough, and you’ll be ordered to fall back. Move towards the waypoint, shooting any ants in your path. Don’t bother fighting everything, just keep running.
At the fallback location, you’ll find two Anti-Air Turrets that will be handy for dealing with the gunships and carriers. Jump into one and start knocking gunships out of the sky.
Eventually, ants will swarm towards the base. The turrets are useless against ants, so jump out and fight them on foot. As the carriers close in, move to yet another location.
This time, you’ll be up against giant spiders. The spiders are nasty, they don’t charge like ants, instead they leap from place to place while spitting a sticky string of spiderweb at you. If you touch the webbing, you’ll be slowed for several seconds, adding another nasty layer to these spiders.
Now you can fight the carriers. Aim for the red hatches when they open to spawn enemies. Usually enemies will only drop from one of the hatches – aim for the empty hatch to maximize your damage. Once the red light starts to darken and turn black, you know you’ve almost won.
After the carriers are taken out, move towards your new waypoint into a storm drain filled with ants and tickers. Shoot through them to reach the green smoke, they’ll just keep coming.
At the green smoke, wait until you’re pointed to a new location. Like before, fight towards it – this time you’ll have to defend the drainage doors until they can be opened. You’ll be swarmed by spiders, ants, tickers, and gunships. This battle gets hectic fast, so keep moving, keep shooting, and retreat back down through the drainage ditch if you need some breathing room.
When the doors finally open, you’ve completed the mission.
Mission 4: Ditchslap
Starting another mission in another ditch. Try to bring a missile launcher, it’ll make taking care of the carrier much easier. Don’t worry about that for now.
For now, jump into one of the mechs landers drop for your team. Mechs are handy devices, with a cannon and minigun. They’re slow, but tough and powerful. You’ll need the mechs to punch through the incoming Ravager hordes.
Follow the straight ditch to the end, shooting the Hectors, ants, and spiders. There’s plenty of them, but your mech makes these bugs no problem at all.
At the end of the ditch, you’ll find a cracked wall. Set an explosive charge and run through the tunnel below. Sadly, you won’t be able to bring your mech with you.
Inside the tunnels, you’ll find swarms of ants. Three anthills are spawning them, so destroy the hills one at a time, starting with the closest and ending with the furthest. The ants won’t wander too far from their anthills.
As you leave the tunnel, heading up the slope, a small swarm of ants will ambush through the large tunnel opening. Take care of them and move to the stairs to reach the bridge above.
Near the bridge, run across and destroy yet another anthill. Just the one this time, that is, until you reach your next waypoint.
At the green smoke, you’ll have to destroy all the Ravagers, and a Carrier. The Carrier is the big problem, if you’re having trouble taking it down, try returning to the mech you left behind and shooting the carrier down from across the level.
When the carrier is down, it’s a fairly simple job of mopping up the gunships, spiders, and ants. Move to the last waypoint to complete the mission.
Mission 5: The Daddy
Time for the big finale of Chapter 1. Bring long-range weapons while avoiding close-range stuff, like the Tactical armor’s weapons, shotguns, and grenade launchers.
At the start of the mission, squish the ants at the green smoke. After that, run towards the lander to make your escape. You’ll spot a mech and more in the park, but ignore those extra tools for now. Just run towards the lander.
Near the lander, swarms of gunships will attack. Knock the gunships out of the sky, until the Big Daddy Long Legs shows itself.
Daddy Long Legs is one tough opponent, it stomps around the stage, dropping enemies while shooting with a variety of dangerous energy blasts. Stay away from the giant spider robot for now, and focus on shooting down the vast group of gunships in the sky.
This is the time to grab the mech, as a carrier will appear to add even more Ravagers to the fight. The game starts to get hectic from here on out.
Once the carrier is destroyed, the Daddy Long Legs will begin spawning enemies of its own. Shoot the open bay to damage the monster.
Gunships, ants, spiders, and Hectors will all enter the fight to help the Daddy Long Legs. Either save the mech for this stage of the battle, or simply play it safe to keep your mech alive. The mech makes this battle much easier, without it you’re far more vulnerable.
Fight back the incoming hordes – your first priority should always be the Daddy Long Legs, but the Hectors and ants will kill you if they’re not dealt with. Split your attention between the regular enemies and the boss – focus on the ants and spiders while the Daddy Long Leg’s hatch is closed.
When the hatch is open, keep on the run, and do as much damage as you can, preferably with an explosive weapon.
Achievement / Trophy Unlocked: Patricide (10G) – You squished the Daddy Long Legs. Try it in your very own home, today.
After the Daddy Long Legs is dead, run to the green smoke to complete the stage.
Chapter 2: Fallen Birds
Mission 1: Industry
Pick your Armor class and upgrade when you need to. This is a new chapter, so the missions will start to ramp up in difficulty. Try to play as the same class every mission to gain more experience towards leveling up your chosen armor class.
If you’re having a lot of trouble, try playing previous missions on harder difficulty settings for an experience boosts. Replaying old missions will always get you experience, and every large enemy destroyed will usually drop a random weapon pick-up.
More large enemies will start appearing from here on out. Don’t forget that your AI allies are invaluable, they can and will kill the Ravagers with you. Even better, a couple of friends in local or online can make even the toughest missions manageable.
Starting the mission, take off over the bridge towards the green smoke. Ravagers ants will pop out, and when the lander crashes a carrier will zip into the area. This carrier is nasty, spawning swarms of gunships.
The carrier and gunships make your life hard if you didn’t bring the right weaponry. A good assault rifle, shotgun, or missile launcher will take out the gunships. A rocket launcher is best against the carrier, though missile launchers are also good, while sniper rifles are probably the best.
Grenade launchers are only useful against swarms of ground-based enemies. In most cases, you won’t have to worry too much about being completely overrun while playing the game on normal. Stick with all-around good weapons like the assault rifle and missile launcher that can take care of a variety of threats.
This opening fight against two carriers is a tricky one. Keep plugging away at those carriers, and shoot down the ant or gunship swarms before you’re overwhelmed.
You’ll have access to a tank during this first fight, as well. The tank isn’t bad, with a powerful cannon and two seats for your partners to shoot out from. The controls are a little tricky, and the thing is too sluggish to escape the swarm of ants – while being unable to shoot high enough to blast the carriers.
Leave the tank alone until after both carriers are downed. Then take it for a spin to the next objective.
Your objective is to locate the crash site and activate the transponder. The streets will be clear until you’re ordered to blow up the crash. Activate the self-destruct and swarms of Ravagers will burrow out of the ground.
Deal with the ants and Hectors as you move towards the waypoint where the crew is waiting. It’s a long trek, but nothing else will bother you on the way.
Linking up with the crew, you’ll need to protect them while Ravagers attack from all sides. This is a kill objective, so get to work cleaning up bugs.
The fight starts simply with huge swarms of ants graduating into spiders, and finally ending with the bomb spider.
The bomb spider is an enormous and grotesque spider that soaks up a crazy amount of damage while spawning tickers. The tickers make your life difficult, but the bomb spider is the real danger. Despite being huge, it’s a lot faster than normal spiders, and sprays acid instead of webbing.
Like all enemies, run around and shoot it until it’s dead. The execution is never that simple. Always know where extra health is and stay near while running if you need a quick boost. Shoot the tickers as they spawn, and just keep aiming for the giant pustule on the spider’s back.
Shoot the monster enough and it’ll die, dropping a medical kit and a special weapon. Finish off any remaining Ravagers, and move to the waypoint to finish the mission.
Mission 2: Predation
No, the fight isn’t about to get easier. As the mission starts, take off towards the crash site. A handful of ants will be crawling around the buildings.
At the waypoint, you’ll link up with more EDF soldiers. Down the street, a bomb spider will spawn with tickers. You’ve got a little bit of room, and the spider is a long ways off. Use the range to your advantage and do serious damage before the bomb spider is on top of you.
When the bomb spider bursts through the street barricades in your position, ants won’t be far behind. Kill all the insects before continuing on to the crash site.
The crash site itself is empty, but a group of spiders attacks from across the ditch. Destroy all the spiders, and a new enemy will appear.
The mantis is another giant robot, this one even more dangerous than the Hectors. It’s huge and it’s fast, with two giant blades for arms. It’ll slices forward with one huge wave of energy that’s tricky to dodge, or blast the area with a shock wave.
There are no weak points on the mantis, just shoot it wherever you can. The mantis will charge forward while slicing the ground – and it’s a good idea to dash away when it does.
Blast the mantis enough and it will die. Of course, that isn’t the end of things. A waypoint will lead you to a supply drop where three large medical kits are waiting. Grab one or two if you’re really in need, otherwise leave them behind for later.
Achievement / Trophy Unlocked: Manticide (10G) – One less Mantis to worry about.
At the supply point, ants and a bomb spider will attack. As always, the bomb spider is a huge pain in the neck. Focus on taking out the ants and tickers, while blasting the bomb spider whenever you have a free moment.
When the bomb spider is dead, two carriers will show up to make your life difficult. With them, they bring more spiders and ants. To cap all that off, after you down the carriers, another bomb spider will attack.
See what I mean about saving those large medical kits? This final battle is brutal, a second mantis will arrive with the bomb spider. Wasps will also join the mix, adding a more dangerous and damaging flying enemy.
Powerful weapons are a must. If you find yourself having trouble, level up that armor class. New weapons become available with each level, and these new weapons are invaluable.
Wipe the Ravagers clean and wait at the waypoint to complete this mission.
Mission 3: Trash Island
The crash site here is just down the road, you can see the lander from your starting position. The place is also crawling with ants, with more on the way as you near the lander.
Kill the bugs and you’ll be ordered to activate the transponder. A few spiders are crawling about on the other side of the ditch, so get rid of them before activating the thing.
When the transponder has been placed, you’ll have to hold the landing zone. Gunships will appear in droves, along with spiders on the ground.
A useful ability for solo players is the Battle armor class shield and bug-zapper abilities. The battle armor will bring up a shield when holding the special ability menu active. The bug-zapper is a shock wave attack that will wipe out any nearby enemies. The shield is great for blocking incoming attacks, it will absorb blasts at the cost of energy.
Fight enough spiders and gunships until two Hectors drops in. They’re tough, so focus on taking them down one at a time. You won’t have to worry about actually protecting the lander, just worry about surviving.
Destroy the Hectors and board the lander. You’ll fly to your destination while getting the chance to shoot some bugs. Try to kill as many as you can on the island before landing, but it doesn’t matter that much.
On the island itself, you’ll have to deal with a large swarm of ants. The island itself is fairly small, but not tiny. Set the transponder, and you’ll have to deal with one big final encounter.
The fight begins with ants burrowing onto the island, while a carrier and a Daddy Long Legs appear. The Daddy Long Legs spawns spiders while the carrier spawns ants. Oh, but these aren’t normal spiders.
That’s right, the metal spiders are faster, tougher, and more powerful than regular spiders. This battle will get out of hand fast if you aren’t equipped to deal with the swarms of enemies while damaging the Daddy Long Legs. The carrier will actually flee once the Daddy Long Legs shows up.
Split your time clearing out the swarm, then aim for the hatches of the Ravagers giants. Keep one weapon ready, and beware the Daddy Long Legs’ energy blasts and lasers.
Always look for health, keep picking it up and running towards it – there should be enough medical kits keep stay alive.
Stand on the green smoke once island is clear of enemies to complete the mission.
Mission 4: Hectored
Back in the city, and right away you’ve got metal spiders. There’s even some regular spiders mixed in. This is a short encounter, so deal with the spiders and continue running to the EDF staging ground. You’ll find plenty of health, a tank, and two turrets.
Leave the supplies for later, for now jump into the tank and wait.
A meteor will drop yet another new enemy nearby. The Giant Hector is an enormous robot with incredible power. You’ll be fighting this monstrosity this mission, and it is a problem.
When the Giant Hector is close, it will raise both arms and smash them into the ground, creating an enormous shock wave. Stay far away from the Giant Hector to avoid this.
The Giant Hector is armed with a laser beam, an energy machine gun, and a rocket barrage. If the giant is pointing at you, dash in the opposite direction until you have time to fight.
Like the regular Hectors, the giant can only be harmed by shooting its chest. Unlike other Hectors, this monster takes a huge amount of damage.
As the fight continues, a bomb spider, metal spiders, and wasps will join in to make this extremely chaotic. Revive your AI allies if they go down, they’ll be invaluable here – you need them to take the heat off you.
The bomb spider is actually quite a lot easier to deal with than the giant. For one thing, the giant’s attack do damage to the surrounding Ravagers. If you can manage, use the giant Hector’s shock wave to hurt the Ravager swarms.
Shoot the enormous Hector enough and it will fall. Run to the waypoint to complete the stage.
Achievement / Trophy Unlocked: Hectorcide (10G) – You killed the giant Hector. Good for you. Pat yourself on the back.
Mission 5: The Cube
Run towards the crash site ahead. This is the first of several crash sites you’ll be visiting this stage, and each one is guarded by swarms of Ravagers. Surprising, I know.
Retreat down the street and use the cars to your advantage, blowing them up as the metal spiders crawl after you. This is an all-metal-spider encounter, once enough of the things are dead you’ll be able to set the transponder.
Of course, it isn’t that easy just setting the transponder, ants have shown up too. Clear the ants out and get that transponder set. The number of ants burrowing out of the ground makes the simple job tricky – unless you just kill off all the ants.
Set the transponder, then set off the self-destruct. More metal spiders will be drawn to your location. Fight them as you move to the Lander cube holding civilians. In Earth Defense Force, defense missions never really require you to defend, just stay alive. Move to the large cube and kill the Ravagers there.
At the cube crash site, some tickers will attack, followed by two Hectors. Not easy, but nothing you haven’t seen before. Two more Hectors will help out.
When the Hectors are down, a Lander will save the civilians while ants pour onto the streets. Collect the medical supplies and fight your way to the next waypoint.
At the supply point, you’ll find three large medical kits and a tank. Jump into the tank, it’ll make the rest of the mission much easier to handle. Your AI companions (or real companions) will use the tank’s two machine guns to blast swarming ants or spiders.
Drive the tank to the crash site in the construction zone. Huge groups of ants will be in your path, so just keep driving. Even more ants will crawl out of anthills as you arrive, so blast the ants, plug the holes, and set explosives.
After the first anthill is destroyed, a second hill will appear. Now you’ll have to deal with metal ants – the faster, stronger, and tougher variant of the regular ants. A third anthill will appear near the first, but with your tank it shouldn’t be a problem.
A fourth anthill spawns metal spiders behind the first two. This is the easy part, the hard part will come soon.
For now, metal spiders and metal ants surround your muddy ditch and move in. Clear out the first wave, and a mantis combined with a bomb spider will attack. The mantis / bomb spider combination is tricky, especially when dealing with two mantises and two bomb spiders.
Four giant enemies makes this an insanely chaotic battle. When you’re not shooting, dash. The only effective strategy here it to keep running and don’t stop. Don’t let yourself be pinned in a corner, and always know where your next medical kit will be.
Your companions will also provide a handy helping hand here. Keep them alive and revive them!
When all four giants are done, run to the green smoke to complete the mission. That’s all for Chapter 2.
Chapter 3: Big Business
Mission 1: Downtown
Chapter 3 starts fast. At the first waypoint, you’ve got metal ants, gunships, wasps, and tickers. With all these flying enemies, try to pack a weapon with homing capabilities. All missile launchers can home-in, and they’ve got pretty fast reload rates.
Clear the first area of Ravagers, and you’ll move on to a second area. Ants and gunships will harass you on your way to the EDF base ahead.
The base itself is stocked with medical kits and three turrets. Two of the turrets near the center are Anti-Air, so don’t try to use them against the bomb spider and metal ants.
One bomb spider just isn’t enough. A second bomb spider and ants will attack the base just because they can. Suck it up and take them out.
The base is now secure. It’s your job to keep it secure. A Ravager counterattack is incoming, so prepare by collecting what medical kits you can, then jump into one of the two Anti-Air turrets.
Two super-carriers will appear above the base and start depositing metal ants, gunships, and a new enemy.
The metal wasps are fast tougher and nastier than their regular counterparts. They fly around at ridiculous speed, even your homing missiles will have a hard time following them.
The upgraded wasps also shoot a beam of energy that is very tricky to dodge unless you’re keeping an eye on the metal wasps at all times.
Use the Anti-Air turrets to fend off the gunships and metal wasps, while also dealing superior damage to those super-carriers. Just don’t stick around inside the turrets for two long while they’re eaten alive by metal ants.
Get near the green smoke to finish this mission, you’ve got big things ahead.
Mission 2: Busywork
Hop into the mech as the mission begins. You’re defending the EDF base against an even large counterattack now.
That means Hectors are running in with some metal ant buddies. The Ravagers are nothing if not persistent. Use the awesome power of the mech to clean these chumps up.
So the counterattack wasn’t that big, because the Ravagers are still preparing. A question mark will appear on the map, where three anthills are spawning more Ravagers all around a massive skyscraper.
Fight towards the hills and temporarily close them with rockets. Two bomb spiders are lurking about, be sure to destroy them before trying to destroy the anthills.
Without the bomb spiders, the anthills can be destroyed one at a time. Though after destroying the second hill, a group of metal spiders will appear and attack, which is always a problem.
Destroying the third anthill completes the objective and forces you to hold your ground against another group of metal ants. The fight won’t take you long if you can keep your mech in one piece.
Move to the waypoint for a collection of medical kits. You can return here if you need health later.
Another question mark will appear on your map, signifying even more anthills. Fight towards the skyscraper surrounded by anthills. On the way, you’ll reach a ditch, and fight plenty more metal ants, metal spiders, and gunships.
Nearing your objective, the place is swarming with metal ants and tickers. Clears out the Ravagers, while temporarily closing the anthills to stop the flow of enemies.
Things are never so easy. After closing each of the three anthills, metal spiders accompanying metal ants will reinforce their other bug friends.
When all three anthills are closed, you’ll have to deal with a giant Hector, or the Hector Mark 2. The Mark 2 is always a deadly opponent. Now would be a good time to back off and return to the supply station you passed by earlier for a health boost.
Remember, stay far-far away from the Hector Mark 2, and aim for the red circle on its chest.
With that monster dead, move to the green smoke on your waypoint to finish the mission.
Mission 3: The Package
Another mission, another order to search a crash site. You’ll be doing a lot of crash site searches for this mission, so get to work.
Metal ants will burrow out of the ground surrounding the first crash site, with some tickers thrown into the mix. Clear them out when you meet the crash site, and you’ll have to clear out the remaining metal ants and metal spiders before continuing.
The battle here at the first crash site is lengthy, legions of metal spiders and ants will harass you for several minutes. Just keep plugging away, you’ll manage.
Whatever it is EDF Command is looking for, it isn’t at the first crash site. Move on to the second site marked by your waypoint.
At each of the waypoints, move to the crash site while fighting the Ravagers in your path. The Ravagers will just keep spawning until you activate the next objective.
Stand on the waypoint itself, and you’ll be ordered to eliminate more Ravagers while the crash site is scanned.
Tickers, metal ants, metal spiders, and even metal wasps join the fun. Fight these buggers long enough and your elimination objective will move down the road to a swarming hive of Ravagers.
Temporarily close down the three anthills in the business park ahead to end the flow, then blow them shut for good. Wipe out the ants as they leave their hill with some well-timed rockets.
The anthills are closed, and you have a new waypoint leading you to a third crash site. The run there is actually safe for once. It isn’t until you examine the site that metal spiders burrow out of the ground. Fight the metal ants and metal spiders until the objective is complete.
Work your way through the infested streets to reach the fourth and final crash site location. It won’t be easy getting there, metal ants litter the street. Clean up and get moving to that crash site, the Ravagers won’t leave you alone until you stop nearby.
Of course, the Ravagers won’t leave you alone near the crash site either. As you close in, three mantises will attack. Three at once isn’t easy, take them down one at a time. If you’re having trouble, grinding for experience to increase your armor level isn’t a bad idea. If this mission doesn’t stop you, the next will.
Kill all three mantises and investigate the crash site. That translates to standing near it.
At the site, you’ll have to defend against incoming Ravagers, as per usual. This group is mostly composed of metal spiders and tickers. It’s a breeze compared to the previous battles in this mission.
Crush the Ravagers and run to the waypoint to complete this mission.
Mission 4: Mushrooms
Prepare for a doozy. If your class hasn’t reach armor level 4, try replaying previous stages on harder difficulties for easy and quick experience. Buy yourself new weapons that can deal with metal wasps and crowd control.
Towards the first elimination mission down the street, you’ll fight an epic swarm of metal ants and metal spiders. They attack in huge groups, and they just won’t stop attacking.
Once you’ve killed what feels like an endless amount of bugs, Hector robots will stomp into the battlefield – three of them. When the Hectors are destroyed, collect all the medical kits you can before moving into the hive itself.
The hive is easy to spot, the huge mounds of dirt should be enough of a tip-off. As you enter the hive entrance, the Queen will crawl out and begin its attack.
The Queen is one vicious monster. It doesn’t move much, and it’s acid attacks only hit if you’re nearby, but the Queen is still very dangerous.
Just as the Queen shows itself, it will spawn a large quantity of ants to swarm you, while four anthills spawn metal ants and metal spiders. The first anthill is just right of the Queen, while the other three are along the opposite ridge of the hive.
Three metal wasps will also continuously spawn from the hive itself, giving you another constant annoyance to worry about.
Before all else, try to close the anthills. Stopping the flow of enemies will make dealing with the Queen and her endless supply of ants much, much easier.
Your allies will save your life during this fight, you need them to draw attention away and kill the weaker Ravagers for you.
Close all four anthills, and you’ll be free to attack the Queen herself. The only way to damage the Queen is by shooting the sections of her exoskeleton covered in gross boils. She’s vulnerable in two locations – on the second and third sections of her body behind her head.
The first set of boils is just over the Queen’s head, making it an easy target. Once the first spot is wiped out and turns black, the Queen will crawl out of the hive. The second boil is along the underbelly of the third section, and it can be tricky to hit behind all those legs.
To hit the second boil, stand to the Queen’s left and shoot at her from there until she turns to face you. The Queen is very slow on the turn, so you won’t have a problem flanking her.
Beware of the swarms of ants and metal wasps the Queen summons. The giant ant will also spray areas down with acid – if you’re not standing in front of the Queen, you’re safe from her acid.
When both boils are destroyed, the Queen will die. Clean up the remaining Ravagers, including the anthills if you didn’t close them.
Achievement / Trophy Unlocked: Regicide (10G) – You killed the Queen, good job. Murderer.
A bomb will be delivered via lander. Activate it and another waypoint will activate. Move to this final waypoint and wait to complete the mission.
Mission 5: Big Trouble
Big is right. This is the big one, and one tough mission. Follow the first instructions and run down to the waypoint.
An army of Ravagers is coming your way, the falling skyscrapers in the distance should be your first clue. Metal spiders and metal ants will be all over your EDF soldiers.
Take care of the Ravagers and run across the bridge to meet another squad of EDF soldiers. Fight the growing army of Ravagers until big trouble comes your way.
Before finding that second squad of EDF troops, two Hectors and a Hector Mark 2 will burst out of the buildings nearby.
Start at the bottom and work your way up. Clear out the remaining metal spiders or metal ants, move up to the Hectors, and finally plug away at the Hector Mark 2.
Clear out the Ravagers and you’ll be ordered to meet X-Ray squad. On the way, you’ll face even more metal spiders and even Hectors. This mission is just all chaos, all the time.
At X-Ray’s location you’ll find the true threat of this stage. The Mothership appears over the city and begins laying waste with a stunning array of beams and blasts.
The Mothership might be impressive, but you’ve got bigger problems to deal with. Metal wasps and Hectors are your real problem, both normal Hectors and Mark 2s.
At the waypoint, a friendly Lander will try to meet up with you, but the Ravagers below are stopping it from picking you up. The Mothership will drop more Hectors and Hector Mark 2s, while metal spiders burrow out of the ground.
If you’re surrounded, dash. Play it safe and keep your armor high. If the Mark 2 is onto you, run away until your allies get its attention.
The enemies here aren’t limitless, stick to fighting the small fries before taking on the Mark 2. More Mark 2s will show up, and you don’t want any distractions while fighting them.
The Mothership isn’t a huge threat to you personally, but it will launch volleys of energy blasts that can be tricky to dodge. When you see reddish pink projectiles flying straight for you, just dash.
Take down enough of the Hectors and the Lander will pick you up. Run inside for a short rail-shooting section that leads to the end of the mission.
Wait… that can’t be all, can it? Check back for more.
Achievement / Trophy Unlocked: Lemon Squeezy (20G) – Completed the campaign on Normal. Now try to complete the campaign on Hard!


 Dont Starve: Beta Impressions
 7 Remastered Games That Are Better Than The Originals
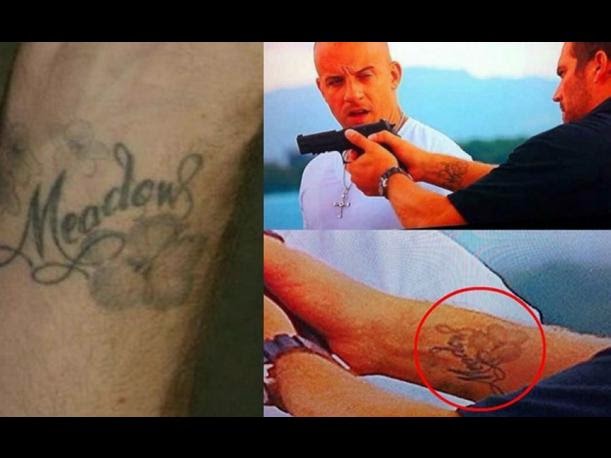 Fast and Furious 7: Look at the top 8 actors / actress with tattoos
 The Classic Games We Cant Play
 How to become the best on the newest Moba on Xbox - Smite